
Chapter 4
Performing Initial Configuration Tasks
IN THIS CHAPTER
![]() Understanding the default settings in Windows Server 2022
Understanding the default settings in Windows Server 2022
![]() Getting an overview of the configuration process
Getting an overview of the configuration process
![]() Providing the information your server needs to be set up properly
Providing the information your server needs to be set up properly
![]() Updating Windows Server 2022 with the latest patches, hotfixes, and everything in between
Updating Windows Server 2022 with the latest patches, hotfixes, and everything in between
![]() Customizing Windows Server 2022 to your preferences
Customizing Windows Server 2022 to your preferences
![]() Configuring your server startup options with BCDEdit
Configuring your server startup options with BCDEdit
Now that you’ve installed Windows Server 2022, it’s time for the fun to begin! As an administrator, your next task after installing the server operating system is to configure it to do what you want it to do.
Microsoft introduced the Server Manager feature in Server 2008, and it was updated heavily in Windows Server 2012 to support Remote Management, as well as multi-server management. Server Manager is your starting location for the majority of the configuration tasks that you need to accomplish on your server if you’re working on a server that has Desktop Experience.
If you’re working on a Server Core system, you won’t use Server Manager on the console. Instead, you’ll use the sconfig utility to do your initial configuration, assuming that you aren’t deploying Server Core images that are already configured for your environment. Of course, you can use Server Manager to administer your Server Core systems remotely, with a little setup initially to get things going. I cover that subject in my overview of the configuration process.
Understanding Default Settings
When Windows Server 2022 is first installed, there are some settings that are created or set by default. Typically, these are things that you’ll want to change, such as setting the server’s name, setting an IP address, joining the server to a domain, and so on. Table 4-1 covers these default settings and discusses what they’re set to out of the box to give you a better idea of what you’re starting with.
TABLE 4-1 Windows Server 2022 Default Settings
Setting | Default Value | Description |
|---|---|---|
Computer Name | WIN-<randomstring> | This will be a randomly generated name starting with WIN-. You should change the name based on your organization’s naming standards. When you change the name, you’ll be required to restart the system. |
IP Address | Assigned by DHCP | By default, your brand-new server is using DHCP to automatically receive an IP address. If your organization uses DHCP to manage IP addresses, you’re good to go. If not, you may need to set a static IP address. |
Domain or Workgroup | Workgroup named WORKGROUP | Windows Server 2022 begins life joined to a workgroup named WORKGROUP. If it’s going to be a standalone server, then that setting may work well for you. Servers in workgroups are not domain joined. If your server needs to be joined to a domain, you’ll want to change this setting. Doing so will require a reboot. |
Windows Update | Automatic update download | Updates are downloaded automatically, but they aren’t installed until you allow them to be. |
Microsoft Defender Firewall | Public and private profiles: On Core OS functionality: Allowed | In its default state Microsoft Defender Firewall has a public and a private profile. Core functionality needed for the operating system to function is allowed automatically. The domain profile will appear if the server becomes domain joined. |
Microsoft Defender Antivirus | Real-time protection: On | Provides real-time virus/malware scanning. It prevents malware from installing and/or running on your server. Automatic sample submission is also enabled by default. This sends sample files to Microsoft for analysis. |
Roles and Features | Some roles/features are installed | Some roles and features are enabled out of the box to allow the server basic functionality. It’s important to note that just because a role or feature is selected, that doesn’t mean that the role as a whole is installed. |
Remote Management | Enabled | Allows the server to be managed by PowerShell remotely. Also allows applications or commands that require Windows Management Instrumentation (WMI) to manage the server. |
Remote Desktop | Disabled | Allows users to connect to the desktop of the server remotely. Allowed users can be configured individually or by security groups. |
Getting an Overview of the Configuration Process
When you start with a freshly installed server, it isn’t configured to do much of anything. You’ll need to take some basic configuration steps. Some of these steps are the basics like setting the day and time; others are tasks that will allow you to manage your systems remotely.
Here’s the basic process:
- Activate Windows Server 2022.
- Set the date, time, and time zone.
- Change the computer name.
- Add to the domain (if there is one to join).
- Configure the networking.
- Configure the server to receive Windows updates.
- Add roles and features.
- Setup the Windows Server OS for remote administration.
- Configure the Windows Server firewall.
You can find the specifics on how to do each of these tasks in the following section.
Providing Computer Information
When you’re deploying new servers, you have to perform certain tasks, such as activating the operating system with a valid Microsoft product key, setting the time zone, changing the name, and adding the server to the domain. In this section, I explain how to provide information for the server on both Windows Server 2022 with Desktop Experience and Server 2022 Core.
Windows Server 2022 with Desktop Experience
Many system administrators got their start with the graphical user interface (GUI) of a Windows Server operating system. Windows Server 2022 continues the tradition of the GUI with the Desktop Experience installation. Let’s take a look at what is involved with configuring Windows Server 2022 with Desktop Experience.
Activation
One of the first things that you do after installing the Windows Server operating system is activate it with a valid product key. You can do this through the desktop interface or through PowerShell.
In this section, I cover activating through the desktop interface. I cover activation through PowerShell in the later section on activation for Server Core.
Log into the server.
Server Manager opens automatically.
- In Server Manager, click Local Server in the navigation pane.
To start the activation process, click the Not Activated hyperlink next to Product ID.
A dialog box launches automatically asking for the product key.
Enter your product key and click Next.
You’re prompted to activate Windows.
Click Activate.
You get a confirmation that Windows has been activated.
Click Close.
You’re left on the Activation screen shown in Figure 4-1, where you see that your version of Windows is now activated.
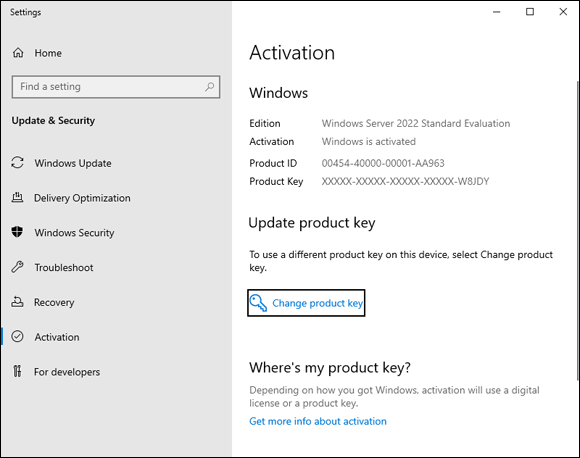
FIGURE 4-1: The Activation screen showing that Windows Server 2022 is activated.
Time zone
Setting the time zone is a common task in the server provisioning process. You may want to set the server to the time zone that you are in, or to the same time zone as a corporate office located elsewhere. This is common if your servers are in a co-location and you want them to be on the same time zone as your local systems.
- In Server Manager, click Local Server in the left-hand menu.
Click the hyperlink next to Time Zone.
This may already be set to the correct time zone for your area.
- Click the Change Time Zone button.
- Select your time zone from the drop-down list.
- If you’re in an area that uses Daylight Saving Time, click the check box next to Automatically Adjust Clock for Daylight Saving Time. If you do not use Daylight Saving Time, leave the box unchecked.
- Click OK to exit the Time Zone Settings dialog box, and then click OK again to exit the Date and Time dialog box.
Computer name and domain
Setting the computer name is a must in an enterprise environment. Most organizations have a naming convention that you need to follow, but the names the organization requires will certainly be easier to remember than the default randomly generated name. Joining to the domain is one of the simpler steps, but also one of the most important steps to enable centralized authentication management and configuration capabilities.
- In Server Manager, click Local Server in the left-hand menu.
Click the hyperlink next to Computer Name.
This will be the default name that starts with WIN- and will be followed by a random string of letters and numbers.
- Click the Change button.
In the Computer Name field, enter the name that you want for your server, and then click OK.
A dialog box appears telling you that you need to restart the server.
- Click OK.
Click the Close button in the System Properties dialog box.
You’re prompted to either Restart Now or Restart Later.
Click Restart Now if you want to reboot the server immediately. Click Restart Later if you want to finish other administrative tasks you may have first.
If you click Restart Later, you’ll need to manually reboot the server when you’re ready.
- To join a domain, perform Steps 1 through 3.
- In the Computer Name/Domain Changes dialog box, click the Domain radio button, and enter the name of the domain you want to join.
Click OK.
A dialog box appears telling you that you need to restart the server.
- Click OK.
- Click the Close button in the System Properties dialog box.
Click Restart Now or Restart Later.
After the restart, the server will be joined to the domain.
Configure networking
Your server will use a dynamically assigned IP address by default. If this is not desirable, you’ll want to set a static IP address so that the server will continue to use the same address.
- In Server Manager, click Local Server in the left-hand menu.
- Next to Ethernet, click the hyperlink that says IPv4 Address Assigned by DHCP, IPv6 Enabled.
- Right-click your network adapter (it should be called Ethernet), and click Properties.
Click Internet Protocol Version 4, and then click the Properties button.
By default, the server is set to obtain an IP address automatically and obtain DNS server addresses automatically. If this is what is desired, then no changes are necessary.
- If you need to make changes, select Use the Following IP Address.
- Fill in the IP address, subnet mask, and default gateway.
Manually enter the addresses for the preferred DNS servers.
See Figure 4-2 for an example.
- Click OK to close the dialog box.
- Click OK one more time to exit out of Ethernet Properties.
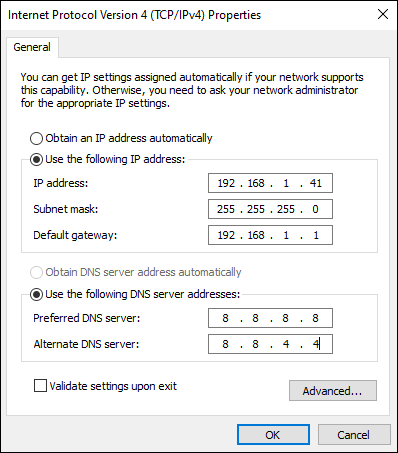
FIGURE 4-2: The Internet Protocol Version 4 Properties dialog box.
Windows Server 2022 Core
Many system administrators have configured a Windows Server with a GUI, but not many have used Windows Server Core. As you see in this section, Windows Server Core has a simple interface, and when you learn how to navigate it, you may find it simpler to work with than Windows Server with Desktop Experience.
Activation
Windows Server Core gives you a few different options for activating your copy of Windows Server 2022. In this section, I cover activating via sconfig, as well as activating via PowerShell.
ACTIVATING WITH SCONFIG
Sconfig is the built-in configuration utility in Windows Server Core. It’s a text-based menu that allows you to do the majority of your initial configuration tasks all from one central location. By default, sconfig launches automatically after you’ve logged in.
- From the sconfig utility, type 11 for Windows Activation and press Enter.
- Type 3 to install your product key.
Enter your 25-character product key in the dialog box that pops up, and then click OK.
After the key is installed, you see a message saying the key was installed successfully.
- Close the window by clicking the red X, or by pressing Enter twice.
When you’re back on the sconfig screen, type 2 to Activate Windows, and then press Enter.
A Command Prompt window launches again with the slmgr.vbs script to perform the activation. Assuming there are no errors, this will complete with no message.
- Close the window by clicking the red X or by pressing Enter twice.
ACTIVATING FROM POWERSHELL
After you’ve logged into Windows Server Core, you’re presented with the sconfig utility. From there, you can activate your copy of Windows. To set the license and do the activation from the command line, you’ll need to select menu option 15, “Exit to command line (PowerShell)”. To activate, you have to set the key. You do this with the Windows Server License Manager script, slmgr.vbs.
 The slmgr.vbs script allows you to work with your Windows Server product keys in different ways depending on the parameter that you use along with it. In the example in this book, I use both
 -ipk and -ato. The -ipk parameter is used when installing product keys, and the -ato parameter is used to specify online activation.
To install the product key that will be needed for your version of Windows Server 2022, use the following command with the parameter -ipk. Just replace <productkey> with your 25-character license key, including the dashes.
slmgr.vbs -ipk <productkey>
You get a dialog box that tells you the product key installed successfully. Click OK.
After the license key is installed, you use the same script with the -ato parameter to do an online activation of your copy of Windows. You do that with the following command:
slmgr.vbs -ato
If the activation was successful, you get a dialog box that says the product was activated successfully (see Figure 4-3).
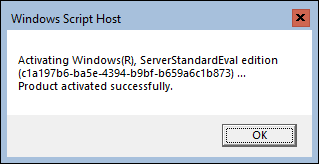
FIGURE 4-3: Using slmgr.vbs to activate Windows Server.
Time zone
Much like activation in Windows Server Core, you can set the time zone via sconfig or PowerShell. In this section, I cover both methods. The great thing about PowerShell version is that it will work on Windows Server with Desktop Experience as well.
SETTING THE TIME ZONE WITH SCONFIG
Sconfig is the built-in configuration utility in Windows Server Core. Because it's a simple text-based menu, it provides a simple way for administrators to configure the time zone without needing scripting knowledge to do so.
From the sconfig utility, type 9 to go into the settings for Date and Time.
The Date and Time dialog box appears.
- Click the Change Time Zone button.
- Select your time zone from the drop-down list.
- If you’re in an area that uses Daylight Saving Time, click the check box next to Automatically Adjust Clock for Daylight Saving Time. If you do not use Daylight Saving Time, leave the box unchecked.
- Click OK to exit out of the Time Zone Settings dialog box, and click OK once more to exit out of the Date and Time dialog box.
SETTING THE TIME ZONE FROM POWERSHELL
If you prefer to work in PowerShell, you can also set the time zone from there. This utilizes the control command to call the Control Panel’s Date and Time screen.
In PowerShell, type the following:
Set-TimeZone -Id <Time Zone Id>
 If you aren’t sure what your time zone ID is, you can run
 Get-TimeZone -ListAvailable to see all the time zones you can choose from.
Computer name and domain
Setting the name and adding a server to a Windows domain are some of the most common activities that system administrators do with new servers. With Windows Server Core, there are two methods that you should know to complete this task: sconfig (the configuration utility in Windows Server Core) and PowerShell.
SETTING THE COMPUTER NAME WITH SCONFIG
The sconfig utility in Windows Server Core makes it simple to change the name of your server with its text-driven menus. Follow these steps:
In the sconfig utility, type 2 to change the computer name.
You’re prompted to enter a new name.
Enter the new name, and press Enter.
You need to restart your computer to apply the change.
- Type yes to reboot now or no to reboot later.
ADDING TO A DOMAIN WITH SCONFIG
When the server has the correct name, you may want to add it to a Windows domain. You can do this with the sconfig utility as well.
- In the sconfig utility, type 1 to change the domain.
- Type D to join a domain and press Enter.
- Give it the name of the domain you want to join and then press Enter.
- Enter the name of an authorized user and press Enter.
Enter the password of the user and press Enter.
You need to restart your computer to apply the change.
- Click yes to reboot now or no to reboot later.
SETTING THE COMPUTER NAME FROM POWERSHELL
Although sconfig is a nice utility, you may want to be able to script the changes that you want to make. Whenever this is the case, PowerShell can be very helpful. From running batch scripts in the Command Prompt, to running PowerShell scripts in PowerShell, both methods work regardless of whether you’re on Windows Server Core or Windows Server with Desktop Experience.
From the sconfig utility, type 15 to exit to command line (PowerShell).
The PowerShell window opens on your Server Core box.
- Use the
Rename-Computercommand to change the name of your server:Rename-Computer -NewName <new-name> - You get a message stating that the NetBIOS name will be truncated if your name is longer than 15 characters.
- If you receive this message, type Y and then press Enter to accept.
ADDING TO A DOMAIN FROM POWERSHELL
The ability to script the joining of the domain is a useful skill if you're going to be deploying any quantity of servers. Not only does adding a domain via PowerShell make it simpler to do, but it also helps to ensure that there are no mistakes in the process of joining the domain.
From the sconfig utility, type 15 to exit to command line (PowerShell).
The PowerShell window opens on your Server Core box.
Use the Add-Computer command to add the server to the domain.
Here’s an example:
Add-Computer -DomainName "your_domain_name" -RestartA dialog box appears asking for a username and password.
- Enter a username that is authorized to add systems to your Active Directory domain and enter the corresponding password.
Click OK.
The server restarts.
Configure networking
Before you can set the IP address for the adapter with PowerShell, you need to find out what the index of your interface is. You can do this by typing the following:
Get-NetAdapter
The output lists all network adapters. In this case, you want the one that says Ethernet. After you have the index number, you can set the IP address and the DNS servers. On my server, the index is 4.
Use the following command to set the static IP address. InterfaceIndex is the index number for my network card, IPAddress is the IP address I want to assign, PrefixLength is the subnet mask that I want to use, and DefaultGateway is the gateway address for the local network (see Figure 4-4).
New-NetIPAddress -InterfaceIndex 4 -IPAddress 192.168.1.50 -PrefixLength 24 -DefaultGateway 192.168.1.1
I haven't discussed PowerShell much at this point, and this is a more complex bit of PowerShell. The New-NetIPAddress is a cmdlet that allows you to work with IP addresses on Windows Server systems. The parameters that come afterward, like -InterfaceIndex, help to identify the object you want to work with (the network adapter, in this case) or to make changes to the settings, like the -IPAddress parameter where you specify the IP address you want to set on the network adapter.
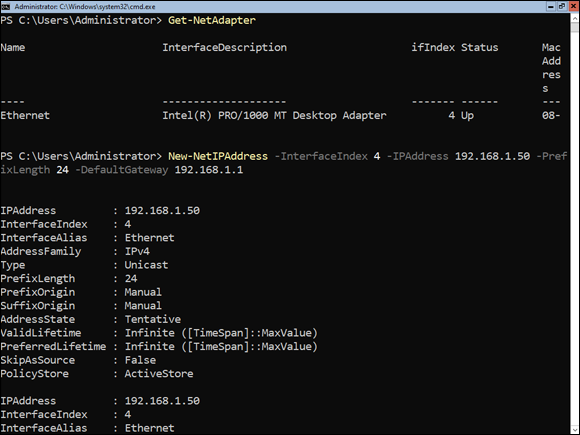
FIGURE 4-4: Setting the IP address with PowerShell.
To set the DNS Server after that, the command uses the same index number for my network card. ServerAddresses is used to identify the DNS servers that the system should use (see Figure 4-5). If you have more than one, you can separate them with a comma.
Set-DNSClientServerAddress -InterfaceIndex 4 -ServerAddresses 8.8.8.8, 8.8.4.4
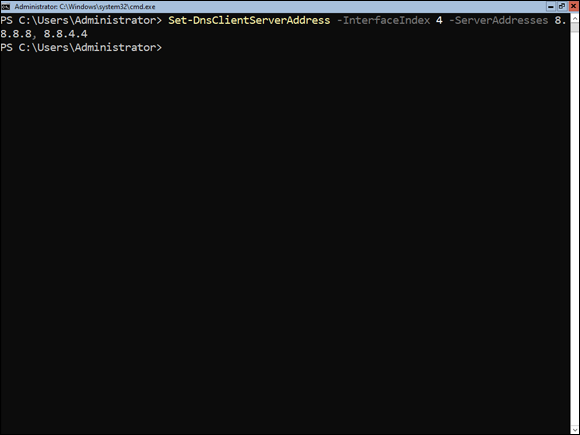
FIGURE 4-5: Setting the DNS servers with PowerShell.
Updating Windows Server 2022
After you have installed your brand-new Windows Server, and maybe even done some of the basic configuration work like changing the name and joining the domain, you'll want to update the server. Updates contain fixes for security vulnerabilities and new features, and should always be installed before turning a server over to the team that requested it.
Windows Server 2022 with Desktop Experience
Considering how important it is to stay up to date on Windows Server updates, most organizations are going to set up automatic updates. You may have a server that can’t be set to receive updates automatically, or there may be an emergency patch that was issued and you want to apply it right away. In this section, I explain how to do automatic updates and manual updates.
Automatic updates
Most organization use automatic updates. The following directions walk you through setting up your server to reach out to Microsoft’s update servers (the default behavior).
Many organizations have patching solutions that handle the scheduling of updates, and could still be considered an automatic update because the tool will schedule the deployment of approved patches.
- Click the Start menu and type gpedit.msc.
- Navigate to the Windows Update section by clicking on Computer Configuration, then Administrative Templates, then Windows Components, and finally Windows Update.
- Double-click Configure Automatic Updates.
Select Enabled.
You’re given configuration options.
Under Configure Automatic Updating, you can see that it’s set to Auto Download and Notify to Install. This is the default setting.
Click the drop-down box and select the setting that works best for your environment.
In my case, I’ve chosen Auto Download and Schedule the Install. See Figure 4-6 for an example.
- Click OK to save the change.
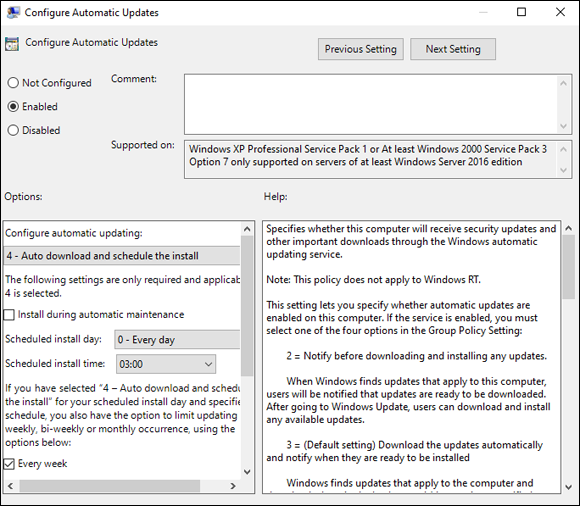
FIGURE 4-6: Using the Local Group Policy Editor to change the automatic updates setting in Windows Server 2022.
Downloading and installing updates
You hear about the next big security vulnerability on the news media, and vendors release patches to the vulnerability very quickly after that. When a security vulnerability impacts your Windows Server systems, you may want to start a manual update — that way, your systems are protected outside of your normal patching windows. If your organization uses a patching solution, the patch may be pushed from that system, but there are always a few systems that don’t take the patch for whatever reason. You may have to manually update when that occurs.
- With Server Manager open, click Local Server in the left-hand menu.
Click the hyperlink next to Last Checked for Updates.
This may say Never if it hasn’t been run yet.
Click the Check for Updates button.
The server will check to see if there are any updates available.
Windows Server 2022 Core
Windows Server Core has the same needs when it comes to receiving updates from Microsoft that Windows Server with Desktop Experience does. In this section, I show you how to set up automatic updates and how to perform manual updates from PowerShell.
Automatic updates
There are two ways you can enable automatic updates on Server Core: using the sconfig utility and using PowerShell.
SETTING UPDATES TO AUTOMATIC VIA SCONFIG
The text-driven menu provided by the sconfig utility makes enabling automatic updates very simple. You can set up automatic updates in just four quick steps:
From the sconfig menu, type 5 to configure Windows Update settings, and then press Enter.
You’re given the choice of selecting A for automatic download and install, D for download only (which is the default), or M for manual updates.
Type A for automatic download and installation of Windows updates.
You get a text confirmation that the change was successful.
- Press Enter to exit the updates section.
SETTING UPDATES TO AUTOMATIC VIA PowerShell
To set updates to automatic via PowerShell, you need to navigate to C:Windowssystem32 and stop the Windows Update service. It may already be stopped. Then you can use the script program to execute scregedit.wsf. Adding the switch /AU 4 enables automatic updates, /AU 1 would disable automatic updates. The following example enables Windows updates:
- Stop the Windows Update Server service.
net stop wuauserv - Set automatic updates to 4 which is enabled.
cscript scregedit.wsf /AU 4 - Start the Windows Updates Server service.
net start wuauserv
If you would like to see an example of what this looks like and what the responses should be, please see Figure 4-7.
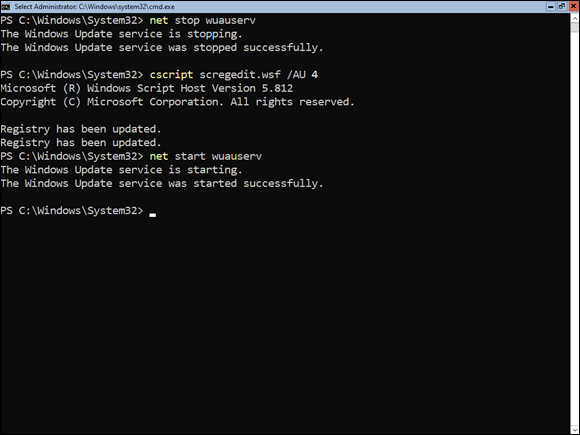
FIGURE 4-7: Setting automatic updates in PowerShell.
Downloading and installing updates
To force Server Core to then detect and install any available updates, simply type the following command and press Enter.
wuauclt /detectnow
Customizing Windows Server 2022
After your Windows Server operating system is installed, the next step is to customize it and make it your own! This involves things like installing roles and features, setting up remote administration, and configuring the firewall.
Windows Server 2022 with Desktop Experience
I'll start the customization discussion with the Desktop Experience. When you log into a server with Desktop Experience enabled, by default Server Manager will launch. A lot of the configuration and customization tasks you may have can be accomplished from Server Manager.
Adding roles and features
Roles and features are added in Windows Server 2022 with Desktop Experience through Server Manager.
- Open Server Manager.
- Choose Manage⇒ Add Roles and Features.
- On the Before You Begin page, click Next.
- On the Select Installation Type page, click Next.
- On the Select Destination Server page, click Next.
Check the check box next to the role that you want to install and click Next.
For this demonstration, I’ve chosen File Server under File and Storage Services (see Figure 4-8).
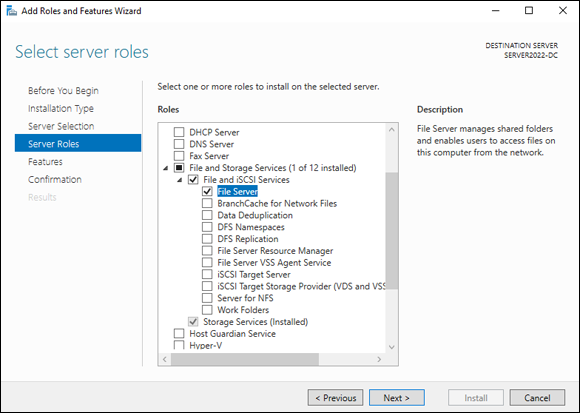
FIGURE 4-8: The select Server Roles Screen with File Server selected.
- On the next screen, select any features you may want to install and then click Next.
- If you want the server to restart automatically if needed for the role you installed, you can select the Restart the Destination Server Automatically if Required check box. If a restart is not needed, or you don’t want it to restart, leave the check box unchecked.
- Click Install to install the roles and/or features you selected.
Enabling remote administration
 Remote Management is enabled by default and allows for remote administration through PowerShell. Remote Desktop is a separate setting that allows you to connect to the server and work with it directly.
When a server has Desktop Experience, administrators often prefer to work with the server over Remote Desktop. This is disabled by default; you enable it to use it. If the firewall on the server is enabled and does not have Remote Desktop enabled, you won’t be able to connect to it. You need to enable the Remote Desktop – User Mode (TCP-In) rule listed in the Inbound Rules of your server’s firewall.
- With Server Manager open, click Local Server in the left-hand menu.
- Click the hyperlink next to Remote Desktop that says Disabled.
In the dialog box that appears, select Allow Remote Connections to This Computer.
A dialog box appears telling you that a firewall exception will be made for Remote Desktop.
- Click OK.
- If you want to set remote access for specific people or groups, click the Select Users button.
- Click Add, choose your person or group, and click OK.
- Click OK again on Remote Desktop Users to close out of it.
- Click OK one more time on the System Properties screen to enable Remote Desktop.
Configure Windows Firewall
Assuming that you’re going to use the Windows Firewall on your server, you need to know how to enable applications through the firewall. By allowing inbound traffic, you enable the server to do the job you plan on using it for.
- From Server Manager, select Local Server on the left-hand side.
Click the Private: On link next to Microsoft Defender Firewall.
The Firewall & Network Protection app opens.
- Click Allow an App through Firewall.
- Select File and Print Sharing and enable it for the Private profile by selecting the check box under Private (see Figure 4-9).
- Click OK to save your changes.
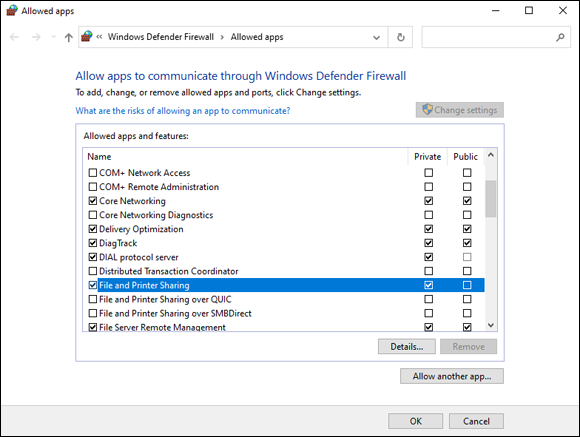
FIGURE 4-9: Allowing an app through Microsoft Defender Firewall.
Windows Server 2022 Core
Whether you’re running PowerShell commands against your Windows Server Core system while connected to the console or through remote PowerShell, you can do much of your configuration work with just a few PowerShell commands.
Adding roles and features
To get really good working with Server Core, half of the battle you face is learning how to find the things you want. In Server with Desktop Experience, you have the GUI to guide you. Not so with Server Core.
Let’s look at the example I used with the Desktop Experience server. You want to install the File Server role. Before you can install the role, you need to find out what to call it. By using Get-WindowsFeature, you can find the names of the roles and features you’re interested in. If you have an idea of what the name is, you can do a wildcard search. In the following example, I’ve used *file* to indicate that I want the Get-WindowsFeature cmdlet to return results that have the word file in them.
Get-WindowsFeature *file*
When you type the preceding command, you get three results of items that have file in their names. You can see File Server under Display Name. For the installation command, you need the name under the Name column. In this case, it's FS-FileServer. Now you’re ready to install it! Use the following command to install the File Server (see Figure 4-10):
Install-WindowsFeature FS-FileServer
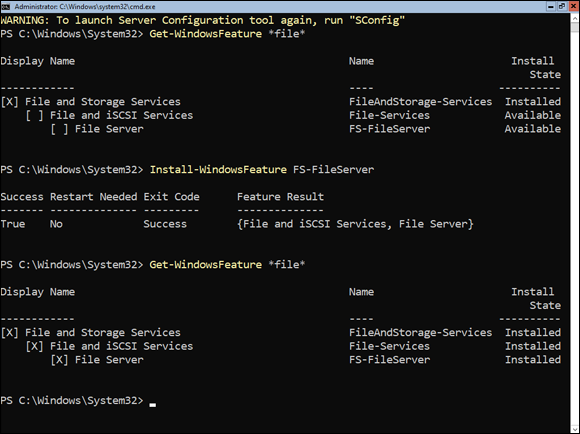
FIGURE 4-10: Using PowerShell to install roles and features.
You see a progress bar as the feature is installed. After it’s installed, if you run the first command again, you see that all three results are now installed. File and iSCSI Services was installed because File Server relies on it.
Enabling remote administration
Remote Management is enabled by default in Windows Server 2022. If it was disabled in your environment, you can enable it by running the Configure-SMRemoting command. This allows you remotely administer your server with Server Manager.
Configure-SMRemoting -Enable
To be able to administer the server remotely with PowerShell, you need two additional commands. Enable-PSRemoting configures PowerShell to receive remote commands that are sent to your system. Winrm quickconfig will analyze and automatically configure the WinRM service for you. This is very helpful when you just want it to work and don't need to customize it. The command starts the WinRM service if it isn’t already started, and ensures that WinRM is set to automatically start. It also configures listeners for HTTP and HTTPS, and ensures that the Windows firewall is allowing HTTP and HTTPS traffic inbound.
The Enable-PSRemoting command will not give you any output if it succeeds. You’ll simply be presented with the PowerShell prompt again.
Enable-PSRemoting -force
Running winrm quickconfig is a little different. After it runs its analysis, it tells you what needs to be changed and asks for a yes or no as to whether it can make the necessary changes. Select Y and press Enter. If everything looked good during the analysis, you'll be told that WinRM is already running and is already set up for Remote Management instead of the yes/no question.
winrm quickconfig
Configure Windows Firewall
Working with the Microsoft Defender Firewall on Server Core is pretty simple. You need to find the name of the rule you want to work with first. You can do that with the Get-NetFirewallRule command (see Figure 4-11). Using the Format-table command at the end makes the output more easily readable. Try the command without it — you'll see what I mean!
Get-NetFirewallRule *remote* | Format-table

FIGURE 4-11: Using Get-NetFirewallRule to find rules.
The preceding command looks for any rules that have remote in the name. You can see each rule and whether it's enabled.
Let’s enable the Remote Firewall Management rules. These would allow you to administer this server’s firewall from another system. The rules you’re interested in are RemoteFwAdmin-In-TCP and RemoteFWAdmin-RPCSS-In-TCP.
Here are the commands you'll use to enable these (see Figure 4-12):
Set-NetFirewallRule –Name "RemoteFwAdmin-In-TCP" –Enabled True
Set-NetFirewallRule –Name "RemoteFwAdmin-RPCSS-In-TCP" –Enabled True
If the commands complete successfully, you’ll get no response. You’ll be returned to the PowerShell prompt. If you run your search again, you’ll see that these rules are now enabled.
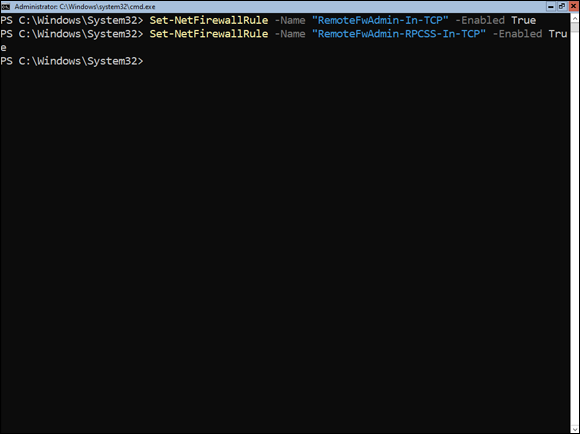
FIGURE 4-12: Using PowerShell to set firewall rules and validate that they’re enabled.
Configuring Startup Options with BCDEdit
With Windows Server 2008, Microsoft introduced a utility called BCDEdit, which allows you to manipulate the Windows boot configuration data (BCD) store. The BCD is used to tell the operating system how it should boot; it contains all the boot configuration parameters needed to support that function. This replaced the older bootcfg.exe utility that was used to edit the boot.ini file pre–Windows Vista. You must be a member of the local Administrator's group on a system to use BCDEdit. This is an advanced utility that is useful in troubleshooting issues that are preventing a server from booting properly.
You may need to disable or suspend both BitLocker and Secure Boot on a system before you can use BCDEdit.
 Mistakes made using the BCDEdit utility could leave your system unable to boot at all. Always make sure that you either have a good backup of the system, or if you don’t have a good backup, export the current settings from BCDEdit so that you can restore them if needed. You can export the current boot configuration database by typing BCDEdit /Export <export_path>. If you need to restore from that export, the command is very similar. You need only type BCDEdit /Import <path_to_export>.
Table 4-2 lists some of the more common options available for BCDEdit.
TABLE 4-2 BCDEdit Common Options
Option | Description |
|---|---|
| Enables or disables boot debugging. |
| Configures the type of debugging connection. |
| Enables or disables kernel debugging. |
| Deletes boot entries from the datastore — use with caution! |
| Deletes or removes a boot entry option — use with caution! |
| Sets the order used by the boot manager when displaying the multiboot menu. |
| Lists all the entries in the boot configuration datastore. |
| Exports the contents of the BCD; can be used as a backup to restore the BCD. |
| Imports the contents of an exported file; can be used as a restore option if needed. |
| Sets a value in a boot option. |
Most often, you'll use bcdedit /set to make changes to your boot configuration datastore. Before you make any changes, you need to know what your BCD looks like currently. You can use the /enum option to do that. In Figure 4-13, you can see the current settings for the Windows Boot Manager and the Windows Boot Loader.
You may notice that the description in the Windows Boot Loader just says Windows Server. Maybe you want it to be more descriptive than that. You can change it with bcdedit /set. You need the ID of the object that you're wanting to work on. In this case, you’re wanting to edit the Windows Boot Loader; the identifier that you can see in Figure 4-13 is {current}. The full command you type will look something like this:
bcdedit /set {current} description "Windows Server 2022 Standard"
This command will work perfectly in a command prompt, but if you try to run it in PowerShell, you’ll need to put quotes around the identifier. For instance, if I were to run the command in PowerShell I would type it like this:
bcdedit /set "{current}" description "Windows Server 2022 Standard"
When you get the message The operation completed successfully, use bcdedit /enum again. You'll see your new description. See Figure 4-14 for my example.
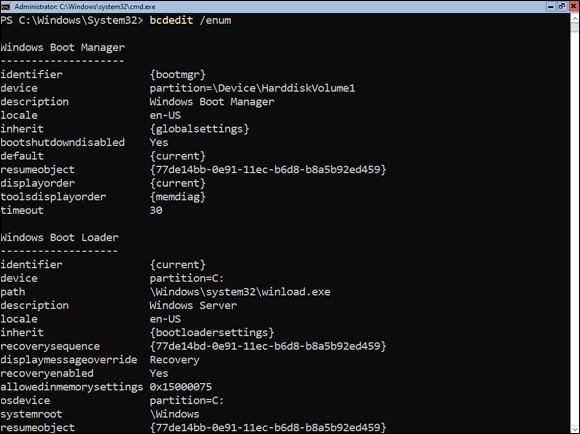
FIGURE 4-13: Using bcdedit /enum to see the current settings of the boot configuration datastore.
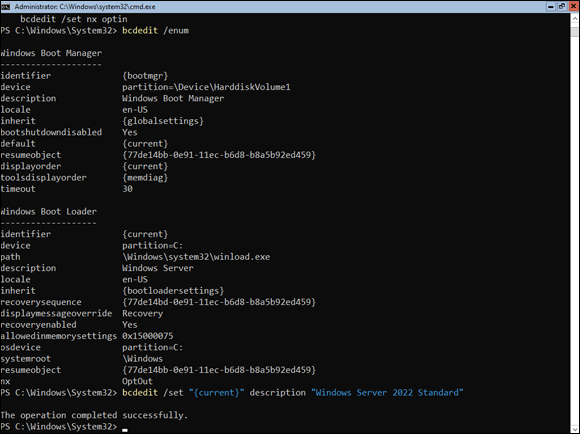
FIGURE 4-14: Using bcdedit /set to alter the description of the Windows Boot Loader entry.
Why would you want to change the name on the Windows Boot Loader? Consider the example of a multiple boot system that has the same operating system on both disks. The disks are used for very different purposes, so you want to ensure that you remember which is which. Being able to change the descriptions will simplify choosing the appropriate disk in the boot menu. BCDEdit can also be used to change the order of the boot menu. This is useful if you want to set one of your disks to be first in the list and the default disk to boot to after a certain amount of time.