Calculator: windowssystem32calc.exe
Numerical scientific and nonscientific calculator.
To open
Start → All Programs → Accessories → Calculator
Command Prompt → calc
Description
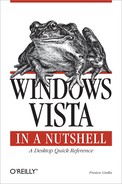
By default, the Calculator starts in Standard mode, containing only the numeric keypad and some basic functions (add, subtract, invert, square root, etc.). Select Scientific from the View menu to use the calculator in Scientific mode, useful for more advanced functions, such as logarithmic, logical, trigonometric, and base functions (see Figure 10-9). Each time you subsequently open the Calculator, it will appear in the previously used mode.
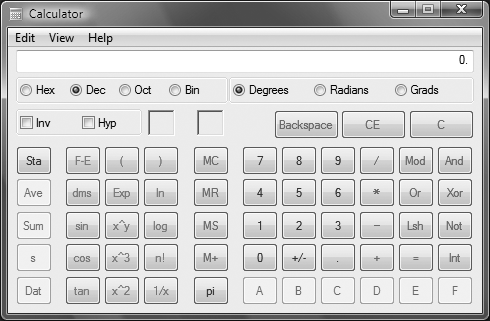
Figure 10-9. The scientific view of the Calculator, which provides access to many more functions than the standard view
Entering data and performing calculations
You can enter data by clicking the buttons or by pressing keys on the keyboard. All keys have keyboard equivalents (see Table 10-1); key mappings that are not quite obvious (such as Log) are documented in Table 10-7. Note that many of the functions in Table 10-1 are available only in Scientific Mode.
Table 10-1. Calculations and keyboard equivalents
|
Calc button |
Keyboard key |
Action |
|---|---|---|
|
|
Esc |
Clears all calculations. |
|
|
Delete |
Clears the last entry. |
|
|
Backspace |
Clears the last digit. |
|
|
Ctrl-R |
Displays the number stored in memory. |
|
|
Ctrl-M |
Stores the current value in memory. |
|
|
Ctrl-P |
Adds the current value to the number stored in memory. |
|
|
Ctrl-L |
Clears the memory. |
|
|
F9 |
Changes the sign (negative). |
When in Hex mode, you can enter hexadecimal values A-F from the keyboard or by using the A-F buttons on the Calculator. Table 10-2 shows number systems and keyboard equivalents. Table 10-3 and Table 10-4 show binary-mode keyboard equivalents and bitwise (logic) functions and keyboard equivalents, respectively.
Table 10-2. Number systems and keyboard equivalents
|
Calc button |
Keyboard key |
Action |
|---|---|---|
|
|
|
Hexadecimal (base 16) |
|
|
|
Decimal (base 10) |
|
|
|
Octal (base 8) |
|
|
|
Binary (base 2) |
Table 10-3. Binary-mode keyboard equivalents
|
Calc button |
Keyboard key |
Action |
|---|---|---|
|
|
|
64-bit value |
|
|
|
32-bit value |
|
|
|
16-bit value (low order bit) |
|
|
|
8-bit value (low order bit) |
Table 10-4. Bitwise (logic) functions and keyboard equivalents
|
Calc button |
Keyboard key |
Action |
|---|---|---|
|
|
|
Modulus |
|
|
|
Bitwise AND |
|
|
|
Bitwise OR |
|
|
|
Bitwise exclusive OR |
|
|
|
Left-shift (right-shift via |
|
|
|
Bitwise inverse |
|
|
|
Integer (remove the decimal portion) |
When in Decimal mode, the Deg, Rad, and Grad radio buttons switch among degrees, radians, and gradients (see Table 10-5).
Table 10-5. Decimal-mode keyboard equivalents
|
Calc button |
Keyboard key |
Action |
|---|---|---|
|
|
|
Calculates trigonometric functions in degrees. |
|
|
|
Calculates trigonometric functions in radians. |
|
|
|
Calculates trigonometric functions in grads. |
Statistical functions
To perform a statistical calculation, start by entering the first data, then click Sta to open the Statistics Box, click Dat to display the data in the Statistics Box, and then continue entering the data, clicking Dat after each entry. When you’ve finished entering all the numbers, click the statistical button you want to use (Ave, Sum, or S). The buttons available in the Statistics Box are listed in Table 10-6.
Table 10-6. Statistics Box buttons
|
Calc button |
Action |
|---|---|
|
|
Returns the focus to the calculator. |
|
|
Displays the selected number in the Statistics Box in the Calculator display area. |
|
|
Clears the selected number (data). |
|
|
Clears all numbers (data) in the Statistics Box. |
Scientific calculations
Scientific calculation buttons and keyboard equivalents are shown in Table 10-7.
Table 10-7. Scientific calculation buttons and keyboard equivalents
|
Calc button |
Keyboard key |
Action |
|---|---|---|
|
|
|
Sets the inverse function for |
|
|
|
Sets the hyperbolic function for |
|
|
|
Turns scientific notation on and off. You can use this only with decimal numbers. Numbers larger than 1015 are always displayed with exponents. |
|
|
|
Starts and ends a new level of parentheses. The maximum number of nested parentheses is 25. The current number of levels appears in the box above the |
|
|
|
If the displayed number is in degrees, convert to degree-minute-second format. Use |
|
|
|
The next digit(s) entered constitute the exponent. The exponent cannot be larger than 9999. Decimal only. |
|
|
|
Natural (base e) logarithm. |
|
|
s |
Sine of the displayed number. |
|
|
y |
|
|
|
l |
The common (base 10) logarithm. |
|
|
o |
Cosine of the displayed number. |
|
|
# |
Cubes the displayed number. |
|
|
! |
Factorial of the displayed number. |
|
|
t |
Tangent of the displayed number. |
|
|
@ |
Squares the displayed number. |
|
|
r |
Reciprocal of displayed number. |
|
|
p |
The value of pi (3.1415 . . .). |
Notes
If you convert a fractional decimal number to another number system, only the integer part will be used.
Those serious about calculators will probably notice that there is no Reverse Polish Notation (RPN) mode. Fortunately, there are literally dozens of freely available alternatives on the Web (try AepCalc from http://www.aepryus.com).
Character Map: windowssystem32charmap.exe
Display all the characters and symbols in a particular font. This provides access to symbols not easily accessible with the keyboard.
To open
Start → All Programs → Accessories → System Tools → Character Map
Command Prompt → charmap
Description
Character Map displays a visual map of all the characters in any font, making it easy to paste them into other documents (see Figure 10-10).
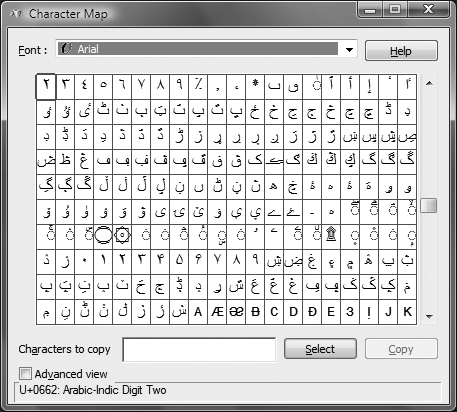
Figure 10-10. Character Map, which lets you access the symbols you can’t normally type from the keyboard
To use Character Map:
Select a font from the Font drop-down list. If you’re inserting a character into an existing document, you should select the same font that is used in the document.
Find the character you want to use; click once on any cell to magnify its character. If you can’t find the desired character, remember to scroll down. If the selected font doesn’t have the character you want, try another font.
Double-click the character you want (or click once and then click the Select button) to place the character in the “Characters to copy” box. You can place as many successive characters as you want in this box.
Click Copy to copy the character(s) to the Windows Clipboard.
Switch to your other application, click where you want the character(s) to appear, and paste (using either the Edit menu or Ctrl-V).
If the font in the target application isn’t the same as the one you’ve selected in Character Map, you’ll need to highlight the newly inserted character(s) and then change it to the same font you used in Character Map. If the character in your document doesn’t look as it did in Character Map, it’s because the wrong font is being used.
Notes
Effective use of Character Map relies on correct font selection, especially when you’re pasting characters into applications that don’t support multiple fonts. For example, the default font used in Notepad is Lucida Console (which you can change by going to Notepad → Format → Font).
Character Map is helpful not only for selecting extended characters in standard fonts, but also for accessing dingbats, such as those found in the Webdings, Wingdings, Symbol, and Marlett fonts.
Character Map is useful for finding out what key combination will produce a nonstandard character in any given font. This can eliminate the need to repeatedly go back to Character Map to retrieve the same character. Select a character in any cell and see the corresponding character code in the status bar. For example, the Yin-Yang symbol in Wingdings is character code
0x5B. Now, this is a hexadecimal code, so you’ll need to use the Calculator to convert it to a decimal number. In the Calculator’s Scientific mode, click Hex, type the code (not including the0xprefix--5Bin this case), and then clickDecto view the decimal equivalent (91in this case). To then insert the character into an application using the keyboard, hold down the Alt key and type the code using the numeric keypad (the numbers above the letters won’t work). In the case of the Yin-Yang, press Alt and type91. Appendix C lists some of the most useful character codes.
See also
“Fonts Folder,” in Chapter 3, and “Calculator” and “Private Character Editor,” in this chapter
Default Programs Control Panel
Change a variety of program-related settings, including specifying the default programs to use for various file types and protocols, changing AutoPlay settings, and controlling access to certain programs.
To open
Start → Default programs
Description
By default, certain programs are associated with certain file types and protocols and will automatically launch when those files and protocols are opened. For example, by default Internet Explorer opens all .html files and Windows Contacts opens all .vcf files—vCard files that contain contact information. So whenever you double-click to open either of those file types—in Windows Explorer, in Windows Mail, or anywhere else—the default program will launch and open the file.
The Default Programs Control Panel (Figure 10-11) lets you make changes to those defaults, and lets you change a variety of other settings as well, such as whether CDs, DVDs, and other media should auto-play when inserted.

Figure 10-11. The Default Programs Control Panel, where you can change a variety of program and Windows defaults
The Default Programs Control Panel lets you make these changes:
- Set your default programs
Many programs can handle a wide variety of file types, but when they are installed, they are not necessarily the default programs for all those file types. Choosing this option lets you change the default associations on a program-by-program basis. When you click it, the screen shown in Figure 10-12 appears. As you can see, only programs that ship as part of Windows Vista are included; you can’t use this option to make changes for other programs. (Notable exceptions include third-party email and web programs such as Mozilla Thunderbird and Firefox.)
Figure 10-12. Configuring the default programs for the file types and protocols handled by core Windows Vista applications
Select the program whose defaults you want to check. If the program is not set to open by default all the file types it can handle, you’ll be told the total number of file types it can handle, as well as the total number it is set by default to open. To have it open by default all file types it can handle, click “Set this program as default.” To choose some file types but not others, click “Choose defaults for this program” and select from the list.
If the program is already set to open by default any file type it can handle, when you highlight the file it will read “This program has all its defaults.”
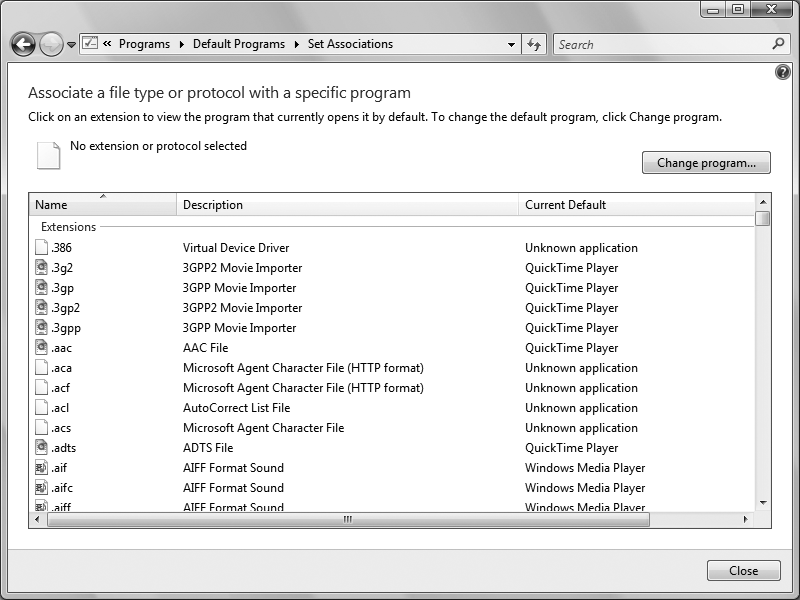
- Associate a file type or protocol with a program
Select this to choose, on a file type-by-file type basis, which programs should open various file types. For example, if you want .mp3 files to be opened by the WinAmp freeware program, you would do that in this screen.
When you make this choice, the Set Associations screen, shown in Figure 10-13, appears. For each file extension, you’re shown a description of what the file type is, as well as which program will open it by default. To change which program opens the file by default, click “Change program.” You’ll be shown the recommended default program, as well as other installed programs that can handle the file. If you want to choose a program not on either list, click Browse to locate it.
- Change AutoPlay settings
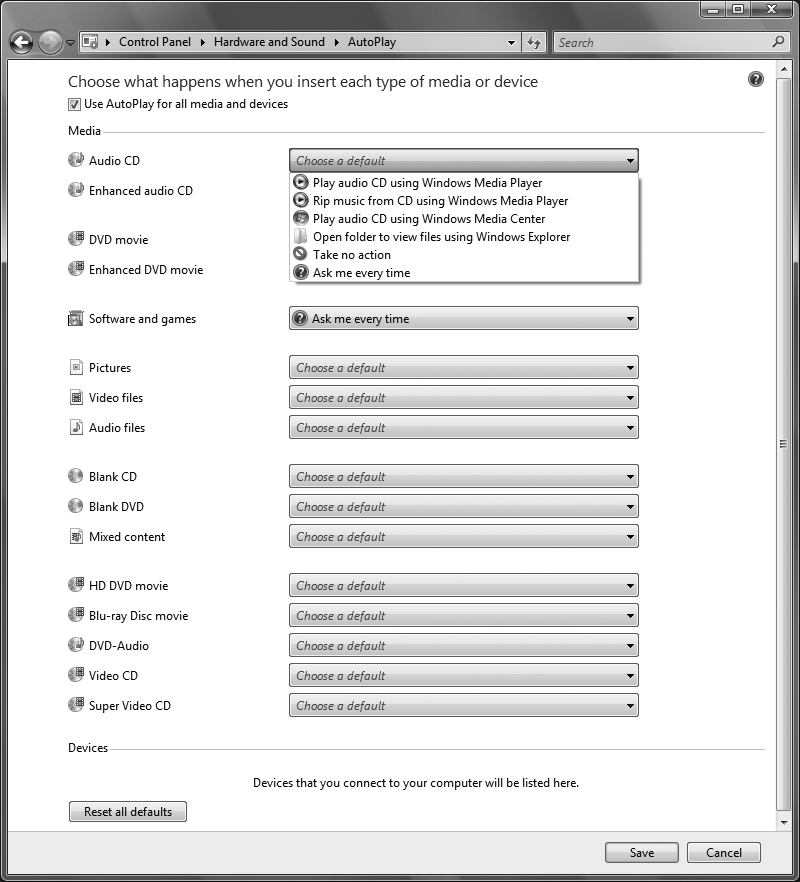
This lets you choose what action Windows Vista should take when you insert a CD or DVD into a drive—use AutoPlay to play the media, or let you decide which action to take. It also lets you choose which program should play the media. As you can see in Figure 10-14, you can make choices for a wide variety of media and content, ranging from Blu-ray Disc movies, to mixed content on a CD or DVD, to HD DVD movies, and more.
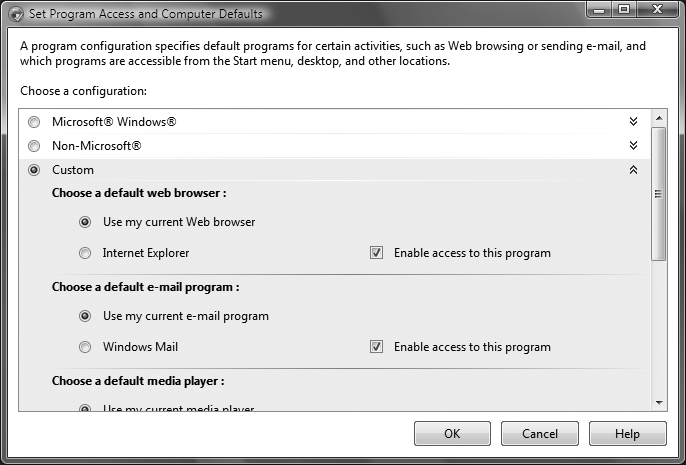
- Set program access and computer defaults
Several years back, Microsoft fell afoul of the U.S. Justice Department, which claimed that the company was illegally using its Windows monopoly power to promote its own software, such as Internet Explorer, over rivals such as Netscape Navigator. As part of that suit’s settlement, Microsoft had to allow PC makers to ship Windows with whatever default programs they wanted for web browsing, media playing, and so on. Microsoft also had to allow consumers to easily change those defaults.
Why am I telling you all this? Because that’s the reason for this feature’s existence. Click the link, and you’ll come to the page shown in Figure 10-15, which lets you choose an overall configuration of select programs for your PC, for web browsing, email, media playing, instant messaging, and using Java.
Figure 10-15. Choosing default programs for web browsing, email, media playing, instant messaging, and using Java
Choose Microsoft Windows, and you’ll use all of Windows Vista and Microsoft programs. Choose Non-Microsoft, and not only will your system use non-Microsoft programs for all those purposes, but you’ll also disable access to the Microsoft programs. Choose Custom to select a mix of Microsoft and non-Microsoft programs, and to enable or disable access to them.
If Windows Vista came preinstalled on a PC you bought, you may see another option here, Computer Manufacturer, which will restore your settings to those chosen by the manufacturer from which you bought your PC.
Notes
Windows Vista offers you far less control over file associations than did Windows XP. In Windows XP, you could set multiple associations for files, as well as customize precisely what actions a program should take when it opens a file. You could, for example, set one program to play a file type by default, but a different program to edit the file by default. None of that is possible in Windows Vista, though.
The choices you make in the Default Programs Control Panel are applied to all users of the PC; you cannot choose different settings for different users.
See also
“Windows Media Player,” in Chapter 12
Fax Cover Page Editor: windowssystem32fxscover.exe
Create and modify cover pages for use with Windows Fax and Scan.
Windows Fax and Scan → Tools → Cover Pages → New
Command Prompt → fxscover
Description
The Fax Cover Page Editor (Figure 10-16) works like an ordinary drawing/layout program, in that you can indiscriminately place text, shapes, and images on a blank page. Pages created with the Cover Page Editor are used automatically when sending faxes with Windows Fax and Scan.
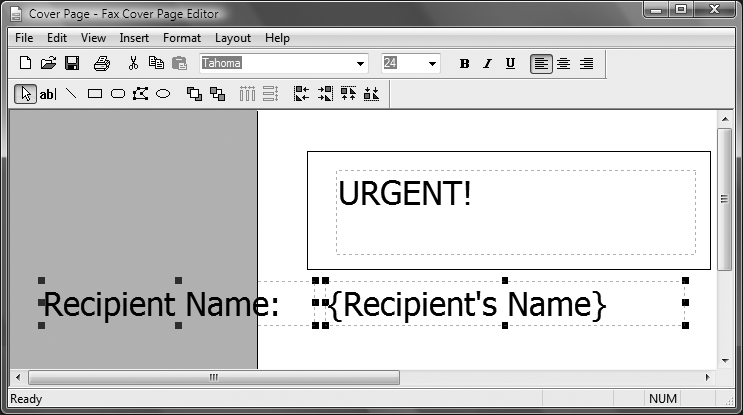
Figure 10-16. The Fax Cover Page Editor, which, among other things, enables you to support fields to import data such as recipient names
What makes the Cover Page Editor different from other drawing/layout programs to which you might be accustomed is its support for fields. Naturally, it wouldn’t do you much good to create a custom cover page for only a single recipient; rather, it is desirable to create a single cover page (or a series of cover pages) that you can use with any number of recipients. Use the Insert menu to place text fields on the page; fields are divided into the following three categories (menus):
- Recipient
Place the name or phone number fields on your cover page, and Windows Fax and Scan will insert those details of the recipient on each fax that is sent out.
- Sender
The information in the Sender menu does not change from fax to fax; rather, you set it in the Windows Fax and Scan application (discussed later in this chapter) by going to Windows Fax and Scan → Tools → Sender Information. Note that it’s generally preferred to use fields rather than static text, even if the information contained therein is the same for all faxes—it not only makes it easier to change later on, but it also means that your cover pages can be used easily by others.
- Message
Like items in the Recipient menu, Message details the message change from fax to fax, such as the subject, time, date, and number of pages.
When you’ve created or modified the cover pages desired, you must save them into a Cover Page (.cov) file, stored, by default, in Users
usernameDocumentsFaxPersonal Coverpages. Then, when sending a fax, simply specify the desired Cover Page file, and it will be used as the first page in your outgoing fax.You may want to preview outgoing faxes immediately after creating or modifying a cover page to make sure information is inserted into the fields properly.
See also
IExpress: windowssystem32iexpress.exe
Create a self-extracting/self-installing package, used to distribute files and install applications.
To open
Command Prompt → iexpress
Usage
iexpress.exe [/n [/q] [/m]]file[/o:overidefile,section]
Description
A self-extracting/self-installing package is actually an application, commonly known as an installer or setup program, that is used to install one or more files onto a Windows system and, optionally, to execute a setup script. IExpress is an interactive program that helps you create these packages, making it easy to, among other things, distribute files to other computers (see Figure 10-17).
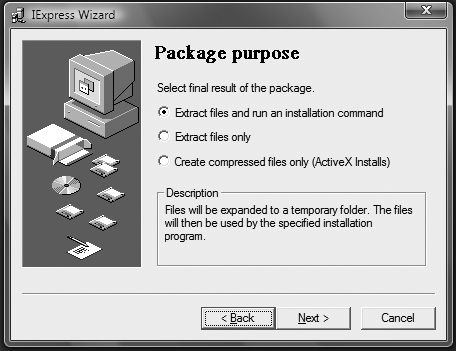
Figure 10-17. The IExpress Wizard, which lets you package up a collection of files for easy distribution
Say you want to put together a collection of documents that can be sent to another user, either via email or by using a floppy disk or CD. Rather than simply sending the files separately or compressing them into a .zip file, both of which would require additional instructions (not to mention a reasonably knowledgeable and patient recipient), you can make a full-featured, professional-looking installer with IExpress.
When you start IExpress, the IExpress Wizard guides you through the steps for creating a self-extracting package. The first step prompts for a Self Extraction Directive (.sed) file, a file that contains all the options and files to include. If you don’t have one, select “Create new Self Extraction Directive file” and click Next.
The next page, “Package purpose,” asks what you want the installer to do with the files on the target computer when the recipient opens the package. If you select the first option, “Extract files and run an installation command,” the files will be copied to a temporary folder and a separate installer program that you provide will be launched. If you don’t have a separate installation program, choose “Extract files only” and click Next. The last option, “Create compressed files only,” is used by application developers to assist in the distribution of application components and is of little use to most users.
The subsequent steps allow you to specify a package title, type welcome and “finished” messages, and even include a license agreement. When you reach the “Packaged files” page, use the Add button to select one or more files to be included in the package; you can choose as many files as you like, and they can be any format. In fact, IExpress will compress the files so that they take up less space (like .zip files). Then, IExpress will ask you to specify a package name, which is the path- and filename of the package (.exe) to be created. IExpress will also optionally save your choices into a Self Extraction Directive (.sed) file, making it easy to re-create this package without having to answer all the aforementioned prompts again.
When the process is complete, you’ll end up with a new .exe file that you can run on any Windows system. This package can now be emailed, FTP’d, distributed on a CD or floppy, or even posted on a web site; the recipient won’t need any special tools or elaborate instructions to extract the files from the package.
IExpress also has an automated, noninteractive mode for advanced users who want to skip the somewhat cumbersome wizard interface and instead create a package using the following command-line parameters:
-
file The full path and filename of a Self Extraction Directive (.sed) file. If you don’t have a .sed file, you’ll have to use the wizard interface to create one.
-
/n Build package now (
filemust be specified). If you omit/n, IExpress will open in the interactive wizard interface.-
/q Quiet mode (no prompts); used only with
/n.-
/m Use minimized windows; used only with
/n.-
/o Specify override .sed file and section.
-
/d Override directory for .exe stub.
If you’ve already created a .sed file (say, c:stuff hing.sed) and you want to generate the corresponding package without walking through the wizard or being bothered with any prompts, type the following at a command prompt:
iexpress /n /q c:stuff hing.sed
The filename of the resulting package will be as specified in the .sed file.
Notes
Self Extraction Directive (.sed) files are just plain-text files, similar in format to Configuration Files (.ini), and you can edit them with a plain text editor, such as Notepad. The easiest way to get started with .sed files is to use the IExpress Wizard to create one and then edit (if necessary) to suit your needs.
See also
Microsoft Magnifier: windowssystem32magnify.exe
Show an enlarged version of the area of the screen near the mouse cursor.
To open
Start → All Programs → Accessories → Ease of Access → Magnifier
Command Prompt → magnify
Description
The Microsoft Magnifier is used to assist those with visual impairments by magnifying a portion of the screen. When you start Magnifier, the top 15 percent of the screen turns into an automatic magnifying glass, which follows the mouse cursor around the screen. If you have trouble seeing something on the screen, just float the cursor over it to magnify it (see Figure 10-18).
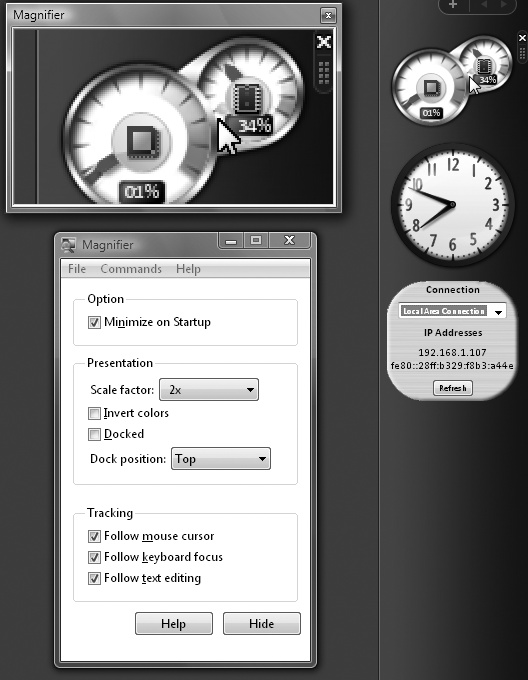
Figure 10-18. The Magnifier tool, which can follow your mouse cursor, enlarging any portion of the screen you point to
You can resize or move the Magnifier with the mouse. Furthermore, when the Magnifier is first opened, the “Magnifier settings” window appears, allowing you to change the magnification level and choose whether the Magnifier follows the mouse cursor, keyboard focus, or text cursor. To hide the settings window, just minimize it; if you close it, the Magnifier will close.
Notes
The Magnifier can also be very handy for application developers and web site authors, who may need to see pixel detail in their work.
See also
“Narrator” and "On-Screen Keyboard"
Narrator: windowssystem32 arrator.exe
A text-to-speech program intended for visually impaired users.
To open
Start → All Programs → Accessories → Ease of Access → Narrator
Command Prompt → narrator
Description
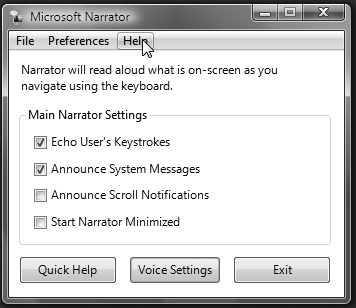
The Narrator assists those with visual impairments by using a voice synthesizer and the sound hardware on the user’s computer to read aloud text and the titles of screen elements (see Figure 10-19). You can configure the Narrator with these options:
- Echo User’s Keystrokes
The Narrator will speak each letter, number, and keyboard action as its corresponding key is pressed on the keyboard.
- Announce System Messages
The Narrator will speak any Windows Vista system messages as they appear on the screen, as well as the titles of Windows when they are activated and the captions of many types of screen elements.
- Announce Scroll Notifications
The Narrator will tell you when the screen scrolls.
- Start Narrator Minimized
This will start Narrator minimized to the toolbar.
In addition to these functions, you can use the following keyboard shortcuts to read additional items:
To read an entire window, click the window and then press Ctrl-Shift-Space bar.
To read the caption of the control with the focus, or to read the contents of a text field, press Ctrl-Shift-Enter.
To get a more detailed description of an item, press Ctrl-Shift-Insert.
To read the title bar of a window, press Alt-Home.
To read the status bar of a window, press Alt-End.
To silence the speech, press the Ctrl key by itself.
Notes
A far more impressive, related technology is that used in speech recognition software, in which the computer will take dictation, translating anything spoken into a microphone into text on the screen. Although initially developed for physically challenged users, speech recognition has become very popular among all types of users, partly because of the novelty, partly because of the speed (some can type up to 160 words per minute), and partly to help reduce repetitive stress injuries. Windows Vista also comes with a new voice recognition feature, although it’s not nearly as sophisticated as NaturallySpeaking (http://www.dragonsys.com) or IBM’s ViaVoice (http://www.ibm.com/speech).
See also
"Microsoft Magnifier,” "On-Screen Keyboard,” and "Windows Speech Recognition"
Notepad: windows otepad.exe
A rudimentary plain-text editor.
To open
Start → All Programs → Accessories → Notepad
Command Prompt → notepad
Usage
notepad [/p] [filename]Description
Notepad is one of the simplest yet most useful tools included with Windows Vista. Those familiar with word processors may find Notepad to be laughably limited at first glance, as it has no support for even the simplest formatting. However, the fact that it supports only text in the documents that it creates is an absolute necessity for many of the tasks for which it is used on a daily basis (see Figure 10-20).
Among the file types Notepad can edit are .txt files (plain-text files), .reg files (see "Exporting and Importing Registry Data with Patches,” in Chapter 13), .bat files (see "Batch Files,” in Chapter 14), .ini files (configuration files), .html files (web pages), Unicode, and any other ASCII text-based file type.
Notepad has gained a bit more popularity recently, with the rise of blogging. When you copy and paste text from a word processor, such as Microsoft Word, into some blogging tools, the copied text brings along with it stray bits of code and invisible HTML. This causes problems with the blog. Notepad, on the other hand, handles only text, so it doesn’t cause the same problems.
Notepad is the default application for .txt and .log files and is set up as the Edit context menu action for .bat, .inf, and .reg files, among others. Furthermore, via the /p command-line parameter, Notepad is used to print most text-based file types via the Print context menu action.
Notes
In some previous versions of Windows, Notepad had a limit as to the size of the documents it could open. The Windows Vista version of Notepad has no such limit, and you can use it to open a file of any size.
Notepad has no intrinsic formatting of its own, so any file that is opened in Notepad is displayed exactly as it is stored on the hard disk, with the proviso that only visible characters will be shown. This means that you can open any file, text-based or otherwise, in Notepad; if you try to open a binary file, however, you’ll see mostly gibberish. There are times, though, when this can be useful; if you suspect that an image file or a movie file has the wrong extension, you can open it in Notepad to verify its contents. (Naturally, some experience is required to correctly identify different types of files.)
The Word Wrap feature (Edit → Word Wrap) will break apart long lines of text so that they are visible in the Notepad window without horizontal scrolling. However, no permanent changes will be made to the file, so you can use the Word Wrap feature without fear of damaging the integrity of the document.
If you type the text
.LOG(in uppercase and including the period) as the first line in a text file, Notepad will automatically place the time and date at the end of the file (with the cursor right below it) every time you open it, forming a simple logfile. Furthermore, you can use the F5 key to manually place a date/timestamp at the current cursor location while editing any file.Notepad is a simple program, but by no means is it a full-featured text editor. UltraEdit (http://www.ultraedit.com) is a much more sophisticated text editor that you also can use as a hex (binary) editor. NoteTab Pro (http://www.notetab.com) is also far more sophisticated, and it includes a very easy-to-use HTML editor as well.
See also
"WordPad"
On-Screen Keyboard: windowssystem32osk.exe
A full, on-screen keyboard controlled by the pointing device.
To open
Start → Programs → Accessories → Accessibility → On-Screen Keyboard
Command Prompt → osk
Description
Among the tools provided with Windows XP to assist users with physical disabilities is the On-Screen Keyboard. Intended to be used by those who are unable to comfortably use a keyboard, the On-Screen Keyboard allows any key normally available on the keyboard to be pressed with a click of the mouse, or whatever pointing device is currently being used (see Figure 10-21).
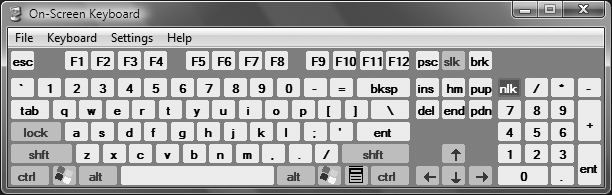
What makes the On-Screen Keyboard especially appropriate as a primary input device is that you can click keys when another application has the focus. For example, open the On-Screen Keyboard and then open your word processor; the keyboard will float above the word processor, allowing you to click any key to “type” it into your document.
Configuring the On-Screen Keyboard is straightforward. Use the Keyboard menu to change the layout of the keys, or Settings → Font to change the font of the key labels. Go to Settings → Typing Mode to choose how keys are pressed; by default, each key must be clicked, but you can set it up so that you can hover over keys to select them, or even use a joystick to control the keyboard.
Notes
Also included with Windows Vista is the Character Map (discussed earlier in this chapter), which allows access to symbols and other characters not normally available on a standard keyboard. However, only the On-Screen Keyboard is designed to be a primary input device.
See also
"Microsoft Magnifier,” "Narrator,” and "Character Map"
Program Compatibility Wizard
Configure older programs to help them run under Windows Vista.
To open
Control Panel → Programs → Use an older program with this version of Windows
Description
Old programs, especially old DOS-based programs and games, may have problems running under Windows Vista. The Program Compatibility Wizard helps you troubleshoot problems with those programs, and help them run under Windows Vista.
Run the wizard, then choose the program from a list of programs, browse for it on your hard disk, or choose a program in your CD or DVD drive. After you select it, you can choose one of five compatibility modes—Windows 95, Windows NT 4.0 (Service Pack 5), Windows 98/Me, Windows 2000, or Windows XP (Service Pack 2). Choose the version of Windows under which the program was developed or worked previously. When you do that, the Program Compatibility Wizard will apply settings so that whenever the program runs, it will in essence think it’s running under the older operating system, and all should be right in its world. So, for example, it may run at 256 colors and in 640 × 480 resolution.
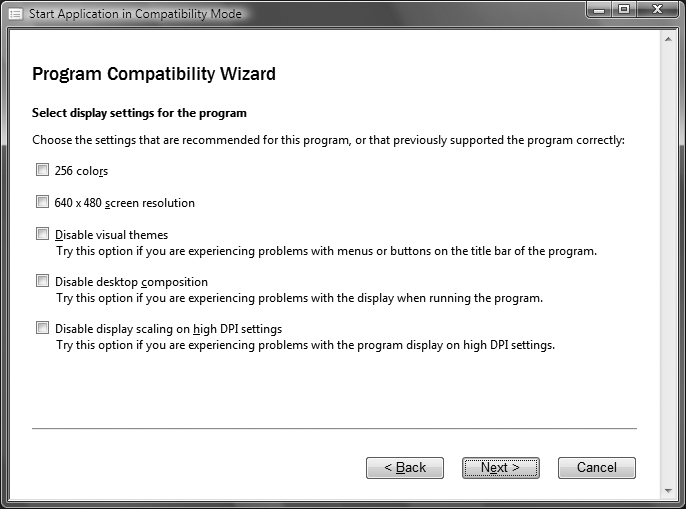
What if that doesn’t work, or if you don’t know under what version of Windows it previously ran? Choose “Do not apply a compatibility mode” instead. You’ll be walked through a series of screens letting you manually choose settings (Figure 10-22), such as under what screen resolution and color depth to run the program, whether to run the program as an administrator, and so on. When you’re done, if the program still doesn’t work, go back in and change the settings until you find a set that works.
Notes
You shouldn’t use the Program Compatibility Wizard with older virus detection, backup, or system programs, because using those older programs on Windows Vista can potentially cause serious system problems.
If you’re experiencing problems with the program’s menus, buttons, or title bar, check the box next to “Disable visual themes” when you’re choosing your settings manually. Select “Disable desktop composition” if you’re experiencing problems with the display.
Uninstall or Change a Program: windowssystem32appwiz.cpl
Uninstall programs, or add or remove extra program features.
To open
Control Panel → Programs → Programs and Features
Command Prompt → appwiz.cpl
Description
This Control Panel applet (Figure 10-23) lets you uninstall any program on your PC, as well as change the program by adding new features, or repair the program if for some reason it has been damaged.
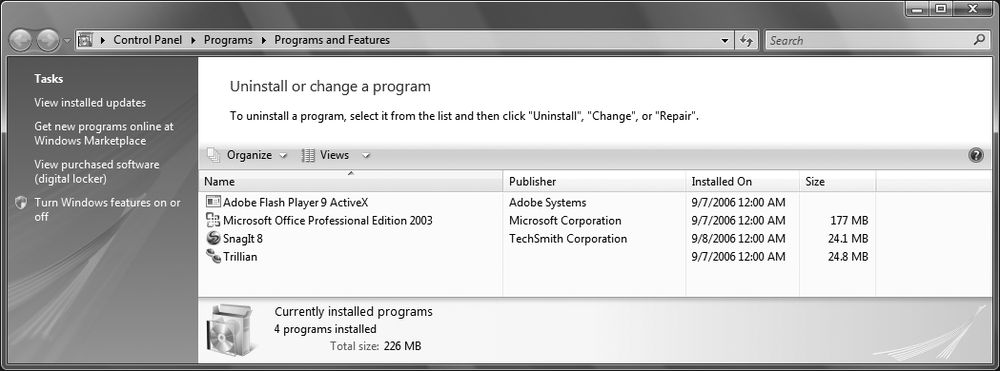
To uninstall a program, double-click it and follow the prompts that appear. (You can also right-click it and choose Uninstall.) To add new features or remove features from the program, right-click it and select Change. In many instances, you’ll need the CD or DVD from which you installed the program in order to add—and sometimes remove—features. You’ll be prompted for the CD or DVD. Right-click and choose Repair to fix a damaged program—and again, you’ll usually need the CD or DVD installation disk in order to do that.
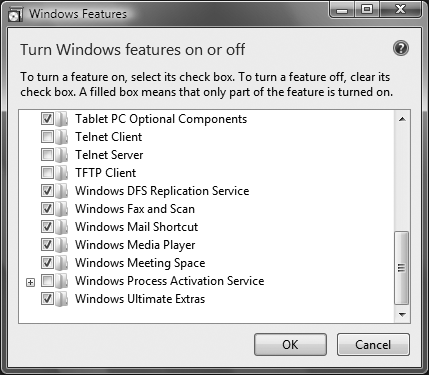
The Uninstall or Change a Program applet also lets you turn Windows features and programs on and off—features and programs such as games, Windows Media Player, and so on. Click “Turn Windows features on or off,” and the screen shown in Figure 10-24 appears. Turn a feature on by checking the box next to it; turn it off by unchecking the box. Note that turning off a Windows feature doesn’t actually delete the files from your hard disk; it only turns off access to them. In this way, when Windows Update runs, you know that every possible program you could run is safe (otherwise, if you had to install the program anew from Windows DVD, you could install older, buggy versions).
Notes
Remove or disable add-ins to Internet Explorer and/or ActiveX controls using Internet Explorer. In Internet Explorer, choose Tools → Manage Add-ons → Enable or Disable Add-ons.
Windows Fax and Scan: windowssystem32WFS.exe
Send and receive faxes, including scanning documents to be faxed.
To open
Start → Windows Fax and Scan
Command Prompt → wfs
Description
Windows Fax and Scan lets you send, receive, and manage all incoming and outgoing faxes (see Figure 10-25). It is set up like Outlook Express, with folders shown in a hierarchical tree in the left pane and the contents of the currently selected folder shown in the right pane.
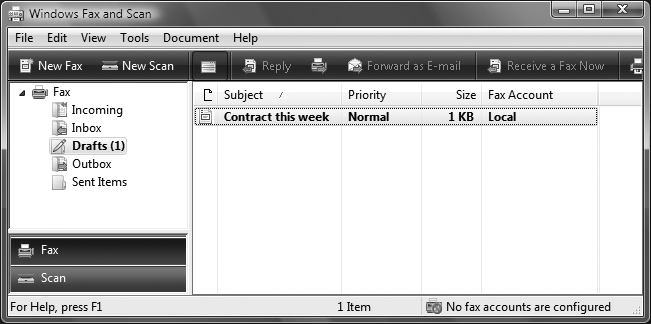
Windows Fax and Scan lets you create documents to fax with its message editor, which looks much like the editor included with Windows Mail. You can use different fonts and font attributes, embed graphics, and so on, and then fax the document.
If you have a document on paper that you need faxed, you can use the scan features to scan the document and then fax it. Switch between the fax and scanning features by clicking either Fax or Scan at the bottom of the screen.
Windows Fax and Scan works much like an email program. For example, if you receive a fax and want to respond to it, click Reply, and you’ll be able to send a fax back to the sender, using the built-in editor to create it. You can even take a fax you’ve gotten, attach it to an email, and send it. (Click Forward as E-Mail.) Of course, it prints faxes as well.
If you’re attached to a network that has a network fax, you can use that instead of a fax connected to your PC.
If you create documents using Word, Excel, or other applications that you want to fax, you can instead fax the documents straight from the application. Applications consider the fax as little more than a remote printer connected to a phone line. Print as you normally would, except choose Fax instead of your normal printer. After your application has sent the document to the fax printer driver, a new wizard appears and asks you for the recipient name and phone number, as well as any queuing options (useful if you want to postpone sending the fax until off-peak hours).
To receive faxes, start Windows Fax and Scan and click Receive a Fax Now.
Notes
Not surprisingly, if you don’t have a modem, you won’t be able to send or receive faxes; you can’t send them from Windows Fax and Scan via the Internet.
If you want to receive faxes but don’t have a modem, or if you just don’t want to leave Windows Fax and Scan running all the time, Internet-based fax services (such as http://www.efax.com), some of which are completely free, send incoming faxes to you as email attachments.
An alternative to using faxes is to email documents and scans. A program such as Adobe Acrobat (http://www.adobe.com) is especially useful for preserving fonts and formatting in computer-generated documents, and it can even accommodate scanned pages, making it easy for the recipient to view or even print them. Not only will this result in higher-quality documents and lower phone bills, but it also might save a few trees. You can also use Windows Vista’s built-in XML Paper Specification (XPS) file format for the same purpose, although the document can then be shared only with people who use Windows Vista or an XPS viewer. XPS isn’t in as widespread use as Acrobat. For more details, see "XPS Document Viewer,” in Chapter 9.
See also
WordPad: Program FilesWindows NTAccessorieswordpad.exe
To open
Start → All Programs → Accessories → WordPad
Command Prompt → wordpad
Description
Although WordPad lacks many of the features that come with full-blown word processors such as WordPerfect and Microsoft Word, it has enough features to let you create and edit rich-text documents. WordPad is the default editor for .rtf, .doc, and .wri files (unless Microsoft Word is installed). You also can use WordPad to edit plain-text files (.txt), although Notepad (discussed earlier in this chapter) is the default and is more appropriate for this task (see Figure 10-26).
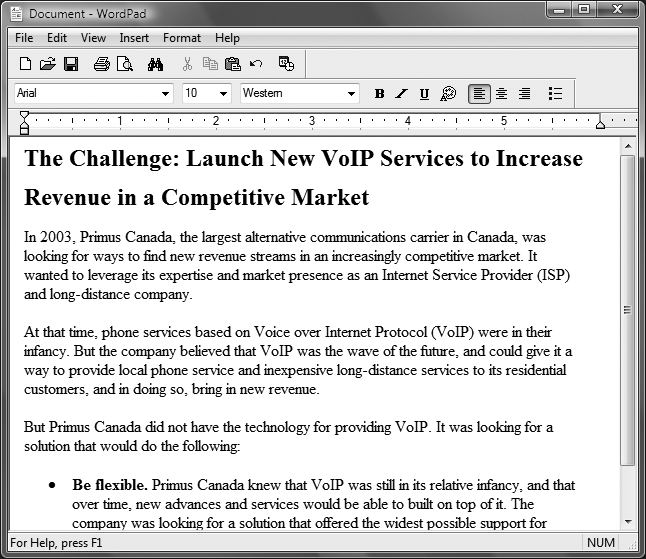
Depending on the type of file opened, WordPad may or may not display its formatting toolbar and ruler. When you use File → New, WordPad prompts you to choose a document type, including Rich Text Document (formatted text, such as word processor documents), Text Document (plain ASCII text), and Unicode Text Document (plain text using the Unicode character set). Once a file is open, however, you can turn on or off the formatting bar and ruler and even apply formatting to plain-text documents. If you try to save a text document with formatting, though, WordPad will warn you that your formatting will be lost (because text files don’t support formatting).
WordPad has several advantages over the simpler Notepad application. Among other things, WordPad lets you choose from a wide selection of fonts and font sizes, use colors in your documents, set tab stops, use rulers, and even insert objects (e.g., images, some clips, etc.). Although not a full-featured word processor, WordPad does enough to create simple formatted documents that can then be printed, emailed, or faxed.
Notes
You can open Microsoft Word documents with WordPad, but you might lose some formatting if you save the file (which will prompt WordPad to warn you).
When dragging a file onto WordPad, be sure to drop the file icon onto the WordPad title bar if you want to view it or edit it, or drop it onto the middle of the document if you want to embed the icon as an object into the currently open document.
To prevent WordPad from overwriting your file extensions and adding its own when you save a file, place quotation marks around the name of the file you want to save (e.g., "read.me“) and click Save. Otherwise, you’ll get read.me.doc.
Like Notepad, WordPad does not allow you to open more than one document at a time. If you want to view multiple WordPad documents simultaneously, you’ll need to open multiple instances of the WordPad application.
See also
"Notepad"