6. YouTube: Your Brand Channel
We are in a YouTube society now.
—New York Times (2011)

A Little History
YouTube was founded by three former PayPal employees in 2005 and has never looked back! Based in San Bruno, California, it primarily showcases user-generated video content online, with registered users being able to upload an unlimited number of videos. YouTube was purchased by Google Inc. in 2006 for $1.6 billion, and the company now operates as a subsidiary of Google.
It’s Big
Whereas many of us think of YouTube as a great hosting site for the next big viral video sensations, savvy entrepreneurs use the true benefit of YouTube to market their businesses and educate their customers.
After all, YouTube enables us to connect with an audience like never before and without the huge budgets needed to support our television-oriented efforts. Now we can freely share our expertise and knowledge using brains over budget to market and showcase our products and services.
So before we get started in establishing your channel, let’s find out what YouTube really enables us to do:
• YouTube enables us to upload event presentations and slides in video format, to benefit those individuals who were not able to attend. This means that a local event can have a global audience.
• Both existing and potential customers or clients can be shown your company’s expertise on its products and services and that knowledge is always just a click away from them. Many companies are now choosing to translate their user manuals and guides into instantly accessible video tutorials that provide a human touch to your brand.
• The relatively new Google Universal Search will also show YouTube video options when you search for a specific topic. Try using it to find videos on products and services like your own. You can utilize this great tool by ensuring that you use the right channel tags and keywords, which we discuss later in this section.
• YouTube videos offer you the opportunity to receive feedback comments and subscriptions—the ultimate tool and subsequent incentive for producing customer-friendly relations.
YouTube testimonials allow you to create a community of enthusiasts who will become your 24-hour sales team.
• Customer testimonials no longer need to be consigned to the filing cabinet or a static web page. By encouraging customers to send in their testimonials by video, you can create a community of enthusiasts who will become a 24-hour sales team, their endorsements being accessible to potential customers around the clock.
• Case studies can also be brought to life using YouTube, showcasing your professionalism and broadcasting your potential to millions every day.
By utilizing Cross Platform Promotion (CPP), which we unveil in Part III of the book, you can make your YouTube videos accessible across all the major social media platforms. In other words, “YouTube it, and they will come.”
Many people visit YouTube to carry out research into products and services and upload videos of their findings back on to YouTube. In the same way as the customer testimonials are posted (as mentioned earlier), so too can product reviews find their way to potential customers. Of course, this can be a double-edged sword, in that negative reviews are also freely available, which is why monitoring and responding to postings is vital to your maintenance of an effective and positive social media presence.
Getting Started
1. Decide on the username for your channel (your business name or perhaps a reflection of the products and services you offer). This should be a name that is, or will become, instantly recognizable with your brand.
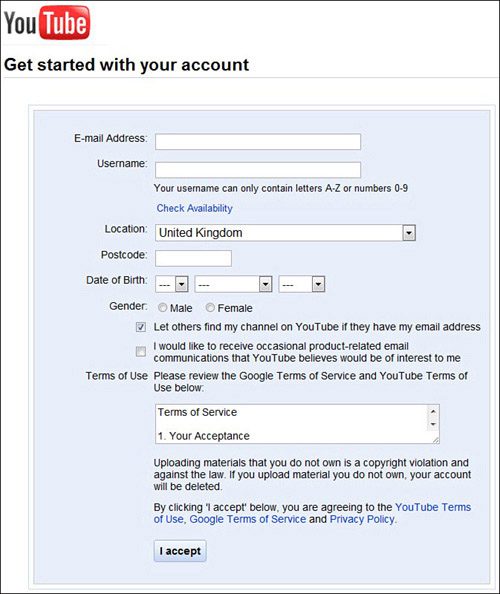
2. Go to the YouTube Create Account page and enter your chosen username in the Username box, as shown in Figure 6-1.
Figure 6-1. The YouTube Create Account page.
(Source: Youtube.com)
3. Either click the Check Availability link or move the cursor to another field.
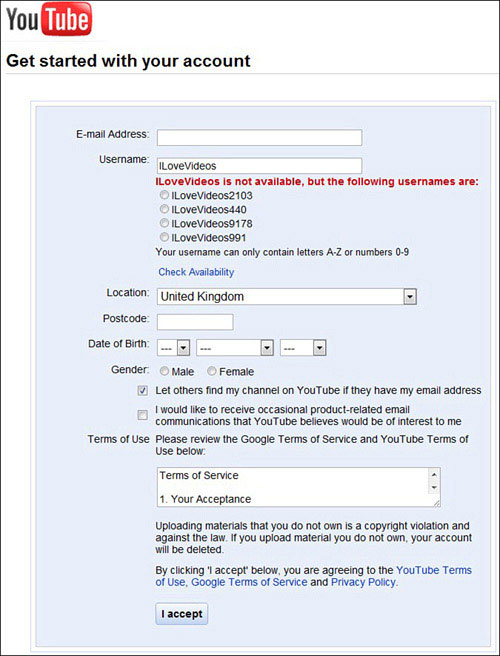
4. Beside the username you entered, you will see either “Username unavailable” or “Username available.” If your chosen username is unavailable, some alternatives will be suggested (see Figure 6-2). Alternatively, enter a new username choice, as in step 2.
Figure 6-2. If your preferred username is unavailable, some available alternatives will be listed.
(Source: Youtube.com)
5. When you’ve found a username you like, fill in the other boxes (or fields) to complete the signup process.
Customizing Your Channel
Now that you’ve registered with YouTube, you’ll have the exciting task of customizing your channel. Branding or customizing your channel will make you look professional, and you’ll gain more views and subscribers.
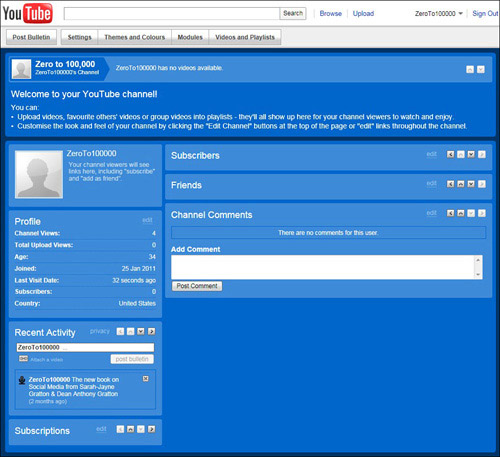
The first page you see when you view your channel will be quite gray and somewhat disconcerting (see Figure 6-3), but this will all soon change.
Figure 6-3. Your YouTube channel page will look something like this prior to customizing it.
(Source: Youtube.com)
Start by clicking the Settings button. You’ll be taken to an area where you can view your YouTube URL and channel name in all their glory. You’ll now have the opportunity to add channel tags, which are basically key words from which users can find you. For example, if you are a coffee shop, the channel tags coffee and shop are obvious choices.
You can now select the type of account you want to present to the world. These are predominantly entertainment based, so as a business, you might want to stick with the YouTuber option.
You’ll have the option to make the channel visible, but we suggest waiting until your channel is fully customized before doing so. The same principle goes for the option that you’ll see just below the Channel Tags box, Let others find my channel on YouTube if they have my email address (see Figure 6-4).
Figure 6-4. Your YouTube channel’s Settings options.
(Source: Youtube.com)
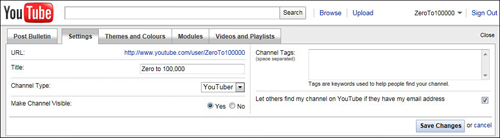
Don’t forget to click the Save Changes button (in the lower-right corner of the window) to save and apply the updates you’ve just made.
Selecting a Channel Theme
1. Start by clicking the Themes and Colors tab, which will take you to a page of color theme options as shown in Figure 6-5. You can choose to select one of these themes for your channel or create your own individual theme.
Figure 6-5. Themes and Colors section options.
(Source: Youtube.com)
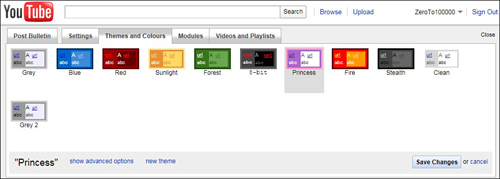
2. When you click one of the color themes, the background of your channel changes to show you a preview of how your channel will look if you select it.
3. If you find a theme that you want to stick with and have displayed on your channel, click the Save Changes button to update your channel to that of your chosen theme.
4. If you don’t like the theme you are seeing in preview, click Cancel or click another theme to change the channel background.
Making It Your Own
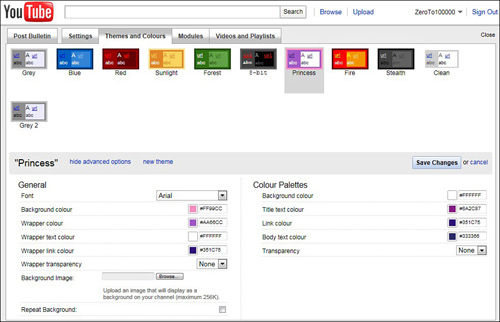
You can further customize your theme by clicking the Show Advanced Options button, which appears just below the standard color themes.
The window expands as shown in Figure 6-6 to display a variety of ways to create your own background theme. Customize by selecting different colors for the various aspects of your channel.
Figure 6-6. Selecting advanced theme options.
(Source: Youtube.com)
Adding a Background Image
1. Click the Show Advanced Options button, then click the Browse button beside the Background Image option (see Figure 6-6). Choose an image from your computer that works well as your channel’s background. Select the image.
2. It will now appear centered on your channel page, and you can see a preview of how your channel will look with it included in this way. If you prefer to repeat the image across your channel’s background, click and check the Repeat Background box (see Figure 6-7).
Figure 6-7. @grattongirl used a repeat background image to personalize her channel.
(Source: Youtube.com)
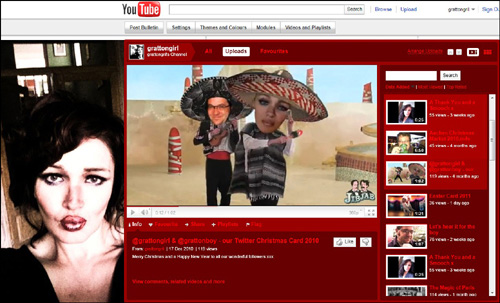
3. Click the Save Changes button to update your channel with these settings.
Managing Modules
To edit the modules/boxes that are displayed on your channel, you must click the Modules button, as shown in Figure 6-8. Various options will then be displayed.
Figure 6-8. Selecting which modules to display on your channel.
(Source: Youtube.com)
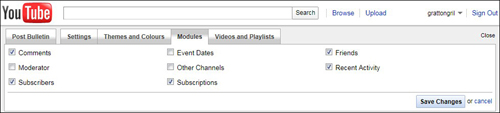
Choose the modules that you want to show on your channel, as shown in Table 6-1.

If you want to show one of these modules on your channel, click and select that option. Then click the Save Changes button to update your channel with the new modules now displayed.
If you do not want to show one of these modules on your channel page, click and uncheck the box next to that module option (so that the box is blank).
As always, be sure to click the Save Changes button to update your channel. You can change the location of your channel modules by locating the module you want to move and then clicking the arrow buttons in the right corner of the module to shift it either up, down, or across your channel page.
Your First YouTube Video
You may be surprised to learn that your first YouTube video is probably already made (or, at least on its way to being). If you have or work for a company that likes to make interesting slide shows and demonstrations of its products, or if you have footage of a recent product launch or even a number of great photos to make into a slide show, you’re well on your way to launching the first video on your YouTube channel.
Your first YouTube video is probably already made.
The first thing you need to do is to make use of video-editing software. If you’re a Mac user, you probably already have iMovie installed, which enables you to transform pretty much any existing footage, slide show, or images into a pretty decent video. If you’re a Microsoft Windows user, take advantage of Microsoft’s own video-editing options or invest in an easy-to-use editing package such as Cyberlink’s Power Director, Sony Vegas Movie Studio, or Pinnacle Studio. You’ll need these if you want to add an introduction in the form of an opening screen with titles, a voiceover (if needed), or maybe a little background music to set the scene, captions throughout (if necessary for clarification), and an ending screen with company details, to include your website and other contact information.
Think Simple
The best YouTube business videos are short, simple, and easy on the eye, so, don’t try to be too clever with your production. Otherwise, you might end up with a piece that’s too busy and confusing to get your brand message across.
Basic Rules for YouTube Success
These guidelines show you how to take a basic YouTube account and make it one of your strongest business tools.
• Remember that YouTube is a social platform, a community where two-way communication is standard practice. Your videos need to reflect your desire for feedback and the exchange of ideas and opinions.
• If you have a fresh and exciting team, capture their presentations and bring a sense of connection to your audience so that they almost feel a part of your team.
• Where possible, keep your videos under five minutes to maintain interest. Careful editing will keep the content fresh and relevant.
• Spread the word by taking advantage of YouTube’s gigantic community and distribute your videos through emails and embeds. Encourage your subscribers on YouTube to spread the message at the end of each video you upload and on your channel page itself.
• Keep it real! Compelling and genuinely authentic videos frequently receive high view counts, while overly produced messages often fall flat.
• Stay in touch with what’s going on and update supporters when you have a position on a breaking news story that relates to your business. This not only shows that you have your finger of the pulse of your particular arena, but it also marks you as an expert in the field.
• Get creative with question-and-answer videos that call for video replies from the YouTube community.
• Create incentives for viewers to upload videos about your products and services. Keep them engaged and motivated, and they will work to become your brand ambassadors.
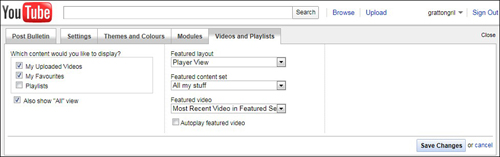
Customizing Your Display of Videos and Playlists
After you’ve begun to upload your videos, you can choose to display and highlight the latest ones on your channel by clicking the Video and Playlists tab (see Figure 6-9). You can choose to display:
• All (playlists, uploads, and favorites)
• Just Uploads
• Just Playlists
• Just Favorites
Figure 6-9. Customizing which videos and playlists are displayed.
(Source: Youtube.com)
In Part III of the book, “The 10 Step Method to Building a Fast and Effective Online Presence,” you’ll find additional tips and tricks to help you get the very best out of YouTube.