
Chapter 7. Transitions, Themes, and Travel Maps
Cutting and ordering clips into a coherent narrative makes them infinitely more entertaining than the hours of dreck you’d otherwise have. But why stop there? This is computer video editing, after all. The next two chapters cover what you can do between your clips (this chapter) and what you can do to your clips (video effects) to make your whole project more vivid.
About Transitions
What happens when one clip ends and the next one begins? In about 99.99 percent of all movies, music videos, and commercials—and in 100 percent of camcorder movies before the Macintosh era—you get a cut. That’s the technical term for “nothing special happens at all.” One scene ends, and the next one begins.
Note
Impressively enough, iMovie requires no rendering time—no delay while the program computes the video effect you’re creating—as there is in most other video-editing programs. You see the effect instantly.
Professional film and video editors, however, have at their disposal a wide range of transitions—special effects that smooth the juncture between one clip and the next. For example, the world’s most popular transition is the crossfade or dissolve, in which the end of one clip gradually fades away as the next one fades in (see Figure 7-1). The crossfade is popular because it’s so effective. It gives the transition a feeling of softness and grace, and yet it’s so subtle that you might not notice it.

Like all video-editing programs, iMovie offers a variety of transitions, of which crossfades are only the beginning. You’ll find a catalog of them beginning on Adjust Automatic Transitions. iMovie makes adding such effects easy, and the results look awesomely assured and professional.
When to Not Use Transitions
When the Macintosh debuted in 1984, one of its most exciting features was its fonts. Without having to buy those self-adhesive lettering sets from art stores, you could make posters, flyers, and newsletters using any typeface you wanted. In fact, if you weren’t particularly concerned with taste, you could combine lots of typefaces on the same page—and thousands of first-time desktop publishers did exactly that. They thought it was exciting to harness the world of typography right on their computer screen.
You may even remember the result: a proliferation of homemade graphic design that rated very low on the artistic-taste scale. Instead of making documents look more professional, the wild explosion of mixed typefaces made them look amateurish in a whole new way.
In video, transitions present exactly the same temptation: If you use too many, you risk telegraphing that you’re a beginner at work. So when you begin to polish your movie by adding transitions, consider these questions:
Does it really need a transition? Sometimes a simple cut is the most effective transition from one shot to the next. Yes, the crossfade lends a feeling of softness and smoothness to the movie, but is that really what you want? If it’s a sweet video of your kids growing up over time, absolutely yes. But if it’s a hard-hitting “issue” documentary, then probably not, as those soft edges would dull the impact of your footage.
Remember, too, that transitions often suggest the passage of time. In movies and commercials, consecutive shots in the same scene never include such effects. Plain old cuts tell the viewer that one shot is following the next in real time. But suppose one scene ends with the beleaguered hero saying, “Well, at least I still have my job at the law firm!” and the next shot shows him operating a lemonade stand. (Now that’s comedy!) In this case, a transition would be especially effective, because it tells the audience we’ve just jumped ahead a couple of days. Learn taste in transitions. They should be done for a reason.
Is it consistent? Once you choose a style of transition for your movie, stick with it for the entire film (unless, as always, you have an artistic reason to do otherwise). A consistent style gives your work unity. That’s why interior designers choose only one dominant color for a room.
Which effect is most appropriate? As noted earlier, the crossfade is almost always the least intrusive, most effective, and best-looking transition. But each of the other iMovie transitions can be appropriate in certain situations.
The catalog on Adjust Automatic Transitions gives you an example of when each transition might be appropriate. Most are useful primarily in music videos and other situations when wild stylistic flights of fancy are more readily accepted by viewers.
Tip
iMovie’s Fade to Black transition is exempt from this stern advice. Use it at the beginning of every movie, if you like, and at the end. Doing so adds a fade in and fade out, lending a professional feeling to your film. But it’s so subtle, your audience will notice it only subconsciously, if at all.
Two Ways to “Transish”
You can insert iMovie’s transition effects one by one, placing them between scenes only where appropriate, and hand-tailoring each one. That’s the way you add transitions in most programs, including the old iMovie.
But lurking one millimeter beneath iMovie’s surface at all times is its primary mission: letting you assemble edited video fast, automating everything. For that reason, iMovie also lets you turn on automatic, global transitions (great for slideshows!). The following sections cover both hand-crafted and automatic transitions.
Create Individual Transitions
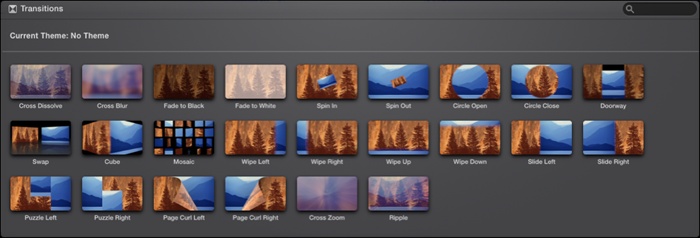
To see the 20 transitions iMovie offers, click Transitions in the Content Library (identified in Figure 7-2), found in your Libraries list. (Or just press ⌘-1.)
All the available transitions appear where your Event browser used to be. Skim over a transition’s icon (like Cross Dissolve) without clicking to see an animated preview of it in the Viewer. (This behavior is a little buggy in the current version of iMovie after you skim the first transition. It helps if you skim something in the storyboard and then come back to skim a transition.)
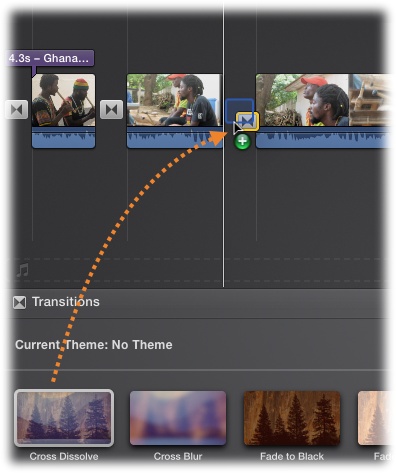
Once you find a good effect, drag its icon out of the Transitions panel and directly into the storyboard area, in the vertical gap between the two clips that you want transitioned. Figure 7-3 shows the technique. You can also insert a transition by double-clicking it. It appears in the gap closest to the storyboard playhead.
Tip
Most people think of putting transitions between two clips. But if you drag a transition to the beginning of your storyboard, the transition works just as well—except that it transitions out of blackness. Fade to Black and Circle Open work especially well at the start of a movie.
The same happy surprise awaits if you drag a transition to the end of a movie. iMovie wipes, fades, or ripples from the final shot into blackness.
Once you drop a transition in place, you can review the result.
To watch just the transition itself, click the transition’s icon in the storyboard (it sprouts a yellow border to show you’ve selected it) and then press the / key. That’s on the bottom row of the keyboard, and it always means “play the selection” in iMovie.
It’s a good idea to watch your transition by “rewinding” a few seconds into the preceding footage, to get a sense of the effect in the context of the existing footage. To watch the transition and the clips that it joins together, point to a spot just before the transition, and then hit the space bar.
If you think the scene seam looked better without the transition, choose Edit→Undo (⌘-Z).
You’ll discover that the audio from the clips on either side of a transition still plays—you hear the sounds overlapping for a moment—but iMovie gradually crossfades the two.
Tip
If you want transitions on most of your scene seams, turn on the Automatic Transitions feature described on Automatic Transitions. Then, using the Tip on that page, you can delete just the transitions you don’t want.
Change or Delete a Transition
If you like the idea of a transition but you just don’t like the one you put there, you can replace it in two ways:
Drag a different effect out of the Transitions panel and drop it right on top of the old one.
Highlight the transition in your storyboard and then, in the Transitions panel, double-click the replacement transition.
To get rid of a transition, even months or years later, highlight its icon and then press the Delete key. Your original clips return instantly, exactly as they were before you added the transition.
A Long Discussion of Transition Lengths
iMovie thinks that choosing a duration for each transition is a nuisance. Every transition you insert starts out at the same length—1 second for transitions found in the Content Library, 2 seconds for transitions added as part of a movie theme (see Custom Theme Transitions and Titles). But iMovie isn’t a complete tyrant; you can adjust the duration of transitions in three ways:
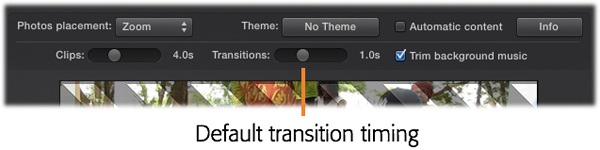
Change the duration of future transitions. This option involves a visit to the Viewer. Go to Window→Movie Properties (⌘-J), and then click Settings in the Viewer window. That unearths the Transitions slider (Figure 7-4), where you can change the duration of future transitions, to anywhere from 0.5 seconds to 2 seconds. So what happens to the transitions you already added to your movie? They retain the duration they had when you inserted them, whether that was iMovie’s default of 1 second or a custom duration you set using one of the methods discussed here. (If, for example, you set a custom duration using the Transitions slider, that duration remains in play until you select a new duration here, which will affect any transitions you add to the movie from this point forward.)
Change individual transitions. Fortunately for control freaks, you can change transition durations by simply double-clicking them. When you do, iMovie pops up a little balloon above your transition. Type in the new timing and click Apply. If you want more fine-grained control, you can also bring up the Precision Editor (The Precision Editor). It represents the current transition with a little pill-shaped icon and a dot at either end. Drag either dot sideways to make the transition longer or shorter. A balloon pops up with the durations as you make adjustments.
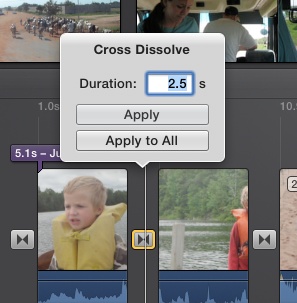
Change all transition durations at once. If you want to change all of your transitions to be a specific length, double-click on any transition in your timeline so the transition bubble appears (Figure 7-5). Type in the desired length, but this time, click Apply to All. iMovie sets all your transitions to that duration. (Well, hopefully—see the next section for exceptions.)
Note
If you manually set the duration of individual transitions in the Precision Editor, be careful. Using “Apply to All Transitions” wipes out all your handiwork.
The transitions Viewer window, as you can see, is a way to change all transitions to a certain style, too. Just choose an existing transition for reference and then click the “Apply to All Transitions” button to make them all that way.
Why You Don’t Always Get What You Want
Even after you master transition durations, you may find yourself thwarted by iMovie itself. For example, you might tell iMovie to make all your transitions 3 seconds long, only to find that one of them is only 2 seconds long. The problem lies with either the leading or trailing clip. If either is too short to accommodate your requested duration, iMovie steps in and gets as close as it can. Thus, iMovie enforces its own Law of Reasonable Durations, which states that no transition effect may consume more than an entire clip. It doesn’t take a genius to figure out why: A transition has to have enough video to transish.
Note
You can’t extend transitions into areas occupied by titles, either. You have to move or shorten the title (Add by Double-Clicking) to put a transition there.
How Transitions Affect the Length of Your Movie
As you can see by the example in Figure 7-6, transitions generally make your movie shorter. To transition from the end of one clip to the beginning of the next, iMovie has to overlay the two clips—pull each one into the transition, in other words—which shortens your movie.
Under most circumstances, there’s nothing wrong with that. After all, that’s why, when you insert your clips, you should avoid trimming off all the excess leader and trailer footage (known as trim handles) from the ends of your clips. By leaving trim handles on each clip—which you sacrifice to the transition—you give iMovie some fade-in and fade-out footage to play with.
Sometimes, however, having your overall project shortened is a serious problem, especially when you’ve been “cutting to sound,” that is, synchronizing your footage to an existing music track. Even if you use the snapping feature to edit your movie to the beats in a song (covered on Edit to the Beat), any transitions you add will throw off the timing.
In iMovie, there’s no good solution to this problem if you opt for manual control over transitions. (The automatic transition feature, which puts a transition between every scene in the entire movie, offers a semi-solution; see the next section.) Your best strategy is to plan ahead. Don’t fit your film to music until after you add all the transitions you want.
Automatic Transitions
If you’re really in a hurry to crank out your edited movie, like the now-legendary Apple programmer who wound up writing iMovie so he could whip out highlight reels without hand-tweaking everything, you’re in luck. You don’t have to bother placing transitions one at a time. Using the “Automatic content” feature, you can tell iMovie to put transitions between all your clips.
For themes (covered on Cross Zoom), this setting means iMovie will add transitions that match the theme—if you choose Neon, for example, iMovie’s transitions will be flashy. (If you choose No Theme, iMovie simply adds a nice cross-dissolve between clips.)
This feature is OK if all of this is true:
You want a transition between every clip in your movie (no simple cuts between scenes, in other words).
You want cross-dissolves as your transitions.
You set the duration to something short, like 1 second (because crossfades can get old fast).
You’re creating a highlight reel—a sequence of shots that aren’t intended to tell a story (simple cuts move a narrative along).
If you’re not careful, these frequent transitions can get annoying or cloying, and they’ll lose their impact in a hurry.
If you want all the transitions to be something else, you can change them all at once using the instructions on Why You Don’t Always Get What You Want. Just remember that this removes any customizing you did to individual transitions; all your adjustments get wiped away.
Tip
There is, however, a way to turn all of these automatic transitions into individual transitions that you can edit separately; see the section below.
Still interested? Then proceed like this:
Choose View→Movie Properties.
Alternatively, press ⌘-J. Either way, the Movie Information screen appears in the Viewer.
Click Settings.
Turn on “Automatic content.” From the pop-up menu, choose the transition you want.
Remember, this works only if you chose No Theme for your movie. (You can change that in the movie settings, too.) You also don’t get to choose the transition style, but the only one you’d ever use this much anyway is the Cross Dissolve. (Right?)
Now, if you add any new clips to your movie, iMovie adds your chosen transition to the end of them automatically.
Adjust Automatic Transitions
To make changes to all of these automatic transitions, use the steps described on Why You Don’t Always Get What You Want.
Turn Off Automatic Transitions
If you’re sick of the automatic transitions, just go back into your movie settings and uncheck the “Automatic content” box.
Transitions: The iMovie Catalog
iMovie gives you a choice of 20 transitions. Here’s a description of each, along with what editing circumstances might call for it. They’re listed in the same order they appear in iMovie.
Cross-Dissolve
The crossfade, or dissolve, is the world’s most popular transition. iMovie superimposes the end of the first clip over the beginning of the second one, making the image in the leading clip gradually disappear while the image in the trailing clip gradually fades in. If you must use a transition, you can’t go wrong with this one.
Tip
You can use a very short cross-dissolve to create what editors call a “soft cut.” When you think a scene change would occur too abruptly with a regular cut, use a 10-frame cross-dissolve, which makes the transition slightly smoother. Soft cuts are common in interviews, where the subject says the right thing, but not in the right order.
Cross Blur
Like an autofocus adjustment gone awry, the first clip gets blurry, only to have the focus return with the second clip now onscreen.
Fade to Black, Fade to White
Use Fade to Black at the beginning and end of every movie, for a handsome, professional fade in/fade out. (While Fade to Black at the beginning of a movie may seem like a contradiction, here’s where it works: Once the opening titles roll, insert a Fade to Black transition to signal the end of the credits and the start of the movie.) Or use Fade to Black at the start of any scene that begins in a new place or time. In that situation, the first scene fades to black momentarily, and then the next scene fades in (Figure 7-7).

Fade To White works the same way, with one big difference, of course: It fades out to, and then in from, white instead of black. Fading in and out to white lends a very specific feel to a movie: It indicates something ethereal, ghostly, or nostalgic. In today’s Hollywood movies (including The Sixth Sense), a fade to white often indicates that the character you’ve been watching has just died.
Fade to White is a popular technique in today’s TV commercials, when the advertiser wants to show you a series of charming, brightly colored images. By fading out to white between shots, the editor inserts the video equivalent of an ellipsis (…like this…) and keeps the mood happy and bright. (A fade-out to black would stop the flow with finality.)
Tip
If you’d rather fade to black and then hold the black onscreen for a moment, follow a Fade to Black transition with a black clip. See Import from the Finder for details.
Spin In, Spin Out
Did you see Superman 3? Where General Zod ends up in a floating jail cell that looks like a playing card flipping through space? Now you, too, can create that effect. Amaze your friends!
With Spin In, the second clip looks like a tilted card that straightens up and zooms into the middle of the screen, eventually filling the frame. Spin Out looks similar, but the first clip looks like a card zooming off, while the second one serves as a backdrop. Spin In trains your focus on the clip coming in, while Spin Out dwells on the departing clip.
Circle Open, Circle Close
This effect, called iris open, iris close or iris in, iris out in professional editing programs, is a holdover from the silent film era, when, in the days before zoom lenses, directors used the effect to highlight a detail in a scene.
It creates an ever-enlarging or narrowing porthole. In Circle Open, the second clip sits inside the expanding porthole, and it eventually takes over the frame. With Circle Close, the first clip dwindles to nothing, leaving the second clip full-frame (Figure 7-8). The effect is useful at the beginning or end of a movie, when the subject of the first clip is centered in the frame and the second clip is solid black. In that setup, the movie begins or ends with a picture that grows or shrinks. (If the subject in the center waves goodbye just before being blinked out of view, the trick is especially effective.)

Doorway
Here’s an effect that takes full advantage of the three-dimensional powers built into your Mac. The first clip splits in half, and the two halves swing open like double doors. The second clip then charges through the doors, filling the screen.
Swap
This transition leaves no doubt that you’re changing clips. Again harnessing your Mac’s ability to animate in 3D, the first clip slides backward and to the left, as the incoming clip slides in from the right, eventually filling the screen. Several of these transitions in a row would leave the impression of some sort of assembly line.
Cube
Another 3D effect, this one makes it look like your first clip is playing on the side of a box that suddenly makes a quarter-turn, revealing the second clip. The effect conveys a sense of different scenes from the same event.
Mosaic
Like an impatient game of Memory, iMovie breaks your first clip into a bunch of little cards, and then flips them all over to reveal the second clip. The flipped cards blend together to finish the effect.
Wipe Left, Wipe Right, Wipe Up, Wipe Down
In this transition, the outgoing clip slides offscreen to the left, right, or up or down, trailed by the second clip (Figure 7-9). The transition gives you the feeling of a change in time and place. If you’re a Star Wars fan, the Wipe will look familiar—George Lucas used it so much you’d think he owned the patent on it.

Slide Left, Slide Right
Just in case you want to make a convincing recreation of a vacation slideshow (back when people used manual slide projectors), this effect slides the new clip in on the heels of the old one—it’s basically the Wipe, but with sharper edges. You could use the Slide in a clever, self-aware documentary, where the host, who appears in the second clip, pushes his way onto the screen.
Puzzle Left, Puzzle Right
This transition is a mix of the Mosaic and Slide transitions. Your incoming clip slides on top of the outgoing one as three separate “puzzle” pieces coming from different directions. It’s fun and lighthearted, something you might use for a montage.
Page Curl Left, Page Curl Right
This slightly tacky transition makes the upper corner of the video frame appear to curl inward and toward you from the left or right, as though you were peeling a giant Post-it note off of a pad (Figure 7-10). The second clip is revealed underneath.

Cross Zoom
If you’ve ever jumped into hyperspace—and hey, who hasn’t?—this transition will look familiar. The first clip turns into a streaky tunnel, giving you the illusion of speeding through space, only to come out on the other end with the second clip showing. This transition emphasizes what’s at the end of the wormhole.
Ripple
The Ripple effect is gorgeous, poetic, beautiful—and hard to justify. It invokes the “drop of water on the surface of a pond” metaphor (Figure 7-11). As the ripple expands outward, it pushes the first clip (the pond surface) off the screen to make way for the second one (the expanding circular ripple). It’s a soothing, beautiful effect, but unless you’re making mascara commercials, it calls a little too much attention to itself for everyday home movies.

Themes
Themes are like fancy wrapping for your videos. They add professionally designed and animated transitions, titles, and soundtracks that run throughout your movie, usually including an opening-credit sequence, some special transition styles, and a closing-credit sequence. Best of all, iMovie sews them right into your movie, with all the cool artwork and animations included.
iMovie gives you a choice of 15 themes. They have names like Travel, Comic Book, Photo Album, and Scrapbook. Each one includes unique transitions, titles, and soundtracks, adding serious production value to your movies. The iReport, News, and Sports themes also offer some fun customizability.
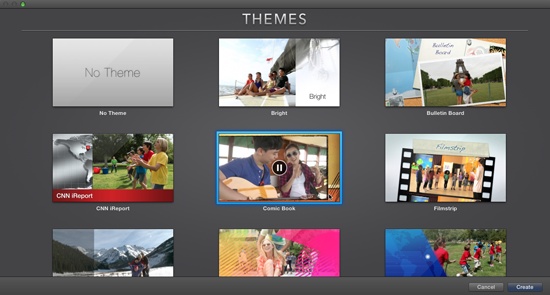
Choose a Theme
When you create a new project, iMovie asks you to apply a theme (happily for Type A’s, one option is No Theme). Choosing one opens the Themes window (Figure 7-12), where you can preview your choices with sample footage. That way, you get an idea of what your stuff will look like—or at least, what it would look like if your family and friends were professional models. Still, iMovie themes can make your footage look pretty great.
Once you select a theme, iMovie automatically adds transitions, titles, and a soundtrack to your project, and turns on the “Automatic content” checkbox in the Viewer (Automatic Transitions). From that point on, iMovie applies its theme magic to each new clip or picture you add to your storyboard. It mixes things up to avoid too many similar transitions in a row. Sometimes, for example, it uses stock transitions, like a simple cross-dissolve, while at others, it adds theme-specific transitions, like an animated photo album.
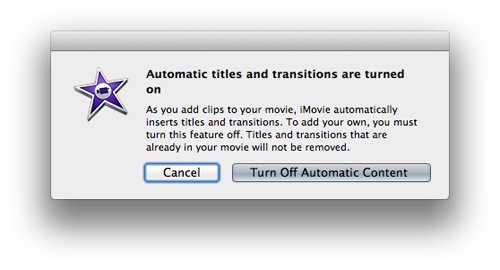
You can always override iMovie and add your own transitions, but the moment you do, iMovie warns you that you’ll be turning off automatic content (Figure 7-13). Then you’re back in manual mode. All the transitions already inserted will stay, but iMovie won’t add anything automatically anymore.
Note
You can avoid having to insert transitions individually by first letting iMovie do the work for you. Then, once all the transitions are in place, you can change them to your heart’s content.
If you turned off automatic content and then decide that you really were better off with iMovie in charge, go to Window→Movie Properties (⌘-J) and click Settings, where you can turn automatic content back on (just turn on the checkbox). iMovie begins anew, adding the custom elements for the theme you initially chose, with one exception: It preserves any custom transitions you added to your project.
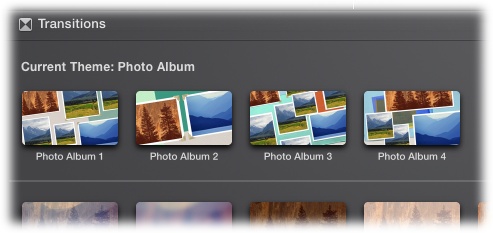
Custom Theme Transitions and Titles
If you choose a theme for your project, iMovie offers you transitions (and titles and soundtracks) available to that theme only, as shown in Figure 7-14. (If you chose No Theme, you don’t see these options at all.)
Tip
If you like having options but don’t want your movie dominated by a theme, go ahead and pick a theme—but turn off “Automatic content.” You can still add theme elements manually.
On the other hand, if you choose a theme, you’re locked out from the custom stuff available in the other 14 themes. (Maybe that’s for the best. Mixing themes could look pretty ugly anyway.)
Change a Theme
iMovie is very generous to the wishy-washy. Each theme has title, transition, and soundtrack elements that correspond precisely to those in the other themes. When you change to a different theme, iMovie just replaces elements from the old theme with the matching elements from the new one.
To change a theme, choose Window→Movie Properties (⌘-J) and click Settings. Then use the Theme drop-down menu to choose a new theme. Once you do, iMovie takes a moment to update all the corresponding elements. Everything else, like timing and the clips in the project, stays the same.
Adjust Theme Transitions
You can adjust a theme transition’s length the same way you adjust a regular transition’s length in the Precision Editor. Read more about that on The Precision Editor.
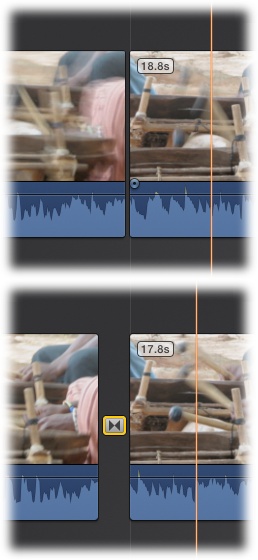
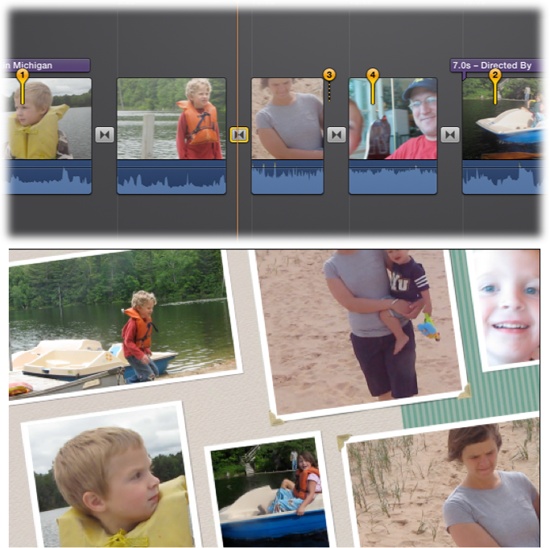
But one of the coolest things about themes is that they incorporate your pictures and video into the neat animations that go between clips. The animated photo album, for example, displays your video and photos as though they were actual photos in the album (Figure 7-15).

iMovie automatically chooses what clips go where in the animation, but you can have some influence on the outcome. (This may be especially useful if iMovie happened to choose the part of a clip where you’re shoveling birthday cake into your mouth.) To make a more dignified appearance in theme animations:
Click the animated transition you want to adjust.
When you click the theme transition that needs changing, orange numbers hover above various points in your storyboard. The numbers represent different frames in the animation (see Figure 7-16).
Drag the numbers where you want them.
As you drag the numbers to different points in your storyboard, iMovie updates the transition frames, displaying whatever image is under the corresponding number. This is how you change focus from your cake-stuffed face to your brother’s cake-stuffed face.
Preview your changes.
As with most editable iMovie elements, such as titles and photos, you can preview your changes by clicking
 in the Viewer.
Click away from the transition.
Your changes stick as you make them, so once you’re done, just carry on with editing the rest of your movie. iMovie displays the transition with the updated images.
Note
If you used themes way back in iMovie HD or iDVD, you know that those theme elements could use any photos and videos, even if they didn’t show up anywhere else in your project. Now iMovie isn’t so generous. Its themes point only to parts of photos or clips that actually appear in your storyboard. Anything that isn’t going to be shown full screen isn’t going into the theme transitions, either.
Customize Transitions That Are Maps
The CNN iReport, News, and Travel themes offer opening titles that show a map pinpointing a location on the globe. Obviously, this is meant to convey where the movie is taking place. That’s why you can customize it.
But first, in a typical example of Apple brilliance, the opening map may already be updated for you. If your footage was shot with a GPS-enabled device—like an iPhone—your clip may already be geotagged, or embedded with information about where the footage was taken. iMovie reads this data and updates the map, even with the name of the particular place (like Cascade Golf Course) instead of just the city. Pretty neat.
If you’re not lucky enough to have a geotagged clip, you can customize the map by double-clicking the title banner in your storyboard. The Viewer displays tools that help you make title changes (covered in Chapter 10), one of which is a little globe. That opens a window with a list of locations in it. Pick a location or, if it’s not listed, type one in. Now the map in your theme shows the right locale.
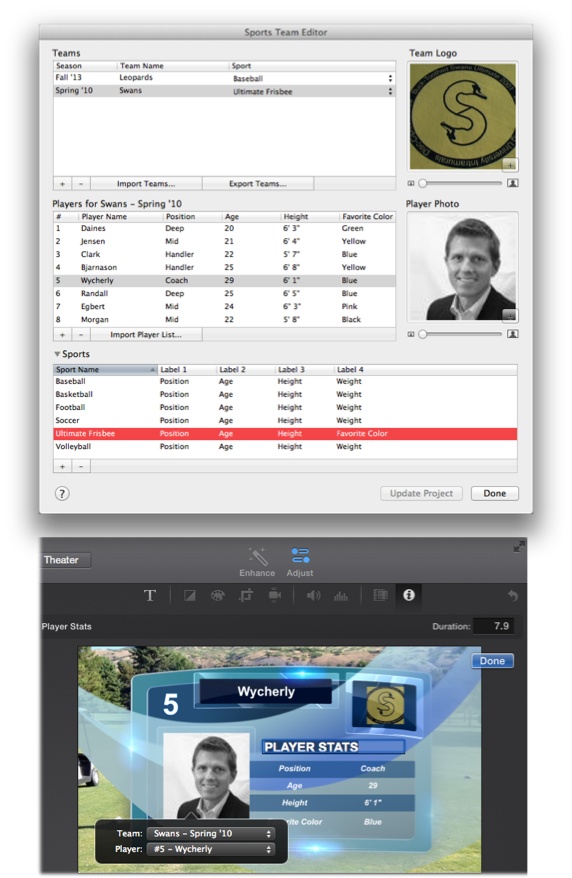
Customize the Sports Theme
If you’re using the Sports theme, you can take it a lot further than just a few neato transitions and titles. Apple devised a slick, professional theme for presenting your team to the world. It works by pulling players’ names and stats from a roster you build using the Sports Team Editor. Then, when you want to show a cool graphic highlighting a player during your movie, you just drag a title into your project and choose the player from the roster. Voilà! You’re making a highlight reel worthy of ESPN.
To build your team and put the Sports theme through its paces, follow these steps:
Open the Sports Team Editor by choosing Window→Sports Team Editor.
The handy window that appears prompts you for all the information you need to enter (Figure 7-17).
Create your team.
The top third of the Editor window lists all the teams you’ve created. iMovie already has one there to get you started. You can make changes to that one or create a new one by clicking the + button at the bottom of the list.
Tip
If your assistant coach has created a team roster in her copy of iMovie, she can export it using the Export Teams button under the teams list. This produces a file that she can email to you. Once you have it, import it using the Import Teams button. Now you have everything she’s already typed in. That’s what you call teamwork.
Customize your stats.
At the bottom of the Sports Team Editor window, click
 next to Sports, and you’ll see a list of
sports already entered into iMovie. You can customize the list
of sports, as well as the stats you see for each player. Notice
that you can set the stat categories to whatever you want, and
even specify your players’ favorite colors (Figure 7-17).
next to Sports, and you’ll see a list of
sports already entered into iMovie. You can customize the list
of sports, as well as the stats you see for each player. Notice
that you can set the stat categories to whatever you want, and
even specify your players’ favorite colors (Figure 7-17).Add players to your roster.
In the middle of the Editor, start adding players by clicking the + button. iMovie creates a new player form so you can fill in the details. iMovie fills out the number field automatically, but be sure to change it to the player’s jersey number.
Add the Sports theme graphics to your project.
All your work in the Editor pays off when you start adding player graphics to your project. These come in the form of titles, which you can read about in detail on Add Titles. A customized player graphic/title looks like the one you see in Figure 7-17.
Note
You can customize some of the Sports theme elements with
things like a game score or two teams facing off. If you find you
can’t edit them with the titles tool (Add Titles), click the ![]() tool instead. Then, when you click the
scores or the team names in the Viewer, you can change
them.
tool instead. Then, when you click the
scores or the team names in the Viewer, you can change
them.
A movie with these awesome Sports theme graphics will get the other players/parents wondering how much you paid to have it professionally edited. You can just tell them you know a guy at ESPN and they won’t have any reason to doubt you.
Remove a Theme
You may come to realize that a particular project is worse off with a theme applied to it. If so, choose Window→Movie Properties (⌘-J), click Settings, and then click the Theme drop-down menu, which opens the Themes window, where you choose No Theme. iMovie sweeps away all the theme-related titles and transitions, leaving you with a decidedly less theme-y project. (Non-theme transitions, like cross dissolves, survive iMovie’s sweep.)
Travel Maps
Just in case you didn’t get the memo, here’s some big news: iMovie loves travel footage. Maybe Apple did some rigorous focus-group research, or maybe the Apple programmer behind iMovie just loves to tour the world. (He does.) Whatever the reason, if you travel, iMovie has a special place in its heart for you.
Travel Maps are the grandest token of iMovie’s travel-love. These are animated maps that take viewers from Point A to Point B with a snaking, animated red line across a map or a globe, à la the Indiana Jones movies. They’re great for conveying your itinerary in a quick, visually compelling way. Although you might think of them as transitions—after all, they fill the space between things (in this case, places), much as transitions do—iMovie doesn’t think of them that way. To iMovie, they’re specialized video clips.
Add a Travel Map
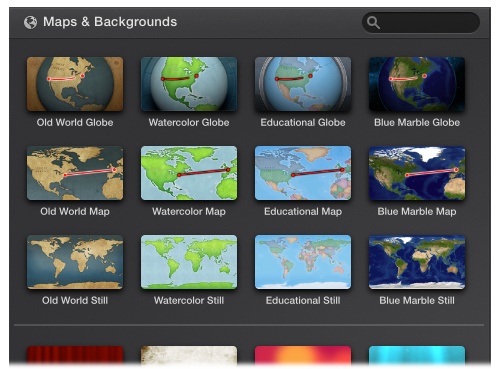
In the Content Library list, click Maps & Backgrounds (or press ⌘-3) to show the pane with all the maps (see Figure 7-18). You see eight animated map options at the top of the list: a globe version and a flat version of four different map styles. You also see non-animated versions of each map that you can stick in your project as images. Scrolling down, you find a bunch of images that look nothing like maps (hence the “Backgrounds” part). Backgrounds are just pictures that you can use as backgrounds for titles, for example.
Adding an animated travel map to your project is a matter of dragging one of the eight icons into your project, just as you would a transition or a video clip. iMovie generates a specialized video clip you can now customize.
Change Travel Points
After you drag a map icon into your project, you’ll probably need to make changes to it. Highlight the map clip and then click the Adjust tool. The Viewer reveals a custom tool for editing maps.
That’s fortunate, because your first order of business is to change the endpoints of your new animated map. After all, showing your dramatic flight from Topeka to Tangiers is why you’re putting this thing into your movie to begin with. You can choose your departure and destination points from a list of hundreds of preset locations (Figure 7-19).

To change a location, click the San Francisco button (or whatever it says next to Start Location). iMovie reveals a huge list of cities and airports. You can winnow the list down by typing a destination’s name into the box at the top of the window. Click to highlight the desired location, and then click Done.
Repeat the process for the End Location so the red line knows where to go.
If the location you need isn’t in the list, choose the one closest by and then type a custom name in the text box at the bottom of the little location chooser.
Tip
If the list doesn’t offer the location you want, you can type in the decimal coordinates (for example, 44.768056, -85.622222 points to Traverse City, MI). You can get these coordinates at www.itouchmap.com/latlong.html. Then just edit the “Name to display” text at the bottom of the Inspector window.
Change a Map’s Style
If you started with a globe map and decide you prefer a flat one, or if you started with the Educational Map and like the Watercolor Map better, you can easily change it. Just drag a new map from the Maps & Backgrounds pane onto the map you want to replace. iMovie preserves locations and the length of the animation.
Tip
Because iMovie treats travel maps like clips, you can apply most video effects to a map as well. You might do this to match a map’s style to the rest of your video, for example. Read all about video effects in Chapter 8.
If you chose a Globe map, you can find extra options in the Viewer; click the map and then the Adjust tool in the toolbar. By clicking the Style button you can change between the four map styles and even zoom in on the globe by checking the Zoom In box. You can also hide the destination names or the red travel line connecting the points, just by turning off the corresponding checkbox.
Change a Map’s Timing
If a map’s animation is too slow or too fast, you can adjust it by simply dragging the ends of it in the storyboard, or by dragging it around in the Precision Editor. iMovie helpfully shows you how much time you’re adding to or subtracting from it.