
Chapter 15. Share via Email and the Web
If you ask Apple, the DVD has had its day in the sun. Today, the real action is on the Web, that billion-seat megaplex where unknown independent filmmakers get noticed, and where it doesn’t cost a penny to distribute your work.
Email is a distribution option for short movies, but hardly a way to showcase your 1080p feature-length film. For that, you need to turn to online video-sharing services like YouTube. People watch six billion hours of YouTube videos every month. Facebook is no slouch, either. Its video-hosting tools help you quickly share your movie with your closest (or remotest) friends. And for projects that need a certain sophistication, try the classy site Vimeo. Even professional filmmakers use it as a video outlet, so you’d be in good company.
Fancy yourself a witness to history? Do some citizen reporting and post your movies to CNN’s iReport website, where one of the CNN networks might pick up your footage and broadcast it to the world. Or, what the heck: Post videos to your own website and share it there.
This chapter covers all the ways to distribute your opus via the Web. And if you disagree with Apple’s take on DVDs and prefer the ease and simplicity of sharing that way, take a trip to Chapter 16.
First, a Word About Sharing Raw Footage
If you’ve ever dusted off a tape camcorder or a DVD video camera full of raw footage from old home movies, you’ve probably had a lot of fun reveling in the memories—seeing, for example, what the kids used to look and sound like. Odds are that other people—like your grown kids and their grandparents—would enjoy seeing those clips, too. In short, you want to be able to share old footage.
Since iMovie debuted, the only way to do that was by creating a movie—you couldn’t share clips straight from the Event browser. Unfortunately, the only way to distribute old footage is by creating a movie project. You can’t share raw, unedited clips straight from the Event browser. Luckily, the process takes just a few steps, as described in Chapter 5.
Tip
Be considerate when you share old footage. Even simple edits, like deleting shaky shots, can make a world of difference in watchability. Whatever you do, don’t be that guy, the one who makes people sit through hours of boring shots of your vacation. Read up on the advice in Chapter 9 for simple tricks to improve your movies.
Share via Email
As noted, email isn’t the ideal way to send movies, because they tend to be big, and your Internet service provider can limit the size of email attachments (in which case it won’t deliver your file). The exception is small movies, though even there you’ll have to dial down the dimensions—what you gain in convenience, you give up in quality.
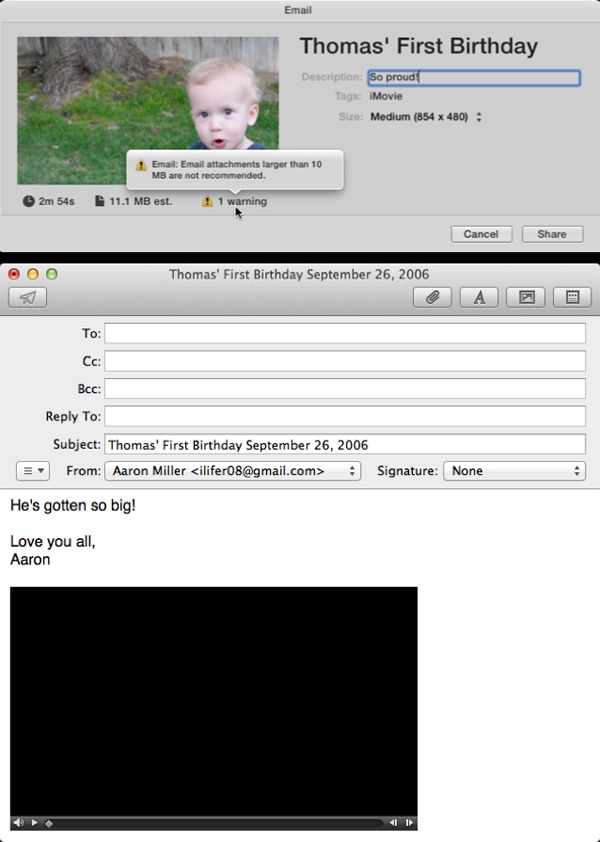
To send a movie by email, click the Share icon in the iMovie toolbar, and then choose Email from the drop-down menu (or choose File→Share→Email). iMovie displays a dialog box like the one in Figure 15-1, top. It includes a thumbnail of your movie, and, underneath that, the movie’s duration (2:54, for example, for 2 minutes, 54 seconds). You can edit your movie’s title, description, and tags by clicking once in the text boxes. (Oddly, the original title shows up in your email’s subject line when you send the file.)
You can change the video’s dimensions, too, and therefore its file size, using the drop-down Size menu. iMovie offers three less-than-hi-def options for movies you want to email:
Small (428 x 240 pixels)
Medium (854 x 480)
Large (960 x 540)
When you select a dimension, iMovie displays the resulting file size under the thumbnail. Notice that when you choose a size that results in a file larger than 10 MB, iMovie warns you to reconsider. That’s because the file will take a long time to transmit, and your email system may not let you send that big an attachment.
Once iMovie generates an email version of your project, it automatically opens your Mac’s Mail application and attaches the video to a message (Figure 15-1), though the description and tags are nowhere to be found. Enter the recipients’ addresses, type a personal word or two, and send away.
Note
If you use a Web-based email service like Gmail, the Share→Email option doesn’t work. For Web-based email accounts, you have to save your movie as a file (see File Exports) and then attach it to a mail message yourself.
Share to YouTube
By far the easiest way to share your movies on the Internet is through YouTube.
YouTube is, of course, the insanely popular video-sharing website, filled to the brim with hundreds of millions of funny home videos, TV excerpts, amateur short films, memorable bloopers—and now your iMovie projects. Once you post a movie, other people can find it in many ways: by typing in its web address, by searching for your name, or by searching for keywords (called tags) you list in the video’s description.
The first thing you need in order to post to YouTube is a YouTube account (it’s free). To get one, visit www.youtube.com/signup and fill in the blanks. If you have a Gmail account, you can use that login information to sign in to YouTube. One signed into YouTube, be sure to click the Upload button at the top of the page and follow the brief instructions to create a channel for all your videos.
Post to YouTube
Once your movie is ready for the masses:
Choose the Share icon from iMovie’s toolbar, and then select YouTube.
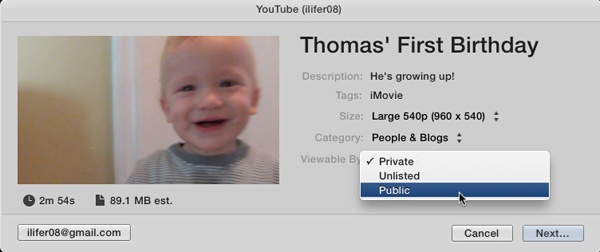
A dialog box appears. The first time you post, it looks like the one in Figure 15-2.
Click Sign In and, in the box that pops up, enter your YouTube username and password. Then click OK.
You need to sign into your account so the edits you make in the dialog box get transferred over to YouTube. Turn on the “Remember this password in my keychain” checkbox so you don’t have to type in your username and password the next time you share.
Edit the placeholder text for your movie’s name, description, and tags (keywords) (see Figure 15-2).
Click the text once to edit it. iMovie transfers this info when you post your movie to YouTube—it appears right under your posted movie.
Specify what size you want the movie to be.
You can upload any of the four size movies iMovie offers: SD 480p, Large 540p, HD 720p, or HD 1080p (assuming your source video even has that much resolution). Generally, you should go big. YouTube automatically scales down your video for people with slower Internet connections. In fact, the only reason not to go big is if your Internet connection is too slow to upload a large movie.
Choose who can see the movie.
Most people make their YouTube movies available to the entire Internet, but you have three options: Private, Unlisted, and Public. If you make a movie private, nobody will see it unless you invite them from YouTube’s video settings page. If you make it unlisted, people can see it only if you send them the movie’s web address (which YouTube gives you). If you don’t care who sees your video and you want to invite the whole world to the party, choose Public.
Click Next.
A dialog box appears reminding you that it’s naughty to upload TV shows, movies, or anything else that’s copyrighted.
Click Publish.
iMovie springs into action, compressing and uploading your video. This part can take awhile. You can check its progress by clicking the blue circle in the top-right corner of the iMovie window. Feel free to check your email while iMovie crunches away.
Once iMovie finishes, you’ll see a message like the one in Figure 15-3.
Click Visit to watch and share your movie.
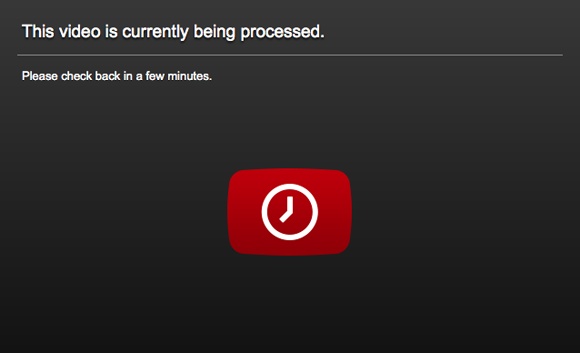
Your uploaded video isn’t available right away. YouTube needs a little time to process it. (You’ll see a message like the one in Figure 15-4.) Before long, though, your movie will join the millions of others. If you close your browser and want to see the movie later, visit http://www.youtube.com/my_videos.

After the YouTube Movie Is Up
Once you post a video to YouTube, you can tell others about it simply by sharing the web address, which you find in the Video URL box beside your movie.
You can manage your videos—rename, annotate, or remove them—by visiting the Video Manager page at http://www.youtube.com/my_videos (Figure 15-5).
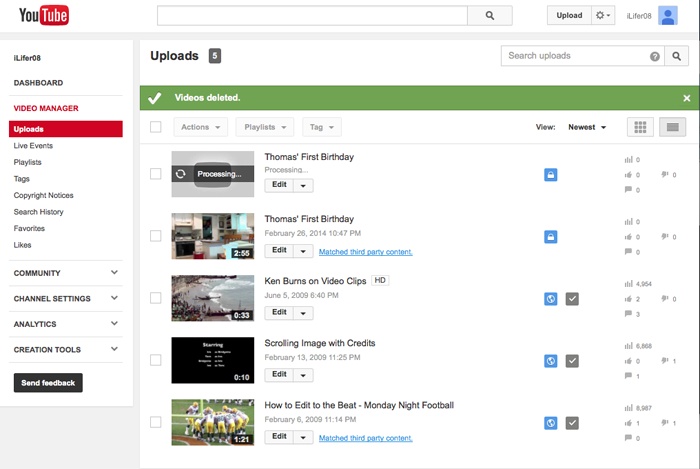
If you realize you made a mistake in an uploaded movie, you can delete it from YouTube and upload a new one. You can even upload the same movie multiple times, so don’t count on iMovie or YouTube to detect duplicates for you.
Share to Facebook
More than a billion people use Facebook every month. With that many members, the odds are pretty good that someone (everyone) you know has a Facebook account—probably one that’s checked frequently. For that reason, Facebook is a no-brainer when you want to share your videos with friends and family. It even plays HD videos, so your work can look its best.
Post to Facebook
When you choose Share→Facebook for your project, iMovie displays the screen in Figure 15-6. The steps for uploading to Facebook are basically the same as they are for YouTube and the sites mentioned on the following pages: Enter your account information, type in a movie title, description, and tags, and then choose a video quality.
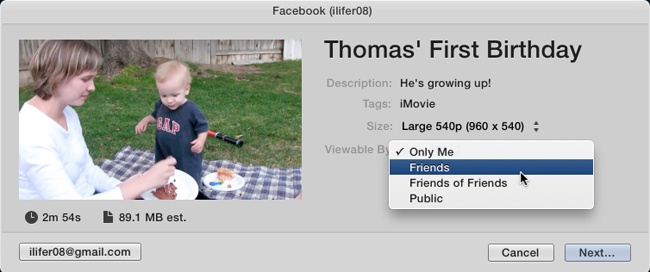
Facebook lets you choose who can see your movie, too (Figure 15-6). You can make it an entirely private affair (click Only Me), share it with friends, friends of friends, or the whole world (Public). If you change your mind later, go to your Facebook timeline to find your video and then edit the sharing settings that appear when you click Edit This Video.
Facebook takes a few minutes to process your video before you can view it. As you’re probably aware, Facebook offers plenty of other ways to spend your time while you wait.
After the Facebook Movie Is Up
Publishing your video creates a copy of it on Facebook. To delete it, go to your Facebook video page (see the previous instructions) and click Delete Video.
Share to Vimeo
If YouTube is the McDonald’s of online video—ubiquitous, but full of “fast-food” movies—Vimeo is the Whole Foods, directed at those with a more refined palate. It’s still a video-sharing website, but the videos posted there tend to be of higher production values. The site also shies away from the cluttered look you find on YouTube. For this reason, people who are picky about how their videos look online tend to turn to Vimeo.
If you’re the Vimeo type, you can create a free account at http://vimeo.com/join. (You can also sign up for a Plus account, which, for $10 a month, gives you a bunch of additional benefits, like higher upload limits and more control over how your videos appear to viewers.)
Upload to Vimeo
Choose Share→Vimeo to upload your video. The Vimeo publishing screen (Figure 15-7) has the same Sign In button you saw on the YouTube screen.
As usual, be sure to enter a good description and tags so people searching the Internet will have more luck finding your video, and you can upload movies with resolutions of up to 1080p.
Vimeo offers several ways to limit who sees your movie, the most interesting being “Anyone with Password.” Enter a password in the box provided, and only the people you send the code to can watch your movie.

When you finish filling in the dialog box, click Next to get the same copyright warning/scolding you see when you upload to YouTube. iMovie processes and uploads your video, displaying a confirmation message when it’s done.
Share to CNN iReport
Now that almost everyone carries around a smartphone, laptop, or camera, the big news agencies are wising up to the power of citizen journalism. These days, the first video you see of a natural or celebrity disaster usually comes from the Man on the Street™.
If the idea of citizen reporting excites you, make sure to take advantage of the convenience iMovie offers in sending your reports straight to CNN’s iReport website (http://ireport.cnn.com/).
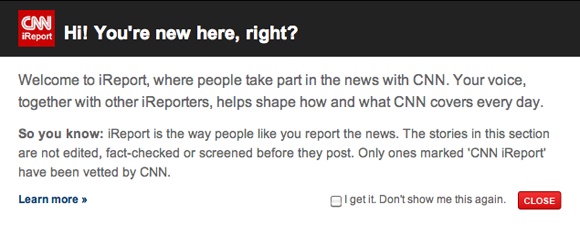
iReport is CNN’s system of publishing video news from ordinary people like you. (Some of the photos and videos even make it onto CNN’s TV broadcasts.) The first time you visit the site, it gives you a brief explanation of how it all works (Figure 15-8). Follow the link in the top-right corner to create an account and get started.
Tip
Once you create a CNN account, you’ll notice that CNN regularly sends out “assignments” to you, the citizen reporter. Obviously, if your goal is to be seen on TV, your chances of success go up if you file reports meeting these assignments.
Upload to iReport
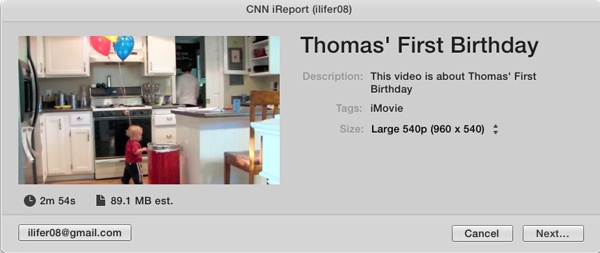
When you have your Pulitzer Prize-worthy report ready to go, choose Share→CNN iReport in iMovie and then select a resolution from the Size menu (Figure 15-9). CNN doesn’t offer any tag or description fields, but you can add that info on the iReport website. Click the Sign In button and enter your iReport account vitals (email address and password).
Unlike YouTube, Vimeo, and Facebook, iReport doesn’t let you limit who can see your video. Everything you upload is public, viewable by anyone. (iReport is for public reporting, after all, not private video sharing among friends.)
Once you upload your report, you can see it online and tell friends about it. If you try to watch your report right away, you might see a message telling you that CNN’s servers are still processing the video.
Share to Your Own Web Page
If you’re a savvy, webmastery kind of person, you can design a website and then post your videos without any help from iMovie.
Post a Movie on Your Own Site
To post a movie to your site, export a file version of it from iMovie (File Exports) and then upload it to your site’s hosting service. You can embed any movie into your web page by writing the necessary HTML, and every modern browser can play back your movie natively.
This isn’t really a book about building websites, but to get you started, you can download a free PDF appendix to this chapter called “Movies on Custom Websites.” You can find it on this book’s Missing CD page at http://oreilly.com/missingmanuals/cds/imovie2014/. It provides the HTML code you need to post a movie on your web page, make it pop up in a window or play embedded in the page, and other advanced topics.
Post to Blogging Services
Every major blogging service (Tumblr, Blogger, and the like) offers a simple way to embed YouTube videos in your blog. It’s easy and requires no knowledge of web programming. You can get the code you need to add to your blog from your video’s page on YouTube.
Vimeo also offers the custom code you need to embed a movie you uploaded there in your blog.