
Chapter 16. Share to the iPhone, iPad, iPod Touch, Apple TV, and iDVD
In case you haven’t noticed, Apple thinks that one of the classic destinations for your home movies—DVDs—is ancient history. What Apple really wants you to do with your videos is post them to the Web (see Chapter 15) or transfer them to another Apple device, like an iPad, iPhone, iPod Touch, or Apple TV.
The bulk of this chapter covers those latter options: sending your finished masterpiece to another fine piece of Apple merchandise.
But if you’re a DVD holdout—and you have iDVD on your Mac from an earlier version of iMovie (see iDVD)—you’ll learn how to save your movies old school, out of iMovie, into iDVD, and, finally, onto DVD.
Sharing Basics
To share a video in iMovie, click the Share icon in iMovie’s toolbar, or choose File→Share. iMovie displays a list of destinations (iMovie Theater, Email, iTunes, and so on). When you select one, iMovie gets to work sewing up your film in a format suited to its eventual home. The details of sharing for each destination are in the following sections.
iMovie Theater
Until this version of iMovie, sharing your project to an iDevice required a trip to iTunes, which added an extra and cumbersome step to the whole sharing process. In recent years, however, Apple has replaced iTunes as the interim medium with one that’s much more convenient—iCloud, Apple’s online storage locker. You can wirelessly tap into files saved “in the cloud” from any Apple gadget. For example, with an iCloud account, you can add a friend to your Contacts list on your iPhone and she will show up on your iPad’s Contacts list, too.
Now iMovie is up with the times. With the iMovie app installed on your iDevice, a movie you share to iMovie Theater (iMovie’s full-size playback screen) gets synced with your iCloud account and shows up on all your Apple devices. iMovie Theater is the simplest way to share a movie with people who have an Apple gadget, whether that device is an iPad, iPhone, iPod Touch, or Apple TV.
iCloud
For iMovie Theater to work, you need two things: the iMovie app installed on your device and an iCloud account.
To get iMovie for an iPhone, iPad, or iPod Touch, head over to the App Store, type “iMovie” into the search box, and get ready to shell out $4.99, unless you bought your iDevice after September 2013, in which case it’s free. Once you have the app installed, you watch your movies through iMovie Theater, the playback portion of the iMovie app. If you own an Apple TV, iMovie Theater is already installed.
iCloud accounts are free, and you’re invited to create one anytime you set up a new piece of Apple hardware. (This same account gives you cool features like the Find My iPhone device-location app, an iCloud email account, and the PhotoStream image-sharing service.) Point is, you probably already have an iCloud account.
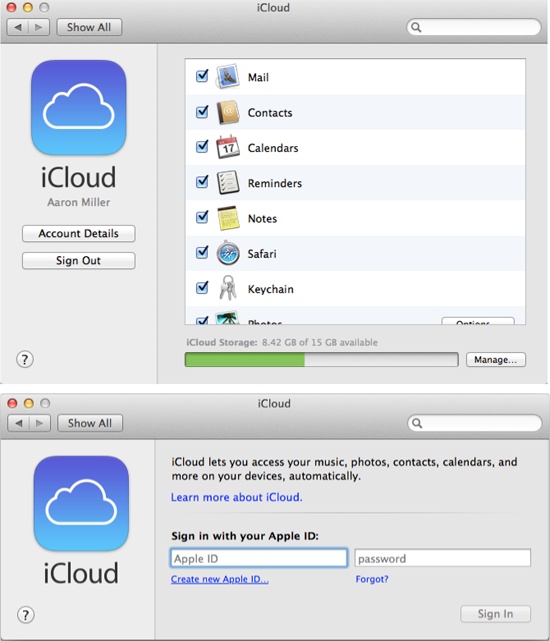
If not, or if you’re not sure, go to the Apple menu on your
Mac and choose System Preferences (![]() →System Preferences). In the window that
appears, choose iCloud.
→System Preferences). In the window that
appears, choose iCloud.
If you see a window like the one in Figure 16-1 (top), you’re good to go. If not, you need to create an iCloud account by signing in with your Apple ID and password, which you probably established when you set up your Apple device for the first time. (If you skipped that step during setup, click “Create new Apple ID” and follow the instructions.)
Because iMovie Theater stores your videos in iCloud, you need to be able to tap into the cloud from your iDevice, too. To set up iCloud there, open Settings→iCloud. If you see a screen like the one in Figure 16-1 (bottom), you have everything you need. If not, you either need to log in with your Apple ID and password, or you have to click “Create new Apple ID” and follow the instructions. When you finish, you’ll have iCloud up and running on your gadget.
Share to iMovie Theater
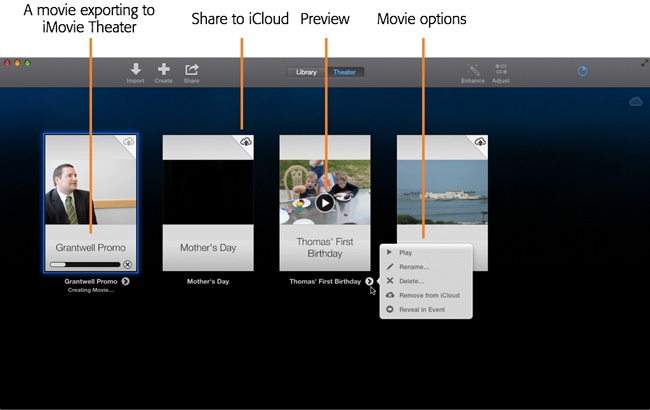
With your iCloud account sorted out, sharing to iMovie Theater, and then to iCloud itself, couldn’t be easier. First, make sure iMovie automatically uploads your movies to iCloud. Go to iMovie→Preferences in iMovie’s menu bar and make sure “Automatically upload content to iCloud” is turned on. Then, with a project open in iMovie, click Share→Theater in iMovie’s toolbar (or press ⌘-E, or choose File→Share→Theater). iMovie opens the iMovie Theater window (Figure 16-2) and exports your movie. (If you don’t have “Automatically upload content to iCloud” turned on, you can export movies to iCloud individually by clicking the cloud icon in the top-right corner of an exported movie.)
To view your movie on an iPad, iPhone, or iPod Touch, open the iMovie app and choose Theater from the menu bar at the top of the screen. The movie you shared to iCloud appears as a thumbnail on the next screen.
Tapping the > button on the thumbnail gives you options for managing your video (Figure 16-2); they include a way to preview the movie now, and to download it now from iCloud so you can share or watch it when your device is offline.
If you have an Apple TV, select the iMovie Theater icon from the menu, and you’ll see thumbnails for all the movies you shared to iCloud.
Share to iTunes
If you don’t use iMovie Theater to share your films on Apple gadgets, iTunes is the next-best option. iTunes, like iCloud, lets you sync information to an iDevice, but this time you share files stored in iTunes’ libraries (Music, Movies, Books, and so on), and you share them one at a time to a single, connected device.
Just as with iMovie Theater, the first step in sharing a movie is to export it. This time, however, you share to iTunes.
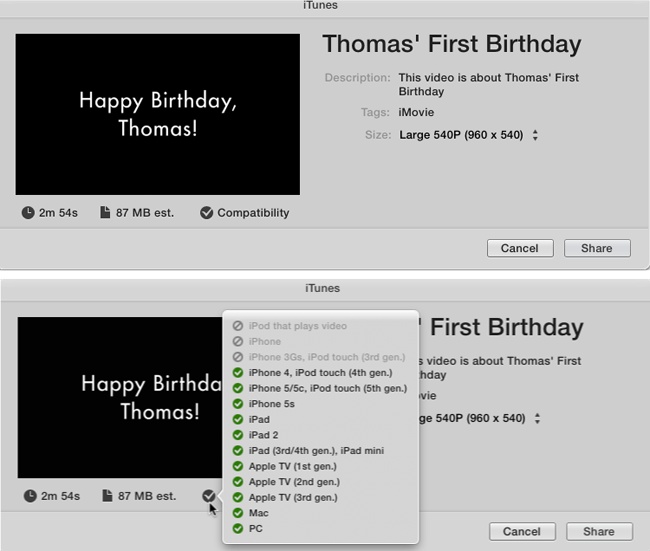
When your project is ready for prime time, click Share→iTunes in the iMovie toolbar.
iMovie launches the iTunes dialog box (Figure 16-3). You can skim your mouse over the preview window to make sure your movie looks right. Although you’ll see an active Share button, don’t click it just yet.
Mouse over the
 button below the
movie thumbnail.
button below the
movie thumbnail.You’ve probably never seen an information box quite like this. Since different Apple gadgets have different maximum screen sizes, iMovie offers to export your movie at a size tailored to your device (Figure 16-3, bottom).
Tip
In any of the various Share windows that appear when sharing from iMovie, the little preview is not a mere static image, but a skimmable version of your movie.
Figure 16-3. Top: The Size drop-down menu offers standard compression settings for your movie, the same as the options for all the Web-sharing outlets like YouTube (page 248). Be sure to choose a size that will play on your target devices. Bottom: Once you pick a size, hover over the checkmark to see a list of the devices that can play back that format.For example, the iPhone 4 can handle an HD 720p movie, while the iPhone 5s can manage an HD 1080p film. The same difference applies to second- and third-generation Apple TVs. Point to the checkmark without clicking to see the devices compatible with the format you chose (Figure 16-3, bottom).
Click Share.
iMovie begins the time-consuming process of compressing and exporting your video. If your movie is long, feel free to switch to other programs—check your email or surf the Web, for example—while iMovie crunches away. A blue “progress” circle in the top-right corner of the iMovie window gives you an idea of how long the export will take. Click it to get a specific amount of time or to cancel the export.
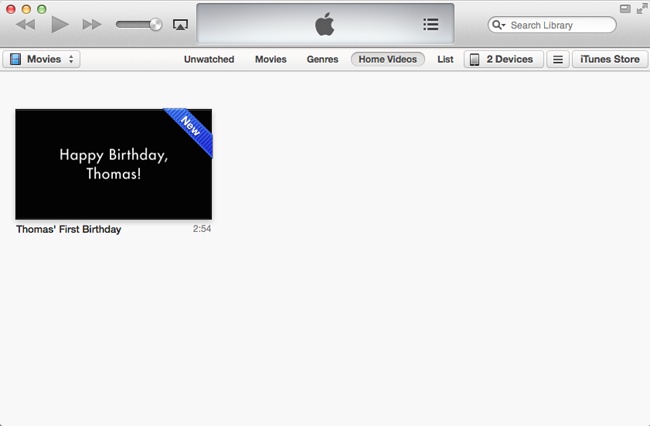
When it’s all over, iTunes opens by itself. If you click the Movies folder, you’ll see your newly exported movies in the Home Videos section (Figure 16-4).
From iTunes to iPad, iPhone, iPod Touch, or Apple TV
Once you have your movie in iTunes, getting it onto your iPad, iPhone, iPod Touch, or Apple TV works just like it always does:
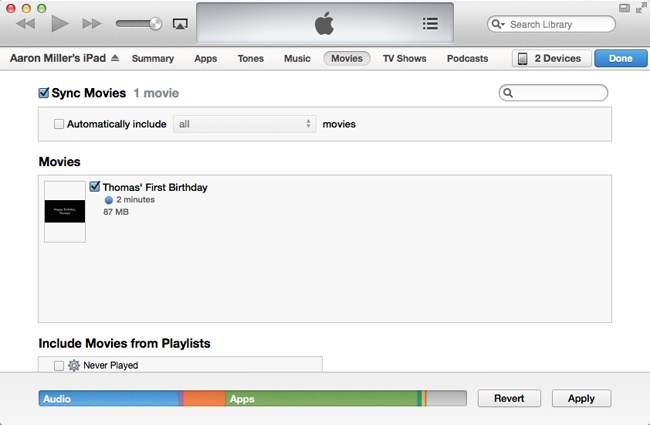
iPad, iPhone, iPod Touch. Connect the gadget to your Mac. Its icon shows up under Devices in the left column of the iTunes window. Select your device, click the Movies tab, select the movie you want iTunes to copy over to your gadget, and then click Apply or Sync (Figure 16-5).
Apple TV. To play your exported movie on an Apple TV, you need to turn on Home Sharing in iTunes. That lets your Apple TV play items from your iTunes library (which sits on your Mac, hence the need for Home Sharing).
In iTunes, choose File→Home Sharing→Turn On Home Sharing. On the Apple TV, choose Settings→Computers and then turn on the feature there.
With Home Sharing turned on, choose Computers from the Apple TV app icons and you’ll see your Mac’s iTunes libraries listed. (Be sure that iTunes is running on your Mac.) There you can browse everything in iTunes, including the Home Videos folder, where your exported movie lives.
File Exports
There are plenty of non-Apple devices in the world, and sharing your movies to them requires you to export your movie as a file. You end up with a movie file on your Mac that you can copy to your destination.
Note
The files you export will probably be big, so copying them will probably take some time. It also requires you to connect the destination device to your Mac somehow. If either of these is a problem, consider just sharing your movie to the Web using any of the options explained in Chapter 15.
Choose Share→File to see an export box like the one in Figure 16-3. Use the size menu to change the quality of your movie (which also affects its file size and conversion time). iMovie displays how big the resulting file will be under the skimmable preview of your movie.
When you click Next, iMovie asks you to name the file and pick a destination. Once you do, click Save and iMovie goes to work. The top-right corner of the iMovie window displays a blue progress circle; click it to see exactly how much longer the export will take. Eventually, iMovie notifies you that it’s finished and you’ll find the movie file in your selected destination. As an added touch, QuickTime opens the file automatically so you can play your movie right away.
iDVD
As a company, Apple has always been forward-thinking, but that also means that it usually abandons the status quo before everyone else does. So even though Apple has moved on from the DVD player, not everyone has. After all, players are inexpensive and Red Box rental kiosks are widespread. In fact, DVDs are still the most common way people watch movies. More importantly, many of your loved ones probably still use DVD players.
Once upon a time, iMovie came with a companion program called iDVD that let you save your movies to DVD. That option is long gone now, but that doesn’t mean you can’t use iDVD with your current iMovie projects. In fact, it’s still pretty simple to burn your movies to DVD and then share them.
To do that, you have to have iDVD on your Mac. You may, if you’ve used an older version of iMovie. But you can’t download iDVD from the App Store: Apple simply doesn’t offer it.
But you can still get iDVD, by buying an older version of iLife, the software suite that included iMovie and iDVD. Look for iLife on sites like Amazon.com and eBay. Any version from ’08 to ’11 includes the most recent version of iDVD.
Of course, you also need a DVD burner in your Mac. Newer laptop models, like the Retina MacBook Pros and the MacBook Air, don’t have one. If that’s the case for you, you need to buy an external burner. Apple sells one for $79 that works just fine.
To burn your iMovie project to DVD, follow these steps:
Export your movie as a file.
Follow the instructions in the previous section. Be sure to remember where you saved the file, because you’ll need to drag it into iDVD.
Open iDVD and create a new project (File→New or ⌘-N).
When you start a new project, iDVD asks you to choose a name and destination for it. You also need to choose between the Standard and Widescreen DVD format. That setting won’t change the format of your actual movie, it just changes the look of the DVD menus. Choose a format that matches the dimensions of your TV.
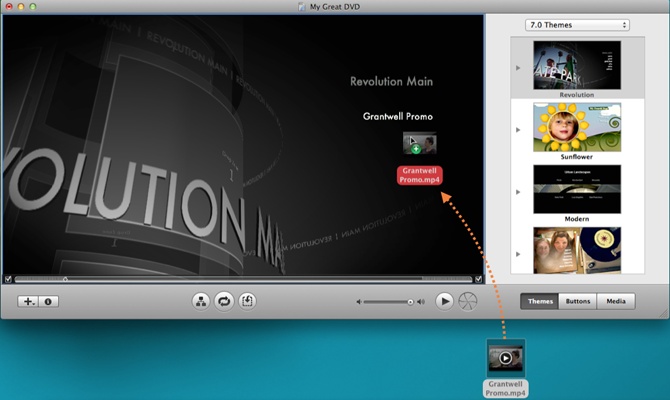
Drag your movie file from the Finder into the iDVD window.
iDVD creates a menu with a single item on it, labeled with your movie’s file name. After you burn the DVD, this will be the menu item people choose to play the movie (Figure 16-6).
Customize your menu and then burn the DVD.
You can change all kinds of things about your DVD menus and settings. The most popular edit is to choose a theme from among the dozens Apple offers. Once your DVD menu looks right, choose File→Burn DVD (⌘-R) and then follow the instructions iDVD gives you. Behind the scenes, iDVD converts your movie file to DVD format. Wait until iDVD burns the disc, and your DVD is ready to go.
Note
If you’d like to dive into your old copy of iDVD in more detail, a free PDF appendix to this chapter called “iDVD: The Missing Manual” awaits you on this book’s Missing CD page at http://oreilly.com/missingmanuals/cds/imovie2014/.