Chapter 19. iMovie for iOS Projects
Now that you have some video to work with, you can start a new movie project or trailer. This chapter deals with the basics of editing a movie, though many of the same processes apply to trailers, too. If you’re set on making a trailer as your first project, review this chapter and then head over to Chapter 23.
Create a New Movie
When you open iMovie, you see a toolbar with three options: Video, Projects, and Theater. Chapter 18 describes the Video Browser; Chapter 24 covers iMovie Theater. For now, pay attention to the Projects link (Figure 19-1).
To create your first movie, click Projects. That takes you to a screen that says “Tap + to start a new movie or trailer.” Do that and then choose Movie from the next screen.
Pick a Theme
Once you choose Movie, iMovie opens a theme screen so you can choose from the eight offered. The theme you choose will determine which titles, transitions, and other elements your movie uses.
Tip
Themes in iMovie for iOS work just like they do in iMovie for the Mac, except that there’s no No Theme option. Don’t sweat it, though. If you want your movie to be clean and simple, without excessive animations or colors, choose the Simple theme to keep things, well, simple.

All eight of the themes found in iMovie for iOS match ones found in iMovie for the Mac. That’s a good thing. If you want to edit a single project both at home and on the fly—between your desktop Mac and an iDevice, in other words, just choose a theme common to both machines.
Don’t stress out when you choose a theme; you can always change
it later. To do that, tap ![]() as you edit a project; iMovie displays all
eight themes again. Pick a new one. iMovie automatically updates all
the theme-specific elements in your film, like the titles and
background music.
as you edit a project; iMovie displays all
eight themes again. Pick a new one. iMovie automatically updates all
the theme-specific elements in your film, like the titles and
background music.
Find Clips
Once you select a theme and click Create Movie, iMovie takes you to the Timeline screen so you can start building your movie. Since you haven’t selected any clips yet, the screen is pretty barren, with a few tools and silhouette placeholders for your clips (see Figure 19-2).

To add clips, tap the Add Media button—the tiny film strip/musical note icon circled in Figure 19-3. That opens the Media screen, where you see all the videos, photos, and music stored on your iDevice. You generally see your video clips first. To see your photos or music files, select Photos or Audio from the toolbar at the bottom of the screen.
Note
If you’re using an iPad in landscape mode, you don’t need to tap Add Media. You can browse your clips from the top-right corner of the screen.
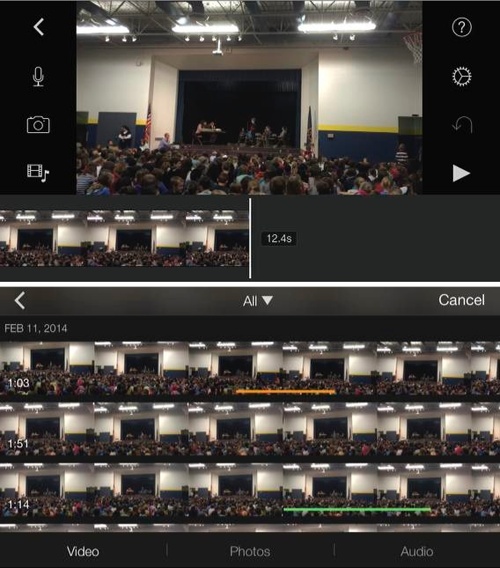
To sort your footage, tap < on the Media screen. You can choose to see all your clips (select All), your best-of clips (choose Favorites), or footage shot with your device’s camera app (choose Camera Roll). If you use the camera app within iMovie to shoot footage (see Add Favorites), you’ll see another sort option, iMovie Media—that’s where iMovie-shot clips live (yes, in iMovie for iOS, you can shoot video from both the camera app and from within iMovie itself. The clips show up in different places).
Once you choose a sort option, all the clips in that group show up as filmstrips. You can scrub each one by drawing your finger across it.
Rename a Project
As soon as you add a clip to a movie project, iMovie automatically saves the project with the uninspiring name “My Movie 1.” If you keep creating projects without renaming them, iMovie names each new one in sequence, so your second opus will be “My Movie 2.” If you want something catchier, like “My Movie 2: The Return of My Movie,” you need to rename the project.
You do that from a movie’s Project Info page (Figure 19-4), which you can get to two ways. One is by opening iMovie and then selecting Projects in the toolbar, which shows you all your movies-in-progress. Tap the thumbnail of a movie to open its Project Info page. The other way is from the timeline, when you’re in the process of editing a movie. From there, tap < in the top-left corner.
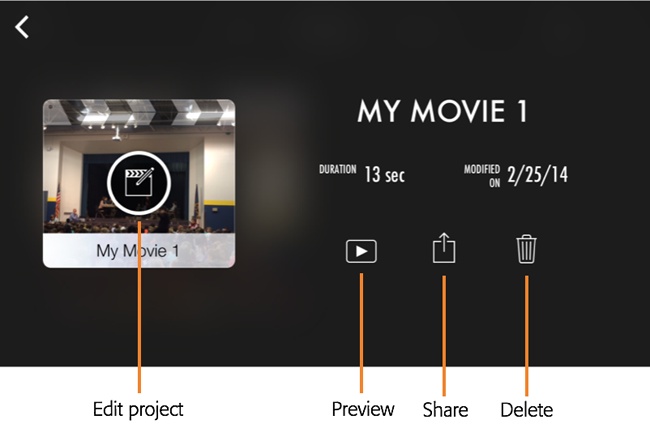
Either way, iMovie opens the Project Info screen, which includes your movie’s name, duration, and the date you last edited it. Tap the placeholder movie name, and iMovie calls up the iOS keyboard and places your cursor at the end of the text box. Tap the X there to delete the current moniker and type in a new one.
Find Audio and Photos
You’ll probably want to add photos and music or sound effects to your movie, too. This chapter focuses on video, while two other chapters discuss audio (Chapter 21) and photos (Chapter 22).
Build Your Movie
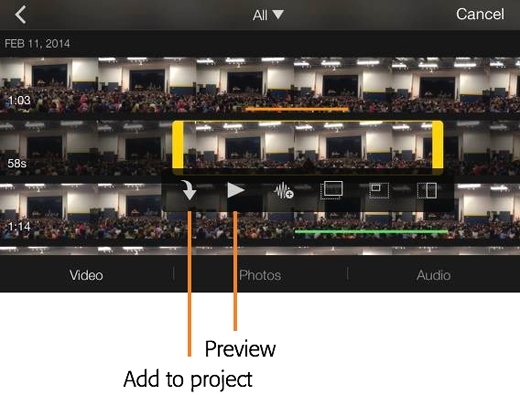
If you’re accustomed to iMovie on the Mac, you might assume that you can drag a clip from the Media screen into your timeline, but it doesn’t work that way in iMovie for iOS. You first have to select the clip, which calls up the yellow editing border and floating menu shown in Figure 19-5.
You can use all or part of the clip in your movie. To use just part of it, drag either end of the yellow border. When you finish, tap the swirling down-arrow button to add the clip or a clip section to your movie.
Tip
You can add a clip to the timeline one other way: If you’re in
the Video Browser (The Video Browser) and find a
clip you want to use, select it and then tap the Share button
(![]() ). From there, choose Create Movie. iMovie
gives you the option to start a new project or add the clip to an
existing project. If you choose the latter, iMovie adds it to the
end of that project’s timeline.
). From there, choose Create Movie. iMovie
gives you the option to start a new project or add the clip to an
existing project. If you choose the latter, iMovie adds it to the
end of that project’s timeline.
As you add clips to your movie, your timeline starts to fill in nicely. To see different parts of your movie, drag the clips in the timeline (in iMovie for iOS, the playhead remains stationary, and you move the clips themselves to scrub through your project). The white playhead line marks the frame you see in the preview screen above. The position of that line matters when you add clips—each time you add a new clip, iMovie slips it in after the clip that’s currently under the playhead.
Add Favorites
Remember all that work you did marking favorite footage in
Chapter 18? (Sort Clips explains the process.) Now your hard work
pays off. In the Media screen, choose ![]() →Favorites so iMovie shows you only the good
stuff. Select and add footage as described in Figure 19-5.
→Favorites so iMovie shows you only the good
stuff. Select and add footage as described in Figure 19-5.
If you didn’t mark favorite clips earlier, you don’t have to
go back out to the Video Browser. You can flag them right from the
Media screen. Tap ![]() at the top of the screen and then choose
“Find more favorites” from the menu that opens. iMovie displays your
clips in a new screen. Select one, trim it by dragging the yellow
borders, and then hit the
at the top of the screen and then choose
“Find more favorites” from the menu that opens. iMovie displays your
clips in a new screen. Select one, trim it by dragging the yellow
borders, and then hit the ![]() button to mark it as a Favorite. Tap Done
when you finish.
button to mark it as a Favorite. Tap Done
when you finish.
Shoot New Video
You can film footage or shoot photos from within iMovie itself; those recordings appear right on your timeline.
Find the camera icon in the iMovie toolbar (Figure 19-6) and tap it to open the Camera app you know and love. Once you shoot some footage or take a photo, preview it and then choose to reshoot it or save it to the timeline.
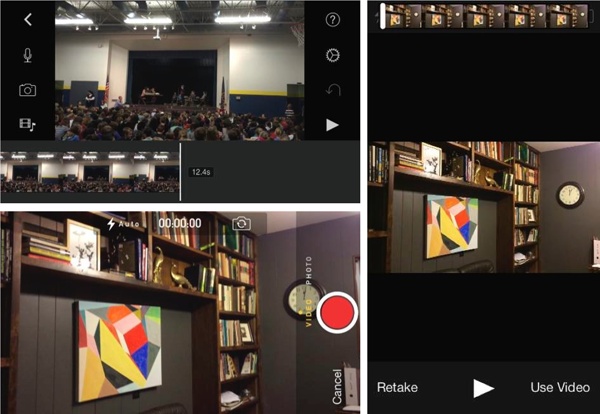
This is a great strategy to use if you have your movie planned out in your head and you just need to shoot the footage. Go from one shot to the next, adding each to the timeline as you shoot. If a take doesn’t work, tap Retake instead of Use Video. Get good at this and you’ll be cranking out blockbusters in record time.
iMovie automatically gives you access to any videos or photos stored on your iDevice. It also lets you shoot and then save videos and photos straight to the timeline (see Add Favorites). But iMovie will be stingy with that media unless you tell it to play nice and share.
At the heart of every iDevice is the Camera Roll, a central repository for photos and video, available to any and all installed apps. iMovie taps into the Camera Roll to find stuff to use in your projects.
But when you shoot footage and images through iMovie, it keeps those files in iMovie alone. Other apps can’t access them until you tell iMovie to share them to the Camera Roll.
To do that, tap ![]() on the Media screen (The Video Browser) and then tap “Manage local media.”
From there, you can see how iMovie highlights locally stored clips
with a gray Import button (
on the Media screen (The Video Browser) and then tap “Manage local media.”
From there, you can see how iMovie highlights locally stored clips
with a gray Import button (![]() ) and a red trash can. The Import button
saves the clip to your Camera Roll, making it available to other
apps.
) and a red trash can. The Import button
saves the clip to your Camera Roll, making it available to other
apps.
Be careful with the trash can button. Tap it once and your clip goes away forever, without so much as a warning screen.
Add Clips as Overlays
Like iMovie for the Mac, iMovie for iOS lets you insert clips as cutaway, picture-in-picture, or side-by-side shots (explained starting on Contrast). iMovie for iOS calls these overlays. (In the Mac version, they’re called connected clips.)
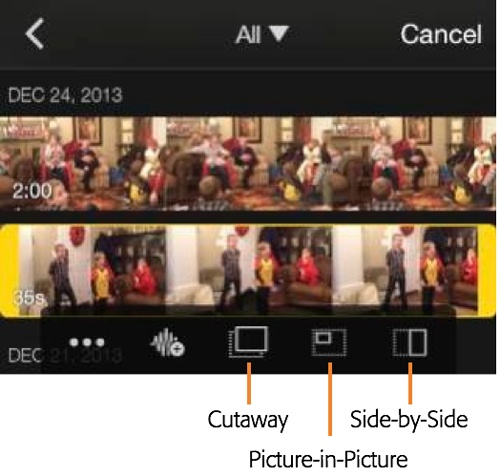
To add an overlay clip, first position the playhead where you
want the overlay to appear. Now select a clip in the Add Media
screen, and then tap the ![]() button. You see three buttons for creating a
cutaway, picture-in-picture, or side-by-side overlay (see Figure 19-7). Tap the
desired button, and iMovie inserts the clip as the chosen type of
overlay. It shows up as a small filmstrip hovering above your main
one.
button. You see three buttons for creating a
cutaway, picture-in-picture, or side-by-side overlay (see Figure 19-7). Tap the
desired button, and iMovie inserts the clip as the chosen type of
overlay. It shows up as a small filmstrip hovering above your main
one.
Tap the overlay filmstrip in your storyboard to make these custom edits:
For a cutaway, you can zoom the video (Split Clips).
For a picture in picture clip, you can tap the compass button in the Viewer and resize or reposition the inset window.
For a side by side clip you can position it to the left, right, top, or bottom using the buttons in the toolbar.
You can change the type of overlay you inserted using the toolbar buttons that mimic the ones in Figure 19-7.
Finally, you can make audio adjustments in the toolbar (Adjust Audio Levels).
If you change your mind, you can delete an overlay clip by
selecting it and tapping ![]() .
.
Reposition Clips
To reorder a clip in the timeline, press down on it (lightly) until it attaches itself to your finger. Then drag it to its new position and let go. The clips underneath slide around to make space for the one you just dropped in.
Edit Clips in the Timeline
Once you have your clips assembled in the timeline, you can edit them by selecting them and using the tools iMovie provides.
You can adjust a clip’s final edit, change its theme titles, speed it up or slow it down, split it so you can insert a new clip in between, freeze a frame, duplicate the clip, zoom in on an area of it, and rotate the clip.
You see options to do all this when you select an individual clip in the timeline. On iPhones, you find these tools spread across two “pages” of options (see Figure 19-8). Tap the second, small dot beside Title and Speed to get to the second page. On iPads, all the tools fit on a single toolbar.
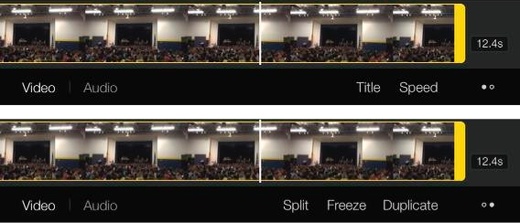
If you don’t see the tools, make sure you have a clip selected in the timeline and that you have Video (not Audio) selected in the toolbar.
Re-Edit a Clip
You may find that a clip starts too late or ends too soon, or just goes on too long. Don’t waste time deleting it and adding a newly edited version back in. Make the adjustments right in the timeline.
Tap the clip to call up the yellow border, and then drag either end to shorten or lengthen it. Then tap anywhere outside the yellow border to unselect the clip and move on.
Shortening clips is neat, but adding to them is pretty advanced. iMovie for iOS can do this because it edits by reference, just as iMovie for the Mac does. (See The Concept of iMovie Projects for an explanation of reference editing.)
Edit Movie Titles
Most movies have titles (text) that include things like the name of the movie, the actors’ names, subtitles, and so forth. iMovie for iOS’s titling feature is explained in detail in the next chapter.
Change a Clip’s Speed
Sometimes the normal pace of life just doesn’t do a moment justice. iMovie for iOS can change the speed of a clip. You can recreate a frenzied Benny Hill shtick or the slo-mo finish-line victory in Chariots of Fire.
Select a clip and then choose Speed in the toolbar. iMovie displays a timing slider (Figure 19-9). Drag it to the left to slow a clip down to as little as one-quarter the normal speed. When you do, a little tortoise appears in the top-left corner of the clip. Drag the slider to the right to speed up the clip by as much as twice the normal speed. A rabbit appears in the corner of the clip.
Tip
Normally, slowed-down footage looks a little jumpy, because it’s shot at 30 frames per second, and slowing it down makes the individual frames more obvious to the human eye. But if you have an iPhone 5s and you know you want to play back footage in slow motion, you can shoot that footage at 120 frames per second (with your Camera app open, just swipe to the Slo-Mo setting). That way, it’ll look smooth when you slow it down.
Split Clips
To break up a clip so you can put another one in the middle, first drag the filmstrip so the playhead sits over the spot where you want the split. Tap the clip to select it and then choose Split in the toolbar. iMovie dutifully cuts the clip in two.
Note
If you don’t want a clip split anymore, tap the Undo button
(The Undo Button) immediately after you split
the clip (though a split clip doesn’t affect playback). Or, if
it’s too late for that, you can always delete the two parts
(![]() ) and then add the whole clip back in from
the Media screen.
) and then add the whole clip back in from
the Media screen.

Freeze a Frame
In iMovie, you can turn a frame of video into a still image that you can use in your project. Video Freeze Frames explains how.
Duplicate a Clip
You can use more than one copy of a clip in the timeline without having to find it in the Media screen and add a second copy. Select the clip in the timeline, and then choose Duplicate in the toolbar. Now you have two copies to work with.
Don’t worry about taking up extra storage on your device—remember, iMovie edits by reference, not by making multiple copies of clips (see The Concept of iMovie Projects).
Zoom in on a Clip
Shooting on an iPhone or an iPad has one big drawback: It doesn’t have a zoom lens. The best way to get a closeup while you shoot is to use your feet, but that won’t help you with footage you’ve already shot.
To zoom in on a clip after the fact, tap it in the timeline and then tap the small magnifying glass in the preview window. Once tapped, the glass turns blue, indicating that you turned on the zoom tool.
Now you spread two fingers on the glass to zoom in, as though you were stretching a sheet of rubber to make it bigger. Then, if necessary, use one finger to drag the zoomed clip until the part you want fills the frame.
You can zoom out on a clip by pinching with two fingers. That can come in handy when you rotate a clip (see the next section), so that the whole thing fits your screen. Doing this creates big black bars on either side of the image, but at least you’ll be able to see everything in the frame.
Rotate a Clip
Without repeating the tirade against smartphone footage shot in the vertical orientation, suffice it to say that filming with your iPhone upright (instead of on its side) is a bad idea (see Aspect Ratios: The Missing Manual). Knowing that now doesn’t fix the footage after the fact, however. Lucky for you, iMovie offers a way to rotate a clip in your timeline.
This trick requires some finger dexterity. Select a clip in the timeline, and then put two fingers on the preview screen. Now twist your fingers in a circle right or left, dragging the clip with you. iMovie rotates the clip a quarter-turn in that direction. Repeat as necessary. A quarter-turn takes vertical footage and crops it to fill the screen.
If you want to see more of the image, zoom in on the clip so the whole thing fills the screen. Doing this creates big black bars on either side of the image, but at least you’ll be able to see everything in the frame. If you end up with the wrong part of the rotated clip showing, drag the clip with your finger until you get the framing you want.
Play Back Your Movie
As you work on your project, you’ll want to repeatedly review it to make sure it looks right. There are two ways to preview your movie.
Preview from the Editing Screen
Tap the ![]() button under the preview window to play back
your movie-in-progress from the playhead forward. To watch your
movie from the beginning, drag the timeline all the way to the start
of the first clip before tapping
button under the preview window to play back
your movie-in-progress from the playhead forward. To watch your
movie from the beginning, drag the timeline all the way to the start
of the first clip before tapping ![]() . (The back-arrow button next to it takes you
to the start of the clip or transition currently under the
playhead.)
. (The back-arrow button next to it takes you
to the start of the clip or transition currently under the
playhead.)
Preview Full Screen
To see your movie at its best, tap < from the Timeline screen. That brings you to the Project Info screen, the one where you can rename your movie. Tap the Play button on the movie thumbnail (noted in Figure 19-4) to see your opus full-size.
Save Your Project to the Camera Roll
Add Clips as Overlays explains how to save
video you shot from within iMovie to your Camera Roll. Of course, a
completed project, edits and all, could be just as worthy of
saving to your Camera Roll so you can share it later
(see CNN iReport). From the Project Info screen,
tap ![]() and then choose Save Video. iMovie ships it
over to your Camera Roll, where it’s available to other apps on your
phone.
and then choose Save Video. iMovie ships it
over to your Camera Roll, where it’s available to other apps on your
phone.
Import Projects from Other iDevices
Let’s say you shoot a movie with your iPhone and put a simple rough cut together. Now you’re back home and want to edit it on the roomier screen of your iPad.
The easiest way to do this, by far, is to use AirDrop, a feature that lets you share projects and movies between iOS devices. AirDrop explains the AirDrop process for iOS in detail, so flip ahead to read more. But not all iOS devices can use AirDrop. (You need an iPhone 5 or later, a fourth-generation iPad or later, any iPad mini, or a fifth-gen iPod Touch or later.)
Lucky for you, you can transfer the project between devices using iTunes. These steps describe the process from iPhone to iPad, but they work for any iOS devices going in either direction:
Tap the Share button (
 ) in the Project Info
screen, and then choose iTunes.
) in the Project Info
screen, and then choose iTunes.iMovie displays a message telling you where to find the project when you connect your iPhone to iTunes.
Connect your iPhone to your computer and then open iTunes.
If you sync by WiFi, your iPhone may already be listed in the Devices section of iTunes. If you don’t see it, connect your iPhone using the USB cable that came with the device.
Select your device in iTunes.
Look for your gadget under Devices in the left-hand column of iTunes. It may be listed as iPhone, iPad, iPod Touch, or, if you named your device, it’ll be something like “Joanne’s iPhone.” When you find it, click its name to select it.
Choose Apps from the list of media types at the top of the iTunes window.
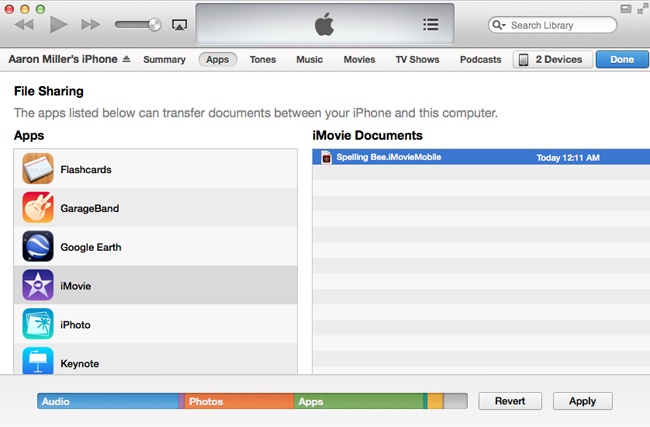
Scroll down to the File Sharing section of the screen. Under Apps, select iMovie.
When you do, iTunes displays a list of projects you can export (Figure 19-10).
Choose the project you want to transfer, and then click “Save to.”
Save the project to a spot you’ll remember, like the desktop.
Connect your iPad to iTunes and then repeat steps 2–6 to get to the same iMovie Documents list.
Click Add in the lower-right corner and then choose the project you saved in step 6.
iTunes copies the project into iMovie on your iPad.
Open iMovie on your iPad and then tap Projects at the top of the screen.
You’ll see all your projects listed.
Tap
 and then choose the
project you just copied from iTunes.
and then choose the
project you just copied from iTunes.The project you originally edited on your iPhone is now an iPad project. iMovie copied all the clips, sounds, and photos you used in the project, so nothing is missing.