Chapter 5. Create Your Movie
Whether you work with video on your Mac or on a multimillion-dollar Hollywood studio setup, film editing boils down to three tiny tasks: selecting, trimming, and rearranging clips. Of course, that’s like saying that painting a portrait boils down to nothing more than mixing various amounts of red, yellow, and blue. The art of video editing lies in your decisions about the clips you select, how you trim them, and in what order you put them.
You work with clips in two place in iMovie. There’s the Event browser, usually at the top half of your screen, where all your raw, unedited video lives. And there’s the Project pane, also called the storyboard, which is usually at the bottom half of your screen—that’s where you assemble and edit your masterpiece.
At its simplest, then, iMovie editing is all about this three-step process:
Reviewing your video in the Event browser and finding the good parts.
Adding those chunks to the storyboard, where iMovie plays them in one seamless pass, from left to right.
Adding crossfades, titles (a.k.a. credits), music, and effects.
This chapter shows you the mechanics of the first two tasks: selecting raw footage and adding it to your movie-in-progress. The following chapters cover the last step.
Phase 1: Review Your Clips
Video editing always starts with a pile of raw, unedited footage. In iMovie’s case, that’s the bunch of clips you stored as events. Click an event’s name to see what video lurks inside.
Working with Filmstrips
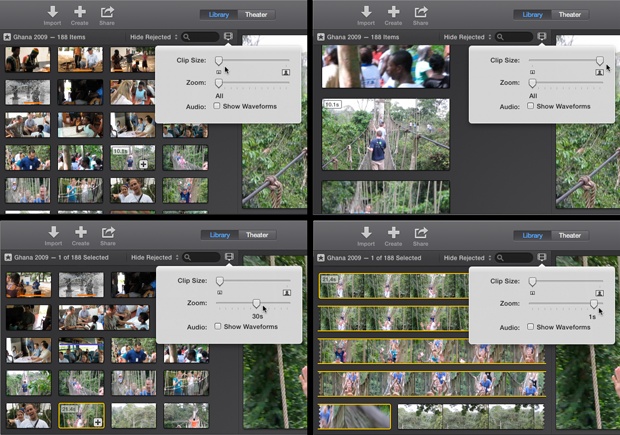
iMovie represents every imported clip as a filmstrip—a horizontal bar made up of sample frames from the clip and whose length reflects the clip’s duration. You can adjust both how tall the filmstrip is and how many frames of your footage it displays. You make both adjustments in iMovie’s “slider” window. Call it up by clicking the filmstrip icon at the top-right corner of the Event browser. The Clip Size slider adjusts the filmstrip’s height, and the Zoom slider changes the number of frames you see (see Figure 5-1).
Note
If you have iMovie’s wrapping timeline turned on (The Wrapping Timeline) and a filmstrip is too wide for the Event browser, it wraps around to the next line. A ragged filmstrip edge tells you that iMovie has wrapped your clip (think of that ragged edge as the video version of a hyphen). If you use iMovie’s default timeline, your filmstrip is one long, uninterrupted filmstrip, and you have to scroll to the right to see it all.
You can make these same adjustments in the Project pane, but the controls differ slightly. To adjust the height of the filmstrip, click the filmstrip icon in the top-right corner of the storyboard (Figure 5-2). To change the number of frames iMovie displays, use the Zoom slider to the left of the filmstrip icon (Figure 5-2, circled).

So what’s the right setting for these sliders? That’s up to you, but here are some suggestions:
At the Zoom slider’s extreme left position, iMovie represents every video clip as one frame. You can no longer tell the relative length of a clip. This arrangement makes clips easy to move around and resequence, and it makes a very long movie fit on your screen without scrolling. It also makes iMovie a lot more familiar if you’re used to working in previous versions of the program.
At the Zoom slider’s extreme right position, each frame of the filmstrip represents a half-second of video, and you can edit your movie in the storyboard frame by frame, as explained in the box on Frame-Accurate Editing.
As you work, you can fiddle with the Zoom slider, zooming in and out as necessary. For example, when you need to tweak the precise starting point of a piece of audio, you’ll want to zoom in tight (by dragging the slider to the right); when you want to get a good overview of a long movie, you want to zoom out (drag the slider to the left).
As for the Clip Size slider, the proper adjustment really depends on how well you want to be able to see what’s going on in each clip. Make clips bigger and they’re easier to see. On the downside, the bigger you make the clips, the less of your event footage or project you’ll see at once. Of course, the Viewer is the best way to see what’s going on in your footage, so get good at skimming, discussed next.
Skim Filmstrips
You’re about to learn two iMovie skills that you’ll use most often in editing your footage: skimming and playing. Practice them, commit them to memory, make them automatic, and you’ll fly through the editing process.
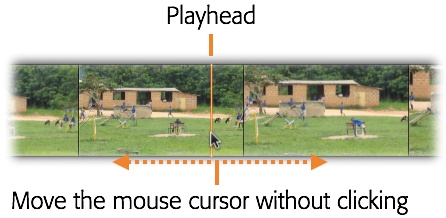
Skimming means moving your cursor across a filmstrip. Do not click or drag the strip, which would mean pressing the mouse button. Just point with the mouse.
The playhead—an orange vertical line the height of the filmstrip—moves along with your cursor. And as you skim, the Viewer plays back the underlying video at high speed—or medium speed, or slow speed, depending on how fast you move the cursor. (You see the same video playing within the filmstrip itself, beneath your cursor.)
Tip
You can also play the sound of a clip as you skim—fast or slow, in forward or reverse. Sometimes, that’s helpful. When it is, choose View→Audio Skimming (Shift-S) to turn the audio on. Then, when you skim, your clip will sound like you’re fast-forwarding through a cassette tape. (Remember those?) But if the audio starts driving you crazy, turn it off by selecting View→Audio Skimming (Shift-S) again.
Skimming may take some getting used to, because it’s such an unusual computer technique; it’s probably the first time in history that moving the mouse without clicking does anything besides, well, moving the cursor to a new spot. But it means that you can control not only the speed of playback, but also the direction—forward or reverse—in real time, almost effortlessly.
Skimming works anywhere fine filmstrips are found—either in the Event browser or in the project storyboard (Figure 5-3).
Tip
You may sometimes wish you could use the cursor as, well, a cursor, instead of always making stuff play back. You may wish, for example, that you could freeze a frame as you skim—“Stay on this frame for just a sec”—while you go off to do something else with the mouse. You can. When you get to the spot you want to freeze, hold down the Control key. iMovie turns off skimming and leaves the video frame onscreen until you release the Control key. (This trick works only in the project storyboard, not in the Event browser.)
Play Clips
Skimming is great for quickly getting the gist of what’s in your captured clips. But unless you’re some kind of cyborg, you’ll find it very difficult to skim at exactly the right speed for real-time playback.
Fortunately, iMovie can also play back clips all by itself, at the proper speed. To do that, use the space bar on your keyboard as the Start/Stop control. Hitting the space bar always begins playback at the position of your cursor, and hitting it again stops playback.
Once you master that difficult technique, you’re ready for the real gem: using skimming and playback together. It works like this: Using your mouse, skim your footage, looking for the part you want to watch. When you get close to the right spot, tap the space bar. Playback begins from the precise position of your cursor.
Tap the space bar again to stop playback, move your cursor to another spot, and then tap the space bar once more. This way, you can jump around, spot-inspecting your clips (or even within a clip), without ever touching the mouse button—and without ever having to wait.
There are four other ways to play back a source clip or your movie-in-progress, complete with corresponding keyboard shortcuts. Don’t Remember to Save has the details, but here are the CliffsNotes:
Play the selected chunk (/ key).
Play from the beginning ( key).
Play full-screen (Shift-⌘-F).
Loop playback, so you don’t have to keep replaying a clip that needs lots of rewatching (⌘-L).
Phase 2: Select the Good Bits
The reason you’re reviewing clips in the Event browser is, of course, to find the good parts—the highlights, the pieces you want to include in your finished movie. Once you select a chunk of video, you can drag it into the storyboard to make it part of your movie.
Selecting comes in handy for other purposes, too. As you’ll read in the next chapter, you can designate part of a clip as either a Favorite (a snippet you know you’ll want to use) or Reject (a worthless shot). These steps, too, require that you first select the piece of clip you want to tag.
Since selecting is such a critical step in iMovie moviemaking, Apple made sure you had all kinds of ways to do it. The following pages review them one by one.
Select by Dragging
The first selection method is the one you’ll probably use most often: dragging. That is, slide the cursor across some footage while you press the mouse button, just the way you’d select a phrase of text in a word processor.
iMovie indicates which part of a clip you selected by surrounding it with a yellow border (Figure 5-4). A little bubble on the top edge of the filmstrip shows you how many seconds’ or minutes’ worth of video you highlighted. (If you select part of a clip, you can adjust it later; see Adjust a Selection.)
Select an Entire Clip
In some cases, you may find that all this dragging business is just too much fussiness—you really want to select entire clips from the Event browser. To do that, either double-click the clip or Option-click it.
Select Multiple Clips at Once
It’s often useful to select more than one clip at a time. Imagine how much faster you could perform common tasks—deleting clips, dragging them, cutting and pasting them, and so on—if you could work on them all at once.
Selecting clips in the storyboard or Event browser works just like selecting file names in the Finder. For example, here’s some of what you can do:
Highlight all the filmstrips. Press ⌘-A (the equivalent of the Edit→Select All command).
Highlight random clips. If you want to highlight, for example, only the first, third, and seventh clips in a storyboard, start by clicking clip No. 1, and then ⌘-click each of the others.
Remove a clip from the selection. If you’re highlighting a long string of clips and click one by mistake, you don’t have to start over. Instead, just ⌘-click the errant clip again to deselect it. (If you do want to start over, you can deselect all the selected clips by clicking any empty part of the window.)
Highlight consecutive clips. Click the first clip you want to highlight, and then Shift-click the last one. iMovie automatically selects all the clips in between, along with the two you clicked.
Adjust a Selection
Once you highlight a portion of a filmstrip, you’re not stuck with that yellow boundary the way it is. You can adjust it in either of these two ways:
Dragging the vertical ends of the yellow border to the right or left to select more or less of the clip.
Shift-clicking another spot in the filmstrip. The nearest edge of the yellow border jumps to the location of your click, which makes the selection longer or shorter.
Tip
These tips are great for making rough edits. For much finer control, get to know iMovie’s Precision Editor (The Precision Editor).
Play a Selection
As you know, tapping the space bar begins playing back a clip at the position of the cursor. But when you’re making a selection, fiddling with that yellow border, that’s not always what you want to do. In fact, it’s probably not what you want.
A much more useful keystroke would be one that means, “Play just what I’ve selected.” And that’s what the / key is for. (That’s the forward-slash key, the one next to the period key.) Tap it once to play whatever you selected; tap it a second time to stop playback.
Deselect a Clip
To deselect whatever is selected—that is, to remove the yellow border entirely—use any of these three techniques:
Click anywhere in the dark-gray background.
Choose Edit→Deselect All.
Press Shift-⌘-A.
Actually, there’s another way, but it involves a little backstory; see the tip on Tip.
Select Specific Project Elements
By the time you finish building a project, it might be full of all kinds of stuff—video clips, transitions, maps, and so on. In iMovie, you can select all the stuff of one type—for example, all the background images—to make universal changes. For example, you could change all backgrounds from blue to black. To do that, choose Edit→“Select in Movie.” iMovie lists all the elements you can isolate in a project: video clips, transitions, photos, maps, and backgrounds. Pretty handy.
Phase 3: Build the Storyboard
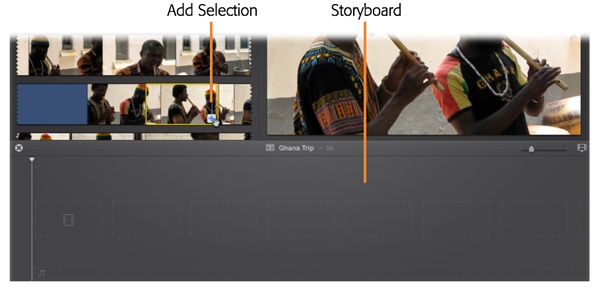
The project storyboard is the large work area that starts out at the bottom of the screen, as shown in Figure 5-5. The key to building a movie is moving your selected video bits from the Event browser to this storyboard.
Add to the End of a Storyboard
Most people, most of the time, build a movie by reviewing a clip of raw footage from left to right—from beginning to end—and choosing bits, in sequence, to include in their final movie. In such cases, you add a selected clip or clips to the end of the storyboard.
iMovie offers two ways to do that automatically (that is, without selecting the clip and then dragging it to the end of the storyboard, which might be offscreen). Once you select some video in the Event browser, do one of these things:
Press the letter E key.
Click the Add Selection button (identified in Figure 5-5).
In either case, the selected chunk(s) of video flies from the Event browser to the end of your storyboard.
To check the result, point to the storyboard (without clicking) just before the spot where the new video has landed, and then press the space bar.
Insert Video in the Middle of Your Movie
You don’t have to add a clip to the end of your storyboard. You can place it between clips or smack in the middle of a single, continuous clip.
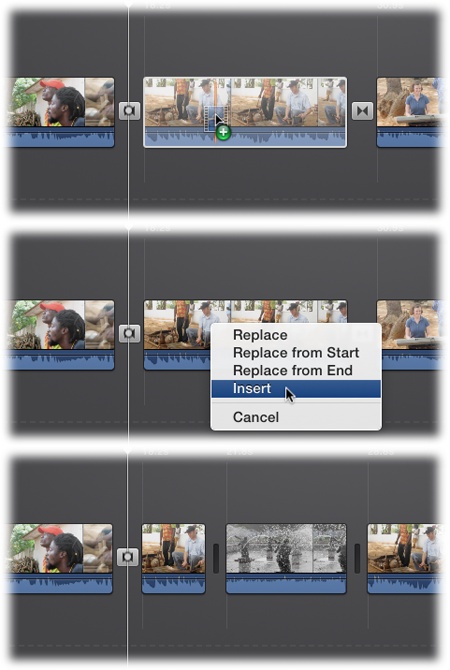
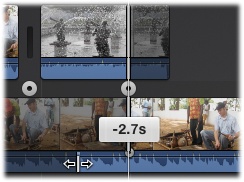
To add a chunk of footage between clips, drag the selected chunk (by positioning your cursor inside the yellow border so that it becomes a handle) right into the storyboard. iMovie previews your insertion point with a blue shaded box. When you find the right spot, release the mouse (see Figure 5-6). The chunk of video slips right in between the surrounding clips.

What if you want to drop a clip in the middle of another clip, splitting it in two with your clip sandwiched in between? If you drop a chunk of video on top of a clip, iMovie launches a floating menu (see Figure 5-7). Its options include Insert, which splits the underlying clip into two pieces and drops your chunk between them (the other options are covered next).
Replace a Clip
Suppose you’re editing a project that has music in it, and you worked hard to get the timing of the cuts to match up with the music. (Let’s say you worked that hard because you haven’t yet discovered the Beat Markers covered on Edit to the Beat.) But as you preview your masterpiece, you realize that the video part of the clip is just plain dull. You have something much more interesting to replace it with, but you know that unless your replacement is exactly the same length as the original shot, it will mess up the timing of your entire project.
iMovie offers three ways to replace a clip with a better one of the exact same length. Select your replacement footage, drag it to your storyboard, and drop it onto the boring section. In the floating menu that appears (Figure 5-7), select from the following options:
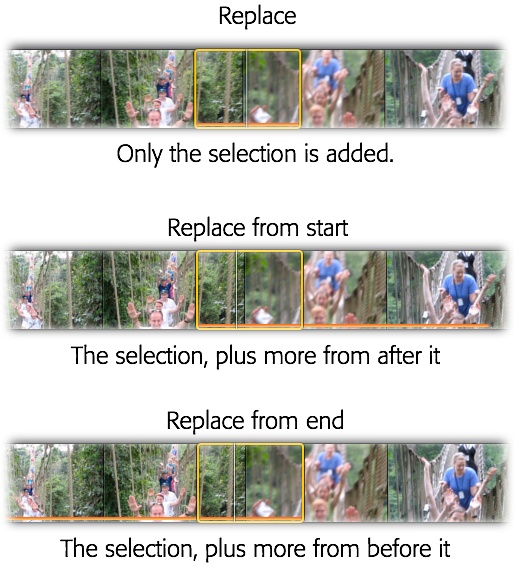
Replace replaces the entire underlying clip with the selection you’re adding, no matter how long either one is. This option does not match lengths and will alter your project’s timing (Figure 5-8, top).
Replace from Start resizes the incoming clip to match the length of the replaced clip—by adding more footage to, or subtracting it from, the right end of the clip you selected (see Figure 5-8, middle).
So if the soon-to-be-replaced clip is 8 seconds long and your incoming clip is only 4 seconds long, iMovie extends the incoming video by 4 seconds to the right end (assuming there’s footage available). Alternatively, if the incoming selection is longer than 8 seconds, iMovie cuts from the right end of the clip so that it matches the duration of the original clip.
Replace from End is a lot like Replace from Start, except that it resizes the incoming footage by extending or reducing your selection to the left (Figure 5-8, bottom). So if you’re replacing a clip that’s 8 seconds long, but the replacement selection is only 4 seconds long, iMovie extends your selection by adding 4 seconds of footage to the beginning of the selection. If the incoming video is longer than the original, on the other hand, the first part of it gets lopped off.
Tip
If your resized footage doesn’t display the moment just right, you can adjust it using the handy Clip Trimmer, covered on Use the Clip Trimmer.
Connect a Clip
iMovie offers one more way to add clips, by “connecting” them. Connected clips offer many cool tricks, namely cutaways, green-screen effects, side-by-side video, and picture-in-picture viewing. Each of these is explained in detail in Chapter 8 (Reverse a Clip’s Playback Direction).
The Orange Stripe
Each time you add source video to your nascent movie, iMovie slaps an orange stripe across the bottom of the original clip in the Event browser, as shown in Figure 5-8. That’s a reminder that you’ve used this segment of footage in your project. As your work proceeds, you’ll be able to tell, with a glance at your Event browser, what portion of the original video you used in your finished opus.
Now, remember that all your edited movies—your projects—draw on the same well of source video on your computer. What’s cool, therefore, is that iMovie memorizes the orange striping for every project. If you used a different set of Little League footage in each of three projects, you’ll see the stripes jump around in the Event browser as you select each project in turn.
Don’t Remember to Save
You don’t have to save your work. iMovie automatically saves as you go. (It doesn’t even have a Save command.)
Phase 4: Fine-Tune Edits
Once you’ve got a rough cut of your project, you may consider the Event browser a lot less necessary. Your focus will probably shift to the storyboard so you can fine-tune your edits. Now, in other words, might be a good time to hide the Libraries list and, if you swapped the storyboard and Event browser as explained on Adjust the Viewer, to move the whole storyboard back to the wider space at the bottom of the iMovie window.
The rest of this chapter explores a few ways to fine-tune your movie-in-progress.
Storyboard Playback
You can instantly play back your project to spot-check your work in the Viewer. Since you’ll probably do this a lot, iMovie offers multiple techniques:
Anyplace playback. Point (without clicking) to any spot in your project and then press the space bar to begin playback. Press the space bar again to stop.
Tip
As you fine-tune your movie, you might want to make the Viewer bigger, so you see your work closer to full size. See Adjust the Viewer.
Selection playback. Select some footage in the storyboard (click a clip or ⌘-click multiple clips). Then press the forward slash key (/, next to the period key) to play back just the selected clips from the beginning. Press / again to stop.
Whole-storyboard playback. Press the backslash key (, above the Return key) to play the entire storyboard from the beginning. Press again (or the space bar) to stop.
Note
There are menu equivalents for all three of these commands. In the View menu, select Play, Play Selection, or Play from Beginning. But it’s far more efficient to use the keyboard shortcuts.
No matter how you start playback, you can always stop it by tapping the space bar.
Full-Screen Playback
You can make the Viewer window bigger to get a more detailed view of your video by dragging the top edge of the storyboard window. But, eventually, you’ll want to treat yourself to iMovie’s IMAX mode: full-screen playback. That’s when all of iMovie’s controls and menus disappear, and the Viewer fills your monitor.
No matter where you are in the storyboard, press Shift-⌘-F to begin full-screen playback of the selected video.
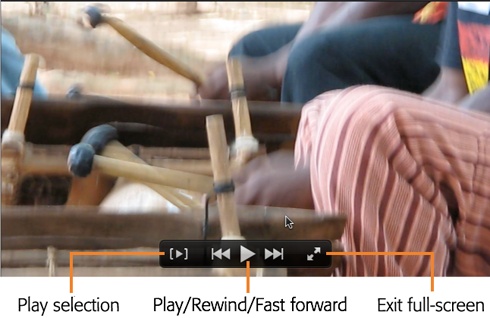
Once you have full-screen playback under way, moving your mouse makes the navigation tools shown in Figure 5-9 appear. They look a lot like the controls you see when you play a movie full screen in iTunes or QuickTime.
Tip
Don’t miss the Play Selection button on the left-hand side. Click it to skip back to the beginning of the clip you selected instead of going back to the beginning of your project.
Here’s how you navigate in full-screen mode:
Press the space bar to start and stop playback without exiting full-screen mode. Or click
 in the middle of the navigation tools.
(The button changes to
in the middle of the navigation tools.
(The button changes to  as the video plays.)
Use the diamond-shaped slider to move back and forth within your video. You can also click any spot in the slider track to jump straight to that point in the movie. During playback, if you move the slider, iMovie will continue playing the video from that spot on.
Use the left and right arrow buttons to skip forward or backward to the beginning or end of clips.
In a project with multiple clips, one click of the left arrow takes you to the start of the current clip; a second, quick click takes you to the start of the previous clip. Hitting the right arrow takes you to the next clip.
To exit full-screen mode, click the diagonally opposing arrows in the upper-right corner of the playback controls, or press the Escape key.
Tip
Depending on the size of your screen, your video might have lower resolution than your Mac. To fill your screen for playback, iMovie stretches the picture, which slightly lowers its quality. Don’t get scared if it looks blurry. That’s the result of having a really nice computer screen.
In a few other cases (for example, high-def video on a small laptop), the video may actually be too big for the screen. In that case, iMovie scrunches it down to fit.
Rearrange Clips
Unless your last name is Spielberg or Scorsese—and maybe even if it is—the first place you put a clip in the storyboard won’t always be the best spot for it. Sooner or later, you’ll wish you could move shots around in a film.
You can, if you know how.
Select the clip or clips you want to move.
You can select just one clip or multiple clips by ⌘-clicking each.
Tip
At this point, consider adjusting the storyboard’s zoom level (Phase 1: Review Your Clips) so you have an easier time finding where to place the moved video.
Drag the selection to its new location.
Grab anywhere inside the yellow border, drag the selection to its new location, and then let go. Moving clips in a project works just like it does when you add footage from an event. That means you can add it to the end, replace a clip, insert it, or connect it. (See Figures Figure 5-6 and Figure 5-7 to remember what this looks like.)
Copy and Paste Clips
Dragging isn’t the only way to move footage around in iMovie; the Copy, Cut, and Paste commands can feel more precise. These commands are also the only way to copy edited footage from one project to another. They’re also a really easy way to insert clips into the middle of other clips.
Note
When you copy and paste clips, you’re never duplicating files on your hard drive, so don’t worry about eating up free space.
You already know how to indicate what you want to cut or copy; just use the selection techniques described on Select by Dragging.
Then use the Edit→Cut or Edit→Copy command (⌘-X or ⌘-C). Point to where you want to paste the copied material (do not click), and then choose Edit→Paste (⌘-V). Presto! The cut or copied material appears at the position of your cursor and shoves the rest of the movie to the right.
Resize Clips
Almost nobody hits the camcorder’s Record button at the precise instant the action begins, or stops recording the instant an action stops. Life (not to mention animals, geysers, and children) is just too unpredictable.
Most of the time, of course, you’ll leave the boring stuff (Phase 2: Select the Good Bits) in the Event browser before you add a clip to the storyboard. Sometimes, though, you’ll discover—only after you put the clip in the storyboard—that you didn’t get the clip-editing process quite right. Maybe the shots are still too languorous and should be shorter. Or the shots are too quick, and it’s going to be hard for your audience to figure out what’s going on.
In both cases, it would be nice to shorten or lengthen a clip even after you place it in the storyboard.
Note
“Lengthen a clip?” That’s right. iMovie is a nondestructive editing program. No matter how much editing you do, iMovie never, ever changes the original footage on your hard drive. For example, if you shorten a clip by hacking a piece off the right end, you can change your mind—even three presidential administrations later—and restore some or all of the missing footage, using the techniques described on these pages.
Fortunately, iMovie is crawling with ways to make these adjustments. They boil down to these approaches:
Shorten or lengthen a clip-in-place by subtracting from or adding to the front or back.
Trim (shorten) a clip to the position of the playhead.
Shorten, lengthen, or reposition a clip with iMovie’s Clip Trimmer.
Shorten, lengthen, or reposition a clip using the Precision Editor.
The following pages cover all four methods.
Note
When you shorten a clip, all subsequent clips slide to the left to close the resulting gap. (That’s called ripple editing.) On the other hand, when you lengthen a clip, exposing previously hidden footage, iMovie shoves all subsequent clips to the right to make room. Your movie, as a result, gets longer.
Resize Clips in Place
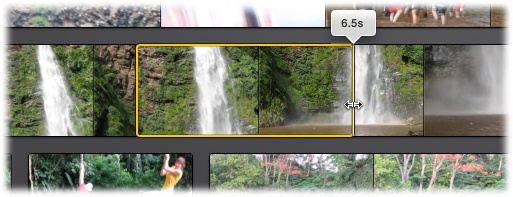
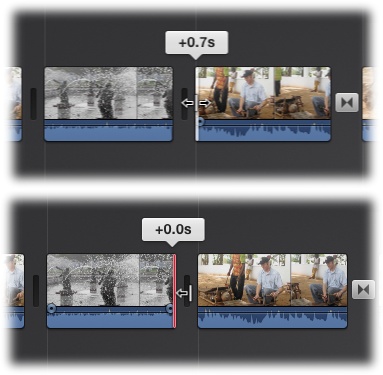
Perhaps the simplest way to resize clips is to drag the ends around. When you point without clicking to the beginning or end of a clip, your cursor changes to a couple of arrows with a line in the middle (Figure 5-10). You can now drag the end of the clip in either direction, making it longer or shorter.
As you drag, the Viewer shows the footage you’re adding or subtracting from your movie. Also, a handy little bubble appears above the cursor telling you how many seconds of footage you’re adding or subtracting.
If you see a red line at the end of a clip as you resize it, you’ve hit the end of the original footage: There’s nothing more to add. In that case, you see just a single arrow at the end of the clip, telling you you can adjust it in only one direction (Figure 5-10).
Trim to the Playhead
If all you want to do is shorten the end of a clip that’s too long, you don’t even need to drag. Just position the playhead where you want the clip to end and press Option-/. iMovie lops the end off the clip right at the playhead.
Use the Clip Trimmer
All right, resizing clips in place is a quick, efficient way to make basic changes. But you can’t see what you’re doing until you add or subtract it. What if you can’t even grasp what you’re looking at and wish you could see the entire original clip?
That’s what the Clip Trimmer is all about. You open it by choosing Window→Show Clip Trimmer (⌘-). iMovie displays the original footage in a strip just above the clip you’re trimming. You can see it in Figure 5-11.
In essence, you’re seeing the full-length clip, just as it originally appeared in the Event browser. The white borders indicate which part of the clip you’re using in your movie. You can use the usual tricks to play back the footage, skimming the clip and hitting the space bar as necessary.
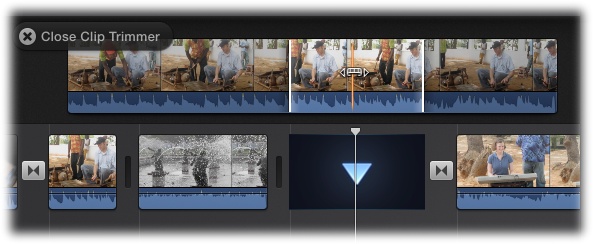
Your main business here is to readjust your selection by dragging the white border. Make it longer if you want more of the clip in your project, shorter if you want less, just as if you were resizing the clip in place. Or grab any part of the clip, inside or outside the white boundaries, and slide the entire thing horizontally to include an earlier or later portion of the same duration.
When you finish reselecting, click the ![]() that says Close Clip Trimmer, or click the
big blue down arrow on the clip in your storyboard.
that says Close Clip Trimmer, or click the
big blue down arrow on the clip in your storyboard.
The Precision Editor
In editing jargon, a cut is the place where one clip ends and another begins—the crossroads where clips meet, in other words. A well-designed cut looks professional, even if it’s subtle. For example, you might cut between two birthday parties that happened in the last year. To make the cut really cool, you could move from one birthday to the next using the exact moment when the candles are blown out. One of your kids would lean down to blow out the candles and, post-cut, the other would stand up smiling. The effect forges a connection between the two birthdays, even though they happened at different times.
The Precision Editor, an innovative tool that debuted in iMovie ’09, makes cuts like these—cuts that would involve many steps in a professional editing tool—remarkably simple. Assuming you already have the clips in the storyboard, using the Precision Editor to create a refined cut goes like this:
Call up the Precision Editor.
You can do this several ways. The easiest is to double-click the space between two clips. But if you already have a clip selected, you can choose Window→Show Precision Editor or press ⌘-/.
Note
If you placed a transition between two clips (About Transitions), double-clicking the transition’s icon brings up the Adjustment Viewer for the transition. To get the Precision Editor instead, double-click the empty space just above or below the transition icon.
The Precision Editor and its controls overlay the storyboard and position the footage that comes before the cut above the footage that comes after the cut (see Figure 5-12).
Figure 5-12. Behold the Precision Editor! The top layer holds the clips leading into a cut. The bottom layer contains the clips trailing the cut. You adjust the position of the cut by dragging the dot between the layers. Adjust the clips surrounding the cut by dragging the clips themselves. (The other dots running along the bar between the layers represent the different transitions and cuts in your project.)The gray vertical line with the dot in the middle is the cut line—think of it as the Precision Editor’s playhead. It represents the position of the existing cut. You can drag the dot left or right to precisely position the cut. Dragging to the right extends the clip in front of the cut (called the leading clip) and shortens the clip that occurs after the cut (the trailing clip). Drag left for the opposite effect.
If you added a transition, the dot looks more like a gray pill with two dots in it. Drag the middle part, between the two dots, to precision-cut here. (Dragging either of the dots increases the length of the transition, not the position of the cut.) Successfully grabbing the middle part may be hard to do if the dots are close together, so you may need to lengthen the transition (by moving the dots) to give yourself some room to work. You can then make the cut and shrink your transition back down to size.
Adjust the clips surrounding the cut.
You may like where the leading clip cuts out, but not where the trailing clip comes in. To adjust the clip itself, drag it left or right (remember, the leading cut and trailing cut are on two separate lines, so you can move each independently of the other).
Overlap the audio, if you like.
Say the leading clip has someone describing a fun memory in Grandma’s backyard, while the trailing clip shows the next generation running out of Grandma’s back door to play.
Position the playhead where it crosses the audio track you want to edit (without clicking), and then move your cursor over only the audio portion of the playhead. You can then drag the cursor to “snap off” that audio portion from the Precision Editor’s playhead and adjust the sound only (Figure 5-13). Drag the snapped-off part to specify where you want the audio to cut out. This means you can take the audio of the leading clip (memory of Grandma’s backyard) and extend it into the video of the trailing clip (kids running out the back door) for a very nice effect. (Basically, this is another way to do the Cutaway audio trick explained on Adjust the Fade-In and -Out.)
Not everything involved in a cut is video. You may have titles, songs, or photo cutaways in your masterpiece. You can drag these elements left or right to adjust their timing, too, just as you do for audio or video.
Preview your edit.
Previewing in the Precision Editor is just like previewing everywhere else. You can skim and play with the commands covered on Skim Filmstrips.
Go to the next cut.
Now that you have an Oscar-worthy cut, you can go to other cuts by clicking the gray dots that run along the middle bar. Each dot represents a different cut.
Once you finish, click Done or hit the Esc key.

Split a Clip
The techniques described in the previous section work well when you want to remove or add footage to a clip. Sometimes, however, you want to split a clip without removing or adding footage. For example, iMovie can only apply video effects to entire clips; if you want only part of your clip to get special treatment, you’ll have to break that portion off into a standalone clip. (Don’t worry; on playback, it still looks like part of the bigger clip.)
Tip
If you were thinking of using Split Clip to insert something, maybe a picture, in the middle of a clip, save yourself the trouble and use the Insert feature discussed on Insert Video in the Middle of Your Movie.
Or you may just want to break off one piece of a clip to use somewhere else in your movie. The Split Clip command is exactly what you need. Position your playhead where you want the split to occur, and then choose Modify→Split Clip (⌘-B).
Tip
Because of the way skimming works, you’ll probably misplace the playhead on your way to click a menu item. Remember that you can lock the playhead on a spot in a clip by holding down the Control key while you move your cursor out of the storyboard.
If you change your mind about a split immediately afterward, you can always use the Undo command to take back that step. If you split a clip and change your mind much later, after you’ve done a lot of other editing, iMovie can still accommodate you. Click either part of a split clip and choose Edit→Join Clip; iMovie plays marriage counselor and reunites the clip with its former soul mate, assuming it’s still adjacent. (If something else is now between them, get it out of the way so iMovie can do its job.)
Aspect Ratios: The Missing Manual
You may find yourself editing new video clips together with old ones you imported from some DV tapes you had in a drawer. When that happens, you’re combining video that has different aspect ratios. It’s worth taking a moment to explain how iMovie handles this.
Aspect ratio is an annoying geek term for the shape of a movie frame. Learning about aspect ratios is an unfortunate requirement of mastering video editing.
A history lesson is in order. As you may remember, the standard 1980 TV set’s screen isn’t the same shape as a movie screen. The TV is almost square, but the movie is wide and short. They have different aspect ratios (see Figure 5-14).

Old TVs have a 4:3 aspect ratio. Those are the horizontal:vertical proportions. So if your screen is 4 feet wide, it’s 3 feet high.
Note
Weirdly, 16:9 is not the standard aspect ratio for Hollywood movies! Those are usually 1.85:1 or 2.35:1. (Don’t ask why movie aspect ratios always have 1 in the denominator. Nobody ever accused the video industry of being consistent.)
Believe it or not, those aren’t the only common aspect ratios. Consider the older iPhones (4s or prior)—their screens are 3:2.
Another common aspect ratio, the 9:16 format, is the opposite of HDTVs. This is the result of uninformed smartphone owners who hold their phones vertically when they shoot video. Read the sidebar below to find out why this is generally a bad thing.
iMovie doesn’t bother wasting time with aspect ratios. Everything it edits comes out in the 16:9 format. That’s an executive decision Apple made, based on the fact that HDTVs and the 16:9 format are the standard these days. But when you edit a movie that has footage shot at different aspect ratios, you have to choose how iMovie handles it, as explained in the next section.
How iMovie Handles Mismatched Aspect Ratios
Whenever iMovie encounters source video that doesn’t fit a frame, it can do one of two things:
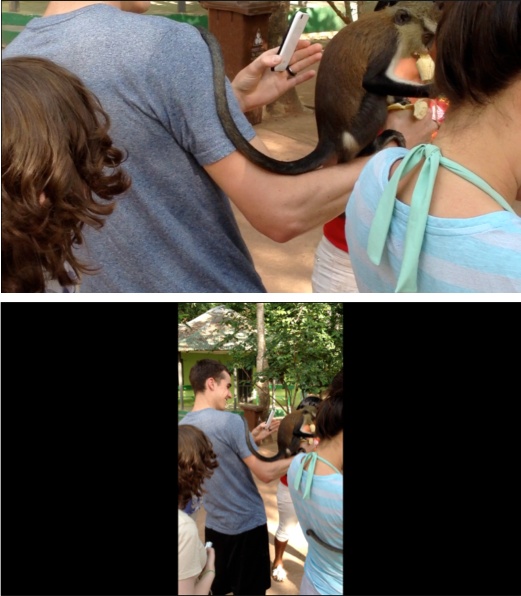
It can blow up the video large enough to fill the frame. In the process, of course, some of the picture gets chopped off the top and bottom of the frame. This is called cropping.
It can add black letterbox bars on either side of the picture. This is called fitting.
Figure 5-15 shows what happens in both situations. By default, iMovie crops mismatched video. But you can change that.
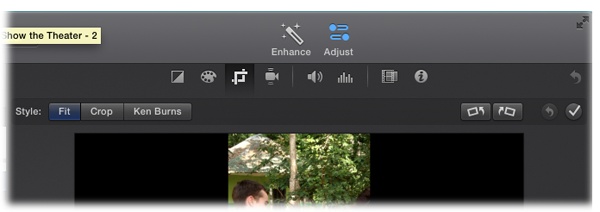
Change How iMovie Handles Non-16:9 Footage
Yes, iMovie’s factory setting is to crop mismatched video, but you don’t have to play along. After all, this cropping could cut off the tops and bottoms of very important things, like Grandma and Grandpa.
To change the way iMovie displays non-16:9 footage, select the clip in your storyboard and then click the Adjust button in the iMovie toolbar. A set of editing tools appears in the Viewer. Choose the Cropping tool (Figure 5-16) and then click the Fit button. Now all of your clip appears in the frame, along with the necessary black bars on either side.