Chapter 8. Video Effects
It’s a funny thing that we’ll take pristine HD video and make it look old and grainy. On purpose. But video effects, like the popular Aged Film effect, create a mood that you can’t really communicate in any other way.
Apple has put a lot of work into juicing iMovie’s video effects. They include not only classic old tricks like Slo-Mo, Picture-in-Picture, and filters, but also some very cool new ones, like a one-step Instant Replay. Moreover, the new iMovie simplifies how most of the effects work. Now more than ever you can edit stuff in place, rather than having to fiddle with settings in a separate Inspector window.
Note
Still no plug-ins, though, just in case you’ve been holding out for them. Don’t expect that set of third-party plug-ins you bought for iMovie HD to ever work in the new iMovie.
Maybe best of all is that you don’t have to wait for iMovie to render (process) an effect. Your project immediately reflects any effect you select.
Video Effects
What iMovie calls video effects may be better described as video filters. They generally change only the color and definition of the underlying video. (The one notable exception is the Flipped effect, which displays a mirror image of your clip.)
The Effects
A rundown of iMovie’s video effects is in order (Figure 8-1).
Flipped. Turns your clip into a mirror image of itself.
Raster. Covers your clip with horizontal scan lines, like you’d see on an old TV.
Cartoon. Smooths the different colors in your clip to make it look like the clip was taken from a comic book.
Aged Film. One of the most popular effects, Aged Film applies a sepia tone and film noise to make your clip look like an old, worn-out filmstrip.
Film Grain. Applies a mild sepia tone and adds tiny speckles that look like grainy film.
Hard Light. Overexposes the light colors and darkens the dark colors.
Day into Night. Darkens the whole clip with a bluish hue, as though it were shot at night.
Glow. Overexposes the light colors without darkening the dark colors.
Dream. Blurs the clip and washes out its colors, to convey the idea of dreaming.
Romantic. Blurs just the edges of the clip, so your focus rests on whatever’s in the center (presumably the object of your desire).
Vignette. Instead of blurring the edges, this effect fades the edges to black, not unlike what you’d see in studio photography from the 1980s.
Bleach Bypass. Washes out colors, just like bleach.
Old World. A sepia tone and a glow combined. Yet another way to make that high-tech footage look low-tech.
Heat Wave. This is what your clip would look like under the punishing desert sun, yellow and overexposed.
Sci-Fi. If you’ve seen the Matrix movies, you know exactly what Sci-Fi looks like. It applies a green hue to everything.
Black & White. The old classic.
Sepia Tone. The other old classic. Applies a brownish hue to everything, making it look like ancient photographs or films from the turn of the century (the turn of the previous century).
Negative. Inverts all the colors in your clip by replacing them with their color-wheel opposites.
X-Ray. Turns everything into shades of greenish-gray, with lights and darks inverted. Presumably, this is what your movie would look like if you filmed the whole thing with an X-ray machine.
Apply a Video Effect
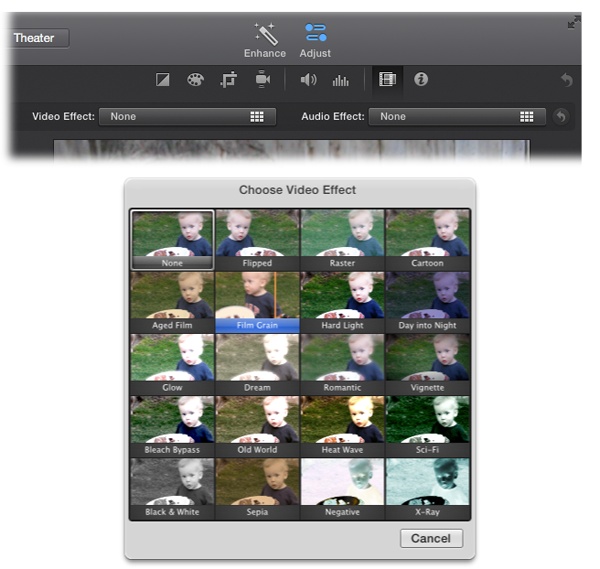
You can apply video effects to any clip or photo in your project, even cutaways and travel maps. Start by selecting the clip, and then click the Adjust button in the toolbar. The Effects icon (shown highlighted in Figure 8-2) offers both video and audio effects.
Clicking the Effects button reveals a bunch of thumbnails that show what your clip would look like with the various video effect applied (Figure 8-2). Click an effect and iMovie skims across it, previewing it in the Viewer. To apply an effect, click the thumbnail itself.
iMovie doesn’t update filmstrip thumbnails on the fly, so the filmstrip in the storyboard doesn’t reflect the change. But the effect will show up when you preview the clip.
Tip
You can also play the clip (with the effect applied) by tapping the space bar while you preview the video effects. iMovie plays the clip repeatedly while you make up your mind. As your clip plays back, you can point to other effect thumbnails in the preview window (without clicking) to see what they’d look like if you applied them to your looping video.
Adjust a Video Effect
You can’t make any adjustments to iMovie’s video effects. If you don’t like the way an effect that comes from Apple looks, you’re out of luck.
Remove a Video Effect
To remove an effect, pull up the Effects chooser again, and then click the None thumbnail. Your clip is back to normal.
Fast/Slow/Reverse
Whether you want to mimic the race in Chariots of Fire or a Benny Hill chase scene, you can add a lot to your movie by changing the speed of your footage. Slowing a clip down emphasizes the drama of a moment. Speeding it up conveys urgency, depicts the passage of time, or just makes it funny. Throw in a good Reverse effect and you could pretend your protagonist has a remote control that rewinds time.
Change a Clip’s Speed
iMovie offers two principal ways to make a clip play back faster or slower:
Speed changes from the menu bar. In the Modify menu, iMovie gives you options for Slow Motion, Fast Forward, Instant Replay, Rewind, and Reset Speed. The first two options are simple clip speed changes. The next three are cool, complex effects you can apply with just one click.
The value of these menu options is that they’re easy. They may not give you the precision you want, but you can’t find a simpler way to make these edits. Plus, you can fine-tune them later using the next method.
Speed changes with the Speed Editor (⌘-R). A huge improvement in this new version of iMovie, the Speed Editor is a very simple way to adjust the speed and direction of clips right in the storyboard.
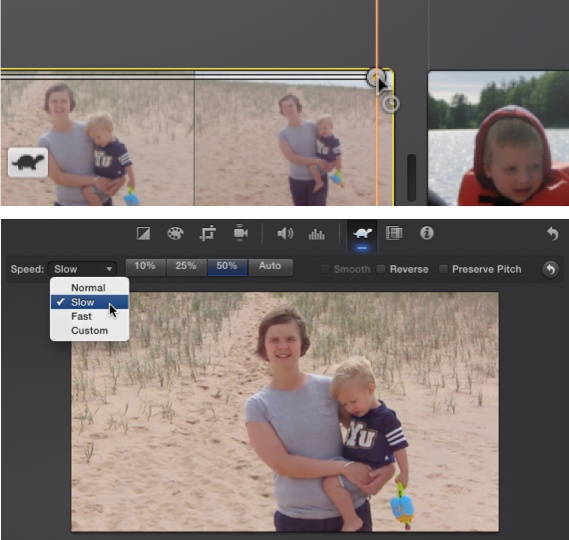
The Speed Editor comes in two flavors. One lets you make rough speed changes; the other gives you finer control (Figure 8-3 shows both of these parts at work).
For quick-and-dirty speed changes, press ⌘-R or Control-click your clip; choose Show Speed Editor from the shortcut menu. A dot appears in the top-right corner of your footage. Drag the dot to change your clip’s playback speed. When you do, you see either a bunny or tortoise button on the clip. Click either to launch the Speed Editor tool in the Viewer, where you can control speed by the numbers. To go directly to the Speed Editor window, call up the speed dot and then click the speed line once, no dot adjustment necessary.
Reverse a Clip’s Playback Direction
Playing a clip backward has been a comedic staple since film was born. To do that in iMovie, just check the Reverse box, shown in Figure 8-2.
With the Speed Editor turned on, your reversed clip appears
with a ![]() button on it.
button on it.
Remove Speed and Direction Changes
If you just finished fooling with a clip’s speed or playback direction, you can undo your changes with the Mighty Undo (Edit→Undo or ⌘-Z). But if you meddle with your clip in the meantime, or quit iMovie and then restart it, you can undo changes (or set a new speed) through the Speed Editor tool. But an even easier option is to select Modify→Reset Speed (Shift-Option-R). That removes any speed or direction changes.
Connected Clips
Some video effects mingle two clips together in various ways, like the video box that hovers over a news anchor’s shoulder or the ubiquitous green-screen effects that Hollywood uses. iMovie handles these marriages through a feature called “connected clips.” The idea is that you join two clips so that they interact in one of these special ways.
Specifically, iMovie can do cutaway, green-screen, side-by-side, and picture-in-picture effects. Each is discussed in the following sections.
Connect a Clip
To get any of these effects, you first need to connect two clips, and there are many ways to do so. With a clip in the storyboard, select the second clip in your Event browser. The slow way is to choose Edit→Connect. The super fast way is to press the letter Q key. In either case, iMovie connects the second clip starting at the playhead. You can also drag a selection from the Event browser (or even drag a clip in your project, so long as it includes no titles) and drop it just above the first clip.
Once connected, the second clip hovers above the first, with a little blue flag denoting the arrangement (Figure 8-4). You can move a connected clip wherever you want; you can even change your mind and drag it into the main row of clips to have it behave as a normal clip.
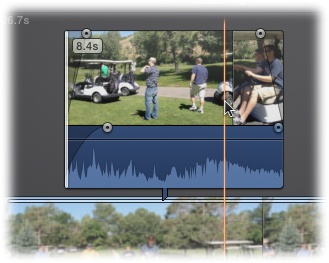
Adjust the Fade-In and -Out
You can’t add a special transition to a connected clip—iMovie uses a basic cross-dissolve on all of them. But you can adjust the timing of the transition to a connected clip using the little gray and blue handles shown in Figure 8-4.
Drag these handles inward to increase the video and audio fade. Drag them out to the ends to have your clip and/or audio appear immediately, without any fade.
Trim. Edit. Go Nuts.
You can adjust connected clips in pretty much all the same ways you work with normal clips. You can trim or edit them with the Clip Trimmer or Precision Editor, apply video or audio effects, and use them with titles. You can even make speed and direction changes. Don’t hold back just because it’s not a normal clip.
Cutaways
The first, most basic kind of connected clip is the cutaway. A cutaway is an important, basic editing technique. That’s when someone on-camera begins talking…and you hear her keep talking, even as the video switches to something different (like something that illustrates what she’s saying, for example). You see cutaways all the time on the nightly news, and in every documentary you’ve ever seen.
iMovie makes cutaways ridiculously easy. Just add a selection as a connected clip. iMovie chooses the cutaway automatically. But doing it like the professionals takes a little bit of planning.
In the following discussion, you’ll work with what the pros call A-roll (the beginning video, usually of the person talking) and B-roll (the soundless footage that illustrates what she’s talking about). Then, to make a cutaway:
Start with the A-roll footage in your project.
Make sure that the footage has audio that’s useful while showing the B-roll, like someone describing what the audience is going to see.
Select your B-roll footage from the Event browser.
This is whatever footage you want to cut away to while the audio of the A-roll plays underneath.
Drag and drop the B-roll selection onto your A-roll filmstrip in the project.
When you do, iMovie inserts the clip as a cutaway.
Select your cutaway clip, and then press Shift-⌘-M to mute it.
You’ve just silenced any audio that came along with the B-roll clip, so it doesn’t compete with the sound of the person talking.
Adjust a Cutaway
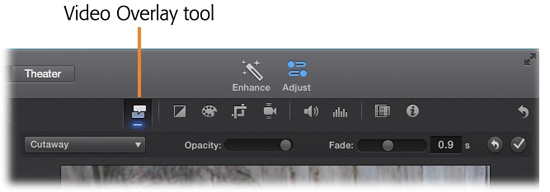
As mentioned, you can use all the standard editing tools with your cutaways, but two additional tools are specially designed for cutaways, and they’re very cool. You find them by selecting the cutaway and then clicking the Adjust tool. Once there, click the Video Overlay tool (Figure 8-5) to see two other options:
Fade in/Fade out. You don’t have to cut abruptly to the cutaway; you can use a graceful crossfade into or out of it using the Fade slider.
Note
If you made adjustments using the little blue and gray fader handles described on Adjust the Fade-In and -Out, then your adjustments will be lost once you move the Fade slider.
Opacity. Your cutaway doesn’t have to completely replace the talking-person video, either; you can make it appear superimposed on the talking-head video, as though it’s translucent. It’s a special effect you won’t use often, but it’s good to know it’s there. Drag the Opacity slider to control how see-through the superimposed video looks.
Remove a Cutaway
To get rid of a cutaway, select it in your project and then press the Delete key.
Green Screen/Blue Screen
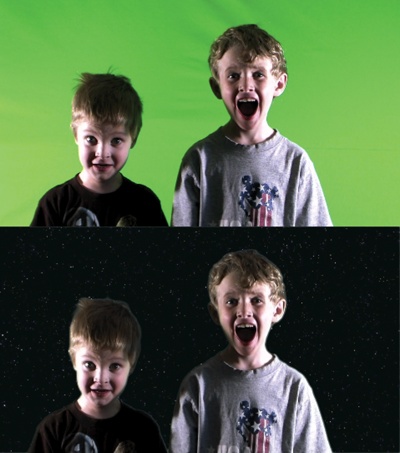
iMovie has opened the door to all kinds of fun with this effect. Why film your kids playing in the backyard, when you can film them playing on the moon? Or wherever.
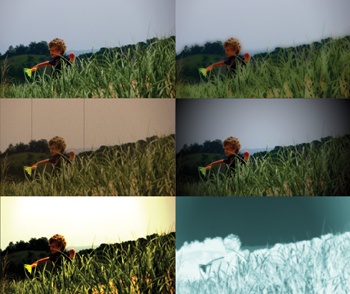
iMovie’s Green Screen and Blue Screen effects let you superimpose your subjects on whatever background you can think up, just as Hollywood has been doing for decades. With a little preparation, you could film things that would otherwise be impossible to shoot (Figure 8-6).
Prepare a Green Screen
Professional green screens can cost hundreds or thousands of dollars, which is way too much for something you’re editing in iMovie. The brains behind iMovie get this, so they designed the Green Screen effect to work with some pretty common, inexpensive materials.
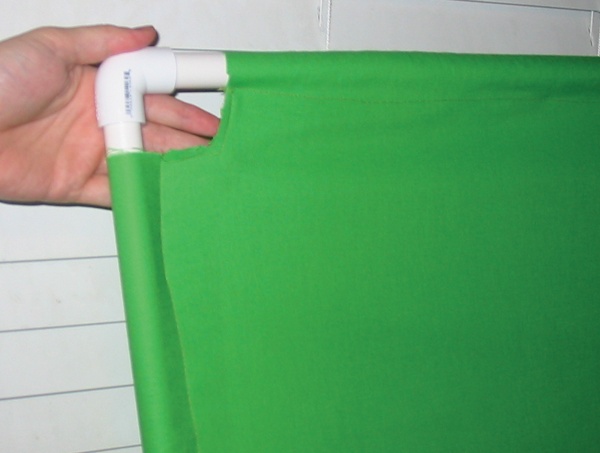
You can try almost any kind of green background, as long as it’s a bright, pure green (no limes, turquoises, or pines) and isn’t too shiny (read on). To get a good idea of the right shade of green, use the color chooser you can find in most applications on your Mac, like TextEdit. (Pressing Shift-⌘-C usually brings it up.) Click the crayons tab and choose the Spring crayon. This is the color you need for your background. Fabric stores are a good bet, as are hardware stores that carry broad paint selections. Figure 8-7 shows how you can fake it.
Note
The instructions here describe making a green screen, but if you have your heart set on blue, don’t let these instructions stop you. Just use the purest blue you can find, like what you’d see if you used the color chooser in OS X and picked the Blueberry crayon. Then follow the instructions in this section.
A popular, low-budget approach to green screens is to buy some green fabric and attach it to a frame you make from plastic pipes or wood slats. If you don’t glue the pipe joints, you can even make it collapsible. Use green paint only if you have a stiff, smooth surface that you can paint green, like the wall in your basement or garage. Keep in mind that surfaces like this are probably less mobile.
Get the Shot
Besides having the right color green, here’s a short list of other tips that will make a world of difference in your green screenshots:
Good lighting. The last thing you want are shadows on your green background, because shadows change the color that your computer sees and ruin the seamless effect. Shadows cast by the actors themselves are particularly frustrating. Your best bet is to light the background and the actors with separate light sources.
Lots of space. Whether or not you have great lighting (but especially if you don’t), keep lots of space between your actors and the green background. Four feet is a decent minimum. This reduces the likelihood that shadows will mess up the effect your computer will apply.
Tip
Good lighting and lots of space also help you avoid the dreaded halo. When the lighting is poor or the actors are too close to the green screen, green light can reflect off your subjects. The outcome is a strange halo effect that makes it easier to tell that the subject isn’t really flying through outer space.
No shine. Some green materials, like poster board, come in the right color but if they’re shiny, they reflect white light in addition to green. Green fabric is preferable, because it diffuses light and minimizes reflections. If you use poster board, just make sure you don’t see any glare.
No bumps or wrinkles. We’re not talking about your actors here. To eliminate shadows, the green surface has to be smooth. Wrinkles and bumps make the computer-added background look wrinkled and bumpy, too.
No other greens. Don’t let your actors, or anything else you want in the shot, wear green.
Insert a Green-Screen Effect
Now that you’ve shot your green-screen footage and imported it into iMovie, the rest is refreshingly easy.
Choose your background footage and add it to your project.
You can choose a still image or video footage, but avoid using backgrounds that distract from the subjects in the foreground. Be especially aware of scale; for example, closeup footage of garden flowers will make your actors look unnaturally small. (Of course, you may be going for that Honey, I Shrunk the Kids look on purpose.)
If you use moving footage as the background, consider two things. First, because you lit your subjects a certain way, try to shoot the background with similar lighting. (Or try to shoot your actors with similar lighting, like daylight for daylight.)
Second, make sure you filmed enough background footage to cover the duration of your actors’ scene. Or just repeat the background footage—loop it—by adding it to your project several times over.
Select your green-screen footage. Drop it onto your background clip.
When you drag and drop it onto your background, it first appears as a regular cutaway clip.
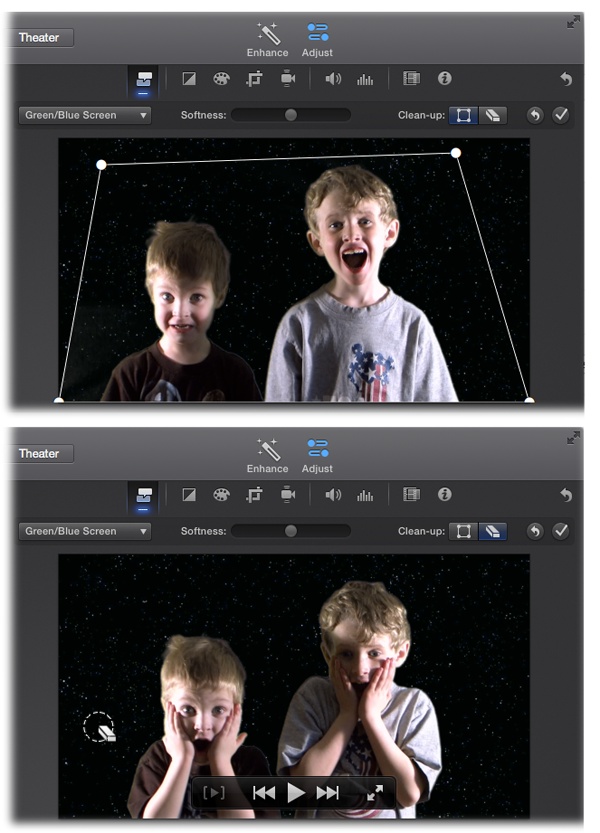
Click Adjust in the Viewer toolbar, select the Video Overlay tool, and then choose Green/Blue Screen from the drop-down menu (Figure 8-8).
iMovie superimposes your green-screen clip onto the underlying background. In the storyboard, the green-screen clip has a green border and floats on top of the background clip.
Crop and clean up your green-screen background.
With your green-screen clip selected, use the dots in the corners of the Viewer to tighten the green-screen replacement area around your subject (Figure 8-8). Everything outside the points will show your background, whether it was green or not, so you don’t have to worry about shadows, lighting, or wrinkles there. When you drag the boundaries, be careful not to eliminate an area where your actors will be at some point or they’ll wind up losing body parts in a most unnatural way. (To check, play the entire clip by clicking the |
 | button in the Viewer.)
Use the eraser tool (shown in Figure 8-8) to clean up parts that need to disappear into the background. For example, if a wrinkle shows up in your video, erase it with this tool.
Once you finish, click the checkmark to apply your settings.
Figure 8-8. The Green/Blue Screen options let you “soften” (blur the edges of) the superimposed clip using a slider. Top: The “Clean-up” tool lets you crop out part of the background, in case it isn’t all green. Bottom: The eraser tool lets you clean up trouble areas caused by bad lighting, wrinkles, or other inconsistencies in your background.You can drag the green-screen clip (the upper one in the storyboard) left or right to adjust its playback relationship to the background clip. You can also drag its ends to make it longer or shorter. To get really specific about the clip’s timing, use the Clip Trimmer (Use the Clip Trimmer).
Adjust the sound.
Use the ducking tool, the volume slider, or any of the other volume-adjustment tricks described in Chapter 11.
Adding Effects to the Green-Screen Effect
You can stabilize a green-screen clip and change its speed or direction. In fact, you can do anything to it that you can do to a regular clip, even add a video effect.
That’s awesome, too. Imagine how fun it would be to have the green screen actors look like X-rays of themselves while talking to other actors you put in the background shot. The possibilities are endless.
You can add video effects to the background, too. That dramatically increases the potential for amazingness.
Side by Side
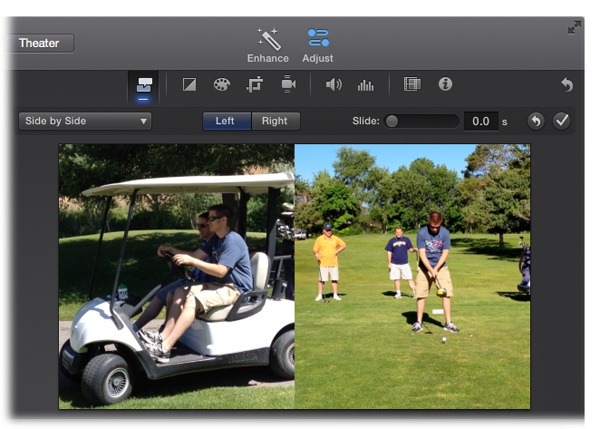
The Side by Side effect displays your additional clip by filling up half the screen with it. This is a common effect in movies when you want to show two events taking place at the same time, like a house being broken into while the family is having a great time on vacation.
You add Side by Side clips to a project as connected clips, though you will need to change it from a cutaway to a side-by-side in the Video Overlay tool (Figure 8-9).
Note
Use this effect only with clips that have the subject smack dab in the middle of your shot. When two clips share the screen, iMovie cuts off the left and right ends of the clips. Widescreen footage, in particular, gets severely trimmed on either side. If you’re not careful, one of your clips might show a shot of a talking tree instead of the person you filmed.
Change the Side by Side Appearance
There isn’t a whole lot to adjust in terms of how the Side by Side effect looks onscreen. You can only change its location (Left or Right) and its entry/departure timing (Slide). You make both of these adjustments in the Video Overlay tool (Figure 8-9).
Tip
The Slide setting makes your Side by Side clip slip onto the screen with a slick animation. Little touches like this really make your movie look professionally edited. But notice that the little fade handles discussed on Adjust the Fade-In and -Out don’t work for the video part of Side by Side clips. The Slide setting is fully in charge here.
Picture in Picture (PiP)
Picture in Picture is the effect that lets TV junkies watch two channels at once. The football game fills the big screen, but 60 Minutes plays in a small inset window in the corner.
In its heyday, PiP was a boon to those who hated commercials. When the ads came on, you could switch to another show, all the while keeping your eye on the channel carrying the game. The moment the commercials ended, click, you were back.
Commercials are obviously not why you’d use the Picture in Picture effect in your movie. It’s more likely that you’ll use it to recreate the effect on the nightly news (or The Daily Show), where a magic box floats over the anchorperson’s shoulder to display some corny graphic to go along with the story. The PiP box in this case is supplemental.
iMovie’s PiP effect lets you do the same kinds of things. It might be a family member narrating that great hit from the reunion softball game. It might be a shot of the crowd as your kid takes her bows at a recital. Whatever the reason, the primary footage stays primary, while the PiP box helps it along.
Insert a PiP
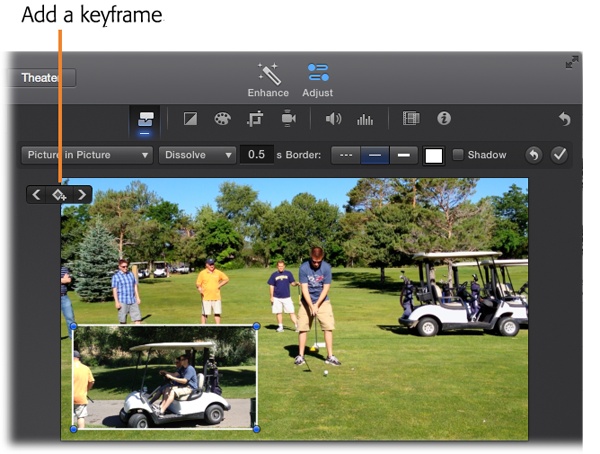
Add some event footage to the storyboard as a connected clip. Select that clip and use the Video Overlay tool to change it to a Picture in Picture shot (Figure 8-10).
Adjust the PiP Size and Position
On a TV, PiP boxes are relegated to one corner of the screen and usually have a fixed size. If iMovie insisted on such behavior, a PiP box might cover up Aunt Bertie’s face the entire time. (Of course, that might not be such a bad thing.) The point is that when it comes to PiP placement, iMovie is much more flexible than your TV.
When you select the PiP clip in your storyboard, look at the preview window to see the effect. Notice the inset picture? You can drag that box anywhere in the frame. You can also resize it by dragging one of the corners inward or outward. In fact, you can, if you want, make the box big enough to cover all of Aunt Bertie. (Of course, if you’re going to make the PiP box fill the whole screen, it may make more sense to use a cutaway [Adjust the Fade-In and -Out].)
Note
Although you can change the size and position of a PiP box, you can’t change its dimensions. The box will always have the same proportion of height to width, usually 16:9. (See Split a Clip for a primer on aspect ratios.)
Animate a PiP
Maybe the first thing you thought when you read about this feature was, “Boy! Wouldn’t it be great if I could make the PiP box fly around the screen?” Well, if you thought that, you’re in luck (and maybe a little too “creative” for your own good).
It’s hard to imagine a situation when this would be useful, but don’t let that stop you. (Or maybe do let that stop you, for your audience’s sake.) You can use iMovie to shift the position of the PiP clip while your movie plays. It could start out in one corner, move to the middle, and then do a big loop in the screen, if you really want it to.
In Figure 8-10, you can see how the Viewer offers keyframe tools just below the PiP tools. You’ll use keyframes to animate your PiP.
Note
A keyframe is an animator’s tool for determining how an animation should behave. Basically, you give the video-editing software point A and point B using keyframes, and it figures out how to move the object between the two.
To animate a PiP effect, follow these steps.
Have your PiP effect added to your movie and ready to go.
Position and resize your PiP box the way you want it to look.
Move the project playhead to the moment when you want your PiP box to move. This spot will be the “point A” from which iMovie knows to start the animation.
Click the Add Keyframe button.
That’s the button between the two arrows.
Move and/or resize your PiP box.
Once you move/resize the box, iMovie knows how to process the necessary animation for making it change from point A to point B. You don’t get to control how long it takes the box to change, but that also saves you the hassle of managing such details.
Repeat steps 4 and 5 as needed.
You can move the box around as much as you want. In fact, you can create smoother motions by adding a lot of keyframes.
Preview your work.
Click the checkbox to finish.
If at any point you place a mistaken keyframe, you can always delete it. Just use the arrow keys to page through each keyframe. As you do, the Add Keyframe button changes to a Delete Keyframe button. Page to the errant one and delete it with a simple click.
Change the PiP Appearance
There’s more to a PiP box than just size and position. You can actually change quite a few other aspects of its appearance. Each of these appear in the Video Overlay tool (Figure 8-10).
Change the PiP effect. Using the PiP Effect pop-up menu, you can control how the smaller, inset video makes its appearance. “None” means it simply blinks onto the screen. “Dissolve” makes the inset fade in and out. “Zoom” makes the PiP box zoom forward to its spot, and then, at the end, zoom back to its original location. Swap makes the two clips trade places, so that the underlying footage becomes the PiP. Type a time (in seconds.tenths format) in the timing box to adjust how long it takes the PiP to appear and disappear.
Tip
You can also use the fade handles on the clip itself (Adjust the Fade-In and -Out) to change the timing of how your PiP appears.
Change the box border. The Border Width and Border Color options control the outline that appears around the inset video. Your width options are None, Thin, or Thick. Choose any color you like for the border color, from a nearly infinite number of options, thanks to the color picker that appears (more on the color picker on Underline, Strikethrough, Color, Shadow).
Add a drop shadow. Turn on Drop Shadow to make the inset cast a subtle shadow on the underlying video, as though it’s floating just above it.
And remember, even though it’s a PiP clip, you can still manipulate it every which way—stabilize it, add a video effect, or speed it up and slow it down. In fact, you may need to make these adjustments to get the clip to look more like the rest of your project.
Mix PiP Audio
There are a lot of reasons to use a PiP effect, and none of them involve having the audio from both clips on full volume. You want either the underlying clip or the PiP clip to be heard.
Fortunately, you can control their relative volume levels just as you would any other clip, using the Volume slider, rubber-band editing, or the ducking feature. You’ll find all three described in Chapter 11.
Move and Trim a PiP Clip
Odds are, you didn’t get your PiP clip into exactly the right place you wanted when you dropped it into your storyboard. You can fix its position by grabbing anywhere inside the clip and dragging it to the correct spot.
Tip
Even if your PiP clip covers a transition, the transition will still work. iMovie carries out the transition underneath the PiP clip.
You may also have to adjust the length of your PiP clip. You don’t want too much or too little of the clip to play. Grab either end of the clip and drag it to make the clip longer or shorter.
Tip
To get really precise with the length and content of your PiP clip, use the Clip Trimmer (Use the Clip Trimmer) instead.
Remove a PiP Clip
Change your mind? Select the PiP clip and hit the Delete key.
One-Step Effects
Having read this chapter on video effects, your mind is probably cranking away on all the possibilities. For example, you could use the Slo-Mo effect to create an instant replay of your nephew’s home run. To do this, you’d find the footage in your project that you want to replay, select that footage in the event and insert it into the middle of your clip, use the Slo-Mo setting (Modify→Slow Motion) to slow down the replay, and then add a title to the replay clip saying “Instant Replay.” It might take you 5 minutes to get this all to look right, but now all your relatives can enjoy the crack of the bat replayed like it would be in any Major League game.
Or you could just select your clip and choose Modify→Instant Replay to have iMovie do all that work for you, instantly and automatically.
This example shows you the sheer coolness of iMovie’s new One-Step Effects: Select any of the effects in the Clip menu of the menu bar, and iMovie executes all the same steps you’d take to create the effect.
Now that you know how One-Step Effects work, all that’s left to do is run through the list of what each one does.
Choose a clip in your project, and then click the spot where you want the effect to start. (If you don’t do this first, your effect will appear in the wrong place.) Then, in the Modify menu, choose a One-Step Effect to do any of the following:
Fade to Black and White/Sepia/Dream. To enhance a particular moment in a clip, this effect takes the part of a clip you select and fades it to the Black and White, Sepia, or the Dream filter you read about on The Effects.
Flash and Hold Frame. This effect turns the last frame of your selection into a still frame (Freeze Frames). There’s also a flash-like transition before the frozen frame and a zoom effect to make it look like someone just took a photograph.
Add Freeze Frame. Just like the Flash and Hold effect, but it doesn’t insert the flashbulb or the zoom. Instead, it looks just like someone hit the pause button for a moment.
Slow Motion. Slows your clip down to 50%, 25%, or 10% of normal speed, without your having to fiddle with the Speed Editor.
Fast Forward. Speeds up your clip by 2x, 4x, 8x, or 20x the normal speed, again saving you the minor inconvenience of fiddling with the Speed Editor.
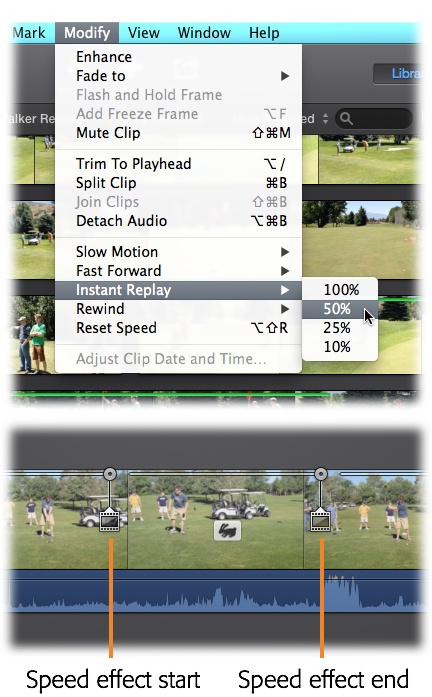
Instant Replay. This effect takes either the current position of your playhead or the selected part of a clip and then creates and inserts a Slo-Mo version. It even includes a cool-looking “Instant Replay” title. Once the Slo-Mo clip ends, your movie picks right up where it left off. (Figure 8-11 shows what this looks like and how to adjust it.) Choose 100%, 50%, 25%, or 10% to dictate how slowly the clip replays.
Tip
When you use one of these effects that changes your clip’s speed, the Speed Editor offers a Smooth checkbox to make the speed change less abrupt.
Note
The Instant Replay and Rewind effects do a special trick in the Speed Editor. They add something like keyframes in the speed line. These are basically extra (and draggable!) handles that tell iMovie to do something different with the speed and direction.
You can adjust the speed of either of these effects by dragging these handles around. You can even reposition where the keyframes occur by dragging the filmstrip icons around (Figure 8-11).
Remember that you can choose part of a storyboard clip by clicking and holding on a spot and dragging the mouse once your cursor turns into the special selection tool.
Rewind. Takes part of the clip and plays it quickly backward, as if you rewound an old VCR tape for just a moment. It’s basically the Instant Replay effect but without the title, and with a fast rewind instead of a slow replay.
Reset Speed. To undo an effect that changes a clip’s speed or direction, choose Modify→Reset Speed (Shift-Option-R).
Tip
Even if a One-Step Effect doesn’t get you exactly where you’re going, it might still save you time. You can tweak all these effects to your liking, since they’re all fully editable after the fact.
If, after you apply an effect, you don’t like the results, press ⌘-Z to undo it.