Chapter 12. Photos
You may think that iMovie’s primary purpose in life is working with video, but the truth is, it’s quite handy with photos and graphics, too. For example, you can add images to your movie from iPhoto, Aperture, or your hard drive to use as still shots, which you can then pan and zoom for an authentic, documentary-style effect. You can also use images and graphics to create slideshows. And you can turn individual frames of your movie into still images for use as freeze-frames. This chapter tells all.
Using Photos and Graphics
You may want to import a photos or graphics into iMovie for any number of reasons. For example:
You can use a graphic, digital photo, or other still image as a backdrop for movie credit rolls (Chapter 10). A still image behind your text is less distracting than moving footage.
You can use a graphics file for your credits themselves instead of using iMovie’s titling feature. As noted in Chapter 10, iMovie’s titling effect offers a number of powerful features, but it also has a number of limitations. For example, you have only rudimentary control over the title’s placement in the frame (see Figure 12-1).
Preparing your own title graphic in, say, Photoshop or Photoshop Elements gives you a lot of flexibility that iMovie titling doesn’t. You get complete control over the size, color, and placement of text, and you can add graphic touches or a unique background.
One of the most compelling uses of video is the video photo album: a smoothly integrated succession of photos, joined by crossfades, enhanced by titles, and accompanied by music. Thanks to iMovie’s ability to import photos directly—either from the iPhoto or Aperture photo-management programs, or your hard drive—creating this kind of slideshow is a piece of cake.

Note
Of course, you can create video photo albums in iPhoto, too. And iPhoto lets you loop a slideshow, while iMovie doesn’t. Rearranging and regrouping photos is much easier in iPhoto, too.
So why consider iMovie? Building a slideshow in a movie has several advantages. First, you have many more audio options; you can record narration as you play the slideshow, for example. And you have a full arsenal of tools for creating titles, credits, and special effects.
As your life with iMovie proceeds, you may encounter other uses for its picture-importing feature. Maybe, when you edit a home movie of your kids tussling in the living room, you decide it would be hilarious to insert some Batman-style fight-sound title cards (“BAM!”) into the footage. Maybe you need an establishing shot of, say, a storefront or apartment building, and realize that you could save production money by inserting a still photo that passes for live video in which there’s nothing moving. Or maybe you want to end your movie with a fade-out—not to black, but to maroon (an effect described later in this chapter).
Photo Sources
You can bring still photos into a project two ways. If you use either of Apple’s photo-management programs, iPhoto for consumers or Aperture for pros, the first and most convenient way is to choose from their libraries, which you can tap into directly from iMovie (see the next section). If you don’t use either program, you can import pictures directly from your hard drive.
The iPhoto Library
The more you work with iMovie, the more you appreciate the way Apple integrates related programs like iTunes. If you use iPhoto or Aperture, you’ll experience another case of synergy.
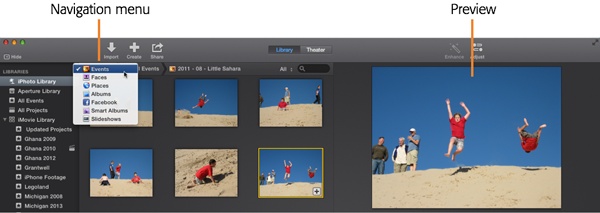
In iMovie’s Libraries list, the first offering is your iPhoto library. Select it and you see what amounts to iPhoto Lite: a panel of thumbnail images of shots from your iPhoto library. Using the drop-down menu just above the thumbnails, you can browse your photos by event, album, folder, or according to other iPhoto presets (like flagged photos or photos added during your last import). You can filter your photos based on Faces or Places you identified in iPhoto. too. And you can view any Facebook albums you synced with iPhoto.
Tip
Events in iPhoto are a lot like events in iMovie. That is, iPhoto groups all the photos the way you tell it to. Each photo can be in only one event.
Note
Albums are different; they’re more like iMovie’s “projects.” A photo can be in as many albums as you like. You create one by choosing File→New Album (or by clicking the + button in the lower-left corner). Complete details are in iPhoto: The Missing Manual (O’Reilly).
Here are more handy photo browser tips:
iMovie shows your photos as a row of thumbnails. Unfortunately, there’s no way to resize these thumbnails like you can filmstrips.
When you click a photo to select it, iMovie displays it in the Viewer, giving you a chance to review it.
iMovie supports iPhoto’s cool Places feature. If you choose Places from iMovie’s drop-down navigation menu, you get a map with pushpins identifying where photos were shot, just like you see in iPhoto.
If you flag photos in iPhoto, you can limit what iMovie shows you by choosing Flagged from iMovie’s drop-down menu (Figure 12-3).

The Aperture Library
Your Aperture library works in iMovie just like the iPhoto library does. The navigation menu in Figure 12-2 works the same way. The only difference is that it shows Projects instead of the iPhoto-equivalent events. Other than that, everything works identically.
Import from the Finder
If you don’t have iPhoto or Aperture, you add images to your movie by locating them in the Finder and dragging them into your project window.
Tip
iMovie can import graphics in any format that QuickTime can understand, which includes PICT, JPEG, GIF, PNG, Photoshop files, and even PDF files (for when you want to display an IRS form in your movie). Avoid the GIF format for photos, which limits the number of colors available to the image; otherwise, just about any format is good still-image material.
Once you add a photo to iMovie, you don’t have to keep track of the original. Behind the scenes, iMovie copies the image to your project (hidden in the huge library file explained on Project Properties). So even if you delete a photo from iPhoto or your hard drive, it still exists in your project files.
iMovie Backgrounds and Maps
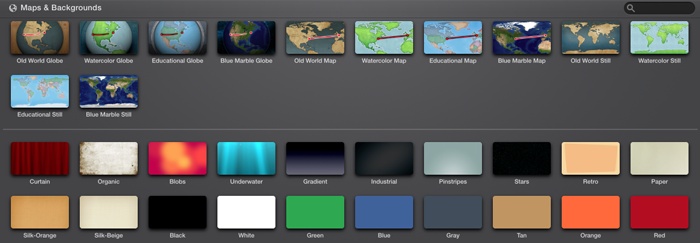
Generations of iMovie fans have dressed up their opening credits and chapter titles by creating custom backgrounds, so that text appears in front of red curtains or a Hollywood opening-night spotlight instead of plain black. To save you that hassle, iMovie comes with a handsome set of premade background images (Figure 12-4). Some are even animated; for example, the Underwater background shows shimmering rays of sunlight filtering through the water.
Tip
You can use background images and animations for your green-screen work, too (Green Screen/Blue Screen). So, instead of revealing that you shot your newscaster skit in your pathetic basement, you can insert one of these much more handsome backgrounds.
To use a background image, drag it out of the Content Library’s Maps & Backgrounds browser and into any empty area of your project—between two clips, after a clip, or on top of a clip (which will make it a cutaway; see Adjust the Fade-In and -Out). It appears as a 4-second clip, though you can adjust the timing (see Timing Changes).
Two Ways to Add Photos
Adding photos to your project is a lot like adding music, in that there are two ways to go about it. If you use photos from your iPhoto library, your Aperture library, or the Finder, you can add them between clips or on top of them (the latter giving you a connected clip). The results are quite different.
Photo Clips
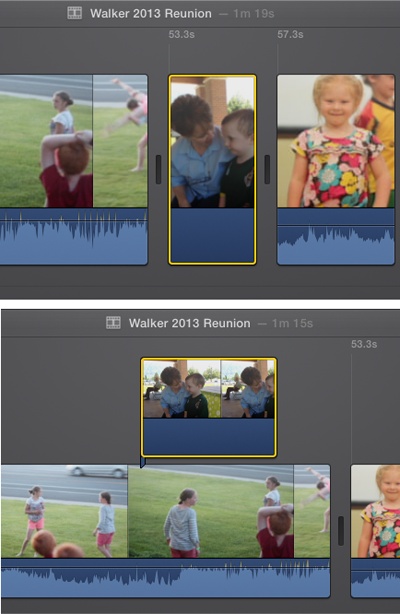
If you drag a photo between two filmstrips in your storyboard, you create a photo clip (Figure 12-5, top).
Tip
You can drag more than one photo at a time into your storyboard—a handy trick if you’re creating a slideshow. Select the set in the photo browser or Finder just as you’d select multiple files—by ⌘-clicking each one, or by clicking the first one in a series and then Shift-clicking the last one.
In most regards, the photo clip now behaves exactly like a video clip. You can crop it, rotate it, and make color adjustments to it, as described in Chapter 9. You can also apply the snazzier video effects described in Chapter 8, or superimpose titles and credits on it, as described in Chapter 10. You can even use the Split or Trim commands as described in Chapter 5.
You can also replace photos with other photos, just as you do with video clips: Drag and drop a photo onto the one you want to replace, and iMovie launches the Replace menu, explained on Replace a Clip.
Connected Photos
Alternatively, you can drag a photo above a video clip to make it a connected photo. It works just like a connected video clip, as explained on Reverse a Clip’s Playback Direction.
The most common use of connected photos is as a cutaway (Figure 12-6), a documentary-style effect discussed on Adjust the Fade-In and -Out. When you use a photo as a cutaway, iMovie sticks it right on top of the underlying clip in the timeline.
Note
Connected photos get close to full iMovie citizenship. You can crop, rotate, and apply effects to them to adjust the color of the cutaways. What you can’t do is adjust audio, since photos don’t have it.
Of course, it also covers up the video in the movie itself. So if the photo blocks the video, what good is it? Why not just create a photo filmstrip?
A connected photo has four advantages over a photo clip:
Connected photos are much easier to adjust. You can slide a connected photo left or right, earlier or later in the movie, with the touch of the mouse. And you can shorten or lengthen it by dragging its ends. (Oddly, this last trick works only when the clip is not selected.)
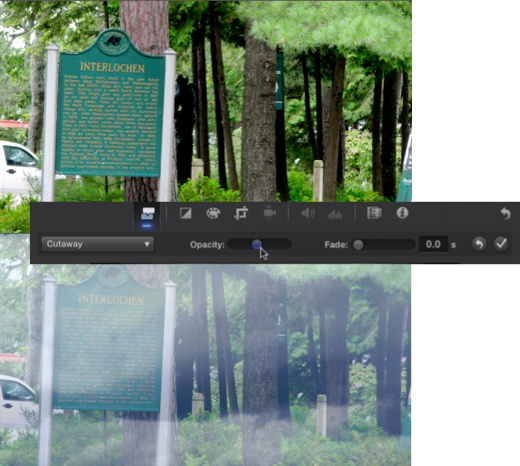
You can make photo cutaways transparent. Because iMovie lets you adjust the transparency of a photo cutaway (see Adjust a Cutaway for instructions), you can dial it back, turning the photo into a translucent layer. You might take a photo of clouds, dial back the opacity, and—bam!—you have fog covering the clip underneath.
Photo cutaways are incredibly useful. You’ve seen it a million times on TV. Someone starts talking; as the narration continues, the camera cuts away to a still shot, and then we return to the original person speaking.
It’s actually pretty remarkable how easy iMovie makes this. Instead of having to extract audio from your video clip and then create a still image to plug in the middle, you just drop a photo above the top of the video clip. The result is a cutaway (with a cross dissolve, if you like) that looks like it took a lot more work than it actually did.
You can poke holes in it. This tip is for Photoshop (or Photoshop Elements) mavens, but it’s wicked cool. It lets you create see-through pieces of a photo—while the video behind it plays through the holes. (It’s not the same as the whole-photo transparency setting already described.) The steps for creating this fantastic effect appear in Figure 12-7.
This trick opens up a host of effects that iMovie can’t do with its built-in tools. You could, for example, create a black image with two holes in it that make it look like you’re peering through a pair of binoculars. (A great way to pump up your 10-year-old’s spy movie!)

Use this trick to put a pair of nose glasses or a funny hat on someone. Or create text titles, like Batman-style “BAM!”s and “KAPOW!”s superimposed on your footage. As long as you use the PNG image format (which recognizes transparency), a little creativity can lead to all kinds of cool effects. (iMovie also supports transparency in TIFF files.)
Timing Changes
When you add a photo to a movie, it gets something regular photos don’t have: a duration. You want your picture to remain onscreen for just the right amount of time, so follow these steps to change a photo’s duration.
Standard Photo Timing
Long ago, iMovie’s designers made the decision that the optimal length for just about any clip or photo is 4 seconds. That’s why, when you add a photo to your project, the proposed length is 4 seconds. (iMovie even used to scold you with a warning if you added a whole video clip from the Event browser instead of selecting part of it.)
This default timing quickly becomes a pain if you’re making a photo slideshow and want each photo to last, say, 5 seconds. Save yourself the hassle of adjusting each photo by changing the standard timing before you add photos to your project. Go to Window→Movie Properties (⌘-J)→Settings and move the Clips slider to anything from 1 to 10 seconds. Now all the photos you add will show up at the length you set.
Adjust Timing
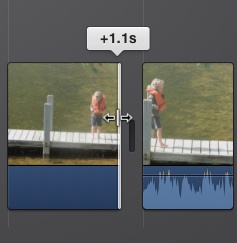
To retime a photo already in your storyboard, drag the end to add or subtract time from it (Figure 12-8). This works just like adding or subtracting video footage (Resize Clips). iMovie displays a window that tells you how much time you’re adding or subtracting. You resize photo clips and connected photos the same way. Unlike video, however, it doesn’t matter which end you drag, because whatever iMovie adds or trims will look the same.
Retime Multiple Photos
If you added multiple photos that need to go from, say, 10 seconds to 5, you can retime them all at once:
Choose all the photos to be retimed.
You can select multiple photos in your storyboard by ⌘-clicking them.
Click the Adjust button, followed by the
 button.
In the Viewer, iMovie tells you how many photos you selected and displays a Duration box.
Type in the new duration (in seconds) and then hit Return.
Tip
This is a nice fix if your default timing (Insert Video in the Middle of Your Movie) wasn’t what you wanted when you started adding photos to your project.
The Dimensions of an iMovie Photo
If you’re designing a custom image for your movie, you generally want it to have the same dimensions as your video. Otherwise, iMovie crops the photo or inserts black bars to make it fit.
iMovie makes movies only in widescreen format (16:9). (See Aspect Ratios: The Missing Manual for a complete discussion.) That’s not a normal dimension for most photos, which are usually around a standard 4:3 format. For now, here’s how big to make your photos so that they fit a widescreen movie frame.
Your imported photo should be at least 1,920 pixels wide and 1,080 pixels tall. Your footage may actually be the smaller 1,280 by 720 kind, but iMovie will shrink your photo down, if needed.
If you have an image that wasn’t born with the right dimensions, don’t worry. The powerful Crop tool (Crop Video) and the Ken Burns effect (The Ken Burns Effect) can help you compensate.
Fit, Crop, and Rotate Photos
One of iMovie’s greatest virtues is its resolution agnosticism. You can combine widescreen footage from your new HD video camera with standard-def footage from your old DV camera in the same movie; iMovie gracefully handles their different dimensions.
This adaptability extends to photos. Chapter 9 includes a detailed discussion of cropping video to fit the frame (or to draw emphasis to a certain part of the picture) by adding letterbox bars and even rotating it.
Well, surprise, surprise: iMovie makes exactly the same features available for photo clips. See Crop Video for the full discussion.
The Ken Burns Effect
The only problem with using still photos in a movie is that they’re still. They just sit there without motion or sound, wasting much of the dynamic potential of video.
For years, professionals addressed the problem using special sliding camera rigs that produce gradual zooming, panning, or both, to bring photographs to life.
But this smooth motion isn’t just about adding animation to photos for its own sake. It also lets you draw the viewer’s attention where you want it, when you want it. For example: “Little Harry graduated from junior high school in 1963”—slow pan to someone else in the school photo, a little girl with a ribbon in her hair—“little suspecting that the woman who would one day become his tormentor was standing only a few feet away.”
Among the most famous practitioners of this art is Ken Burns, the creator of PBS documentaries like The Civil War and Baseball, which is why Apple named the feature after him.
Tip
In iMovie, you can also apply the Ken Burns effect to video. You can create very smooth pans and zooms in footage where the camera didn’t actually move an inch. Powerful feature! (Familiarize yourself with the Ken Burns tools here, then see Adjust or Remove a Crop for more info.)
Apply the Ken Burns Effect
iMovie’s Ken Burns controls are pretty easy to get the hang of. Here’s how you use them:
Tip
By default, iMovie applies the Ken Burns effect to all the photos you add to a project, varying the panning and zooming in each one. If you don’t like what iMovie does with a particular photo, these steps let you adjust the effect.
Click a photo clip or cutaway.
A yellow border appears.
Click Adjust in the Viewer toolbar, followed by the Crop button.
This unveils the Style menu with the Fit/Crop/Ken Burns buttons.
Click the Ken Burns button.
iMovie superimposes two rectangles over your photo, one marked “Start” and the other labeled “End.” They represent the beginning and end frames of your photo. iMovie automatically produces the animation required to smoothly pan and/or zoom between them.
Set the photo’s starting point.
That is, select the Start box by clicking it. Drag its corners to resize the box and drag in the middle to move it.
Tip
Getting your hands on those boxes isn’t always easy, since they’re sometimes hugging the outer edges of the Viewer. Here’s a tip: When you mouse over a corner of either of these boxes, your mouse cursor changes to two diagonal arrows. That’s when you know to click and drag.
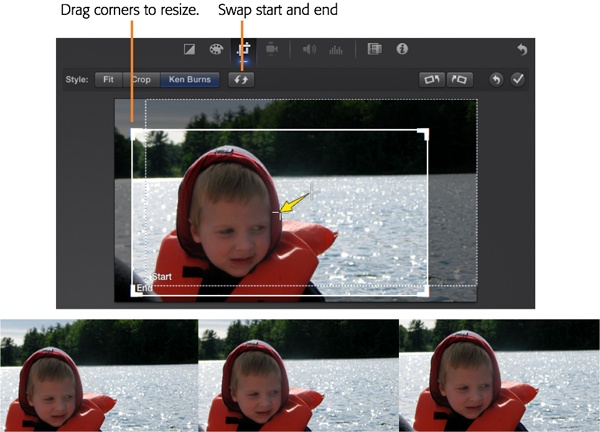
Set the Start box so it frames the photo as you want your viewers to first see it. For example, if you want to zoom in on the photo, make the Start box big. (Drag its corners to resize it.) If you want an effect that zooms out from the photo, make the Start box small. See Figure 12-9.
Adjust your end point (the End box).
Click the End box to select it. Move and resize it just as you did with the Start box.
If you want your shot to move but not zoom, make sure the End box is the same size as the Start rectangle. Line them up, match their sizes, and then move the End box to the point in the image where you want it to end. With the start and end points the same size, iMovie simply pans from one perspective to the other.
Figure 12-9. Top: In this somewhat confusing display, you adjust the Start box and then the End box to show iMovie how you want to pan and zoom across a photo. The yellow arrow shows the current direction of the pan to help you visualize the motion of the shot. Bottom: This three-frame sample shows a representation of the pan and zoom the settings above will produce.Preview your effect and make adjustments.
Click
 in the Viewer to preview your Ken Burns effect. If you don’t like what you see,
adjust the boxes accordingly.
in the Viewer to preview your Ken Burns effect. If you don’t like what you see,
adjust the boxes accordingly.If you decide that you want to reverse what you set up—you want to zoom out instead of in, or pan left instead of right—click the Swap button identified in Figure 12-9. That turns your Start box into the End box, and vice versa.
Click the checkmark in the Viewer toolbar when you’re done.
You can always adjust the Ken Burns effect by running through these steps again.
Note
If you drag a group of photos into your project all at once, iMovie creates automatic, varied Ken Burns effects, subtly panning and zooming in different directions for each one. Add a sweet little crossfade to all of them simultaneously (About Transitions), and you’ve got a gorgeous slideshow. (If you’re a killjoy, you can always turn off the automatic Ken Burns feature. Choose Window→Movie Properties followed by the Settings button in the Viewer, and then use the “Photo placement” pop-up menu to choose either Fit or Crop.)
Freeze Frames
iMovie doesn’t just accept still photos, it also creates them, from a frame in the storyboard. And why would you want to create a still from your video? Let us count some ways:
To create a freeze-frame. One of the most obvious uses of a still frame is as a freeze-frame, in which the movie holds on the final frame of a shot. It’s a terrifically effective way to end a movie, particularly if the final shot depicts the shy, unpopular hero in a moment of triumph, arms in the air, hoisted onto the shoulders of the crowd. (Fade to black; bring up the music; roll credits.)
Tip
You can also use the automatically created one-step effect called “Flash and Hold Frame” (One-Step Effects), which adds a little more flair than a normal freeze frame.
For credit sequences. If you were a fan of 1970s action shows like Emergency!, you may remember how the opening credits looked. You’d be watching one of the starring characters frantically at work in some lifesaving situation. As she looked up from her work, just for a moment, the picture would freeze, catching her by lucky happenstance at her most flattering angle. At that instant, you’d see her credit flash on the screen: “Julie London as Dixie McCall, RN.”
That’s an easy one to simulate. Just create a freeze frame as described in the next section, and then superimpose a title on it.
To create a layered effect. In many cases, the most creative use of still-image titles comes from using several of them, each building on the last. For example, you can make the main title appear, hold for a moment, and then transition into a second still graphic on which a subtitle appears.
If you have more time on your hands, you can use this trick to create simple animations. Suppose you were to create 10 different title cards, all superimposed on the same background, but each with the words in a different size or position. If you were to place each card onscreen for only half a second (15 frames), joined by very fast crossfades, you’d create a striking visual effect. Similarly, you might consider making the color of the lettering shift over time. To do that, create two or three title cards, each with the text in a different color. Insert them into your movie, join them with slow crossfades, and you’ve got a striking, color-shifting title sequence.
Create a Still Frame
Here’s how you extract a still frame from your video:
Position the playhead on the frame you want frozen.
You can choose from any clip in the Event browser.
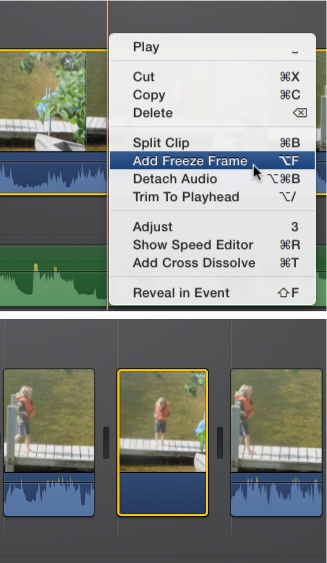
Right-click (or Control-click) the clip where you want to extract the still. From the shortcut menu, choose Add Freeze Frame (Figure 12-10). With your playhead in the right spot, you can also choose Modify→Add Freeze Frame from the menu bar, or Option-F.
This command directs iMovie to place a new photo clip at the playhead in your storyboard.
Drag the still clip into place in your storyboard.
You can drag it with the mouse just like you would any other photo or video clip in your project.
Adjust the still’s duration, cropping, color, and so on.
Your still frame behaves like any other photo. You can use the Ken Burns effect, for example, to zoom in on a meaningful part of the shot. (Ever seen a suspense movie, where the director zooms in on the once-vanquished villain watching the hero from the middle of a crowd? Works every time.)
Although you can move a still frame you created, you can always keep the photo in place as a true freeze frame, to great effect. Just imagine that moment when Baby Tommy finally smiles into the camera. You could freeze on that spot for a second or two, and then have your video keep going. The smile has 10 times the impact if you can dwell on it just a little.
Tip
If you want to create a still from the first or last frame of a clip, move your mouse just past the end of the clip and then click to set the playhead on the last frame of that clip before you freeze the frame.
Figuring out how to handle the audio in such situations is up to you, since a still frame should have no sound. That’s a good argument for starting your closing-credits music during the final clip, and making it build to a crescendo for the final freeze frame.