
Chapter 20. iMovie for iOS Themes, Titles, and Transitions
You must choose a theme for every iMovie project you make on your iPhone or iPad. A theme is a collection of coordinated titles, transitions, and music that tie your shots together and make your movie look professionally done. Each theme comes with three special titles, one unique transition style, and a theme song.
Besides the titles and transitions that come as part of a theme, iMovie offers an additional eight titles and four transitions. That’s not a terribly big catalog, but it includes the most popular ones. (The truth is, you should be keeping things simple most of the time anyway. It helps people focus on your movie, instead of your titles and transitions.)
This chapter covers theme basics and then talks more about using titles and transitions.
Themes
What does a theme actually do for you? Unless you can carry a film post-production team around in your pocket, complete with editors, animators, and musicians, a theme is the easiest way to give your project the appearance of a professionally produced movie.
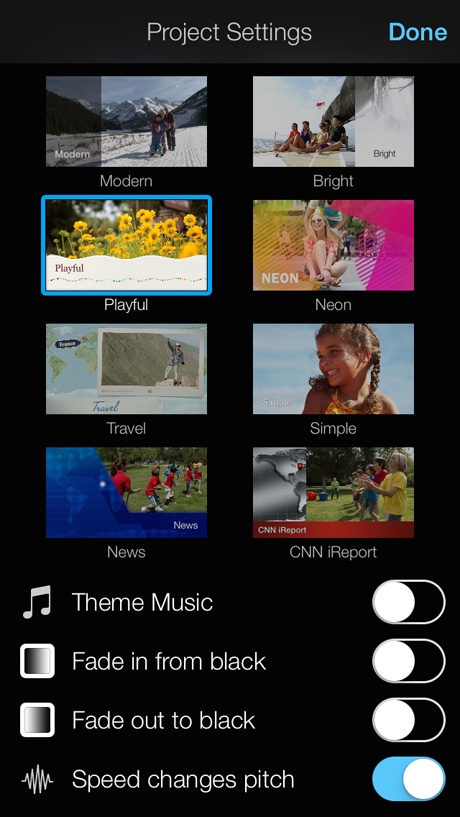
iMovie for iOS offers eight themes: Modern, Bright, Playful, Neon, Travel, Simple, News, and CNN iReport. Each one has an analogous theme in iMovie for the Mac; if you want to edit the same movie on both your portable and desktop device (by transferring the movie between the two—see Preview Full Screen), choose one these themes.
Theme titles and transitions behave just like non-theme titles and transitions (explained more on Titles and Transitions). Just know that you can’t use a title or transition from one theme with the titles or transitions from another one. With themes, it’s all or nothing.
Change a Theme
You can change the theme for a project any time. Tap
![]() from the Timeline screen and iMovie shows your eight themes again (Figure 20-1). Tap one, and
iMovie updates all the theme elements in your project.
from the Timeline screen and iMovie shows your eight themes again (Figure 20-1). Tap one, and
iMovie updates all the theme elements in your project.
Turn Theme Music On or Off
Apple had iMovie’s theme music professionally recorded to match the theme titles and transitions. For example, the music for the News theme sounds like what you’d hear a TV network play to introduce a breaking story.
To turn theme music on, tap ![]() (Figure 20-1). You’ll see a
set of switches, one of which is Theme Music. Turn it on (tap the
switch to the right), and a green band appears beneath your video
clips, representing the audio. When you play back your movie, the
theme music plays along with it.
(Figure 20-1). You’ll see a
set of switches, one of which is Theme Music. Turn it on (tap the
switch to the right), and a green band appears beneath your video
clips, representing the audio. When you play back your movie, the
theme music plays along with it.
Note
Like other audio in iMovie for iOS (Chapter 21), theme music won’t play longer than your movie does. If you want the music to keep playing, add more video or pictures, or a solid black image (a tip explained on Two Ways to Add Photos).
Use the same switch to turn off the theme music.
Tip
Unlike titles and transitions, you can use the music from any theme in any project. If you like the titles and transitions from one theme but the music from another, choose the theme with the right visual elements and then bring in the other theme’s song, as explained on Add Audio to Your Project.
Titles
Pretty much every movie uses onscreen text at some point, so Apple engineers were sure to include a convenient way to title your features in iMovie for iOS.
While the titling tools are handy, they’re more rudimentary than the ones in iMovie for the Mac. For example, you can’t customize the font, color, or alignment of your iOS titles. Also, and more frustratingly, titles in iMovie for iOS only appear superimposed over clips; you can’t see them during a transition effect, nor can you have iMovie for iOS display a black background behind titles, as you can in the Mac version of iMovie.
Tip
To put titles over a black background in iMovie for iOS, you can create a black JPG image on your Mac and sync the photo to your iDevice. Or you can cover up your camera lens on the device and snap a blacked-out picture. Either way, add the image to your project as a photo (Chapter 22), and then superimpose your titles over the image using the steps that follow.
Add Titles
Follow these steps to add a title to your movie:
Tap the clip where the title will appear.
Because titles can appear only over clips or photos, not in between clips, you have to choose a clip or a photo.
In most cases, the iPhone and iPad versions of iMovie are so much alike, there’s really no need to explain the differences between the two.
One noticeable difference, however, is the
 button, which only lives in the iPhone
version of iMovie, and only appears when you select a video
clip in your project. (It replaces the camera button.) This
button gives you access to the toolbar that holds most of the
features described in this part of the book.
button, which only lives in the iPhone
version of iMovie, and only appears when you select a video
clip in your project. (It replaces the camera button.) This
button gives you access to the toolbar that holds most of the
features described in this part of the book.If you’re using the iPad version of iMovie, you’ll go crazy looking for the
button; it’s not there. An iPad has
enough real estate that iMovie doesn’t need to hide the
toolbar when you’re not using it.So whenever you see a reference to the toolbar in this chapter, you can get to it on an iPhone with the
button. (In most cases, you can also
just double-tap an item in your timeline to see the
toolbar.)Tap Title in the toolbar.
iMovie shows you a row of tools (mostly) related to editing titles.
Select the “T” icon to choose a title style.
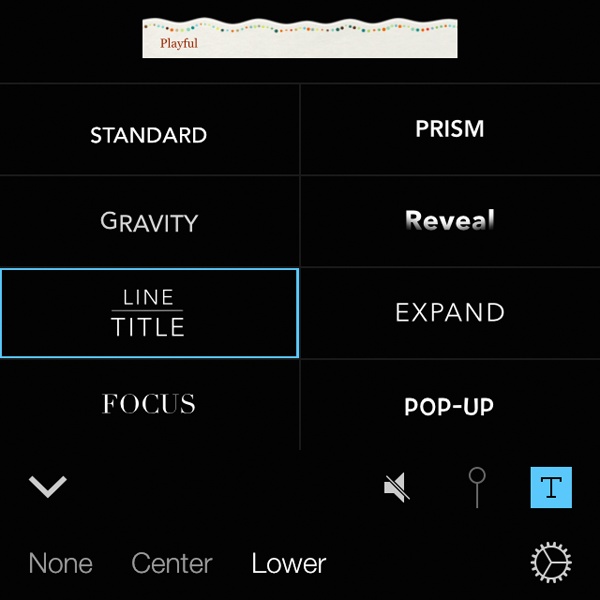
When you select the Text button, iMovie opens a screen that previews the nine title styles available to your movie (Figure 20-2). The first one is theme-specific and changes depending on your movie’s theme. The other eight are consistent, no matter which theme you use.
Choose the title placement.
If you select the theme-specific title (the first choice on the titles style screen), you get three placement options: Opening, Middle, and Closing. Choose one, and iMovie places a title that matches your theme—choose Opening from the Travel theme’s placement options, for example, iMovie displays a freeze frame from your movie as though it were a photo lying on a map.
The other title styles come in two versions: Center and Lower. Center puts the title right in the middle of your frame, and Lower positions it in the bottom-left or -right corner, depending on the title style you choose.
Type in your title text.
When you choose a title placement, iMovie previews it in the video window above, complete with placeholder text. Tap the text, and iMovie brings up the keyboard so you can replace it. Tap Done when you finish.
Change a Title
You can change any aspect of a title by following these same
steps, but using the clip where you placed the title. Be aware,
though, that text that looks good with one title style may not work
well with another. Preview your title any time by tapping
![]() .
.
Note
In iMovie for iOS, titles cover an entire clip. That’s really annoying if the clip is long. To fix this, reduce the title’s onscreen time by splitting the clip. Select the clip, position the playhead where you want the title to end, and then choose Split from the toolbar (on the iPhone toolbar, select the second “dot” to see the Split option). Now your title covers only the first section of the clip.
Remove a Title
If you have title regret, you can remove a title by choosing None as the title placement. (See step 4 on Change a Title.)
Tip
In one of the themes—Travel—the custom title actually displays information about your location. Specifically, it shows the location in the letter postmark.
Note
If you shot your footage on a location-aware device, like an iPhone or an iPad with cellular networking, the location data is embedded in the video file. iMovie uses this info to automatically choose the location for your title.
If iMovie gets it wrong, adjust the location by tapping the pin button found in the Titles toolbar. From there, tap the compass arrow to choose your current location or the magnifying glass to choose from a huge list of locations. In either case, iMovie updates the title with the new postmark.
Transitions
A transition occurs when your film goes from one clip to the next, even if that happens without any sort of animation (in which case the transition is called a cut). Of course, there are lots of other kinds of transitions, like fades and wipes. iMovie for iOS offers six transitions. (If you were hoping for more transition choices, consider editing your movie on a Mac. iMovie for the Mac offers a whopping 24 transition styles.)
You can’t add a transition at the start or end of an iMovie for
iOS project. If you want your movie to fade in at the start or out at
the end, choose the ![]() from the Timeline screen and tap the Fade In or
Fade Out switches.
from the Timeline screen and tap the Fade In or
Fade Out switches.
Edit a Transition
iMovie automatically embeds the most popular transition, the cross-dissolve, between each of your clips. That’s sometimes handy, but you might prefer one of the other five styles.
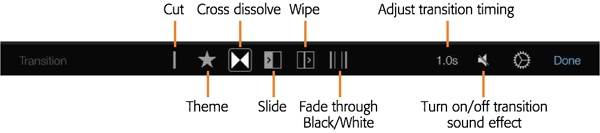
To edit a transition, go to the Timeline screen and tap the transition in your storyboard. That brings up the transitions toolbar (Figure 20-3). iMovie doesn’t identify your choices with anything more helpful than a set of buttons that look like characters from an alien language. Figure 20-3 demystifies them.
With the transitions toolbar in view, you can change the style, timing, and sound of a transition:
Style. Tap any of the six title styles. For Slide and Wipe, you can change the direction of the transition, and for Fade, you can fade through black or fade through white.
Timing. A transition takes time, and you can edit its duration by tapping the time readout in the toolbar. Choose from 0.5, 1, 1.5, or 2 seconds.
Note
If you can’t embed a transition with a particular duration, it’s likely because the underlying clips aren’t long enough to accommodate the transition length. A Long Discussion of Transition Lengths explains in more detail.
Sound. When you transition from one clip to the next, iMovie can play a sound effect to accompany the move. Each transition has its own sound. Mute or unmute it using the speaker button in the toolbar.
“Delete” Transitions Altogether
To cut from one clip to the next—that is, to have no transition effect at all—you have to select the cut icon from the transitions toolbar (Figure 20-3). iMovie for iOS always includes a transition in the timeline, even if that “transition” is a simple cut.
