In Chapter 7, you learned about UITabBarController and how it allows a user to access different screens. A tab bar controller is great when you have screens that don’t rely on each other, but what if you want to move between related screens?
For example, the Settings application has multiple related screens of information: a list of settings (like Sounds), a detailed page for each setting, and a selection page for each detail. This type of interface is called a drill-down interface.
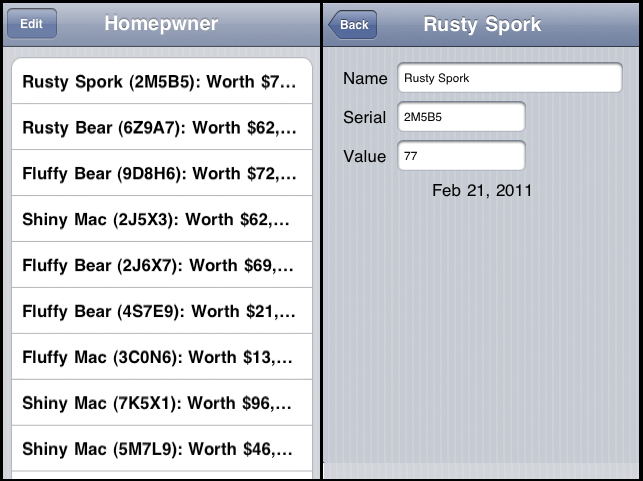
In this chapter, you will use a UINavigationController to add a drill-down interface to Homepwner that lets the user view and edit the details of a Possession. (Figure 12.1).
When your application presents multiple screens of information, UINavigationController maintains a stack of those screens. The stack is an NSArray of view controllers, and each screen is the view of a UIViewController. When a UIViewController is on top of the stack, its view is visible.
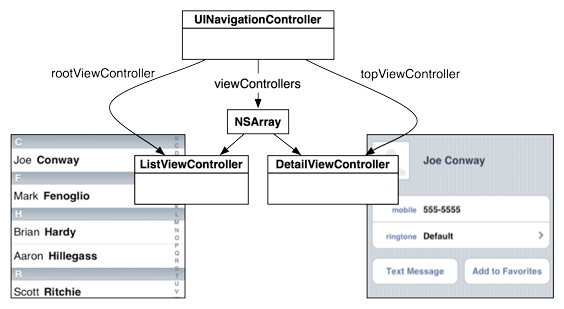
When you initialize an instance of UINavigationController, you give it one UIViewController. This UIViewController is called the root view controller. The root view controller is always on the bottom of the stack (which is also the top if there is only one item). Figure 12.2 shows a navigation controller with two view controllers: a root view controller and an additional view controller above it at the top of the stack. The additional view controller is the one the user sees. When the UIViewController is pushed onto the stack, its view slides onto the screen from the right. When the stack is popped, the top view controller is removed from the stack, and the view of the one below it slides onto the screen from the left.
More view controllers can be pushed on top of the UINavigationController’s stack during execution. This ability to add to the stack during execution is missing in UITabBarController, which gets all of its view controllers when it is initialized. With a navigation controller, only the root view controller is guaranteed to always be in the stack.
The UIViewController that is currently on top of the stack is accessed by sending the message topViewController to the UINavigationController instance. You can also get the entire stack as an NSArray by sending the navigation controller the message viewControllers. The viewControllers array is ordered so that the root view controller is the first entry and the top view controller is the last entry.
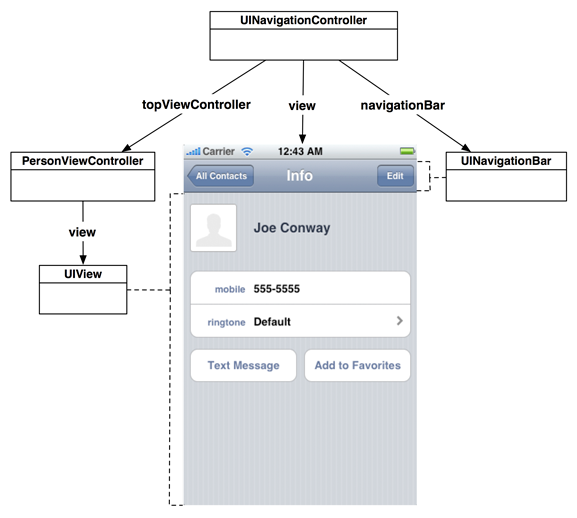
UINavigationController is a also subclass of UIViewController, so it has a view of its own. Its view always has at least two subviews: a UINavigationBar and the view of its topViewController (Figure 12.3).
In this chapter, you will add a UINavigationController to the Homepwner application and make the ItemsViewController the UINavigationController’s rootViewController. Then, you will create another subclass of UIViewController that can be pushed onto the UINavigationController’s stack. When a user selects one of the possession rows, the new UIViewController’s view will slide onto the screen. This view controller will allow the user to view and edit the properties of the selected Possession. The object diagram for the updated Homepwner application is shown in Figure 12.4.
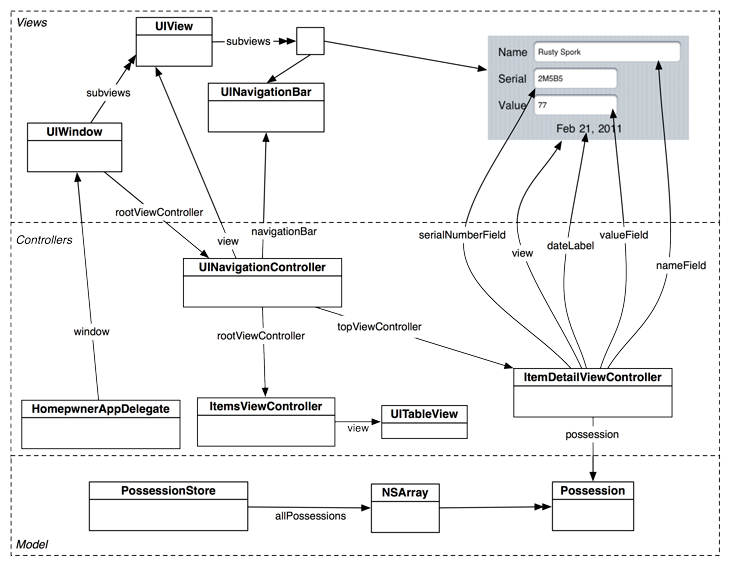
This application is getting fairly large, as you can see in the massive object diagram. Fortunately, view controllers and UINavigationController know how to deal with this type of complicated object diagram. When writing iOS applications, it is important to treat each UIViewController as its own little world. The stuff that has already been implemented in Cocoa Touch will do the heavy lifting.
Now let’s give Homepwner a navigation controller. Reopen the Homepwner project and then open HomepwnerAppDelegate.m. The only requirements for using a UINavigationController are that you give it a root view controller and add its view to the visible view hierarchy. In application:didFinishLaunchingWithOptions:, create the UINavigationController, give it a root view controller of its own, and set the UINavigationController as the root view controller of the window.
- (BOOL)application:(UIApplication *)application
didFinishLaunchingWithOptions:(NSDictionary *)launchOptions
{
ItemsViewController *itemsViewController = [[ItemsViewController alloc] init];
// Create an instance of a UINavigationController
// its stack contains only itemsViewController
UINavigationController *navController = [[UINavigationController alloc]
initWithRootViewController:itemsViewController];
// You can now release the itemsViewController here,
// UINavigationController will retain it
[itemsViewController release];
// Place navigation controller's view in the window hierarchy
[[self window] setRootViewController:navController];
[navController release];
[[self window] makeKeyAndVisible];
return YES;
}
This code initializes the UINavigationController instance with ItemsViewController as its root view controller and makes the UINavigationController the rootViewController of the window. Becoming the window’s rootViewController places the navigation controller’s view in the view hierarchy.
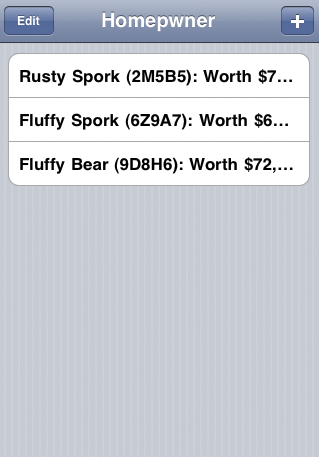
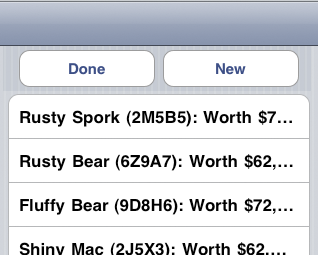
Build and run the application. Homepwner will look the same as it did before – except now it has a UINavigationBar at the top of the screen (Figure 12.5). Notice how ItemsViewController’s view was resized to fit the screen with a navigation bar. UINavigationController did this for you.
The UINavigationBar isn’t very interesting right now. At a minimum, a UINavigationBar should display a descriptive title for the UIViewController that is currently on top of the UINavigationController’s stack.
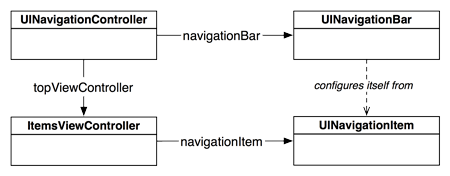
Every UIViewController has a navigationItem property of type UINavigationItem. However, unlike UINavigationBar, UINavigationItem is not a subclass of UIView, so it cannot appear on the screen. Instead, the navigation item supplies the navigation bar with the content it needs to draw. When a UIViewController comes to the top of a UINavigationController’s stack, the UINavigationBar uses the UIViewController’s navigationItem to configure itself, as shown in Figure 12.6.
That’s not the easiest thing to understand at first glance. So, consider the following analogy. Think of a UIViewController as an NFL football team, and moving to the top of the stack as going to the Super Bowl. The UINavigationItem is the team logo design, which is the property of the team and, no matter what happens, remains unchanged. The UINavigationController is the stadium, and the UINavigationBar is an end zone. In a similar manner, when a UIViewController is moved to the top of the stack, its UINavigationItem is painted on the UINavigationBar of the UINavigationController.
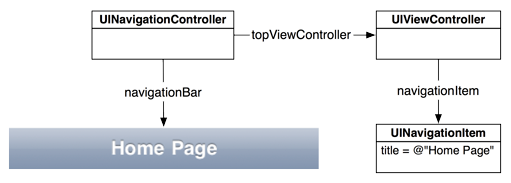
By default, a UINavigationItem is empty. At the most basic level, a UINavigationItem has a simple title string. When a UIViewController is moved to the top of the navigation stack and its navigationItem has a valid string for its title property, the navigation bar will display that string (Figure 12.7).
A navigation item can hold more than just a title string, as shown in Figure 12.8. There are three customizable areas for each UINavigationItem: a leftBarButtonItem, a rightBarButtonItem, and a titleView. The left and right bar button items are pointers to instances of UIBarButtonItem, which contains the information for a button that can only be displayed on a UINavigationBar or a UIToolbar.

Like UINavigationItem, UIBarButtonItem is not a subclass of UIView but supplies the content that a UINavigationBar needs to draw. Consider the UINavigationItem and its UIBarButtonItems to be containers for strings, images, and other content. A UINavigationBar knows how to look in those containers and draw the content it finds.
The third customizable area of a UINavigationItem is its titleView. You can either use a basic string as the title or have a subclass of UIView sit in the center of the navigation item. You cannot have both. If it suits the context of a specific view controller to have a custom view (like a button, a slider, an image, or even a map), you would set the titleView of the navigation item to that custom view. Figure 12.8 shows an example of a UINavigationItem with a custom view as its titleView. Typically, however, a title string is sufficient, and that’s what we’ll do in this chapter.
Now let’s give Homepwner a UINavigationBar it can be proud of. In ItemsViewController.m, create a UIBarButtonItem instance. This button will sit on the right side of the navigation bar when the ItemsViewController is on top of the stack. When tapped, it will add a new Possession to the list. Also, set the navigation item’s title. This string will be displayed in the center of the navigation bar.
- (id)init
{
self = [super initWithStyle:UITableViewStyleGrouped];
if (self) {
// Create a new bar button item that will send
// addNewPossession: to ItemsViewController
UIBarButtonItem *bbi = [[UIBarButtonItem alloc]
initWithBarButtonSystemItem:UIBarButtonSystemItemAdd
target:self
action:@selector(addNewPossession:)];
// Set this bar button item as the right item in the navigationItem
[[self navigationItem] setRightBarButtonItem:bbi];
// The navigationItem retains its buttons, so bbi can be released
[bbi release];
// Set the title of the navigation item
[[self navigationItem] setTitle:@"Homepwner"];
}
return self;
}
Build and run the application. Tap the + button, and a new row will appear in the table. (Note that this is not the only way to set up a bar button item; check the documentation for other initialization messages you can send an instance of UIBarButtonItem.)
A bar button item has a target-action pair that works like UIControl’s target-action mechanism: when tapped, it sends the action message to the target. When you set a target-action pair in a XIB file, you Control-drag from a button to its target and then select a method from the list of IBActions. To programmatically set up a target-action pair, you pass the target and the action to the button. The action is passed as a value of type SEL.
The SEL data type is a pointer to a selector. A selector is a unique ID for a method. Wrapping a method name in the @selector() directive returns the SEL that points at that method. Remember that a selector is the entire method name including any colons. Here are some examples of method declarations and how you would wrap them in @selector():
- (void)method; - (int)methodWithArg:(id)arg1; - (BOOL)methodWithArg:(id)arg1 andAnotherArg:(id)arg2; SEL m1 = @selector(method); SEL m2 = @selector(methodWithArg:); SEL m3 = @selector(methodWithArg:andAnotherArg:);
Notice that @selector() doesn’t care about the return type, argument types, or names of arguments – only the selector itself. Also, know that @selector() doesn’t check to see if the method actually exists. If you give a SEL to a button, that button will send the corresponding message regardless of whether the method is implemented by the target.
Now you’re going to replace the Edit button in the table view header with a UIBarButtonItem. In ItemsViewController.m, edit the init method.
- (id)init
{
self = [super initWithStyle:UITableViewStyleGrouped];
if (self) {
UIBarButtonItem *bbi = [[UIBarButtonItem alloc]
initWithBarButtonSystemItem:UIBarButtonSystemItemAdd
target:self
action:@selector(addNewPossession:)];
[[self navigationItem] setRightBarButtonItem:bbi];
[bbi release];
[[self navigationItem] setTitle:@"Homepwner"];
[[self navigationItem] setLeftBarButtonItem:[self editButtonItem]];
}
return self;
}
Surprisingly, that’s all the code you need to get an edit button on the navigation bar. Build and run, tap the Edit button, and watch the UITableView enter editing mode! Where does editButtonItem come from? UIViewController has an editButtonItem property, and when sent editButtonItem, the view controller creates a UIBarButtonItem with the title Edit. Even better, this button comes with a target-action pair: it sends the message setEditing:animated: to its UIViewController when tapped.
Now that Homepwner has a fully functional navigation bar, you can get rid of the header view. In ItemsViewController.m, delete the following two methods.
// Delete these!
- (UIView *)tableView:(UITableView *)aTableView
viewForHeaderInSection:(NSInteger)section
{
return [self headerView];
}
- (CGFloat)tableView:(UITableView *)tableView
heightForHeaderInSection:(NSInteger)section
{
return [[self headerView] frame].size.height;
}
Also remove the instance variable headerView along with the implementation of the methods headerView and toggleEditingMode:.
Now you can build and run again. The old Edit and New buttons are gone, leaving you with a lovely UINavigationBar (Figure 12.9).