
In this part of the exercise, you will update Homepwner to present the ItemDetailViewController modally – but only when the user creates a new Possession. When the user selects an existing Possession, the ItemDetailViewController will be pushed onto the UINavigationController’s stack as before.
To implement this dual usage of ItemDetailViewController, you will give it a new designated initializer, initForNewItem:isNew:. This initializer will check whether the instance is being used for creating a new Possession or for showing an existing one and then configure the interface accordingly.
In ItemDetailViewController.h, declare this initializer.
} - (id)initForNewItem:(BOOL)isNew; @property (nonatomic, retain) Possession *possession;
If the ItemDetailViewController is being used to create a new Possession, it will show a Done button and a Cancel button on its navigation item. Implement this method in ItemDetailViewController.m.
- (id)initForNewItem:(BOOL)isNew
{
self = [super initWithNibName:@"ItemDetailViewController" bundle:nil];
if (self) {
if (isNew) {
UIBarButtonItem *doneItem = [[UIBarButtonItem alloc]
initWithBarButtonSystemItem:UIBarButtonSystemItemDone
target:self
action:@selector(save:)];
[[self navigationItem] setRightBarButtonItem:doneItem];
[doneItem release];
UIBarButtonItem *cancelItem = [[UIBarButtonItem alloc]
initWithBarButtonSystemItem:UIBarButtonSystemItemCancel
target:self
action:@selector(cancel:)];
[[self navigationItem] setLeftBarButtonItem:cancelItem];
[cancelItem release];
}
}
return self;
}
In the past, when you’ve changed the designated initializer of a class from its superclass’ designated initializer, you’ve overridden the superclass’ initializer to call the new one. In this case, you’re going to make it illegal to use the superclass’ designated initializer by throwing an exception when anyone calls it.
In ItemDetailViewController.m, override UIViewController’s designated initializer.
- (id)initWithNibName:(NSString *)nibName bundle:(NSBundle *)bundle
{
@throw [NSException exceptionWithName:@"Wrong initializer"
reason:@"Use initForNewItem:"
userInfo:nil];
return nil;
}
This code creates an autoreleased instance of NSException with a name and a reason and then throws an exception. This halts the application and shows the exception in the console.
To confirm that this exception will be thrown, let’s return to where initWithNibName:bundle: is currently called – the tableView:didSelectRowAtIndexPath: method of ItemsViewController. In this method, ItemsViewController creates an instance of ItemDetailViewController and sends it the message init, which eventually calls initWithNibName:bundle:. Therefore, selecting a row in the table view will result in the “Wrong initializer” exception being thrown.
Build and run the application and tap a row. You will see an exception in the console, and your application will halt. Notice that the name and the reason are part of the console message. The debugger will show you that sending init to the ItemDetailViewController was the cause.
You don’t want to see this exception again, so in ItemsViewController.m, update tableView:didSelectRowAtIndexPath: to use the new initializer.
- (void)tableView:(UITableView *)tableView
didSelectRowAtIndexPath:(NSIndexPath *)indexPath
{
ItemDetailViewController *detailViewController =
[[[ItemDetailViewController alloc] initForNewItem:NO] autorelease];
NSArray *possessions = [[PossessionStore defaultStore] allPossessions];
Build and run the application again. Nothing new and exciting will happen, but your application should no longer crash when you select a row in the table.
Now that we’ve got our new initializer in place, let’s change what happens when the user adds a new possession.
In ItemsViewController.m, edit the addNewPossession: method to create an instance of ItemDetailViewController in a UINavigationController and present the navigation controller modally.
- (IBAction)addNewPossession:(id)sender
{
Possession *newPossession = [[PossessionStore defaultStore] createPossession];
ItemDetailViewController *detailViewController =
[[ItemDetailViewController alloc] initForNewItem:YES];
[detailViewController setPossession:newPossession];
UINavigationController *navController = [[UINavigationController alloc]
initWithRootViewController:detailViewController];
[detailViewController release];
// navController is retained by self when presented
[self presentModalViewController:navController animated:YES];
[navController release];
}
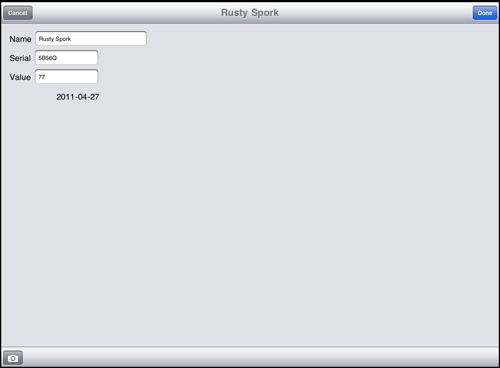
Build and run the application and tap the New button to create a new possession. An instance of ItemDetailViewController will slide up from the bottom of the screen – but now it has a Done button and a Cancel button on its navigation item. (Tapping these buttons, of course, will throw an exception since you haven’t implemented the action methods yet.)
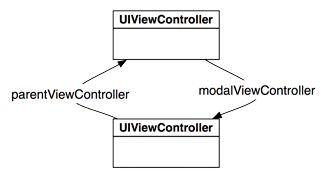
Every view controller has a property named modalViewController. If a view controller presents another view controller modally, then this property holds a pointer to that view controller. Every modally-presented view controller has a pointer named parentViewController that it sets to the view controller that presented it (Figure 14.6). These relationships are useful when it comes time to dismiss modal view controllers.
When a view controller is sent the message dismissModalViewControllerAnimated:, it removes its modalViewController’s view from the screen, releases that view controller, and sets its modalViewController property to nil. The modalViewController’s parentViewController property is also set to nil. Therefore, when either of these two buttons is tapped, we need to tell the parentViewController of the ItemDetailViewController to dismissModalViewControllerAnimated:.
At the top of ItemDetailViewController.m, make the following import statement.
#import "PossessionStore.h"
Then, implement the action methods in ItemDetailViewController.m to dismiss the view controller.
- (IBAction)save:(id)sender
{
// This message gets forwarded to the parentViewController
[self dismissModalViewControllerAnimated:YES];
}
- (IBAction)cancel:(id)sender
{
// If the user cancelled, then remove the Possession from the store
[[PossessionStore defaultStore] removePossession:possession];
// This message gets forwarded to the parentViewController
[self dismissModalViewControllerAnimated:YES];
}
Notice that this code sends dismissModalViewControllerAnimated: to the ItemDetailViewController. This is odd because ItemDetailViewController is not the parentViewController. It turns out that view controllers are smarter than they look. If you send the message dismissModalViewControllerAnimated: to a modal view controller (like ItemDetailViewController), it thinks, “I don’t have a modalViewController... I must be the modalViewController. I’ll forward this message to my parent.”
Build and run the application. Create a new possession and tap the Cancel button. The instance of ItemDetailViewController will slide off the screen, and nothing will be added to the table view. Then, create a new possession and tap the Done button. The ItemDetailViewController will slide off the screen, and your new Possession will appear in the table view.
On the iPhone or iPod touch, a modal view controller takes over the entire screen. This is the default behavior and the only possibility on these devices. On the iPad, you have two additional options: a form sheet style and a page sheet style. You change the presentation of the modal view controller by setting its modalPresentationStyle property to a pre-defined constant – UIModalPresentationFormSheet or UIModalPresentationPageSheet.
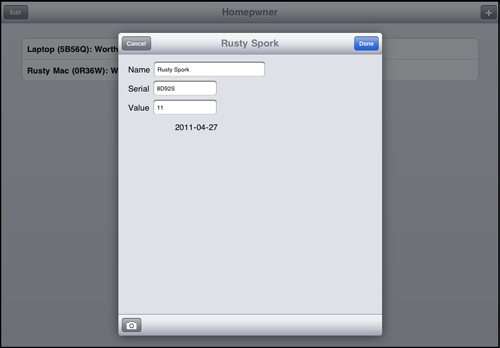
The form sheet style shows the modal view controller’s view in a rectangle in the center of the iPad’s screen and dims out the presenting view controller’s view (Figure 14.7). The page sheet style is the same as the default full-screen style in portrait mode. In landscape mode, it keeps the same width as in portrait mode and dims the left and right edges of the presenting view controller’s view that stick out behind it.
In ItemsViewController.m, modify the addNewPossession: method to change the presentation style of the UINavigationController that is being presented.
[navController setModalPresentationStyle:UIModalPresentationFormSheet]; [self presentModalViewController:navController animated:YES];
Build and run the application on the iPad simulator or on an iPad. Tap the button to add a new possession and watch the modal view controller slide onto the screen. Add some possession details and then tap the Done button. The table view reappears, but your new Possession isn’t there. What happened?
Before you changed its presentation style, the modal view controller took up the entire screen, which caused the view of the ItemsViewController to disappear. When the modal view controller was dismissed, the ItemsViewController was sent the messages viewWillAppear: and viewDidAppear: and took this opportunity to reload its table to catch any updates to the PossessionStore.
With the new presentation style, the ItemsViewController’s view doesn’t disappear when it presents the view controller. So it isn’t sent the re-appearing messages when the modal view controller is dismissed, and it doesn’t get the chance to reload its table view.
We have to find another opportunity for the ItemsViewController to reload its table view. We know that to dismiss the ItemDetailViewController, we send it the message dismissModalViewControllerAnimated: – a message it forwards to its parentViewController. One potential approach, then, is to override dismissModalViewControllerAnimated: in ItemsViewController and reload the table there.
But the ItemDetailViewController’s parentViewController is not the ItemsViewController; it’s the navigation controller that holds the ItemDetailViewController. “No problem” you say, “I’ll just get the parentViewController of the navigation controller... which is the ItemsViewController, right?”
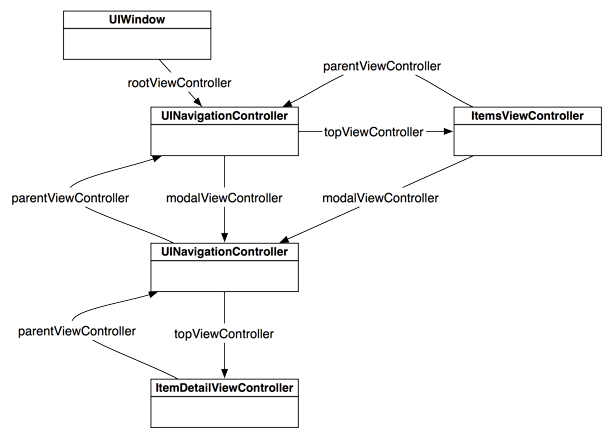
Unfortunately, no. When a view controller presents a modal view controller, the parentViewController of the modal view controller is set to be the parent of the presenting view controller. Thus, the parentViewController of the UINavigationController that holds the ItemDetailViewController is set to the UINavigationController that holds the ItemsViewController. These relationships are shown in Figure 14.8.
Instead of relying on the (somewhat complicated) relationships that the SDK has established, we’re going to create a new relationship between these two view controllers so that they can send messages to each other directly. But how should we structure this relationship? Let’s consider three options:
-
For view controllers that are closely related, like a table view controller and its detail view controller,
you can simply give them instance variables that point to each other. This is the easiest way to send messages between two view controllers,
but it is also the least adaptable.
// Send message to another view controller, kept as instance variable [myDetailViewController showItem:myItem];
-
You can also create a delegate protocol that specifies
the messages one view controller can send to the others. This technique allows multiple controllers to adopt the same protocol.
It also means the view controller sending the message does not have to know what type of object it is sending the message to;
it only needs to know that it conforms to the protocol.
// A protocol specified by the sending view controller @protocol ItemShowingProtocol - (void)showItem:(id)sender; @end // Send message to another view controller id <ItemShowingProtocol> detail = [[[self navigationController] viewControllers] objectAtIndex:1]; [detail showItem:myItem];
- The third approach is to use the notification system. This solution is essential when the view controllers are not related. It is also useful when multiple view controllers are interested in a single controller. A view controller can post to the NSNotificationCenter, and interested objects can register for that notification.
In our case, you could choose to give the ItemDetailViewController a pointer to the ItemsViewController that effectively presented it. Then, when the ItemDetailViewController is dismissed, it would send a message to the ItemsViewController to say, “I’m being removed from the screen – do what you need to do.”
However, it is possible that a different view controller might one day be responsible for presenting the ItemDetailViewController. To prepare for this possibility, you’re going to create a delegate protocol for ItemDetailViewController and give it a delegate property. Although the ItemsViewController will serve as the delegate, using the delegate pattern will allow any object to present the ItemDetailViewController and be informed when it is dismissed.
In ItemDetailViewController.h, create a new protocol at the top of the file.
@class ItemDetailViewController; @protocol ItemDetailViewControllerDelegate <NSObject> @optional - (void)itemDetailViewControllerWillDismiss:(ItemDetailViewController *)vc; @end @interface ItemDetailViewController : UIViewController
In ItemDetailViewController.h, add a new property to ItemDetailViewController.
- (id)initForNewItem:(BOOL)isNew; @property (nonatomic, assign) id <ItemDetailViewControllerDelegate> delegate; @property (nonatomic, retain) Possession *possession;
In ItemDetailViewController.m, synthesize this property.
@synthesize delegate;
(Notice that we did not create an instance variable for the delegate. Remember that when you synthesize a property that does not have a matching instance variable, the instance variable is automatically created for you.)
Now, in ItemDetailViewController.m, update the two action methods to inform its delegate that it is being dismissed. Because the delegate method is optional, use respondsToSelector: to make sure the delegate implements the method before you call it.
- (IBAction)save:(id)sender
{
[self dismissModalViewControllerAnimated:YES];
if([delegate respondsToSelector:@selector(itemDetailViewControllerWillDismiss:)])
[delegate itemDetailViewControllerWillDismiss:self];
}
- (IBAction)cancel:(id)sender
{
[[PossessionStore defaultStore] removePossession:possession];
[self dismissModalViewControllerAnimated:YES];
if([delegate respondsToSelector:@selector(itemDetailViewControllerWillDismiss:)])
[delegate itemDetailViewControllerWillDismiss:self];
}
In ItemsViewController.h, declare that ItemsViewController conforms to this new protocol and import the header file for ItemDetailViewController.
#import "ItemDetailViewController.h" @interface ItemsViewController : UITableViewController <ItemDetailViewControllerDelegate>
In ItemsViewController.m, implement the method from the delegate protocol to reload the table.
- (void)itemDetailViewControllerWillDismiss:(ItemDetailViewController *)vc
{
[[self tableView] reloadData];
}
Then, update addNewPossession: in ItemsViewController.m to set the delegate of the presented ItemDetailViewController.
- (IBAction)addNewPossession:(id)sender
{
Possession *newPossession = [[PossessionStore defaultStore] createPossession];
ItemDetailViewController *detailViewController =
[[ItemDetailViewController alloc] initForNewItem:YES];
[detailViewController setDelegate:self];
Build and run the application. Create a new Possession and then return to the table view. The table view will update appropriately.
In addition to the presentation style of a modal view controller, you can change the animation that places it on screen. Just like with the presentation styles, there is a view controller property (modalTransitionStyle) that you can set with a pre-defined constant. By default, the animation will slide the modal view controller up from the bottom of the screen. You can also have the view controller fade in, flip in, or appear underneath a page curl (like in the Maps application).
In ItemsViewController.m, update the addNewPossession: method to use a different transition.
[navController setModalPresentationStyle:UIModalPresentationFormSheet]; [navController setModalTransitionStyle:UIModalTransitionStyleFlipHorizontal]; [self presentModalViewController:navController animated:YES];
Build and run the application and notice the change in animation. Try out some of the other options, but make sure to read the fine print in the documentation. For instance, you can’t use the page curl transition unless the presentation style is full screen. Also, note that these transitions will still work if you switch back to deploying on an iPhone. The presentation style, however, will always be full screen.