
Chapter 8. Emailing, Sharing, and Web Galleries
Holding a beautiful, glossy print created from your own digital image is a glorious feeling. But unless you have an uncle in the inkjet cartridge business, you could go broke printing your own photos. Ordering high-quality prints with iPhoto is terrific fun, too, but between printing and mailing, you’ll spend a few days waiting for them to arrive.
For the discerning digital photographer who craves both instant gratification and economy, the solution is to put your photos online—by posting them on social media sites, creating web galleries, exporting web pages that you can post on your own website, or sharing them with others through iCloud (Apple’s online storage and synchronization service). If you go the social media or iCloud route, any comments your admirers have left even show up in iPhoto’s Info panel.
Note
If you’ve got an iCloud account (Using iCloud’s Photo Stream) and an iOS device (iPad, iPhone, or iPod Touch), you can also create gorgeous web journals, with highly customizable layouts, captioning opportunities, and more. This fun feature is covered in Chapter 15.
All of this is particularly easy and satisfying in iPhoto, especially if you’re an iCloud member or a fan of Facebook, Flickr, or Twitter. And if you’d rather send electronic photos directly to your fan base (instead of requiring them to visit a website), you can fire off an instant message or email from inside iPhoto, where you’ll find a plethora of graphical email themes. iPhoto even remembers each instant message and email it sends on your behalf, so you can see when you sent which pictures to whom.
This is where iPhoto gets really fun. So read on—your adoring public awaits!
Instant Messaging Photos
Somewhere between email and the telephone lies the joyous communication tool called instant messaging (if you don’t know what that is, there’s a teenager near you who does). Basically it combines the privacy of email with the immediacy of the phone. You type messages in a chat window, and your friends type replies back to you in real time.
Plenty of instant messenger programs run on the Mac, but Mavericks comes with Messages (which used to be called iChat). It’s built right into the system and is ready to connect to your friends on the Yahoo, AIM, Jabber, Facebook, or Google Talk networks.
As luck would have it, Messages is built into iPhoto, too. This makes sending photos to your pals—their phones included—while seated comfortably at your Mac an absolute breeze.
Getting Started with Messages
In order to use Messages in iPhoto, you need to set up a chat account. Open the Messages program by clicking its icon in your Mac’s dock (it looks like two thought bubbles: one blue and one white) or by double-clicking its icon in your Applications folder.
When you open Messages for the first time, you’re invited to enter your iCloud or Apple account login info. (If you don’t have such an account, you can click “Create an Apple ID” to set one up.) Or, to use Messages with a different chat service, click Not Now; you then see a more generic Account Setup window where you can pick a service (Yahoo, AIM, Jabber, and so on), enter your name and password, and then click Continue. You can also enter your account info later—the setup assistant isn’t your only opportunity, as Figure 8-1 explains.
Tip
If you and your conversation partner both have iCloud accounts (Using iCloud’s Photo Stream), then you can move freely from phone to tablet to Mac—your conversation is auto-synced between gadgets (if you’re signed in with the same iCloud account, that is). You don’t even have to pay for a texting plan on your phone because the messages, which Apple calls iMessages, are routed through the Internet rather than a cell network. As far as your cellphone company is concerned, you’re not texting at all.
Once you’ve set up a chat account in Messages, you’re ready to start using it in iPhoto.
Using iPhoto’s Messages
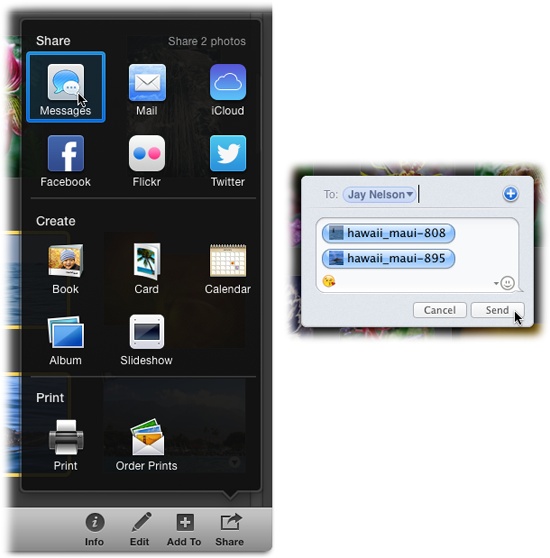
Instant messaging a photo in iPhoto starts like any other task: Select the thumbnail(s) of the pictures you want to send (up to 10). Then click Share in iPhoto’s toolbar and, from the pop-up menu, choose Messages. A small Messages window appears atop the photo-viewing area (see Figure 8-2).

At the top of the Messages window, start typing the lucky recipient’s name in the To field (you can also enter an email address or a phone number). As you type, Messages sprouts a list of matching names from OS X’s Contacts. You can also click the + button to get a pop-up version of your Contacts, complete with a search bar at the top. Select your recipients and add any text you want to include in your message. Once you’re finished addressing and composing your message, click Send. If everything goes well, a note appears in the photo-viewing area confirming that your photos were sent.
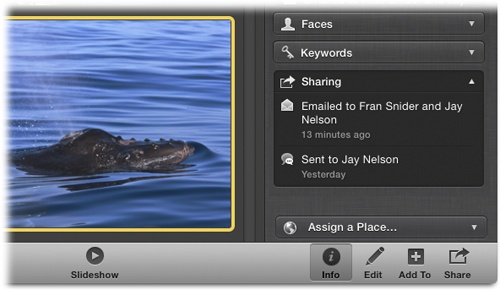
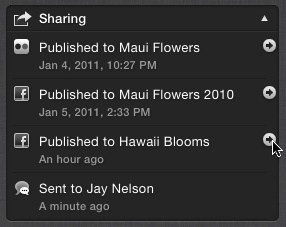
iPhoto also records your Messages activity in the Info panel. Select the photo you sent and then click Info in the toolbar; you’ll spot a new section on the right called Sharing, which lists the recipient and the date the message was sent (Figure 8-5 shows this notation).
Note
Messages comes ready to connect you with other people in your home or office via your wireless network, thanks to a technology called Bonjour. Unfortunately, Bonjour won’t work for sending pictures from iPhoto. While iPhoto reports that it sent the photos, they never make it to the recipient (though any text you include arrives just fine). Bummer!
Emailing Photos
Emailing from iPhoto is perfect for quickly sending off a few photos—or even a handful of them—to friends, family, and coworkers. As you’re about to learn, iPhoto lets you do it in a gloriously graphical way. However, if you have a whole batch of photos to share (11 or more), you’re better off using iCloud’s photo stream or the online-sharing features described later in this chapter.
Using iPhoto’s Mail Command
Earlier versions of iPhoto handed your pictures off to your email program, where they appeared as attachments, and you can still send your photos that way. The downside of that method is that your recipients may not see the photos in the body of your message; they may have to open the attachments individually, which is a hassle for some (and beyond the technical skills of others).
That might be why Apple came up with iPhoto’s embedded-photo email feature, in which your photos are the body of the message, complete with captions, frames, and other graphical niceties. iPhoto even does the emailing all by itself, without having to open your regular email program.
Here’s how the embedded-email process works:
Select the photo(s) you want to email.
You can use any of the picture-selecting techniques described on Selecting Photos. You can’t, however, select thumbnails in a saved slideshow or project. You can send up to 10 photos in a single email. If you want to send more than that, skip ahead to the section on dragging and dropping (The Drag-and-Drop Method).
Click Share in iPhoto’s toolbar, and then choose Mail.
If you already use Mail (Apple’s email program), the screen changes to show a gigantic and customizable email message, along with several theme options.
If you’ve never used Mail, you see a list of email providers instead: iCloud, Hotmail, Yahoo, Gmail, Aol Mail, and Other. Click the one you use and then click Setup. You’re taken to another pane where you can enter your email address and password. Click Save and you’re good to go.
You can also add email accounts by choosing iPhoto→Preferences→Accounts, and then clicking the +.
Choose a theme.
Apple believes emailing photos is an event worthy of graphics, descriptions, captions, and so on. You can choose among several designs in the Themes pane shown in Figure 8-3:
Classic, Journal. If you choose one of these no-nonsense themes, iPhoto inserts your photos into the email message without additional fanfare or extra graphics, circa iPhoto ’09. You see the phrase “Insert Text Here” above each photo, prompting you to add a caption. In the Journal theme, you also see a spot to add a beautifully formatted title in the body of your email.
Snapshots, Celebration. These themes add a white border to each photo and place them on a light-colored background, complete with drop shadows. In Snapshots, you’re prompted to add a message in a handwriting typeface, though you can change the typeface, size, and alignment using the pop-up menus that appear (they’re labeled in Figure 8-3). Celebration uses an embossed “card” complete with whimsical border and party hats; there’s also a spot where you can add a message. Neither theme includes captions.
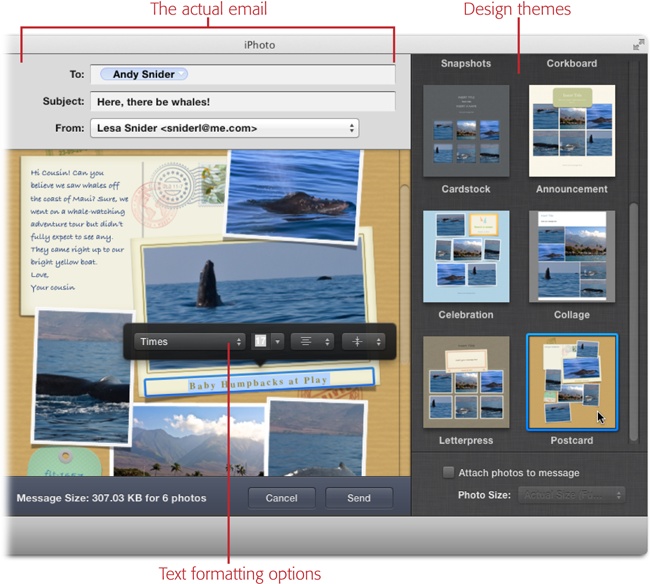
Figure 8-3. Behold, iPhoto’s design themes for email! Choose one by clicking it in the Themes panel on the right. The left side of the window lets you fill in your email’s blanks. The address field automatically pulls from OS X’s Contacts and attempts to fill in the correct address once you start typing. Click within the message area to see formatting options; the pop-up menus let you change the font, size, and alignment of the text in your message (you have to highlight the text to change it). This example uses the Postcard theme, which gives you a message and exactly one captioning opportunity (for your prized shot!).Corkboard. Your message and photos are tacked onto a realistic-looking corkboard. The message area is on a piece of virtual graph paper, with your photos underneath in a filmstrip.
Cardstock, Letterpress. These sleek themes display your photos in rows of squares, surrounded by a thin border that looks like it was pressed into a textured background. In the Letterpress theme, a “card” containing a message area and today’s date is perched atop the first row; in Cardstock, there’s an area for this info below the photos.
Announcement. Similar to Cardstock and Letterpress, this theme displays slightly larger versions of your photos without borders. The images appear inset into the background, and the message slot is on a rounded, “stitched” card, making it perfect for baby announcements.
Collage. This theme truly showcases your photos—they’re enlarged to fill the whole email. They’re also placed side by side, just a few pixels apart, as a variety of rectangles. It’s like the Origami slideshow, minus the animation. There are no captions in this theme.
Postcard. This fun theme (shown in Figure 8-3) adds borders and drop shadows to your photos, which appear pasted onto a scrapbook page. A stamped postcard offers to hold your personal message and a coat-check tag automatically bears today’s date. You can add a title to the largest photo, but that’s it.
Size and position your photos within their frames.
It’s incredibly simple to resize and reposition your photos inside each frame, as Figure 8-4 explains. To move photos between frames, drag one atop the desired frame; when you release your mouse button, iPhoto flip-flops them.
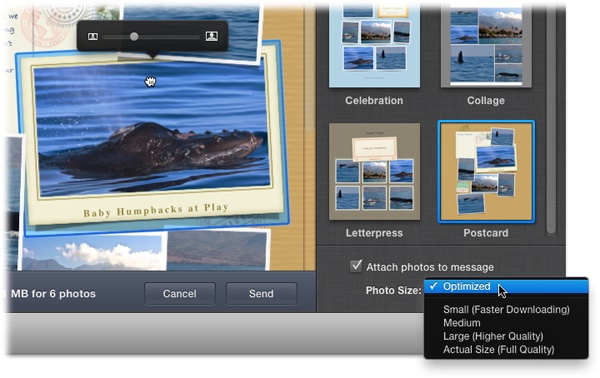
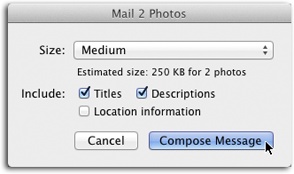
Figure 8-4. Click a photo to see its zoom slider; drag right to make the picture bigger or left to make it smaller. To move the photo within the frame, drag it into place (your cursor turns into a tiny hand, shown here). Unless you tell it otherwise, iPhoto also attaches the original photo files to the email (the design arrives as a JPEG file, and the photos arrive as an attached .zip file). Pick an attachment size from the Photo Size pop-up menu, or turn off “Attach photos to message” to send just the JPEG.Tell iPhoto whether to attach your photo(s) to the email, and if so, at what size.
Once you send the email (which you’ll do in step 7), iPhoto converts the completed layout into a JPEG image and sticks it into the body of the message. And if “Attach photos to message” is turned on, then iPhoto also compresses the photos into a .zip file and attaches it to the message (which your recipient can double-click to open it). The Photo Size menu shown in Figure 8-4 lets you control how big the attached images should be.
iPhoto encourages you to send scaled-down versions of your photos by including Optimized in the Photo Size menu. (The resulting photo resolution falls between Medium and Large, as discussed below.) In most cases, Optimized works just fine—big enough for onscreen display, just not for high-quality printing. But you also have four additional choices:
Choose Small (Faster Downloading) to keep your email attachments super-small (320 x 240 pixels)—but only if you don’t expect the recipient of your email to print the photo. (A photo this size can’t produce a quality print larger than a postage stamp.) On the other hand, your photos will consume less than 100 K apiece, making downloads quick and easy for those with dial-up connections. (For more about photo sizes, flip to Using iCloud to Share Photos.)
Choosing Medium yields a file that will fill a nice chunk of your recipient’s screen, with plenty of detail. It’s even enough data to produce a slightly larger print—about 2 x 3 inches (640 x 480 pixels). Even so, the file size (and download time) is still reasonable; this setting can trim a 2 MB, 4-megapixel image down to an attachment of less than 150 K.
The Large (Higher Quality) setting downsizes even your biggest photos, preserving enough pixels (1280 x 960) to make good 4 x 6-inch prints and to completely fill the average person’s monitor. Use this setting sparingly. Even if your recipients have a cable modem or DSL, these big files may still overflow their email boxes.
Despite all the cautions above, there may be times when a photo is worth sending at Actual Size (Full Quality), like when you’re submitting it for printing or publication. This works best when both you and the recipient have high-speed Internet connections and unlimited-capacity inboxes, as this option attaches a copy of your original photo at its original dimensions, with plenty of pixels for printing at high resolution (Resolution and Shape has more on resolution). That said, many email services limit attachments to 20 megabytes.
Note
iPhoto retains each picture’s proportions when it resizes them. But if a picture doesn’t have 4:3 proportions (maybe you cropped it, or maybe it came from a camera that wasn’t set to capture at that aspect ratio), then it may wind up smaller than the indicated dimensions. In other words, think of the choices in the Photo Size pop-up menu as meaning “this size or smaller.”
Include a personal message, caption, or title, if desired.
On the left side of the window is the actual email you’ll send, and the body area is filled with text boxes you can customize; just click to change the text, or highlight it and then use the little pop-up menus to change the font, size, and so on (see Figure 8-3). iPhoto automatically inserts the photo’s Event or album name in the email’s subject line, though you can change it to anything you want.
Enter your recipient’s email address into the To field, and then click Send.
When you start typing an address, iPhoto looks to see if it matches an entry in OS X’s Contacts and tries to fill it in for you. You can type any address you want into this field.
As soon as you click Send, iPhoto processes your design and photos, converting the design into a JPEG image and—if you told it to—resizing and compressing your photo attachments. If everything went well, you see a message in the photo-viewing area saying however many photos were sent on their merry way.
When you click Send, iPhoto records the email in the Info panel. This is supremely useful if you can’t remember which picture you sent to whom and when. Simply select a photo, click Info in iPhoto’s toolbar, and if you used iPhoto to email that photo (and not another program), you see a Sharing section that lists the recipient and the date it was sent (Figure 8-5).
Using Another Email Program
If you’d rather send photos as regular file attachments—as in older iPhoto versions, with no fancy graphics—you can tell iPhoto to hand them off to Mail (the email program that came with your copy of OS X) or Microsoft Outlook.
Note
As of this writing, no other email programs work with iPhoto’s email command. If you want to use something besides Mail or Outlook, you can use the drag-and-drop method described in the next section.
To set this up, choose iPhoto→Preferences→General, and then choose the email program you want from the “Email photos using” menu. From now on, when you choose Email from the Share menu, you’ll get the dialog box shown in Figure 8-6.
The Drag-and-Drop Method
There are three situations in which you’d want to avoid iPhoto’s Mail command: when you want to send more than 10 photos, when you want to send the email to large groups of people, and when you want to retain the photo’s original file format.
For example, iPhoto always converts photos into JPEG format when emailing them. So if you want to send raw files, for example, don’t use iPhoto’s Mail command. Instead, drag the thumbnails from iPhoto directly onto your email program’s application icon (in the Dock, for example) to open a new message and attach them in one fell swoop.
Of course, raw files can be huge, and emailing huge files is a serious faux pas (see the box on Notes on Photo Size). However, exactly how you keep file sizes manageable depends on which email program you use. If you’re using Mail, you can use the Size pop-up menu at the bottom right of the message window to pick an appropriate size for your attachments (to keep raw files from being converted to JPEGs, choose Actual Size). For any other email program, you’ll want to export the photos from iPhoto first using the File→Export command, which offers you a choice of scaling options (see Exporting and Converting Pictures). When you’re finished, drag the exported photos onto your email program’s icon or into the message window.
Using iCloud to Share Photos
iCloud is Apple’s free syncing and storage service. It makes sharing photos between your Mac and your iPhone, iPad, or iPod Touch incredibly easy through a feature called photo streams. You can also create shared photo streams and invite up to 100 people to join them. It’s a fantastic way for family members and other interested parties to keep up with your photographic life, with zero effort on their part and very little on yours. Shared photo streams also let you share photos in a more private way than the current crop of social media sites.
Tip
If the person you want to share your photos with doesn’t use a Mac or iOS device, you can post it as a public web gallery instead. Exporting iPhoto Web Pages has more info.
Once people join your photo stream, they can obsess over your pictures and video to their hearts’ content. And if they’re iCloud members, they get to have even more fun. They can click a button to tell you they like something, add comments to your photos, and even upload their own pictures and videos to the stream (if you allow it), all from the comfort of their own Macs, iPhones, iPads, or iPod Touches (basically any gadget on which they’ve turned on iCloud Photo Sharing, as described on Using iCloud’s Photo Stream). You can see their likes and comments in iPhoto’s Info panel on your Mac.
The process of sharing photos via iCloud is fairly straightforward:
Turn on iCloud Photo Sharing, as described on Using iCloud’s Photo Stream.
In iPhoto, select the photos and videos that you want to share.
Create a shared photo stream and invite people to it. The invitees get an email asking if they’d like to join your photo stream. (The notification also appears in their copy of iPhoto.)
Folks join the photo stream by accepting your invitation via email or in their copy of iPhoto. From then on, the stream shows up in their copy of iPhoto, on their Mac, and on their iOS devices (if they have any).
When you or the other person(s) adds a picture or video (if you’ve allowed that kind of collaboration), leaves a comment, or clicks “like,” everyone in the stream gets notified.
The next few sections have all the details.
Note
Shared photo streams are also a great way to share photos among iPhoto fans in the same household, as Enhancing iPhoto’s HTML explains.
Creating a Shared Photo Stream
Once you’ve created an iCloud account and turned on iCloud Photo Sharing (see Using iCloud’s Photo Stream), you’re ready to get the photo-stream-sharing party started. Here’s how:
Choose the photos you want to share.
You can click an album or an Event, or select a batch using the techniques described on Selecting Photos. If you pick an album or Event, make sure no thumbnails are selected or you’ll end up sharing only the selected photo(s).
Choose Share→iCloud (or click the Share button in the toolbar and choose iCloud), and then click “New photo stream.”
You see the message pane shown in Figure 8-7.
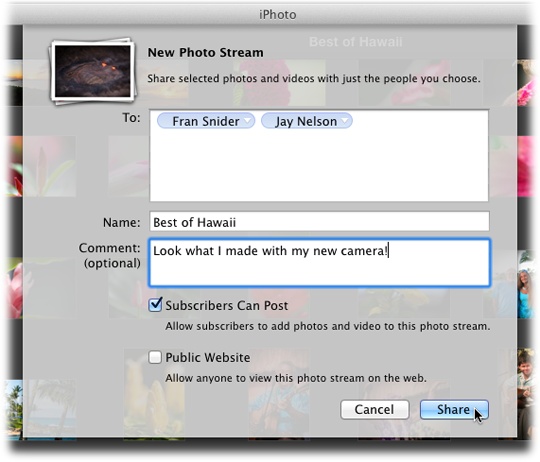
Specify who can see your pictures and give the stream a name.
Enter the names or email addresses of up to 100 of your closest friends in the To field. Then type a title for your stream in the Name field and, if you wish, add a note in the Comment field to get the conversation started.
Decide whether invitees can post to your stream, and whether you want the whole thing to be public.
The Subscribers Can Post setting means that all of your invitees can add their own pictures and videos to the stream, provided they have iCloud accounts. The stuff they post shows up in your copy of iPhoto. This is a great option for parties, as your guests can upload their own photos to the photo stream. Details are on Adding and Deleting Photos.
Note
It’s important to realize that iPhoto automatically performs a two-way sync with your photo stream. If you add photos to the shared stream, they show up in your invitees’ streams, and if someone else adds photos, those pictures show up in the photo stream in your copy of iPhoto! If you want to add the new photo(s) to your iPhoto library—so it actually lives on your hard drive—drag it from the stream onto the Photos or Events item in your Source list.
The Public Website option is even more intriguing. If you’re an iCloud member and you want to publish this particular set of pictures on the Web so folks without Apple devices can see them, turn on this setting. When you do, invitees receive the web address of your stream, where they can view your images as a visually pleasing, Tetris-style collage on a solid black background. Skip ahead to Sharing Streams via Public Website for the scoop.
Figure 8-7. Here’s where you decide who gets to see your photo stream and whether it’s an art gallery that they can look at but not modify or a photo-exchange system. In the To field, enter the names or email addresses of up to 100 people. Once you start typing, iPhoto tries to fill it in for you by accessing your Mac’s Contacts. (You don’t need to assign a password to your photo stream because the stream is by invitation only.) And if you want the whole world to see what you (and your invitees) post, then turn on the Public Website option.Click Share.
iPhoto sends your photos off to your invitees. This can take a few minutes, depending on the number of pictures and the speed of your Internet connection.
When it’s all over, the photo-viewing area doesn’t change a bit, which is kind of unsettling. (If you watch closely, you see miniatures of the thumbnails leap in unison into the iCloud icon in your Source list, but it happens really fast.)
However, once you’ve shared a photo stream, you’ll spot an iCloud item in the Source list under the Shared heading. If you’ve got an iPhone, iPad, or iPod Touch and you’ve turned on iCloud Photo Sharing on those devices (Using iCloud’s Photo Stream), then this item was already in your Source list, but clicking it displayed the contents of My Photo Stream—the most recent 1,000 photos taken with your iOS device(s) or that you’ve imported to your Mac. However, clicking it now shows My Photo Stream plus each photo stream you share.
For your invitees, however, all manner of bells and whistles start going off, as the next section explains.
Accepting a Photo Stream Invite
If your invitees have iPhoto 9.4 and OS X Mountain Lion (or later), they can accept the invitation to your photo stream, thereby subscribing to it. If you make changes to the stream—adding or removing pictures, say—those changes are automatically reflected in your subscribers’ iPhoto libraries.
Once you’ve been invited to a shared photo stream, you can subscribe to it in a variety of ways:
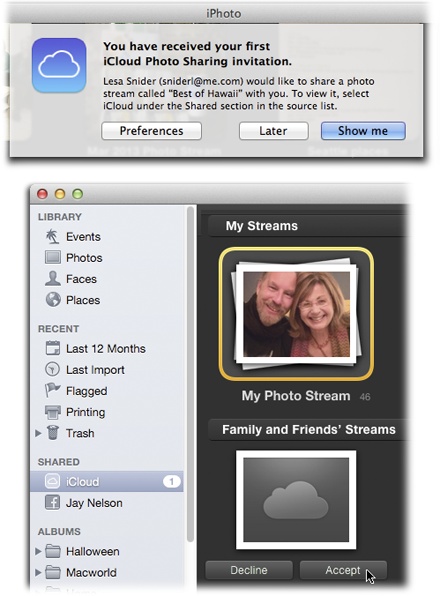
In iPhoto, click “Show me.” If iPhoto is running when you get the invitation, a pane appears at the top of the window announcing the invitation, the sender’s name, and the name of the photo stream. (If the program isn’t running, you see the message the next time you launch it.)
If this is the first photo stream invitation you’ve gotten, you see the message shown in Figure 8-8 (top). (For subsequent invitations, iPhoto drops the word “first.”) When you click “Show me,” iPhoto selects iCloud in the Source list and shows a generic icon of the stream in the photo-viewing area (Figure 8-8, bottom). Click Accept to begin the syncing.
Clicking Preferences opens, well, iPhoto’s preferences (so you can adjust your sharing settings, if necessary), and clicking Later temporarily dismisses the message (you can click the iCloud item in your Source list to accept or reject the invite later).
In the invitation email, click “Subscribe to this Photo Stream.” When you do, a dialog box appears announcing that, “[Sender] would like to share [Name of stream] with you.” Click Ignore to make the message go away, though iPhoto displays a number to the right of the iCloud item in the Source list letting you know that a photo stream is waiting to be accepted (see Figure 8-8, bottom). Click Join and you’re transported to iPhoto, which starts syncing the photo stream.
In any of the Notification Center message bubbles that appear, click Join. The second you’re invited to a photo stream, the Notification Center on your Mac and iOS devices kicks into high gear and assaults you with myriad message bubbles. (At least, any iOS devices where you’ve turned on iCloud Photo Sharing; see Using iCloud’s Photo Stream.) Clicking Join in any message bubble accepts the photo stream invitation and gives iPhoto the all clear to sync photos.
Once you’ve subscribed to someone’s photo stream, you can access it by clicking iCloud in your Source list; the stream’s album appears in the photo-viewing area.
Double-click to open it, just like you would a regular album or Event. When you do, the photo-viewing area displays the stream’s thumbnails. (It can take a while for the photo stream to sync the first time you open it. Best not to sit there waiting for it; go do something else and come back later.)
As mentioned in the previous section, simply viewing a photo in a shared stream doesn’t mean that the photo is saved to your hard drive. If the person who owns the stream deletes a photo or the whole stream (Deleting a Shared Photo Stream), that photo or stream disappears from your copy of iPhoto. You can avoid this possible catastrophe in two ways:
To download individual photos, click iCloud in your Source list, double-click the stream’s icon, select the photo(s) you want to download, and then drag them onto the Events or Photos in your Source list.
To download all the photos in a shared stream, click iCloud in your Source list, and then select the stream but don’t open it (in other words, single-click it). Click Add To in iPhoto’s toolbar, and when the program asks if you want to import the photos to your library, click Import. (This trick also works when you’ve opened a photo stream but don’t have any thumbnails selected.)
Viewing and Managing Photo Streams
Photo streams look like a stack of photos, just like albums and Events. To view a photo stream, click iCloud in the Source list, and all of your streams appear. The ones you create appear beneath the “My Streams” heading; the ones you subscribe to appear beneath the “Family and Friends’ Streams” heading.
You can see who’s joined a stream, invite more people to it, and even change its settings after you’ve shared it. Just click the stream’s icon to select it, and then mouse down to the toolbar and click Info to reveal the options shown in Figure 8-9.
Tip
To remove a person from your photo stream, click the name in the Subscribers field and then press the Delete key on your keyboard. The stream disappears from that person’s copy of iPhoto on all of his devices, though he gets no formal notification. To reinvite someone to a stream, delete his name from the Subscribers field and then add it back.
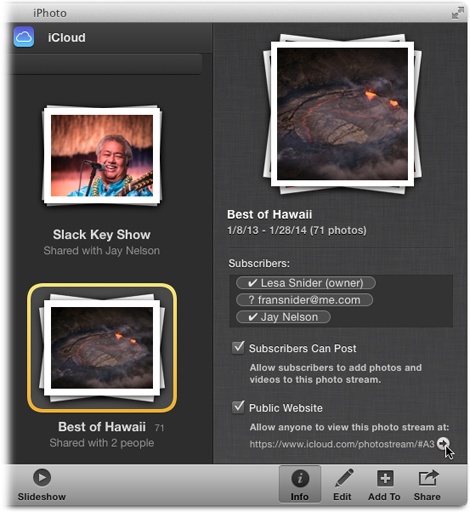
As you might suspect, double-clicking a stream’s icon opens it so you’re viewing the individual photos. At the top of the photo-viewing area, iPhoto displays the name of the stream, the total number of people it’s shared with, and the number of photos it contains.
Adding and Deleting Photos
You can change the contents of your shared photo stream by adding or deleting the photos in it. When you do, iPhoto publishes your changes automatically (you’ll see a little status bar appear at the top right of the photo-viewing area when iPhoto is making changes). The process for all this is the same whether you shared the stream yourself or whether you subscribe to it.
Note
See the box on Editing Photos in a Photo Stream for info about editing the images in photo streams.
To add a photo, select it (or more than one using the techniques described on Selecting Photos), and then use one of these techniques:
Drag the thumbnail(s) onto the iCloud item in your Source list. A pop-up window appears next to the Source list so you can choose which stream you want to add the photo(s) to (Figure 8-10, bottom); click the appropriate one.
Click Add To in iPhoto’s toolbar and choose iCloud. A pop-up window appears at the bottom right of the iPhoto window containing all your photo streams. Click the one you want to add the photo(s) to.
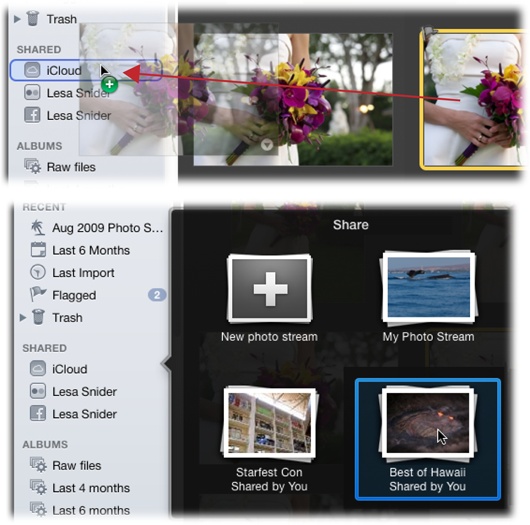
Either way, iPhoto asks for confirmation in the form of a message pane, where you can also add a comment. Click Publish; iPhoto syncs the photos with all of your subscribers’ Macs and iOS devices.
To delete a photo, just pop open the photo stream and select the unfortunate thumbnail. Press the Delete key on your keyboard and, when iPhoto asks if you’re sure you want to delete the picture from the stream, click Delete Photo.
Adding and Viewing Comments
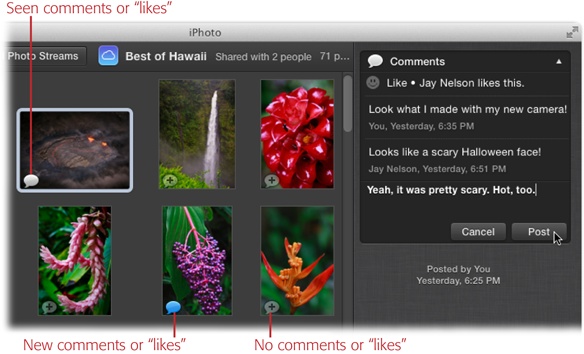
Adding comments to a photo in a shared photo stream is easy: Open the photo stream, select a photo, and then open the Info panel by clicking Info in the toolbar. In the panel’s Comments section, click “Add a comment” and type away. To “like” a photo, click the smiley face. When you’re finished, click Post. Figure 8-11 explains how to view other people’s comments and likes.
Once your subscribers start interacting with your photo stream, you hear about it in numerous ways:
On your Mac, a message bubble appears at the top right of your screen; you also see message bubbles on each of your iOS gadgets. These notices are driven by the Notification Center.
Tip
If your photo streams get a lot of action—with comments, likes, or new photos or videos—the message bubbles may drive you insane. You can shut them up by Option-clicking the
 in your Mac’s menu bar. That stifles
all bubbles for the rest of the day (or until you
Option-click it again). On an iOS device like an iPad, tap
Settings→Notification Center.Figure 8-11. To see a comment, select the photo and then open the Info panel. At the top of the panel, you see the aptly named Comments section, which contains the comment, along with the commenter’s name and the date it was posted. (If the Comments section is collapsed, click it to expand it.) Unfortunately, you can’t see comments or likes in iPhoto for iOS.
in your Mac’s menu bar. That stifles
all bubbles for the rest of the day (or until you
Option-click it again). On an iOS device like an iPad, tap
Settings→Notification Center.Figure 8-11. To see a comment, select the photo and then open the Info panel. At the top of the panel, you see the aptly named Comments section, which contains the comment, along with the commenter’s name and the date it was posted. (If the Comments section is collapsed, click it to expand it.) Unfortunately, you can’t see comments or likes in iPhoto for iOS.In your Dock, a red circle appears atop the iPhoto icon. The microscopic number in the circle shows you how many notifications are lying in wait.
In iPhoto, a number appears next to the iCloud item in your Source list. Click iCloud to view your shared streams; you see a blue dot to the left of the stream that wants your attention. Double-click the stream to open it, and then scour the thumbnails for a tiny, blue thought bubble at the bottom-left corner (see Figure 8-11).
Sharing Streams via Public Website
iPhoto’s public website feature (Creating a Shared Photo Stream) is great for sharing photos with people who don’t have iOS gadgets or a Mac. Streams you share this way sport far less interactivity than their iCloud-based cousins, but they’re still incredibly useful.
Once your fans arrive at the web address that they received in their photo-stream invitation email or that you gave them (if you turned on the Public Website option after initially sharing the stream, say), they’re in for a rollicking good time. They can view your images in a variety of ways, as Figure 8-12 shows.
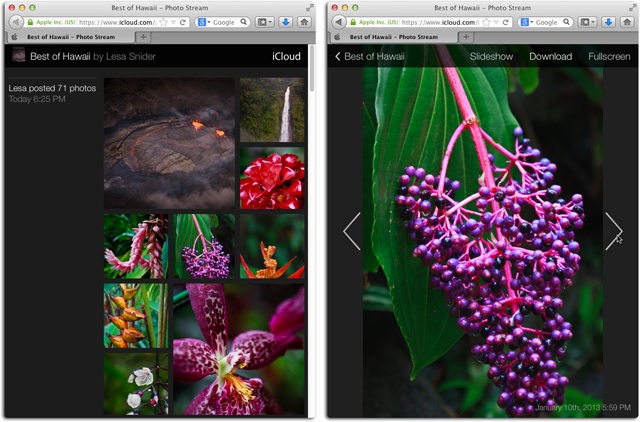
If you click a photo in the collage, you see it at an enlarged size, with back and forward arrows on either side that let you see the next (or previous) photo. Once you’re viewing an enlargement, you also see handy links above the photo:
Click Slideshow to enlarge all the photos and view them one after the other—no clicking required. As soon as you click this link, it changes to read “Stop Slideshow”; it’s pretty obvious what clicking that link does.
Click Download to download the current photo. It’s not the full, high-resolution original. For example, if the original photo weighs in at 5 MB, the version you’re viewing comes in at a mere 768 KB. In other words, it’s not big enough to create good prints, so you don’t have to worry about people stealing photos from your stream and displaying them in galleries as their own work.
Fullscreen is similar to Full Screen view in iPhoto: Clicking it fills your entire monitor with black, and you see the enlarged photo—or slideshow, if you’ve clicked that link—without distractions.
Your public website stays live until you either delete the photo stream or turn off the Public Website option in the Info panel.
Deleting a Shared Photo Stream
It’s easy to find out how many photo streams you’ve shared: Just click iCloud in your Source list, and they’re listed right in the photo-viewing area.
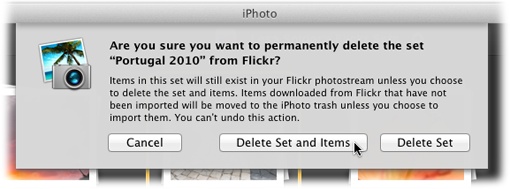
They’re very easy to take down, too, once they’ve outlived their usefulness. To delete a photo stream, click its name and then press ⌘-Delete. (If your stream contains photos that were synced to your copy of iPhoto [for example, photos submitted by other people], a message warns you that those pictures are about to be obliterated, and you get an “Import photos to your library before deleting this stream” option.)
When you click Delete, the stream disappears from your Source list and from any subscribers’ copies of iPhoto. (If you turned on the Public Website option, the stream’s web incarnation disappears, too.) And you instantly reclaim some of your iCloud storage space.
Publishing Photos on the Web
Putting your photos on the Web is the ultimate way to share them with the world. If the idea of allowing the vast throngs of the Internet-using public to browse, view, download, save, and print your photos sounds appealing, read on.
Note
Publishing photos to the Web is not a substitute for backing them up. Chapter 12 has the scoop for creating a real backup plan.
Aside from the Public Websites feature of iCloud photo streams described in the previous section (Sharing Streams via Public Website)—wherein iPhoto builds your web gallery and lets you share its address privately with people you pick—iPhoto provides three additional roads to Webdom. The following methods let you post single or multiple photos (save for Twitter, which lets you post only one at a time), which are easily synced when you make changes.
However, the first few routes are decidedly more public than anything you’ve posted thus far. Your choices include these:
The easiest approach: iPhoto makes it a snap to publish your pictures via Facebook, Flickr, or Twitter so that anyone with a web browser can admire your photography:
Facebook.com has become the destination for people to post news, gossip, and pictures. The site offers photo albums you can share with your Facebook friends. And since you have iPhoto, sharing photos and videos on Facebook is nearly a one-click affair.
Flickr.com is the world’s most popular photo-sharing site. It’s free, and it lets you upload a terabyte worth of photos (about 650,000 of them; that should cover your kids’ first few birthdays). iPhoto gives you a quick route to posting images here. (Beware: For those concerned about image theft, Flickr is the scariest option of all; details on Posting Photos to Flickr.)
Twitter.com is the free, microblogging phenomenon that lets you type short, 140-character messages that announce what you’re doing. You can also use it to share individual photos straight from iPhoto.
Tip
Once you start publishing photos on Facebook, Flickr, or Twitter, iPhoto keeps track of which photos went where. That’s a handy feature when you can’t remember where you posted that photo of your latest facial piercing. The box on The Info Panel Knows has the scoop.
More effort, more design options: iPhoto on your iOS device has a neat feature called web journals that you can use to create gorgeous online galleries (you also need a free iCloud account). You can permit people to download your photos (though not at full size) and play them as a slideshow in a web browser. Chapter 15 has the full story.
For the experienced web page designer: If you already have a website, you can have iPhoto generate HTML documents using the Export command. You can then upload these files, with the accompanying graphics, to your website. (Most Internet accounts, including those provided by your phone or cable company, come with free space for web pages uploaded in this way.)
This is the most labor-intensive route, but it offers much more flexibility to create sophisticated pages if you know how to work with HTML. It’s also the best option if you hope to incorporate the resulting photo gallery into an existing website.
Note
iPhoto used to let you create web galleries using a program called iWeb. Apple has discontinued iWeb, but if you still have a copy, you can find instructions on how to use it by visiting this book’s Missing CD page at www.missingmanuals.com/cds.
Sharing Photos via Facebook
From its humble beginnings in 2004 as an online directory for Harvard students, Facebook has exploded into the world’s most popular social-networking site, with over a billion members around the world. The concept is ingenious: You sign up for an account at www.facebook.com, create a profile page where you add resumé-like details, plus lists of your favorite books, movies, and quotes. You then link your profile to the profiles of your friends. Once you’ve “friended” someone this way, you can see each other’s profile pages and socialize in the virtual realm.
You can also upload pictures and video to your Timeline (your public bulletin-board page, formerly called your “Wall”), and post photo albums to your profile page so your Facebook friends can see them. You can even “tag” people in those photos so you, your pal, and all the friends you both have can see those pictures.
With iPhoto, the whole photo-and-video-uploading part is a piece of cake. Heck, you can even change your Facebook profile picture using iPhoto.
Once you have a free Facebook account, you’re ready to link it to iPhoto and start the photo-uploading frenzy:
In iPhoto, select the photos you want to publish to Facebook.
You can select whole albums or arbitrary batches of photos (see Selecting Photos for photo-gathering tips). If you’re particular about the order of the photos, create an album and arrange the photos before posting the album.
Choose Share→Facebook, or click Share in the iPhoto toolbar, and then choose Facebook.
Sign into your Facebook account.
If you’re not already logged in, you’re asked to supply your Facebook username and password (if you don’t have an account, create one at www.facebook.com). Facebook also asks for permission to communicate with iPhoto.
Choose where you want to put your photos on Facebook: in a new album, on your Timeline, or in an existing album.
Once iPhoto connects to your Facebook account, the Share menu displays the options shown in Figure 8-13 (top). To add photos to an existing album, click the album’s thumbnail, and iPhoto automatically uploads your photos to that album.
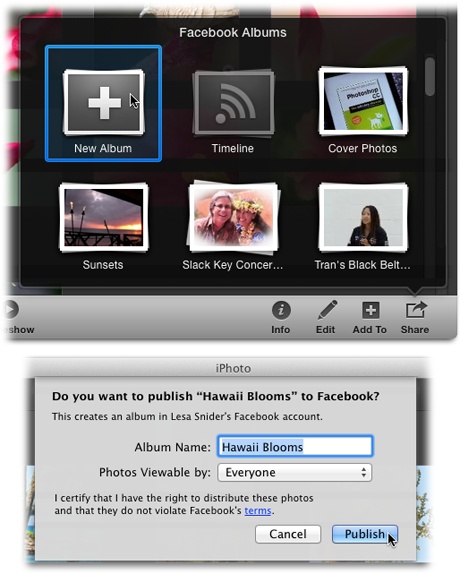
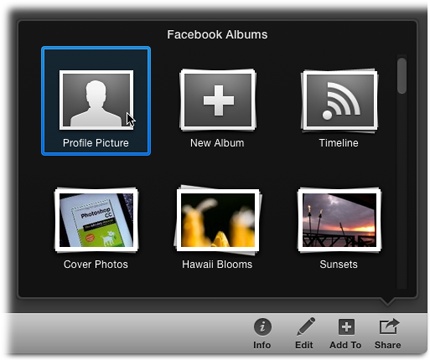
If you want to create a new Facebook album or publish the photo(s) to your Timeline, click the appropriate icon and then proceed to the next step.
An iPhoto pane appears, asking you for more info.
If you clicked the Timeline icon, iPhoto displays a box where you can type a comment that will appear with the photo.
If you clicked the New Album icon, you see the pane shown in Figure 8-13 (bottom), where you can give the album a name (if you selected an iPhoto album before starting the sharing process, the album’s name automatically appears here, but you can edit it). You also get to choose who can see the soon-to-be-uploaded photos: only the people you’ve personally accepted as Facebook friends, friends of those friends, or any Facebook member who meanders by.
Tip
If you change your mind about the permissions you set for a Facebook album, you can change them on the fly by selecting the album and then opening the Info panel. Use the “Album viewable by” option to set things right.
Figure 8-13. Top: Once you’ve logged into Facebook, the Share menu repopulates itself with the contents of your Facebook account (if you’ve posted a lot of photos, it’ll take a moment or two). From here, you can add a new Facebook album, post the selected photos to your Timeline, or add them to an existing album. Bottom: iPhoto lets you manage privacy options on a per-album basis, so you’ll see this pane each time you upload photos to Facebook. You can also use iPhoto to change your Facebook profile picture. Page 214 tells you how.Click Publish.
Sit back as iPhoto passes the pictures over to Facebook. While it’s working, you can do other things in iPhoto, but it’s best to let it finish publishing one album before you start publishing another.
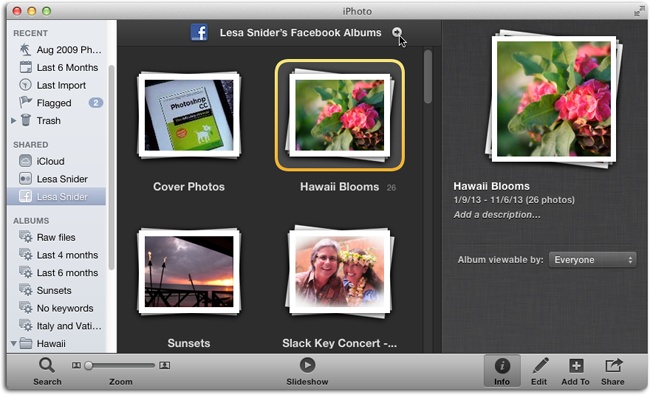
In iPhoto’s Source list, your Facebook account appears under the Shared heading (Figure 8-14).
At this point, you’re ready to view your handiwork.
To see all your photos on your Facebook page, make sure your Facebook account is selected in the Source list. Then, at the top of the iPhoto window, click the arrow next to the “[Your Name]’s Facebook Albums” heading (visible in Figure 8-14). To see a single Facebook album, double-click the album (they appear as stacks of photos, as shown in Figure 8-14), and then click the album link at the top of your iPhoto window.
Editing Published Facebook Albums
As with iCloud photo streams, syncing is a two-way street between Facebook and iPhoto: Anything you do in one updates the other. For example, to change the name of an album you’ve published to Facebook from iPhoto, click its name and then enter a new one. The new name appears on Facebook when you double-click the album in iPhoto to view it.
Likewise, you can change the album’s name on Facebook by clicking the Photos link at the top of your profile page and then selecting the album you want to change. When the album opens to reveal all the pictures inside, click the Edit button near the album’s name. Enter something clever into the Album Name field, and then click Done. You see the change in iPhoto when you double-click to view the album, which triggers syncing between the two.
Note
Unlike the photos you publish via iCloud photo streams, you can edit photos after publishing them to Facebook; iPhoto syncs the changes automatically. However, if you’re editing the photo from within a published Facebook album, you’ll need to trigger a sync by clicking the All Albums button at the upper left of the iPhoto window and then double-clicking to reopen the album. If you have Facebook open in your web browser, you might need to reload the page to see the changes.
Once you’ve published photos to a Facebook album, adding more photos is easy: In iPhoto, just select the photo(s) you’d like to add and then click Share in the toolbar. Click Facebook; the pop-up menu changes to reflect all the Facebook albums you’ve published. Click the album you want to add the photos to, and the deed is done. iPhoto displays a message in the photo-viewing area letting you know how many photo(s) were published and the album’s name.
This syncing process goes both ways. If you upload photos to this same album via Facebook (using Facebook’s uploading tools or your smartphone), small, web-size copies of those photos show up in your iPhoto library. This syncing happens automatically when you double-click a previously published album in iPhoto.
Deleting photos from your Facebook albums works exactly like it does with iCloud photo streams (Adding and Deleting Photos). Before you delete anything, make sure you’ve selected the Facebook item in your Source list, and not Photos or Events (if either of those are selected, then you’ll delete the pictures from iPhoto.) Then select the offending photo and press the Delete key; when iPhoto asks for confirmation, click Delete. Facebook and iPhoto do a little dance, you see a progress bar at the top of your iPhoto window, and then the photo goes offline. The original, however, is still safe in your iPhoto library.
Deleting Albums from Facebook
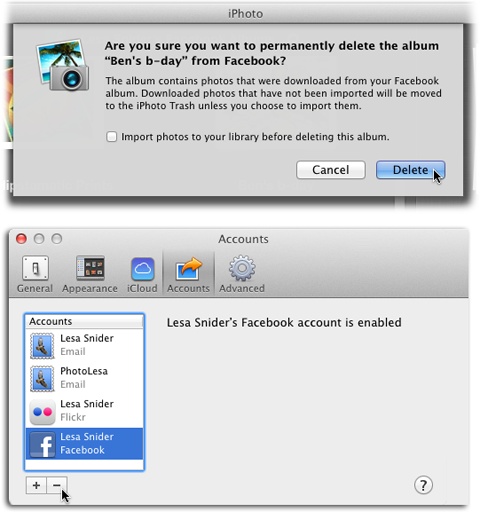
To delete a whole Facebook album via iPhoto, make sure Facebook is selected in the Source list. Then select the album and press ⌘-Delete. If you added any photos to the album via Facebook, you get the option to import those photos, as shown in Figure 8-15 (top). These aren’t high-resolution versions, just small web editions. Turn on this checkbox, if you’re so inclined, and then click Delete.
When you delete a Facebook album in iPhoto, it’s removed from your Facebook page, too. If you want to delete the album from iPhoto only (so that it’s still visible in Facebook), then you have to delete the Facebook account from iPhoto before you delete the album. To do so, choose iPhoto→Preferences→Accounts (Figure 8-15, bottom). Select your Facebook account in the list and then click the – sign.
Managing Facebook Accounts
If there’s more than one avid Facebooker in your household, you can let her upload albums to her own Facebook page by adding another Facebook account in iPhoto’s Preferences. Likewise, if you want to remove someone’s Facebook privileges, you can remove the account.
To do so, choose iPhoto→Preferences→Accounts tab (Figure 8-15, bottom). Click the + sign at the bottom of the pane and, from the resulting list, choose Facebook and then click Add. Enter the new account details when prompted. When you’re finished, the Source list displays each member’s Facebook account as a separate item in the Shared section.
Automatic Photo-Tagging in Facebook
If you’re always tagging your pals on Facebook, iPhoto can save you a ton of time. Remember how much fun you had back in Chapter 4 getting iPhoto to recognize your friends using the grinding analytic power of the Faces feature? If you took the time to add full names and email addresses to the albums on your Faces corkboard, then tagging your Facebook friends in photos is pretty much a done deal.
Once you upload Faces-tagged photos to Facebook, friends you’ve identified in the pictures are also noted with Facebook’s photo-tagging tool. In other words, if you’ve filled in Ralph’s info in his Faces album in iPhoto, then when you upload a photo from that album, Facebook blabs to all your mutual friends that you’ve just tagged Ralph in one of your pictures.
Depending on your Facebook settings, all your Facebook friends may spot a thumbnail of the Ralph-tagged photo and be able to click a link to see it at full size.
Note
If you know you’ve face-tagged someone in Faces view but the tags aren’t showing up on Facebook, check the Info panel (The Info Panel) to see what name and email address you entered for that person. For Facebook to understand iPhoto Faces tags, this info has to match the name and email address on the person’s Facebook account.
Adding and Viewing Comments
One of the most rewarding aspects of publishing photos on Facebook is having people interact with them. Happily, you can now view those interactions without ever leaving iPhoto, as shown in Figure 8-16.
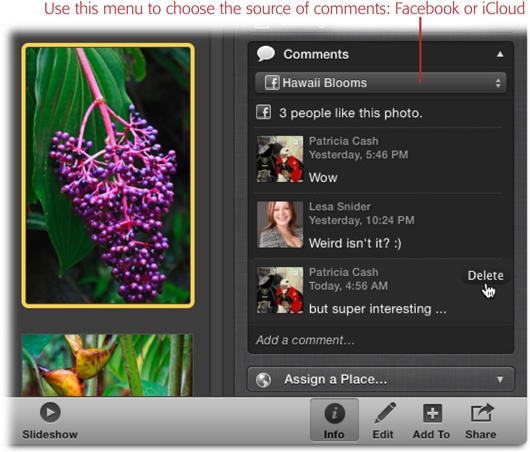
When someone “likes” your photo on Facebook (by clicking the thumbs-up button near the photo), you can see this info in the Comments section of the Info panel whenever that photo is selected—no matter what’s selected in your Source list (save for Projects and Slideshows). In other words, you don’t have to view the photo in the published album to see “likes” and comments; you could be in Photos or Events view, or in an album or a smart album.
Tip
The Info panel’s Comments section isn’t very big (though it does have a scroll bar). To enlarge it so you can see more input from adoring fans, drag the bottom-right corner of your iPhoto window downward and to the right.
You can add your own comments to keep the conversation going; just click “Add a comment” at the bottom of the Comments section, type away, and then click Post. If you point your cursor at an existing comment (whether it’s one that you wrote or that someone else added), a Delete link appears; just click it to obliterate the comment.
Changing Your Facebook Profile Picture
iPhoto also lets you change your Facebook profile picture—the photo that appears at the top left of your profile page—without your having to visit Facebook on the Web.
Just select the photo you want to use and then click the Share button in iPhoto’s toolbar. Choose Facebook; the Share menu changes to include a new option: Profile Picture. Figure 8-17 explains the rest.
Posting Photos to Flickr
Flickr.com is an insanely popular photo-sharing site; it’s not uncommon for its members worldwide to upload 30,000 photos and videos a minute. The site recognizes geotagged photos and displays them on a map, so those pictures you so carefully pinpointed back in Chapter 4 using iPhoto’s Places feature take their location information with them.
iPhoto can send photos directly to your Flickr page—no special software required. All you need is a Flickr account. To get one, visit www.flickr.com and sign up (you can also log in with your Facebook or Google account, if you have one).
These days, Flickr is free. Gone are the days when you had to pay for more uploads. Absolutely anyone can upload a terabyte of photos and videos at full resolution—hundreds of thousands of them. Photos are limited to 200 MB each (no problem) and video files are limited to 1 GB (meaning that you can’t post the entire school play in high definition).
When you join Flickr, you’re in for quite a ride. Flickr isn’t just a place to post your photos on the Web for your friends and family to see, although it’s great for that. It’s also a place for photo fans to comment on your photos (though unfortunately, you can’t see the comments in iPhoto), link to one another’s photo pages, search for photos by keyword (before visiting a place, for example), and so on. You can also order printed books of your photos, complete with a hard cover and matching dust jacket.
Note
Flickr’s privacy settings let you keep personal photos out of the public view. Through the site, you can set up lists of friends and family so that only the people you place on these lists can see specified sets of pictures. Details live at www.flickr.com/help/faq.
One-Time Setup
Once you have your Flickr account, it’s time to link it to iPhoto and then transfer some photos. Here’s the gist of the one-time process:
In iPhoto, select the pictures you want to share on Flickr.
You can select whole albums or choose individual photos in your library using the selection techniques on Selecting Photos.
Click Share in iPhoto’s toolbar, and choose Flickr.
iPhoto displays a message at the top of the photo-viewing area asking if you’d like to set it up to publish to your Flickr account.
Once you start sharing and publishing photos publicly via iCloud, Facebook, Flickr, and Twitter, it can be tough to remember where you shared each one. Sure, you can choose one of the items in the Shared section of the Source list and root around through albums to see what’s where, but there’s a faster way: using the Info panel.
In addition to details about when, how, and where you took a photo, the Info panel also keeps track of what services you shared the photo with, and to whom you’ve sent the photo via instant message (Instant Messaging Photos) or email (Emailing Photos).
To find out exactly where that photo of your latest tattoo ended up, select the photo in your library and then click Info in iPhoto’s toolbar. (This won’t work if you select multiple photos or an entire album; the Info panel’s Sharing section is visible only when a single photo is selected and you’ve shared or published it to the services mentioned above.)
The Info panel opens and, if the photo has been published outside of iPhoto, you’ll see a section called Sharing. Give it a click; the pane expands to show you all the places the photo lives. In the example shown here, the photo has been shared on Flickr, in two Facebook albums, and once via instant message—whew!
If you need to quickly delete the tattoo shot from Facebook—in the hopes that Grandma hasn’t yet seen it—click the arrow next to the service’s listing in the Sharing section. iPhoto opens the web page where the photo lives. There, you can cross your fingers and search for the service’s Delete command. Or you can follow the instructions on Deleting Photos for deleting the item within iPhoto. (Alas, you can’t take back a photo that you’ve sent via instant message or email.)
Click Set Up, and then sign into your Yahoo account.
iPhoto opens your web browser and asks for your Yahoo username and password (Yahoo owns Flickr). If you forgot to sign up for an account in your excitement about this whole Flickr thing, you can actually sign up here. And if you’ve got a Facebook or Google account, you can use that instead.
Authorize your Flickr account to talk to iPhoto.
This is where you agree to let Flickr snag copies of your photos. Once you agree by clicking the second Next button (the one that says you arrived here through iPhoto), you get another screen confirming your choice. Click “OK, I’ll authorize it.”
Finally, you see a screen saying you can close the browser window and safely return to iPhoto, where the authorization pane promptly disappears.
Posting to Flickr
Once your account is in order, you’re ready to send pictures from iPhoto to Flickr:
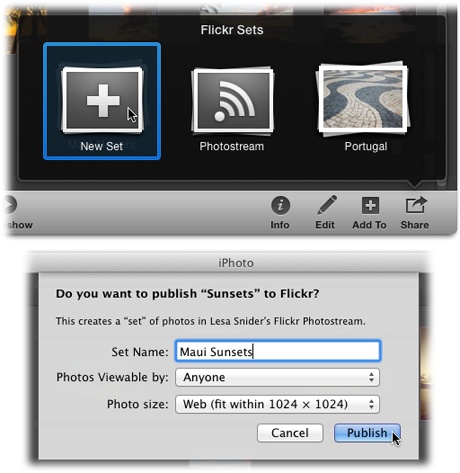
Select individual photos or an album, click Share in the toolbar, choose Flickr, and then click New Set or Photostream.
Figure 8-18 explains the difference between these options.
An iPhoto pane appears so you can choose privacy and file-size settings.
You can specify who in your Flickr realm will be able to view the uploaded pictures—You, Friends, Family, Family and Friends, or Anyone. (To change your audience settings later on, log into www.flickr.com.) You can also pick the size—Web, Optimized, or Actual—as shown in Figure 8-18.
Click Publish.
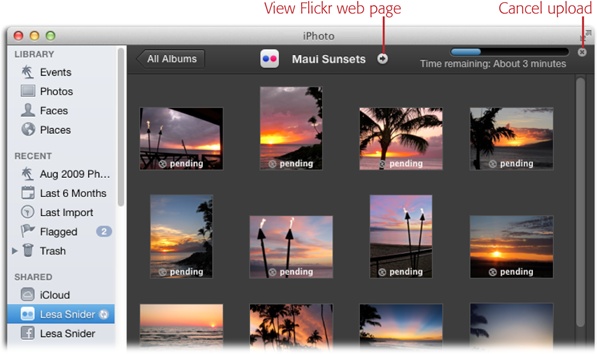
iPhoto hands the pictures off to Flickr so that the world (or the subset of the world you’ve specified) can see them. A status bar at the top of the iPhoto window shows the program’s progress (see Figure 8-19). Depending on the number of photos you’re uploading, this process can take awhile. (It’s best to let iPhoto finish publishing one set before you ask it to publish another.)
As Figure 8-19 shows, the name of your Flickr account now appears in iPhoto’s Source list under the Shared heading. Any set or photos you’ve uploaded appear in the main viewing area in a stack, like an album or Event.
Tip
If you change a Flickr set’s name in iPhoto, it changes on Flickr, too. (Just click your Flickr account in iPhoto’s Source list, click the set in the photo-viewing area, and then type a new name.) It works the other way, too: Changing the set’s name on Flickr also changes it in iPhoto.
Any keywords you’ve applied to your pictures in iPhoto (Keywords) are converted into Flickr tags when you publish them on the site. So, if you’ve added the keywords sunset, beach, and island to all your sunset pictures while lounging on the beach in Maui, other Flickr members doing searches for photos tagged with sunset, beach, or island will see your pictures in their search results—if you’ve got your privacy settings configured to let anyone see your photos.
The same thing happens with Places tags (Chapter 4). If you took the time to add location data to your photos, it travels with them when they migrate to Flickr.
Tip
You can even set up multiple Flickr accounts in iPhoto. To do so, choose iPhoto→Preferences→Accounts. Then click the + sign and, from the resulting list, choose Flickr and click Add. iPhoto then prompts you for your account details. When you’re finished authorizing the new account, each Flickr account shows up as a separate icon in your Source list.
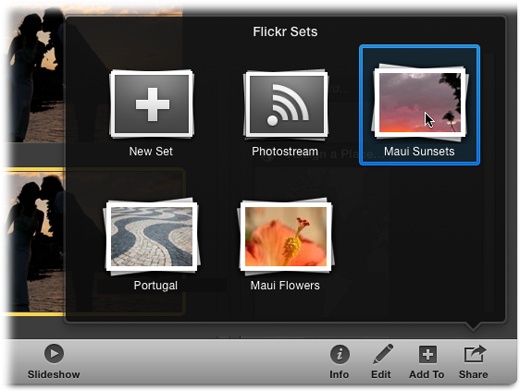
Adding More Photos to Published Flickr Sets
Once you’ve published photos to a Flickr set, adding more photos to the set is easy: Just select the photos(s) you’d like to add and then click Share in the toolbar, choose Flickr, and then select the set you want to add the photos to, as shown in Figure 8-20. iPhoto summons the privacy pane shown at the bottom of Figure 8-18 again. Click Publish, and your photos appear on Flickr.
If you upload a photo to this same set via Flickr (using Flickr’s own uploading tools or your smartphone), small web-size copies of those photos show up in your iPhoto library. This syncing happens automatically when you double-click a previously published set in iPhoto.
Note
Feel free to edit your photos after publishing them to Flickr; iPhoto is happy to update them. After you’ve finished making changes, you can sync your iPhoto and Flickr sets by exiting the published set (click the All Albums button at the top left of the iPhoto window), and then double-clicking it to reopen it. When you do, a status bar appears at the top of the window letting you know that a sync is in progress.
Deleting Photos from Flickr
Freeing your photos from Flickr is simple: Select a photo and then press Delete, or select a Flickr set and press ⌘-Delete. (Just be sure to take a quick peek at your Source list beforehand to make sure you’re deleting them from Flickr and not from Photos or Events.) iPhoto then gives you the choice of leaving your pictures on the Flickr website. Figure 8-21 has the details.
When you delete photos on the iPhoto end, any photos you added to the set via Flickr get moved to iPhoto’s Trash; to restore them to your library, just drag them onto the Photos or Events item in your Source list.
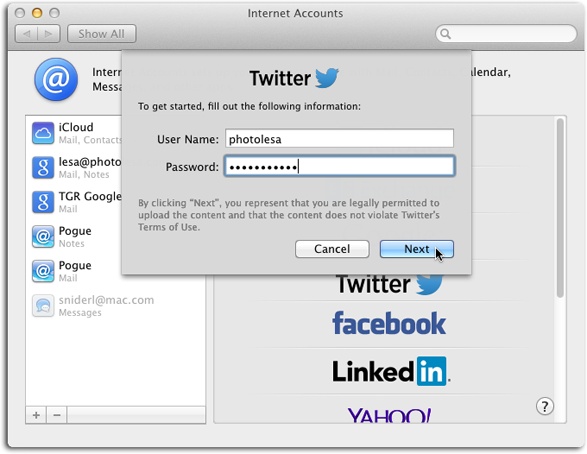
Uploading Photos to Twitter
Posting your photos on Twitter is a piece of cake, though it
takes a tiny bit of setup. To get started, you need to let iPhoto
know about your Twitter account. Oddly, you do this via your
Mac’s preferences instead of iPhoto’s. Choose
![]() →System Preferences→Internet Accounts, and
then click Twitter. Figure 8-22 has the
rest.
→System Preferences→Internet Accounts, and
then click Twitter. Figure 8-22 has the
rest.
Now on to the fun part: the actual tweeting.
Back in iPhoto, select a thumbnail to share with the Twitterverse, and then click Share in iPhoto’s toolbar and choose Twitter (you can also choose Share→Twitter). You see the window shown in Figure 8-23. Type your message and then click Send. iPhoto displays a message letting you know that your tweet was sent. If you listen carefully through your speakers, a little bird whistles, too.
Note
You can tweet only one photo at a time. If you have more than one photo selected when you choose Twitter from the Share menu, you get an error message.
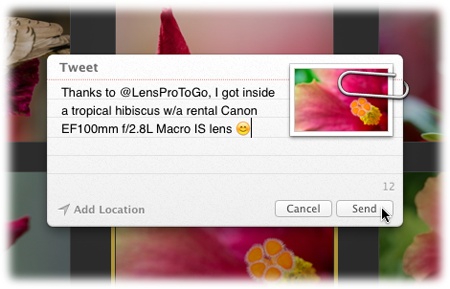
As with any shared or web-published picture, iPhoto keeps track of it in the Sharing section of the Info panel; just select a single photo, and then click Info in iPhoto’s toolbar. For tweeted photos, the Info panel displays your entire tweet, not just the fact that it was tweeted.
Exporting iPhoto Web Pages
If you already have your own website, you don’t need iCloud to create an online photo album, though you can still enlist iPhoto’s help. By using iPhoto’s Export command, you can generate HTML pages that you can upload to any web server. You’re still saving a lot of time and effort—and you even get a handy thumbnail gallery page.
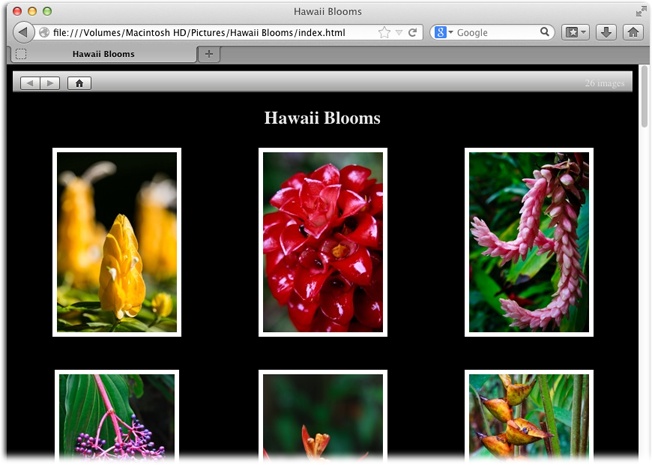
The web pages you export from iPhoto don’t include any fancy designs or themed graphics. In fact, they’re kind of stark; just take a look at Figure 8-24. But this is the best method if you plan to post the pages you create to a website of your own—especially if you plan on tinkering with the resulting HTML code.
Here are the basic exporting steps:
In iPhoto, select the photos you want to include in the web gallery.
The Export command puts no limit on the number of photos you can export in one go, so select as many as you want. iPhoto will generate as many pages as needed to accommodate all the pictures in your specified grid.
If you don’t select any photos, iPhoto assumes you want to export all the photos in the current album, even if it’s the Library or the Last Import album (yikes!). So pay close attention to what’s selected in your Source list.
Choose File→Export, or press Shift-⌘-E.
The Export dialog box appears.
Click the Web Page tab (Figure 8-25).
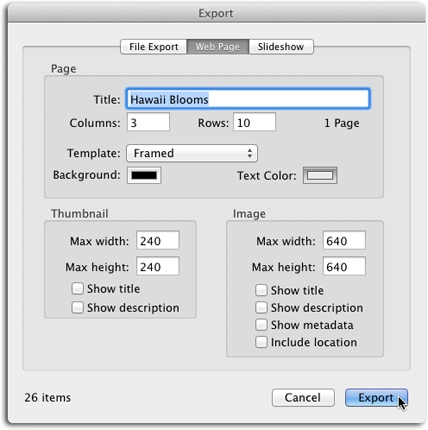
Figure 8-25. As you change the size of the thumbnails or the grid, iPhoto updates the number of pages it will need to generate to handle the images. (The page count for your current settings appears next to the Rows field.) The total number of the photos you’re about to export appears in the lower-left corner of the dialog box. Choose Framed from the Template pop-up menu to put a little frame around each thumbnail. And if you turn on “Show metadata,” then when someone clicks a thumbnail to open the full-size photo, its camera, shutter, aperture, exposure, and other photographic data appear. Turn on “Include location” to include the location info in geotagged pictures.Adjust the Page settings, including the title, grid size, and background color.
The title you set here will appear in the title bar of each exported web page, and as a header in the page itself.
Tip
For maximum compatibility with the world’s computers and operating systems—if you’re trying to get international visitors to check out your photos—use all lowercase letters and no spaces.
Use the Columns and Rows boxes to specify how many thumbnails you want to appear across and down your “index” page. If you’d like a background page color other than white, click the swatch next to the word “Background” and follow the instructions in Figure 8-26. You can also pick a color for the text on each page by clicking the Text Color swatch.
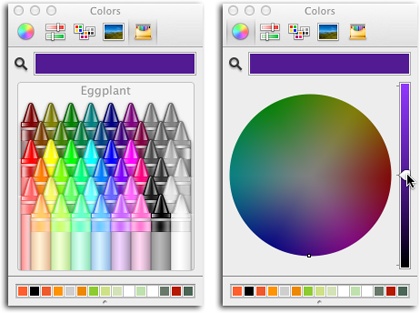
You can even choose a background picture instead of a solid background color. To do that, click the Image Palettes icon at the top of the Color Picker (it looks like a tiny snapshot). Then, from the pop-up menu near the bottom of the window, choose “New from File” to locate the graphics file on your hard drive. But be considerate of your audience: A background graphic may make your pages take longer to load, and a busy background pattern can distract viewers from your photos.
Figure 8-26. Left: If you’re not a fan of OS X’s standard Color Picker layout, click one of the icons at the top of the dialog box. The crayon picker shown here is both easy to use and offers creative color names, like Eggplant. Right: In the standard layout, drag the slider on the right up and down to view lighter and darker colors.Specify how big you want the thumbnail images to be, and choose a size for the enlargement that appears when someone clicks a thumbnail.
The sizes iPhoto proposes are fine if all your photos are horizontal (that is, in landscape orientation). But if some are wide and some are tall, you’re better off specifying square dimensions for both the thumbnails and the enlarged photos—240 x 240 for the thumbnails and 640 x 640 for the biggies, for example.
Adjust the remaining settings, as desired.
“Show title” draws upon the titles (filenames) you’ve assigned in iPhoto, centering each picture’s name underneath its thumbnail. The larger version of each picture will also bear this name. Turning on “Show description” displays any text you’ve typed into the Description field in iPhoto. Depending on which checkboxes you turn on, you can have the description appear under each thumbnail, under each enlarged image, or both.
“Show metadata” displays reams of photographic data (shutter speed, aperture, flash status, and so on) beneath each enlargement.
Finally, “Include location” makes the photo retain any Places tags (Chapter 4) showing where it was taken. If you have privacy concerns, it’s best to leave this setting turned off.
Click Export.
The Save dialog box appears.
Choose a folder to hold the exported files (or click New Folder to create one), and then click OK.
The export process gets under way.
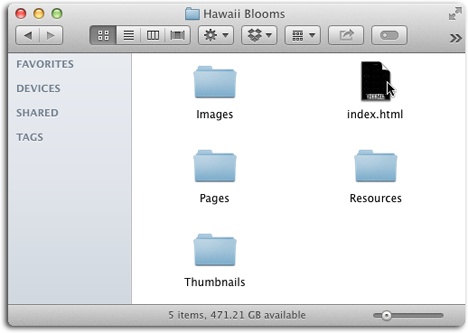
When iPhoto is done exporting, you end up with a series of HTML documents and JPEG images—the building blocks of your website-to-be. A number of these icons automatically inherit the name of the folder where you saved them. If you export the files into a folder named Hawaii Blooms, for example, you’ll see something like Figure 8-27:
index.html. This is the main HTML page, containing the first thumbnails in the series that you exported. It’s the home page, the index page, and the starting point for the exported pages. To preview the HTML pages in your browser, open this file. If you exported enough photos to require more than one page of thumbnails—that is, if iPhoto required multiple “home” pages—you’ll see additional pages named index2.html, index3.html, and so on.
Thumbnails. This folder holds the actual thumbnail graphics that appear on each of the index pages.
Pages. This folder contains the HTML documents (named 1.html, 2.html, 3.html, and so on) that open when you click the thumbnails on the index pages.
Images. This folder houses the larger JPEG versions of your photos. These are the graphics that appear on the 1.html, 2.html, 3.html pages.
Resources. This is where iPhoto puts the graphics used to navigate the web pages, such as next and back arrows, a Home icon, and so on.
Once you’ve created these pages, it’s up to you to figure out how to post them on the Internet where the world can see them. To do that, you’ll have to upload all the exported files to a web server using an FTP program like the free RBrowser, which is available from www.rbrowser.com. For a fancier program, check out Transmit or Fetch. They’re available from the Mac App Store for about $30 each; click the Mac App Store icon in your Dock to buy them.
Enhancing iPhoto’s HTML
If you know how to write HTML code, you’re not stuck with the uninspiring web pages exported by iPhoto. You’re free to tear into them with a full-blown web authoring program like Adobe Dreamweaver, Adobe Muse, or the free KompoZer (www.kompozer.net) to add your own formatting, headers, footers, and other graphics. Heck, even Microsoft Word lets you open and edit HTML documents—it’s got plenty of power for changing iPhoto’s layout, reformatting the text, or adding your own page elements.
If you’re a hard-core HTML coder, you can also open the files in a text editor like BBEdit or even TextEdit to tweak the code directly. With a few quick changes, you can make your iPhoto-generated web pages look more sophisticated and less generic. Here are some of the changes you might want to consider making:
Change the font faces, sizes, and alignment of titles.
Add a footer with your contact information, copyright, and email address.
Add metadata tags (keywords) to the page header so that search engines can locate and categorize your pages.
Insert links to your other websites or relevant sites on the Web.
Sharing Photos on a Network
One of the coolest features of iTunes is the way you can “publish” certain playlists on your home or office network so that other people in the same building can listen to your tunes. Why shouldn’t iPhoto be able to do the same thing with pictures?
Well, previous versions of iPhoto let you do that, but Apple has removed that feature. Now, Apple wants you to do your photo sharing via iCloud, its free syncing and storage service (The Drag-and-Drop Method). By creating shared photo streams (Creating a Shared Photo Stream), you can easily access photos across multiple libraries at your home or office and then drag them into your own library.
And there are other ways to get photos from one Mac onto another:
Use AirDrop to transfer the files. This method is fast, simple, and efficient. There’s no setup or passwords involved, and no software to install. AirDrop, a feature of OS X since Mountain Lion, lets you copy files to another Mac that’s up to 30 feet away, instantly and wirelessly; you don’t need an Internet connection or even a WiFi network. It works on a flight, a beach, or a sailboat in the middle of the Atlantic.
Both parties need to have an AirDrop window open. To open one, open a Finder window and then click AirDrop in the Sidebar, or choose Go→AirDrop. After a moment, the window fills with icons for nearby Macs running Mountain Lion or later that also have an open AirDrop window. Simply drag the image files (or folder, if you stuffed them into one) onto your recipient’s icon. When the Mac asks if you’re sure, click Send or press Return.
Your recipient sees a message that says, “[Other guy’s Mac] wants to send you [filename].” She has three options: Save and Open, Decline, and Save. If she clicks one of the Save buttons, then the file transfer proceeds and a progress bar wraps around the other person’s icon in the AirDrop window. The file is encrypted, so evildoers nearby have no clue what you’re transferring (or even that you’re transferring). The file winds up in your recipient’s Downloads folder.
Copy the files onto an external drive or flash drive, and then plug the drive into the other person’s Mac and copy them into iPhoto.
Use iPhoto Library Manager. This $30 shareware program is described in Chapter 12. One of its best talents, however, is letting you access a single iPhoto library from multiple Macs on the same network. (The built-in Help screens show you how.) Very cool.