
Chapter 15. Sharing Photos on the iPad
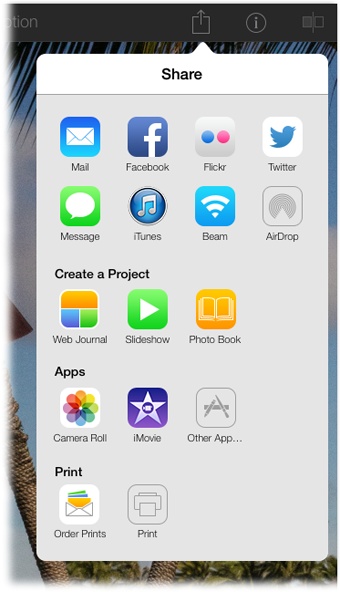
If you want to do something more with a photo than just stare at it, you can share it. iPhoto on your iPad (or other iOS device) lets you print a photo; text it; beam it; email it; AirDrop it; post it on Twitter, Facebook, or Flickr; or pass it over to another app.
iPhoto also lets you create some incredibly cool projects. You can whip up a web journal (a digital scrapbook you can share online) from your photos and video that includes nifty widgets like weather, a map, or a note (the web journal feature is unique to iPhoto for iOS). You can also create a slick slideshow and share it on the Web or beam it to a buddy, as well as handcraft (and order) a hardcover book or individual prints from the Apple Mother Ship.
Think about it for half a second and you realize that not only do iOS gadgets have some of the best cameras on any mobile device, they’re also typically online. So once you’ve taken a few pictures, or synced some using your computer (Syncing with iTunes), and you’ve used iPhoto to perfect them—which is what this book is all about—you can do something with them right away. That’s instant gratification at its technological best.
This chapter teaches you how to do all of those things and more.
Sharing Photos and Videos
In iPhoto for iOS, it’s easy to send pictures via email, web, text message, AirDrop, iCloud photo stream, and so on.
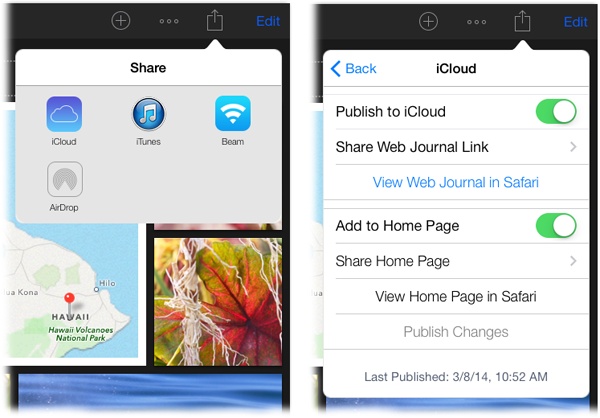
The app’s Share icon (![]() ) is your headquarters for sending stuff
elsewhere, and for creating projects (which are covered later in this
chapter, beginning on Creating Projects). Once
you’ve opened a photo or selected a few using the thumbnail grid, tap
the icon to see the pane in Figure 15-1.
) is your headquarters for sending stuff
elsewhere, and for creating projects (which are covered later in this
chapter, beginning on Creating Projects). Once
you’ve opened a photo or selected a few using the thumbnail grid, tap
the icon to see the pane in Figure 15-1.
Before diving headfirst into Shareland, here are two things to keep in mind:
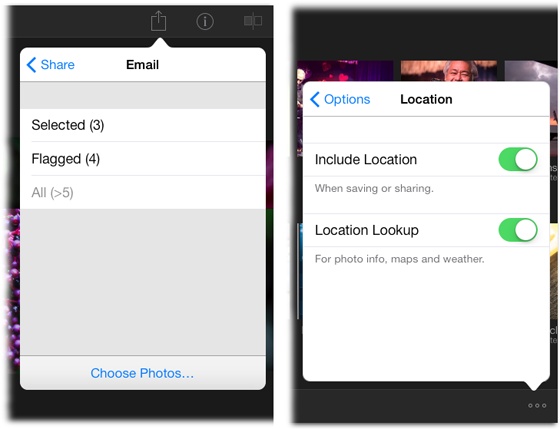
Selecting photos. You don’t have to select any photos before tapping the Share icon, though you do need to have at least one photo open. As Figure 15-2 (left) shows, when you tap an icon in the Share pane, iPhoto gives you the opportunity to pick exactly what you want to share. You can share selected photos, all the flagged photos (Auto-Enhancing and Rotating) in the album or Event you’re viewing, or all photos in that album or Event. Tap Choose Photos, and then use the techniques described on Viewing and Selecting Multiple Photos to select photos in the thumbnail grid. When you’re finished picking pictures, tap the Next button at the top right of your screen. (Sharing projects works a little differently, as the section beginning on Creating Projects describes.)
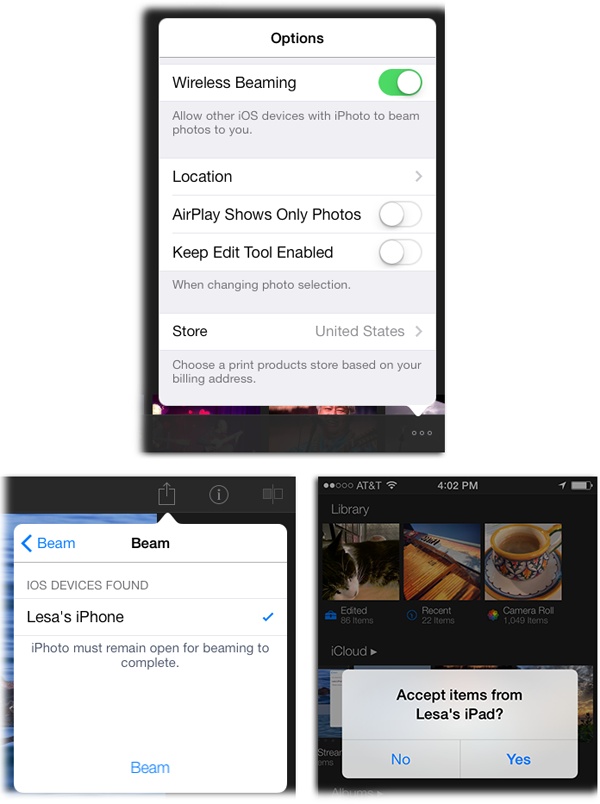
Location info. If your photos include location data such as Places tags, you need to decide whether you want to include that info when you share your photos with the world. To tell iPhoto your preference, head to the main screen—the one with Photos, Albums, and Projects at the bottom—tap the Options icon (the three dots), and then tap Location to see the pane shown in Figure 15-2 (right) and adjust the settings.
The next section starts you off nice and easy, in the familiar territory of sharing your pictures and videos via email.
When you open the Share pane and tap Mail, iPhoto automatically compresses, rotates, and attaches the selected photo or video clip to a new outgoing message. All you have to do is address it, type a subject, and tap Send. You don’t even have to decide how much to scale down the photo from its original size—iPhoto handles the downsizing all by itself.
Unlike iPhoto for Mac, iPhoto for iOS doesn’t keep track of when or to whom you’ve emailed your photos. You have to use the database in your skull to remember.
Facebook, Flickr, Twitter
If you’ve told your iPad (or other iOS device) your Facebook, Flickr, or Twitter user name and password (by going to the iPad’s settings and choosing the appropriate app), then posting a photo from your iPad to your Facebook Timeline, Flickr page, or Twitter feed is ridiculously simple.
Note
Facebook and Flickr let you post up to 10 photos at a time. Twitter, on the other hand, lets you post just one.
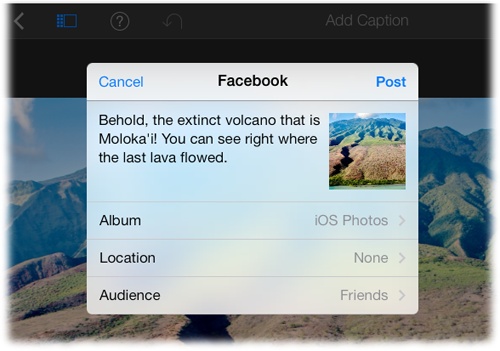
Open the photo you want to post, tap ![]() , and then tap Facebook, Flickr, or Twitter.
iPhoto offers you the chance to type a message that will accompany
your photo, as shown in Figure 15-3. You can also
tap Location if you want Twitterites or Facebookers to know where
the photo was taken (Flickr no longer uses iPhoto’s location
data).
, and then tap Facebook, Flickr, or Twitter.
iPhoto offers you the chance to type a message that will accompany
your photo, as shown in Figure 15-3. You can also
tap Location if you want Twitterites or Facebookers to know where
the photo was taken (Flickr no longer uses iPhoto’s location
data).
Tip
The Location option is available only if you’ve permitted Twitter or Facebook to use your location information, which you set up in your iPad’s Settings→Privacy→Location Services settings.
If you’re posting to Twitter, your message can use only 140 characters. (Fewer, actually, because some of your characters are eaten up by the link to the photo.) iPhoto helps out by keeping a count of how many characters you’ve typed.
When you tap Send or Post, your photo and your accompanying tweet or post zoom off to Facebook, Flickr, or Twitter for all to enjoy.
Note
Unfortunately, iPhoto doesn’t have a quick way to share photos with Instagram (the world’s second largest photo-sharing community behind Facebook), but that doesn’t mean you can’t get it done; flip ahead to Sending Photos to Other Apps for a workaround.
Message
You can also share photos as an instant message or text message so they wind up on the recipient’s cellphone screen. It’s a delicious feature, almost handier than sending a photo by email. After all, your friends and relatives don’t sit in front of their computers all day and all night (unless they’re serious geeks).
Note
If you’re sending a photo to another Apple gadget, like an iPhone, iPad, iPod Touch, or Mac, it will be sent as a free iMessage (assuming the recipient has turned on the iMessages option); your cellphone carrier won’t even be involved. But if you’re sending to a non-Apple cellphone, it will be a regular MMS message. All of this is described on Instant Messaging Photos.
To share this way, open the Share pane and tap Message. You can then pick up to five photos using the techniques described earlier in this chapter (Viewing and Selecting Multiple Photos). Specify the recipient’s phone number or choose someone from your Contacts list. (If you’re sending the picture by iMessage, then the person’s email address also works.) Then type a little note, tap Send, and off the photo goes.
Tip
Free photo-sharing sites like Flickr and Snapfish let you upload photos from your phone, too. For example, Flickr gives you a private email address for this purpose (visit www.flickr.com/account/uploadbyemail to find out what it is). And the big ones, including Flickr, also offer special iPhone apps that make uploading easier; they’re available from the App Store.
Sharing Photos to iTunes
As you learned on Using iTunes File Sharing, iTunes’ file-sharing feature lets you transfer full-sized photos from your computer to your iPad instead of the downsized versions produced by a regular iTunes sync. This section teaches you how to perform iTunes file sharing in the opposite direction, to send files you’ve edited in iPhoto on your iPad to your Mac in their full-sized glory. (As the box on Copying Edited Photos to Your Computer explains, edited photos aren’t automatically transferred to your Mac.)
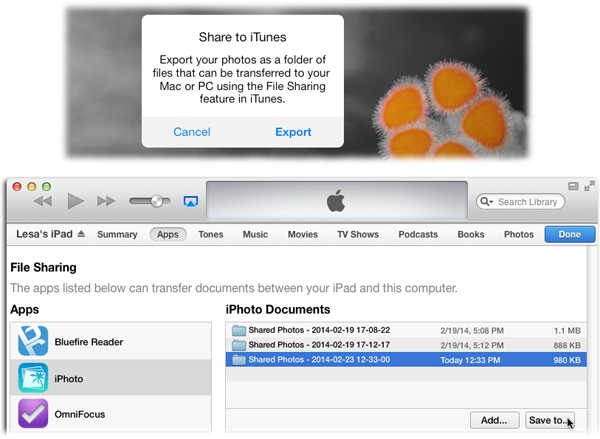
To get started, tap iPhoto’s ![]() , tap iTunes, and then select the picture(s)
you want to send to your computer. You see the message in Figure 15-4 (top); tap
Export, and the next time you sync your iPad with your computer
using iTunes, the photo(s) you selected get synced, too—at
full size.
, tap iTunes, and then select the picture(s)
you want to send to your computer. You see the message in Figure 15-4 (top); tap
Export, and the next time you sync your iPad with your computer
using iTunes, the photo(s) you selected get synced, too—at
full size.
Note
Remember, editing a raw file on your iPad makes iPhoto save
a downsized JPEG version of it to your iOS
device’s Camera Roll. To save a full-size copy of the edited photo
instead, you have to manually save it to your Camera Roll by
tapping ![]() and choosing Camera Roll. That way, the
picture is transferred to your Mac the next time you plug in the
device and import the contents of your Camera Roll using iPhoto.
And if you turn on My Photo Stream (Using iCloud’s Photo Stream), a downsized version
shows up there, too.
and choosing Camera Roll. That way, the
picture is transferred to your Mac the next time you plug in the
device and import the contents of your Camera Roll using iPhoto.
And if you turn on My Photo Stream (Using iCloud’s Photo Stream), a downsized version
shows up there, too.
But where does the picture go? It’s sitting in iTunes on your computer, patiently waiting for you to come and save it. Here’s how:
On your Mac, open iTunes, and then click Apps (see Figure 15-4, bottom).
In the Apps list, select iPhoto, and then select the folder of photos that you want to save.
Scroll down to the bottom of the Apps screen to see the File Sharing section shown in Figure 15-4. From the Apps list on the left, choose iPhoto. When you do, a list of synced folders appears in the iPhoto Document section on the right; click the folder you want to save. Happily, the folder’s sync date appears to its right, making it easy for you to figure out which one to pick.
Save the folder somewhere on your hard drive.
At the bottom of the iPhoto Documents section, click “Save to.” In the resulting dialog box, pick a location and then click Save To.
Now that the edited photos (finally) live on your computer, you can do anything you want with them. You might want to import them into iPhoto on your Mac by dragging and dropping the file(s) onto the iPhoto window, or by choosing File→“Import to Library.” (When you’re finished, you can delete the shared folder from iTunes by selecting it and pressing the Delete key.)
Note
As the box on Copying Edited Photos to Your Computer explains, the edits you make in iPhoto on your iPad are not undoable in iPhoto on your Mac. Bummer!
Beaming Photos
iPhoto lets you share photos with other iOS devices that also have iPhoto installed by beaming them. (If you’re a Star Trek fan, this is the section you’ve been waiting for; if not, this maneuver is still darn cool.) You can wirelessly beam photos, albums, Events, web journals (Web Journals), and even slideshows (Slideshows).
Tip
To wirelessly send something from one iOS device to another device that doesn’t yet have iPhoto installed, use AirDrop instead; it’s explained in the next section.
On an iPad, you can beam up to 1,000 photos at a time (on an iPhone or iPod Touch, the limit is 100). When you do, the photos arrive on the recipient’s device at their full size. The more photos you send, the longer they take to transfer. And if the receiving device goes into sleep mode, the beaming is canceled (a message to that effect appears on the sending device).
The first step in sharing photos this way is to make sure iPhoto’s beaming feature is turned on in both the sending and receiving device. Go to iPhoto’s main screen—the one with Photos, Albums, and Projects at the bottom—tap the Options icon, and then make sure Wireless Beaming is turned on. Next, make sure both iOS devices are on, awake, and have iPhoto open. Figure 15-5 has the rest.
Once you receive a beamed photo, a new album named Beamed automatically appears in the Albums section of iPhoto’s main screen. (Too bad Apple didn’t license the sound of a starship’s transporter from CBS/Viacom!)
Note
In addition to individual photos, you can also beam web
journals and slideshows. (You’ll learn how to create these little
gems later in this chapter.) In Projects view (Browsing Photos), tap to open the web journal or
slideshow you want to send. Then tap the ![]() at the upper right of your screen and
choose Beam. On the recipient’s iOS device, the item lands in
iPhoto’s Projects view.
at the upper right of your screen and
choose Beam. On the recipient’s iOS device, the item lands in
iPhoto’s Projects view.
Sharing via AirDrop
If you’ve got a newer iOS device—an iPhone 5, a fourth-generation iPad, an iPad mini, or a fifth-generation iPod Touch, or later—it has a nifty feature called AirDrop. It lets you send photos, videos, and other goodies to other iPhones, iPads, and iPod Touches wirelessly, even if they don’t have iPhoto installed.
Behind the scenes, AirDrop uses Bluetooth (to find nearby gadgets within about 30 feet) and a private, temporary WiFi mini-network (to transfer the file). Both sender and receiver must have Bluetooth (Settings→Bluetooth) and WiFi (Settings→Wi-Fi) turned on, and they need iOS 7. And, not surprisingly, they must also have AirDrop turned on; to turn it on, swipe up from the bottom of your screen, tap AirDrop, and then tap Everyone. Finally, both parties must have iCloud accounts (Using iCloud’s Photo Stream).
Note
The Mac also has a feature called AirDrop; it, too, is for sending files wirelessly. But it’s only for sending to other Macs. You can’t AirDrop files between Macs and phones/tablets. Hello, Apple?!
The process goes like this: In iPhoto for iOS, select the item you want to share. Then tap the
![]() and choose AirDrop. Within a few seconds, you
see something that would have awed the masses in 1975: the icons of
everyone nearby—or at least everyone with an Apple device running
iOS 7 who’s open to receiving AirDrop transmissions.
and choose AirDrop. Within a few seconds, you
see something that would have awed the masses in 1975: the icons of
everyone nearby—or at least everyone with an Apple device running
iOS 7 who’s open to receiving AirDrop transmissions.
Tap the icon of the person you want to share with. A message appears on the recipient’s screen, showing a picture of the thing you’re trying to send.
At this point, it’s up to your recipient. If she has iPhoto installed and taps Accept, then the transfer begins; the picture, album, event, web journal, or slideshow appears automatically in her copy of iPhoto, and the word “Sent” appears on your screen. If she taps Decline, then you must have misunderstood her willingness to accept your photo (or she tapped the wrong button). In that case, you see the word “Declined” on your screen. If she accepts the transfer but doesn’t have iPhoto installed, she can tap Get App; the App Store opens to iPhoto’s page so she can download it. If she doesn’t want to install iPhoto, then she has to tap Cancel. At this point, you can save the photo to your Camera Roll (if it doesn’t already exist there), fire up the Photos app on your iPad, and AirDrop it from there so it lands in your recipient’s Camera Roll.
If you’re on the receiving end of an AirDrop transmission, photos appear in a new album on iPhoto’s main screen aptly named AirDrop.
iCloud Photo Streams
This special iCloud feature has two faces. There’s My Photo Stream, which magically stores the last 1,000 pictures you take on every iCloud-connected Apple gadget you own (Using iCloud’s Photo Stream). And then there are the shared photo streams (The Drag-and-Drop Method) that let you publish sets of pictures that other people can subscribe to and view on their phones, tablets, or Macs. (And if you grant them permission, those people can contribute their own photos to your streams.) You can even post a photo stream as a public web gallery.
Oddly, iPhoto for iOS doesn’t let you create, contribute to, or see a photo’s “likes” or comments in a shared photo stream; however, you can do all of that in the Photos app. (Sharing a web journal or a slideshow to iCloud from your iOS device is easy, and both techniques are covered later in this chapter.)
The first step in creating a shared photo stream on an iOS device is to turn on the Photo Stream feature; the switch is in Settings→iCloud→Photos. Then, to share some of your masterpieces with your adoring fans, proceed like so:
Create the stream in the Photos app.
Open the Photos app. On the Shared tab, scroll to the bottom of the list (if necessary) and tap New Shared Stream.
Name the new stream.
In the Shared Stream box, name the Photo Stream (“Bday Fun” or whatever). Then tap Next.
Specify your audience members.
You’re now asked for the email addresses of your lucky viewers; enter their addresses in the “To:” box just as you would in an outgoing email. (Conveniently, a list of recent sharees appears below the “To:” box.) When you’re done, tap Create. You return to the list of Shared Streams, where your new stream appears at the top. But it’s still empty.
Pour some photos or movies into the stream.
Tap your new stream’s name. Then, on the No Items screen, tap the + to burrow through your photos and videos—you can use any of the three tabs (Photos, Shared, Albums)—to select the material you want to share. Tap their thumbnails so that they sprout checkmarks, and then tap Done. A little box appears so you can add a description.
Type a little description of the new batch.
In theory, you and other people can add to this stream later. That’s why you’re offered the chance to caption each new batch. Once you’re done writing the caption, tap Post. The thumbnails of the shared photos and videos appear, along with the + button, in case you want to add more pictures later.
Tip
You can easily remove photos from the stream, too. On this screen of thumbnails, tap Select; tap the thumbnails you want to nuke; tap the trash icon; and then confirm your decision by tapping Delete Photo.
At any time, you can tap the Shared tab in the Photos app. There, for your amusement, is a visual record of everything that’s gone on in Shared Photo Stream Land: photos you’ve posted, photos other people have posted, comments back and forth, “likes,” and so on. It’s your personal photographic Facebook. (For more on using the Photos app, pick up a copy of iPhone: The Missing Manual.)
Apps
iPhoto is also happy to pass your photos over to other applications, such as Camera Roll (technically part of the Photos app) or iMovie. The app doesn’t even have to be made by Apple—as long as it can handle photos, you can use iPhoto to send one over to it.
Saving Photos to Your Camera Roll
iPhoto lets you save up to 100 photos to your Camera Roll;
just tap ![]() , select your pictures using the techniques
described earlier in this chapter (Sharing Photos and Videos), and then tap Camera Roll.
The photos show up in the Camera Roll of your Photos app, as well
as in the Camera Roll album in iPhoto, and a
downsized version appears in your iCloud photo stream (if you’ve turned it on—see
Using iCloud’s Photo Stream).
, select your pictures using the techniques
described earlier in this chapter (Sharing Photos and Videos), and then tap Camera Roll.
The photos show up in the Camera Roll of your Photos app, as well
as in the Camera Roll album in iPhoto, and a
downsized version appears in your iCloud photo stream (if you’ve turned it on—see
Using iCloud’s Photo Stream).
How is this helpful? Let us count the ways:
Import edited photos into iPhoto or Aperture. To get files you’ve edited on your iOS device back into iPhoto or Aperture on your Mac, save them to your Camera Roll (as described in the box on Copying Edited Photos to Your Computer, photos you edit in iPhoto on your iPad aren’t automatically imported into iPhoto on your Mac). Next, plug your iPad (or other iOS device) into your Mac, fire up either program, and then import the photos at full size. (If you edit photos that are already in your Camera Roll, your changes are automatically saved in your Camera Roll.)
Save full-size copies of edited raw files. As described on Editing Raw and Full-Sized Photos, iPhoto for iOS displays, edits, and exports a JPEG version of any raw files you open. To save space on your iOS device, iPhoto also saves a downsized version of the edited JPEG to your Camera Roll. To save a full-size JPEG of your edited image instead, you have to save it to your Camera Roll (and, yes, you’ll end up with two versions of the same edited file in your Camera Roll, one larger in size than the other).
Apply multiple effects. iPhoto lets you apply only one effect to each photo, but saving the photo to your Camera Roll creates another copy of it. This lets you reopen the photo and apply another effect to it, and lets you save different versions of the same image (say, with different effects applied to it). But what if you want to apply three effects to the same shot? Simple: Apply one effect, save the photo to your Camera Roll, open the saved photo in iPhoto for iOS and apply another effect to it, save that photo to your Camera Roll, open the photo you just saved and apply another effect to it, and so on.
Sending Photos to Other Apps
iPhoto makes it super easy to send photos and slideshows
over to the iMovie app so you can include them in a video
project. Simply tap iPhoto’s ![]() and choose iMovie. The end.
and choose iMovie. The end.
However, don’t fret if you want to use an app that’s not listed in iPhoto’s Share pane; there’s simply not enough room to list all the possibilities. For example, while Instagram isn’t included in the Share pane, you can still send photos to it, as well as any other photo-related app like Google’s Snapseed (similar to Instagram) and Day One (a popular daily journal app).
To share photos with other apps, tap ![]() and choose Other App. Next, select the
photos you want to share. The resulting screen lists apps that
iPhoto can share with; just tap the icon of the one you want to
use. If you’ve got a plethora of photo-happy apps, you might need
to swipe leftward on your device’s screen to scroll through all
the icons to find the one you’re looking for.
and choose Other App. Next, select the
photos you want to share. The resulting screen lists apps that
iPhoto can share with; just tap the icon of the one you want to
use. If you’ve got a plethora of photo-happy apps, you might need
to swipe leftward on your device’s screen to scroll through all
the icons to find the one you’re looking for.
Tip
If you prefer, you can select the photos you want to share (Sharing Photos and Videos), and then tap Other App. The choice is yours.
Alternatively, you can save the edited photo to your Camera Roll, as described in the previous section, and then launch the other photo-happy app (such as Instagram) and access your Camera Roll via that app.
Printing Photos
iPhoto for iOS gives you two options for printing photos: Do it yourself or pay Apple to do it for you. It’s good to have those options, since wrestling with your own printer can be problematic, and high-quality photo paper and ink cartridges aren’t cheap. This section explains how to do both.
Printing from Your iPad
The very phrase “printing from your iOS device” might seem a little peculiar. How do you print from a gadget that doesn’t have any jacks for connecting a printer?
Wirelessly.
You can send printouts from your iPad, iPhone, or iPod Touch to any printer that’s connected to your Mac (as long as your Mac is on the same WiFi network as your iOS device) by springing for a program like Printopia ($20).
Or you can use your iPad’s built-in AirPrint feature, which can send files directly to a WiFi printer without requiring a Mac. Not just any WiFi printer, though—only those that recognize AirPrint. A lot of recent Canon, Epson, HP, and Lexmark printers work with AirPrint; you can see a list of them on Apple’s website: http://support.apple.com/kb/HT4356.
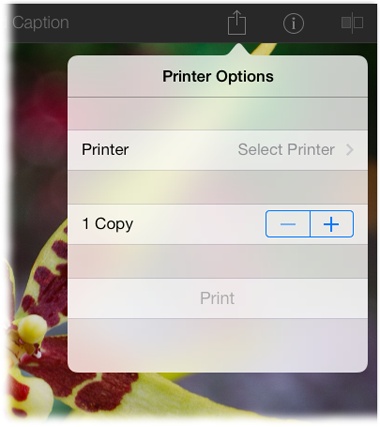
To use AirPrint, start by tapping iPhoto’s ![]() and choosing Print. In the resulting pane,
tap Select Printer to introduce your iPad to your printer, whose
name should appear automatically (if iPhoto can’t find a printer,
you see the message “No AirPrint Printers Found”). Figure 15-6 has the
rest.
and choosing Print. In the resulting pane,
tap Select Printer to introduce your iPad to your printer, whose
name should appear automatically (if iPhoto can’t find a printer,
you see the message “No AirPrint Printers Found”). Figure 15-6 has the
rest.
Ordering Prints
The prints you can order from Apple are, it must be said, gorgeous. You don’t even have to worry about Apple unexpectedly cropping your images; you can see and adjust the crop right there on the order screen. You can have prints sent to multiple shipping addresses, and your pictures are printed on super high-quality Fuji Crystal Archive paper so they won’t fade.
You can order prints in a wide range of standard and non-standard sizes. For example, you get the traditional size options of 4 x 6, 5 x 7, and 8 x 10 inches, though you can also order square ones that are 4 x 4, 5 x 5, or 8 x 8 inches for prices ranging from 12 cents to $2 each. You can have your pictures blown up into posters, too, at 16 x 20 or a whopping 20 x 30 inches ($13 and $18, respectively).
Apple also offers an interesting, decidedly non-standard option called Auto-Sized that you can use to print your pictures at their actual proportions (think panoramas and oddly sized snapshots). For example, if you haven’t cropped your pictures because you don’t want them cropped into a standard print size, you can specify the shortest dimension of your photo (either width or height) and Apple will print the image at its original aspect ratio, without any unexpected cropping. For instance, if you have a picture that’s 8 x 11, you can specify 8 inches as the shortest dimension; you’ll get a print that’s actually 8 x 11. Pricing for Auto-Sized prints range from 12 cents for a 4 x 4 to $6 for an 8 x 36.
Note
The Auto-Sized route does have some limitations. For example, the smallest photo you can order is a 1:1 aspect ratio, and the largest is a 1:4.5 aspect ratio. In other words, if your shortest dimension is 5 inches, the smallest print you can get is a 5 x 5 and the biggest is a 5 x 22.5 (just use 4.5 as a multiplier to find the longest dimension).
The print-ordering process is remarkably customizable. Follow these steps to get some prints on the way:
Open a photo in iPhoto, tap
 , and then tap Order
Prints.
, and then tap Order
Prints.You have to have at least one photo open to start the ordering process.
Select the photos you want to print.
You can select photos either before tapping the Share icon or after. If you opt for the latter, use the techniques described at the beginning of this chapter (Sharing Photos and Videos).
Pick a format and size.
As described earlier, your print-format options are Auto-Sized, Traditional, Square, and Poster. Once you pick a format, a list of available sizes appears; simply tap the one you want.
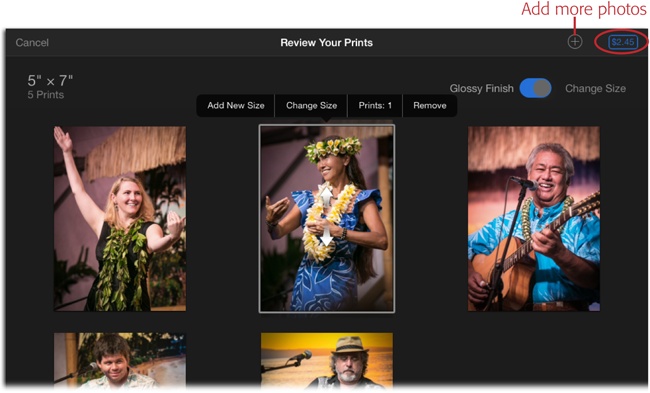
Adjust the print sizes, quantity, and cropping.
Tap the photo you want to adjust; the menu shown in Figure 15-7 appears. To add a photo to your order or change the print size of that particular shot, tap Add New Size or Change Size (respectively), and then pick a format and size from the resulting menu. To change the quantity of prints you’re about to buy of a particular photo, tap “Prints: 1” and in the resulting menu, tap the – or + sign to lower or raise the print quantity; the number after the colon updates as you make changes.
To adjust how a photo will be cropped to fit the print size you picked, tap a photo. A light-gray border appears around it; drag the photo to reposition it. An arrow appears atop the picture showing you the directions in which you can drag it; it’s visible in Figure 15-7. Whatever portion of your picture fits inside the gray border is the part that prints.
If you change your mind about printing a certain picture, tap it and, in the resulting menu, tap Remove. When iPhoto asks if you’re sure, tap Remove.
If you’d like, add more pictures to your order.
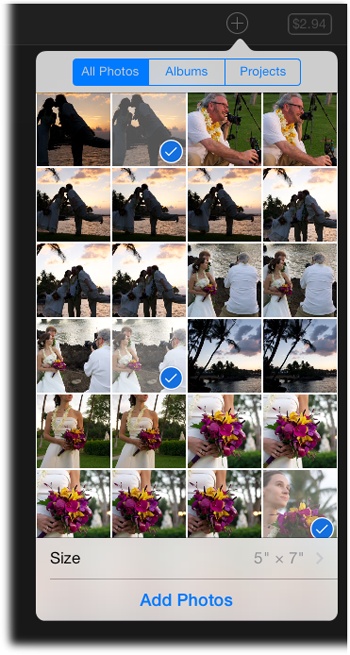
To add more pictures, tap the + sign near the top right of your screen and, in the menu shown in Figure 15-8, tap the photos you want to add. Next, at the bottom of the menu, tap Size, and then pick a format and size for the additions (remember, you can fine-tune sizes of individual photos once you add them to your order). When you’re finished, tap Add Photos.
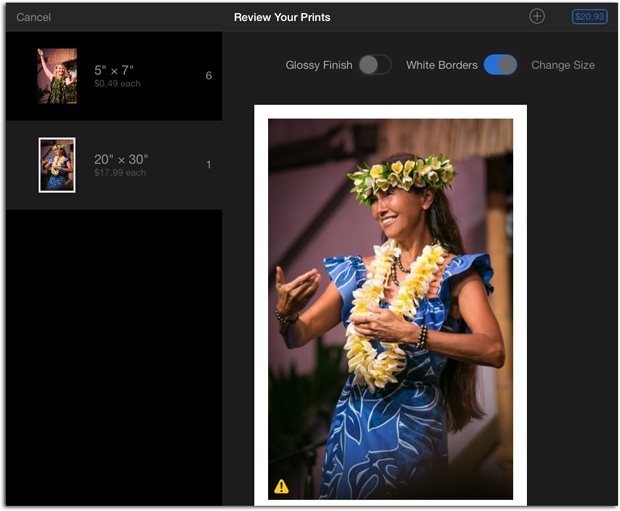
Figure 15-7. When you tap Order Prints, iPhoto lists the size and number of prints at the top left of your screen and calculates the cost of your order (circled). Tap a photo to get the menu shown here, which lets you adjust that photo. You can add an additional print size, change the current print size, change the quantity, or remove it from your order. To adjust how a photo is cropped, use your fingers to reposition the photo inside the gray border; arrows appear atop the picture indicating which directions you can drag.Figure 15-8. Tapping the Add Photos icon summons this menu. Tap All Photos, Albums, or Projects to pick a group of photos, and then swipe upward to find individual photos to add to your order. As you tap to select pictures, a blue appears on each photo’s thumbnail, as
shown here; tap a selected photo again to deselect it.
appears on each photo’s thumbnail, as
shown here; tap a selected photo again to deselect it.Pick a photo finish and border.
See the Glossy Finish slider near the top right of your screen? Straight from the factory, Apple assumes you want a glossy finish (so the slider’s background is blue). If you want a lustre finish instead—lustre is somewhat shiny, though less reflective than glossy—tap the slider (its background turns black).
As Figure 15-9 explains, if you’re ordering any poster-sized prints, you can add a white border around them.
Tip
If a photo doesn’t have enough pixels to print at a particular size, a yellow warning icon appears on the photo’s thumbnail (you can see one in Figure 15-9). Your choices are to change the print size to something smaller, remove the photo from your order, or let it ride and hope for the best!
Figure 15-9. Once you add more print sizes to your order (say, some 5 x 7s and a poster, as shown here), the sizes stack up in a list on the left; just tap a size to view (and adjust) the photos you’ve prepared at that size. When you order a poster, you also get the choice of adding a white border around it. Just tap the White Borders slider to turn it on (it turns blue).Tap the dollar amount at the top right of your screen and pick a shipping address.
iPhoto calculates the cost of your order as you’re creating it (handy!). When you’ve gotten the order just right, tap the amount and pick a shipping address from the resulting list. iPhoto tunnels into your Contacts to populate the list; swipe up to find the address you want, or type a name into the Search field. If the address you want isn’t in the list, tap New and then enter it. Once you tap an address, iPhoto confirms it with the U.S. Postal Service via the Internet. If a more accurate address is found—say, you entered “Avenue” and iPhoto asks to change it to “Ave” instead—it appears; just tap the modified address to accept it or tap Ignore Suggestions if you had it right to begin with.
Adjust the number of sets you’re ordering, and enter any additional shipping addresses.
The final screen lets you adjust how many sets of prints you want, and the addresses where you want them sent. For example, if you’ve prepared an order of six different 5 x 7-inch photos of cousin Casey’s wedding and you also want to make another set of those prints for Aunt Edna, then instead of changing the print quantity of the individual photos (as described in step 4), tap the + beneath the word “Sets” to double the whole order.
Note
To return to the previous screen for viewing and adjusting your prints, tap Review Your Prints at the top of your screen.
If, however, you want the second set mailed directly to Aunt Edna, leave the set quantity at 1 for your own address, and then tap Add Shipping Address at the top right of your screen. Pick Aunt Edna’s address from the resulting list; that way, you’ll each receive a set of those prints. To remove a shipping address from the list, just tap the checkmark to its left (tap the same spot again to turn the address back on).
When everything looks good, tap Place Order.
Enter your Apple ID and tap Sign In. iPhoto then prompts you to enter your credit card’s security code. Tap OK, and the prints are on their way!
Creating Projects
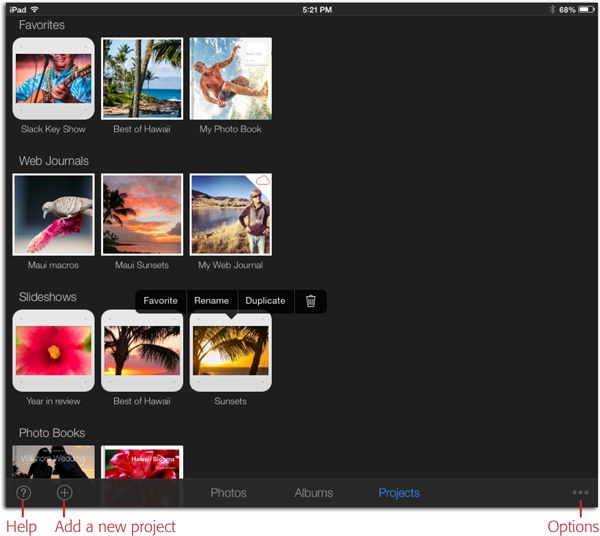
The projects you can create in iPhoto for iOS include web journals, slideshows, and photo books. This section teaches you how to build and manage each of them. Once you start creating projects, they show up in neat little categories in Projects view (see Figure 15-10). If you create a bunch, you can swipe leftward to scroll through the list.
If you fall in love with a project you’ve created, you can tag it as a favorite (Auto-Enhancing and Rotating). Doing so makes that project appear in a separate row at the top of Projects view, making it easier to find. To add a favorite tag in Projects view, tap and hold the project’s icon, and in the menu that appears, tap Favorite. If you change your mind, you can unfavorite a project by tapping and holding its thumbnail and then choosing Unfavorite.
Other useful items in this menu let you do the following:
Rename. iPhoto prompts you to name each project when you create it, though you can always edit it by tapping this menu item.
Duplicate. This maneuver lets you create a different version of a project to, say, experiment with the design or to personalize it for a special recipient.
The next section shows you how to create perhaps the most enjoyable project of all: a web journal.
Web Journals
If you’re into scrapbooking, you’ll love web journals, a feature that’s available only in iPhoto for iOS. You can think of a web journal as a digital scrapbook that you can play as a slideshow or, if you have an iCloud account, share on the Web.
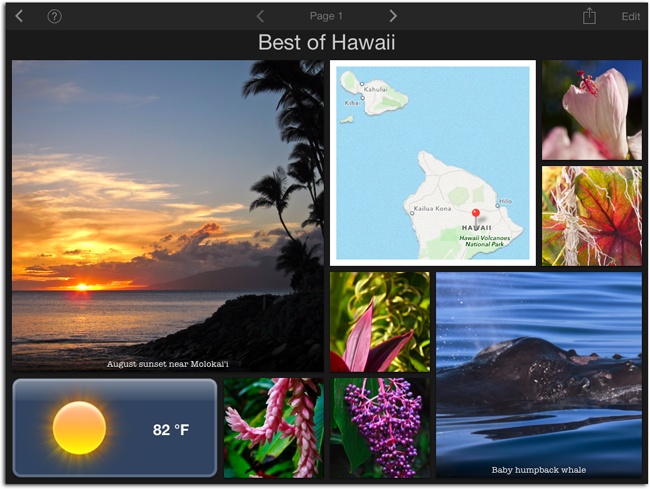
Web journals let you arrange up to 200 pictures into a visually pleasing and highly customizable grid-style layout. You can change the grid’s size (and thus the photo thumbnails’ size) or design, resize and rearrange photos using gestures (unimaginable fun), and include stuff like photo captions (Adding Captions), a map that shows where the pictures were taken, a widget that shows what the weather was like when you took the shots, and even quaint little sticky notes that you can personalize. Figure 15-11 shows you what a web journal can look like.
The first step in creating a web journal is to open a photo,
album, or Event. Next, tap ![]() and choose Web Journal. The resulting pane
lets you select up to 200 photos. As described earlier in this
chapter (Sharing Photos and Videos), you can
select photos before tapping
and choose Web Journal. The resulting pane
lets you select up to 200 photos. As described earlier in this
chapter (Sharing Photos and Videos), you can
select photos before tapping ![]() to create a project or after.
to create a project or after.
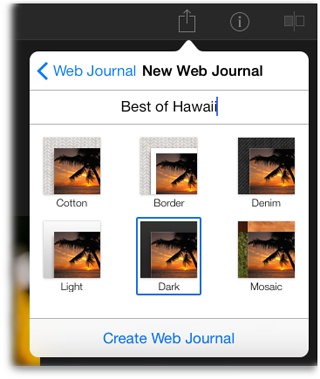
Once you’re finished picking pictures, the pane shown in Figure 15-12 appears. Tap Enter Web Journal Name and type to give your journal a meaningful moniker. You can also pick a theme (design style) for your journal by tapping one of six thumbnails to assign a background color, texture, and photo border style.
Tip
You can also create a web journal from Projects view by tapping the + at the bottom left of your screen and then tapping Web Journal.
Tap Create Web Journal; a status bar appears onscreen indicating iPhoto’s progress. When it’s finished, a friendly message lets you know that the journal was created. Tap Show to see the journal or Done to return to the photos from whence you came. Either way, the new journal appears as its very own thumbnail in the Journals section of Projects view (this section only appears once you’ve created a journal).
Now that you’ve got a journal to play with, the customization party starts. The next few sections explain all your options.
Customizing the Layout
Once you see your web journal, you might change your mind about the theme you picked when you created it. Or you might decide to change the grid size, sort the photos in a different way, or alter the grid’s design. Happily, changing all those things is super simple.
The first step is to open the journal, if it isn’t open already, by tapping its thumbnail in Projects view. Tap Edit at the top right of your screen to enter edit mode (the word “Edit” turns blue, as shown in Figure 15-13, top); tap Edit again to exit edit mode (the word turns gray).
In edit mode, you can double-tap the journal’s name and type something else, or single-tap the name to summon a few text formatting options (Figure 15-13, top).
To change the journal’s theme, grid size, photo sort order, or layout, tap the Options icon labeled in Figure 15-13 (bottom). Here are your choices:
Themes. To swap themes, simply tap another theme’s thumbnail. iPhoto instantly updates your web journal.
Grid Size. Straight from the factory, iPhoto uses a medium-sized thumbnail for the majority of your pictures, and thoughtfully places a few of them at a larger size for contrast and visual interest. However, you can reduce the size of the smaller thumbnails by tapping Small (so more pictures fit on a journal page) or increase their size by tapping Large (for fewer pictures per page). There’s not much difference between Small and Medium, but Large makes the thumbnails noticeably bigger.
Figure 15-13. Top: The formatting options for any kind of web-journal text are few. You get three font and four alignment choices; click an option to apply it (it turns blue). Bottom: The Options menu is your key to changing themes, grid size, sort order, and the design of the grid layout (the Dark theme was used here). Adding photos is discussed later in this section.Sort Photos. iPhoto assumes you want to drag photos on the journal page to rearrange them, but you can have them appear in chronological order. Tap the down arrow to put them in descending order (so the newest photos appear at the top of the journal page) or the up arrow to put them in ascending order (so the oldest ones appear at the top instead).
Layout. You can choose among four different grid designs by tapping the thumbnails in this section. The first layout, which is what iPhoto automatically uses, places larger photos at each of the page’s corners and fills the middle with small thumbnails. The other designs include different combinations of larger and smaller photos, except the last design, which consists of small thumbnails only.

Changing the Journal’s Key Photo
The key photo is the one that appears atop an album, Event, or project thumbnail.
To change the key photo of a web journal, tap the journal to open it, and then tap Edit at the top right of your screen. Next, tap the thumbnail of the photo that you want to use as the new key photo. In the menu that appears above the thumbnail, tap Edit; iPhoto deposits you into the familiar editing screen you mastered back in Chapter 14. Tap the Options icon at the bottom right, and in the resulting menu, tap “Set as Key Photo.” To return to your web journal, tap the < near the top left of your screen.
Adding Photos and Videos
If you forgot to include a prize-winning photo of you and Zooey Deschanel in your journal, don’t panic—iPhoto is gloriously forgiving and lets you add photos and videos to a journal even after you create it. You’ve got two options:
Open the photo you want to add. In Photos or Albums view, open one of the photos that you want to add and then tap
 . Choose Web Journal, and then pick the
pictures you want to add using the techniques described on
Sharing Photos and Videos. When you’re
finished, a pane appears showing all the journals you’ve
created. Tap the one you want to add the shots to, and then
tap New Page to add the photo(s) to a brand-new page, tap
“Place by Date” to add the picture(s) in chronological order,
or tap the individual page that you want to add it to. When
you’re finished, tap Add Photos. In the confirmation message
box, tap Show to view the journal or Done to return to the
photos you were looking at.
. Choose Web Journal, and then pick the
pictures you want to add using the techniques described on
Sharing Photos and Videos. When you’re
finished, a pane appears showing all the journals you’ve
created. Tap the one you want to add the shots to, and then
tap New Page to add the photo(s) to a brand-new page, tap
“Place by Date” to add the picture(s) in chronological order,
or tap the individual page that you want to add it to. When
you’re finished, tap Add Photos. In the confirmation message
box, tap Show to view the journal or Done to return to the
photos you were looking at.Note
If the journal you’re adding photos to consists of just one page, then Page 1 is selected automatically; however, adding more photos may force iPhoto to add more pages to accommodate them. The moral of this story is this: If you add some photos to a web journal but you don’t see them when you open the journal, swipe leftward to view the next journal page, or use the next icon labeled in Figure 15-13 (bottom).
Use the Add menu. Tap the
 labeled in Figure 15-13, bottom,
and choose Photo. A pane appears with Photos, Albums, and
Projects buttons at the top that let you pick a group of
photos in order to find the ones you want to add. If you tap
Albums or Projects, the pane displays your albums or projects;
tap one to open it. Swipe downward to scroll through the
resulting thumbnails and tap the ones you want to add to your
journal. As you select photos, a blue appears on their thumbnails. When
you’re finished, tap Add at the pane’s top left.
labeled in Figure 15-13, bottom,
and choose Photo. A pane appears with Photos, Albums, and
Projects buttons at the top that let you pick a group of
photos in order to find the ones you want to add. If you tap
Albums or Projects, the pane displays your albums or projects;
tap one to open it. Swipe downward to scroll through the
resulting thumbnails and tap the ones you want to add to your
journal. As you select photos, a blue appears on their thumbnails. When
you’re finished, tap Add at the pane’s top left.
Rearranging, Resizing, or Removing Photos
Have a few words to say about some of the photos in your web journal? No problem. iPhoto lets you add captions to any photo, as well as rearrange and resize them on each page. You can delete photos from your journal, too. This section teaches you how to do all of that.
It’s helpful to think of each grid slot in your journal as the photo’s frame. By using gestures, you can change the frame’s size, which also changes the photo’s size. iPhoto even lets you change the position of the photo inside the frame, as well as the photo’s zoom level. You’ll learn the details of all these maneuvers in the following list.
Of course, to make any changes to your web journal, you have to open the journal and then tap Edit at the top right of your screen. Once you do that, tap the thumbnail of the photo you want to alter and then perform one of these tasks:
Note
If you tap a photo’s thumbnail when you’re not in edit mode, iPhoto merely displays the picture at a larger size so you can get a better look. To do some actual editing instead, tap the Back button at the top left of your screen to return to the journal and then tap Edit.
Move a photo. To move a photo to another position on the same journal page, touch and hold its thumbnail—leave your finger still for a second, and the thumbnail magically lifts beneath it—and then drag it to a new position. The other photos automatically scoot out of the way and rearrange themselves on the page.
Add a caption. When you tap a thumbnail, the text “Add Caption” appears at the bottom of the photo; just tap it and then type something more creative. Tap Done when you’re finished. Once you’ve added a caption, tapping the photo displays a menu above it that includes three font options and a photo-enlargement button (tap one to apply it). To remove a caption, tap the photo, tap the existing caption, and then use the Delete key on your iPad’s digital keyboard to get rid of it.
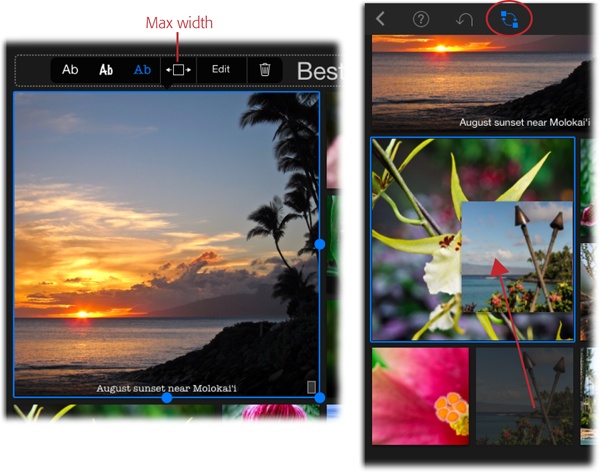
Resize a photo. Tap a photo (or any of the custom objects described in the next section) and then use your finger to drag any of the round, blue selection handles that appear around it (see Figure 15-14, left).
Tip
To make a photo as wide as your journal page, tap the photo and then, in the menu that appears above it, tap the max width icon labeled in Figure 15-14 (left). To undo the size change, tap the photo and then tap the same icon again.
Reposition a photo within a frame. Double-tap a photo and use your finger to drag the photo up or down (arrows appear atop the photo letting you know which directions you can drag). This technique is helpful when you want to fine-tune the position of the photo’s subject, for example. You can also pinch the photo with two fingers to zoom out or spread your fingers atop the photo to zoom in.
Edit a photo. If you want to embellish the photo with some of the editing techniques you learned in Chapter 14, tap an image and then tap Edit in the menu that appears above the photo’s thumbnail. When you’re finished, tap the < to return to your journal.
Swap one photo with another. If you want to substitute one photo for another, at the same size as the other photo and without causing the other thumbnails to rearrange themselves on the page, tap the Swap icon circled in Figure 15-14 (right). Once the icon turns blue, you can drag one picture onto another to make them swap places. Turn off this behavior by tapping the Swap icon again.
Figure 15-14. Left: You can drag the round, blue selection handles in any direction to resize your pictures. Happily, iPhoto preserves the photo’s original aspect ratio, so the photo never gets squished or stretched. Tap a captioned photo to get the font and alignment options shown here. Right: After you tap the Swap icon (circled), you can drag one photo atop another to make them switch places. To go back to moving photos instead of swapping them, tap this icon again to turn it off.Move a photo to a different page. If your journal has multiple pages, you can scoot photos from one page to the next. Tap and hold the photo and then drag it to the far left or right edge of your screen. When the page you want to add the photo to appears onscreen, drag the photo into the desired spot and then lift your finger. (This is handy if you add a photo to a journal and iPhoto plops it on page 2, when you really wanted it to land on page 1.)
If your journal includes only one page, you obviously need to add pages before you can move images between them. Tap the
to open the Add menu, and then choose
Page.Delete a photo. Tap a thumbnail, and then tap the trash can icon that appears to remove the photo from your journal. You don’t get a confirmation message; the photo just disappears.
Tip
If you delete a photo that you wish you had back, tap the Undo icon labeled in Figure 15-13 (bottom).
Adding Custom Objects
To spice up your journal pages, you can add resizable and customizable objects including a map showing where the photos were taken, a box that shows the weather on the day they were shot, and notes that look like a torn piece of paper or a yellow sticky pad.
To add a custom goodie, open a web journal, tap Edit, and
then tap the ![]() to open the Add menu shown in Figure 15-15.
to open the Add menu shown in Figure 15-15.
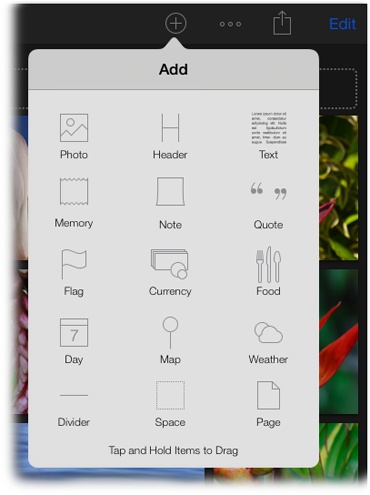
No matter what object you pick in the Add menu, you can drag it anywhere you want on your journal page. You can also customize the object by double-tapping it to reveal another menu (your options depend on the object). Here’s a list of the stuff you can add, along with their customization options:
Photo. Tap this icon to add a photo to your journal. In the resulting pane, tap Photos, Albums, or Projects to see those thumbnails, and then navigate to the picture(s) you want to add. Tap to select as many thumbnails as you want, and then tap Add.
Header. See the title at the top of your first journal page? That’s a header. Tapping Header in the Add menu lets you add another one that you can enter text into and then drag into position on your journal page. When you’re finished typing, tap anywhere else on your screen to dismiss your iPad’s digital keyboard. To format the header, tap it to reveal a few formatting controls (they’re the same ones you saw back in Figure 15-13, top). To edit the text, double-tap the header.
Text, Memory, Note, Quote. These options give you room to add your own text. Tap Text to create a text box with no background; tap Memory to add text atop a piece of paper; tap Note for a realistic sticky-note background; or tap Quote to surround whatever you type with semi-lame curly quotes (they’re tiny and you can’t resize them). No matter which option you pick, you can resize the object just like you would a photo (Changing the Journal’s Key Photo). To format it, tap the object and then use the controls that appear above it; you get the same controls as you do with Header, though Memory also gives you a choice of four kinds of paper (torn, rounded corners, notebook, or graph) and Note gives you a choice of four colors (yellow green, blue, or gray). Double-tap the object to edit its text.
Flag, Currency. If your journal chronicles your adventures in another country, then these two options make for a slick addition to your journal. They add a picture of a flag or a picture of a pile of money, respectively. When you tap Flag, iPhoto automatically adds a flag for the country in which the photos closest to where you dropped flag object were taken. To select a different country, double-tap the flag, turn off Auto, and then tap Country.
The Currency object works the same way: Double-tap it, turn off Auto, and then tap Currency to reveal a menu that includes Egyptian pounds, Swiss francs, and so on.
Tip
Even if your pictures include location info, you need to have iPhoto’s Location Services feature turned on for the Flag, Currency, Map, and Weather objects to set themselves automatically. To turn it on, tap the < at the top of the screen, tap the Options icon at the bottom right of your screen, and then tap Location. In the resulting pane, make sure Include Location and Location Lookup are both turned on (Mail).
Food. Perhaps the cheesiest of all, this option adds a text block with a teeny-tiny icon of boring gray cutlery above it, which you might use to describe a food picture in your journal. Unfortunately, you can’t change the size of the cutlery no matter how much you resize the text box. You get the same text formatting options as you do with Header.
Day. This option adds a calendar icon to your page that includes the month, day, and year you took the photos closest to where you drop the Calendar object (the date changes if you drag it next to a photo shot on another day). To enter a custom date, double-tap the calendar and, in the resulting menu, turn off Auto and then tap Date. Swipe up or down to find the date you want, and then tap to select it.
Map. This option adds a resizable map to your page, which makes for a nifty addition to your journal. If you’ve added location tags to your photos (Auto-Enhancing and Rotating) or if you took them with an iOS device or other geotag-happy camera, iPhoto places a pin on the map to indicate where the photo closest to the Map object was taken; otherwise, the map shows Cupertino, California (the location of Apple’s headquarters). Don’t worry; you can specify a new location easily enough.
When you first add a map object, four white arrows appear in its center to indicate that you can drag in any direction to reposition the map. You can also use the two-fingered pinch or spread gesture to change the map’s zoom level. Double-tap the map anytime to bring these controls back.
That said, it’s far easier to use the Map’s search feature to find a new location. Single-tap the map, and then tap Place Pin in the menu that appears above it. Tap the search field in the next pane and then type the location you’re looking for. (Any recent locations you’ve searched for appear in a list beneath the search field.) Tap Search to have iPhoto hunt for matching locations online and in your Contacts app. When the location you want appears in the list, tap it; iPhoto drops a pin onto the map in that spot. Tap the
 at the upper right of the pane to have
iPhoto drop a pin on your current location (helpful if you
took the photos at home and you’re currently
at home). Once you’ve placed a pin, you
can remove it by tapping the map and choosing Remove
Pins.
at the upper right of the pane to have
iPhoto drop a pin on your current location (helpful if you
took the photos at home and you’re currently
at home). Once you’ve placed a pin, you
can remove it by tapping the map and choosing Remove
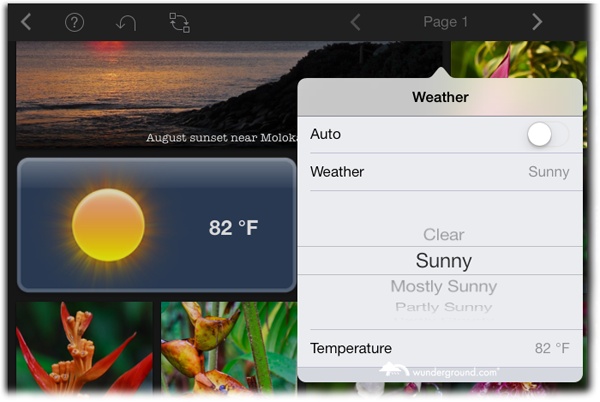
Pins.Weather. Tap this icon to add the weather condition and temperature to your journal page, as shown in Figure 15-16)—a nice addition if the weather was a key factor in your trip (think beach, desert, or ski destinations). iPhoto performs this nifty trick using the location tag and date info embedded in the photo. If iPhoto doesn’t know what the weather was like when you took the shot, double-tap the weather object and, if necessary, tap the Auto switch to turn it off. Then tap Weather and pick a condition from the resulting list (sunny, cloudy, rainy, and so on). Tapping Temperature reveals a list of Fahrenheit options.
Divider. Adds a thin, gray, horizontal line the width of your journal page. iPhoto adds a little space before and after the line, making this option a great way to add some visual breathing room to your page. It’s also handy for dividing a journal page into sections.
Space. To keep your page from being too busy, you can use this option to add an empty photo frame. Think of it as an invisible spacer that you can reposition and resize any way you want (horizontally or vertically) in order to add a blank spot to your page.
Page. Adds another page to your web journal. Swipe left or use the Previous and Next icons labeled in Figure 15-13 to view other pages.
After you add objects, you might decide to delete one of them. No problem—just tap the object to select it, and then tap the tiny trash icon that appears above it (the journal has to be in edit mode for this to work).
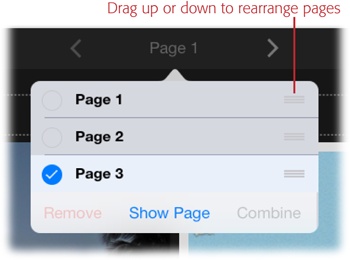
Managing Journal Pages
Photos aren’t the only ones having all the customization fun—you can combine, remove, and reorder individual journal pages, too. (You just learned how to add pages via the Add menu.) If you post the journal on the Web as described in the next section, visitors can click to move from page to page. This kind of thing is handled by the Page menu (Figure 15-17), which you open by tapping the word “Page” at the top of your screen.
Tip
In the Pages menu, you’ll notice that iPhoto doesn’t exactly give your pages inspiring names. If names like Page 1, Page 2, or Page 3 don’t light your fire, just double-tap the name and type a new one (say, Sandy’s Bachelor Party, Sandy’s Incarceration, and so on).
Here are your page-wrangling options:
Combine pages. In the Page menu, tap the empty circle to the left of the pages you want to consolidate, and then tap Combine. (You have to select more than one page to use this command.)
Remove pages. Select the page you want to get rid of and then tap Remove. You don’t get a confirmation message with this option, though if you delete a page that you want back, tap the Undo icon.
Reorder pages. To rearrange journal pages, tap the icon labeled in Figure 15-17 and drag it up or down in the list.
Sharing Web Journals
Once you’ve perfected a web journal, you can send it out into the world by sharing it in a variety of ways, using the menu shown in Figure 15-18 (left). After all, how can anyone else appreciate all your hard design work?
You can post your journal on the Web using iCloud (Apple’s free syncing and storage service; Using iCloud’s Photo Stream), copy it to your computer using iTunes file sharing (Using iTunes File Sharing), and transfer it onto another iOS device by beaming it or by using AirDrop (Beaming Photos).
Note
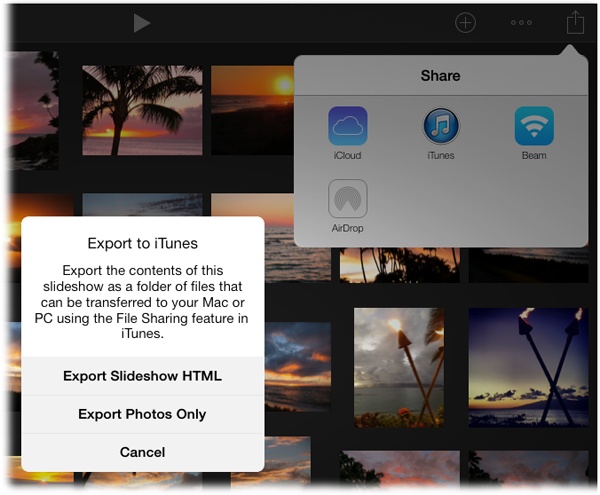
If you don’t want to publish your journal using iCloud, you can export it as HTML files that you can upload to your own website. To do that, in the Share menu, tap iTunes and then choose Export Journal HTML. The next time you sync your iPad with your computer using iTunes, the files are transferred using iTunes file sharing. (Exporting iPhoto Web Pages has the scoop on how to find the files once they’ve been copied to your computer.) If you want to export the individual pictures in your journal instead, tap iTunes and then choose Export Photos Only.
Publishing a web journal using iCloud is a simple affair. Here’s how to do it:
Open a journal, tap
, and then tap iCloud.The Share menu handles getting your journal off of your iPad and in front of other people’s eyeballs.
When you do, iPhoto prepares the journal and publishes it to the Web. You see a status bar indicating its progress. When iPhoto finishes, the menu repopulates itself with the options shown in Figure 15-18 (right).
Figure 15-18. Left: The Share menu lets you show off your web journal. Right: By choosing iCloud, you get a link you can share using iPhoto’s messaging, emailing, tweeting, and Facebooking abilities. Publish as many journals as you want—iPhoto gives you a different link for each one. You can also gang them onto a single home page so visitors can see them all.Preview your journal by tapping “View Web Journal in Safari.”
This step is optional, but it’s a good idea to see what the journal looks like on the Web before you start telling everyone about it. When you tap this option, Safari opens and displays your journal. To return to iPhoto, double-tap your iPad’s Home button and then tap iPhoto.
Once you’re back in iPhoto, you can make any necessary changes to your journal (make sure it’s in edit mode!). When you’re finished, tap
, choose iCloud, and then tap Publish
Changes (published journals don’t update automatically). At
the bottom of the Share menu, iPhoto dutifully reports the
last time the journal was published. Now
it’s safe to tell the masses about your journal. To share it
privately, proceed to step 5; otherwise, keep reading.Note
While you can view published journals on any iOS device where you’ve turned on iCloud sharing (iCloud Photo Streams), you can make changes to the journal only on the iOS device you used to create it. And remember that web journals are an iPhoto for iOS–only feature, so you can’t edit them on your Mac (but you can view them there).
To add this journal to your iCloud Home page, turn on “Add to Home Page.”
Turning on this option means that everyone you share your Home page link with can see this journal (and any other journals that you publish in this way). It’s a nice way to put all your journals on a single web page so your friends can pick and choose what they want to see. However, if you don’t want everyone to see, say, the costume you wore to the San Diego Comicon, then leave this setting turned off.
Tap Share Web Journal Link or Share Home Page.
If you posted your journal to your iCloud home page (see step 4), then tap the latter; otherwise, tap the former. Both options give you the choices shown in Figure 15-19 (left). Tap Message to send the link via instant (text) message (in the resulting menu, add a lucky recipient and tap Send). To tweet the link, tap Twitter, compose your tweet, and then tap Post. To post the link on Facebook, tap Facebook, and then tap Post. To email the link, tap Mail, add a recipient (or several), and then tap Send. To copy the link to your iPad’s memory, tap Copy, and then paste it wherever you want. To save the link to your Safari reading list so you can view it later, tap “Add to Reading List.”
If you ever want to unpublish a
journal, you have to pay a fee to Apple (kidding!). You can
unpublish anytime you want—just open the journal, tap
![]() , choose iCloud, and then turn off the
“Publish to iCloud” switch. That’s all there is to it.
, choose iCloud, and then turn off the
“Publish to iCloud” switch. That’s all there is to it.
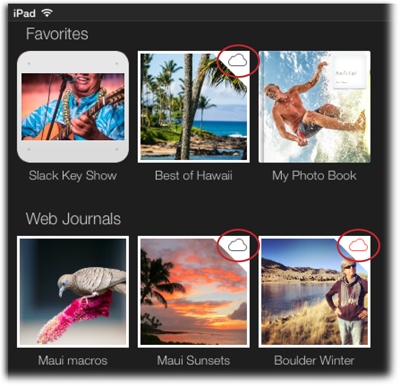
In Projects view, any journals you’ve published to your iCloud account have a tiny cloud icon at their upper right. Figure 15-20 has more.
As with any project you create in iPhoto for iOS, there’s no way to sync a copy of it into iPhoto on your Mac. The only way to get the journal onto your computer is to use iTunes file sharing to export the journal as HTML files, as the Tip on Note explains.
Slideshows
As you know from Chapter 6, a slideshow is a great way to display your photos and videos. With all the built-in themes, transitions, and customization options, you can put together a truly impressive show. However, iPhoto for iOS lets you go a step further and share the slideshow on the Web via iCloud (iCloud Photo Streams).
You learned how to create and play a slideshow on your iPad in Chapter 13. This section teaches you how to edit an existing slideshow, as well as how to share a slideshow on the Web.
Tip
You can create a slideshow from Projects view by tapping
![]() at the bottom of your screen and choosing
Slideshow. Then pick some pictures, and you’re on your way!
at the bottom of your screen and choosing
Slideshow. Then pick some pictures, and you’re on your way!
Editing a Slideshow
Once you’ve created a slideshow by following the directions on Viewing Photos as a Slideshow, here are a few handy things you can do to it:
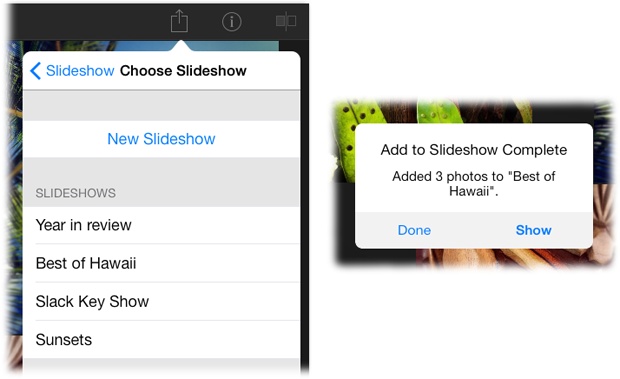
Add photos. There are two ways to add photos to a slideshow. One method is to open the slideshow and then tap the
at the top of your screen. Tap to
select some photos; iPhoto adds them to your show (you can see
this pane in action back on Ordering Prints).The other method is to open an album or Event and then select photos using the methods described on Viewing and Selecting Multiple Photos. After that, tap
and choose Slideshow. In the next pane,
you can tweak your photo selection, if need be, and then tap
Selected, Flagged, or All. When you do, you see the pane shown
in Figure 15-21; just
tap the slideshow you want to add the photos to. When
iPhoto finishes adding photos, a confirmation
message appears; tap Show to open the slideshow, or tap Done
to go back to whatever pictures you were perusing.Rearrange photos. Tap a slideshow’s thumbnail in Projects view to open it, tap and hold the photo you want to move (it appears to lift off the screen), and then drag it into place. iPhoto scoots the other thumbnails out of the way to make room for the one you’re dragging.
Play, pause, and exit. Go into Projects view and tap the thumbnail of the slideshow you want to see, and then tap the
 at the top of your screen to start the
show. iPhoto happily auto-advances each slide, though you can
run the show manually, too; just tap the screen and then use
the controls described in Figure 15-22. To
pause a slideshow, tap the
at the top of your screen to start the
show. iPhoto happily auto-advances each slide, though you can
run the show manually, too; just tap the screen and then use
the controls described in Figure 15-22. To
pause a slideshow, tap the  . To exit the slideshow, tap the < at
the top of the screen.
. To exit the slideshow, tap the < at
the top of the screen.Tip
You can also tag a slideshow as a favorite, making it easier to find in Projects view. Auto-Enhancing and Rotating has details.
Edit a photo or change a slideshow’s key photo. Open a slideshow and then tap the photo you want to edit or use as the key photo (Viewing Photo Info). In the menu that appears, tap Edit. If the photo needs adjustment, you can do that here (see Chapter 14). To assign it as the slideshow’s key photo, tap the Options icon at the bottom right of the screen and choose “Set as Key Photo.” To return to the slideshow, tap the < at the top of the screen.
Figure 15-22. Tap your screen while a slideshow plays to reveal these controls. They let you view the previous or next image, pause/play the show, change the music’s volume (if there is any), or scrub through the show by dragging the slider labeled here. You can also swipe left or right to view the previous or next image (respectively).Remove a photo. Open the slideshow and then tap the thumbnail of the picture you want to remove. Tap the tiny trash icon that appears above the thumbnail, and it disappears from the show (though it’s still on your iPad). You don’t get a confirmation message, so if you change your mind, you can get it back by tapping the Undo icon at the top of your screen.
Change theme, music, and slideshow speed. Open the slideshow and then tap the Options icon to reveal the controls described on Viewing Photos as a Slideshow.
Rename, duplicate, or delete a slideshow. In Projects view, tap and hold the slideshow you want to duplicate or delete. In the menu that appears, tap the action you want to take. To delete a slideshow, tap the trash icon and, in the confirmation message that appears, tap Delete.
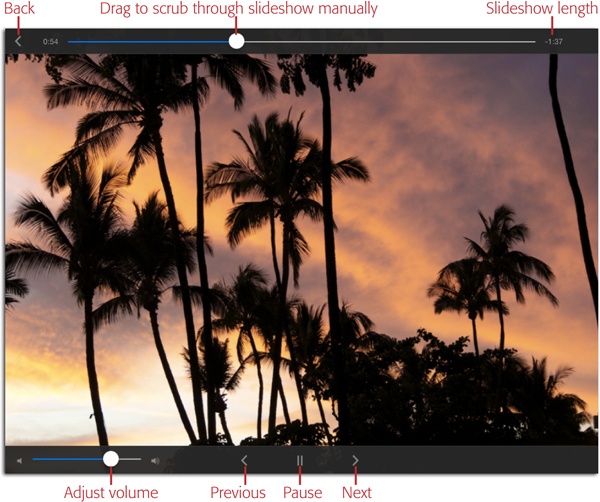
Sharing a Slideshow
Once you’ve perfected your slideshow, you can share it with others using the Share menu shown in Figure 15-23. Here are your options:
iCloud. If you have an iCloud account (Using iCloud’s Photo Stream), you can post your slideshow on the Web and invite people to view it. When visitors watch your show in their web browsers, they get controls they can use to pause the show, display the images one by one, and adjust the volume of any music you’ve included. The slideshow-publishing process is exactly the same as for web journals (ditto for making changes to it once it’s been published). Sharing Web Journals has the mercifully easy details. To publish changes to a slideshow you’ve shared via iCloud, tap
, choose iCloud, and then tap Publish
Changes.iTunes. Tapping this option lets you export your slideshow as HTML files (great for posting the slideshow on your own website) or as individual photos that you can do anything you want with (see Figure 15-23). Once the export process is finished, your iPad lets you know; when you tap OK, the next sync copies the files to your computer. Exporting iPhoto Web Pages tells you how to find the files once they’re on your computer.
Beam, AirDrop. As with any other project—or picture, for that matter—iPhoto lets you beam slideshows to other iOS devices (see Beaming Photos). You can also use AirDrop to transfer it via wireless network to another iOS device that’s within 30 feet of you (Beaming Photos). Either way, the slideshow appears in the Slideshow section of Projects view in the recipient’s copy of iPhoto.
Note
If your slideshow includes music from your iTunes library, the music doesn’t travel with the slideshow when you transfer it to another iOS device by beaming it or AirDropping it.
Unfortunately, even though iPhoto for Mac can create slideshows (Chapter 7) too, there’s no way to sync a slideshow you’ve created in iPhoto on your iPad into iPhoto on your Mac. (As the box on Copying Edited Photos to Your Computer explains, the two programs are completely independent when it comes to editing photos and creating projects.) The only way to get a slideshow from your iPad onto your computer is to use the iTunes option explained above to export HTML files. It’s a huge drag.
Photo Books
You can create and order hardcover photo books from iPhoto on your iPad that are identical to the ones you can create on your Mac, as described in Chapter 9.
Here’s a quick refresher: Each book begins life with at least 20 pages, though you can add up to 100. An 8 x 8-inch book costs $25 (add 80 cents for each additional page) and a 10 x 10 book will set you back $40 (additional pages cost $1 each). Once you’ve created a book, you can rearrange individual pages or two-page spreads; swap, resize, and reposition pictures; add captions; change the theme; and so on. The main difference between creating books in iPhoto for Mac and iPhoto for iOS device is the use of gestures.
There are exactly two ways to create a photo book on your iPad, and your choice depends on how you want to go about placing pictures onto the pages. Do you want iPhoto to automatically place them, or do you want to place them manually into a blank book? Here’s how to do both:
To have iPhoto place the photos, open a photo, album, or Event, and then tap
and choose Photo Book. As described on
Sharing Photos and Videos, you can select
photos before you tap Share, or you can use
the next pane you see to select the photos you want to include
(and then tap either Selected or Next). In the resulting pane,
tap New Photo Book. You see the pane shown in Figure 15-24 (top),
which lets you name the book and choose a size and a
theme.Tap Create Photo Book; iPhoto assembles the book and places the pictures on each page in chronological order. (If you didn’t select enough photos to fill the photo boxes of each page, the pages toward the end of the book are blank.) When iPhoto finishes, a confirmation message appears; tap Show to view the book or Done to see it later. Either way, the book’s thumbnail appears in Projects view (visible in Figure 15-24, bottom).
Note
Adding and removing a favorite tag, as well as renaming, duplicating, or deleting your book project works the same way as it does for web journals. See Web Journals for details.
To add pictures manually, go to Projects view, tap the
(Figure 15-24, bottom),
and choose Photo Book. In the resulting pane, you can name the
book by tapping My Photo Book and typing, as well as pick a book
size and theme. When you tap Create Photo Book, iPhoto creates a
blank book. In the confirmation message
that appears, tap Show to open the book. Tapping Done returns
you to Projects view.

When you open your book—either by tapping Show when you created it or by tapping its thumbnail in Projects view—you see thumbnails of all the pages it contains (Figure 15-25).
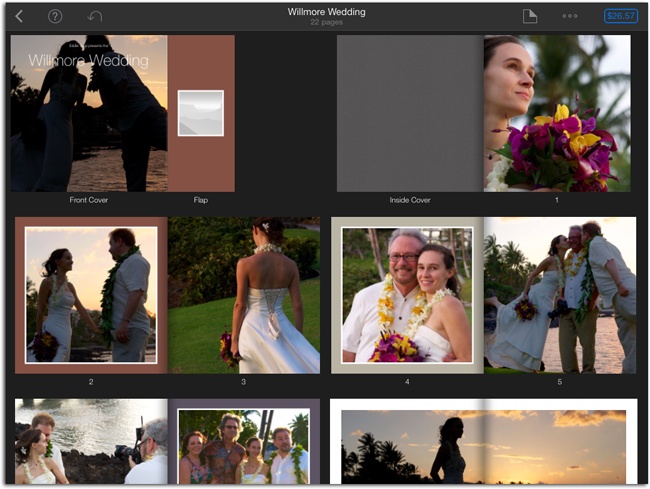
To open a two-page spread, double-tap anywhere on the page. Once you’ve opened a page, you can swipe left or right to see the next or previous page (respectively). To return to viewing all the pages in your book, use two fingers to pinch the page.
Adding, Replacing, and Removing Photos
iPhoto gives you a couple of ways to add photos to your book. You can add them one at a time to the photo boxes on each page, or you can add several photos to your book project and then place them onto pages individually. Here’s how to use both methods:
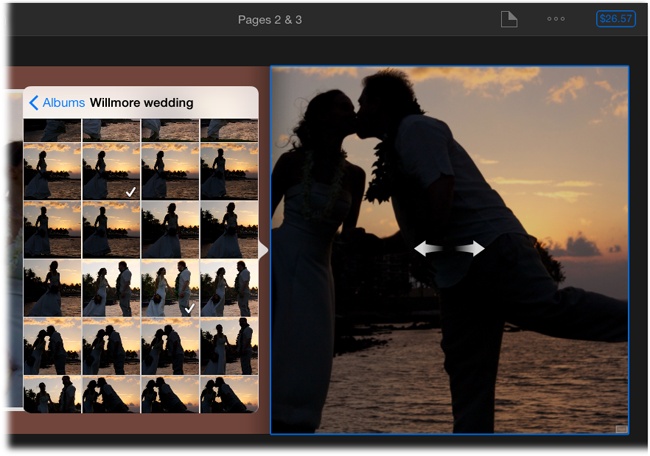
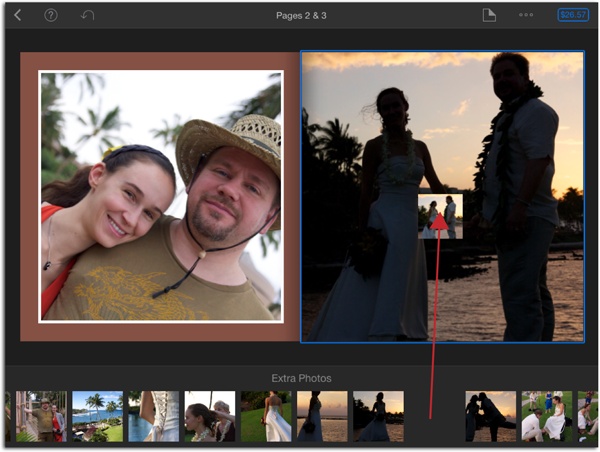
To add or replace a photo in a photo box, open the book you want to add the pictures to and then double-tap a page to open it. If you tap an empty photo box, the pane shown in Figure 15-26 appears. Navigate to the photo you want to add, and then tap it; iPhoto plops it into the photo box.
If you tap a photo box that already contains a photo, a menu appears above it. Tap Replace to see the pane shown in Figure 15-26, which you can use to find the picture you want to use instead. Tap a photo in the list; it replaces the image in the photo box. (Where does the old photo go, you ask? iPhoto puts it in a special storage bin called Extra Photos [Figure 15-27], where the photo patiently waits for you to use it on a page later.)
To add several pictures to your project, go to Photos or Albums view and tap an album or Event to open it. Use the techniques described on Viewing and Selecting Multiple Photos to select some shots, tap
, and then tap Photo Book. The next pane
lists all the books you’ve made; tap the one you want to add
the pictures to, and then tap Add Photos. When iPhoto finishes
adding them, a message appears; tap Show to open the book or
Done to return to the album or Event you were viewing.Pictures you add this way aren’t automatically placed; instead, they land in the Extra Photos section at the bottom of your screen (see Figure 15-27). Swipe left or right to see all the photos it contains.
To place a photo that’s in Extra Photos, tap and hold the thumbnail, and then drag it into a photo box. If the photo box you’re dragging it into already contains a photo, the two photos swap places—the one that was in the photo box gets tucked into Extra Photos, and the one you dragged is removed from Extra Photos and plopped into the photo box.
Figure 15-26. Double-tap a page to open it, and iPhoto displays its page numbers at the top of your screen. Tap an empty photo box to see this pane. Photos that are already included in your book have white checkmarks on them (two are visible here). Use gesturing to position a photo within a photo box (arrows indicate the directions you can drag). To zoom into the picture, use the two-finger spread gesture.To remove a photo from a photo box, tap the photo and then, in the menu that appears above it, tap the trash icon. iPhoto removes the photo and tucks it into Extra Photos; a gray placeholder appears inside the photo box. (You can accomplish the same thing by tapping and holding a photo in a photo box and then dragging it into Extra Photos.)
Tip
The Extra Photos section appears whenever you open a book page, though if you don’t have any unused photos, it reads, “Drag photos here to use them on other pages.” Either way, you can gain back a little screen real estate by collapsing it when you’re not using it. To do that, tap the words “Extra Photos”; tap again to expand it.
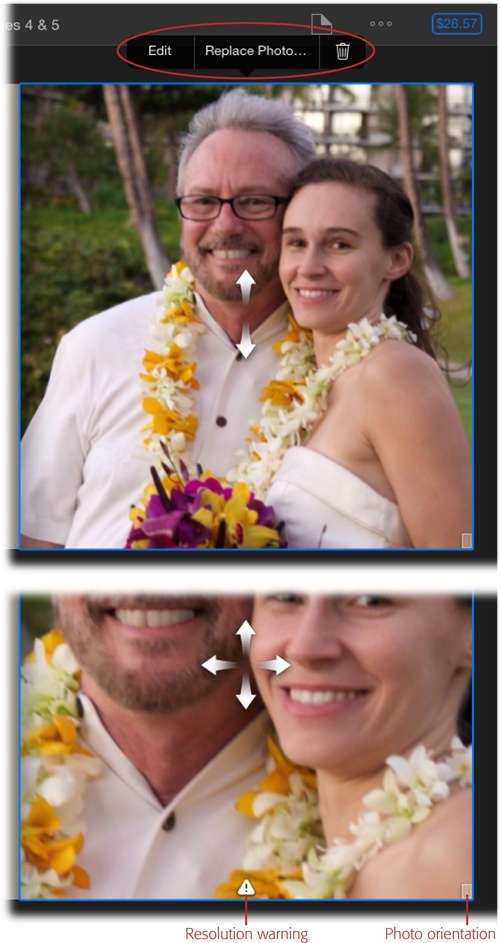
Resizing, Repositioning, and Editing Photos
Half the fun of creating a photo book on your iPad is manipulating the photos inside the boxes. By using gestures, you can do all kinds of things with them: resize or reposition a photo, zoom in or out of it, and swap photos between two boxes on a page. If a photo needs a little extra editing—say, it looks too dark or too light next to another one on a page—you can summon the editing tools you learned about in Chapter 14. The changes you make are reflected on your book page.
Once you open the book project you want to play with, find the page you want to edit and double-tap it to open it. Next, tap the photo you want to tweak, and then proceed as follows:
Edit. In the menu that appears above the photo, tap Edit (Figure 15-28, top). Then use the techniques you learned in Chapter 14 to improve the picture. When you’re finished, tap the < at the left of your screen; iPhoto whisks you back to the page from whence you came.
Reposition. When you tap a photo, white arrows appear on it that indicate the directions you can drag to reposition it (see Figure 15-28, top). If you enlarge the photo using the two-finger spread gesture, you get arrows in all four directions. To reposition a photo inside a box, drag in any of the indicated directions.
Resize. Use the two-finger spread gesture to zoom into a photo, making it bigger (Figure 15-28, bottom). Once you’ve zoomed in, you can use the pinch gesture to zoom out, making it smaller.
Swap photos between boxes. To swap two photos on a page, tap and hold one photo until it shrinks and lifts off the screen, and then drag it onto the other photo box. When you lift your finger, iPhoto swaps the two.
Editing text on a Book Page
Depending on the theme you picked when you created the book, you’ll have more or less text to edit throughout the book. Some themes include areas for captions as well as detailed descriptions. That said, every theme includes a title on the front cover, at the very least, so you want to be sure and customize it.
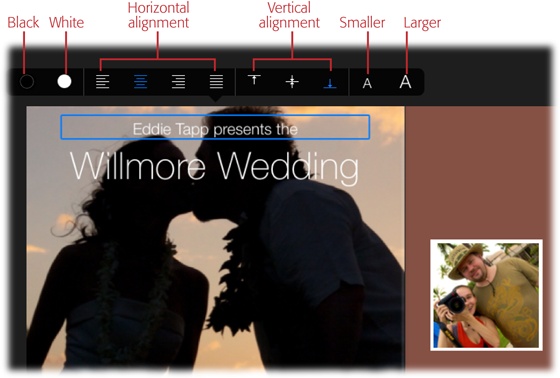
To edit text, double-tap the page to open it, and then tap the text. When you do, the formatting controls explained in Figure 15-29 appear. However, to edit the actual text, you need to double-tap the text box to summon your iPad’s digital keyboard and then type whatever you want. When you’re finished editing the text, tap somewhere else on the page or tap the dismiss button at the lower right of your iPad’s digital keyboard.
Note
It’s helpful to keep in mind that there are multiple text boxes involved—if there’s small text on one line and larger text on another, say, iPhoto puts them in separate text boxes.
Changing a Book’s Theme, Size, and Number of Pages
Ever flexible, iPhoto doesn’t squawk if you decide to change the theme or even the size of your book. All you have to do is tap the Options icon to display the pane shown in Figure 15-30 (left). To change the size of your book, tap 8″ x 8″ or 10″ x 10″. To change themes, tap the icon of the one you want to use; iPhoto reflows your pictures onto the new pages.
You can also change the number of pages in your book and how many photos each page holds. From the factory, iPhoto uses the number of photos you select when you create the book to determine the number of pages in it. That said, photo books consist of at least 20 pages; if you don’t select enough photos to fill them, you end up with blank pages at the end of the book. However, if you have more than 20 pages, you can tap the Options icon, tap “Number of Pages,” and then use the slider at the top of the resulting pane (Figure 15-30, right) to adjust the total page count. If you’ve got more than 20 pages and you drag the slider leftward, iPhoto deletes pages and stuffs the photos that were on them into Extra Photos (Adding, Replacing, and Removing Photos).
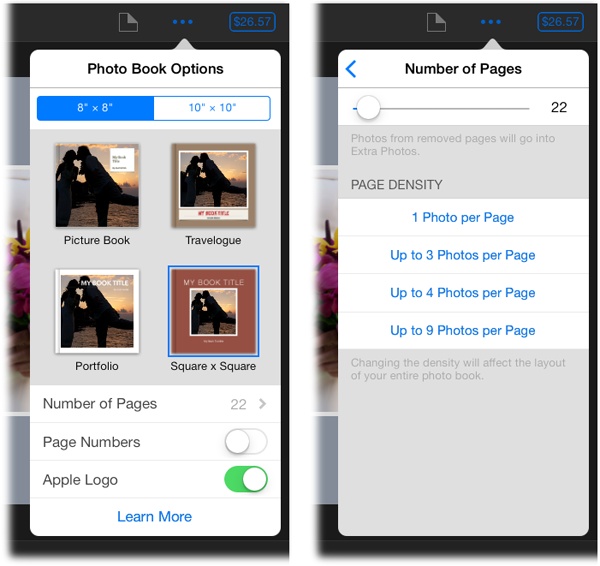
Changing Page Design
To change the layout of an individual page, double-tap the page to open it, and then tap the page icon at the top left of your screen to reveal the pane shown in Figure 15-31 (left). There are a slew of delightful options for you to experiment with, so do give yourself permission for this fun activity (a frosty beverage may be helpful). Swipe up to scroll through a variety of page-layout options—you get different ones depending on the theme you picked (Photo Books). When you find a layout you like, tap its icon to apply it; any photos you previously added to the page change to fit the new design, meaning you may end up with empty photo boxes if you pick a layout that includes more photos per page than the previous layout.
iPhoto also lets you adjust each page’s background color. Tap Background to see the choices shown in Figure 15-31 (right); tap one to apply it to the selected page. You can also use this pane to add a page to your book or a full-page spread—a layout option in which a single photo spans both pages. The next section has more info.
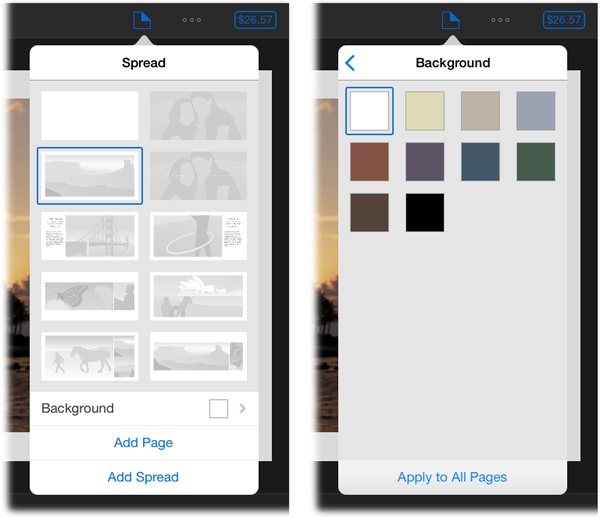
Adding, Removing, and Rearranging Pages
iPhoto is also happy to let you add, remove, and rearrange the individual pages in your photo book; the latter is especially fun because you get to use gestures. To whip your pages into picture-perfect order, open a book project and then do the following:
Add a page by tapping the page icon at the top of your screen and choosing Add Page. iPhoto adds a new page to the end of your book.
Add a two-page spread to the end of your book by tapping the page icon and choosing Add Spread.
Move a page or two-page spread by tapping and holding the page until it miniaturizes and “lifts” off the screen, and then dragging it to a new location. iPhoto scoots nearby pages out of its way to make room.
Ordering a Photo book
When you’ve depleted your attention span and your spouse’s tolerance, it’s time to pull the trigger and order your book.
Take a deep breath and start the ordering process by tapping the blue price at the top right of your screen. The resulting screen lists recent shipping addresses; tap to the left of any address to select it (a checkmark appears to its left). If the lucky recipient’s address isn’t listed, tap Add Shipping Address and enter the details.
Note
If your book contains any placeholder (temporary) text or empty photo boxes, a message appears to alert you. Tap OK and then add photos to, delete, or add text to the pages in question.
Once you’ve selected a shipping address (or three), iPhoto illuminates the word “Sets” to its right. Tap it to order more than one book and have it sent to that address; tap the + sign to add a book or the – sign to subtract one from your order.
When everything is just right, tap Place Order. Now tap your toes until the mailman delivers your masterpiece.