How iPhoto initially creates Events
Using Events to create groups
Addressing multiple same-day Events
Combining Events
Separating Events
Hiding photos without deleting them
An alternate grouping strategy — Faces
The feature that iPhoto '09 uses to allow quick and accurate grouping of your photos is Events. Events reflect the baseline concept that photos taken at nearly the same time can be related under the heading of date and time, if nothing else.
For those of you upgrading from older versions of iPhoto, Events might be a new term for you. Events are similar to Film Rolls — the organization used in previous versions of iPhoto — that provide easier access to your photos. When you upgrade from iPhoto 6 or earlier, iPhoto converts all your Film Rolls into Events.

Of course, the time for a series of photos can't be exactly the same, but you can set up a time span of hours, days, or weeks into which your photos will be gathered, forming an Event. There's a lot of latitude in how Events are named and displayed, as well as how Event contents can be changed after they're created.
For your photos that contain people, you can also use facial recognition technology — Faces — to not only group photos containing the same person but also make them all easy to find. Sounds like stuff out of a spy novel, doesn't it? But it's actually part of iPhoto's capability. Time to get up close and personal with Events and Faces.
A great deal of information is generated by most cameras and stored as part of the photographs you take. This information can comprise the type of camera; the lens' focal length, shutter speed, and aperture; and a host of other details, including the date and time of the photo capture. All this info is vital for iPhoto because this is how (by default) it first creates Events. And for cameras so equipped, this information can also contain GPS coordinates and location, which can be used by Places in iPhoto.
Note
The information generated by the camera — metadata — is included within the image. This metadata goes by the name EXIF, which stands for Exchangeable Image File data. It generally contains date and time, camera settings, copyright information, and much more.
Figure 4-1 shows a sample of this metadata information. Just highlight a photograph in iPhoto and choose Photos
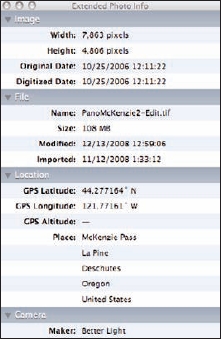
Because the original date and time of capture are embedded, it doesn't matter what day you import your photos into iPhoto or whether you download from a Flash card or the camera itself (via USB cable) to import the photos — the date of capture is preserved in the photo.
And here's one other important thing to know about the default grouping — it isn't forever. At any time after import, you can change the name of an Event and alter the Event contents. I'll show you how to do that.
All of us have experienced milestone events in our lives. The ones that are important to you will define how your iPhoto Library is constructed. Regardless of how Events were assembled and named in iPhoto initially, you might want to redefine and rearrange how your photos are stored, thus creating a customized Event. In iPhoto, that's easy and straightforward.
To create a customized Event
Select Photos from the Source list in iPhoto.
With this selection, you can now view all the photos in all Events in your Library.
Select all the photos you want to include in your customized Event.
To select nonconsecutive photos, hold down the Command key (

Choose Events
Create Event.
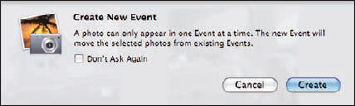
The Create New Event dialog opens, as shown in Figure 4-3.
Tip
You see a warning message in the dialog reminding you that photos can be in only one Event — and, therefore, the selected photos will be moved to the new Event and removed from the Event they were previously grouped in.
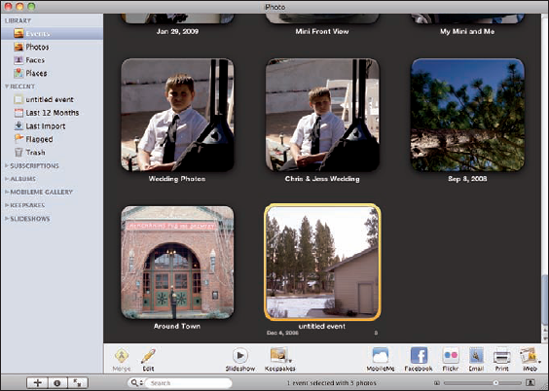
Click Create and then select Events from the Source list.
A new untitled event appears containing the photos you selected, as shown in Figure 4-4.
To change the name of the Event, click the name untitled event and then enter a new name.
Tip
If the photos in the new Event were taken on different dates, a date range will display beneath the Event name. In iPhoto, you have the opportunity, using the Batch Change option, to make the date and time of all the photos in an Event the same, or to change just the date. You can also modify the photo's Title, Time, and Description.
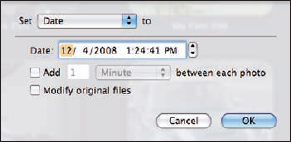
To use the Batch Change option, make sure the Event is still selected and then choose Photos
Batch Change.Figure 4-5 shows an example of a date change to be made. This change affects only the currently edited state of your photos in the Library. If you want to modify the originally imported photos as well, select the Modify Original Files check box.
Click OK.
The change is made.
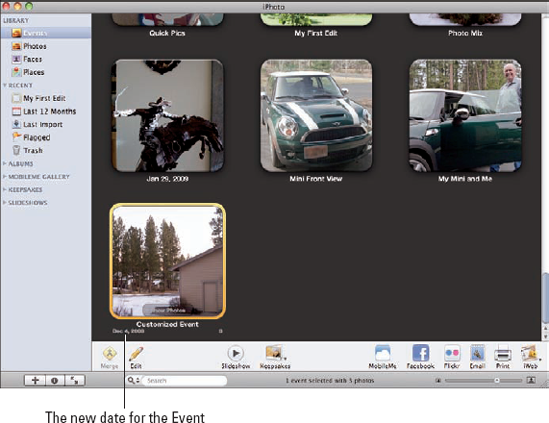
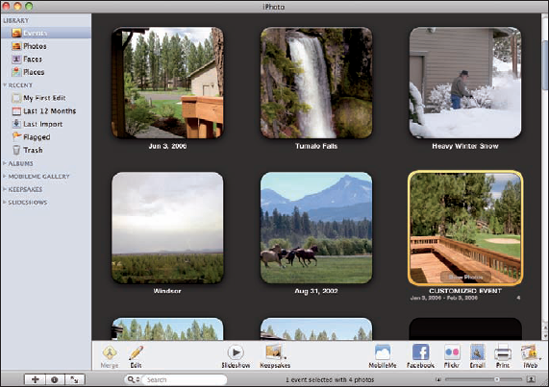
Figure 4-6 shows the changes applied. Notice that after the change, the date shown for the entire Event is the new date you chose.
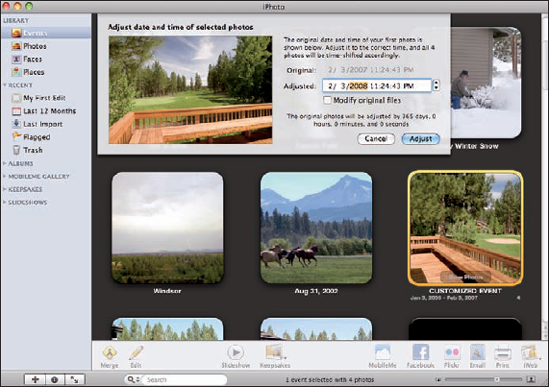
Another way to make date and time changes is to choose Photos
Adjust Date and Time.With this command, the date and time of each photo is shifted, based upon the new date and time for the first photo in the Event. The original files may also be changed if desired. For example, if the photos in the Event are each one day apart, changing the first one by one month will simply shift all photos in the Event by that amount. There will still be a one day difference between them, though. This capability is shown in Figure 4-7.
Although you can't see all the photos, the photo dates originally spanned Jan 3, 2005 to Feb 3, 2007. Note in Figure 4-8 that they will now span Jan 3, 2006 to Feb 3, 2008.
The idea of separating photos taken on different days into different Events works very well. Events can be a birthday, wedding, trip to the lake, visit to Uncle Harry, and so on. But what happens if you do more than one of these on a single day? Turns out that iPhoto can be of some help there, too.
As you see in Figure 4-9, you can choose to Autosplit into Events in Events Preferences (see Chapter 2 for more on Events Preferences) based on a 2- or 8-hour gap in capture time on the same day. If the Events you're dealing with don't fit that time frame, you have to use the techniques described in this chapter to move photos between Events to restore the Event separation you desire.

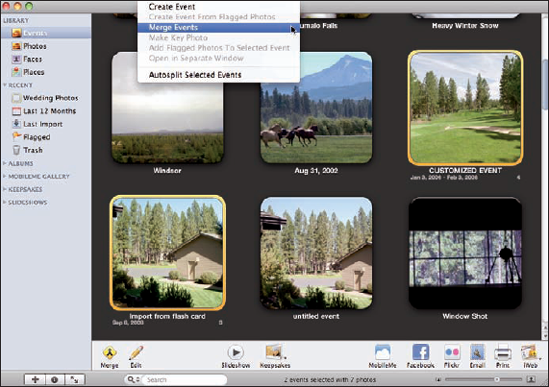
Another way to manually manipulate Events is to merge two or more Events into one. Perhaps you photographed a lake scene at two different times of the year and would like to merge the photos into an Event called A Change of Seasons at the Lake. To merge Events
Select Events from the Source list.
- -click to select the two or more Events you want to merge.
Either click the Merge button (bottom-left of the iPhoto toolbar) or choose Events
Merge Events, as shown in Figure 4-10.In the dialog that appears, click Merge Events.
The first Event selected becomes the one into which all other selected Events will be merged.
You can now rename the merged Event by clicking the Event name and typing a new one.
You can also use the Information (the lowercase "i") button (lower-left corner of the iPhoto window) to do this.
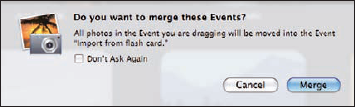
You can also merge two or more Events by simply dragging them onto the Event you want to merge them with. As is often the case in iPhoto, there are multiple ways to accomplish the same result. Dragging and merging works like this:
Select the Event or Events, using
-click, to be merged into another.Click and drag onto the Event to be merged with.
A dialog appears, verifying the operation that's about to begin, as shown in Figure 4-11.
The selected Event(s) will be merged, in order, into the Event they're being dragged onto.
Another technique you can use to manipulate how your photos have been stored is to split an Event. This can be useful if, for instance, you were photographing multiple happenings on a single day but they weren't more than two hours apart. When you import into iPhoto, the photos would be stored as part of one Event. Using iPhoto's Split feature for splitting them apart works like this:
Set the Double-Click Event option in Events Preferences to Shows Event Photos.
Tip
For more on Events Preferences, see Chapter 2.
Select Events from the Source list and then double-click the Event you want to split.
This displays all the photos in the Event.
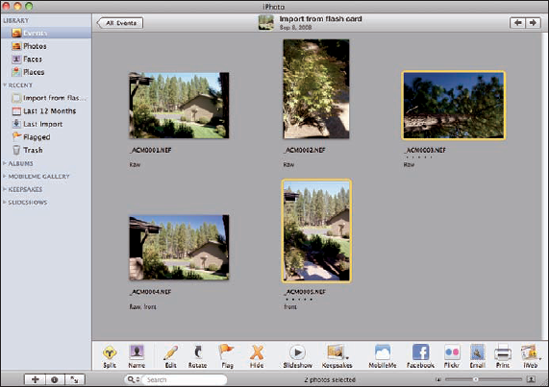
Select the photos that will constitute the second Event.
You can use either standard Macintosh way of selecting:
Hold the Shift key and then click the first and last photos that are consecutive.
Press
Figure 4-12 shows the Event and the highlighted photos.
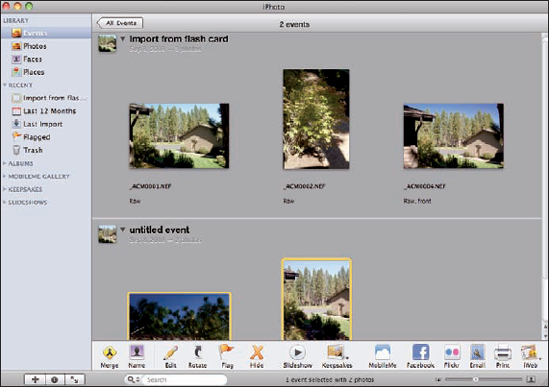
Click the Split button on the iPhoto toolbar or choose Events
Split Events.The photos you select are moved to a new untitled event, as shown in Figure 4-13.
Click the name Untitled Event and type in a meaningful name.
Maybe you have photos within an Event that you want to keep in it but don't want to appear when the Event is opened. Hiding a photo can be useful if you don't want to use it or see it, but you're not sure you want to delete it. "Magic!" you say? Not really. Just an easy way to change the look of an Event without losing any photos. As you might have guessed, you can hide a photo. Refer to Figure 4-13 as I show you how to hide one of the photos in the untitled event. Here's how easy it is to do. These steps can be applied to any photo you want to hide.
To hide a photo, select it and either click the Hide button on the toolbar or choose Photos
Hide Photo(s).The second photo in CUSTOMIZED EVENT becomes hidden, as shown in Figure 4-14. Notice the wording to the right of the Event name in the figure — Show 1 Hidden Photo — letting you know that there is one photo in the Event that isn't displayed in the Event pane.
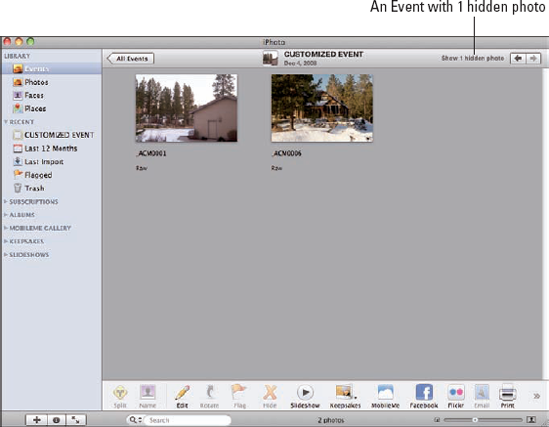
Figure 4-14. An Event with a hidden photo.
The photo reappears.
Figure 4-15 shows the photo reappearing with an X in its upper-right corner, denoting that it's a hidden photo.
Tip
Notice that the wording toggles to Hide 1 Hidden Photo. Click that, and the photo disappears again.
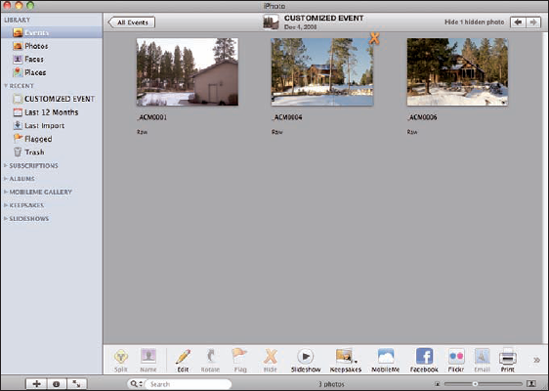
Figure 4-15. A hidden photo revealed.
If you want to see all the hidden photos in the iPhoto Library, click Photos in the Source list and then choose View
Hidden Photos.The hidden photos will appear with an X in the upper-right corner. They are now visible but are still marked as Hidden. To hide them again, choose View
To unhide the photos, select one or more of the hidden photos and then click the Unhide button on the iPhoto toolbar, or choose Photos
Unhide Photo(s).This makes them visible regardless of any other settings.
Here's another way of grouping some of your photos without really incurring any extra overhead. You, quite literally, put a flag on the photos. This flag is visible in the corner of the photo's thumbnail. It's like sorting through a stack of photos and setting some aside for further review. A special heading under Recent — Flagged — contains any flagged photos. So why bother to do this?
You can create a temporary grouping while you browse through one or more Events.
You can create a new Event from the flagged photos.
You can move the flagged photos to another Event.
To flag photos
Select the Event you want and then open it. Or you can go to Photos in the Source list and see all the photos at once.
Select the photo or photos you want to flag.
Click the Flag button on the iPhoto toolbar or choose Photos
Flag Photo(s).The flag indicator appears in the thumbnail. Figure 4-16 shows the indicator.
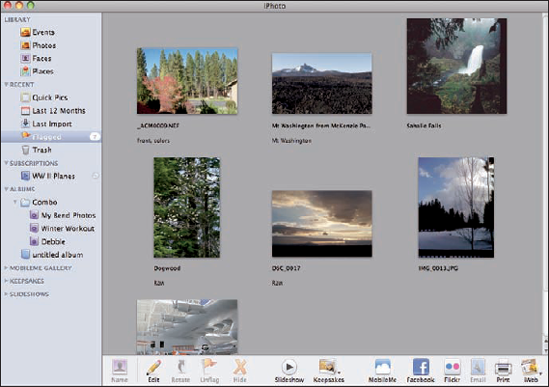
To look at all your flagged photos, select Flagged in the Source list.
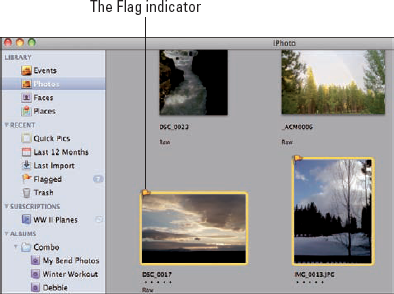
Figure 4-17 shows the flagged photos. Notice that the number of flagged photos is indicated next to the word Flagged.
To create a new Event with the flagged photos
Choose Events
Create Event from Flagged Photos.Because a photo can only be in one Event at a time, a warning dialog alerts you that the photos will be moved to the new Event.
If you're satisfied, click the Create button.
An untitled event is created containing these photos. If you change your mind, you always can Undo.
You can now name the Event as you like.
You can also move flagged photos to an existing Event. After you flag the photos
Tip
If you wish to Unflag any photos, simply select them and then click the Unflag button on the iPhoto toolbar or choose Photos
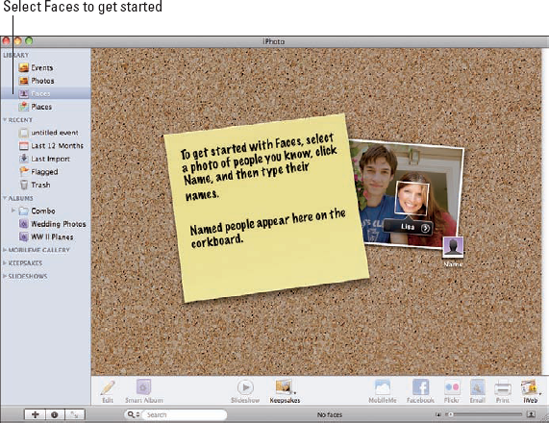
A wonderful feature of iPhoto, straight out of the high-tech world, is the facial-recognition technology called Faces. iPhoto can detect all the faces in the photos that you imported into your Library. When you start iPhoto '09 for the first time, it will scan your iPhoto Library to find photos with faces in them. Depending on the number of photos you have, this could take some time. It will then ask you to name the persons it finds and to suggest additional photos that have that person in them. You can also add the full names and e-mail addresses of the persons recognized by iPhoto. This provides a clever way to see all the photos of a particular person across any span of time and, perhaps, many Events.
After a face is recognized and named, it can be viewed on the Faces corkboard by selecting Faces from the Source list. Even better, you can delete a face from the Faces corkboard without deleting the photo from the iPhoto Library.
Tip
This section on the operation of Faces is correct as of the time of this writing. You can check the Apple iPhoto Discussion Forum from iPhoto for any software updates by choosing Help
Here's how Faces works.
Click Faces in the Source list to open the Faces pane and corkboard for the first time, as shown in Figure 4-18.
Tip
If there are no photos in the Faces pane, you either don't have photos with faces, or they weren't recognized by iPhoto. As I mentioned earlier, whenever photos are imported into iPhoto, they're scanned automatically to see whether there are faces to be recognized. If iPhoto didn't recognize any faces but faces do exist in the photo, no problem! — you can manually address them.
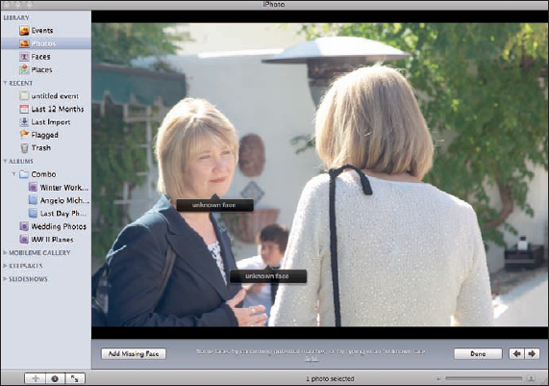
Click Photos in the Source list and select a photo that shows someone you want to name.
Click the Name button on the iPhoto toolbar, as shown in Figure 4-19.
A pane similar to the one in Figure 4-20 opens, displaying the photo.
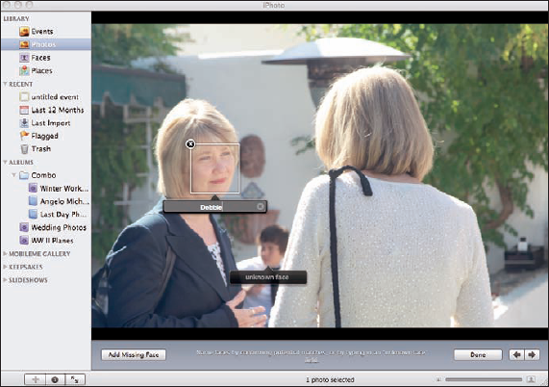
iPhoto will mark, with a pointer, each area it recognizes as a face. Each of these areas are marked as Unknown Face. As you move the mouse pointer over a face, a rectangle appears.
Click the words Unknown Face, type in the person's name (Debbie, as shown in Figure 4-21), and then press Return.
If there is more than one face and you know all the names, add them the same way. However, you don't have to name every face; you can remove the face-positioning rectangle from any face you want to ignore. Simply click the face and then click the X in the rectangle.
Click Faces in the Source list to see how the corkboard has changed; see Figure 4-22.
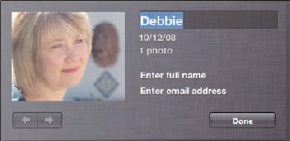
(Optional) To add more information about this person, put your mouse on the photo you named and then click the small information icon that appears in the right-hand corner.
The photo will flip over and allow you to enter a full name and e-mail address for the person, as shown in Figure 4-23. Then click Done.
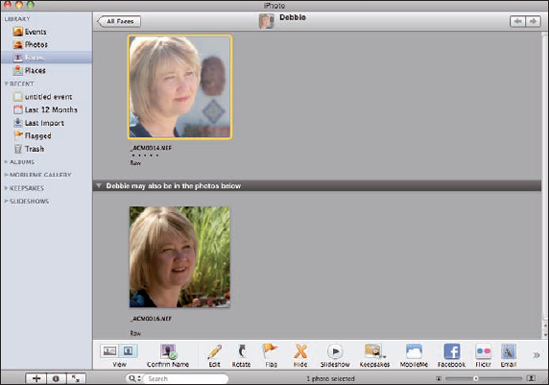
To search for other photos of this person, double-click the photo.
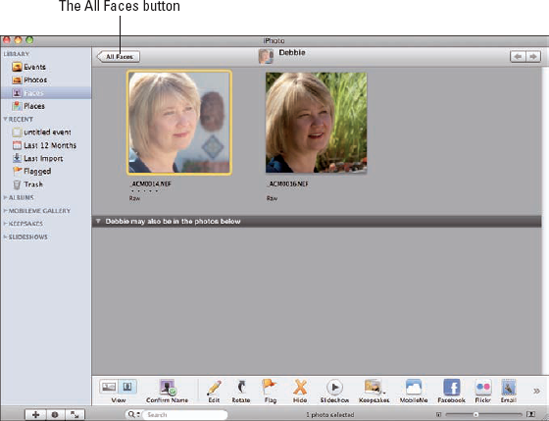
If iPhoto finds any other photos iPhoto thinks this person is in, those photos appear below the line in this same pane, as shown in Figure 4-24.
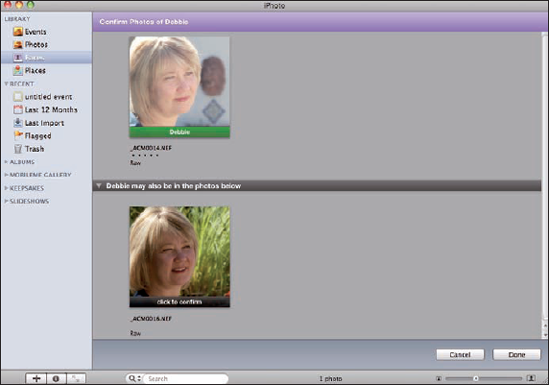
To confirm that this is the same person, click the Confirm Name button on the iPhoto toolbar.
The pane changes to the one shown in Figure 4-25.
To confirm the bottom photo, click the text Click to Confirm (directly beneath the photo), and then click the Done button in the bottom-right corner of the pane.
Tip
To confirm a photo, you can also just drag the photo above the dividing line.
(Optional) If this isn't the correct person, click the bottom photo twice.
Click to Confirm will change to Not Debbie, and the photo will not be added.
Click Done when you're finished.
Figure 4-26 shows the result of confirming the name in this example. Two photos are now identified as Debbie.
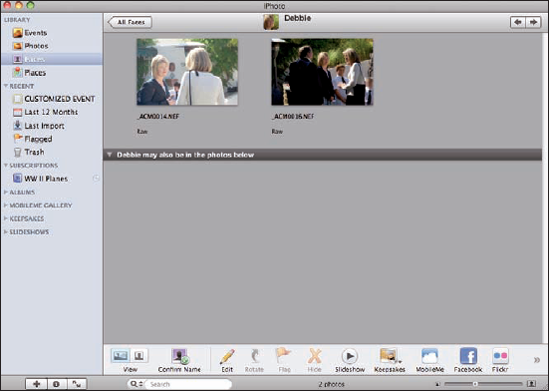
Click the All Faces button to stack the photos on the corkboard. To open them again, just double-click the stack — or tile, as it's sometimes called.
In the lower-left corner of the iPhoto toolbar is a button named View, with two halves. Clicking the right half shows the photos in Faces zoomed in as shown in Figure 4-26. To see the person as they appear in the original photo, click the left half of the button, which is the Photo View portion. Figure 4-27 shows the difference.


If you want to delete a stack from the Faces corkboard, drag the stack to the iPhoto Trash, or select the stack and choose Photos
Tip
You find out more about using Faces to search for photos in Chapter 6.