Chapter 13. iPhoto on the iPad
iPhoto isn’t just for Macs anymore. These days you can use it on your iPhone, iPod Touch, or iPad. As long as the device is running iOS 7—the software that powers Apple’s mobile gadgets—you can hold iPhoto’s organizational and image-editing prowess in the palm of your hands.
This development is exciting because it releases you from the shackles of your desk. The iPad in particular sports a screen that’s perfectly suited for displaying and editing your photos while you’re away from your main machine. Imagine flying home from Fiji and having your pictures perfected before you hit baggage claim, or parking at your favorite coffee shop and whipping up a web journal (an online digital scrapbook—see Web Journals).
iPhoto for iOS lets you do all those things and more. You can use it to upload photos to Facebook, Flickr, or Twitter; design and order hardcover books, prints, panoramas, or posters; create slideshows; and beam pictures onto other iOS devices or pass them off to iPhoto-friendly iOS apps like iMovie.
You’ve already learned most of what you need to know to use iPhoto on your iPad, though this version of the program has significantly different controls. This chapter gives you an overview of what you can do with iPhoto for iOS; explains how to get photos onto your iPad; and teaches you how to view, compare, flag, tag, and create slideshows from your shots.
Note
Photo isn’t available for iOS 8, which Apple released in September 2014. So if you’ve updated to that version of iOS, you won’t be able to use iPhoto on your iPhone, iPod Touch, or iPad.
An Overview of iPhoto for iOS
iPhoto for iOS requires an iPhone 4 or later, iPod Touch fourth generation or later, iPad Air, iPad 2 or later, or an iPad mini. If you purchased your iOS gadget after October 1, 2013, you can download iPhoto from the Mac App Store for free; otherwise you have to pay $5.
Once you install iPhoto, you’ve got everything you need to view, edit, and share pictures right there on your mobile device. The program looks the same no matter which device you’re using it on, though this book focuses on using it on the iPad because it has the biggest screen. (The minor differences in the iPhone/iPod Touch and iPad versions are noted.) Here’s what you can do with iPhoto on your iPad:
See all your pictures. iPhoto’s opening screen lets you see your photo thumbnails in three familiar categories: Photos, Albums, and Projects (see Figure 13-1). As you’ll learn in the next section, it’s incredibly easy to get photos into iPhoto whether they’re in your Camera Roll (pictures you’ve taken with your iPad; Apps), synced via iTunes (Syncing with iTunes), shared using iCloud (The Drag-and-Drop Method), saved from an email or instant message (Saving Photos from Messages, Email, or the Web), or downloaded directly onto your iPad from your camera or memory card (see the box on From Camera to iPad).
Note
iPhoto for the iOS creates albums automatically when you do certain things such as edit, flag, tag, or view a picture.
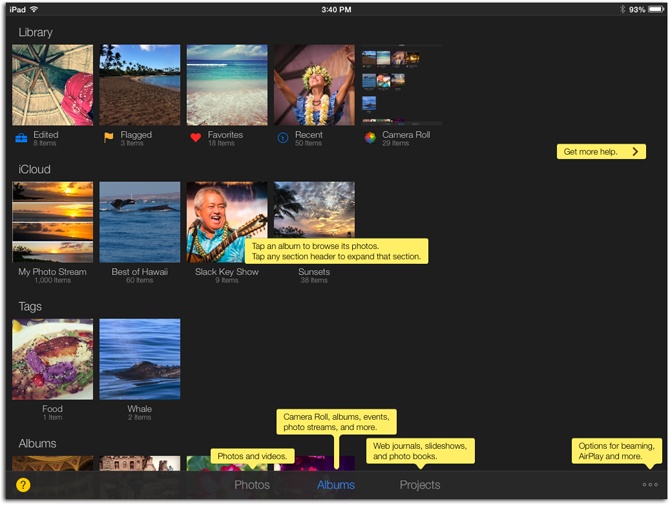
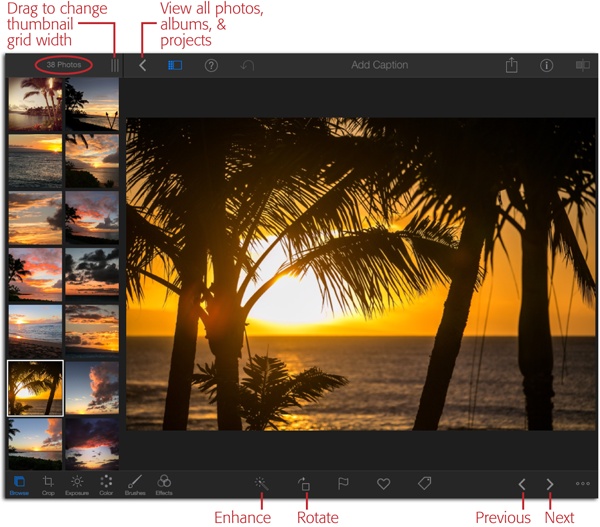
Figure 13-1. Tap Photos, Albums, or Projects at the bottom of iPhoto’s main screen to pick a grouping of pictures to view. By choosing Albums, you can see your iPad’s Camera Roll as well as your iCloud photo streams. Any albums you’ve set to sync in iTunes show up here, too. Tap the at the bottom left of the screen to
display the helpful yellow tips shown here. Tap the
again to hide them.
at the bottom left of the screen to
display the helpful yellow tips shown here. Tap the
again to hide them.Compare, flag, and tag photos. You can select multiple photos and see them side by side (Viewing and Selecting Multiple Photos), and add a flag or favorite tag to mark the ones you like best (Auto-Enhancing and Rotating). If you double-tap a thumbnail, iPhoto shows you all the similar photos in that particular album. You can also create and add keywords (Auto-Enhancing and Rotating), add captions (Adding Captions), and search for specific shots (Adding Captions).
Edit your photos. iPhoto on your iPad lets you perform all the same editing tricks as iPhoto can on your Mac, plus a whole lot more. Not only can you edit whole photos by cropping, straightening, rotating, correcting exposure, resetting the white balance, sharpening, and copying/pasting edits from one photo to another, but you can also alter only certain areas of your pictures. For example, you can intensify just the blues or greens, or use iPhoto to repair, lighten, darken, saturate, desaturate, sharpen, and soften certain spots using your fingertips (a maneuver called on-image gesturing). Also available only in iPhoto for iOS: the ability to apply nine categories of creative effects including painterly edges, color treatments (warming, cooling, black and white, and so on), trendy filters, and artistic blurring. Chapter 14 has the scoop.
Share your photos. In addition to posting pictures on Facebook, Flickr, and Twitter, you can also create (or contribute to) shared iCloud photo streams (see iCloud Photo Streams). You can also email photos, send them via instant message, beam them onto another iOS device, transfer them via AirDrop, and more. See Chapter 15 for details.
Create web journals and slideshows. Web journals, a feature exclusive to iPhoto for iOS, are like digital scrapbooks (Web Journals). Once you pick the pictures to include, you can customize the layout in myriad ways: move and resize photos, tweak the design, add fun stuff like maps, and so on. You can beam or AirDrop journals to other iOS devices, sync a journal’s HTML files back to your Mac using iTunes, or—if you have an iCloud account—post them onto the Web. You can also create slideshows that you can view on your iPad, share with other iOS gadgets, and post online.
Design and order books and prints. You can create and order hardcover books right from your iPad (Photo Books). You can also order prints in a variety of sizes. And if you’ve got a wireless printer connected to your home or office network, you can even print directly from your iPad.
At this point, you’re probably wondering what you can’t do with iPhoto on your iPad. In a nutshell, you can’t create albums or folders, add Faces or Places tags, create cards and calendars, or trim movies.
Now that you have an idea of what the app can do, you’re ready to start importing photos into iPhoto for iOS.
Importing Pictures
Every Apple mobile device comes with a built-in app called Photos (not to be confused with iPhoto). This app is the central repository for all the photos and videos on your gadget. It also lets you create, share, and edit slideshows, but it can’t compete with iPhoto’s skill set.
Happily, all the pictures and videos that live in the Photos app show up in iPhoto for iOS automatically; you don’t have to do a thing. And how do you get pictures into Photos (and therefore into iPhoto), you ask? By doing any of the following:
Take a picture with your iPad or take a screenshot on your iPad (by simultaneously pressing the home button and the sleep/wake button).
Beam a photo from one iOS device to another (Beaming Photos).
Create an iCloud account and turn on My Photo Stream (Using iCloud’s Photo Stream). If you subscribe to someone else’s photo stream (iCloud Photo Streams), those photos show up in the Photos app, too.
Use iTunes to sync pictures between your iPad and your Mac (Syncing with iTunes).
Use iTunes to copy pictures from your Mac to your iPad (Using iTunes File Sharing).
AirDrop pictures from one iOS device to another (Using AirDrop).
Save a photo from another iOS app (Apps).
Save a photo you’ve received by email or text message (Saving Photos from Messages, Email, or the Web).
Save photos or videos from Facebook or Flickr (Using AirDrop).
Import pictures directly onto your iPad from your digital camera or memory card as explained in the box on From Camera to iPad.
Using iCloud Photo Streams
If you’ve got an iCloud account and you turn on My Photo Stream (Using iCloud’s Photo Stream), pictures appear in the Photos app on your iPad, and thus as an album in iPhoto, automatically. Each time a new photo enters your life—when you take a picture with your iPad or iPhone, for example, or import one onto your Mac—it gets added to your photo stream and appears on all your iCloud-connected machines (provided you’ve flicked the photo stream switch on those devices, too). Here’s where to find your pictures:
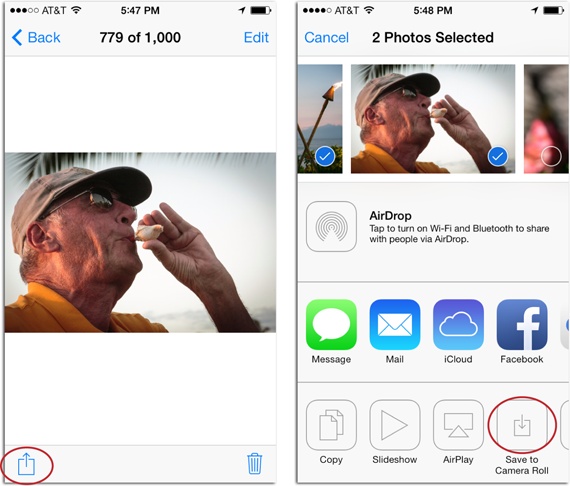
iPhone, iPad, iPod Touch. In your Photos app, you see an album called My Photo Stream. It includes the most recent photos you’ve taken with any of your iOS gadgets, or that you’ve imported to your Mac; you see this same album in iPhoto for iOS (it’s visible in Figure 13-1). To save space on your iOS device, your photo stream consists of just the last 1,000 photos, and the iCloud servers store your photos for only 30 days. But as long as your gadgets go online at least once a month, they update themselves automatically in order to remain current with the photo stream. To have permanent access to a picture in your photo stream on your device, you need to save it to your Camera Roll, as Figure 13-2 explains.
On a Mac. In iPhoto on your Mac, your photo stream appears in the Shared section of your Source list as an item labeled iCloud. If you turned on Automatic Import in iPhoto’s iCloud preferences on your Mac (Using iCloud’s Photo Stream), you don’t have to worry about that 30-day, 1,000-photo limit; once pictures appear on your Mac, they stay until you delete them. This is one of the best features of iCloud, because it means you don’t have to sync your iPad (or iPhone) over a USB cable to get your photos onto your Mac or vice versa. It all happens automatically and wirelessly via WiFi.
Tip
If you’ve got an Apple TV and you’re using it to view your photos (see the box on Viewing Photos and Slideshows on an Apple TV), sign into your iCloud account on your Apple TV and a new album called Photo Stream appears there, too. Few Mac magic tricks are as impressive as displaying your photos on a big plasma-screen TV!
Syncing with iTunes
iTunes, as you probably know, is Apple’s free multimedia jukebox program that comes preinstalled on every Mac. It’s been loading music onto iPods since the turn of the 21st century, and you use it to control which digital movies and photos get synced onto your iOS devices.
The syncing process is simple:
Connect your iPad (or iPhone, or iPod Touch) to your Mac; when iTunes opens, click your iPad’s name, and then click the Photos tab.
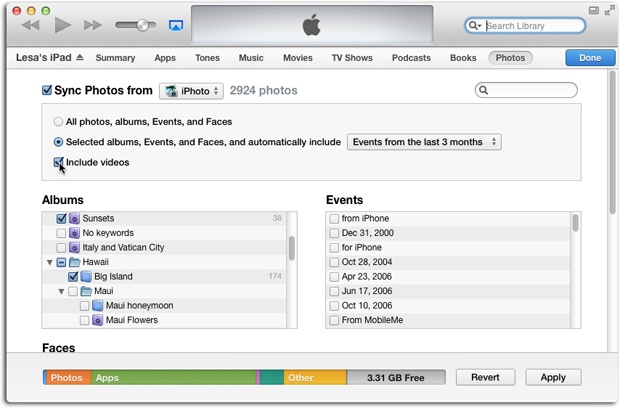
If you set iTunes to open automatically when you connect your iPad (using the Summary tab), it’ll pop right open. If not, go ahead and launch iTunes, and you see the screen shown in Figure 13-3.
Turn on “Sync photos from,” and then choose iPhoto.
If you picked iPhoto in the previous step and you want all your pictures synced, choose “All photos, albums, Events, and Faces.” If you just want some of them, click “Selected albums, events, and faces, and automatically include…” instead, and then turn on the checkboxes of the albums, events, and faces you want synced. (The “faces” option is available only if you’re syncing from iPhoto on the Mac, and only if you’ve used Faces tags.) Either way, your selections are organized into the same structure in iPhoto for iOS when you import them (in albums, Events, and so on).
Tip
If you want to sync videos to your iPad, including any slideshows you’ve exported as QuickTime movies (Exporting a Saved Slideshow), be sure to turn on “Include videos.” However, videos consume a lot of space; if you run out of room on your device, deleting videos is a fast fix.
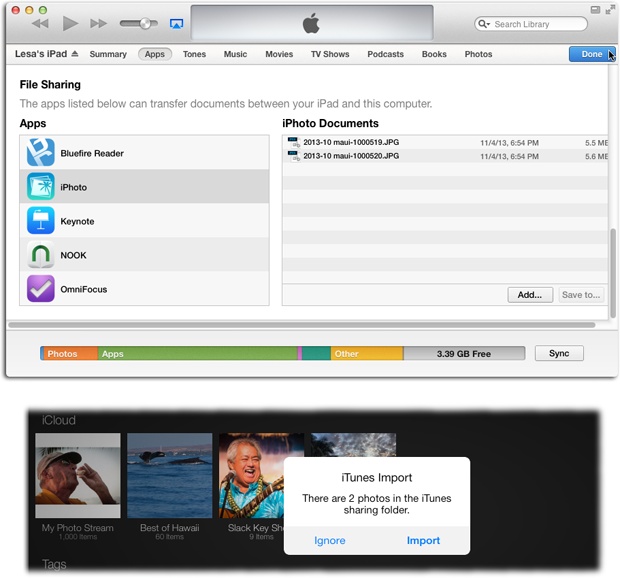
As you choose albums, events, or faces to sync, a faint number appears to each item’s right showing you how many photos are inside. (For example, in Figure 13-3, you can see that the Sunsets album contains 38 photos.) And at the bottom of the iTunes window, a colorful graph shows you the amounts and types of files that are headed for your iPad: Audio, Video, Photos, Apps, Books, Documents & Data, and Other (for your personal data). More importantly, this graph shows how much room your iPad has left, so you won’t get overzealous in syncing your stuff.
Figure 13-3. Once your gadget is connected to your Mac, its name appears near iTunes’ upper left. When you click the name, you see several tabs near the top of the iTunes window: Summary, Apps, Tones, and so on. For the most part, these represent the categories of stuff you can sync to your device. You’re interested in the Photos tab.Click Apply.
iTunes does its thing, creating downsized copies of your photos that will look great on your iPad, and then sends them over.
Note
If you want full-size copies of your photos synced to your iPad—say, for ordering prints or designing a hardcover book—you need to use iTunes’ file-sharing feature instead. The next section has the details.
After the sync is complete, click the ![]() next to your device’s name to disconnect it.
Now you’ll be able to wave your iPad around, and people will
beg to see your photos.
next to your device’s name to disconnect it.
Now you’ll be able to wave your iPad around, and people will
beg to see your photos.
Using iTunes File Sharing
Apple realizes that your iPad doesn’t have nearly as much memory as your Mac. That’s why it downsizes your photos during a sync. And if you’re only using your iOS device to display photos, either on the device itself or on the Web, then you can get away with far fewer pixels.
But if you’re planning on ordering large prints or creating a hardcover book from your iPad (see Chapter 15), you want the maximum number of pixels, so Apple’s printing companies have more info to work with. The more pixels contained in your photo, the smaller those pixels can be when printed. The goal is to have pixels so small that you can’t see them individually in the printed piece.
To transfer a full-size photo file from your Mac to your iOS device, you have to use iTunes’ file-sharing feature.
First, export the full-size files you want to transfer to your iPad (see Exporting and Converting Pictures for instructions) and put them in a folder. Next, fire up iTunes, connect your iPad to your Mac, click your iPad’s name, and then click the Apps tab. Scroll down until you see the File Sharing section (Figure 13-4, top), and then click iPhoto in the Apps list. At the bottom of the iPhoto Documents section, click Add, and then navigate to the folder where you stored the pictures, select the ones you want, and then click Add. Finally, click iTunes’ Apply button. Your photos will be copied to your iPad, in full-resolution glory, the next time you sync.
Honestly, it’s less harrowing to create your print projects on your Mac rather than on an iPad, because then you don’t have to think about downsized versions vs. full-sized versions at all. Of course, if you’re capturing on your iOS device, then you’re always working with the full-sized versions of those particular photos, so there’s nothing to worry about. (That said, if you order small- to medium-sized prints from an iPad 2, it’s unlikely you’d spot a quality difference between the downsized and full-sized versions anyway.)
Saving Photos from Messages, Email, or the Web
If you’ve received a photo via email or instant message, saving it to your Camera Roll so you can access it in iPhoto is super easy.
If the photo arrived via Mail, click the Reply button at the top right of your screen (it looks like a curved arrow) and, in the resulting sheet, click Save Image or Save Video. (If you use a different app for email, then the process may be slightly different.)
If it was delivered via Messages (Apple’s instant-messaging
app), tap the ![]() at the top right of your screen (see Figure 13-5, top). In the
sheet that appears, swipe leftward across the program icons until
you see “Open in iPhoto.” Tap it to have your iPad close Messages
and open the photo in iPhoto. Alternatively, you can tap Save Image
(or Save Video) to stick it in your Camera Roll, which appears as an
album in iPhoto.
at the top right of your screen (see Figure 13-5, top). In the
sheet that appears, swipe leftward across the program icons until
you see “Open in iPhoto.” Tap it to have your iPad close Messages
and open the photo in iPhoto. Alternatively, you can tap Save Image
(or Save Video) to stick it in your Camera Roll, which appears as an
album in iPhoto.
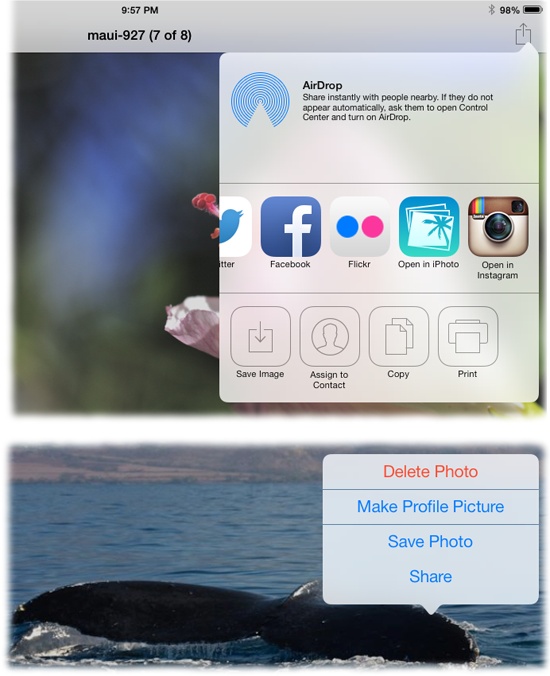
Saving a picture from the Web is nearly the same process. If you’re viewing a photo on Facebook, Flickr, or Twitter, all you have to do is touch and hold the photo (or video clip) for about a second and a sheet appears (Figure 13-5, bottom). Tap Save Image (or Save Video); your iPad deposits a copy in your Camera Roll.
Using AirDrop
With AirDrop, you can shoot a photo (or several) from one iOS device to another—wirelessly, securely, and instantly. It’s much faster than emailing or text messaging, since you don’t have to know (or type) the other guy’s address. The photo ends up in your Camera Roll, and in the Camera Roll album in iPhoto. The whole process is described in Chapter 15 (Beaming Photos).
Browsing Photos
The first step in viewing and browsing your pictures is to choose which group of photos you want to see. As you saw back in Figure 13-1, iPhoto for iOS gives you three choices—just tap the appropriate link at the bottom of the main screen:
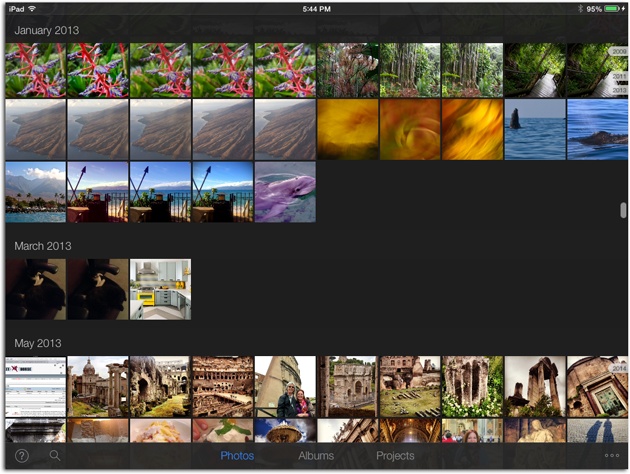
Photos. This view displays thumbnails of every photo you’ve ever snapped with, saved to, imported to (synced), or beamed to your iPad, as Figure 13-6 shows. Thumbnails appear in date order, grouped by month. What you don’t see in this view are photos contained in your iCloud photo streams.
Albums. Choose this view to see all the pictures you’ve synced with your Mac, organized into their respective albums, Events, and so on (this view is shown back in Figure 13-1). You also see any iCloud photo streams you’ve created or subscribed to, along with a bunch of albums that iPhoto creates automatically. You’ll use this view a lot; it’s described in the next section.
Projects. This view shows you all the photo books, web journals, and slideshows that you’ve created on your iPad; projects you’ve created in iPhoto on your Mac aren’t included. Chapter 15 has the scoop on creating and managing projects.
Viewing Albums
As you recall, albums are a collection of photos and videos shown as a small stack of thumbnails. Tap an album to open it, and you see all the photo and video thumbnails it contains.
The biggest difference between iPhoto albums on your iPad and on your Mac is that you don’t create them manually on your iPad. Instead, iPhoto for iOS creates new albums automatically when you do certain things such as edit, flag, tag or even view a photo.
Tip
While you can’t manually create albums in iPhoto for iOS, you can create them in the Photos app. Just open the Photos app and find the photos that you’ll want to be in the new album. Tap Select, and then tap each thumbnail that you want to include in your new album. When you’re finished, tap Add To at the bottom of your screen. Finally, scroll down to the bottom of the next screen and tap New Album.
Albums view is arguably the most useful way to see and work with your photos in iPhoto for iOS, because they’re categorized by the kind of album they’re in. Tap Albums at the bottom of iPhoto’s main screen to see them in these glorious groupings:
Library. This category includes albums that iPhoto creates automatically. Here’s what you get:
Edited. When you edit a photo in iPhoto, it appears in this album—even if all you did was add a caption to it (Adding Captions).
If you’d like to see your photos on a big screen, you can project them wirelessly, thanks to a feature called AirPlay. It lets you transmit photos, music, and hi-def video (with audio) from your iPad (or other iOS device) to an Apple TV or another AirPlay-equipped receiver across the room for an audience to enjoy. Whatever is on your iPad’s screen gets sent to the other device. This is especially useful when you’re viewing your photos as a slideshow, as described later in this chapter (Viewing Photos as a Slideshow).
AirPlay-equipped devices include the Apple TV (version 2 or later), and a slew of speakers, stereos, and audio receivers (which are for playing music instead).
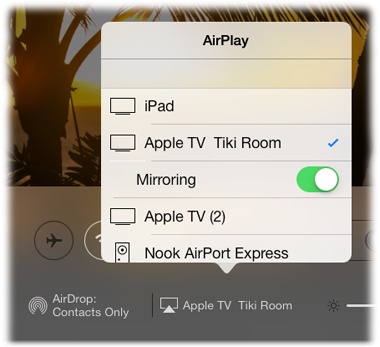
To make AirPlay work, make sure your iPad and the other device are on the same WiFi network. Then grab your iPad and use your finger to swipe up from the bottom of the screen to open the Control Center (it doesn’t matter whether iPhoto is open). Tap the
 to see a list of available AirPlay
receivers, and then tap the one you want to connect to. If
you pick an Apple TV, turn on the Mirroring switch beneath
it (otherwise it’ll play audio from only your
device).
to see a list of available AirPlay
receivers, and then tap the one you want to connect to. If
you pick an Apple TV, turn on the Mirroring switch beneath
it (otherwise it’ll play audio from only your
device).That’s it! Everything on your iPad’s screen now appears on the TV. At the top of the iPad’s screen, the
appears, so you don’t forget that
your every move is visible to everyone in the
living room. (This icon isn’t visible in iPhoto
when you’re viewing individual photos, but you can see
it in Photos, Albums, or Projects view.) To turn AirPlay
off, reopen the Control Center, tap the AirPlay icon, and
then tap your device’s name.Flagged. As you learned back on Flagging Photos, flags are a great way to mark photos that you want to do something specific with later, such as delete, email, or edit. If you flag a picture in iPhoto for iOS, they show up here with a tiny orange pennant on each thumbnail. Confusingly, this album doesn’t contain photos you’ve flagged in iPhoto on your Mac.
Favorites. iPhoto for iOS also lets you mark photos as favorites (Auto-Enhancing and Rotating). When you do, a cute little red heart appears on each thumbnail. Favorites are another great way to mark (and thus automatically group) photos that you want to do something special with later, such as create a Facebook album (Mail), add to a photo book (Photo Books), or order prints (Printing Photos).
Beamed. To the delight of Star Trek fans everywhere, iPhoto lets you beam photos from one iOS device to another (Beaming Photos). If you’ve transported photos in that way, they appear here.
AirDrop. If you’ve transferred any photos from another iOS device onto your iPad using AirDrop (Beaming Photos), they show up here.
Recent. This album contains the most recent pictures you’ve viewed in iPhoto.
Camera Roll. This ever-so-useful album contains all the photos you’ve taken with your iPad and that you’ve saved to your Camera Roll using iPhoto (Apps), or from a text message, email, or the Web (Saving Photos from Messages, Email, or the Web).
iCloud. If you’ve got an iCloud account and you’ve turned on your photo stream (Using iCloud’s Photo Stream), those pictures show up in this category.
My Photo Stream. This album contains the last 1,000 pictures you’ve taken with any of your iOS gadgets, or that you’ve imported into iPhoto on your Mac. (As you learned earlier in this chapter, iCloud’s servers store your photos for 30 days.)
Shared photo streams. If you’ve created any shared photo streams on your Mac or iPad, you see them listed here.
Tags. If you add custom tags (Auto-Enhancing and Rotating) to pictures in iPhoto on your iPad, they show up in this album. Tags are just like keywords (Keywords), though the keywords you assign in iPhoto on your Mac don’t show up here.
Albums. This section includes all the albums you’ve created on your Mac and synced onto your iPad using iTunes (Syncing with iTunes). And if you’ve created any albums in the Photos app on your iPad, they show up in this group, too.
Events. As you might suspect, this is where you find any Events that you’ve synced from your Mac onto your iPad using iTunes. (To learn more about Events, see Chapter 2.)
Apps. Some programs can send pictures directly to iPhoto for iOS. For example, if you use iTunes’ file-sharing feature (Using iTunes File Sharing) to send full-size photos from your Mac to your iPad, those photos land in an album in this group named iTunes. You’ll see an album here for each program that has fired over a photo.
Faces. This section shows albums that you’ve synced using iTunes, named with the Faces tags you’ve added. (For more on Faces tags, see Chapter 4.)
Photo Box. You can think of this album as a catch-all for photos that iPhoto isn’t sure what to do with. If a photo lives in an album that iPhoto created automatically—such as Edited, Favorites, Journals, or Tags—and you delete the photo from your iPad (via the Photos app, say), it doesn’t get deleted from that album in iPhoto. Why? Because it still has the edits or tags that you added, or it still lives in a slideshow or web journal that you’ve made on your iPad. Only if you remove the thing that made iPhoto put the photo in the automatic album in the first place—you undo the photo’s edits, remove its tags, or delete it from a web journal, for example—does iPhoto remove it from the automatic album and shove it into this Photo Box.
Viewing Individual Photos
No matter which group of photos you’re viewing, tapping a photo’s thumbnail opens it at a larger size, as shown in Figure 13-7. This view includes controls at the top and bottom of your screen that let you do things like edit the picture (Chapter 14), enhance it or rotate it (Auto-Enhancing and Rotating), add flags and tags (Auto-Enhancing and Rotating), share it (Chapter 15), see its info (Viewing Photo Info), turn it into the key photo for an album (Viewing Photo Info), and so on.
Tip
You can also compare multiple photos—handy for deciding which photos to keep or use in projects. Flip ahead to Viewing and Selecting Multiple Photos for the full story.
Once you’re viewing an individual photo, you see thumbnails of the other photos contained in that particular album on the left or bottom of your screen (see Figure 13-7), depending on how you’re holding your iPad.
Is this as far as you can zoom into your photo, you ask? Heck no. To see deeper into your picture, you can do one of the following:
Zoom in or out using gestures. To zoom into your photo, use the spreading gesture: Place two fingers (usually thumb and forefinger) on the screen and then spread them apart. The image magically grows as though it’s printed on a sheet of rubber. Once you’ve zoomed in like this, you can zoom out again by putting two fingers on the screen and pinching them together.
Double-tap the photo. This maneuver also zooms in, magnifying the photo. Double-tapping the photo again restores it to its original size.
See it in full-screen view. Tap the photo once to make it hog your entire screen; tap it again to return to the screen shown in Figure 13-7.
Figure 13-7. You can change the size of the thumbnail grid by dragging the icon labeled here (left). Drag the photo count (circled) to the right of your screen to reposition the grid on the right side instead of the left. If you’re holding your iPad vertically, then the thumbnails appear at the bottom of the screen. Clicking the < at the top of the screen returns you to the main screen, where you can see all of your photos, albums, or projects. To see the previous or next photo in the album, click the < and > at the bottom right of your screen (labeled here).Use the loupe. You can summon iPhoto’s magnification loupe by placing two fingers approximately three inches apart atop the photo (or use one finger from each hand); it doesn’t matter where you place your fingers, or whether or not you’re already zoomed in. When you do, you see the black ring shown in Figure 13-8 (and your hear a slick little sound if your iPad’s sound is turned on). This loupe lets you zoom into a specific spot in your photo at up to 3x magnification. To dismiss the loupe, tap anywhere in the photo outside the black ring.
Tip
If you’re not already a pro at using gestures on your iPad,
you can get up to speed by watching a few of Apple’s instructional
videos on your Mac. They’re tucked away in the Trackpad preferences pane: Choose ![]() →System Preferences→Trackpad. The resulting
pane includes a list of gestures. Point your cursor at a gesture
to watch a demonstration video. Click the other tabs at the top of
the pane to see even more gestures and demos.
→System Preferences→Trackpad. The resulting
pane includes a list of gestures. Point your cursor at a gesture
to watch a demonstration video. Click the other tabs at the top of
the pane to see even more gestures and demos.

Viewing Photo Info
iPhoto can display all manner of insider information about
how and when a photo was captured. For example, you can see the
date and time the photo was snapped, what camera it was taken
with, what its pixel dimensions are, and so on. To see this info
in iPhoto on your iPad, tap the ![]() at the top right of your screen (Figure 13-9).
at the top right of your screen (Figure 13-9).
Changing an Album’s Key Photo
Once you’re viewing a photo within an album, you can make it that album’s key photo—the picture that represents the album in iPhoto’s main screen.
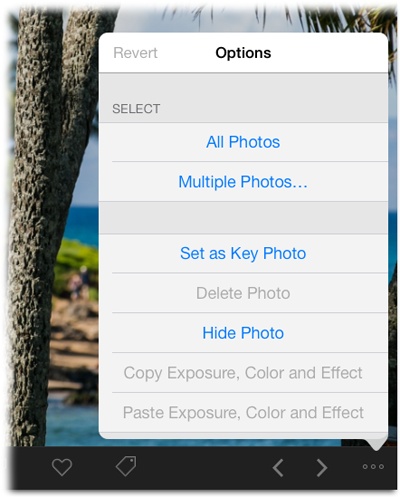
Simply tap the ellipsis (…) at the bottom right of your screen (see Figure 13-10) and, in the resulting pane, tap “Set as Key Photo.”

Auto-Enhancing and Rotating
When viewing an individual photo, you have access to tools for auto-enhancing and rotating the picture (they’re labeled back in Figure 13-7). You’ll learn about more advanced editing in Chapter 14, but these handy tools are as easy as editing could possibly get. Here’s what each one does:
Auto-Enhance. When you tap this magical, do-it-all icon, iPhoto analyzes the relative brightness and color saturation of all the pixels in your photo and attempts to “balance” it by adjusting the brightness and contrast, and intensifying dull or grayish-looking areas. It also tries to eradicate any red-eye that it finds. Usually, the pictures look richer and more vivid as a result. You may find that Auto-Enhance has little effect on some photos, only minimally improves others, and totally rescues a few. In any case, if you don’t care for the result, tap the Undo icon. (For more on using the Auto-Enhance adjustment, see Rotating.)
Rotate. To rotate your photo 90 degrees, tap this icon. Keep tapping it to rotate the picture in 90-degree increments.
Tip
You can rotate photo in smaller increments in Crop mode (Cropping and Straightening). This trick is helpful when you need to straighten a crooked horizon, for example.
Flagging, “Favoriting,” and Tagging Photos
When you mark photos by adding flags to them, designating them as favorites, or adding tags to them, iPhoto groups them into albums so you can easily find them in Albums view (Viewing Albums).
You can use these markers to mean anything you want. For example, you might flag photos that you want to delete (flags are discussed in depth on Flagging Photos), and you might “favorite” photos that you want to add to a web journal (Web Journals) or a Facebook album (Mail). (Favorites are an iPhoto for iOS–only feature; you can’t designate favorites in iPhoto for Mac.) Either way, Figure 13-11 shows you how to get the job done.
Tip
If you tap and hold the flag icon, you see a menu with these options: Flag All, Unflag All, Last 24 Hours, Last 7 Days, or Multiple. The first two flag or unflag all the photos in the current album. Choose Last 24 Hours or Last 7 Days to flag only those photos you’ve taken or imported within those time periods within that album. Or tap Multiple and then use the thumbnail grid on the left to pick all the photos you want to flag. When you tap Done, iPhoto flags all the thumbnails you selected.
Tagging, on the other hand, is a way to add keywords to your pictures in iPhoto for iOS (for more on keywords, see Keywords). Oddly, any keywords you’ve applied in iPhoto on your Mac don’t transfer over to your iPad.
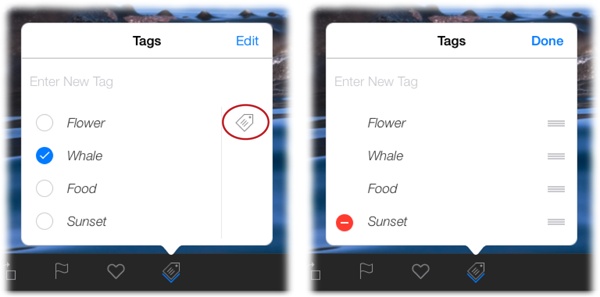
To add a custom tag to a photo, tap the tag icon beneath it and then tap Enter New Tag (see Figure 13-12). When the keyboard appears, type away; tap Done when you’re finished to see the white tag appear on the photo’s thumbnail. You can add as many tags as you want to your photos; each tag gets its own album in the Tags category of Albums view.

To remove a tag from a photo, tap the tag icon, and then tap the tag’s name.
Tip
You can create a default tag, which iPhoto applies as soon as you tap the tag icon, saving you from having to tap again to select a tag in the list. To set a default tag, tap the tag icon, enter the tag’s name, and then tap Done; next, tap the right side of the Tags pane, next to the tag’s name. When you do, a little tag outline appears, indicating that it’s now the default (this icon is circled in Figure 13-12, left). iPhoto lets you assign only one default tag, but you can change it anytime you want.
Adding Captions
You may have noticed the Add Caption text lurking at the top of your screen when you’re viewing a photo. This lets you add text that appears on the photo whenever you use it in projects like a photo book (Photo Books), a web journal (Web Journals), or a slideshow (Slideshows).
To add a caption, tap the thumbnail you want to add a caption to, and then tap Add Caption. Type some text, and then tap Done. To edit or delete a caption, tap it, and then use your iPad’s keyboard to change or get rid of it.
Deleting and Hiding Photos
iPhoto for iOS is pretty persnickety about which photos you can delete. For example, you can’t delete photos in any albums that you synced using iTunes, nor photos in an iCloud photo stream.
Basically, you can delete only what’s in your Camera Roll album. To do that, tap the photo’s thumbnail; then tap the Options icon at the bottom right of your screen (it looks like three dots). Choose Delete Photo.
However, you can delete pictures and videos from the Photos app on your iPad (even ones that are in iCloud photo streams). When you do that, the pictures are deleted from iPhoto, too—if you haven’t edited the photo, captioned it, tagged it as a favorite, or used it in a web journal (Web Journals) or a slideshow (Slideshows). If you’ve used or altered the photos in any of those ways, they disappear from the Photos app but not from iPhoto.
There’s another option, too: If you don’t want to see a photo but you don’t want to—or can’t—delete it, you can always hide it. In iPhoto, tap the photo’s thumbnail, tap the Options icon, and then tap Hide Photo; a tiny white X appears on the photo’s thumbnail. The photo is now hidden in iPhoto but remains visible in your Photos app. To unhide the photo, tap the Options icon again in iPhoto, and then tap Unhide Photo.
Filtering Photos
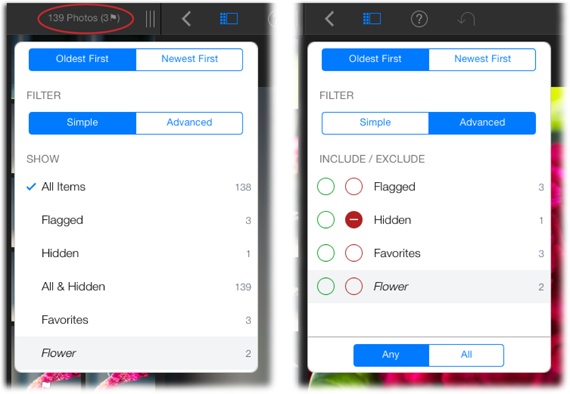
As you flag photos, the label at the top of iPhoto’s thumbnail grid changes to show you how many photos you’ve flagged (see Figure 13-13, left). For example, if you’re viewing an album of 138 pictures and you’ve flagged 3, the label reads “138 Photos (3 [flag]).” (Oddly, this label doesn’t keep track of photos you’ve favorited or hidden.)
But that’s not all. If you tap this label, you reveal a Filter pane that lets you see only the photos that you’ve messed with, as Figure 13-13 explains. The same pane also lets you change the sort order of your pictures. From the factory, thumbnails are shown in chronological order, oldest first. Tap Newest First, and you reverse that order.
When you first open the Filter pane, it’s set to Simple, which lets you tap criteria that iPhoto uses to determine which pictures to display. By clicking Advanced, you get even more options: Tap a green circle to include photos with that particular feature, and tap inside a red circle to exclude them. Tap Any to have iPhoto show you pictures that match any of the criteria you set; tap All to have iPhoto show you only those photos that match all of the criteria you’ve picked.
Viewing and Selecting Multiple Photos
iPhoto gives you some pretty slick ways to compare shots. In addition to seeing a before-and-after versions once you’ve edited a photo, you can view multiple photos, and even have iPhoto fetch similar photos from the album you’re viewing and display them automatically. This section explains how.
Viewing and Selecting Similar Photos
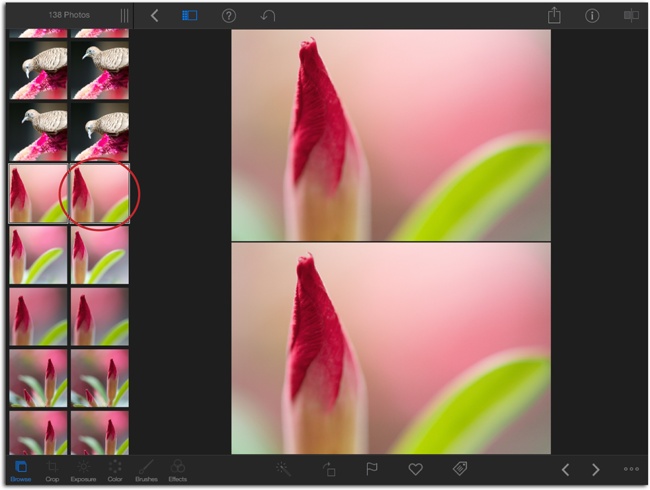
To have iPhoto sift through the album you’re viewing and find all the similar shots, just double-tap a thumbnail in the grid. If iPhoto finds similar shots—and they have to be nearly identical for this to work—iPhoto selects them in the thumbnail grid and shows them to you side by side in the viewing area (see Figure 13-14).
Viewing and Selecting a Range of Photos
To view multiple photos that are next to each other in the thumbnail grid, you’ll need two fingers. Simultaneously tap the first and last thumbnails in the range you want to see; iPhoto displays the selected pictures (as well as all the ones in between) in the viewing area.
To view multiple photos that aren’t next to each other in the thumbnail grid, tap one photo and then tap and hold each additional photo. You can also drag a photo from the thumbnail grid into the viewing area.
To deselect a photo, swipe down across it in the viewing area, or tap and hold its thumbnail in the grid.
Viewing Photos as a Slideshow
iPhoto can display your pictures as an auto-advancing slideshow. While creating a slideshow is technically creating a project, which is covered in Chapter 15 (Slideshows), this section covers the down-and-dirty version because it’s so simple and useful.
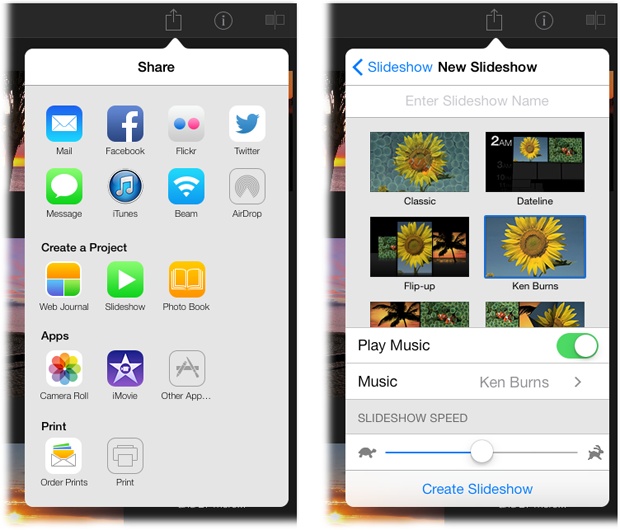
Start by opening an album or an Event. Tap the
![]() at the top right of your screen. In the
resulting pane’s “Create a Project” category, tap Slideshow (Figure 13-15, left). The pane
changes to let you pick the photos you want to see. If you’ve already
selected some photos using the technique described in the previous
section, tap Selected.
at the top right of your screen. In the
resulting pane’s “Create a Project” category, tap Slideshow (Figure 13-15, left). The pane
changes to let you pick the photos you want to see. If you’ve already
selected some photos using the technique described in the previous
section, tap Selected.
To see a slideshow of the photos you’ve flagged (Auto-Enhancing and Rotating), tap Flagged. To have iPhoto include all the album’s photos in the slideshow, tap All. To pick certain photos, tap Choose Photos, and then tap the thumbnails of the ones you want to see (you can include up to 200); when you’re finished, tap Next.
Another pane appears containing themes (Figure 13-15, right); just tap one to choose it. If you want to hear music with the show, turn on the Play Music switch, and then tap the Music entry that appears beneath it to pick your tune. Adjust the Slideshow Speed slider to specify how long each photo stays onscreen; drag it left to make photos linger longer or right to make them speed by.
Tap Create Slideshow; iPhoto assembles the show (you see a
status bar). When it’s finished, tap Show and then tap the
![]() at the top of your screen. (Tapping Done
instead saves the slideshow to your Projects view so you can see it
later).
at the top of your screen. (Tapping Done
instead saves the slideshow to your Projects view so you can see it
later).
Note
If your phone or tablet goes to sleep while transmitting your slideshow to a TV using AirPlay (see the box on Viewing Photos on an External Monitor or TV), the TV stops playing the show. The solution is to plug your iOS device into a power source for the duration of the slideshow.