
Appendix A. Troubleshooting
All programs have their vulnerabilities, and iPhoto is no exception. Many of its shortcomings stem from the fact that iPhoto works under the supervision of a lot of cooks, since it has to interact with printers, talk to web servers, cope with an array of file formats, and so on.
If trouble strikes, keep hands and feet inside the tram at all times—and consult the following collection of problems, solutions, questions, and answers.
The Most Important Advice in This Chapter
Apple’s traditional practice is to release a new version of iPhoto (and iMovie, and Pages, and Keynote…) that’s got some bugs and glitches—and then, just when public outcry reaches fever pitch a couple of weeks later, send out a .0.1 update that cleans up most of the problems.
Spare yourself the headache: Update your copy to the latest
version! To do that right now, choose ![]() →Software Update to open the Mac App Store
window. If there’s an iPhoto update in the list, click Install.
→Software Update to open the Mac App Store
window. If there’s an iPhoto update in the list, click Install.
Importing, Upgrading, and Opening
Getting photos into iPhoto is supposed to be one of the most effortless parts of the process. Remember, Steve Jobs promised that iPhoto would forever banish the “chain of pain” from digital photography. And yet…
“Unable to upgrade this photo library.”
There may be locked files somewhere inside your iPhoto library. If something is locked, iPhoto can’t very well convert it to the latest format.
Trouble is, there can be hundreds of thousands of files in an iPhoto library. How are you supposed to find the one file that’s somehow gotten locked?
The quickest way is to type out a Unix command. Don’t worry, it won’t bite.
Open your Applications→Utilities folder, and then double-click Terminal. The strange, graphics-free, all-text command console may look alien and weird, but you’ll witness its power in just a moment.
Type this, exactly as it appears here:
sudo chflags -R nouchg
—and add a space at the end (after “nouchg”). Don’t press Return yet.
Now switch to the Finder. Open your Pictures folder and drag your iPhoto Library icon right into the Terminal window. Now the command looks something like this:
sudo chflags -R nouchg /Users/Casey/Pictures/iPhoto Library/
Press Return to issue the command. OS X asks for your account password, to prove that you know what you’re doing. Type it, press Return, and your problem should be solved.
Warning
Using a “sudo” command in Terminal is basically telling your Mac, “Hey! I know exactly what I’m doing and I want you to do exactly what I say.” So type this command exactly as listed, and be sure to drag the correct file into the window.
iPhoto doesn’t recognize my camera.
iPhoto generally “sees” any recent camera model, as well as iPhones, iPads, and photos saved on an iPod Touch. If you don’t see the Import screen (Chapter 1) even though the camera most assuredly is connected, then try these steps in order:
Make sure the camera is turned on. Check the USB cable at both ends.
Try plugging the camera into a different USB port.
Try unplugging other USB devices. Some devices hog all available USB power, leaving none for your camera.
Some models don’t see the computer until you switch them into a special “PC” mode, using the Mode dial. Check to see if your camera is in that category.
Try turning on the camera after connecting its USB cable to the Mac.
Turn the camera off, then on again, while it’s plugged in.
If iPhoto absolutely won’t notice its digital companion, then use a memory-card reader, as described on USB Card Readers, or the SD card slot built into your Mac.
iPhoto crashes when I try to import.
This problem is most likely to crop up when you’re bringing pictures in from your hard drive or another disk. Here are the possibilities:
The culprit is usually a single corrupted file. Try a test: Import only half the photos in the batch. If nothing bad happens, then split the remaining photos in half again and import them. Keep going until you’ve isolated the offending file.
Consider the graphics program you’re using to save the files. It’s conceivable that its version of JPEG or TIFF doesn’t jibe perfectly with iPhoto’s. (This scenario is most likely to occur right after you’ve upgraded either your graphics program or iPhoto itself.)
To test this possibility, open a handful of images in a different editing program, save them, and then try the import again. If they work, then you might have a temporary compatibility problem. Check the editing program’s website for updates and troubleshooting info.
Some JPEGs that were originally saved in OS 9 won’t import into the newer versions of iPhoto. Try opening and resaving these images in a native OS X editor like Pixelmator (www.pixelmator.com) or Adobe Photoshop Elements (www.adobe.com). Speaking of Elements, it has an excellent batch-processing tool that can automatically process mountains of images while you go grab some lunch (it’s called the Image Processor).
Finally, a reminder, just in case you think iPhoto is acting up: iPhoto imports raw files—but not from all camera models—and it displays (and thus edits) a JPEG version of it. For details, see Editing Raw Files.
iPhoto crashes when I try to empty the Trash.
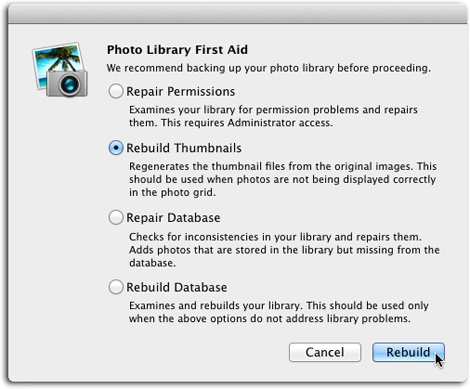
Open iPhoto while pressing both the ⌘ and Option keys; you see the dialog box shown in Figure A-1. Choose Rebuild Thumbnails and then click Rebuild.
Printing
Printing has its share of frustrations and wasted paper, but checking a few settings can solve some common problems:
I can’t print more than one photo per page. It seems like a waste to use a whole sheet of paper for one 4 x 6 print.
Check the following:
My picture doesn’t fit right on 4 x 6-, 5 x 7-, or 8 x 10-inch paper.
Most digital cameras produce photos in a 4:3 width-to-height ratio. Unfortunately, those dimensions don’t fit neatly into any of the standard print sizes.
The solution: Crop the photos first, using the appropriate print size in the Constrain pop-up menu (see Cropping).
Editing and Sharing
There’s not much that can go wrong here, but when it does, it really goes wrong.
iPhoto crashes when I double-click a thumbnail to edit it.
You probably changed a photo file’s name in the Finder—in the iPhoto Library package, behind the program’s back. iPhoto hates this! Only grief can follow.
Sometimes, too, a corrupted picture file makes iPhoto crash when you try to edit it. To locate the scrambled file in the Finder, Control-click its thumbnail and, in the shortcut menu, choose Show Original File. Open the file in another graphics program, use that program’s File→Save As command to replace the corrupted file, and then try again in iPhoto.
iPhoto won’t let me use an external graphics program when I double-click a thumbnail.
Choose iPhoto→Preferences→Advanced. Check the Edit Photos pop-up menu to make sure that the external program’s name is selected. (If not, choose “In application,” and then pick the program you want to use.) If you want to make Photoshop Elements your external editor, be sure to direct iPhoto to the program’s actual application icon and not the icon’s alias, which has a tiny curved arrow atop its icon.
Also make sure that your external editing program still exists. You might have upgraded to a newer version of that program, one whose filename is slightly different from the version you originally specified in iPhoto.
Faces really stinks at identifying the people in my pictures!
To make Faces more skilled at matching up names to the folks in your photos, you need to help it along by training it. If Faces hasn’t identified someone you know is in your library, then open the photo(s) with the poor nameless soul, click Info in the toolbar, and then click the Faces heading to expand that section. Click “Add a face,” and then proceed as shown on Tagging Faces Manually. Manually naming the face, however, doesn’t do much for iPhoto’s face-recognition algorithm—it’s your confirming results in the automatic face-recognition roundup that helps Faces learn.
So click Faces in the Source list, open that person’s snapshot on the corkboard, and then click Confirm Name in the toolbar. Scroll down to the “may also be in the photos below” list, and start confirming or rejecting the suggestions (Adding More Pictures to a Name) so Faces gets more practice at correctly identifying your buddies.
Published pictures I re-edit in iPhoto aren’t updating on my Flickr page.
Sometimes there are breakdowns in communication: between heads of state, management and labor, and even iPhoto and Flickr. Fortunately, that last one is the easiest to solve. In iPhoto, delete the misbehaving photo(s) from your Flickr album. Next, make your edits or changes to the pictures (if you haven’t already), and then publish the photos to Flickr again, as described on Posting Photos to Flickr. If you have only one picture in the Flickr album, delete the whole album from the iPhoto Source list, fix the picture in iPhoto, and then republish the photo to Flickr as a brand-new album.
Note
Flickr used to take advantage a photo’s Places tags (Editing Names), but it doesn’t anymore. Le sigh.
I’ve messed up a photo while editing it, and now it’s ruined!
Select the file’s thumbnail and then choose Photos→“Revert to Original.” iPhoto restores your photo to its original state, drawing on a backup it has secretly kept.
I can’t find a picture I saved to my Camera Roll in iPhoto for iOS.
Oddly, iPhoto for iOS’s Camera Roll album displays photos in chronological order according to the date they were captured, not the date they were edited. So to find the edited version of a picture, you may have to do a fair bit of scrolling.
My iCloud photo stream isn’t syncing.
Photo streams sync only when you’re on a WiFi connection; they can’t sync over a cellular network. You can also encounter syncing problems if the Camera app is open on your iOS device (you have to close it before pictures will upload), or you may merely have a low battery. If your iOS device has less than 50 percent juice left and it isn’t plugged into a power outlet, your photo streams stop syncing.
General Questions
Finally, here’s a handful of general—although perfectly terrifying—troubles.
iPhoto is wigging out!
If the program “unexpectedly quits,” well, that’s life. It happens. This is OS X, though, so you can generally open the program right back up again and pick up where you left off.
If the flakiness is becoming really severe, try logging out
(choose ![]() →Log Out) and logging back in again. And if the
problem persists, see the data-purging steps on General Questions.
→Log Out) and logging back in again. And if the
problem persists, see the data-purging steps on General Questions.
I can’t share my photos over a network.
That’s because you can’t do that anymore. While Apple prefers that you share photos between Macs using iCloud (Using iCloud’s Photo Stream), Chapter 8 has additional workarounds.
I can’t delete a photo!
You may be trying to delete a photo right out of a smart album. That’s a no-no.
There’s only one workaround: Find the photo in your iPhoto Library by heading to the Source list and clicking an icon in the Library or Recent section—Events, Photos, Last Import, or Last 12 Months—and then delete it from there.
I deleted a photo, but it’s back again!
You probably deleted it from an album (or book, calendar, card, or slideshow). These are all only aliases, or pointers, to the actual photo in your library. Just removing a thumbnail from an album doesn’t touch the original.
All my pictures are gone!
Somebody probably moved, renamed, or fooled with your iPhoto Library icon. That’s a bad, bad idea.
If it’s just been moved or renamed, then find it again using your Mac’s search feature (Spotlight, for example). Drag it back into your Pictures folder, if you like. In any case, the important step is to open iPhoto while pressing the Option key. When the dialog box shown on Editing and Sharing appears, show iPhoto where your library folder is now. (If that solution doesn’t work, read on.)
All my pictures are still gone! (or)
My thumbnails are all gray rectangles! (or)
I’m having some other crisis!
The still-missing-pictures syndrome and the gray-rectangle thumbnails are only two of several oddities that may strike with all the infrequency—and pain—of lightning. Maybe iPhoto is trying to import phantom photos. Maybe it’s stuck at the “Loading photos…” screen forever. Maybe the photos just don’t look right. There’s a long list of rare but mystifying glitches that can arise.
What your copy of iPhoto needs is a big thwack upside the head, also known as a major data purge.
You may not need to perform all of the following steps. But if you follow them all, at least you’ll know you did everything possible to make things right. Perform these steps in order; after each one, check to see if the problem is gone.
If you haven’t already done so, upgrade to the very latest version of iPhoto. For example, the 9.5.1 update was hot on the heels of iPhoto 9.5. Getting iPhoto explains how to update.
Rebuild the iPhoto library and fix its permissions. To do that, quit iPhoto. Then reopen it, pressing the Option and ⌘ keys as you do so.
The dialog box shown in Figure A-1 appears; it offers four different repair techniques. They are listed in order of severity and runtime, so start at the top and work your way down if the problem persists.
Once you click Rebuild, iPhoto works its way through each album and each photo, inspecting it for damage, repairing it if possible, and finally presenting you with your new, cleaned-up library. This can take a very long time, but it usually works.
Throw away the iPhoto preference file. Here we are in the age of OS X, and we’re still throwing away preference files?
Absolutely. A corrupted preference file can still bewilder the program that depends on it.
First, quit iPhoto if it’s running. In the Finder, open the Go menu and, while pressing the Option key, choose Library. In the resulting Finder window, open the Preferences folder and trash the file called com.apple.iPhoto.plist.
The next time you run iPhoto, it will build itself a brand-new preference file that, if you’re lucky, lacks whatever corruption was causing your problems.
Import the library into itself. If, after all these steps, some or all of your photos are still missing, try this radical step. Create a new, empty iPhoto library (Multiple iPhoto Libraries). Then drag the older, troubled library folder right from the Finder into the empty iPhoto window. The program imports all the graphics it finds (except the thumbnails, which you don’t want anyway).
You lose all your keywords, Event names, comments, albums, folders, books, saved slideshows, and so on. And you might wind up with duplicates (the edited and unedited versions of the pictures). But if any photos were in the old library but somehow unaccounted for, they’ll magically reappear.
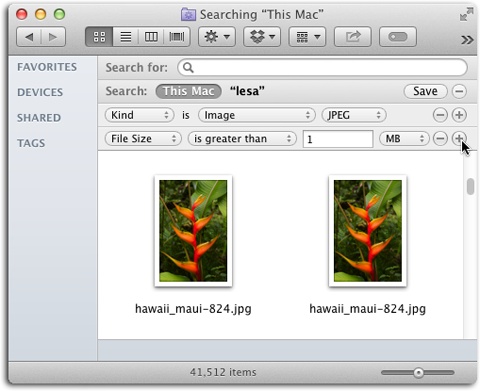
Find the pix yourself. If none of these steps restored your missing photos, all is not lost. Unless you somehow opened your Home→Pictures folder and, while sleepwalking, manually threw away your iPhoto Library folder, then your pictures are still there, somewhere, on your hard drive.
Use Spotlight or the Find command to search for them, as shown in Figure A-2.
Figure A-2. Search for file extensions JPG or JPEG (or images, to be more general) with file sizes greater than, say, 1 MB (to avoid rounding up all the little thumbnail representations; it’s the actual photos you want). The results may include thousands of photos. But in this desperate state, you may be grateful that you can either (a) click one to see where it’s hiding, or (b) select all of them, drag them into a new, empty iPhoto library, and begin the process of sorting out the mess.Recover from a Time Machine backup. If you’ve got Time Machine turned on for backups (see the box on Turn On Your Time Machine), you can use it to restore lost files. The first step is to pinpoint the missing files using Spotlight or the Find command, as described above—if you can (in the case of deleted files, the search will probably come up empty, which is fine). Next, click the Time Machine icon on the Dock, or double-click it in your Applications folder. When you do, your desktop slides down the screen like a curtain that’s been dropped from above. Front and center is your Finder window—or, rather, dozens of them, stretching back into an outer-space background. Each is a snapshot of that window at the time of a Time Machine backup. You have four ways to peruse your backup universe:
Click individual windows to see what’s in them.
Drag your cursor through the timeline on the right side of the screen. It’s like a master dial that flies through the windows into the past.
Click one of the two big, flat perspective arrows. The one pointing into the past means “Jump directly to the most recent window version that’s different from the way it is right now.” In other words, it’s often a waste of time to go flipping through the windows one at a time, because your missing file might have been missing for the last several backups. What you want to know is the last time the contents of a particular window changed. And that’s what the big flat arrows do. They jump from one changed version of this window to another. (Or, if you began with a search, the arrow takes you to the most recent backup with a matching result.)
Use the search box in the corner of the window. You can search for whatever you’re missing in the current backup.
Once you find the file you want to restore (say, your iPhoto Library file), select it and then click Restore in the lower right. The OS X desktop rises again from the bottom of the screen, there’s a moment of copying, and then presto!—the lost file is back in the window where it belonged. (If you recover a different version of a file that’s still around, OS X asks if you want to replace it with the recovered version or keep both versions.)**#pg422**