
In This Chapter
Locating items by artist, album, or playlist
Repeating and shuffling a song list
Creating and saving On-The-Go and Genius playlists
Changing the volume level and volume limit
Even though the iPod and iTunes have irrevocably changed the entertainment industry and how you enjoy music, one thing remains the same: You still play songs. You just play them with more panache on your iPod touch.
You can pick any song that you want to hear at any time. You can also shuffle through songs to get an idea of how wide your music choices are or to surprise yourself or others. Browse by artist and album, select a playlist, and even create playlists on-the-fly — this chapter explains it all.
With so many songs on your iPod touch, finding a particular song by its title may take longer than finding it another way — like finding a needle in a haystack or even trying to find "Needle in a Haystack" by The Velvelettes. It may be faster to locate albums by cover art or to find songs by searching for artist (or composer), genre, album, or playlist. You can browse your music any number of ways without interrupting the music you're playing.
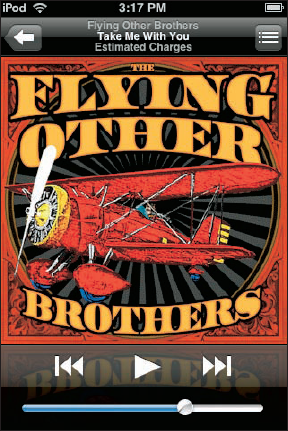
Cover Flow (also called the cover browser) lets you flip through your cover art to select music alphabetically by artist. Choose Music from the Home screen and then turn the iPod touch quickly to view it horizontally. This movement changes the display to landscape mode and displays the cover browser, as shown in Figure 7-1.
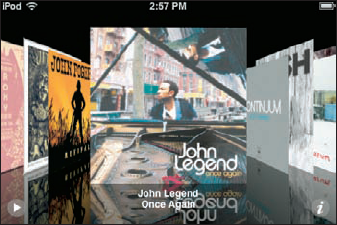
Slide your finger across the album covers to scroll swiftly through the music library, or tap to the right or left of the cover art in the foreground to move forward or backward an album cover at a time. Tap the Play button in the lower-left corner (shown in Figure 7-1) to start playing the first song in the foreground album; the Play button turns to a Pause button so that you can tap it again to stop playback. Tap the i button in the lower-right corner (or tap the foreground cover art) to list the songs in that album. Then you can tap a song to start playing it.
You can quickly and easily locate a song by looking up either the song's artist or its album. To browse music by artist, tap the Music icon on the Home screen and tap the Artists icon along the bottom row of the Music screen. A scrollable list of artists appears, with an alphabet listed vertically along the right side, as shown in Figure 7-2 flick your finger down to see the very top, which shows the search field.
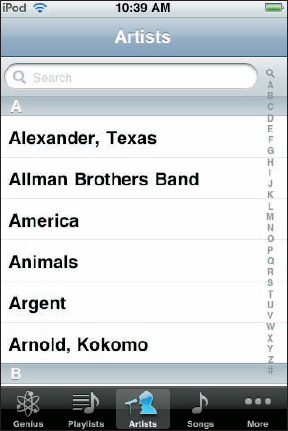
Tap any letter in the alphabet shown on the right to scroll the list directly to that letter. Tap an artist name to see a list of albums or songs by that artist. (You see multiple albums if more than one album is available — tap the album name to select the album.) Tap a song title to start playing the song. To search, tap inside the search field in the top and start typing on the onscreen keyboard that appears. Suggestions appear below matching what you type — tap a suggestion to go to it.
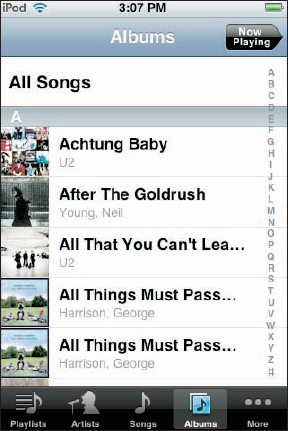
To browse music by album title, tap the More icon in the bottom row of icons to show a list of options, and then tap Albums. Albums appear in a scrollable list with the album cover on the left side and an alphabet listed vertically along the right side, as shown in Figure 7-3 — flick your finger down to see the very top, which shows the search field. Slide your finger up and down the alphabet to scroll quickly, or tap any letter in the alphabet to scroll the list directly to that letter. Tap an album title or its cover art to see a list of songs in the album. Tap a song title to start playing the song.
When you synchronize your iPod touch with your entire iTunes library, your iTunes playlists are included. Well, that makes sense, doesn't it? To browse music by playlist on your iPod touch, tap the Music icon on the Home screen and tap the Playlists icon along the bottom row of the Music screen. A scrollable list of playlists appears. Tap a playlist title to see a list of songs in the playlist and tap a song title to start playing the song. The songs in the playlist are in the order defined for the playlist in iTunes. But don't despair for lack of something new — you can create playlists in your iPod touch, as I describe later in this chapter.
To locate songs by title, tap the Music icon on the Home screen and tap the Songs icon along the bottom row of the Music screen. A scrollable list of songs appears with an alphabet listed vertically along the right side — if you flick your finger down to see the very top, you see the search field. Slide your finger up and down the alphabet to scroll quickly, or tap any letter in the alphabet to scroll the list directly to that letter. To search, tap inside the search field in the top and start typing in the onscreen keyboard that appears. Suggestions appear below matching what you type — tap a suggestion or tap a song title to start playing the song. You can also find music by composer or genre by tapping the More icon along the bottom row of the Music screen.
To play a song, tap the song title (or the Play button in Cover Flow).
When the song finishes, the iPod touch plays the next song in the sequence that appeared in the Playlists, Artists, Songs, or Albums screen you chose it from. For example, if you chose a song in the Songs screen, the next song would be the next one in sequence in the Songs screen. If you chose the last song on an album in the Albums screen, the iPod touch stops after playing it. If you chose a song from a playlist on the Playlists screen, the next song would be the next one in the playlist, and after playing the last song it also stops playing, as with an album. (See the "Repeating songs" section later in this chapter to find out how to repeat albums and playlists.)
Whenever you play a song, you see the album cover associated with the song on the Now Playing screen. You also see the buttons for playback control — Previous/Rewind, Play/Pause, and Next/Fast-Forward. (See Figure 7-4.) Slide your finger along the volume slider at the bottom of the display to change the volume.
Tap the Next/Fast-Forward button once to play the next song in sequence, and tap the Previous/Rewind button once at the beginning of a song, or twice during the song, to play the previous song. You can fast-forward through a song by touching and holding down on the Next/Fast-Forward button, and you can rewind a song by touching and holding down on the Previous/Rewind button.
You can tap the bullet-list button in the upper-right corner if you want to display a list of the album's contents. You can then tap the title of another song on the album to start playing that song.
Tip
To return to menus and make other selections when playing a song, tap the left-arrow button in the upper-left corner of the display.
Tap underneath the left-arrow button or the album title while a song is playing to show more buttons and the scrubber bar for navigating through the song, as shown in Figure 7-5 — and if lyrics are available in the iTunes information, lyrics also appear.
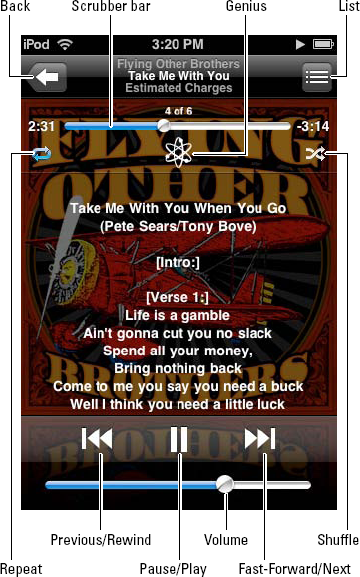
To skip to any point in a song, drag the playhead along the scrubber bar. To start a song over from the beginning, drag the playhead on the scrubber bar all the way to the left, or tap the Previous/Rewind button once.
Tip
If you're viewing another content menu on the iPod touch, tap Now Playing at the top-right corner of the display to go directly to the Now Playing display.
If you want to drive yourself crazy repeating the same song over and over, your iPod touch is happy to oblige. (You might want to try repeating "They're Coming to Take Me Away, Ha-Haaa" by Napoleon XIV, a favorite from the old The Dr. Demento Show radio broadcasts — and perhaps they will come to take you away.) More than likely, you'll want to repeat a playlist or album, which you can easily do.
Tap underneath the left-arrow button or the album title while a song is playing. The Repeat and Shuffle buttons appear, along with the scrubber bar and lyrics, directly below the top row of buttons. (Refer to Figure 7-5.)
Ordinarily when a song finishes, the iPod touch plays the next song in the sequence that appeared in the Playlists, Artists, Songs, or Albums screen you chose it from. When it reaches the end of that list, it stops — if you chose the last song on an album in the Albums screen, the iPod touch stops after playing it. But if you tap the Repeat button once while the songs are playing, the entire sequence repeats. If you chose an album, the album repeats; if you chose a playlist, the playlist repeats.
After you tap Repeat once to repeat the sequence of songs, the Repeat button shows blue highlighting. Tap the Repeat button again to repeat only the current song — the button changes to include a blue-highlighted numeral 1. Tap it once more to return to normal playback.
Maybe you want your song selections to be surprising and unpredictable, and you want your iPod touch to read your mind. You can shuffle song playback to play in random order, just like an automated radio station without a disk jockey or program guide.
You can just shake your iPod touch, and it shuffles the songs in the album you are playing. By default, your iPod touch is set to shuffle when shaken (not stirred). Choose Settings
You can also set your iPod touch to shuffle songs across your library. The shuffle algorithm is as random as it gets (not taking into account a fundamental tenet of chaos theory that says a pattern will emerge). When an iPod touch creates a shuffle, it reorders the songs (like shuffling a deck of cards) and then plays them in the new order.
To turn your iPod touch into a random song player, choose Music from the Home screen and tap the Songs icon at the bottom of the display. The song list appears, with Shuffle at the top of the list. Tap Shuffle to turn on Shuffle.
You can also shuffle songs within an album or playlist, which gives you some control over random playback. For example, you can create a playlist for all jazz songs and then shuffle the songs within that jazz playlist. To shuffle songs in an album or playlist, start playing a song in the album or playlist and then tap underneath the left-arrow button or the album title while a song is playing. The Repeat and Shuffle buttons appear, along with the scrubber bar, directly below the top row of buttons (refer to Figure 7-5). Tap the Shuffle button to shuffle songs within the currently playing album or playlist.
Tip
You can also set an iPod touch to shuffle any album or playlist before playing it. First, select the playlist or album; then tap Shuffle at the top of the list of songs for that playlist or album.
Tip
Want to repeat an entire album or playlist but still shuffle the playing order each time you hear it? Start playing a song in the album or playlist and then set your iPod touch to repeat all the songs in the album or playlist as described in the preceding section, "Repeating songs." Then set the iPod touch to shuffle the songs as described in this section.
If you don't like the playlists copied over from your iTunes library, go out and make some of your own!
You can create a temporary, On-The-Go playlist, queuing the songs in the order you want, right on your iPod touch. The selections appear automatically in a playlist appropriately called On-The-Go, in the Playlists menu. This option is particularly useful for picking songs to play right before driving a car. (Hel-lo! You shouldn't be messing with your iPod touch while driving.)
Your iPod touch can also be a genius about picking songs. If you don't want to go through the process of selecting songs, just select one song and click the Genius button. Your iPod touch takes a look at whatever song you select, and it creates a playlist of songs already on the iPod touch that go along with it.
Follow these steps to select songs for your On-The-Go playlist:
Choose Music from the Home screen.
The Music screen appears with the Playlists and other icons along the bottom of the display.
Tap the Playlists icon and choose On-The-Go from the Playlists list.
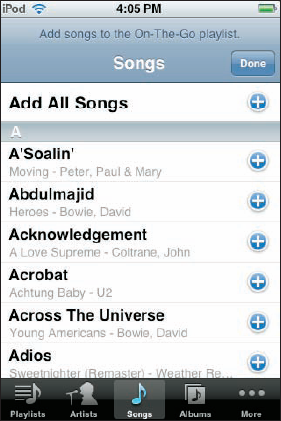
The Songs list appears with a plus (+) sign next to each song, as well as an Add All Songs option at the top, as shown in Figure 7-6. If you have only several dozen albums, this list isn't too long, and you can skip to Step 4. If you have a lot more music, narrow your search with Step 3.
(Optional) Tap Playlists, Artists, Songs, or More to narrow your search for songs to add to the On-The-Go playlist.
Tap an icon along the bottom row (see Figure 7-6) to browse your iPod touch library — tap Playlists to select songs from playlists or entire playlists; tap Artists to browse artists to select songs; or tap More to select songs from albums or compilations, to browse by genre, or to select audio books or podcast episodes.
Tap the plus (+) sign next to a song you want to add to the On-The-Go playlist, or tap the plus sign next to Add All Albums to add all the albums of an artist found in Step 3.
As you tap the plus sign for a song, that song is included in the On-The-Go playlist, and it turns gray in the list so that you know it has already been selected. You can tap Add All Albums as an alternative if you want to add all the songs for a particular artist — first browse for that artist in Step 3.
Repeat Steps 3 and 4, adding songs in the order you want them played.
You can continue to add songs to the list. Your iPod touch keeps track of the On-The-Go playlist until you clear it (as I describe a bit later in this section) or synchronize your iPod touch, as I describe in Chapter 5.
Tap the Done button when you're finished adding songs.
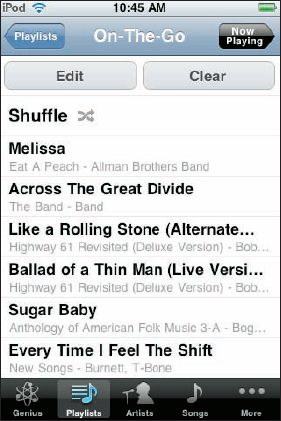
The Done button appears in the upper-right corner while you select songs, just waiting for you to finish. After touching Done, you return to the list of songs in the On-The-Go playlist, as shown in Figure 7-7.
To start playing the On-The-Go playlist, tap any song.
Scroll up or down the list (see Figure 7-7) to choose a song, and tap the song title to play the playlist starting from that song. You can tap Shuffle to shuffle the songs in the playlist.
Tip
The songs in the playlist are in playlist order (the order you added them). You can change that order by tapping the Edit button (see Figure 7-7), which displays the Edit screen with a Move icon (three horizontal bars, like half of an I-Ching symbol) on the far right side of each song. Drag the Move icon for a song to move it up or down the list. Then tap the Done button at the top of the Edit screen.
Tip
You can also add entire playlists, entire albums, or everything by an artist to the On-The-Go playlist. In Step 4, tap the Playlists, Artists, or More icon followed by the Albums selection to show one of those menus, and then select a playlist, album, or artist. Finally, tap All Songs at the top of the list of song selections.
After creating the On-The-Go playlist, it remains defined in your iPod touch until you clear it. It turns out that when you synchronize your iPod touch with your iTunes library, doing so copies the On-The-Go playlist to your iTunes library so that you don't lose it. (You can rename it there.) That means you no longer need that particular On-The-Go playlist on your iPod touch, and it's automatically cleared so that you can start creating a new one.
You can also clear the On-The-Go playlist completely in one step: Just tap the Clear button. (See Figure 7-7.) To remove just one or a few songs from the On-The-Go playlist, repeat Steps 1 and 2 earlier in this section and then follow these steps:
Tap the Edit button (see Figure 7-7).
The Edit screen appears with circled minus (–) signs appear in front of each song title.
Scroll the list to find the item you want to delete.
Tap the minus (–) sign next to the song to remove it; then tap the Delete button.
The red Delete button appears after you touch the circled minus sign.
Repeat Steps 2 and 3 to find and remove each item from the playlist.
When you remove songs, they disappear from the On-The-Go playlist one by one. The songs themselves are not deleted and are still in your iPod touch.
Tap Done at the top of the Edit screen to finish editing the list.
The Genius button and its sidekick, the Genius sidebar in iTunes, work with the iTunes Store to match up your tastes to other iTunes users using a technique called collaborative filtering. The Genius working behind the scenes in the store analyzes the music and video in other people's iTunes libraries — people who also have the same song or video you selected (if they also turn on the Genius feature in iTunes). The Genius sidebar appears next to the List pane in iTunes, and it informs the online store about the items you select whenever it's open. It then shows you music and video that other listeners purchased when they purchased the items you're playing. All of this information is shared anonymously.
For the Genius feature to work in your iPod touch, you must first give iTunes permission to scan your music library and catalog your iTunes collection, and then you need to sync your iPod touch (as I describe in Chapter 5). The scanning process may take a few minutes or (for very large collections) a few hours, but you can continue using iTunes while it scans your music. To do this, open the sidebar by clicking the Show/Hide Genius Sidebar button in the lower-right corner of the iTunes window. (Refer to Chapter 4). Then click the Turn on Genius button in the sidebar, enter your Apple ID and password for your iTunes Store account, and click Continue.
If you don't have an iTunes Store account yet, select the Create a New iTunes Store Account option and see Chapter 4 for further instructions on creating an account.
Tip
After you have enabled the Genius sidebar, you can turn off the Genius feature in iTunes by choosing Store
Tip
When you have the Genius sidebar open, iTunes transmits information to the store about the selection you're playing. To hide the Genius sidebar (and stop transmitting this information), click the Show/Hide Genius sidebar button in the bottom-right corner of the iTunes window.
In your iPod touch, the Genius feature recognizes the song or video you selected, but you must have enough songs or videos on your iPod touch that match the Genius collaborative filtering technique (such as songs purchased by other people who also played the song you are playing).
To create a Genius playlist on your iPod touch, choose Music from the Home screen and follow these steps:
Locate and start playing a song to base the Genius playlist on.
The Now Playing screen appears when the song is playing.
Tap the Now Playing screen to see the control buttons.
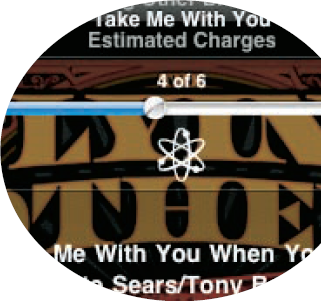
Tap underneath the left-arrow button or the album title while a song is playing. The Repeat, Genius, and Shuffle buttons appear underneath the scrubber bar directly below the top row of buttons. (Refer to Figure 7-5.) The Genius button is the one in the center sporting the atom icon.
Tap the Genius button.
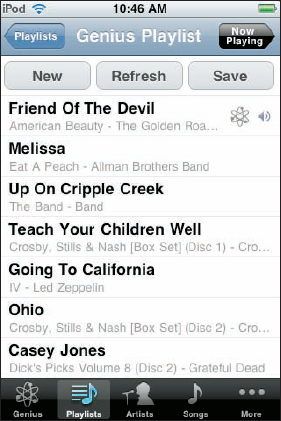
The Genius playlist appears as shown in Figure 7-8, with New, Refresh, and Save buttons at the top. You can flick your finger to scroll the list. The Genius playlist can be as long as 25 songs. Tap any song to start playing the playlist from that song.
(Optional) Refresh the Genius playlist by tapping Refresh.
Refreshing a playlist changes it to include different songs based on the same song you played (depending on how many similar songs you have in your iPod touch).
Save the Genius playlist by tapping Save.
The playlist is saved in the Playlists section of your iPod touch using the title of the song it is based on. The playlist is copied back to your iTunes library when you sync your iPod touch. That's all you need to do — the next steps are optional.
Warning
If you subsequently refresh a saved Genius playlist before syncing, the saved playlist is refreshed and you lose the previous version of it.
(Optional) Create a new Genius playlist by tapping New and then selecting a new song to base it on.
After touching New, the song list appears for selecting a song. Choose a song, and your iPod touch creates a new Genius playlist and starts playing the song, displaying the Now Playing screen.
(Optional) After Step 6, return to the Genius playlist by tapping the left-arrow button in the top-left corner of the Now Playing screen.
You can refresh any Genius playlist, whether you created it in iTunes and synced to your iPod touch or you created it directly on your iPod touch. Select the playlist and tap Refresh at the top of the list (or tap Delete to delete the list).
Tip
Genius Mixes are generated by iTunes from songs in your library that go great together — simply select Genius Mixes in the Genius section of the Source pane. Genius Mixes are synced automatically if you sync everything to your iPod touch, or you can sync specific Genius Mixes as playlists as I describe in Chapter 5. To play your Genius Mixes on your iPod touch, choose Music from the Home screen and tap the Genius icon in the lower-left corner. Flick left or right to browse the Genius Mixes. The dots at the bottom of the Genius Mixes screen indicate how many Genius Mixes are synced. To start playing a Genius Mix, tap the Play arrow in the middle of the screen for a Genius Mix.
In search of the lost chord
If you don't like the music, go out and make some yourself! You can look for the chord the guitar player is playing in a song, and you can try to play it yourself with PocketGuitar (available in the App Store), an app that turns your iPod touch into a virtual guitar. You can press and strum strings with your fingers on the iPod touch screen.
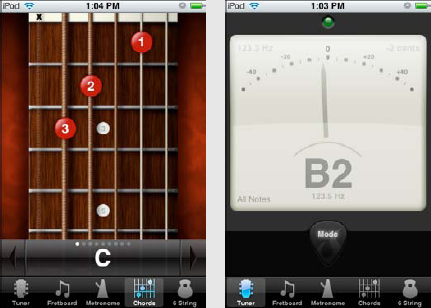
For anyone who plays guitar or wants to play one, you can't beat the value of GuitarToolkit, an iPod touch app (available in the App Store) that provides a chromatic tuner, a chord finder, a metronome, and pitch reference tones.
The tuner itself (see figure with the meter) is worth the price ($9.99 as of this writing) and is far more convenient than carrying a separate tuner. The chord finder lets you quickly cycle through chords and see the fingering for each chord.
Slide your fingers across the iPod touch screen to strum the chord. The scales feature offers a playable fretboard (see figure with the guitar fretboard) to hear what each note sounds like, and the metronome lets you dial in an exact count in beats per minute (BPM) or tap along to a song to get the tempo.
Warning
Because an iPod touch can be quite loud when set to its highest volume, I recommend turning down the volume before using headphones.
To adjust volume, follow these steps:
Play something on the iPod touch.
While the content is playing, tap the lower portion of the display and slide your finger on the volume slider.
After tapping the lower portion of the display while playing something, the volume slider with a silver knob appears on the iPod touch screen at the bottom of the display underneath the playback controls. (Refer to Figure 7-4.) Use your finger to slide the knob to the right to increase the volume or to the left to decrease the volume.
You can also limit the highest volume for your iPod touch to be lower than the actual maximum. This limit can help protect your hearing while you're listening to content from sources with different volume levels. Follow these steps:
Choose Settings

Choose Volume Limit from the Music settings screen.
A volume slider appears with a silver knob.
Slide your finger on the volume slider to limit the volume.
Slide the knob with your finger to the right to increase the volume or to the left to decrease the volume.
Tap the Music button in the upper-left corner of the display to set the limit and return to the previous menu, or, if you want, tap the Lock Volume Limit button to lock the volume limit.
If you accept the new limit without locking it, you get to skip the next step; you're done. The lock is useful for locking the volume limit so others can't change it (such as your children). However, it also means that you have to enter the volume limit code to unlock the iPod touch in order to change the volume limit.
Set the Volume Limit Code for locking the volume limit.
If you tapped the Lock Volume Limit button to lock the volume limit, your iPod touch displays four squares for entering a code number. Tap the calculator-style number pad to type numbers for your code and be sure to make up a code that you can remember! (If you don't want to enter a code, tap the Cancel button in the upper-left corner.)
Maybe you want more bone-rattling bass or treble highs that are as clear as a bell. The equalizer allows you to fine-tune sound spectrum frequencies in a more precise way than with the typical bass and treble controls you find on home stereos and powered speakers.
Or maybe some of your songs are just too loud. I don't mean too loud stylistically, as in thrash metal with screeching guitars; I mean too loud for your ears when you're wearing headphones or so loud that the music sounds distorted in your speakers. And some songs are just too soft; you have to increase the volume to hear them and then lower the volume to listen to louder songs. To remedy instances like these, you can set the volume in advance in iTunes.
With songs, audio books, podcast episodes, and videos that you already know are too loud (or too soft), consider setting the volume for those items in advance so that they always play with the desired volume adjustment. You can even set the volume for entire albums or podcasts.
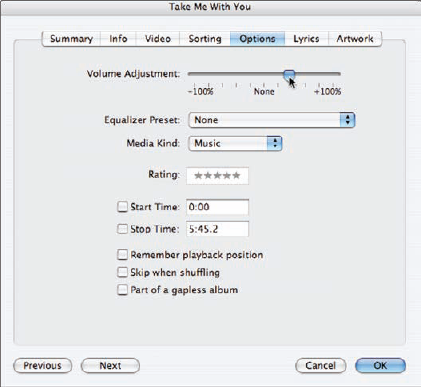
To adjust the overall volume of a particular item in advance so that it always plays at that setting, perform the following steps in iTunes:
Select one or more items in your iTunes library.
Tip
To set the volume in iTunes for multiple songs, you can select an entire album in Browse view or you can select all the songs. To set the volume for a whole podcast, select it instead of individual episodes.
Choose File
The information dialog appears.
Click the Options tab.
Drag the Volume Adjustment slider left or right to adjust the volume lower or higher, as shown in Figure 7-9
You can do this while playing the file.
You can standardize the volume level of all the songs in your iTunes library with the Sound Check option in iTunes. This option has the added benefit of applying the same volume adjustment when you play the songs back on your iPod touch.
Sound Check scans the audio files, finds each track's peak volume level, and then uses this peak volume information to level the playing volume of tracks so that they have the same peak volume (this is called normalization in audio terms). The sound quality isn't affected, nor is the audio information changed: The volume is simply adjusted at the start of the track to be in line with other tracks. If you mix early '60s music with today's much louder music, like I do, all the songs play at relatively the same volume (so I don't have to adjust the volume) without any loss in quality.
To enable Sound Check to work in your iPod touch, first follow these steps in iTunes:
Drag the iTunes volume slider to set the overall volume for iTunes.
The volume slider is located in the top-left corner of the iTunes window, to the right of the Play button.
Choose iTunes
In the iTunes Preferences dialog that appears, click the Playback tab.
The Playback preferences appear.
Select the Sound Check box.
iTunes sets the volume level for all songs according to the level of the iTunes volume slider.
Click OK.
The Sound Check option sets a volume adjustment based on the volume slider on all the songs so that they play at approximately the same volume.
The operation runs in the background while you do other things. If you quit iTunes and then restart it, the operation continues where it left off when you quit. You can switch Sound Check on or off at any time.
To take advantage of volume leveling already set up in your iTunes library, you need to turn on Sound Check in your iPod touch. Choose Settings
You can use the iPod touch's built-in equalizer to improve or enhance the sound coming through a particular stereo system and speakers. With the equalizer settings, you can customize playback for different musical genres, listening environments, or speakers.
Warning
The iPod touch equalizer uses a bit more battery power when it's on, so you might have less playing time.
Note
The quality of the sound is no better than the speakers you play it on. When you adjust the sound coming from your iPod touch, use your everyday listening environment as a guide. If you tweak the sound specifically for your computer speakers or for your home stereo and speakers, though, remember that with an iPod touch you have other potential listening environments — different headphones, car stereo systems, portable boom boxes, and so on.
To set the equalizer setting, choose Settings
Each equalizer preset offers a different balance of frequencies designed to enhance the sound in certain ways. For example, Bass Booster increases the volume of the low (bass) frequencies; Treble Booster does the same to the high (treble) frequencies.
To see what a preset actually does to the frequencies, choose Window
Note
Find out how to assign standard iTunes presets or your own custom presets to specific songs, audio books, podcast episodes, and videos — and use those presets when playing these items back on your iPod touch — by visiting the tips section of my Web site (www.tonybove.com/tonytips).