Chapter 1
macOS Monterey 101 (Prerequisites: None)
IN THIS CHAPTER
![]() Understanding what an operating system is and is not
Understanding what an operating system is and is not
![]() Turning your Mac on and off
Turning your Mac on and off
![]() Getting to know the start-up process
Getting to know the start-up process
![]() Avoiding major Mac mistakes
Avoiding major Mac mistakes
![]() Pointing, clicking, dragging, and other uses for your mouse
Pointing, clicking, dragging, and other uses for your mouse
![]() Getting help from your Mac
Getting help from your Mac
Congratulate yourself on choosing macOS Monterey version 12.0, also known as the 18th release of the venerable operating system formerly known as OS X (which was pronounced “oh-ess-ten”). Now, congratulate yourself again for making your Mac even easier to use, with hundreds of tweaks to help you do more work in less time, plus a user interface overhaul that once again affects almost every pixel on the screen.
In this chapter, I start at the very beginning and talk about macOS in mostly abstract terms; then I move on to explain what you need to know to use macOS Monterey successfully. A number of features I describe haven’t changed in years (other than adopting the updated Monterey graphic look), so if you’ve been using macOS for a while, much of the information in this chapter may seem hauntingly familiar.
But if you decide to skip this chapter because you think you have all the new stuff figured out, I assure you that you’ll miss at least a couple of things that Apple didn’t bother to tell you.
Tantalized? Let’s rock.
Gnawing to the Core of macOS
The operating system (that is, the OS part of macOS) is what makes your Mac a Mac. Without it, your Mac is nothing but a pile of silicon and circuits — no smarter than a toaster.
“So what does an operating system do?” you ask. Good question. The simple answer is that an OS controls the basic and most important functions of your computer. In the case of macOS and your Mac, the operating system
- Manages memory
- Controls how windows, icons, and menus work
- Keeps track of files
- Manages networking and security
- Does housekeeping (No kidding!)
Other forms of software, such as word processors and web browsers, rely on the OS to create and maintain the environment in which they work their magic. When you create a memo, for example, the word processor provides the tools for you to type and format the information and save it in a file. In the background, the OS is the muscle for the word processor, performing the following crucial functions:
- Providing the mechanism for drawing and moving the onscreen window in which you write the memo
- Keeping track of the file when you save it
- Helping the word processor create drop-down menus and dialogs for you to interact with
- Communicating with other programs
- And much, much more (stuff that only geeks could care about)
So, armed with a little background in operating systems, take a gander at the next section before you do anything else with your Mac.
One last thing: As I mention in this book’s Introduction (I’m repeating it here in case you normally don’t read introductions), macOS Monterey comes with nearly 60 applications in its Applications and Utilities folders. Although I’d love to tell you all about each and every one, I have only so many pages at my disposal.
A Safety Net for the Absolute Beginner (or Any User)
In the following sections, I deal with the stuff that macOS Help doesn’t cover — or doesn’t cover in nearly enough detail. If you’re a first-time Mac user, please, please read this section of the book carefully; it could save your life. Okay, okay, perhaps I’m being overly dramatic. What I mean to say is that reading this section could save your Mac or your sanity. Even if you’re an experienced Mac user, you may want to read this section. Chances are you’ll see at least a few things you’ve forgotten that will come in handy now that you’ve been reminded of them.
Turning the dang thing on
Okay. This is the big moment — turning on your Mac! Gaze at it longingly first, and say something cheesy, such as, “You’re the most awesome computer I’ve ever known.” If that doesn’t turn on your Mac (and it probably won’t), keep reading.
Apple, in its infinite wisdom, has manufactured Macs with power buttons on every conceivable surface: on the front, side, and back of the computer itself, and even on the keyboard and monitor.
So if you don’t know how to turn on your Mac, don’t feel bad; just look in the manual or booklet that came with your Mac. It’s at least one thing that the documentation always covers.
![]() You don’t have that little booklet? Most Macs have the power button in the upper-right corner of the keyboard (notebooks), the back of the screen (iMacs), or the back of the enclosure (Mac Mini); it usually looks like the little circle thingy you see in the margin.
You don’t have that little booklet? Most Macs have the power button in the upper-right corner of the keyboard (notebooks), the back of the screen (iMacs), or the back of the enclosure (Mac Mini); it usually looks like the little circle thingy you see in the margin.
Don’t bother choosing Help ⇒ macOS Help, which opens the Help Viewer program. It can’t tell you where the switch is. Although the Help program is good for finding out a lot of things, the location of the power button isn’t among them. If you haven’t found the switch and turned on the Mac, of course, you can’t access Help anyway. (D’oh!)
 Launch the Books (formerly iBooks) app and click the Book Store icon (top left) to search its built-in store for the name of your Mac plus the word Essentials (for example, “MacBook Essentials,” “iMac Essentials,” or “MacBook Pro Essentials”). Click the Only Show Free Titles check box near the upper-right corner of the Books window, and grab the free Essentials e-book with your Mac’s name, by Apple. At around 150 pages each, these booklets aren’t in any way comprehensive, but they do include information you won’t find elsewhere, including where to find the power button on your particular Mac.
What you should see on startup
When you finally do turn on your Mac, you set in motion a sophisticated and complex series of events that culminates in the loading of macOS and the appearance of the macOS desktop. After a small bit of whirring, buzzing, and flashing (meaning that the OS is loading), macOS first tests all your hardware — slots, ports, disks, random access memory (RAM), and so on. If everything passes, you’ll see a tasteful whitish Apple logo in the middle of your screen, as shown in Figure 1-1.

FIGURE 1-1: This is what you’ll see if everything is fine and dandy when you turn on your Mac.
Here are the things that you might see when you power-up your Mac:
Login screen: You might or might not see the macOS login screen. Here, you choose your user account, enter your name and password, and press Return or Enter (or click the little right-arrow-in-a-circle in the password field), and away you go.
If you don’t want to type your name and password every time you start or restart your Mac (or even if you do), check out Chapter 23 for the scoop on how to turn the login screen on or off. You should turn off the login screen only if you’re confident you’ll be the only one touching the machine. With the login screen disabled, your Mac and everything in it is completely available to anyone who turns it on, which is usually not a good thing. So I don’t recommend turning off the login screen if your Mac is a laptop. And even desktop Mac users should think twice before turning it off.
Either way, the desktop soon materializes before your eyes. If you haven’t customized, configured, or tinkered with your desktop, it should look pretty much like Figure 1-2. Now is a good time to take a moment for positive thoughts about the person who convinced you that you wanted a Mac. That person was right!
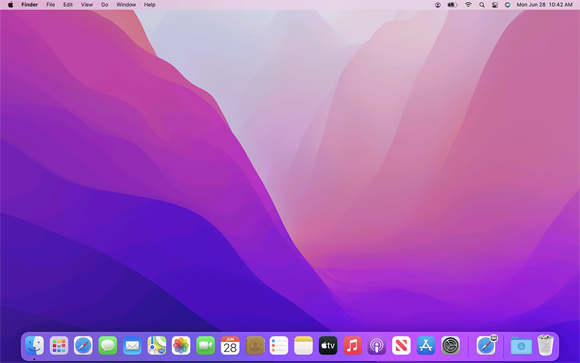
FIGURE 1-2: The desktop after a brand-spanking-new installation of macOS Monterey.
Blue/black/gray screen of death: If any of your hardware fails when it’s tested, you may see a blue, black, or gray screen.
Some older Macs played the sound of a horrible car wreck instead of the chimes, complete with crying tires and busting glass. It was exceptionally unnerving, which might be why Apple doesn’t use it anymore.
 The fact that something went wrong is no reflection on your prowess as a Mac user. Something is broken, and your Mac may need repairs. If this is happening to you right now, check out Chapter 26 to try to get your Mac well again. If your computer is under warranty, set up a Genius Bar appointment at your nearest Apple Store or dial 1-800-SOS-APPL, and a customer service person can tell you what to do. Before you do anything, though, skip ahead to Chapter 26. It’s entirely possible that one of the suggestions there will get you back on track without your having to spend even a moment on hold.
 Prohibitory sign or flashing question mark in a folder: Most users eventually encounter the prohibitory sign or flashing question mark in a folder (as shown in the margin). These icons mean that your Mac can’t find a startup disk, hard drive, network server, or DVD-ROM containing a valid Mac operating system. See Chapter 26 for ways to ease your Mac’s ills.
- Kernel panic: You may occasionally see a block of text in several languages, including English, as shown in Figure 1-3. This means that your Mac has experienced a kernel panic, the most severe type of system crash. If you restart your Mac and see either message again, look in Chapter 26 for a myriad of possible cures for all kinds of ailments, including this one.
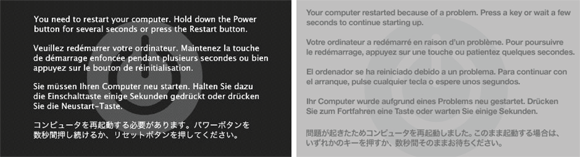
FIGURE 1-3: If you’re seeing something like this, things are definitely not fine and dandy.
How do you know which version of the macOS your computer has? Simple:
Choose About This Mac from the
 menu (the menu with the symbol in the top-left corner of the menu bar).
A window pops up on your screen, as shown in Figure 1-4. The version you’re running appears just below macOS near the top of the window. Version 12.0 is the release we know as Monterey.
 If you’re curious or just want to impress your friends, you might want to know that version 11 was Big Sur; version 10.15 was Catalina; 10.14 was Mojave; 10.13 was High Sierra; 10.12 was Sierra; 10.11 was El Capitan; 10.10 was Yosemite; 10.9 was Mavericks; 10.8 was Mountain Lion; 10.7 was Lion; 10.6 was Snow Leopard; 10.5 was Leopard; 10.4 was Tiger; 10.3 was Panther; 10.2 was Jaguar; 10.1 was Puma; and 10.0 was Cheetah.
- (Optional) Click the Overview, Displays, Storage, Support, or Resources tabs to see additional details about your Mac.
Click the System Report button to launch the System Information application and see even more details.
The System Information app shows you even more about your Mac, including bus speed, number of processors, caches, installed memory, networking, storage devices, and much more. You can find more about this useful program in Chapter 25.
FIGURE 1-4: See which version of macOS you’re running.
Shutting down properly
Turning off the power without shutting down your Mac properly is one of the worst things you can do to your poor Mac. Shutting down your Mac improperly can really screw up your hard or solid-state drive, scramble the contents of your most important files, or both.
If a thunderstorm is rumbling nearby, or you’re unfortunate enough to have rolling blackouts where you live, you may really want to shut down your Mac and unplug it from the wall. (See the next section, where I briefly discuss lightning and your Mac.) If it’s a laptop, you can just disconnect it from its charging cable and continue using it if you like.
To turn off your Mac, always use the Shut Down command from the ![]() (Apple) menu and then click the Shut Down button in the Are You Sure You Want to Shut Down Your Computer Now? dialog.
(Apple) menu and then click the Shut Down button in the Are You Sure You Want to Shut Down Your Computer Now? dialog.
When the Shut Down button (or any button, for that matter) is highlighted, you can activate it by pressing the Return or Enter key rather than clicking it.
The Are You Sure You Want to Shut Down Your Computer Now? dialog sports a check box option: Reopen Windows When Logging Back In. If you select this check box, your Mac will start back up with the same windows (and applications) that were open when you shut down (or restarted). I think that’s pretty darn sweet, but you can clear the check box and disable this option if that’s not what you want!
Most Mac users have been forced to shut down improperly more than once without anything horrible happening, of course — but don’t be lulled into a false sense of security. Break the rules one time too many (or under the wrong circumstances), and your most important files could be toast. The only time you should turn off your Mac without shutting down properly is when your screen is completely frozen or when your system crashed due to a kernel panic and you’ve already tried everything else. (See Chapter 26 for a list of those “everything elses.”) A stubborn crash doesn’t happen often — and less often under macOS than ever before — but when it does, forcing your Mac to turn off and then back on might be the only solution.
A few things you should definitely not do with your Mac
In this section, I cover the bad stuff that can happen to your computer if you do the wrong things with it. If something bad has already happened to you … . I know, I’m beginning to sound like a broken record, but see Chapter 26.
Don’t unplug your desktop Mac when it’s turned on. Very bad things can happen, such as having your OS break. See the preceding section, where I discuss shutting down your system properly.
Note that this warning doesn’t apply to laptops as long as their battery is at least partially charged. As long as there’s enough juice in the battery to power your Mac, you can connect and disconnect its power adapter to your heart’s content.
Don’t use your Mac when lightning is near. Here’s a simple life equation for you: Mac + lightning = dead Mac. ’Nuff said. Oh, and don’t place much faith in inexpensive surge protectors. A good jolt of lightning will fry the surge protector and everything plugged into it, including computers, modems, printers, and hubs. Some surge protectors can withstand some lightning strikes, but those warriors aren’t the cheapies that you buy at your local computer emporium. Unplugging your Mac from the wall during electrical storms is safer and less expensive. (Don’t forget to unplug your external routers, network hubs, printers, and other hardware that plugs into the wall as well; lightning can fry them, too.)
For laptops, disconnect the power adapter and all other cables because whatever those cables are connected to could fry — and fry your laptop right along with it. After you do that, you can use your laptop during a storm if you care to. Just make sure that it’s 100 percent wireless and cableless when you do.
Don’t jostle, bump, shake, kick, throw, dribble, or punt your Mac, especially while it’s running. Older Macs contain a hard drive that spins at 5,200 revolutions per minute (rpm) or more. A jolt to a hard drive while it’s reading or writing a file can cause the head to crash into the disk, which can render many — or all — files on it unrecoverable. Ouch!
Don’t think you’re exempt if your Mac uses a solid-state drive with no moving parts. A good bump to your Mac could damage other components. Treat your Mac like it’s a carton of eggs, and you’ll never be sorry.Don’t forget to back up your data! If the files on your hard drive mean anything to you, you must back up. Not maybe. Must. Even if your most important file is your last saved game of Bejeweled, you still need to back up your files. Fortunately, macOS includes an awesome backup utility called Time Machine. (Unfortunately, you need an external hard drive to take advantage of it.) So I beg you: Please read Chapter 24 now, and find out how to back up before something horrible happens to your valuable data!
I strongly recommend that you read Chapter 24 sooner rather than later — preferably before you do any significant work on your Mac. Dr. Mac says, “There are only two kinds of Mac users: Those who have lost data and those who will.” Which kind do you want to be?Don’t kiss your monitor while wearing stuff on your lips. For obvious reasons!
Definitely do not use household window cleaners or paper towels on your screen. Either one can harm it. Instead, use a soft clean cloth (preferably microfiber), and if you’re going to use a liquid or spray, make sure it’s specifically designed not to harm computer displays. Finally, only spray the cleaner onto a cloth; never spray anything directly onto the screen.
Point-and-click 101
Are you new to the Mac? Just figuring out how to move the mouse around? Now is a good time to go over some fundamental stuff that you need to know for just about everything you’ll be doing on the Mac. Spend a few minutes reading this section, and soon you’ll be clicking, double-clicking, pressing, and pointing all over the place. If you think you have the whole mousing thing pretty much figured out, feel free to skip this section. I’ll catch you on the other side.
Still with me? Good. Now for some basic terminology:
Point: Before you can click or press anything, you have to point to it. Place your hand on your mouse, and move it so that the cursor arrow is over the object you want — such as on top of an icon or a button.
If you’re using a trackpad, slide your finger lightly across the pad until the cursor arrow is over the object you want.
Click: Also called single click. Use your index finger to push the mouse button (or the left mouse button if your mouse has more than one) all the way down and then let go so that the button (usually) produces a satisfying clicking sound. (If you have one of the optical Apple mice, you push the whole thing down to click.) Use a single click to highlight an icon, press a button, or activate a check box or window.
In other words, first you point and then you click — point and click, in computer lingo.
If you’re using a trackpad, press down on it to click.
Double-click: Click twice in rapid succession. With a little practice, you can perfect this technique in no time. Use a double-click to open a folder or to launch a file or application.
Trackpad users: Press down on the pad two times in rapid succession.
Secondary-click: Hold down the Control key while single-clicking. (Also called Control-click or right-click.)
Trackpad users can either hold down the Control key while pressing down on the trackpad with one finger, or tap the trackpad with two fingers without holding down the Control key.
If tapping your trackpad with two fingers didn’t bring up a little menu, check your Trackpad System Preferences pane (see Chapter 6).
Control-clicking displays a contextual menu (also known as a shortcut menu). In fact, if you’re blessed with a two-or-more-button mouse (such as the Apple Magic Mouse), you can right-click and avoid having to hold down the Control key. If it doesn’t work, you can enable this feature in the Mouse System Preferences pane.)
- Drag: Dragging something usually means you have to click it first and hold down the mouse or trackpad button. Then you move the mouse on your desk or mouse pad (or your finger on the trackpad) so that the cursor and whatever you select moves across the screen. The combination of holding down the button and dragging the mouse is usually referred to as clicking and dragging.
- Wiggle (or jiggle): This welcome improvement is awesome when you lose track of the pointer on your screen. Just wiggle your mouse back and forth (or jiggle your finger back and forth on the trackpad) for a few seconds and the pointer will magically get much bigger, making it easier to see on the screen. And, of course, when you stop wiggling or jiggling, the pointer returns to its normal size.
- Choosing an item from a menu: To get to macOS menu commands, you must first open a menu and then choose the option you want. Point at the name of the menu you want with your cursor, press the mouse button, and then drag downward until you select the command you want. When the command is highlighted, finish selecting by letting go of the mouse button.
If you’re a longtime Mac user, you probably hold down the mouse button the whole time between clicking the name of the menu and selecting the command you want. You can still do it that way, but you can also click the menu name to open it, release the mouse button, point at the item you want to select, and then click again. In other words, macOS menus stay open after you click their names, even if you’re not holding down the mouse button. After you click a menu’s name to open it, you can even type the first letter (or letters) of the item to select it and then execute that item by pressing the spacebar or the Return key. Furthermore, menus remain open until you click something else.
Go ahead and give it a try … I’ll wait.
The terms given in the preceding list apply to all Mac laptop, desktop, and pro systems. If you use a trackpad with your Mac, you'll want to add a few more terms — such as tap, swipe, rotate, pinch, and spread — to your lexicon. You can read all about them in Chapters 2 and 13.
Not Just a Beatles Movie: Help and the Help Menu
One of the best features of all Macs is the excellent built-in help, and macOS Monterey doesn’t cheat you on that legacy: This system has online help in abundance. When you have a question about how to do something, Help Center is the first place you should visit (after this book, of course).
Clicking the Help menu reveals the Search field at the top of the menu and the macOS Help item. Choosing macOS Help opens the window shown in Figure 1-5.
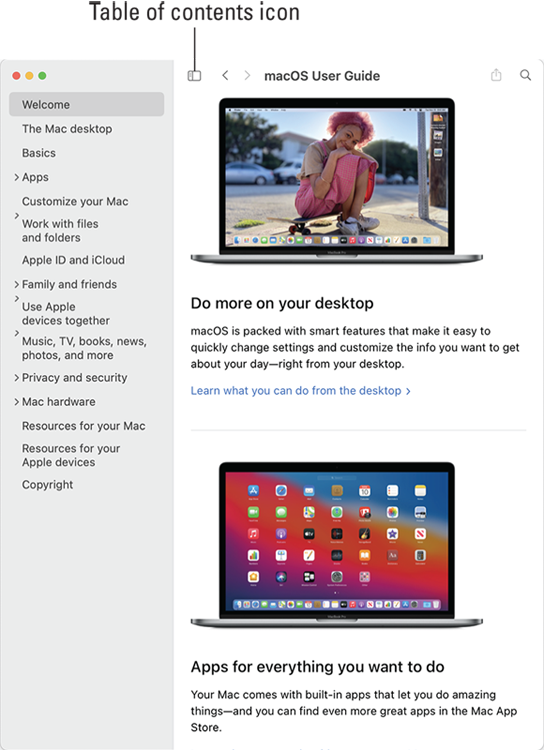
FIGURE 1-5: Mac Help is nothing if not helpful.
Although the keyboard shortcut for Help no longer appears on the Help menu, the same shortcut as always, Shift+⌘ +?, still opens Help.
You can browse Help by clicking a topic in the table of contents and then clicking a subtopic. If you don’t see the table of contents, click the Table of contents icon, labeled in Figure 1-5.
To search Mac Help, simply type a word or phrase in either Search field — the one in the Help menu itself or the one near the top of the Help window on the right side — and then press Return. In a few seconds, your Mac provides one or more articles to read, which (theoretically) are related to your question. As long as your Mac is connected to the internet, search results include articles from the Apple online support database.
Although you don’t have to be connected to the internet to use Mac Help, you do need an internet connection to get the most out of it. (Chapter 15 can help you set up an internet connection, if you don’t have one.) That’s because macOS installs only certain help articles on your hard drive. If you ask a question that those articles don’t answer, Mac Help connects to the Apple website and downloads the answer (assuming that you have an active internet connection). These answers appear when you click Show All near the bottom of some article lists. Click one of these entries, and Help Viewer retrieves the text over the internet. This is sometimes inconvenient but also quite smart, because Apple can update the Help system at any time without requiring any action from you.
Furthermore, after you ask a question and Mac Help has grabbed the answer from the Apple website, the answer remains on your hard drive forever. If you ask for it again — even at a later date — your computer won’t have to download it from the Apple website again.
If you see a See More Results on the Web link, you can click it to launch Safari and perform a web search for the phrase you typed.
macOS also has a cool feature I like to call automatic visual help cues. Here’s how they work:
- In the Help menu’s Search field, type a word or phrase.
Select any item that has a menu icon to its left (such as the items with Trash in their names in Figure 1-6).
The automatic visual cue — an arrow — appears, pointing at that command in the appropriate menu.
Finally, don’t forget that most apps have their own Help systems, so if you want general help with your Mac, you need to first click the Finder icon in the dock, click the desktop, or use the app-switching shortcut ⌘ +Tab to activate Finder. Only then can you choose Mac Help from Finder’s Help menu.
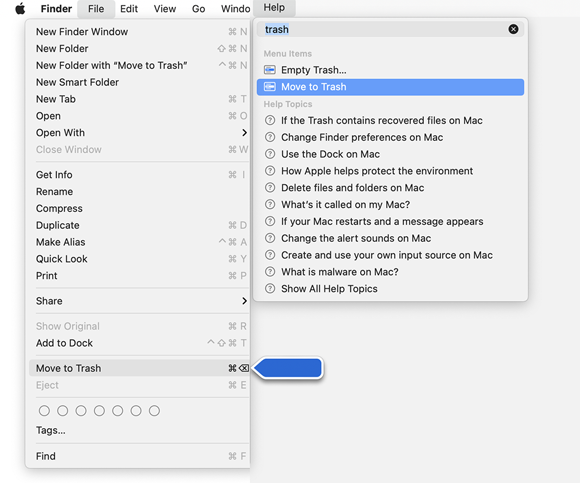
FIGURE 1-6: If you choose an item with a menu icon, an arrow points to that item in context.