
Chapter 12
Apps Born in iOS
IN THIS CHAPTER
![]() Taking stock of securities with Stocks
Taking stock of securities with Stocks
![]() Staying current with News
Staying current with News
![]() Making voice memos with Voice Memos
Making voice memos with Voice Memos
![]() Automate repetitive tasks with the Shortcuts app
Automate repetitive tasks with the Shortcuts app
![]() Smartening your home with the Home app
Smartening your home with the Home app
This chapter covers five apps that have been around on the iPhone and iPad for many years but made their debut on the Mac more recently. They should be familiar to anyone who uses an iPhone or iPad:
- Stocks lets you monitor information about specific stocks and the market in general.
- News gathers stories from myriad publications in one convenient place.
- Voice Memos lets you record (what else?) memos with your voice.
- Shortcuts lets you automate repetitive tasks.
- Home lets you control your HomeKit-enabled smart devices such as lights, thermostats, and locks.
None of the five is earth-shattering as a Mac app, but all can be useful if you need what they provide. More Mac apps that started as iPhone and iPad apps are coming up in Chapters 17 and 18. For now, just dive right in with Stocks.
Taking Stock of the Market with Stocks
If you’re familiar with the Stocks app from your iPhone and iPad, you’re in for a treat, because the Ventura version of the Stocks app makes it easy to view stock quotes, interactive charts, and top business news (from Apple News, which is covered in an upcoming section).
When you launch Stocks for the first time, it’s populated with a default set of quotes and indexes that Apple thinks you might appreciate, as shown in Figure 12-1. Note that if you have an Apple ID and have already selected securities in the Stocks app, your selections will appear instead.
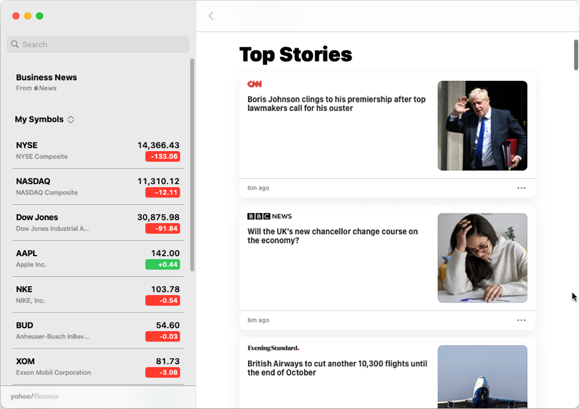
FIGURE 12-1: The Stocks app comes stocked with a handful of securities and indexes chosen by Apple.
The default stocks, funds, and indexes are listed in the sidebar on the left; news items appear in the pane on the right. Figure 12-1 shows only a handful of stocks and news items; scroll down either pane to see more.
When you open the Stocks app, it displays the latest price for the listed stocks, with two provisos:
- The quotes are provided in near real time.
- The quotes are updated only if your Mac can connect to the Internet.
Your stocks also appear by default in Notification Center. If you don’t see stocks in yours, click the Edit Widgets button at the bottom of Notification Center to add the Stocks app. (See Chapter 10 if you don’t know how to add widgets.)
Adding and removing stocks, funds, and indexes
Your chance of owning the exact group of stocks, funds, and indexes displayed by default is slim, so this section shows you how to add your own stocks, funds, or indexes and delete any or all default ones.
Here’s how to add a stock, a fund, or an index:
In the Search field in the top-left corner of the Stocks window, type the name of a stock, fund, or index you want to add.
As you type, the list updates with companies, indexes, and funds that match what you’ve typed so far, with items already in your watchlist appearing in a separate section.
- Do one of the following:
- Click the Add to Watchlist icon, the little + sign in a circle to the left of the item’s name.
- Control-click or right-click the stock, fund, or index you want to add, and choose Add to Watchlist from the contextual menu.
- When you finish adding stocks, funds, and indexes, click the Delete (X) button to the right of the Search field to clear the search results and return to your watchlist.
To remove a stock, fund, or index, select it, press Delete, and then click Remove in the confirmation dialog that opens. Alternatively, Control-click or right-click the item and choose Remove from Watchlist from the contextual menu. Or even click the item and then click the Remove from Watchlist icon, the check-mark icon in the top-right corner of the Stocks window.
That’s all there is to adding and removing stocks.
 To change the order of the items on your watchlist, click an item, hold down the mouse button, and drag the item up or down to its new place in the list.
Details, details, details
To see the details for an item, click it; the right side of the window offers additional information on the item. The interactive chart described in the next section appears at the top of the pane. Scroll down for additional news; click See More Data from Yahoo! Finance for even more additional news.
Charting a course
When you select a stock, fund, or index, you’ll see a graph with the following numbers and letters above it: 1D, 1W, 1M, 3M, 6M, YTD, 1Y, 2Y, 5Y, 10Y, and ALL. These symbols stand for 1 day, 1 week, 1 month, 3 months, 6 months, year to date, 1 year, and 2, 5, 10, and all recorded years, respectively. These numbers and letters are labels; click one, and the chart updates to reflect that period of time.
You can do two other very cool things with charts:
- Hover your cursor over the chart to see the value for that day.
- Click and drag to see the difference in values between two days.
By default, the Stocks app displays the change in a stock’s price in dollars. You can see the change expressed as a percentage instead or as the stock’s market capitalization. Just open the View menu and choose Price Change, Percentage Change, or Market Cap, as needed.
While the View menu is open, check out its other Stocks-related commands:
- Refresh (⌘ +R)
- Hide Sidebar (⌘ +Control+S)
- Back (⌘ +[)
- Next Story (⌘ +→)
- Previous Story (⌘ +←)
- Actual Size (⌘ +Shift+0)
- Zoom In (⌘ +plus sign)
- Zoom Out (⌘ +minus sign)
- Enter Full Screen (⌘ +Control+F)
Finally, Stocks lets you open multiple windows or tabs to keep more information available on the screen.
And that’s about all you need to know to enjoy and be educated by the Stocks app.
Read All about It in News
The Apple News app gathers articles, images, and videos you might be interested in and displays them in a visually appealing fashion. Participating publishers include ESPN, The New York Times, Hearst (publisher of various newspapers), Time Inc., CNN, Condé Nast, and Bloomberg.
What are your interests?
You can customize what appears in your News app by choosing File ⇒ Discover Channels, as shown in Figure 12-2.
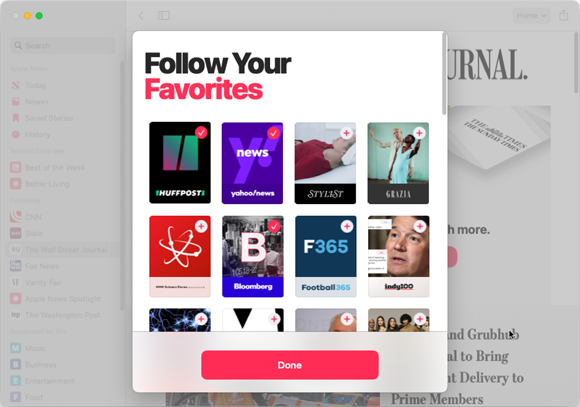
FIGURE 12-2: The Follow Your Favorites screen with HuffPost, Yahoo! News, and Bloomberg selected to follow.
When the Follow Your Favorites screen appears, click the little red plus sign for each source you want to follow in the News app. When you click, a red check mark in a circle appears to indicate that you’re following this source (such as HuffPost, Yahoo! News, and Bloomberg in Figure 12-2).
Click the item again, and the check mark turns back into a small red plus sign to indicate that you’re not following this source.
When you’ve clicked all the sources you want to follow, click Done, and they’ll appear in the Following section of your sidebar.
To remove an item from the sidebar’s Following section, do one of the following:
- Control-click or right-click the item, and choose Unfollow Channel from the contextual menu.
- Select the item, and choose File ⇒ Unfollow Channel.
- Select the item, and press ⌘ +Shift+L.
How News works
News creates a customized real-time news feed based on the sources you’re following, highlighting stories it expects you to be interested in. The more you read, the better its suggestions become, or at least that’s what Apple says.
Click a story to read it; click < (Back) at the top of the pane to return to the main News screen. Or use the handy commands and shortcuts on the View menu, including the following:
- Check for New Stories (⌘ +R)
- Next Story
- Previous Story
- Actual Size (⌘ +Shift+0)
- Zoom In (⌘ +plus sign)
- Zoom Out (⌘ +minus sign)
Managing your news
In addition to the useful commands in the View menu, the News app’s File menu offers myriad commands that help you manage your news.
To help News find stories you’ll enjoy, for example, choose File ⇒ Suggest More Stories Like This (⌘ +L) if you love the story you’re reading; choose File ⇒ Suggest Fewer Stories Like This (⌘ +D) if you don’t love it.
 The more you use these two commands, the more insightful News will be when suggesting stories of interest.
Choose File ⇒ Save Story (⌘ +S) to save the story for future reading (in the Saved Stories section near the bottom of the sidebar).
The History section in the sidebar can help you find that story you read the other day and now want to share.
Finally, check out the other commands on the File menu, which can help fine-tune what you see in News, including the following:
- Follow Channel (⌘ +Shift+L)
- Block Channel (⌘ +Shift+D)
- Manage Notifications & Email
- Manage Blocked Channels and Topics
- Manage Subscriptions
In 2019, Apple began offering a subscription news service called News+, which offers access to hundreds of newspapers and magazines for $9.99 a month. Click News+ in the sidebar for more information or to begin a free one-month trial.
You can also get access to News+ by taking out a subscription to the Apple One service, which bundles up to six services in a single subscription payment. Depending on which other Apple services you want, getting them via Apple One might cost less than getting them individually.
And that’s about all you need to know to customize and enjoy news in the News app.
Recording Memos with Voice Memos
The third addition from iOS is called Voice Memos, a simple one-trick pony of an app that lets you record, play back, and share short audio recordings. Any time you need to capture audio quickly without fuss or muss, fire up Voice Memos, and you’re in business.
Recording a voice memo
Launch Voice Memos, and you’ll see a simple window with a sidebar that sports your previous recordings (if you have them) and a big red button.
Recordings use your Mac’s built-in microphone by default. If you prefer to use a different microphone, select it in the Sound pane of the System Settings app before you begin recording.
To record a voice memo, click the big red button. To pause the recording, click the red Pause button, which becomes the Resume button, as shown at bottom left in Figure 12-3. Click Resume to continue recording, or click Done to finish and save the recording.
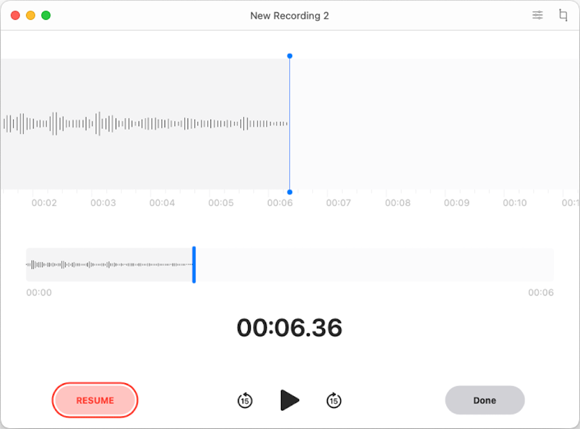
FIGURE 12-3: You can pause at any time and then click Resume or Done.
Listening to a voice memo
After you capture your thoughts or musings, you’ll probably want to play them back. To do so, just click the voice memo you want to hear and then click the triangular Play icon to listen.
You can drag the playhead (the vertical blue line in the middle of the waveform) to move forward or back in the memo.
Naming a voice memo
When a memo is added to your list of recordings, it shows up with the date and length of the recording and the uninspiring title New Recording. If you’ve allowed Voice Memos to access Location Services, Voice Memos gives each memo a name based on the location it detects for you, but these names quickly get repetitive too.
To keep your voice memos straight, rename them like this:
- Click any Voice Memo in the sidebar.
- Double-click the name Apple assigned (New Recording, New Recording 1, and so on).
- Type your own name for the voice memo, and press Return.
That’s it. Your recording is duly identified.
Trimming a voice memo
Maybe the professor you were recording rambled on and on. Fortunately, it’s easy to trim the audio. To do so, first click a recording and then choose Edit ⇒ Trim Recording to display the controls.
Now drag the start marker (<), end marker (>), or both to specify the portion of the audio you want to keep. Click the Play icon to listen to what’s left and make sure that it’s the part you need. If so, click the Trim button and then click the Save button.
If you make a mistake, choose Edit ⇒ Undo immediately to restore the audio you trimmed.
![]() You may want to share a Voice Memo with others. No problem. Just click a Voice Memo to select it and then click the share icon (shown in the margin) on the toolbar. You have the option to email the memo or send it in a message. Or you can share it instantly with Mac, iPhone, or iPad users via AirDrop (covered in Chapter 4), or add it to the Notes or Reminders app.
You may want to share a Voice Memo with others. No problem. Just click a Voice Memo to select it and then click the share icon (shown in the margin) on the toolbar. You have the option to email the memo or send it in a message. Or you can share it instantly with Mac, iPhone, or iPad users via AirDrop (covered in Chapter 4), or add it to the Notes or Reminders app.
When you have no further use for a recording, you can remove it from the Voice Memos app by selecting it in the sidebar and pressing Delete (or Backspace on a non-Apple keyboard). Alternatively, Control-click or right-click the recording in the sidebar and then choose Delete from the contextual menu.
To see all your voice memos on all your Apple devices, do one of the following:
- On your Mac: Open System Settings, click Apple ID in the sidebar, click iCloud, click the Options button on the iCloud Drive row, click the Documents tab, and enable Voice Memos in the list of apps.
- On your iPhone or iPad: Tap Settings ⇒ Apple ID (the button bearing your name) ⇒ iCloud and then set the Voice Memos switch to On.
Automating Repetitive Tasks with Shortcuts
The Shortcuts app which helps you automate repetitive tasks and trigger those automations from the menu bar, from Quick Actions, or with Siri. Shortcuts is a powerful feature that deserves an entire chapter — but not in this book and not today.
The best way to get started with shortcuts is to click the Gallery item in the sidebar. Doing so displays the Gallery (see Figure 12-4), which contains hundreds of premade shortcuts that you can use as they are or customize to suit your needs.
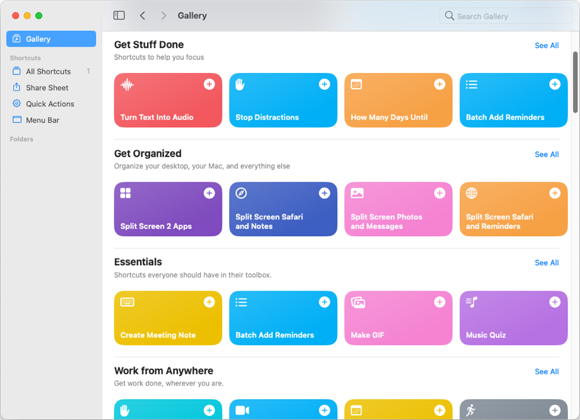
FIGURE 12-4: Explore more than 300 made-for-you shortcuts in the Shortcuts Gallery.
Click any shortcut to see a description of what it does. If you click the Turn Text Into Audio shortcut (the first shortcut in the Get Stuff Done category in the Gallery), you see the Turn Text Into Audio screen (see Figure 12-5). If you like it, click the Add Shortcut button. Depending on how the shortcut is configured, you may just see the message Shortcut Added, or the Setup dialog may open so that you can configure the shortcut for your Mac.

FIGURE 12-5: On the details screen for a shortcut, click Add Shortcut if you want to use the shortcut.
After you’ve added a shortcut, drag it from your All Shortcuts folder to the Quick Actions folder if you want to be able to trigger the shortcut from the contextual menu or to the Menu Bar folder if you want to run the shortcut from the menu bar. You can also ask Siri to perform the shortcut by name.
When you’ve whetted your appetite with built-in shortcuts, you can graduate to creating custom shortcuts of your own. To get started, choose File ⇒ New Shortcut or press ⌘ +N.
Controlling Lights, Locks, and More with Home
The Home app lets you use your Mac to remotely control smart HomeKit accessories, such as smart door locks, lightbulbs, thermostats, garage-door openers, and other devices.
As of this writing, the Home app on macOS is something of a 98-pound weakling, as it can’t yet add HomeKit accessories. Instead, you need to use the Home app on your iPhone or iPad to add the accessories before you can manage them with the Home app on your Mac. Apart from this severe limitation, the Home app on the Mac works in a similar way to the Home app on the iPad and iPhone.