
Chapter 13
(Inter)Networking
IN THIS CHAPTER
![]() Getting an overview of the Internet
Getting an overview of the Internet
![]() Pre-surfing with the Network pane in System Settings
Pre-surfing with the Network pane in System Settings
![]() Surfing the web with Safari
Surfing the web with Safari
![]() Searching the web
Searching the web
These days, networking online is easier than finding a log to fall off: You simply use the Internet to connect your Mac to a wealth of information residing on computers around the world. Luckily for you, macOS Ventura has the best and most comprehensive Internet tools ever shipped with a Mac operating system.
macOS offers built-in Internet connectivity right out of the box. macOS Ventura comes with the following:
- Apple’s Safari web browser, which you use to navigate the web, download remote files, and more
- The FaceTime app for video chats with other users of Macs, iPhones, iPads, and even Windows
- The Messages app, used for instant messaging (text), audio and video chatting, screen sharing, and file transfers
- The Mail app (for email)
This chapter and the two that follow cover the top things most people use the Internet for: surfing the web and video and audio chatting. You discover Safari in this chapter, Contacts and FaceTime in Chapter 14, and Mail and Messages in Chapter 15.
But before we can talk about any of those things, we need to make sure your Mac is connected to the Internet. The good news is that after you finish making the connection, you can play with your Internet-enabled apps to your heart’s content.
And here’s more good news : If you’re already able to surf the web, send and receive email, or send and receive text messages, you’re connected and could skip many (if not most) of the steps in the “Getting Connected to the Internet” section.
Getting Connected to the Internet
Before you can use (or surf) the Internet, you need to connect to the Internet. If you’re a typical home user, you need three things to surf the Internet:
A connection to the Internet, such as a cable modem, digital subscriber line (DSL) modem, fiber, or a satellite Internet service. This connection will normally manifest itself as a physical device that establishes the Internet connection, maintains it, and shares it with your devices via a local area network. In technical terms, this physical device is usually a router and switch combined, and will often be a wireless access point as well. This section uses the term Internet router to refer to this type of device, but you're free to call it your Internet box if you prefer.
The local area network via which your Internet router shares its Internet connection with your Mac and your household's other devices can be a wired network, a wireless network, or (double brownie points) both. Almost all wired networks use the Ethernet family of standards. Almost all wireless networks use the Wi-Fi family of standards.
 All Mac models have Wi-Fi, from the sveltest MacBook Air up to the honking Mac Pro. Recent iMac models have optional Ethernet built into their external power brick. Monitor-free desktop Macs — the Mac mini, the musclebound Mac Studio, and the honking Mac Pro — have built-in Ethernet ports. The Mac Pro is not content with one Ethernet port, so it has two.
An account with an ISP, such as AT&T or Comcast.
 If you like taking a minimalist approach, you can get online with free Wi-Fi, which is available almost everywhere — in stores, restaurants, parks, libraries, and other places. Instead of an ISP account, you can go a long way with a free email account from Apple’s iCloud, Microsoft’s Outlook.com, Google’s Gmail, or Yahoo! Mail.
- A Mac, preferably one running macOS Ventura.
After you set up each of these components, you can launch and use Safari, Mail, Messages, and any other Internet apps.
Choosing an Internet service provider (ISP)
You may have to select a company to provide you access to the Internet: an ISP. The prices and services that ISPs offer vary, often from minute to minute. Keep the following in mind when choosing an ISP:
- If your connection comes from a cable or telephone company, your ISP is probably that company. In effect, the choice of ISP is pretty much made for you when you decide on cable or DSL service.
Broadband access to the Internet starts at around $25 or $30 per month. If your service provider asks for considerably more than that, find out why. Don't take “supply-chain issues” as a reason.
If you think you’re paying too much for Internet service or you don't like your current provider, do your homework and determine what other options are available in your neighborhood.
Generally speaking, ISPs are (belatedly, some would say) getting better at setting up Internet connections so that they work reliably and don't require you to bug the ISPs' tech support departments constantly. But before your Internet connection flatlines, do make sure you know how to get in touch with your ISP's tech support department via phone or another means that doesn't involve your Internet connection.
I'm sure you know that the Number One solution to computer problems is power cycling — switching the darn thing off, cursing freely, and then switching it back on. Well, guess what: The Number One solution to Internet router problems is power cycling too. You don't even need to vary the curses, fun though that can be.
Connecting your Mac to a network via Wi-Fi
Once your network is up and running, you can connect your Mac to it via Wi-Fi either via Control Center or via the Wi-Fi pane in System Settings. Let's start with Control Center, because this is the method you'll probably want to use when you're out and about.
 Click the Control Center icon (shown in the margin) on the menu bar to open Control Center (shown on the left in Figure 13-1).
Click Wi-Fi to display the Wi-Fi panel (shown on the right in Figure 13-1).
Make sure the Wi-Fi switch at the top is set to On (blue).
Click the network's name in the Other Networks list.
Control Center closes. A dialog opens to prompt you for the Wi-Fi network's password.
Type the password in the Password box.
If you want to see the characters you're typing, select the Show Password check box. Seeing the characters can be a lifesaver when you're entering a murderously complex password.
- Click the Join button.

FIGURE 13-1: Click Wi-Fi in Control Center (left), and then click the network in the Wi-Fi pane.
If the Wi-Fi network you want to join doesn't appear in the Other Networks list, but you know the network exists, it's probably set to hide its name (in technical terms, its Service Set Identifier, or SSID). Click Other to open the Find and Join a Wi-Fi Network dialog (see Figure 13-2). Fill in the Network Name field and the Password field, and then click the Join button.
 Most home Internet routers are set to use a technology called Dynamic Host Configuration Protocol (abbreviation: DHCP), which automatically provides connection information to computers on the network. This connection information includes the Internet Protocol address (IP address), a number that identifies the computer; the subnet mask, a number used to organize the network; and the IP address or name of the Internet router, which tells the computer where to find the on-ramp to the Internet.

FIGURE 13-2: Use the Find and Join a Wi-Fi Network dialog to join a Wi-Fi network that hides its name.
To connect your Mac to a Wi-Fi network via the Wi-Fi pane in the System Settings app, follow these steps:
- Open System Settings — for example, click the System Settings icon on the Dock or on the Launchpad screen.
Click Wi-Fi in the sidebar to display the Wi-Fi pane.
Make sure the Wi-Fi switch at the top is set to On (blue).
In the Other Networks list, move the pointer over the Wi-Fi network you want to join, and then click the Connect button that appears on the right (see Figure 13-3).
A dialog opens to prompt you for the Wi-Fi network's password.
Type the password in the Password box.
If you want to see the characters you're typing, select the Show Password check box.
Click the Join button.
Once macOS has established the connection, the network's name appears near the top of the Wi-Fi pane, just under the Wi-Fi switch.
Managing your Wi-Fi networks
If your Mac connects to only a single Wi-Fi network, you may not need to perform any management — you can just let it connect with default settings. But if your Mac connects to multiple Wi-Fi networks, take a minute to make yourself familiar with the controls for managing Wi-Fi networks. This is especially important if your Mac connects to two or more Wi-Fi networks in the same location — for example, if you have multiple Wi-Fi networks in your home, in your workplace, or in your favorite espresso emporium.

FIGURE 13-3: From the Wi-Fi pane in System Settings, you can set up and configure Wi-Fi network connections.
- Open System Settings — for example, choose
 ⇒ System Settings.
 Click Wi-Fi in the sidebar to display the Wi-Fi pane (see Figure 13-4).
The current Wi-Fi network appears at the top, with a green circle and a Connected readout. Below that, the Networks section shows three lists:
- Personal Hotspot: These are hotspot Wi-Fi networks provided by devices such as your iPhone or cellular iPad.
- Known Networks: These are the available Wi-Fi networks your Mac has previously connected to and for which it knows the password (if the network is secured, indicated by the lock icon).
Your Mac will automatically connect to networks in the Known Networks list when they are available. If you don't want your Mac to connect to a particular known network, you need to tell macOS (we'll get to this in a moment).
- Other Networks: These are Wi-Fi networks your Mac hasn't previously connected to or which it has connected to but which you've made it forget.
Set the Ask to Join Networks switch to on (blue) if you want your Mac to prompt you to join an available Wi-Fi network when none of its known networks is available.
These prompts may be helpful, so try turning on Ask to Join Networks and see how it suits you.

FIGURE 13-4: In the Wi-Fi pane, choose whether to automatically join known networks and hotspots.
Set the Auto-Join Hotspots switch to on (blue) if you want your Mac to automatically glom on to available Wi-Fi hotspots.
Some hotspots are run by malefactors keen to slurp up unwary users' credentials, bank information, and cookie recipes, so it's best to turn off Auto-Join Hotspots.
- Click the Advanced button at the bottom of the Wi-Fi pane to display the Advanced dialog (see Figure 13-5).
Configure Auto-Join and prune the Known Networks list as needed:
- Toggle Auto-Join for the network. Click the ellipsis (…) button, and then click Auto-Join to place or remove the check mark.
- Remove a network. Click the ellipsis (…) button, and then click Remove from List.
The Advanced dialog gives you access to two nuggets of information you may sometimes need to know. First, the ellipsis (…) pop-up menu also contains the Copy Password command, which lets you copy a known network's password. Second, the Wi-Fi MAC Address readout at the very bottom of the dialog (which is not visible in Figure 13-5) gives the Media Access Control (MAC, usually all caps to reduce confusion) address of your Mac's network interface. You may need the MAC address to whitelist your Mac with your Internet router.
FIGURE 13-5: In the Advanced dialog, you can control automatic joining and remove Wi-Fi networks you no longer want to use.
Set the Show Legacy Networks and Options switch to Off (white).
Legacies are generally a positive thing, but a legacy network usually means one that has poor network speeds and worse security. Avoid.
- In the Require Administrator Authorization To section, set the Change Networks switch and the Turn Wi-Fi On or Off switch to on (blue) or off (white), as needed.
- Click Done to close the Advanced dialog.
From the Wi-Fi pane in System Settings, you can click the Details button to display the Details dialog, which provides options for configuring the current Wi-Fi network. In this dialog, you can set these three switches:
- Automatically Join This Network. This switch gives you another way to control whether your Mac automatically joins this particular network when it's available.
- Low Data Mode. Set this switch to on (blue) to reduce your Mac's data usage as far as is practical. You'd use Low Data Mode when connecting your Mac to a metered network, such as the extortionate Internet connections some hotels provide. (If the Wi-Fi network is connected to an all-you-can-eat Internet connection, you probably won't want to use Low Data Mode.)
- Limit IP Address Tracking. Set this switch to on (blue) to have macOS hide your IP address from known address trackers in Safari and Mail. Limiting tracking is usually a good idea.
The Details dialog also contains readouts showing the IP address your Mac's wireless connection is using and the IP address of the router through which it is connected to the Internet. Lastly, there's a Forget This Network button that you can click to command your Mac to forget this network.
Use only wireless networks that you know and trust, especially in public places such as hotels and airports. If you must connect your Mac to a network that might be untrustworthy, use a virtual private network (VPN) to encrypt the data your Mac sends and receives.
Finally, if you have any reservations about using public Wi-Fi, use your mobile phone’s hotspot feature (if it has one) instead of a public Wi-Fi network. Why? Because cellular networks encrypt all traffic, making them more secure than Wi-Fi networks.
Also look for https (not http) at the beginning of URLs to ensure your wireless connection to that website is encrypted (more secure).
Connecting your Mac to a network via Ethernet
If your Mac has an Ethernet port, you can connect the Mac to a network in seconds by plugging one end of an Ethernet cable into that port and the other end into your Internet router. Take a few more seconds to arrange the cable so that nobody will trip over it and your cats can't use it as a slackline while you're online with the Slack collaboration app (okay, that was a stretch).
Once you've made the physical connection, macOS normally configures it automatically within a few seconds. To see the details of the connection, open the System Settings app, click Network in the sidebar, and then click Ethernet in the Network pane. The Ethernet pane appears (see Figure 13-6), showing the connection's details, including the IP address and the router address.
From here, you can click the Advanced button to open the Advanced dialog, which enables you to perform heavy-duty configuration of the connection. With the Ethernet category selected at the top of the sidebar, make sure the Limit IP Address Tracking switch is set to on (blue). Beyond this, it's best not to change the settings in the Advanced dialog unless a) you know what you're doing, or b) you're following directions from a network administrator to solve a particular problem.
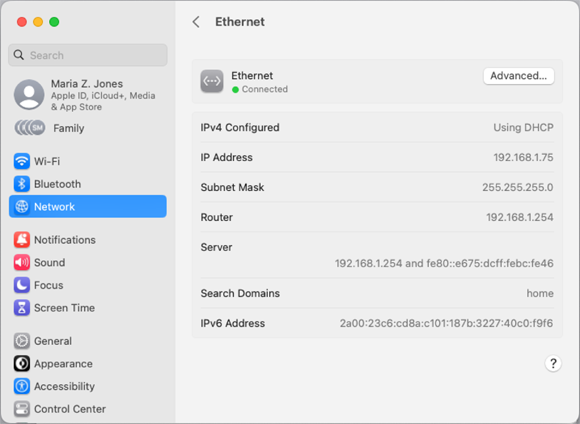
FIGURE 13-6: Use the Ethernet pane to learn the IP address and other details of an Ethernet connection.
Browsing the Web with Safari
With your Internet connection set up, you’re ready to browse the web. The following sections use Safari because it’s the web browser installed with macOS Ventura.
If you don’t care for Safari, check out Firefox or Chrome, which are both free browsers and have features you won’t find in Safari. It never hurts to have a spare in case Safari has issues with a particular website.
To begin, just open Safari in any of these ways:
 Click the Safari icon on the Dock or Launchpad (look for the big blue compass that looks like a stopwatch, as shown in the margin).
- Double-click the Safari icon in your Applications folder.
- Click a URL link in an email, an iMessage, or a document.
- Double-click a URL link document (a .webloc file) in Finder.
The first time you launch Safari, you see a generic start page, as shown in Figure 13-7. (If you've upgraded to Ventura from an earlier version of macOS, Safari will open to the same page it opened to before you upgraded.)
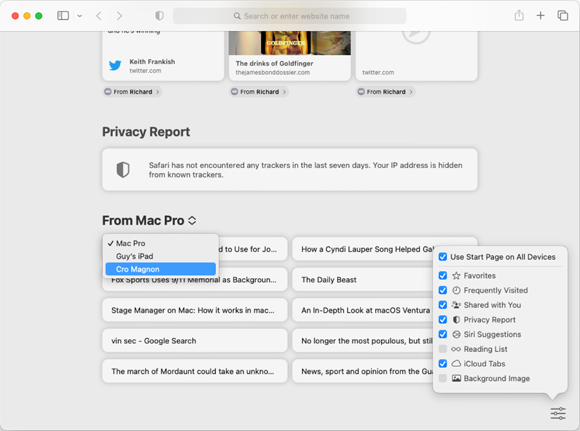
FIGURE 13-7: Safari first displays a generic start page.
![]() You can customize your start page by clicking the little settings icon in the lower-right corner of the start page (shown in Figure 15-1 and in the margin). Enable or disable an item by selecting or clearing its check box, respectively.
You can customize your start page by clicking the little settings icon in the lower-right corner of the start page (shown in Figure 15-1 and in the margin). Enable or disable an item by selecting or clearing its check box, respectively.
The iCloud Shared Tabs section of the start page shows web pages you've recently accessed on your other computers and devices that log into the same iCloud account. To change the device providing the list, hover the pointer over the current device's name (Mac Pro, in the example) in the From list, click the little up-and-down arrow that appears, and then click the device you want.
You can choose what appears in new Safari windows and tabs by choosing Safari ⇒ Settings and clicking the General tab at the top of the Settings window.
Owning your toolbar
The Safari toolbar, at the top of every Safari window, consists of a narrow row of icons and the Search or Enter Website Name field. The icons do pretty much what their names imply. From left to right, they are
- Show/Hide Sidebar: Click to see your favorites or Reading list in the sidebar; click it again to hide the sidebar.
 New Tab Group: Click this icon (shown in the margin) to create a new empty tab group. And if you don’t already know what a tab group is, you will shortly. This icon appears when the sidebar is displayed.
 Tab Group Picker: Click this icon (shown in the margin) to display a pop-up menu containing the list of tab groups, together with the New Empty Tab Group command and the New Tab Group with This Tab command. This icon appears when the sidebar is hidden.
- Back/Forward: When you open a page and move to a second page (or third or fourth), Back takes you to previously visited pages. Remember that you need to go back before the Forward icon will work.
- Privacy Report: Click to see an overlay with a brief privacy report; click the little i-in-a-circle on the overlay to see a more comprehensive report.
Search or Enter Website Name (aka address box): This field, to the right of the Show Sidebar button, is where you enter web addresses, or URLs (Uniform Resource Locators) that you want to visit. Just type one — or paste if you prefer — and press Return to surf to that site.
To the right of the Search or Enter Website Name field are three more icons. Keep reading.
- Share/More: When you find a page of interest or a page you know you’ll want to remember, click this icon (which is actually a drop-down menu) to tell Safari to remember it for you in its cool Reading list or as a bookmark — two topics covered later in this chapter. Or send a link to it via Mail or Messages, both covered in Chapter 15, or post it on Facebook or tweet it on Twitter.
- New Tab (+): Click to open a new tab; press and hold down to see a drop-down menu of recently closed tabs, and then click the one you want to return to.
- Show/Hide Tab Overview: Click the Show/Hide Tab Overview icon to see previews of all your open tabs (which you learn about shortly) or all tabs in the selected tab group. If you have other Macs or Apple devices, you’ll also see the open tabs in Safari on other devices that have Safari enabled in iCloud. This feature is so handy you can also find it in the View menu, where you’ll also spy its handy keyboard shortcut, ⌘ +Shift+.
You can add other useful icons to your toolbar by choosing View ⇒ Customize Toolbar and then dragging icons such as Home Page, History, Bookmarks, AutoFill, and Print from the Customize Toolbar dialog to the toolbar.
Using the Safari sidebar
![]() Click the Sidebar icon on the toolbar, choose View ⇒ Show Sidebar, or press ⌘ +Shift+L to display the sidebar, where you’ll find links to your start page, tab groups, received links, and collected links (where you’ll find Bookmarks and Reading List).
Click the Sidebar icon on the toolbar, choose View ⇒ Show Sidebar, or press ⌘ +Shift+L to display the sidebar, where you’ll find links to your start page, tab groups, received links, and collected links (where you’ll find Bookmarks and Reading List).
Click the first sidebar item, Start Page, to see your Start Page (as discussed previously).
Tab groups are the new pinned tabs
 Earlier releases of macOS offered pinned tabs that persisted until you unpinned them. In Ventura, they’ve been replaced by tab groups, a more flexible approach for managing multiple tabs.
Here’s how to set up and use tab groups:
![]() To create a new tab group, click the New Tab Group icon on the right above the sidebar (shown in the margin) and choose New Empty Tab Group. Or, if you currently have more than one tab open, and you want to create a group containing those tabs, choose New Tab Group with x Tabs (where x is the number of open tabs).
To create a new tab group, click the New Tab Group icon on the right above the sidebar (shown in the margin) and choose New Empty Tab Group. Or, if you currently have more than one tab open, and you want to create a group containing those tabs, choose New Tab Group with x Tabs (where x is the number of open tabs).
Another way to create a new empty tab group is by choosing File ⇒ New Empty Tab Group or pressing ⌘ +Control+N.
You can add a web page to a tab group in these ways:
- If the sidebar is displayed: Drag the web page's tab from the tab bar onto the appropriate tab group in the sidebar. If the sidebar is hidden, you can display it by choosing View ⇒ Show Sidebar or pressing ⌘ +Shift+L.
- If the sidebar is hidden: Click in the address box to make it active, and then drag the little icon that appears left of the address to the left side of the Safari window and pause. When the sidebar slides nonchalantly into view, drag the icon to the appropriate tab group and drop it there.
To see the Tab Overview page for a tab group with thumbnails of all the pages it contains (as shown in Figure 13-8), move the pointer over the tab group's name, click the ellipsis (…) button that appears, and then click Show Tab Overview on the pop-up menu.
To activate a tab group, click its name in the sidebar. The tab group’s tabs replace your current tabs.

FIGURE 13-8: The Tab Overview for the Mac Stuff tab group.
Note that if you open a new tab when a tab group is active (selected in the sidebar), the new tab becomes part of the active group. Conversely, if you close a tab when a tab group is selected in the sidebar, the tab is removed from the group.
Shared with You: Links from others
The Shared with You entry in the sidebar automatically gathers content that’s been shared with you. Click Shared with You and an overview page appears with thumbnails of all the photos, videos, articles, and more that have been shared with you by friends and family in the Messages app.
Bookmarking your favorite pages
When you find a web page you want to remember and return to, you bookmark it. Here’s how it works:
- Choose Bookmarks ⇒ Add Bookmark, press ⌘ +D, or click the Share icon and choose Add Bookmark.
Choose where to store the bookmark from the pop-up menu.
By default, Safari puts new bookmarks in the Favorites folder. The Favorites folder can get full pretty quickly, so it's best to organize your bookmarks into a folder structure that suits your browsing needs.
- Rename the bookmark or use the name provided by Safari.
- (Optional) Add a brief description in the Description field if you care to.
- Click the Add button to save the bookmark.
Finding your bookmarks in the sidebar
To return to a bookmarked page, click it in the Favorites bar, choose Bookmarks ⇒ Show Bookmarks, press ⌘ +Option+B, or click the Show Sidebar icon and then click Bookmarks to see all your bookmarks.
If you add a bookmark to the Favorites folder, it automatically appears in the Favorites bar. If you add the bookmark outside the Favorites folder in the sidebar, it will not appear in the Favorites bar but will be available at the bottom of the Bookmarks menu and in the Bookmarks sidebar.
Open bookmarked pages in the sidebar by clicking them once. View the contents of a folder by clicking the folder name in the list.
To delete a bookmark, Control+click or right-click it and choose Delete.
⌘ +click a folder in the Bookmarks window or Favorites bar to simultaneously open all the bookmarks it contains.
Managing your favorites and the Favorites bar
Below the Search or Enter Website Name field is the Favorites bar, which is populated by default with icons for web pages that Apple thinks you might enjoy, including Apple, Yahoo!, Google Maps, YouTube, and Wikipedia.
If you don’t see your Favorites bar, choose View ⇒ Show Favorites Bar or press ⌘ +Shift+B. If you want to access a ton of bookmarks from your Favorites bar, put folders of bookmarks rather than individual bookmarks on the Favorites bar. The Favorites bar displays the folders as drop-down menus, and you can quickly navigate down the menus to the bookmarks you want to display.
One last thing: Favorites and bookmarks are not exactly the same in macOS. Favorites is a folder of bookmarks that appear in the Favorites bar and Favorites page. Not all bookmarks are favorites, but all favorites are bookmarks. Which makes total sense when you think about it.
What’s on your Reading list?
The Safari sidebar also contains your Reading list, which serves as a repository for pages or links you want to read sometime but don’t want to read right now. A Reading list item is a lot like a bookmark but easier to create on the fly, which makes the Reading list perfect for sites or links you don’t need to keep forever (that’s what bookmarks are for).
To add the page you’re viewing to your Reading list, hover your cursor over the left side of the Search or Enter Website Name field and then click the +-in-a-circle that appears. (You can also use the keyboard shortcut ⌘ +Shift+D or click the Share icon and choose Add to Reading List from its menu.)
To add a link to your Reading list without visiting the page, just press the Shift key before you click that link. It’s fast and easy, and it works even if the sidebar is closed. Or you can Control-click or right-click the link and choose Add Link to Reading List from the contextual menu.
Right-click any item in your Reading list for additional options.
To delete an item from the Reading list, Control-click or right-click the item and then choose Remove Item. To remove all items from the Reading list, Control-click or right-click any item and then choose Clear All Items.
If you have other Macs or Apple devices that sync with the same iCloud account, you can sync your Reading list among your devices by enabling Safari in the iCloud pane in the System Settings app.
Website-specific settings
To specify settings for the active website, choose Safari ⇒ Settings for website name. The website-specific settings overlay appears with the following options:
- Use Reader when available. Select this check box to use Reader view when it is available.
- Enable content blockers. Select this check box to enable content blockers.
- Set page zoom. Click this pop-up menu and set the zoom percentage at which you want to display this site.
- Auto-Play. Click this pop-up menu and choose Allow All Auto-Play; Stop Media with Sound; or Never Auto-Play, as needed.
- Pop-up Windows. Click this pop-up menu and choose Block and Notify; Block; or Allow, as needed.
- Camera, Microphone, Screen Sharing, and Location. Open each pop-up menu and choose Ask, Deny, or Allow, as needed.
Reader view
![]() Finally, Reader view reformats the page for easier reading while hiding ads, navigation, and other distractions. It’s available for a page if the icon in the margin appears at the left edge of the Search or Enter Website Name field.
Finally, Reader view reformats the page for easier reading while hiding ads, navigation, and other distractions. It’s available for a page if the icon in the margin appears at the left edge of the Search or Enter Website Name field.
Click the icon to enter Reader view; click it again to exit Reader view. Alternatively, press Shift+⌘ +R to toggle Reader view on or off.
Controlling audio and video playback
In the bad old days of the web, a web page could start playing audio of its own accord, leaving you leaping for the volume control or trying to find which of your hundred open tabs was emitting Gothic yodeling drenced with guitar feedback.
Apple has improved matters considerably by making Safari block audio and video from playing by default. If you want to enable automatic playback of audio and video for all sites or specific sites, follow these steps:
- Choose Safari ⇒ Settings to open the Settings window.
- Click Websites on the tab bar at the top of the window to display the Websites pane.
- Click Auto-Play in the sidebar to display the Auto-Play controls.
- For each website in the Currently Open Websites list, open the pop-up menu and choose Allow All Auto-Play, Stop Media with Sound, or Never Auto-Play, as needed.
- Open the When Visiting Other Websites pop-up menu and choose Allow All Auto-Play, Stop Media with Sound, or Never Auto-Play, as needed.
And when the noise starts (The bells! The bells!), go to the little blue speaker icon that appears on the right side of the address box whenever audio is playing on a web page. Click that icon, and Safari will fall silent even if the audio is coming from an inactive tab or a hidden window.