
In this chapter you will learn how to:
<objective>Use anchored objects in a structured document
</objective> <objective>Tag anchored objects
</objective> <objective>Clone non-tagged elements
</objective> <objective>Work with multisection XML
</objective> </feature>This chapter continues your education in InDesign’s XML capabilities by adding some very useful tools and techniques. Chapter 4 shows you how InDesign uses XML to create multiple, data-driven layouts quickly and easily. We’re going to ramp it up now by introducing the capability of cloning untagged text and anchored objects.
InDesign has always supported inline objects. Like PageMaker before it, you could slip a graphic or a text frame anywhere into a paragraph or an empty line. Added in InDesign CS2, the anchored object is an amazing feature that breaks the invisible barrier of the text frame’s edge.
Note
Download all applicable files for Chapter 5 from www.peachpit.com/indesignxmlguide and copy them to a folder on your hard drive (approximately 2 MB).
Scenario: You work for a large specialty publisher, which prints cookbooks among other things. The production department sent over the layout for the latest project and the XML file to supply the content. Your task is to merge the layout with the data and get the book ready for press.
Open cookbook.indt from the Chapter 5 folder.
Show the Structure pane, tag markers, and tagged frames (See Chapter 2).
Select View > Show Frame Edges (Cmd-Shift-H/Ctrl-Shift-H), if they are hidden.
By their very nature, recipes and cookbooks are ideal candidates for an XML workflow. Like the business cards in Chapter 4, recipes are simply records within a database (cookbook), and conform easily to our description of a structured document.
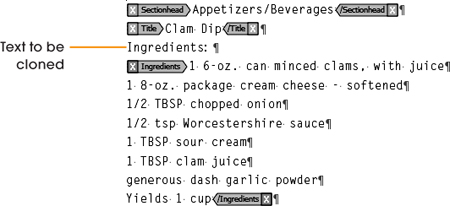
Take a second to observe the layout of the cookbook in Figure 5.1. The first thing you should notice, prominently sitting at the top of the page, is the tagged, anchored text frame holding the placeholder text: “Section Title.” Below it sits another tagged text frame that contains placeholder text for a recipe. Predictably, the recipe (like most) consists of three basic parts: a title, a list of ingredients, and a set of directions.
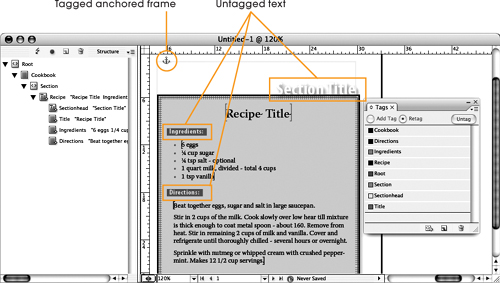
Figure 5.1. The basic structure is similar to Chapter 4’s business card with a couple of exceptions: the anchored text frame at the top of the page and the two untagged subheads that introduce the ingredients and directions.
The observant among you will not only see the tag markers sprinkled throughout the layout but also notice that several text elements on the page in fact don’t display any obvious tags at all, specifically the placeholder text “Section Title” and the words “Ingredients” and “Directions.”
What’s up? Did some production artist slip up? Nope. There’s good reason these items look the way they do. Let’s import the XML and watch the magic.
Select View > Show Text Threads (Cmd-Shift-Y/Ctrl-Shift-Y), if they are hidden. Using the Selection tool, drag the anchored frame an inch or two away from its current position.
Note how the text frame is not inline or attached to any other object.
Press Cmd-Z/Ctrl-Z to undo the move.
The frame should return to its original position.
Select Import XML from the File or Structure pane menu.
Select recipes.xml from the Chapter 5 folder. Make sure the Show XML Import Options checkbox and the Merge Content radio button are selected. Click Open.
Selecting the XML Import Options checkbox is a no-brainer in most XML workflows. It is an essential choice for specifying how the XML will be applied to your document and structure. We leave it checked by default.
Selecting the Merge Content or Append Content radio buttons depends on whether you need to replace the existing content or simply want to insert additional records into the document. In this case, we want to completely replace the existing placeholder text. Therefore, Merge Content is selected.
Select only the following checkboxes in the XML Import Options dialog:
Clone repeating text elements
Only import elements that match existing structure
Do not import contents of whitespace-only elements
Deselect all other checkboxes. Click OK.
In a few seconds the XML content replaces the placeholder text and a complete recipe for Clam Dip appears on the screen.
Remember how in Chapter 4 we dragged one of the employee icons from the Structure pane to the layout, and it replaced all of the existing employee’s contact information? Let’s see what happens if we do the same thing in this document.
In the Structure pane, click the Root element to reveal the Cookbook child element (see “Expanding the Structure” in Chapter 2).
Click the Cookbook element to reveal the four Section elements.
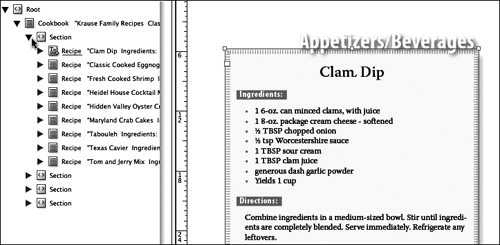
Click the first Section element to reveal nine Recipe elements (Figure 5.2).
If text snippets are still turned on, you should see Clam Dip beside the first
Recipeelement. If you don’t see text snippets next to eachRecipeelement, select Show Text Snippets from the Structure pane menu.Drag the second Recipe icon from the Structure pane anywhere over the main text frame on page 1.
The recipe for Classic Cooked Eggnog instantly replaces the recipe for Clam Dip, and the text for the title, ingredients, and directions automatically assumes the identical formatting and positions.
We can’t tell—are you barefoot yet? Well, the next trick should settle it once and for all.
Click on the second Section element to reveal 13 Recipe elements.
Drag the first Recipe element icon from the second section to the main text frame on page 1.
The recipe for Artichoke Bread instantly replaces the recipe for Classic Cooked Eggnog. Note that, in addition to the text for the title, ingredients, and directions changing and formatting automatically, the section title in the anchored frame changes too!
Now, we know book publishers are sitting there thinking, “I can’t print a book one page at a time!” We totally sympathize. So let’s ramp it up a bit.
In Chapter 4, you saw how you can create business cards one at a time by dragging the individual employee icons or all at once, by dragging the root element to the layout. The cookbook layout is no different.
Drag the first Section element icon to the main text frame.
The recipe for Clam Dip replaces Artichoke Bread. The section title reverts back to Appetizers/Beverages. But, more importantly, the main text frame displays a red plus sign indicating that it now contains overset text.
Using the Selection Tool, click the red plus sign to load the overset text.
Select Layout > Pages > Add Page or press Cmd-Shift-P/Ctrl-Shift-P to add a new page to the layout.
A new blank page appears on the screen displaying a single master text frame. Note that no anchored frame is evident on page 2.
Hold the Shift key to activate autoflow and click anywhere in the main text frame on page 2.
Seven additional pages are added to the document automatically. The nine recipes are identically formatted and, most important of all, each displays the section title in an anchored frame at the top of the page.
In case you were wondering, it doesn’t matter whether there are 9 recipes or 900, they would all appear on their own page, fully and identically formatted.
Wow! You’ll probably never wear socks again.
There’s one last bit of magic left in this lesson. Let’s try to flow all the recipes from all the sections all at once. Can you figure out how to do it? Right, drag the Cookbook element to the layout. Cookbook is the parent element that contains all the Section elements.
Drag the Cookbook element icon from the Structure pane to any main text frame on any page.
The color of the main text frame changes to indicate that it is now tagged for the Cookbook element. Page 9, the last page of the Appetizer/Beverage section, now displays a red plus sign indicating overset text.
Using the Selection tool, click the red plus sign to load the overset text.
Press Cmd-Shift-P/Ctrl-Shift-P to add a new blank page.
Hold the Shift key to activate autoflow and click anywhere on the main text frame on the new page.
This time the autoflow process will take a while, maybe even a minute or so, depending on the speed of your computer. When it’s finished you will be greeted by a 61-page cookbook, completely formatted and ready for press (well, maybe not totally ready, but you understand what we mean).
You may want to consider moving to Florida or someplace warm. We hear they walk around barefoot all the time.
Bugs in the Cupboard
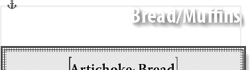
If you are performing this magic in InDesign CS2 you may notice a small bug in your cookbook. The section title has a tendency of ignoring the formatting you apply to the anchored text frame and popping to the top of the frame on the newly created pages (Figure 5.3). Eeeks, a bug! In fact, this bug can appear in any XML structure that employs anchored frames in CS2.
Don’t worry, although there’s no way to kill the bug (except by upgrading to CS3), you can fix the problem by reimporting the XML. That’s right. Simply click the root element in the Structure pane and select File > Import XML. Choose the same XML file and leave all the checkboxes selected as in Lesson 5-1, step 8. When the XML imports and replaces the existing content, all the section titles realign to the bottom of the frames as intended.
Are you excited? Are you ecstatic and breathless waiting to learn how to do this trick yourself? Then let’s get to it.
As in most design projects there are usually several ways to approach things. You can start with the data structure (as we have done so far) and create the design to match it. Or create the design first and conform the data to it afterwards. Either way, you need to make the decision at some time during the process. This is one of the reasons we like using databases and spreadsheets in our XML workflow. The ability to export the data in multiple ways gives you unlimited freedom to create any type of project and use the data in almost any way. In later chapters we examine methods to manipulate the data; for now let’s look at how to construct the structured layout based on an existing XML file.
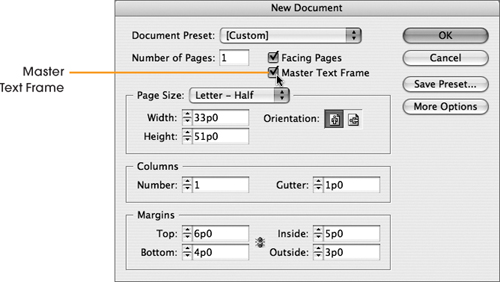
Create a new document with the specifications shown in Figure 5.4.
Import the XML file recipes.xml. Deselect all checkboxes in the XML Import Options dialog.
The Structure pane opens, and the Tags panel fills with tag names automatically.
Open the Root, Cookbook, and Section parent elements in the Structure pane to reveal the first Recipe element.
Drag the first Recipe element to the master text frame on page 1.
The master text frame is overridden by the
Recipeelement. It changes color to reflect the color of theRecipeelement in the Tags panel. The contents of the first recipe appear in the frame. You may also notice tag brackets surrounding each part of the recipe too.
Using the actual XML file for our starting point is a great method for getting the structured document off on the right foot. Because the Recipe element was placed directly from the Structure pane onto the page, you can be certain that the elements are in the exact order they appear in the XML itself. Some elements may not be needed, nor wanted, in the final design, but it’s an easy task to delete them. With all the elements already on the page and in the correct order, the hard part is over.
Before we proceed to the next lesson, it’s important to understand how the XML data is structured. By using the Text tool and the Tags panel, as we describe in “Identifying Tagged Elements” in Chapter 2, you can derive the names and order of the elements appearing in the text frame. Or you may find it easier to simply switch to InDesign’s Story Editor, where the XML tags are plain to see.
The elements should be in the following basic order:
Sectionhead
Title
Ingredients
Directions
But there’s something missing.
By now you may also have noticed that the words Ingredients and Directions appear nowhere in the XML data, except in the tag names themselves (and tag names don’t print). So, are you wondering how they got into each of the 61 recipes of the cookbook?
The answer: cloning. Not the cloning you see in headlines or Star Wars, but text and object cloning made possible through the magic of InDesign’s XML features.
In Chapter 4, it is cloning that creates the six business cards with exactly the same formatting and structure. Cloning not only makes it possible to insert the words Ingredients and Directions into each and every recipe, it also creates and formats the anchored frame holding the section title as well.
Let’s start with the easy ones first.
Select Edit > Edit in Story Editor or press Cmd-Y/Ctrl-Y.
Story Editor appears, displaying the Clam Dip recipe and the tag markers. It will be easier to get the cloned text into the proper location using Story Editor, where the tags are easier to see.
Note the blank line at the top of the text window.
Before we begin setting up the structure, it’s important to clean up the layout by removing any extraneous spacing or hard returns.
Insert the cursor in the first line and press Delete to remove the extra hard return.
Note
Be careful not to delete any tag markers. Luckily, InDesign warns you if you accidentally try to delete a tag that is being used (see “Untagging Graphics and Text” in Chapter 2).
Insert the text cursor in front of the opening Ingredients tag.
Type the word Ingredients: (including the colon—Figure 5.5).
Press the Return/Enter key to insert a paragraph return.
Note
It may seem oddly trivial to observe here that the key that inserts a new paragraph is named Return on Macs and Enter on Windows-based PCs, but it’s actually an important distinction. That’s because there’s another Enter key located on your numeric keypad that must never be used for this purpose. The reason is simple: In InDesign the Enter key on the numeric keypad inserts a column break, not a paragraph return.
Insert the text cursor on the same line, in front of the opening Directions tag.
Type the word Directions: and press the Return/Enter key to insert a paragraph return.
Each sectionhead is now on its own line.
To start the process of creating the anchored frame, select the text Appetizers/Beverages.
Click the Untag button in the Tags panel (see “Untagging Text” in Chapter 2).
The
Sectionheadtags are removed from the text.Press Cmd-X/Ctrl-X to cut the text.
The section title is cut into memory, but the cursor remains in the position originally occupied by the tags.
Press Cmd-Y/Ctrl-Y or select Edit > Edit in Layout to return to Layout view.
You must return to Layout view because InDesign does not allow you to insert an anchored object in Story Editor.
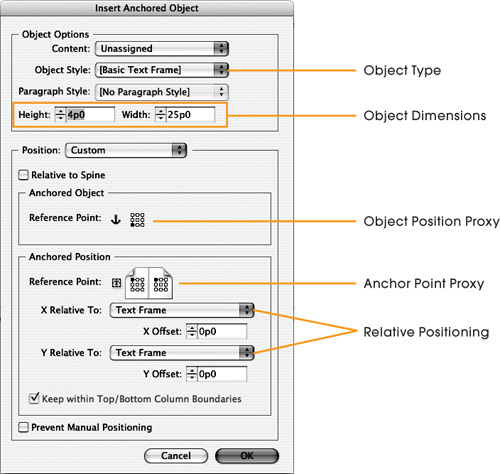
Select Object > Anchored Object > Insert.
The Insert Anchored Object dialog appears.
Create an anchored object with the specifications shown in Figure 5.6.
Click Sectionhead in the Tags panel to apply the tag to the anchored text frame.
The frame adopts the color of the
Sectionheadtag.Using the Text tool, insert the cursor into the anchored frame. Press Cmd-V/Ctrl-V to paste the text cut in step 7.
The Target of the Tag is the Object
It may not make sense that you are tagging the anchored frame and not the text within the frame, until you realize that the contents of anchored objects are not considered part of the flow of the frame in which they are inserted (Figure 5.7). Tagging the text would cause InDesign to ignore or skip over the placeholders (because they are not part of the frame and not within the structured document), and the text in the anchored frame would not be replaced at all. Additionally, this means that anchored objects can hold only one tagged element because their entire contents are replaced based solely on the tag applied to the object. Confused yet?

Think of it this way: The anchored object itself is the placeholder for the XML element. When the XML is imported, the content of the element replaces whatever’s inside the object at the time.
This completes the final XML placeholder for the structure. You could skip to Lesson 5-7 and import the data right now to create your own version of the cookbook. But you’d discover that the paragraph styles we add in Lesson 5-5, besides making the book easier to look at, are essential for getting the recipes to paginate properly (see “Styles Essential to XML Magic” in Chapter 4).
There’s no magic to creating paragraph and character styles for a structured document. Styles simply make the task of standardizing the formatting of text easier. Often we employ specific styling to help position the content on the page or even to start new pages with page or column breaks as we demonstrate in Chapter 4. We don’t want to waste space (or time) here creating the desired formatting, so let’s just import the styles from the cookbook template used in Lesson 5-1.
Select Load All Text Styles from the Paragraph Styles panel menu.
Load all the Paragraph and Character styles from cookbook.indt in the manner described in Chapter 4, Lesson 4-8.
The styles from the cookbook template appear in the Paragraph Styles panel.
Select Load Object Styles from the Object Styles panel menu. Select and open cookbook.indt.
The Load Styles dialog opens. All object styles from the template are selected automatically.
Click OK to load all object styles from the template.
The styles from the cookbook template appear in the Object Styles panel.
You can apply these styles to various text and frame elements manually, but we like to work a little faster and more efficiently. (Why do things yourself when someone else can do it?)
To apply styles automatically, do this:
Select Map Tags to Styles from the Tags panel or the Structure panel menu.
The Map Tags to Styles dialog opens.
Click the Map by Name button.
If the Preview checkbox is selected you will see the layout format automatically. However, a couple elements did not change. The text Ingredients and Directions did not change because they are not tagged and were not mapped to any style. These words and any other untagged element have to be styled manually. But the good news is: 90 percent of the work is already done.
Click OK.
Using the Text tool, insert the cursor in the text Ingredients. Click Subhead in the Paragraph Styles panel.
The text formats appropriately.
Repeat step 8 on the text Directions.
The entire layout is now formatted and ready for importing XML.
We’ll take a brief detour on the way to creating the cookbook to illustrate an important point about importing the XML properly. As it now appears, the layout is nearly identical to the cookbook template, with one exception: the long list of unused recipes.
If you tried the little experiment suggestion in the nearby sidebar “Structure – Importing XML ≠ Magic,” you know that the recipe elements in the Structure pane are currently useless. But perhaps you think they might become more usable after importing the XML. Let’s take a second to disabuse you of that notion.
Select the Root element in the Structure pane.
Select Import XML from the File or Structure pane menu.
Select and open recipes.xml.
Select only the following checkboxes in the XML Import Options dialog:
Clone repeating text elements
Only import elements that match existing structure
Do not import contents of whitespace-only elements
Deselect all other checkboxes. Click OK.
The XML content imports, replacing the placeholders. (Actually, since we used the first recipe as XML placeholders, you’ll just have to take our word for it.)
Drag the second Recipe icon to the layout.
All the text from the first recipe disappears, replaced only by the section title. You can see by the red plus sign indicating that the rest of the recipe text is in overset land. (Again, take our word for it or press Cmd-Y/Ctrl-Y to check it out yourself in Story Editor.)
Since all the recipe elements already exist in the Structure pane incorrectly, even re-importing the XML again didn’t correct the problem.
Press Cmd-Z/Ctrl-Z to undo step 6.
The placeholders return, along with all the proper formatting.
Ok, you knew this was coming...to get this design to work properly, first you must delete all the additional recipes in the Structure and then re-import the XML. Otherwise, the rest of the structure can be left exactly the way you see it.
Select the second Recipe icon in the Structure pane.
Hold the Shift key and select the last icon in the Structure pane.
All elements are selected except for those above the first
Recipeicon. These must remain unchanged.Click the trash can icon at the top of the Structure pane or press the Delete key.
The selected icons disappear.
Select the Root element.
Import recipes.xml as in Lesson 5-6 using all the same settings.
You may notice that the XML Import Options dialog remembers the last settings used.
The Structure pane repopulates with all the cookbook elements.
Drag the second Recipe icon to the main text frame.
It replaces the content and assumes all the proper formatting.
Drag the Section icon to the text frame.
The text frame changes to match the color of the
Sectiontag color and the red plus sign appears indicating overset text.Create a new page and flow the overset text as described in steps 8–10 in Lesson 5-2.
InDesign creates eight more pages to accept the additional recipes, as before.
Drag the Cookbook icon to the main text frame.
The text frame changes to match the color of the
Cookbooktag color, and the red plus sign appears on the last page indicating overset text.Create a new page and flow the overset text as described in steps 12–14 in Lesson 5-2.
InDesign creates 61 total pages for the entire cookbook, as before.
As you can see, the newly imported XML works just as the XML did in Lesson 5-2. We hope you’re starting to understand that it’s not the XML alone, nor the formatted structure that’s responsible for the magic. It’s the relationship between the placeholders, the formatting, and the XML import options and how they work together that makes it all possible.