![]()
Navigating the Specification
The TPM 2.0 specification is not an easy read by any means. Although this is true of most technical specifications, TPM 2.0 presents some unique challenges. The specification is long—1,000 pages at last count—and written in a very concise and formal syntax that often attaches significant functional meaning to what appear to be rather insignificant punctuation marks. Part 2 of the specification was written to be parsed by code-generator tools in order to generate C headers and some marshaling and unmarshalling functions, which explains the emphasis on punctuation marks and the style of the specification’s tables. At times, explanations of important concepts are tersely expressed and difficult to find. Although technically correct, these explanations can be hard to follow. And while the single-minded desire for conciseness and avoidance of redundancy at all costs in writing the specification enhances maintainability, it also adversely affects readability. The goal was a specification that was highly maintainable; we think the developers succeeded admirably, perhaps even too well!
On the other hand, from a technical perspective, the specification is very robust; the information you need is there—the challenge is to find it. It’s like putting together a really large puzzle; you have all the pieces, but they aren’t always where you expect them to be. This chapter aims to help you put the pieces together much faster by passing on some hard-earned lessons that we, the authors, have learned as we have negotiated this terrain. We urge you to keep in mind that the specification is quite logical once you get used to it. You will be assimilated!
To summarize, learning TPM 2.0 isn’t a trivial task. But the good news for you is that we intend to give you a huge boost.
This chapter discusses the following:
- The high-level structure of the TPM 2.0 library specification
- Some definitions that are required to understand the specification
- The command schematic tables
- Some details of the data structures
- Table decorations
- Command schematic syntax
- Tips on where to find crucial and commonly used information
- Some other TPM 2.0-related specifications you need to know about
- Our strategies for learning the specification
![]() Note This chapter doesn’t proceed through the four parts of the specification in sequential order. That might seem logical, but having tried it, we can vouch that it’s not the best way for newcomers to understand the specification. In order to jump-start your understanding, we alter the order in a way that we hope enhances the learning process.
Note This chapter doesn’t proceed through the four parts of the specification in sequential order. That might seem logical, but having tried it, we can vouch that it’s not the best way for newcomers to understand the specification. In order to jump-start your understanding, we alter the order in a way that we hope enhances the learning process.
TPM 2.0 Library Specification: The Parts
The TPM 2.0 library specification is the most important and base-level specification for TPM 2.0. This specification describes the core TPM 2.0 functionality that is common to all TPM 2.0 implementations.
The library specification consists of four parts:
- Part 1, Architecture: This lives up to its name and is the most important part to read in detail. In text form, it describes the TPM operation and much of the rationale behind the design. It also contains many of the practical details of how the TPM operates. For instance, this is the only place that describes how to create sessions, which are used to authorize, audit, and encrypt commands. As such, it describes all variations of session types in great detail.
- Part 2, Structures: This presents the data types, structures, and unions that are used by TPM 2.0, and is analogous to a description of data types in a programming guide. Included in the definitions are the error codes returned when commands fail.
- Part 3, Commands: This presents the TPM 2.0 commands, which are analogous to function descriptions in a programming guide. It describes the input and output parameters for each of the TPM 2.0 commands and the command-specific error conditions. The actions performed by the command are precisely described by the included C code. This code calls many supporting routines that aren’t in Part 3; these routines and their error codes are described in Part 4.
- Part 4, Supporting Routines: This section contains the code for the supporting routines called by the code in Part 3 as well as the error codes output by that code. This code explains the guts of the TPM 2.0 operation in excruciating detail. When stepping through the simulator code to understand why a particular error is occurring, you will spend a lot of time here. So, one way or another, you’re going to become familiar with significant parts of this code.
Some Definitions
Before we get started, some definitions are in order so that you can better understand the specification. This is a good section to bookmark, because you’ll refer to these definitions frequently as you read the specification and the rest of this book. Don’t get discouraged if you’re unable to completely comprehend these definitions at first; aim for a high-level understanding for the first reading, and then bookmark this section for future referral.
General Definitions
The following definitions pertain to both commands and responses:
- Authorization: Proves the right to access some entity in the TPM. TPM 2.0 uses three types of authorizations:
- Password authorization: this is a one shot clear text authorization.
- HMAC authorization: Uses a hash message authentication code (HMAC) for the authorization. The HMAC key is derived using a shared secret that is the basis of the authorization.
- Policy or enhanced authorization (EA): Uses policy assertions that must be satisfied in order to authorize an action on an object. Policy assertions are commands that are sent to the TPM before the command being authorized.
- Session: As defined in the TPM 2.0 specification, a “collection of TPM state that changes after each use.” Unfortunately, this definition is too general and not very informative. A better understanding of sessions comes from knowing how they are used. Sessions are used for authorizations and per-command actions (encryption, decryption, audit, and a few others) in a session. In the case of HMAC and policy sessions, sessions are created and then used for multiple commands. Password authorizations are a special case of sessions that don’t carry any state across multiple commands. The different types and uses of sessions are discussed at length in later chapters; for now it suffices to have a high-level understanding.
- Handle: An identifier that uniquely identifies a TPM resource that occupies TPM memory.
- Byte stream: On a command, the actual bytes sent to the TPM. On a response, the actual bytes received from the TPM.
- Canonicalized data: The command schematics in Part 3 describe the inputs and outputs from the TPM with C structures. These structures are often much larger than the data sent to the TPM. For instance, some structures contain unions consisting of elements of widely varying sizes. For a given instance of one of these unions, only the data required by the particular union element being used when sending the command is sent to the TPM. In addition, all data sent to and received from the TPM is in big-endian byte order. Data that meets these characteristics is canonicalized. The aggregation and ordering of all the canonicalized inputs to a command forms the byte stream sent to the TPM. Response data from the TPM is also in canonicalized format.
- Unmarshalled data: Data in its C structure format.
- Marshalled data: Data in its canonicalized form—that is, the form sent to or received from the TPM.
Definitions of the Major Fields of the Command Byte Stream
The following items are described in the order in which they appear in the command byte stream:
- Command header: A common area for all commands. It consists of the tag, commandSize, and commandCode fields, described next.
- tag: Identifies whether the command contains sessions—that is, whether it contains an authorization area (defined shortly).
- commandSize: The size of the command byte stream, including all fields of the header.
- commandCode: Identifies the TPM command to be executed, and controls the interpretation of the rest of the command byte stream.
- Handle area: Contains between zero and three handles as specified by the Part 3 command schematics.
- Authorization area: Contains command session data. Multiple sessions can be associated with a single command, so this area can contain the parameters for between zero and three sessions. It contains authorization information, per-command session use modifiers, and some session state information that needs to be communicated between the application and the TPM.
- Parameter area: Contains command-specific parameters as described in Part 3 of the specification.
Definitions of the Major Fields of the Response Byte Stream
The following items are described in the order in which they appear in the response byte stream:
- Response header: A common area for all responses. It consists of the tag, responseSize, and responseCode fields, as described next:
- tag: Identifies whether the response contains sessions.
- responseSize: The size of the response byte stream, including all fields of the header.
- responseCode: Identifies the whether the TPM command succeeded and, if not, what specific error occurred.
- Handle area: Contains between zero and three handles, as specified by the Part 3 response schematics.
- Parameter area: Contains the command-specific response parameters, as described in Part 3 of the specification.
- Authorization area: Contains response session data. Multiple sessions can be associated with a single command, so this area can contain the parameters for between zero and three sessions. It contains authorization information, per-command session use modifiers, and some session state information that needs to be communicated between the application and the TPM.
Getting Started in Part 3: the Commands
If you’re like most programmers, you’ll start in Part 3. Seriously, who has time to read a lengthy specification? And after all, the goal is to just “Git ‘er done,” right? That’s typically the mindset of busy engineers, and it’s actually a good approach, except that it will quickly bring you face to face with some of the harsh realities of the TPM 2.0 specification. In order to help you over some of the hurdles we’ve encountered when using the specification, here are a few things you need to know before you delve into Part 3.
The generic byte structure for all TPM 2.0 commands and responses is described in Part 1 in the section titled “Command/Response Structure.” The Separators table and Command Structure and Response Structure figures are particularly helpful. We recommend that you place a bookmark at these sections in the specification, because you’ll be referring to them often.
To make this discussion a bit more practical, we describe in detail two types of commands—a command without authorizations (TPM2_Startup) and a command with authorizations (TPM2_Create)—and explain some of nuances of the command byte stream. We start with TPM2_Startup, because it’s the first command that must be sent to the TPM and is one of the simplest TPM 2.0 commands.
If you look at the Part 3 section that describes the TPM2_Startup command, you see three sections:
- “General Description”: Describes the command in text form, details some of the constraints on the inputs, and discusses error conditions.
- “Command and Response”: A data schematic for the inputs to the command (Command) and the outputs from the command (Response). We discuss these tables in detail in a moment.
- “Detailed Actions”: Contains code and a table of the error conditions that are returned by the command’s code (not including the ones sent by the supporting code).
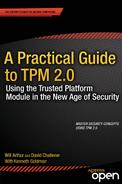
This three-part format is used for all commands. For the purposes of our current topic, we mainly look at the Command and Response tables. For the TPM2_Startup command, these tables are shown in Table 5-1 and Table 5-2.
Table 5-1. TPM2_Startup Command (Table 5 in Part 3 of the TPM 2.0 Specification)
The Type column shows the data type for each field of the command. These types are defined in Part 2 of the specification. The Name column is self-explanatory: it contains the name of the parameter to be passed to or from the TPM. This is also the name of the parameter in the Part 3 source code. The Description column describes the field along with any field-specific requirements. TPM2_Startup has two field-specific requirements: tag must be TPM_ST_NO_SESSIONS, and commandCode must be TPM_CC_Startup. The {NV} is a table decoration that means the command may update nonvolatile memory inside the TPM. (Table decorations are described in the Table Decorations section early in Part 3.)
The format of the first three fields—tag, commandSize, and commandCode—is the same for all commands. These fields form the command header.
Following are explanations of the command fields:
- tag: Indicates whether the command has sessions. Because the TPM2_Startup command can never take sessions, this tag must always be set to TPM_ST_NO_SESSIONS.
- commandSize: The size in bytes of the entire command stream sent to the TPM.
- commandCode: Indicates which command is being sent. This tells the TPM how to interpret the rest of the command data.
Now notice the line following the command code:
This line indicates that any fields following are in the parameter area. In this case, startupType is the only parameter in this area. In general, this area contains fields that configure any command-specific parameters for the command. The meaning of these lines and other table decorations are described in two sections of Part 3: “Table Decorations” and “Handle and Parameter Demarcation.” You will want to refer to these two sections frequently when reading Part 3 of the spec.
Table 5-2. TPM2_Startup Response (Table 6 in Part 3 of the TPM 2.0 Specification)
|
Type |
Name |
Description |
|---|---|---|
|
TPM_ST |
Tag |
see clause 6 |
|
UINT32 |
responseSize |
|
|
TPM_RC |
responseCode |
Following are explanations of the response fields:
- tag: Indicates whether the response has sessions. Because this command never has sessions, tag is always TPM_ST_NO_SESSIONS.
- responseSize: The size in bytes of the entire response byte stream.
- responseCode: Indicates whether the command passed or failed. TPM_RC_SUCCESS indicates passing. Other codes indicate failure.
Notice that TPM2_Startup has no return parameters.
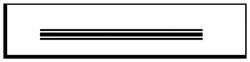
Now we’ll look at a much more complicated command, TPM2_Create. This command is used to create objects such as keys or data objects. Table 5-3 shows its Command table.
Table 5-3. TPM2_Create Command (Table 19 in Part 3 of the TPM 2.0 Specification)
Following are explanations of the command fields:
- tag: In this case, TPM_ST_SESSIONS to indicate that the command must have sessions. Another indication is the @ sign in front of the parentHandle handle name; this means an authorization session is required with this handle. More on that later.
- commandSize: Size of the total byte stream including authorization data.
- commandCode: The command code for this command.
Note this separator. Now things get more interesting; this separator didn’t exist the TPM2_Startup command:

This line indicates that the following fields are in the handle area, as described in the “Handle and Parameter Demarcation” section of Part 3. Handles are 32-bit references to various entities in the TPM. parentHandle is the only handle parameter for this command. Commands can take up to two handles in this area.
Notice the @ character in front of parentHandle. This is a table decoration; it means this handle requires that an associated authorization be included in the authorization section. This and other table decorations are described in the “Table Decorations” section early in Part 3.
Also notice the “Auth Index: 1” text in the description. This indicates the ordering of the authorization in the authorization section. In this case, the authorization for the parentHandle must be the first authorization in the authorization section. All commands that take authorizations can take up to three authorizations. When a command has an @ sign in front of one or more handles, the command requires an authorization for each such handle. In this case one authorization is required.
Notice the Auth Role: USER text. This is a further qualification on the authorization, which is described in the chapter on enhanced authorization. Auth roles are analogous to privilege levels in an operating system. They control who can get access to certain entities.
Handles behave differently from parameters in a command: handles aren’t used in computing the cpHash, which is a hash of the input parameters. This hash is used in calculating HMACs and, in some cases, policy digests. The purpose of this separation is to allow a resource manager to virtualize the handles in order to swap objects in and out of the TPM, much like a virtual memory manager swaps memory contents between disk drives and memory. Later chapters describe HMACs, policy digests, and the resource manager in detail. For now, it’s sufficient to understand that handles and parameters are separated into different fields in the byte stream in order to facilitate some key differences in functionality.
Now you see a line you’re familiar with from the Startup command. Again, it indicates the start of the parameter area:
But in this case, because tag is equal to TPM_ST_SESSIONS, indicating that this command requires an authorization session, this separator also indicates where the authorization data is inserted into the command byte stream. This command’s authorization area can have between one and three sessions, all of which are inserted here. We describe the authorization area in detail in chapter 13.
This command takes four parameters: insensitive, inPublic, outsideInfo, and creationPCR. Part 2 describes the data structure types for each of these.
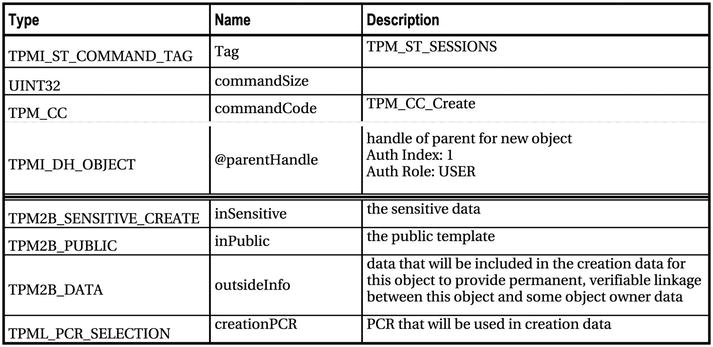
Table 5-4 shows the TPM2_Create command’s Response table.
Table 5-4. TPM2_Create Response (Table 20 in Part 3 of the TPM 2.0 Specification)
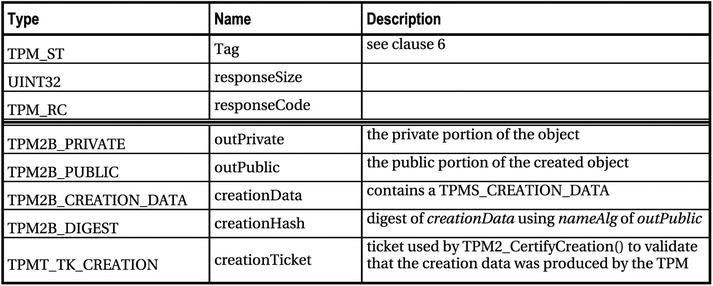
Following are explanations of the response fields:
- tag, responseSize, and responseCode are as described earlier, except that if the command passes, tag is TPM_RC_SESSIONS to indicate the presence of sessions in the response. There are three cases here:
- If the command has no sessions, the response will have no sessions. For this command, the tag is always set to TPM_ST_NO_SESSIONS.
- If the command has sessions and returns success, the response tag is TPM_ST_SESSIONS, indicating that the response, too, has sessions.
- If the command has sessions but fails, the response tag is TPM_ST_NO_SESSIONS. Failing commands never have sessions or response parameters in their response.
When the following line is present in a response schematic, it indicates the start of the response handle area. In this command, there are no response handles, so this line isn’t present:

Now you see your old friend the parameter demarcation line:
Unlike for the command data, for the response, this is simply the dividing line for parameters; the authorization area isn’t located here, but appears later in the byte stream. This command returns five response parameters: outPrivate, outPublic, creationData, creationHash, and creationTicketNotice.
The response authorization area is tacked on to the last line the in the schematic, after all the parameters. This means the response authorization area is the last area in the response byte stream.
Now that we’ve described the overall command and response structures, we’ll discuss some commonly used data types.
Data Details
If you’re writing low-level TPM code, this section is crucial to understand because the majority of your bugs will be in this area. When debugging low-level TPM 2.0 code, you need to understand this section in order to properly decode the byte streams being sent to and received from the TPM. The important data concepts to understand are common data structure constructs, canonicalization of the byte stream, and endianness.
Common Structure Constructs
This section describes some commonly used data structures. A good understanding of these is vital because you will see them often.
TPM2B_XXX Structures
All structures that start with a TPM2B_ prefix are sized-byte buffers. Each sized-byte buffer consists of a size and an array of size bytes. Table 5-5 shows a typical structure of this type.
Table 5-5. Definition of the TPM2B_DATA Structure (Table 71 in Part 2 of the TPM 2.0 Specification)
|
Parameter |
Type |
Description |
|---|---|---|
|
size |
UINT16 |
size in octets of the buffer field; may be 0 |
|
buffer[size]{:sizeof(TPMT_HA)} |
BYTE |
the buffer area that contains the algorithm ID and the digest |
The corresponding C structure looks like this:
typedef struct {
    UINT16    size;                   /* size in octets of the buffer field; may be 0 */
    BYTE    buffer[sizeof(TPMT_HA)];  /* the buffer area that contains the algorithm ID and
                           the digest */
} TPM2B_DATA;
Structure with Union
A union is often contained within a structure and preceded by a union selector. Table 5-6 is an example.
Table 5-6. Definition of the TPMT_HA Structure (Table 69 in Part 2 of the TPM 2.0 Specification)
|
Parameter |
Type |
Description |
|---|---|---|
|
hashAlg |
+TPMI_ALG_HASH |
selector of the hash contained in the digest that implies the size of the digest NOTE The leading “+” on the type indicates that this structure should pass an indication to the unmarshaling function for TPMI_ALG_HASH so that TPM_ALG_NULL will be allowed if a use of a TPMT_HA allows TPM_ALG_NULL. |
|
[hashAlg] digest |
TPMU_HA |
the digest data |
This structure has two elements: hashAlg, which is used as the selector for the digest union. This is indicated by the brackets surrounding hashAlg in front of the digest parameter. In Table 5-6, hashAlg is the selector for the digest union.
The definition of TPM_HA is shown in Table 5-7.
Table 5-7. Definition of the TPMU_HA Union (Table 68 in Part 2 of the TPM 2.0 Specification)
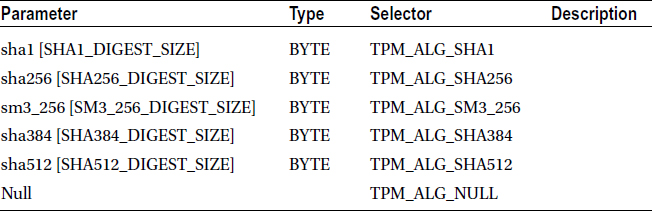
In general, in a structure, when there is a parameter A that is enclosed in brackets and is in front of parameter B’s name, parameter A is a selector for the type of parameter B. In Table 5-7, if hashAlg is set to TPM_ALG_SHA1, then the union element is sha1 [SHA1_DIGEST_SIZE].
The C code generated by Table 5-6 and Table 5-7 is as follows:
typedef struct {
    TPMI_ALG_HASH    hashAlg;
    TPMU_HA          digest;
} TPMT_HA;

typedef union {
    BYTE    sha1 [SHA1_DIGEST_SIZE];        /* TPM_ALG_SHA1 */
    BYTE    sha256 [SHA256_DIGEST_SIZE];    /* TPM_ALG_SHA256 */
    BYTE    sm3_256 [SM3_256_DIGEST_SIZE];  /* TPM_ALG_SM3_256 */
    BYTE    sha384 [SHA384_DIGEST_SIZE];    /* TPM_ALG_SHA384 */
    BYTE    sha512 [SHA512_DIGEST_SIZE];    /* TPM_ALG_SHA512 */
} TPMU_HA;
The data that is sent to the TPM and received from the TPM is minimized to eliminate any unnecessary bytes in the data stream. This guarantees maximum byte-stream transfer rates to the TPM, because TPMs are often connected to rather slow interface buses such as LPC and SPI. This minimized form of data is called canonical data and is not equivalent to the C-like data structures described in Part 2 of the specification. This concept is crucial to understand if you’re dissecting the data stream.
As an example, look at the MAX_NV_BUFFER_2B structure:
typedef struct {
    UINT16    size;
    BYTE      buffer[MAX_NV_BUFFER_SIZE];
} MAX_NV_BUFFER_2B;
This structure has a size field and a buffer that is MAX_NV_BUFFER_SIZE bytes long. In the reference implementation, MAX_NV_BUFFER_SIZE is 1,024 bytes. But when this data is sent to the TPM, only the size and the number of bytes specified by the size field are actually sent down the wire. If size equals 10 bytes, only 12 bytes are sent for this structure: 2 for the size field and 10 for the buffer.
In C, unions are used to overlap different types of data structure in a common union. The union’s size is the size of the largest type included in the union. A TPM 2.0 data structure that includes a union typically includes a selector that tells what type of data is in the union. A canonical representation of the data only contains the selector and the canonical representation of the structure selected from the union. For example, in the TPMT_HA structure, if the selector, hashAlg, is set to TPM_ALG_SHA1, the digest is SHA1_DIGEST_SIZE bytes, which is much shorter than the maximum size of the union.
TPM data is always in big-endian format when transmitted to or received from the TPM. This means little-endian CPUs, such as the x86 architecture, must always swap bytes before sending data to the TPM and after receiving data from the TPM.
The “Notation” section in Part 2 of the specification is very important to understand; we often refer to it when studying the TPM 2.0 data structures. You are highly encouraged to read this entire section of the specification, so we don’t repeat all the information here; but we’ll touch on a few critical areas (this is another good section to bookmark, because you’ll will refer to it often):
- In an enumeration table, a # character specifies the return type when the marshalling of an enumerated value fails: that is, when the passed-in value doesn’t match any of the allowed values.
- A $ character specifies that a parameter can be one of a previously defined range of values.
- A + character prefix to a value name in an enumeration means the value is a conditional type: it’s optional in an enumeration. Whether the optional value is allowed in a particular use of an enumeration is determined by whether the + character is appended to the type specification
- A null parameter in a union definition means the union can be empty.
- If a union member has no selector, it means the member is common to all the union types. The no-selector member is a superclass of the members that have selectors.
- {} specifies parameter limits. Read the “Parameter Limits” section for details.
The “Command Modifiers and Table Decorations” section in Part 3 describes the special notation used in the command schematics in Part 3; this is another good area to bookmark. We describe some of the more commonly used ones here, but please refer to the section in the specification for a complete list:
- +: Similar to the notation used in Part 2 for conditional types. When appended to the type, indicates that the null value of the variable can be used.
- @r: When used as a prefix to the name of a handle parameter, indicates that an authorization is required for that handle. This also means the tag for the command must be TPM_ST_SESSIONS.
- +PP, +{PP}: Suffixes to TPM_RH_PLATFORM that indicate an authorization using this handle is or may be, respectively, required to have physical presence asserted.
- Auth Index: In the description, indicates the number of required handles. (From our viewpoint, this seems redundant. The order of the handles is already indicated by their order in the table.)
- Auth Role: In the description for a required handle, indicates the role of the authorization: USER, ADMIN, or DUP. These roles are described in detail in chapter 13.
Commonly Used Sections of the Specification
Following is a list of some of the most commonly used sections of the specification:
- Command codes are listed in Part 2, in the section “TPM_CC Listing.”
- Error codes are found in multiple places:
- Part 2, “TPM_RC (Response Codes),” lists all the response codes.
- Part 1, “Response Code Details,” shows a flow chart for decoding the error codes. A software decoder application for automating this process is highly advised. After spending months hand-decoding error codes, one of the authors wrote one that he’s found extremely useful.
- Parts 3 and 4 describe the error codes returned by TPM commands and the subroutines called by those commands. A key point with respect to error codes is that Part 3 doesn’t describe all the error codes that may be output when a TPM command is executed. The command-specific code in Part 3 calls routines in Part 4, and these also output error codes. This has tripped up many an unwary TPM 2.0 developer.
- The “Table Decorations” and “Handle and Parameter Demarcation” sections near the beginning of Part 3 are very helpful for understanding the Part 3 command tables. Don’t overlook these sections!
- To understand the data structures in Part 2, the “Notation” section is very helpful. It describes many of the obscure characters and what they mean. Don’t overlook these special characters!
- The various types of sessions and authorizations are described in the “Authorizations and Acknowledgements” section in Part 1. These aren’t described to this level anywhere else. It is crucial to know where this section is and refer to it often when decoding command and response byte streams.
- The handle types are described in the “TPM Handles” section of Part 1. Of particular interest is the most significant octet, which describes the type of resource being referred to by the handle. The “TPM_HT (Handle Types)” section in Part 2 describes the various types of handles.
- Names of various entities and how they are derived are described in the “Names” section of Part 1. This is crucial in order to understand how session HMACs and policy digests are created.
- To understand policy session operations, the following sections in Part 1 are very helpful:
- “Policy Example.”
- “Trial Policy Modification of Policies.”
- “TPM2_PolicySigned(), TPM2_PolicySecret(), and TPM2_PolicyTicket().” This section provides details for these rather complicated policy commands.
How to Find Information in the Specification
You can use a PDF reader to search all four parts of the specification. Sometimes the bit of information you’re looking for isn’t where you might think it would be. For instance, even though Part 1 isn’t normative and isn’t targeted at describing structures, it often has the best descriptions of the functionality of certain data structures and their fields.
If you have access to a TPM library header file, you may be able to use the header to find a complete description of how the structure is used. The easiest way to do this is as follows:
- Find the data structure of interest in the C header file that describes the TPM 2.0 data structures.
- A well-written instantiation of this header file lists the table number for the structure in comments above the data structure or type. Find this table number in Part 2 of the spec; the descriptive text above the table provides the additional information needed to understand the structure. This is one of the most useful tricks to know.
Strategies for Ramping Up on TPM 2.0
Engineers come in many flavors, so there are many approaches to cracking a specification like TPM 2.0. As authors, we have different personalities and have used different strategies to approach this spec. In this section we describes how we ramped up on TPM 2.0 and what worked best for us. You may pick and choose from one or all three of our approaches or develop your own. We hope our journeys will facilitate yours.
I am the newbie of the bunch. I started working on TPM 2.0 in May 2012. I had worked previously with TPM 1.2 but only with the functionality I needed to know for enabling Intel Trusted Execution Technology (Intel TXT). This means I had never learned about sessions and how they worked in TPM 1.2, and I didn’t know much about keys and key management.
As an engineer with product schedules to meet, my goal was to “Get ‘er done.” I first tried to read through the spec but quickly bogged down in the massive quantities of unfamiliar terms and what was, to me, confusing lingo. So, I started figuring out which TPM 2.0 functions I needed and how to implement them. This led me to Part 3 of the specification as a starting point. As I tried running my coded functions against the simulator, I quickly ran into errors that I couldn’t explain, and this caused me to single-step through the simulator. This was when I first understood the difference between the canonical byte stream data that the TPM understands and the C structures used to specify the inputs to TPM 2.0 commands. Painstakingly, I debugged all the functionality needed for a TPM 2.0–enabled TXT prototype in order to meet my scheduled deliverable. In parallel, I began to develop the TSS 2.0 system API code. This required a greater depth of TPM 2.0 knowledge, which came as I simultaneously coded, read the specification, and debugged through the simulator. To be honest, there were still parts of the spec that resisted my attempts at comprehension—my only remedy was telephone consultations with the TPM Working Group chairman, who was extremely helpful in answering my questions about HMAC and policy sessions. As understanding dawned during my consultations with him, we developed some graphical representations of the different types of sessions and how they relate to each other, some of which appear in this book; and thus my idea for this book was born.
After completing much of the TSS system API development work, I had enough knowledge to go back and do a deep dive through the specification; this was largely motivated by the need to prepare training slides for an upcoming TPM 2.0 training session I was slated to present at Intel. For three months, I read the spec from cover to cover, and for the most part, it made sense. This wouldn’t have happened if I had tried a deep dive from the very beginning. Here’s another tip, which may sound strange: I’ve found it very effective to read the specification from my Kindle while exercising at the gym. I think the physical exercise keeps me alert; if I did this at my desk, I would be battling to stay awake. And 30 to 45 minutes per day seems to be the right amount of time to make progress, stay alert, and avoid completely overloading my brain.
To summarize my strategy:
- Initially read some of Parts 1, 2, and 3 but struggled to comprehend them. In spite of the difficulties, this initial read helped me get an overview of what’s different from TPM 1.2.
- Focused on a bare-bones TPM 2.0 development deliverable by beginning with the Part 3 descriptions of TPM 2.0 functions.
- Developed the TSS system API while reading the spec, developing code, debugging through the simulator, and consulting with an expert more or less in parallel.
- Did a deep dive through the spec by reading 30–45 minutes per day.
Some final pieces of advice: start somewhere, and don’t sweat all the details at first. Get a high-level understanding, and then keep digging progressively deeper. And don’t be afraid to ask for help when you get stuck. I’m still learning myself.
I was involved with developing the specification from the start. My input takes the form of advice, rather than a narrative of my own personal experience.
The TPM specification combines the styles of both a user manual (Part 1) and a reference manual (Parts 2 and 3). If you have no prior experience with a TPM, or just TPM 1.2 experience, I recommend reading Part 1, or at least the sections relevant to your application. Even if you don’t immediately grasp all its complexities, you will become familiar with the technical jargon and the TPM features and gain some sense of how they fit together.
Once you know what you want to do and have some sense of the command flow, Part 3 gives the details for each command. The description and command and response tables should be sufficient. Users in general won’t have to read the code in Parts 3 and 4.
I anticipate that most users won’t be constructing command streams. Middleware libraries such as a TPM Software Stack (TSS) normally perform those tasks. If you’re writing or needing to debug through such middleware, Part 2 gives the details for each structure, with the names of the structure members, data types, and possible parameters. The platform-specific specification goes further, describing the parameters for a TPM implementation.
Part 4 describes, in C code, the details of TPM operation. Application and middleware developers should rarely have to refer to Part 4.
I was part of the development of TPM 1.2 and 2.0 from the start. I ramped up by first reading Part 3. It made perfect sense to me, except that it omitted anything about how to actually authorize a command. So for commands that did not require authorization, like TPM2_GetRandom, Part 3 told me everything I need to know: what parameters needed to go where, what size they were, and so on. The first parameter was a bit of a challenge until I realized that it was always likely to be NO_SESSIONS, because I wasn’t going to be auditing the TPM2_GetRandom command. The parameters are described in detail in Part 2 and were mostly pretty easy to understand for commands that don’t require authorization.
Next I dug into doing simple authorizations using the password session. This was nice because the password session always exists, and I didn’t need to do any encryption/decryption, salting, or auditing of the session. It was just a simple password, which was in the clear. Reading the section “Password Authorizations” in Part 1 explained these easily. I started by changing the basic passwords associated with taking ownership of the TPM.
Next I tackled creating a key. This was a more complicated task, because I needed to understand the unions for defining the algorithms and other parameters associated with the key I was creating. I started with a key that only had a password authorization (as opposed to a policy or HMAC authorization), because it was easier. Basically I created a storage root key (SRK) for the TPM.
Then I tackled policy authorizations. Because I wanted to create a signing key whose password I could change, I created keys locked to the password of an NV index. That meant I had to create an NV index; and I wanted one that couldn’t be removed and re-created with a different password, which is what I did. See Chapter 14 later in this book for a description of how I did this.
I wanted to play with types of sessions, so I authorized a key using an HMAC. Then I audited the command. After successfully auditing, I used a decrypt session to pass in the password. Finally I used a salted HMAC session.
Next I did a more complicated policy, using TPM2_PolicyOr and TPM2_PolicyAuthorize. At this point I felt like I had a pretty good handle on how things worked.
Platform specifications augment the library specification to enable the creation of TPM definitions that are platform specific. They list what is mandatory, optional, or excluded; define minimum and maximum values; add initialization and provisioning requirements; and detail the physical interface.
You may need to reference the following platform-specific specifications:
- TCG PC Client Platform TPM Profile (PTP) Specification: Defines platform specifics for PCs and server platforms.
- TPM 2.0 Mobile Reference Architecture: “[D]efines a reference architecture for the implementation of a TPM in modern mobile platforms using a Protected Environment (section 7). This type of TPM is known as a TPM Mobile” (TPM 2.0 Mobile Reference Architecture).
Summary
Although the climb is steep, you can ramp up on TPM 2.0 much more efficiently with a good overview of the specification and some tips from early explorers. In this chapter we’ve shared our somewhat hard-earned expertise to assist you. The assimilation process has begun!
The next chapter describes the commonly available execution environments. It prepares you for the code examples that we present in later chapters.