
After seeing the many HDR photos, anecdotes, tips, and techniques in the previous chapters, you’ve made it to the tutorial. In no time, you’ll be making HDR images of your own. I know I can teach anyone to do this. All you need to do is follow this updated version of the popular online tutorial. I started the skeleton of this tutorial a few years ago, and I continue to evolve the technique, the steps, and the presentation as I receive feedback from users. Because this tutorial has gone through many improvements, it’s pretty solid and should satisfy the vast majority of needs. It is the product of iterations of design and refinement by me and my peers who have helped guide me down this path. In essence, this tutorial has become a beast of its own that has grown and become fitter over time.
HDR actually defines a broad range of substyles that can be sliced and diced many ways; there is no defined vocabulary to describe these various categories. I have been told by many, and I believe objectively, that I have developed a unique style within this genre. These are the techniques I will share with you.
Often, my goal is to produce an image that is rich, realistic, and romantic—my three Rs. Every photo is a wonderful challenge. The first photo out of the camera is probably the most important part of the equation. It should already have those three Rs. The techniques that follow can help to accentuate those factors as needed.
It is also my aspiration to follow humbly in the footsteps of Renoir, who stated, “A painting requires a little mystery, some vagueness, some fantasy. When you always make your meaning perfectly plain you end up boring people.”
So, let’s work on this process together.
When it comes to tutorials, you will note that this one is quite unconventional. I keep instructions simple, practical, and straightforward. I won’t describe every button, possibility, option, and suboption. You don’t have time for all that. You just want the basics so you can make beautiful photos as quickly as possible.
I am a firm believer in giving you the fundamental tools you need, teaching you the best practices, and then sending you off into wild experimentation. By giving you just the basics, you can go beyond them on your own and develop your own style. Feel free to start by emulating, and then branch out on your own.
At the end of this process, I guarantee that you will have created a few shots that will impress your friends and loved ones.
As photographers, you probably already have all the equipment you need to take HDR images. You do not need a special camera beyond most of the standard-issue Digital SLRs. If you do not have a DSLR, I provide suggestions in the Digital SLR section on my Web site that are sorted into Good, Better, and Best categories. Note that my recommendations are all Nikon related because these are the products with which I am most familiar. However, Canon and many other brands have counterparts for the Nikon models I have suggested and are perfectly good for creating HDRs. With a basic camera and a bit of software, you’ll be good to go.
The only two applications you really need to produce HDR images are Photomatix Pro and Photoshop. The cost of Photomatix Pro is less than $100, and you can save even more when you purchase it by using the STUCKINCUSTOMS coupon code. I’ve tried many kinds of HDR software, and many companies send me their products to try. And although there are many other possible options, in my opinion Photomatix Pro is the best. It holds a prized spot on my quick-launch bar!
You can buy and download Photomatix Pro directly from the Photomatix site at www.hdrsoft.com.
I’ll assume you know how to get Photoshop. If you are purchasing it for the first time, I recommend the basic version. You don’t need all the extra bells and whistles in the Extended version unless you know beforehand that you’ll be using them for sure.
In the next chapter, I mention a few more tools that are optional.
I almost titled this section, “How to get some equipment on the sly so your spouse does not ask too many questions.” But here are the tools you’ll need to capture your favorite images.
Because equipment is always evolving, I list the latest data and analysis on www.StuckInCustoms.com in the section called Digital SLR recommendations.
You’ll need a DSLR camera that has a feature called auto-bracketing. Most decent SLR cameras have this feature. Essentially, it allows you to hold down the shutter button while the camera takes multiple photos at different shutter speeds. Commonly, in this mode, if you hold down the shutter, your DSLR camera will take three photos very quickly. Each will be at a different exposure. For example, it may take the first at −2, the second at 0, and the third at +2.
If you are just getting started, the “kit” lens that comes with the camera will probably be sufficient for you. Since I have a penchant for landscapes and think they are wonderful subjects for HDR, I usually use a wide-angle lens. Lenses that range from 10–30mm work well when you’re trying to photograph landscapes. Below this range you’ll get a fish-eye warped look, which can be interesting if you are into that sort of thing. Again, you’ll find lens recommendations, which I constantly update, on my Web site as well.
I highly recommend purchasing a tripod, since you will inevitably be shooting sunsets and the like with your newfound HDR skills. You must be able to keep the camera still during the multiple exposures.
The best advice for buying a tripod is to take your camera to your local camera store and try out two or three different setups. Every head is different. Every set of legs is different. Store employees are always helpful and will assist you in finding one that feels right to you and is easy for you to use. Ordering a tripod over the Internet is almost as scary as ordering the ultimate pair of jeans.
The HDR process is not difficult. In just a few steps you’ll be producing striking images. Here is a short overview of the three major steps:
Take photos.
Create an HDR in Photomatix Pro.
Import that result into Photoshop and remix it with one or more of the original RAW images to create a beautiful final result.
I’ll use one of my HDR images to guide you through the steps. Once you have taken some photos at different exposures, you can use those to follow along as well. I’ll describe each step in detail and then provide some bonus steps—cleaning up noise, using double tone mapping, integrating movement, batch processing, and converting a single RAW file into HDR—to complete the process.
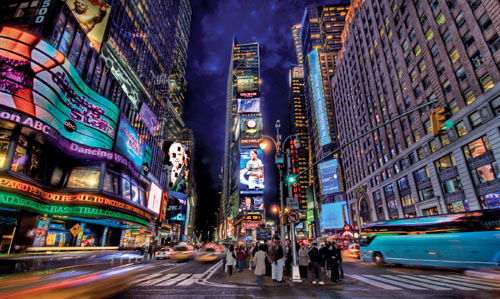
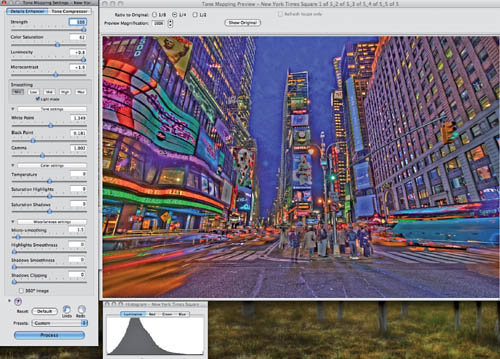
Let’s start by looking at a before-and-after shot of Times Square in New York City.
The before shot (final shot on page 178).
Why not start by taking a photo of your home at sunset? You don’t have to travel, and you’ll have many light levels available to you.
Set up your camera in aperture priority mode because you want everything to line up so the lens does not flex in focus between the shots. What aperture should you use? Well, this tutorial doesn’t really advise on this sort of thing, but f/9 or f/10 should keep everything in focus. There’s a lot more to aperture than that, but this should suffice if you are just starting to understand aperture.
Turn on auto-bracketing. If you have three pictures in the auto-bracket, set it up at −2, 0, +2. On my Nikon D3X, I usually take five pictures at −2, −1, 0, 1, +2. You’ll find this +2 to −2 range satisfactory for 98 percent of light situations.
Make sure your pictures are saving as RAW. JPEG is OK, but RAW gives you more flexibility later in the processing steps. RAW photos contain a lot more light information than JPEGs.
After you take the photos, you’ll notice the results are a dark exposure, a normal one, and a bright one. This is because your auto-bracketing has adjusted the shutter speed automatically for the three shots. The longer the shutter is open, the more the light gets in.
It should be obvious by now that the fast shutter speed only lets in a bit of light. This dark exposure gives you nice details and colors on the brightest objects in the scene. Conversely, the brightest exposure gives you details and colors in the shadows. Thus, you are capturing all the light in the scene.
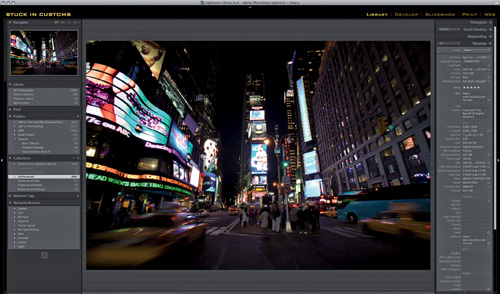
The figure to the left shows the five pictures I have selected from the Times Square image in Adobe Lightroom, which I use to organize my photos. You can also easily see that the images are all taken at different shutter speeds.
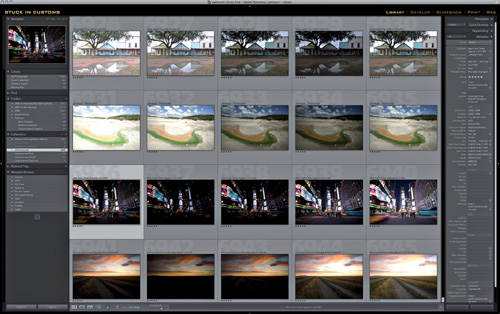
The images lined up and ready in Lightroom.
Now it’s time to fire up Photomatix Pro, which will take your three or more shots and convert them into an HDR image. You can then tone map the image and save it as a JPEG.
You can use Photomatix Pro for a few tasks:
To generate a single HDR from auto-bracketed shots (most common for beginners and the bulk of this tutorial)
To generate a batch of HDR images after you return from a shoot
To convert a single RAW photo into an HDR
I’ll discuss each task in detail, so let’s start with the first.
When Photomatix Pro is loaded, just its menu appears. Note that I am using Photomatix Pro 3.2 on the Mac. The PC version will be very similar. Photomatix Pro is updated frequently, but later versions should still work within the margin of error of these screen shots.
Choose Generate HDR Image. Then browse to and choose the images you want to use.
Choose the options you like, and then click Generate HDR.

Note: Here I’ve used Lightroom to convert the five RAW images to five JPEGs. You can use Photomatix Pro to open the RAW photos as well, but Photomatix Pro will immediately do the conversion. I spoke with the engineers at Photomatix, and they suggest it is best to do the conversion on your own.
I only select Align Source Images if I feel that there might have been a tiny amount of tripod shake. Otherwise, I don’t select it. To be honest, the other options are hit and miss. I never choose Attempt to Reduce Ghosting Artifacts because I do that manually later in the process.
An image will appear. Click Tone Mapping.
Now this is the fun part! All these Willy Wonka-like controls are at your disposal to play around with and modify your image.
My biggest word of warning here is that every photo has different needs. The only way to get used to these settings is to process about 50–100 photos with them. Be patient. Eventually, all these sliders will make sense to you.
In fact, you really only need a few of the sliders. These are the most important:
Strength. Keep this slider at 100%. You can dial the extremity of the result back later when you remix it with one of the originals in Photoshop.
Color Saturation. Keep this setting reasonable. By that I mean don’t oversaturate your photo. There’s a difference between color that pops and color that bleeds too electric.
Luminosity. This slider produces the “painterly effect.” The farther to the right you move it, the less contrast will appear in the photo. If you find you’ve introduced “halo” problems in daylight shots, move this slider to the far right to remove the halos. I describe another way to eliminate halos later in the sidebar “Daytime Sky Considerations.”
Microcontrast. This is a mysterious slider that increases and decreases details and fluctuations in colors on a very small scale. As with the other options, play with this setting until it looks and feels right.
Smoothing. This important slider affects the “HDRness” of the shot. The more you move it to the left, the more psychedelic your image will be.
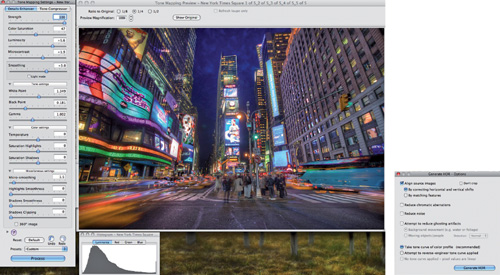
White Point and Black Point. Move these sliders right and left until the bell curve in the histogram rests inside the box. If the histogram bleeds off the left or right side, you are losing light, and that is not good.
What about all the other sliders? They might be useful in their own way, but I honestly don’t use them much. The Micro-smoothing slider can help reduce noise, but I use a special noise-reduction program I’ll discuss shortly.
Click Process. Then save your image as a JPEG or a TIFF. I choose JPEG for speed and because I end up remixing so much of it with the original RAW image that the extra TIFF information would be lost anyway. Processing speed is important to me.
Now that you have read so much about the photos I’ve provided throughout this book, I can assume we are friends, right? I have a favorite saying that I’ve used in a few of my interviews, which I’ll repeat here: “Friends don’t let friends do HDR on drugs.”
Look at the following image. I implore you not to do this. So many people make their HDR images look like this, and it honestly gives us all a bad name.
Now you need to do a few relatively simple things in Photoshop to clean up your HDR image. It looks nice, but it still needs some work. In the Times Square photo:
The cars and pedestrians became “ghosted” because the HDR process was confused by objects being in different locations in the different frames.
The ticker around the ABC building is too blurred.
Many digital billboard images are blown out.
Noise is present.
Note: Perhaps the most important modification you can make in Photoshop is not in the Times Square photo, and it is what I call the “daytime adjustment.” If this was shot in the daytime, the HDR process would make the sky too dark. It is important to remix the original sky with the HDR image to make the photo more realistic. There is no doubt that the sky is brighter than the ground, right? So make it so by using the techniques described in this section.
You’ll start by importing your four photos (the original three exposures and your new HDR image) into Photoshop and stacking them in layers.
I have six photos, the original five plus my new HDR. However, there is no need to import them all. In fact, sometimes you just need to import one or two, depending on the elements you feel need remixing. Your original photos will most likely be quite good, so you’ll only need to mix them “as needed.” This requires experience, but here you’ll see what I’ve done for the Times Square photo.
Use Adobe Bridge to select all the photos, and then choose Tools > Photoshop > Load Files into Photoshop Layers (my preference). Alternatively, you can load all four images separately, and then copy and paste each of them into a single Photoshop file. Each new paste will make another layer.
If you loaded the RAW photos into Photoshop, you may see the Adobe RAW importer dialog. With it you can make some last-minute adjustments to your photos before they import into Photoshop. Since you’ll be blending these with the tone-mapped result, I recommend that you make adjustments here to make the photos as “HDR-like” as possible. Read on to understand what I mean.
Notice that the first figure on the next page shows the brightest of the five exposures. I plan on using the bus, the taxicab, and the pedestrians from this shot. Because I want them to blend smoothly, I’ve set the RAW importer to give an HDR-like quality to the photo. I’ve increased the Fill Light, the Recovery, the Contrast, and the Vibrance settings. These are perhaps my four favorite sliders to use, and they alone can apply some of the qualities of an HDR image to your underlying photos.
Make sure all the images have been imported into Photoshop, as shown in the second figure on the next page. They should also be in the same PSD and layered on top of one another. I’ve placed the result of the Photomatix Pro tone mapping on the top. Beneath that are three of the exposures—the darkest, the medium, and the brightest.
Let’s remix the best elements of those underlying photos to help bring the scene into its proper appearance. Most people neglect this part of the process. I do this with every HDR photo, and so should you.
Place the darkest of the three directly under the tone-mapped photo. You’ll mask through the top layer and reveal the layer underneath. I’ll provide just a basic description of masking here.

This image shows the brightest of the five exposures.

Make sure all the images have been imported into Photoshop.
Click your top, tone-mapped layer, and then choose, Layer > Layer Mask > Reveal All to create a little white box beside your layer (first image on page).
If you use the Brush tool to paint black in that white box, it will reveal the layer beneath. If you use the brush to paint 50% gray in that box, it will show 50 percent of the layer beneath.
Choose the Brush tool. Set the Opacity to 50%. This means that your brush will show 50 percent of the current layer and 50 percent of the layer beneath wherever you paint.

Because the layer beneath is the darkest, I want to mask in the ticker and some of the bright billboards so they are readable (just like when I was there). I use the brush to paint through to the layer beneath. Since the brush is set to 50%, I’ll make multiple strokes to reveal even more of the layer.
If you look closely at the little white box, you will see a series of gray and black strokes. This shows the parts of the image that have been masked.

Select both layers by Shift-clicking, and then choose Layers > Merge Layers.
Photoshop provides multiple ways to do everything. But this is the method I prefer—masking, then merging, then masking and merging again. I do this until I have one final image.
In the image to the right I’ve combined the top two layers into one. There are just two remaining.
Repeat steps 5–7 as needed.
As you can see in the figure to the right, I’ve repeated the masking and merging. At this point I’m masking in the brightest of the original shots. I want to get the pedestrians and the cars, as well as a few other items that look best in the brighter version. Note that in many instances, I’m not masking through to 100% but instead doing a soft merge of the two layers by using a lighter brush. Sometimes I set the brush at 10% opacity if I just want to slightly merge two layers.

If you examine the white box again, you can see that I heavily mixed in the cars and the pedestrians but I went lighter in other areas.
The figure below shows the details of the masking: You can see the white box and how the pedestrians were masked through at 100 percent.

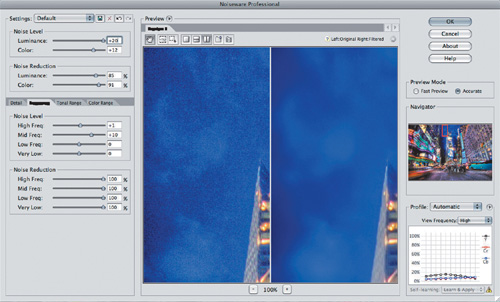
I must admit, I’ve tried a variety of noise-reduction software packages. Many are good, and they are all better than what Photoshop and Photomatix Pro can do on their own.
But the best application on the market is called Noiseware Professional. It is pretty inexpensive. And as with many other pieces of software I use, the manufacturers have provided my readers with a special discount code labeled STUCKINCUSTOMS to save you money.
You can see that the Times Square photo had a ton of noise in the sky, which is not good! This happens a lot in HDR images. The following figure shows just what Noiseware Professional can do. The results are impressive. I can’t tell you how much work and time this application has saved me.
Earlier in the book I made reference to the double-tone-mapping technique. It might be a hidden feature of Photomatix Pro; I’m not sure. To be totally honest, I did it by mistake one day, which is an added benefit of doing something over and over. On occasion, you’ll make a mistake and be pleasantly surprised.
Note that this technique is quite “artistic.” It certainly veers away from realism to an extreme degree. However, I believe we all have photos that demand a nice artistic treatment. Like my friend Frederick Van, host of the excellent weekly podcast “TWIP: This Week in Photography” says, “Those pixels are there to be punished!” High five Fred!
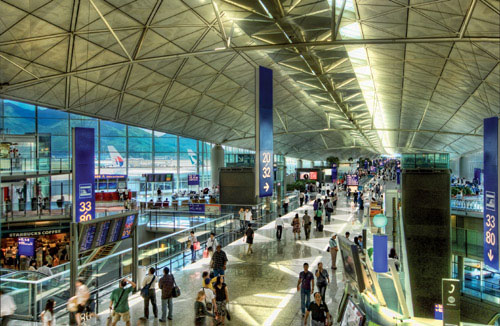
I’ll illustrate this technique with a photo of the new Hong Kong airport. While dodging the Chinese police, I was able to get up on a catwalk with my tripod to take this shot. I do not recommend doing this.
Use Photomatix Pro to create an HDR (as you did in an earlier section).
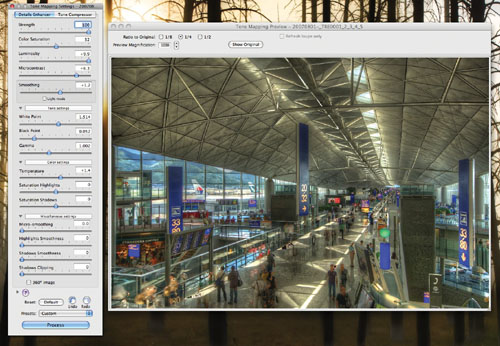
The settings I used are shown in the figure, but again, every photo is different, so these settings will probably not work for you. Do not set your Microcontrast to +6.3 because “Trey did it like that.” Okay? You really need to experiment and make mistakes. There is no right answer or universal settings for any photo.
Click Process.
Your photo will be ready to save, but don’t save it. Tone map it again. The Tone Map button will be disabled, but you can still press Command-T (the hot key) to return to tone mapping.
Because I’m a hot key kinda guy, you can understand how I made the “mistake” of a second tone mapping the first time. It was a late night and I had just completed an HDR image. I was looking at the final product and wondering if I’d already tone mapped the image. So, I pressed Command-T again, and something wild happened.
The Tone Mapping dialog appears. This time, the image will look even more extreme. So, you must change the settings in a different way than before.
Notice the Saturation. The second time through tone mapping can really blow out colors. Be ready to drop the color saturation way down.
Notice the Luminosity. Drag its slider most of the way to the left.
Be sure to lower the Strength meter (at the top) a bit if it is too psychedelic. Every photo is different.
Click Process again. Save the image.
You now have a double-tone-mapped image. Next, you’ll want to bring it into Photoshop and clean it up. Remember to remix it with the original RAW images to bring it to a level of realism that you feel is appropriate. With a double-tone-mapped image, this can be quite difficult since you are now well beyond the look of the original image. However, there is still room for improvement—as with everything.

There are two ways to get moving people and objects to look decent in an HDR image:
With a multi-image HDR, choose one of the constituent images in which the moving images look best.
Use a single RAW to create an HDR image (described in a later section).

Let’s focus on the first method and continue to use the image from the Hong Kong airport. Because this image is a bit “extreme” in the world of HDR, it will prove to be a good example of how to integrate an original image with the final product.
Choose your favorite of the originals that has the moving subjects in the positions you like. Use the RAW importer as you bring it into Photoshop to adjust the Exposure, Recovery, Fill Light, and other sliders to make it look as HDR-like as possible.
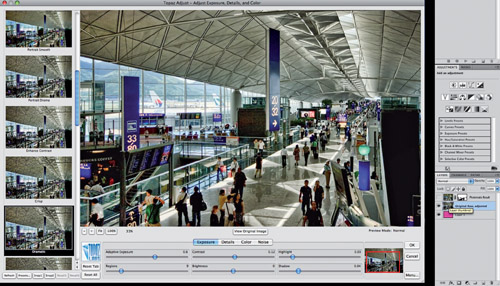
Use Topaz Adjust (a review and more information are provided in Chapter 6) on that layer to make it look even more HDR-like. Topaz has many prerendered settings on the left. Cycle through them and select your preferences. You can also change the settings in the other sliders on the right. Don’t worry about what the building and the nonmoving objects look like. If they look outrageous, it’s okay. Just worry about making the moving objects look appropriate.
When the moving objects in your original image are finally HDR-like, you can begin the masking process.
The first figure below shows the double-tone-mapped image at the top. I made a pink layer beneath so you could see where I masked through, essentially where the moving objects were.
In the next figure, you can see more detail. Note that there was no need to mask the people who were not moving.
The final image is shown on the next page.

Photomatix Pro also has a batch-processing mode. It is quite easy to figure out how to use, so rather than describe the process, I’ll describe the HDR workflow after a shoot in terms of batch processing.
Fill a single directory with all the resulting images from your shoot. For example, I might place 50 images in a folder. I shoot my HDR images in groups of five, so that means there will be ten HDR images when I’m done.
Choose Automate > Batch Processing.
Make sure Generate HDR Image is selected. Do not select any other option except perhaps the Align Images option if you think the photos might contain camera shake.
In “Select X images at a time” type 5 or 3 depending on the number of images in your groupings.
Click the Select Source Folder button and navigate to the folder that contains all the images.
Your images will appear alphabetically in the listing. Ensure that you only have image files in the target directory and no other rogue files because they will disrupt the batch process.
Click Run. This process will take a while, so it’s a great time to get coffee or a glass of wine, depending on your mood.
Open the resulting .hdr files in Photomatix one at a time and follow the tone-mapping process described earlier. You can then continue with other needed tasks to complete your HDR images.
Creating an HDR from a single RAW image is quite simple. I commonly do this with an image with moving subjects that are of core importance to the meaning of the photograph. Of course, it is usually better to try to get multiple exposures because you simply have more light with which to work. However, a single RAW file still contains enough light information to produce an acceptable HDR result.
In Photomatix Pro, choose File > Open, and then locate your RAW photo.
You will see the following message or something similar.
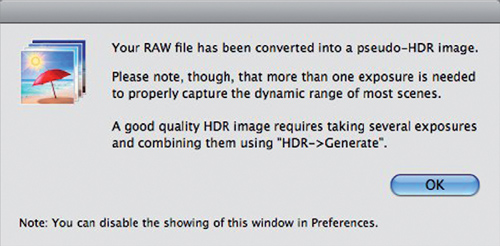
Yes, we know more images are better, but you can still create a great HDR image using this method. Click OK (like you have a choice!).
The Tone Mapping dialog appears, as before. The reason I’m using the road/landscape image in this example is because it is a daytime shot. Recall my warning about how Photomatix Pro will “dirty up the sky.” Well, you can see that happening in the image in the figure.

When you make your adjustments, do not worry about the daytime sky. This advice is also valid for multi-image HDRs. You will fix the sky shortly. Just make the adjustments so you are happy with everything but the sky.
Save the tone-mapped result, and then open it in Photoshop along with the original RAW shot. You’ll probably want to use the RAW importer to make the original RAW image look as good as possible. (Last step on next page.)
Many people new to HDR notice that daytime sky often looks murky right after the tone-mapping process. This is either because of a “halo effect” that has a horizon glow before giving way to a darker upper sky or because of overly dark, gray, or muted colors. Both problems can be overcome by remixing the original RAW to whatever degree looks appropriate. Sometimes I’ll remix in 100 percent of the sky from the original RAW. Other times I will just fix the part of the sky where the clouds have turned pure black during the tone-mapping process. Whichever option you choose, always consider making a wholesale adjustment to the sky area in daytime shots via the masking method described earlier.

Create a layer mask and then paint with a brush to reveal the layer beneath. I created another hot pink layer so you can see where the mask was made. Making the original sky blend in is extremely important.
The following figure shows the final result. Note that I left the lens flare in the image. I like them and usually leave them in the final photo. Many photographers don’t like them, but I think they are colorful and pretty.
When you create a single-image HDR with people in the photo, they will not look right. The HDR process will make their skin dirty and mottled. In these situations, you’ll need to mask in the original skin while blending in with the background as much as possible. But there is a lot of room for experimentation in people photos, so be open-minded and see what you can discover.
