A very large percentage of ML research and modeling today is left to gather dust in Jupyter notebooks or multiple Python scripts. It takes a great amount of understanding of other IT systems and enterprise architecture for a data scientist to take things to production and go live on a real system. Trends have changed in the industry from just a “data scientist” to a “full-stack data scientist.”
All of our modern ML application code is nothing but libraries with a complicated setup process with data munging. In this chapter, you will learn how to take models to production with the help of Docker, which can reproduce the environment you used to develop your ML code, which then leads to reproducible outputs and hence provides portability. You will also deploy your app with a live URL using Heroku.
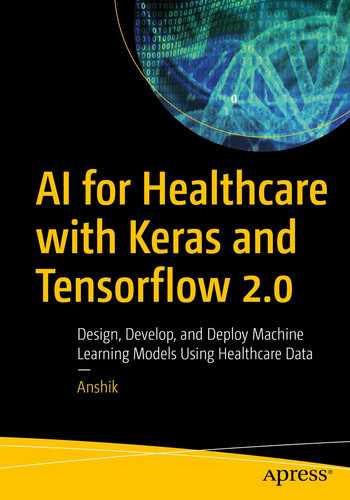
Demystifying the Web
Most enterprise applications today are web applications. Gone are the days of downloading an .exe file to run the latest software. Most software today runs in the cloud. This has led to a change in the scale, experience, and cost for both companies and consumers. We are putting larger computing powers into smaller devices and are living in an “always connected” world via the Internet. With changing times, a change in technology is warranted.
Modern software systems follow a CI/CD approach (continuous integration and continuous deployment). Continuous integration aims at integrating the source code with proper testing, and deployment takes that code and packages it for deployment. For AI to be successful, it needs to be a part of this system.
A data scientist, when given a problem, will start with a Jupyter notebook/Python script and create a model that solves the problem. Once the model achieves the required accuracy, it will be stored in file formats such as .h5, .pkl, or .onnx so that it can be loaded and used by another data scientist or end user. To integrate it into modern applications, which are traditionally written in JS/C#/Java or C++, we have to write a wrapper that can call such a model inside its environment, as most of the data pipelines are written in such languages. This isn’t just a problem of integration but also of storing and making available the compute resources to run such a model, as most likely the model will require a GPU. Hence we can’t just keep exchanging files. We need to manage the model lifecycle just like software development.
How Does an Application Communicate?
Evolution of web technologies
Generally these websites were supported by local servers maintained by a company’s IT but as the applications became complex and extremely connected (with data, people, and other applications), it was difficult to scale the servers proportionately. It didn’t make business sense and the resources weren’t available to maintain such a highly performant system.
Cloud Technology
And then came cloud technology. For the uninitiated, the cloud is an on-demand computer system available to many users over the Internet. This on-demand system helps us get desired storage and processing power through virtualization (i.e. dividing (through resource-locking via software) servers into smaller virtual machines).

Various cloud-based services. Source: redhat.com
On-site is very rare these days. It might be used for some internal software/websites that can only be accessed via a company’s intranet.
In IaaS, only the infrastructure is rented (i.e. a machine with certain storage, RAM, and compute resources is commissioned to you). Imagine buying a CPU. Now you can do anything: install software, make applications, or even start a website. Yes, you can host a website with your computer but can you guarantee uptime and speed?
While using PaaS you are only concerned with developing your code and data scripts. You are not concerned with how many VMs you need to run your code efficiently and also provision the OS, library versions, and so on for each VM separately.
SaaS are generally web-based tools like Google Colab, Facebook, LinkedIn, etc. They are so called because you don’t need to set up anything in order to use them. All you need is an Internet connection that communicates to the cloud.
Docker and Kubernetes
Why Docker?
Modern web apps contain a lot of dependencies. Some of them are OS dependent. Some of them are dependent on versions of different libraries that are used. This situation is only expected to grow as more and more libraries are developed independently. You could be using one library from one developer and another one from another, and thus is the case in ML.
This can be very troublesome if you have to integrate code tested on multiple machines (in development) and then integrate it finally to a staging server. To manage issues like this, a new development paradigm is emerging called containerized applications . It basically keeps the code, libraries used to run it, and OS-level information as a separate, isolated unit. This isolated unit can be run on another machine as is without worrying about configuring the machine for the application code to run. Docker is the most widely used container technology today and is very popular in the ML community.
OS Virtualization
Docker containers run on top of a host operating system and provide a standardized environment for code running within the container. Docker is suitable when the development environment’s operating system and testing operating system are the same. These containerized units basically solve the DevOps issue in ML because you now, along with code, get all of the dependent libraries with the right version and even the OS (i.e. an exact replica of the developer's environment).
This OS virtualization using Docker allows you to achieve efficient use of resources as compared to hardware virtualization done using VM creation with applications such as Hypervisor because you can now dynamically allocate resources between Docker containers, although they all use the same server compared to VMs, which block resources to their respective unit.
Kubernetes
Now, imagine a full-fledged app like Amazon that uses multiple such images of a container. One is allowing search results to come up, one is recommending new items, and one is capturing user behavior and interaction touchpoints with the web app. Can we scale all of them dependent on their usage? Yes. For orchestrating independent Docker containers, we use Kubernetes.
Covering Kubernetes or Docker in more detail than I have is out of the scope for the book but there are some excellent resources online such as articles on https://mlinproduction.com/.
Deploying the QnA System
I have covered the basics. You are ready to now deploy your Q&A setup and create a web app.
First, you need a framework to handle your deployment and integration needs such as front-end and backend communication, client- and server-side scaling, etc. You will use Flask for this purpose. Let’s dive into it.
Building a Flask Structure
Flask is a microservices web-based framework that allows you to expose any business logic/functions via an API. Although I am not going to cover a lot of Flask, for those of you using Flask for the first time, here are some basics.
Start by creating a folder named covidquest. You will use this as the folder for your application.
Install Flask so you can download the latest Flask via a pip channel.
After setting it up, let’s create the Flask app.
There are two essential things that are required to make your Flask app, one that handles the client side (front end) and another that handles the server side (back end).
app.py: A Python script to handle client communication and generate responses.
index.html: Your GUI interface. It allows users to submit inputs (a.k.a. requests) for computation and renders the returned result, exactly like you studied in the section “How Does an Application Communicate?”
You can clone the app files from https://github.com/NeverInAsh/covidquest. This will serve as your starting point, but let’s quickly see the basics of what’s in each of your files.
Deep Dive into app.py
- 1)
You start by importing all the relevant libraries used to write your backend logic.
- 2)
You then create an app object, which is an instance of the Flask object. Using it, you can configure your entire application. For example, you make sure that Flask knows which web page to render by explicitly giving the link to the templates folder. The templates folder is used to store all of the HTML files of the app, whereas all of the CSS and .js files (other technologies used for front-end/client side) are stored in static folders.
- 3)
The app object also helps set up routes for the endpoints/functions, which in turn invoke a URL. (A URL is the addresses of an endpoint.) This is done using the decorator @app.route(<url>, methods), which is an HTTP method for communication.
- 4)
The most common data communication/transfer methods are GET and POST. Whereas GET sends unencrypted information to the server, POST masks this information and passes the data in the request's body.
- 5)
You use the home endpoint as the landing page for your website. It simply renders the index file.
- 6)
You also use decorators like @app.before_first_request, which makes sure that all of the required files/variables needed to generate a response to a request are loaded before the server is ready for communication.
- 7)
app.route() is used to map the specific URL with the function. For example, you are mapping the landing page/home page of the website with the URL “/”. Similarly, you’re mapping “/top_k_results” with the function top_k_results.
- 8)
render_tempalte() is used to render HTML that is the skeleton of the UI for the client to interact with. Flask uses the Jinja template library to render templates. Read more about it at https://jinja.palletsprojects.com/en/2.11.x/.
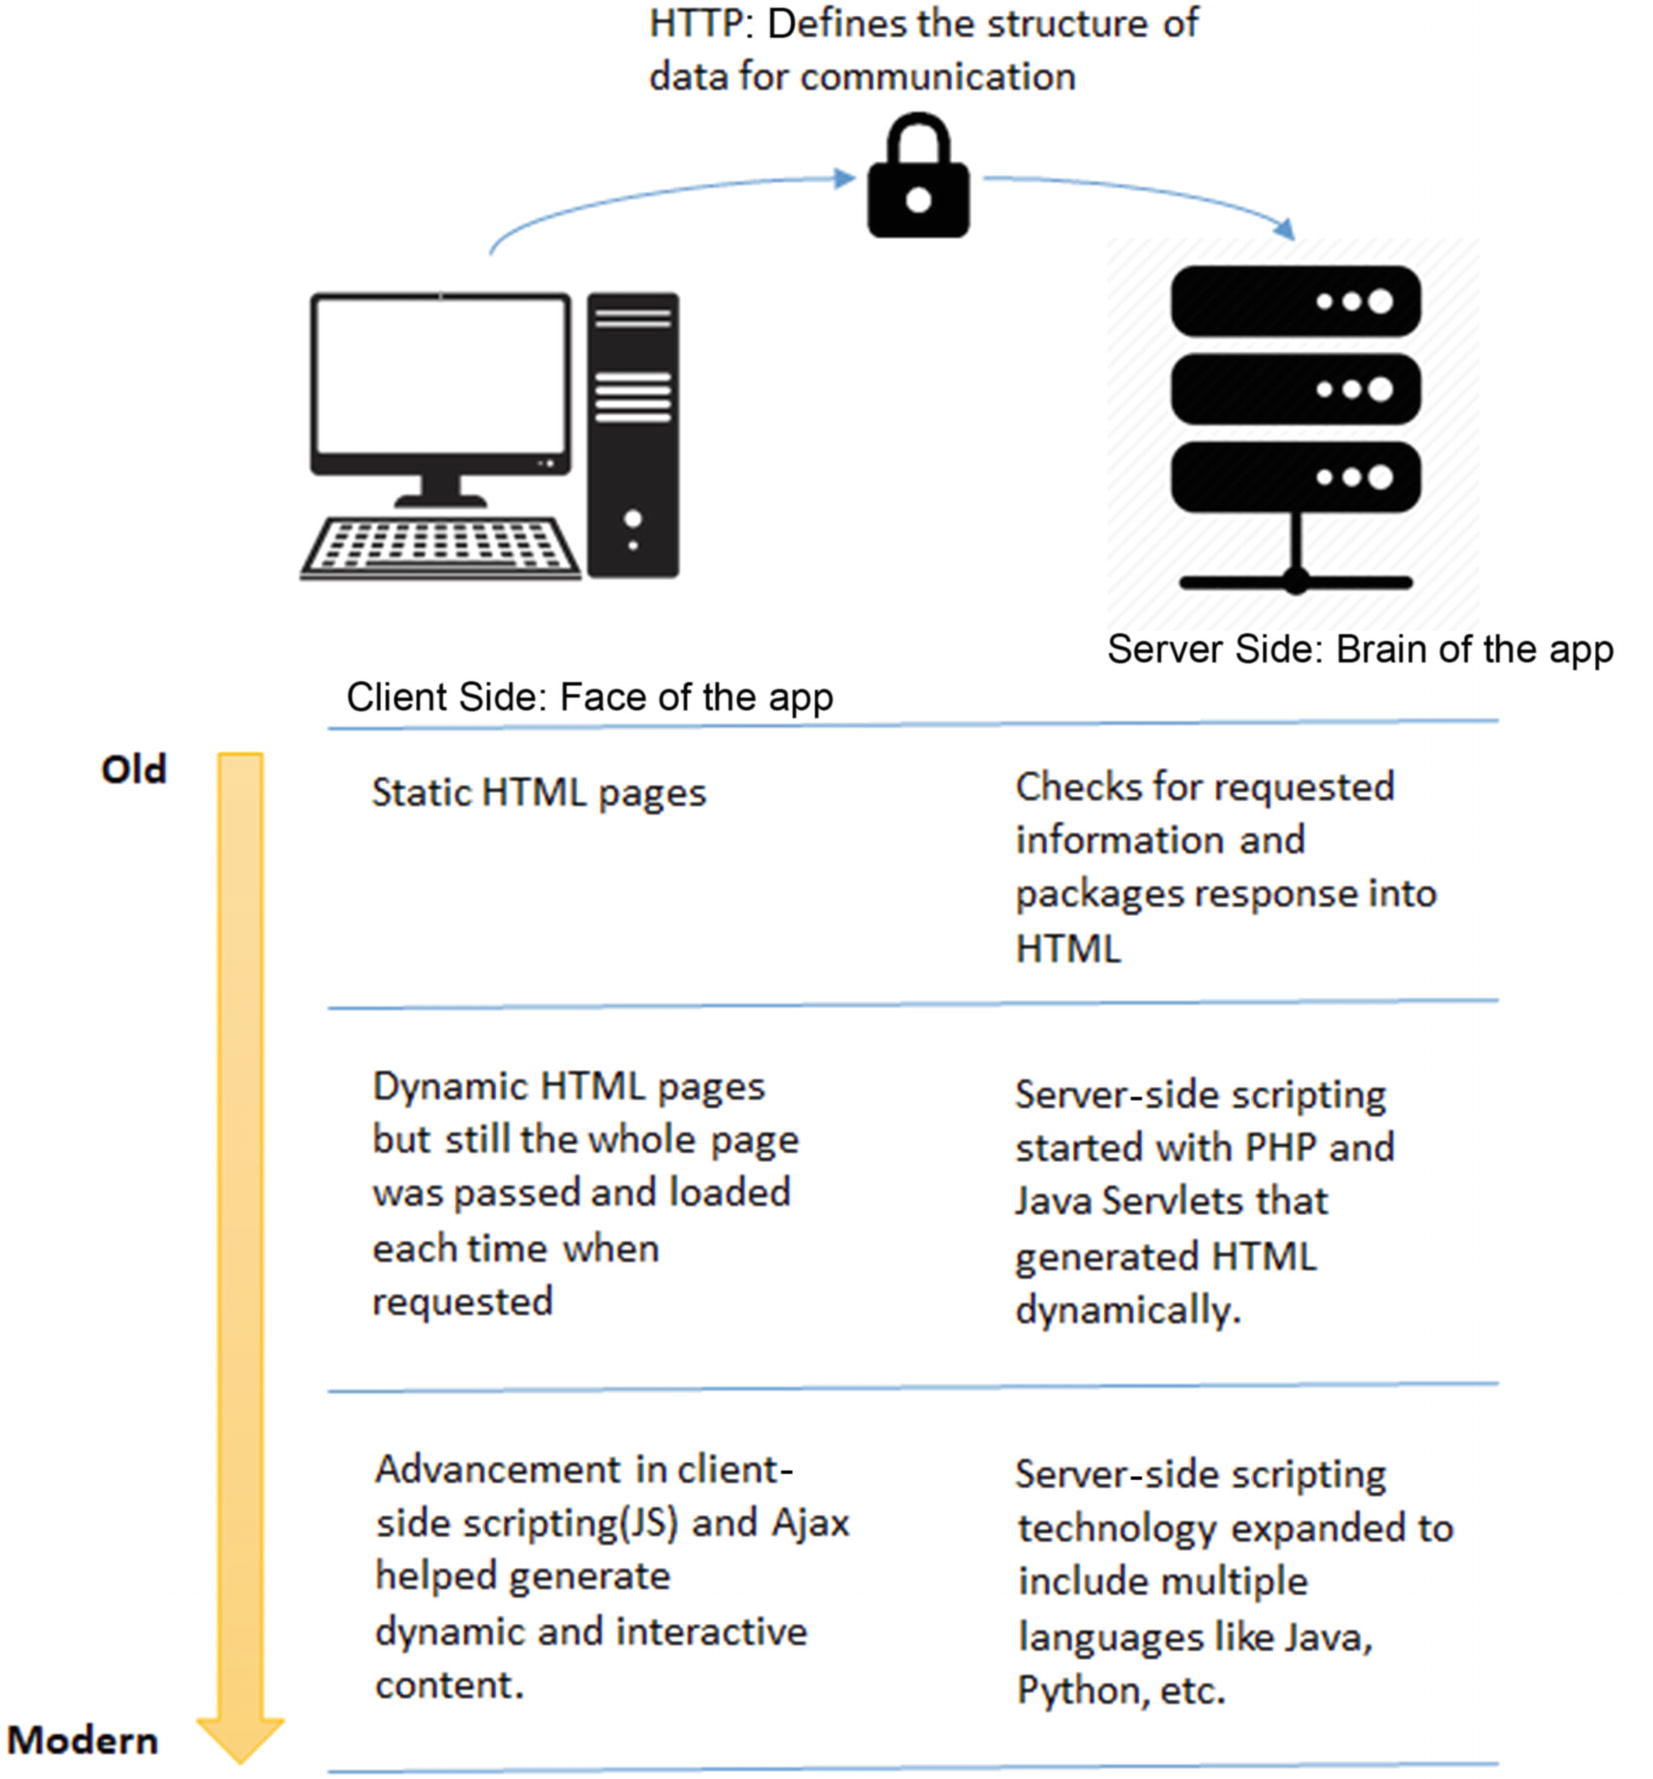
- 9)The main code logic is stored in the top_k_results() endpoint, which collects data from the website form (Figure 10-3). This data is
- a)
Query
- b)
Weight of comprehension score in the final score, which is a linearly weighted sum of the comprehension score and the med-marco rank score
- c)
Top k results to show for the question asked
- 10)
The above data is returned via the POST method in the request body and is all string, so you convert it into the write datatype and also get an actual value and not an HTML element’s value.
- 11)
You return with a render_template() function to render the HTML or URL associated with the endpoint. Note that you pass a number of variables along with render_template(). This helps you embed logic into the markup using backend data. This is done using a Jinja template (discussed more below).
- 12)
Finally, you run the Flask app by calling it with the address and the port number for the server to listen to for the requests.
Form for getting user input
Understanding index.html
You use a form to get post requests from the front end. The weird template {{}} you see is called a Jinja template. It helps create HTML, XML, and other markup formats, which are returned to the user via an HTTP response.
You can use any variable passed as a response from the endpoint you interacted with. It is very helpful. In your use case, you don’t have any pre-hand knowledge of how many responses a user would like to see for the question asked, so this is something that can’t be static.

Windows command of flask run to launch the app on a local host
Dockerizing Your Application
So far, you have built your application. Now it can be deployed on the server. Although for your use case it is not absolutely necessary to dockerize your application because you’re not using very many libraries and packages, this is something that can change with time and hence can cut short the lifetime for your application.
Also, you are coding on Windows but most deployment servers are Unix-based kernels. It is very likely that when you make this app live, there will be package issues and also hardware resource usage issues if the code leverages a GPU.
So to create an isolated and portable machine that can stay true to your present configuration, you will need Docker to sail smoothly through the journey of taking your app from your laptop to the production environment.
To install Docker on your system, please refer to the very simple guide at https://docs.docker.com/desktop/.
Creating a Docker Image
In order to create a Docker image, which is a single file containing all the config and dependency information required to run the app, you must create a Dockerfile. It contains all the startup commands that are executed once the container is spun off. Containers are running instances of an image. For example, a house’s blueprint is the image and the actual house is the container. In the same way that you can use a blueprint to create many houses, a Docker image can be used to create many instances that are run in separate containers.
FROM
COPY
WORKDIR
EXPOSE
RUN
CMD or ENTRYPOINT
Base Image and FROM Command

Docker containers are stacked images
You use the FROM command to get the base image. This is a necessary command to build a Dockerfile. For your application, you are going to use the continuum Anaconda distribution. This image can be found on the Docker hub, which is a collection of container applications: https://hub.docker.com/r/continuumio/anaconda3.
COPY and EXPOSE
Using COPY command you essentially pass your files and folders to the Docker image. This, in your case, is the covidquest folder that contains your Flask app. Once copied, you will be able to fire the app from inside the Docker image.
The EXPOSE command tells the Docker OS’s network to open some ports for the server to listen for requests.
WORKDIR, RUN, and CMD
WORKDIR helps you set up the work directory, which in your case is where the app.py file resides. This is typically the directory you copied your files into using the COPY command.
The RUN command helps you to install a set of dependencies and libraries to run the app inside the container. Instead of installing each dependency separately, you make use of a requirement.txt file that contains all of the required files with particular versions.
This can also be used to run not just library installations but any other command line command. Obviously, it varies with the base image you choose.
The last command in the Dockerfile is CMD, which is the startup command for the container. It’s just like when you ran flask run on your local.
Dockerfile
Now that you are armed with this knowledge, you can finally use these commands to build your Docker image.
One more thing to note is that requirements.txt is kept inside the app folder because multiple containers that are spun off using this image will know exactly what libraries are used to build this app logic.
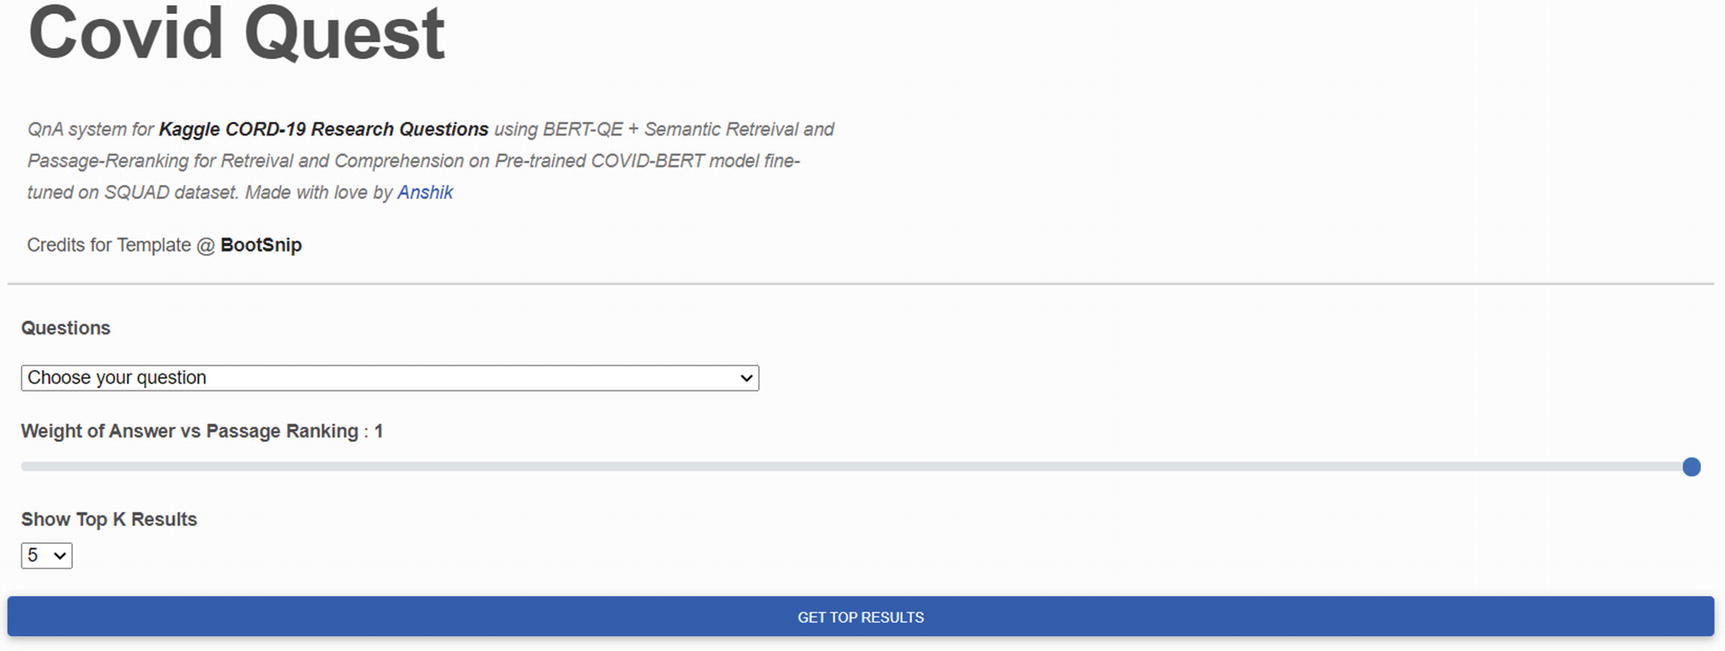
Building Docker Image
Building the Docker image
The -t flag is used to give a name to the newly created image.

Docker image list

Running the Docker container
Even after you press Ctrl + C or CMD + C, the container will still run in the background.

Listing the Docker containers

Kill the container
Stopped containers
Networks not used by at least one container
Images (see Figure 10-7)
Build cache
Making It Live Using Heroku
Now that you have dockerized your application, you can take it anywhere you want and deploy it to an actual address. But before you do that, let’s understand a bit about development servers.
What you have been using until now was Flask’s very own development server. This server is very limited in a sense that it can’t handle multiple users or multiple requests well.
When running a web app in production, you want it to be able to handle multiple users and many requests such that there are no noticeable amounts of time for the pages and static files to load.
To make the server more “production-ready,” you can use Gunicorn. Gunicorn is a pure-Python HTTP server for WSGI (Web Service Gateway Interface) applications. It allows you to run any Python application concurrently by running multiple Python processes over the machine commissioned by Heroku (also called dynos).
You also add a Procfile. Procfile is a format for declaring the process types that describe how your app will run. A process type declares its name and a command-line command. This is a prototype that can be instantiated into one or more running processes such as your Docker container.
You are finally ready to deep-dive into Heroku. Heroku is a PaaS system that helps build data-driven apps with fully managed data services. To learn more about Heroku, see the video “Heroku Explained: Icebergs, Lumberjacks, and Condos.”
You will do so by using the Heroku CLI. The Heroku command line interface (CLI) makes it easy to create and manage your Heroku apps directly from the terminal. It’s an essential part of using Heroku. You can follow the CLI installation from https://devcenter.heroku.com/articles/heroku-cli.

Checking the Heroku version

Heroku login

Creating a Heroku app
But before you push the app to the Heroku container registry, you need to tell the Heroku CLI which app you want to run this command for. For this, you convert your folder to a Git repository using git init. If it is already a Git repo, then you don’t need to worry.
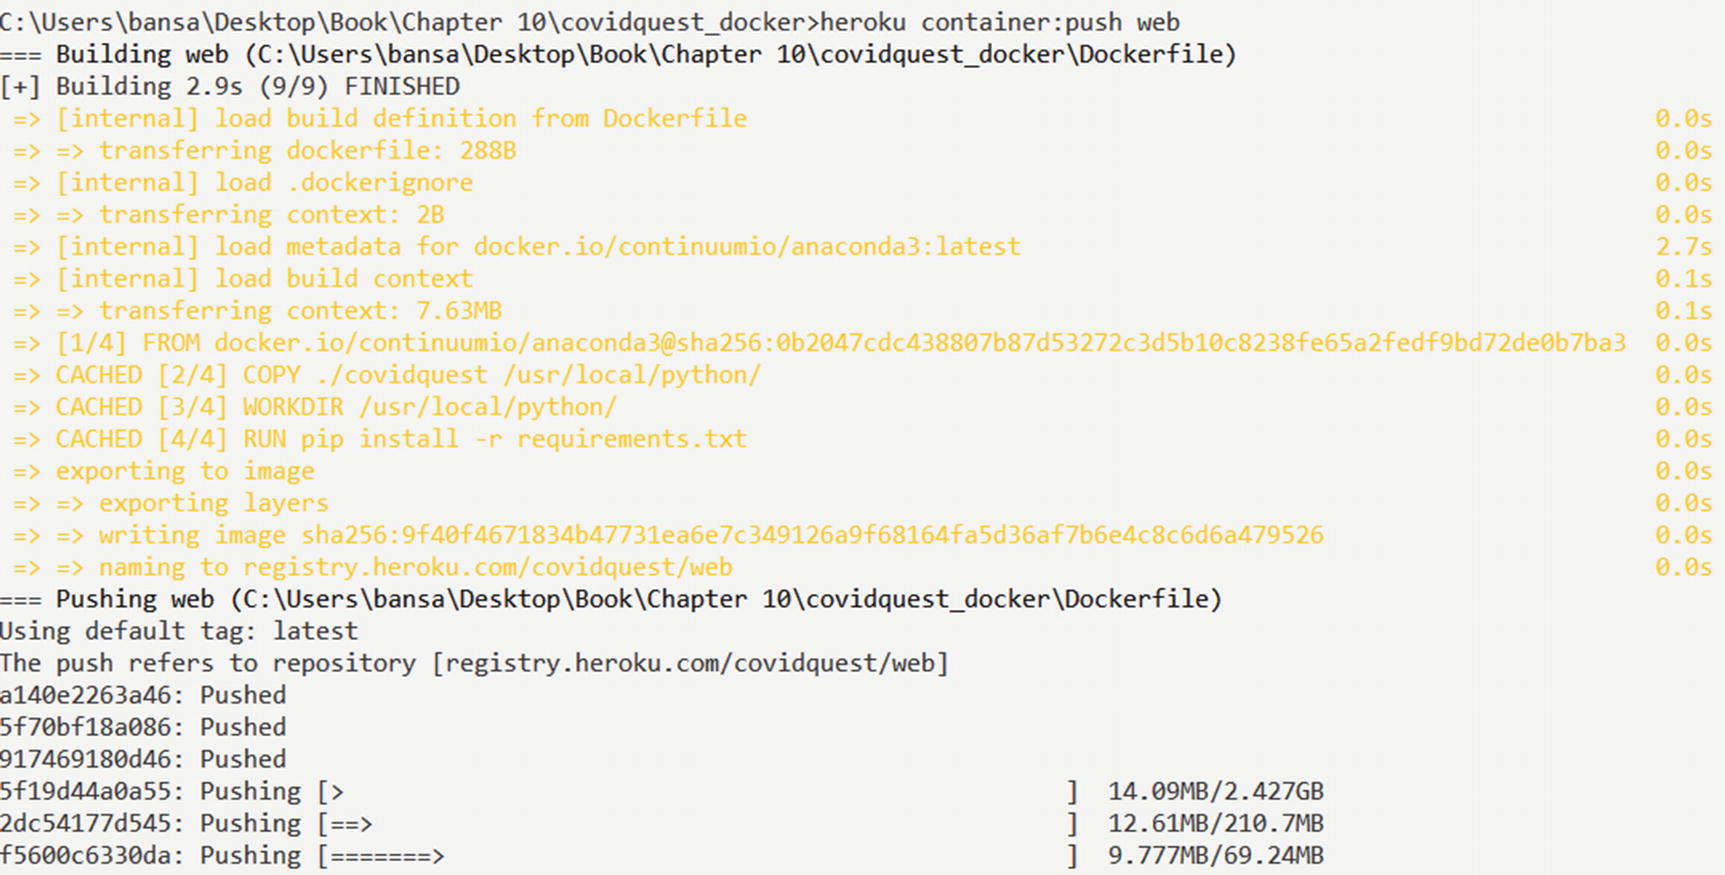
Build and push a Docker image with Heroku
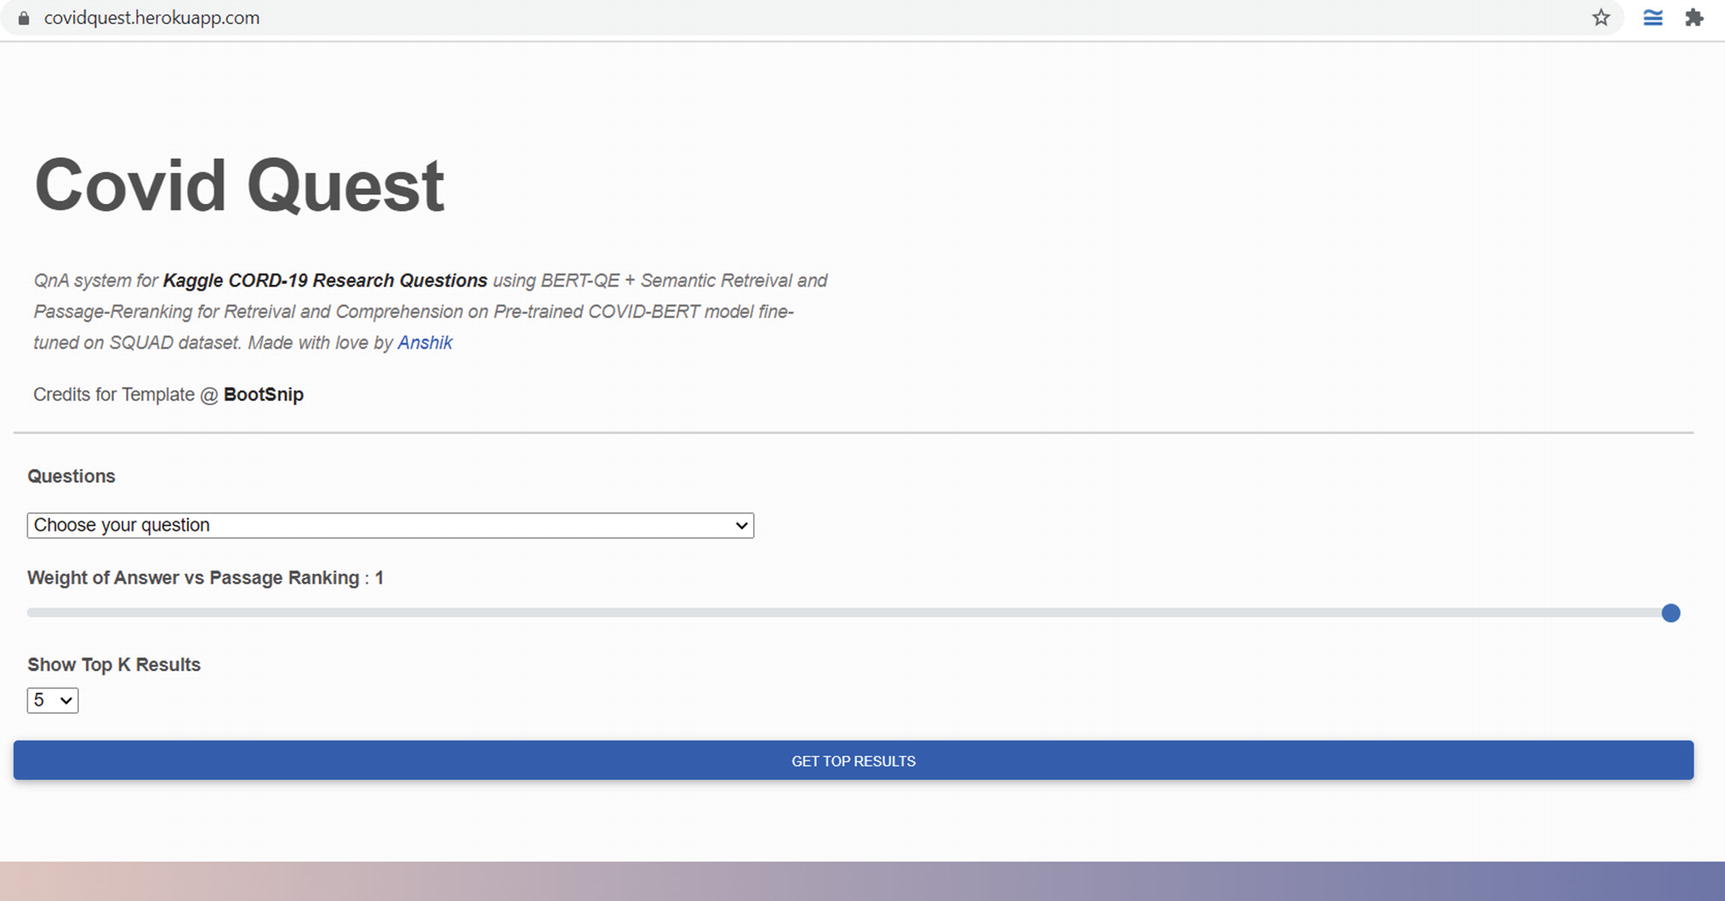
Deployed app with a URL
Since you are using the free tier, the app will go down after 30 mins of idle time. To keep your app up forever, you can explore paid apps.
Conclusion
It has been a long journey. If you made it to this chapter, you are a rock star. I hope in this journey of over seven case studies you felt curious and are excited about the kind of opportunity the current healthcare system offers and why you need to apply advanced AI and ML skills to take healthcare to scale.
You learned how different ethnic groups can have different adoption rates (Chapter 3) and how to extract ICD-9 codes from EHR text to help the insurance system that deals with billions of dollars using the latest flag-bearer of language understanding models, transformers. Then you explored advanced models like GCNs that leverage not just entity information but the linkages between them to learn better from the available data.
In Chapter 6, you explored the biggest pain point for any industry, especially healthcare, given the amount of expertise required to get any training data for the models. You learned about Snorkel, an upcoming power-packed package that makes semi-supervised learning tenable.
Chapter 7 introduced you to another way of looking at training ML models using federated learning. Healthcare has the right balance of consumers (patients), creators (pharma companies), and distributors (physicians and government organizations). Since there are so many stakeholders involved with inequitable power and resources, it begs the question of how we can protect the rights of an individual’s privacy and yet advance science. You learned how this can be done using privacy-preserving mechanisms.
Chapter 8 discussed in length various types of medical image data and their various formats. You also looked at handling two different and highly prevalent image structures, 2-D and 3-D, and solved some of the most important tasks of detection and segmentation, respectively, on these images. You also learned how to optimize your data pipelines using iterators.
Chapter 9 took you to the future of how we will be interacting with computer systems. In the previous decade, the number of clicks to do a task (like buying clothes) has reduced considerably. With advances in UI and financial technologies, we are heading towards a time when we will just be chatting with machines, and QnA is the first step towards it.
Finally, you deployed what you built because if the world can’t see it, it won’t benefit anyone.
I hope you carry forward the learnings from this book and that this knowledge has sparked the flame in you to embrace, develop, and deploy the next great ML app idea you have in your mind.