Testing
Publisher Summary
This chapter deals with testing and various types of automated testing that one can employ, such as unit testing, integration testing, and performance testing. It also looks at how to write good tests, as well as the equally important factor of how to design and implement APIs that are more amenable to testing. Process issues such as collaborating with a QA team, using quality metrics, and how to integrate testing into build process are also discussed. The purpose of testing is to locate the defects as early as possible so that they can be addressed before they affect clients. Some reasons to employ testing for projects are: it helps in increasing confidence, ensuring backward compatibility, saving costs, codify uses cases, and compliance assurance.
Every developer, no matter how experienced and meticulous, will introduce bugs into the software they write. This is simply inevitable as an API grows in size and complexity. The purpose of testing is to locate these defects as early as possible so that they can be addressed before they affect your clients.
Modern software development relies heavily on the use of third-party APIs. As your own APIs become more ubiquitous, failures and defects in your code will have the potential to affect a large number of clients and their end-user applications.
As noted earlier, your clients may eventually seek alternative solutions if the code that you deliver is buggy, unpredictable, or crashes regularly. Conscientious testing is therefore a critical part of your API development process because it can be used to increase the reliability and stability of your product. This will ultimately contribute to the success of your API in the marketplace.
This chapter covers various types of automated testing that you can employ, such as unit testing, integration testing, and performance testing. I will also look at how to write good tests, as well as the equally important factor of how to design and implement APIs that are more amenable to testing. Finally, I will complement this discussion by surveying some of the testing tools that you can adopt for your project and look at how you can write tests using a number of popular automated testing frameworks. Along the way, I will discuss process issues such as collaborating with a QA team, using quality metrics, and how to integrate testing into your build process.
10.1 Reasons to Write Tests
It is a common fallacy that engineers don’t like to write tests. From my experience, every good developer understands the need for testing and most have encountered cases where testing has caught a bug in their code. At the end of the day, software engineers are craftspeople who take pride in their work and will probably find it demoralizing to be expected to produce low-quality results. However, if management for a project does not explicitly incorporate the need for testing into the schedule, then engineers are not given the resources and support they need to develop these tests. In general, a software project can pick among being date driven, quality driven, or feature driven. You can pick two of these, but not all three. For example, in the case of the waterfall development process, feature creep and unforeseen problems can easily eliminate any time at the end of a project that was reserved for testing. Consequently, an engineer who attempts to spend time writing automated tests can appear to be less productive within a date- or feature-driven process. Instead, if engineers are empowered to focus on quality, I believe that they will relish the opportunity to write tests for their code.
I experienced this firsthand at Pixar, where we decided to introduce a new policy that engineers had to write unit tests for their code, and furthermore, that all non-GUI code had to achieve 100% code coverage. That is, every line of non-GUI code had to be exercised from test code. Rather than incite a mass rebellion, we found that developers thought this was a good use of their time. The key enabling factor was that we added time to the end of each iteration where all developers could focus on writing tests for their code. Even after 2 years of following this policy, there was universal agreement that the benefits of writing tests outweighed the costs and that maintaining a 100% coverage target was still appropriate.
In case you still need some incentive, here are some reasons why you should employ testing for your own projects.
• Increased confidence. Having an extensive suite of automated tests can give you the confidence to make changes to the behavior of an API with the knowledge that you are not breaking functionality. Said differently, testing can reduce your fear of implementing a change. It’s quite common to find legacy systems where engineers are uneasy changing certain parts of the code because those parts are so complex and opaque that changes to its behavior could have unforeseen consequences (Feathers, 2004). Furthermore, the code in question may have been written by an engineer who is no longer with the organization, meaning that there is no one who knows “where the bodies are buried” in the code.
• Ensuring backward compatibility. It’s important to know that you have not introduced changes in a new version of the API that breaks backward compatibility for code written against an older version of the API or for data files generated by that older API. Automated tests can be used to capture the workflows and behavior from earlier versions so that these are always exercised in the latest version of the library.
• Saving costs. It is a well-known fact that fixing defects later in the development cycle is more expensive than fixing them earlier. This is because the defect becomes more deeply embedded in the code and exorcising it may also involve updating many data files. For example, Steve McConnell gives evidence that fixing a bug after release can be 10–25 times more expensive than during development (McConnell, 2004). Developing a suite of automated tests lets you discover defects earlier so that they can be fixed earlier, and hence more economically overall.
• Codify use cases. Use cases for an API represent supported workflows that your users should be able to accomplish. Developing tests for these use cases before you implement your API can let you know when you have achieved the required functionality. These same tests can then be used on an ongoing basis to catch any regressions in these high-level workflows.
• Compliance assurance. Software for use in certain safety- or security-critical applications may have to pass regulatory tests, such as Federal Aviation Administration certification. Also, some organizations may verify that your software conforms to their standards before allowing it to be branded as such. For example, the Open Geospatial Consortium (OGC) has a compliance testing program for software that is to be branded as “Certified OGC Compliant.” Automated tests can be used to ensure that you continue to conform to these regulatory and standards requirements.
These points can be summarized by stating that automated testing can help you determine whether you are building the right thing (referred to as validation) and if you are building it right (called verification).
It is worth noting that there can be a downside to writing many tests. As the size of your test suite grows, the maintenance for these tests also grows commensurately. This can result in situations where a good code change that takes a couple of minutes to make might also break hundreds of tests and require many hours of effort to also update the test suite. This is a bad situation to get into because it disincentivizes an engineer from making a good fix due only to the overhead of updating the tests. I will discuss ways to avoid this situation in the following sections. However, it’s worth noting that if the fix in question changes the public API, then the extra barrier may be a good thing as it forces the engineer to consider the potential impact on backward compatibility for existing clients.
10.2 Types of API Testing
Testing an API is very different from testing an end-user application. However, there are still various techniques that are applicable to both. For example, a common general categorization of software testing activities is:
1. White box testing: Tests are developed with knowledge of the source code and are normally written using a programming language.
2. Black box testing: Tests are developed based on product specifications and without any knowledge of the underlying implementation. These tests are often performed by manually exercising an end-user application, although they could also be applied to writing code that tests an API based solely on the API specification.
3. Gray box testing: A combination of white box and black box testing, where black box testing is performed with knowledge of the implementation details of the software.
These terms can be applied equally to API testing and end-user application testing. However, APIs are not end-user applications: they can only be used by writing code that calls functions defined within a library file. As a result, several types of traditional software testing techniques are not applicable to API testing.
For example, the term system testing refers to testing performed on a complete integrated system. This is normally assumed to be an actual application that can be run by a user. While it is conceivable to consider a large API as a complete integrated system, I will not take that view here. I will instead subscribe to the view that an API is a building block or component that is used to build entire systems. As such, I will not consider system testing to be part of the tasks involved in testing an API.
Furthermore, the area of automated GUI testing is generally not appropriate for APIs, that is, the task of writing automated scripts that run an end-user application and simulate user interactions, such as clicking on buttons or typing text. The exception to this would be if you are actually writing a GUI toolkit that creates these button and text entry widgets. However, in this case, you (and your clients) would be well served by creating a custom testing tool that can navigate and interact with your widget hierarchy for the purposes of automated testing. For example, Froglogic provides an automated GUI testing tool for Qt applications called Squish.
In general, manual testing techniques are not applicable to API tests because there is no user interface to manipulate. Therefore, our focus here will be on tests that are written in code and that can be automated. Automated tests are ones that are executed programmatically on a regular basis, such as during the build process for your API. If tests are not automated, then there is more chance that they won’t be run at all, which would defeat the point of writing them.
Consequently, the primary functional test strategies that I’ll concentrate on here are unit testing and integration testing. Unit testing verifies that the software does what the programmer expects, while integration testing satisfies the client that the software addresses their needs. You can also write tests to verify the non-functional requirements of your API. Performance testing is one such example of non-functional testing, and I will cover this topic in detail later in this chapter too. However, there are many other types of non-functional testing techniques. The following list provides a selection of some of the most common ones.
• Performance testing: Verifies that the functionality of your API meets minimum speed or memory usage requirements.
• Load testing: Puts demand, or stress, on a system and measures its ability to handle this load. This often refers to testing with many simultaneous users or performing many API requests per second. This is sometimes also called stress testing.
• Scalability testing: Ensures that the system can handle large and complex production data inputs instead of only simple test data sets. This is sometimes also called capacity or volume testing.
• Soak testing: Attempts to run software continuously over an extended period to satisfy clients that it is robust and can handle sustained use (e.g., that there are no major memory leaks, counter overflows, or timer-related bugs).
• Security testing: Ensures that any security requirements of your code are met, such as the confidentiality, authentication, authorization, integrity, and availability of sensitive information.
• Concurrency testing: Verifies the multithreaded behavior of your code to ensure that it behaves correctly and does not deadlock.
10.2.1 Unit Testing
A unit test is used to verify a single minimal unit of source code, such as an individual method or class. The purpose of unit testing is to isolate the smallest testable parts of an API and verify that they function correctly in isolation.
These kinds of tests tend to run very fast and often take the form of a sequence of assertions that return either true or false, where any false result will fail the test. Very often these tests are colocated with the code that they test (such as in a tests subdirectory), and they can be compiled and run at the same point that the code itself is compiled. Unit tests tend to be written by developers using knowledge of the implementation; therefore, unit testing is a white box testing technique.
To give a concrete example of a unit test, let’s consider a function you want to test that converts a string to a double:
This function accepts a string parameter and returns a boolean to indicate whether the conversion was successful. If successful, the double value is written to the result pointer parameter. Given this function, the following unit test performs a series of checks to ensure that it works as expected.
Assert(StringToDouble("1", &value), "+ve test");
AssertEqual(value, 1.0, "'1' == 1.0");
Assert(StringToDouble("-1", &value), "-ve test");
AssertEqual(value, -1.0, "'-1' == -1.0");
Assert(StringToDouble("0.0", &value), "zero");
AssertEqual(value, 0.0, "'0.0' == 0.0");
Assert(StringToDouble("-0", &value), "minus zero");
AssertEqual(value, -0.0, "'-0' == -0.0");
AssertEqual(value, 0.0, "'-0' == 0.0");
Assert(StringToDouble("3.14159265", &value), "pi");
AssertEqual(value, 3.14159265, "pi &value");
Assert(StringToDouble("2e10", &value), "large scientific");
Assert(StringToDouble("+4.3e-10", &value), "small scientific");
AssertEqual(value, 4.3e-10, "");
AssertFalse(StringToDouble("", &value), "empty");
AssertFalse(StringToDouble(" ", &value), "whitespace");
AssertFalse(StringToDouble("+-1", &value), "+-");
AssertFalse(StringToDouble("1.1.0", &value), "multiple points");
AssertFalse(StringToDouble("text", &value), "not a number");
Note the use of various helper functions to test the result of each operation: Assert(), AssertFalse(), and AssertEqual(). These are common functions in unit test frameworks that follow the JUnit style, although sometimes other similar function names or capitalizations are used. If any of these JUnit-style assertions fail, then the entire test will fail, normally with a descriptive error message that pinpoints the failure.
The example just given is intentionally simple. However, in real software the method or object under test often depends on other objects in the system or on external resources such as files on disk, records in a database, or software on a remote server. This leads to two different views of unit testing.
1. Fixture setup. The classic approach to unit testing is to initialize a consistent environment, or fixture, before each unit test is run. For example, to ensure that dependent objects and singletons are initialized, to copy a specific set of files to a known location, or to load a database with a prepared set of initial data. This is often done in a setUp() function associated with each test to differentiate test setup steps from the actual test operations. A related tearDown() function is often used to clean up the environment once the test finishes. One of the benefits of this approach is that the same fixture can often be reused for many tests.
2. Stub/mock objects. In this approach, the code under test is isolated from the rest of the system by creating stub or mock objects that stand in for any dependencies outside of the unit (Mackinnon et al., 2001). For example, if a unit test needs to communicate with a database, a stub database object can be created that accepts the subset of queries that the unit will generate and then return canned data in response, without making any actual connection to the database. The result is a completely isolated test that will not be affected by database problems, network issues, or file system permissions. The downside, however, is that the creation of these stub objects can be tedious and often they cannot be reused by other unit tests. However, mock objects tend to be more flexible and can be customized for individual tests. I’ll discuss each of these options in more detail later in the chapter.
10.2.2 Integration Testing
In contrast to unit testing, integration testing is concerned with the interaction of several components cooperating together. Ideally, the individual components have already been unit tested.
Integration tests are still necessary even if you have a high degree of unit test coverage because testing individual units of code in isolation does not guarantee that they can be used together easily and efficiently or that they meet your functional requirements and use cases. For example, the interface of one component may be incompatible with another component or information required by another component may not be exposed appropriately for another component to use. The goal of integration testing is therefore to ensure that all of the components of your API work together well, are consistent, and enable the user to perform the tasks they need.
Integration tests are normally developed against the specification of the API, such as any automatically generated API documentation, and should therefore not require understanding of the internal implementation details. That is, they are written from the perspective of your clients. As such, integration testing is a black box testing technique.
You can often use the same tools to implement integration tests that you use to write unit tests. However, integration tests usually involve more complex ways to verify that a sequence of operations was successful. For example, a test may generate an output file that must be compared against a “golden” or “baseline” version that is stored with the test in your revision control system. This requires an efficient workflow to update the baseline version in cases where the failure is expected, such as the conscious addition of new elements in the data file or changing the behavior of a function to fix a bug.
A good integration testing framework will therefore include dedicated comparison functions (or diff commands) for each file type that the API can produce. For example, an API may have an ASCII configuration file, where an integration test failure should only be triggered if the value or number of settings changes, but not if the order of the settings in the file changes or if different whitespace characters are used to separate settings. As another example, an API may produce an image as its result. You therefore need a way to compare the output image against a baseline version of that image. For example, the R&D team at PDI/Dreamworks developed a perceptual image difference utility to verify that the rendered images for their film assets are visibly the same after a change to their animation system. This perceptually based comparison allows for minor imperceptible differences in the actual pixel values to avoid unnecessary failures (Yee and Newman, 2004).
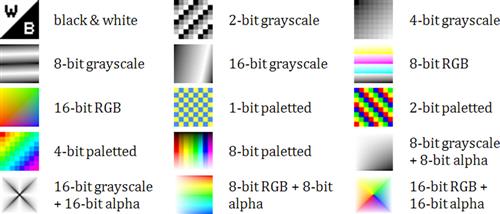
This last example brings up the point that integration testing may also be data driven. That is, a single test program can be called many times with different input data. For example, a C++ parser may be verified with a single integration test that reads a .cpp source file and outputs its derivation or abstract syntax tree. That test can then be called many times with different C++ source programs and its output compared against a correct baseline version in each case. Similarly, the libpng library has a pngtest.c program that reads an image and then writes it out again. This test is then run in a data-driven fashion using Willem van Schaik’s suite of representative PNG images called PngSuite. Figure 10.1 shows a few of the images in PngSuite. This integration test ensures that new changes to libpng do not break its ability to read and write various combinations of the PNG file format, including basic chunk handling, compression, interlacing, alpha transparency, filtering, gamma, and image comments, among other attributes.
Integration testing of APIs can be performed by developers, but in larger organizations it can also be a task that your QA team performs. In fact, a QA engineer will probably refer to this activity as API testing, which is a term that often implies ownership by QA. I’ve avoided using the specific term API testing here simply because this entire chapter is about testing APIs.
Given that integration tests have a different focus than unit tests, may be maintained by a different team, and normally must be run after the build has completed successfully, these kinds of tests are therefore usually located in a different directory than unit tests. For example, they may live in a sibling directory to the top-level source directory rather than being stored next to the actual code inside the source directory. This strategy also reflects the black box nature of integration tests as compared to white box unit tests.
10.2.3 Performance Testing
Typically, your users will demand a reasonable level of performance from your API. For instance, if you have written a library that provides real-time collision detection between 3D objects for a game engine, your implementation must run fast enough during each frame that it doesn’t slow down your clients’ games. You could therefore write a performance test for your collision detection code where the test will fail if it exceeds a predefined performance threshold.
As a further example, when Apple was developing their Safari Web browser, page rendering speed was of paramount concern. They therefore added performance tests and defined acceptable speed thresholds for each test. They then put a process in place whereby a checkin would be rejected if it caused a performance test to exceed its threshold. Engineers would have to optimize their code (or somebody else’s code if their code was already optimal) before it could be checked in.
A related issue is that of stress testing, where you verify that your implementation can scale to the real-world demands of your users, for example, a Web site that can handle many simultaneous users or a particle system that can handle thousands or millions of particles.
These are classified as non-functional tests because they do not test the correctness of a specific feature of your API, but instead are concerned with its operational behavior in the user’s environment. That is, they test the non-functional requirements of your API.
The benefit of writing automated performance tests is that you can make sure that new changes do not adversely impact performance. For example, a senior engineer I worked with once refactored a data loading API to use a std::string object instead of a char buffer to store successive characters read from a data file. When the change was released, users found that the system took over 10 times longer to load their data files. It turns out that the std::string::append() method was reallocating the string each time, growing it by a single byte on each call and hence causing massive amounts of memory allocations to happen. This was ultimately fixed by using a std::vector<char> because the append() method for that container behaved more optimally. A performance test that monitored the time to load large data files could have discovered this regression before it was released to clients.
However, performance tests tend to be much more difficult to write and maintain than unit or integration tests. One reason for this is that performance test results are real (floating-point) numbers that can vary from run to run. They are not discrete true or false values. It’s therefore advisable to specify a tolerance for each test to deal with the variability of each test run. For example, you might specify 10 ms as the threshold for your collision detection algorithm, but allow for a 15% fluctuation before marking the test as failed. Another technique is to only fail the test after several consecutive data points exceed the threshold to factor out anomalous spikes in performance.
Also, it’s best to have dedicated hardware for running your performance tests so that other processes running on the machine do not interfere with the test results. Even with a dedicated machine, you may need to investigate turning off certain system background processes so that they don’t affect your timings. This reveals another reason why performance tests are difficult to maintain: they are machine specific. This implies that you need to store different threshold values for each class of machine that you run the tests on.
A further complication of performance testing is the problem of information overload. You may end up with hundreds or even thousands of combinations of each performance test on different hardware, each producing multiple data points throughout a single day. As a result, you will want to store all of your performance results in a database. Also, if you don’t have automatic measures to highlight tests that have exceeded their performance threshold, then you may never notice regressions. However, with so many tests, you will likely be inundated with false positives and spend most of your time updating baseline values. At this point, you may have more success considering the issue to be a data mining problem. In other words, collect as much data as possible and then have regular database searches that pick the top 5 or 10 most egregious changes in performance and flag those for investigation by a human.
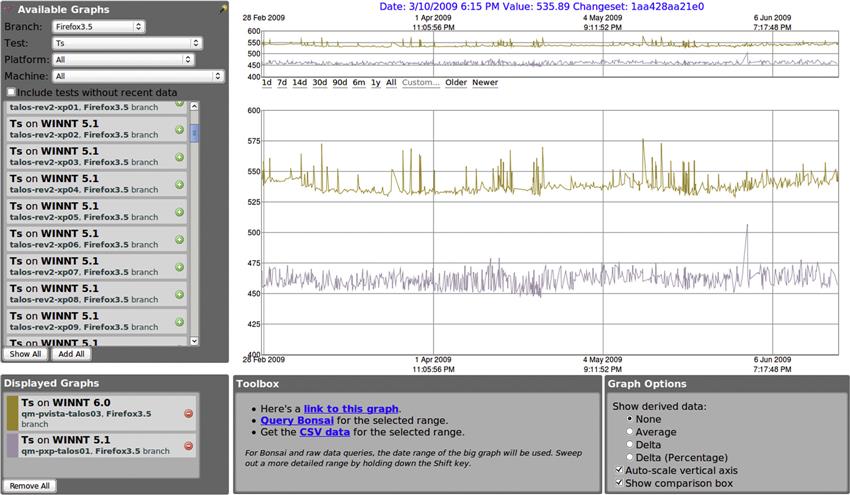
Mozilla offers a fantastic example of extensive performance testing done well. They have implemented a system where performance tests are run for multiple products across a range of hardware. Results can be browsed with an interactive Web site that displays graphs for one or more performance tests at the same time (see Figure 10.2). For example, the Firefox Web browser has various performance tests, such as startup time, shutdown time, page load time, and DHTML performance. The Mozilla graphs Web site will let you pick a version of Firefox, select a test you’re interested in, and then see the performance results for that test for a particular machine. You can then add the results for other machines to the graph to compare performance between those setups. (One thing to look out for when reading performance graphs is whether the y axis starts at zero. If results are scaled vertically to fit the screen, then what looks like a large degree of fluctuation could in reality be a tiny overall percentage change.)
10.3 Writing Good Tests
Now that I’ve covered the basic types of API testing, I will concentrate on how to write these automated tests. I will cover the qualities that make a good test as well as present standard techniques for writing efficient and thorough tests. I’ll also discuss how testing can be shared with a QA team effectively.
10.3.1 Qualities of a Good Test
Before I discuss the details of writing an automated test, I’ll present a few high-level attributes of a good test. These are general qualities that you should always bear in mind when building out your test suite. The overall message, however, is that you should treat test code with the same exacting standards that you use in your main API code. If you develop tests that exhibit the following qualities then you should end up with an easy-to-maintain and robust test suite that provides you with a valuable safety net for your API development.
• Fast. Your suite of tests should run very quickly so that you get rapid feedback on test failures. Unit tests should always be very fast: in the order of fractions of a second per test. Integration tests that perform actual user workflows, or data-driven integration tests that are run on many input files, may take longer to execute. However, there are several ways to deal with this, such as favoring the creation of many unit tests but a few targeted integration tests. Also, you can have different categories of tests: “fast” (or “checkin” or “continuous”) tests run during every build cycle, whereas “slow” (or “complete” or “acceptance”) tests run only occasionally, such as before a release.
• Stable. Tests should be repeatable, independent, and consistent: every time you run a specific version of a test you should get the same result. If a test starts failing erroneously or erratically then your faith in the validity of that test’s results will be diminished. You may even be tempted to turn the test off temporarily, which of course defeats the purpose of having the test. Using mock objects, where all dependencies of a unit test are simulated, is one way to produce tests that are independent and stable to environmental conditions. It’s also the only practical way to test date- or time-dependent code.
• Portable. If your API is implemented on multiple platforms, your tests should work across the same range of platforms. One of the most common areas of difference for test code running on different platforms is floating point comparisons. Rounding errors, architecture differences, and compiler differences can cause mathematical operations to produce slightly different results on different platforms. Floating point comparisons should therefore allow for a small error, or epsilon, rather than being compared exactly. It’s important to note that this epsilon should be relative to the magnitude of the numbers involved and the precision of the floating-point type used. For instance, single-precision floats can represent only six to seven digits of precision. Therefore, an epsilon of 0.000001 may be appropriate when comparing numbers such as 1.234567, but an epsilon of 0.1 would be more appropriate when comparing numbers such as 123456.7.
• High coding standards. Test code should follow the same coding standards as the rest of your API: you should not slip standards just because the code will not be run directly by your users. Tests should be well documented so that it’s clear what is being tested and what a failure would imply. If you enforce code reviews for your API code, you should do the same for test code. Similarly, you should not abandon your good engineering instincts simply because you are writing a test. If there is a case for factoring out common test code into a reusable test library, then you should do this. As the size of your test suite grows, you could end up with hundreds or thousands of tests. The need for robust and maintainable test code is therefore just as imperative as for your main API code.
• Reproducible failure. If a test fails, it should be easy to reproduce the failure. This means logging as much information as possible about the failure, pinpointing the actual point of failure as accurately as possible, and making it easy for a developer to run the failing test in a debugger. Some systems employ randomized testing (called ad hoc testing) where the test space is so large that random samples are chosen. In these cases, you should ensure that it is easy to reproduce the specific conditions that caused the failure because simply rerunning the test will pick another random sample and may pass.
10.3.2 What to Test
Finally, we get to the part about actually writing tests. The way you write a unit test is different from the way you write an integration test. This is because unit tests can have knowledge about the internal structure of the code, such as loops and conditions. However, in both cases the aim is to exercise the capabilities of the API methodically. To this end, there is a range of standard QA techniques that you can employ to test your API. A few of the most pertinent ones are listed here.
• Condition testing. When writing unit tests, you should use your knowledge of the code under test to exercise all combinations of any if/else, for, while, and switch expressions within the unit. This ensures that all possible paths through the code have been tested. (I will discuss the details of statement coverage versus decision coverage later in the chapter when I look at code coverage tools.)
• Equivalence classes. An equivalence class is a set of test inputs that all have the same expected behavior. The technique of equivalence class partitioning therefore attempts to find test inputs that exercise difference classes of behavior. For example, consider a square root function that is documented to accept values in the range 0 to 65535. In this case there are three equivalence classes: negative numbers, the valid range of numbers, and numbers greater than 65535. You should therefore test this function with values from each of these three equivalence classes, for example, -10, 100, 100000.
• Boundary conditions. Most errors occur around the boundary of expected values. How many times have you inadvertently written code with an “off-by-one” error? Boundary condition analysis focuses test cases around these boundary values. For example, if you are testing a routine that inserts an element into a linked list of length n, you should test inserting at position 0, 1, n-1, and n.
• Parameter testing. A test for a given API call should vary all parameters to the function to verify the full range of functionality. For example, the stdio.h function fopen() accepts a second argument to specify the file mode. This can take the values “r,” “w,” and “a,” in addition to optional “+” and “b” characters in each case. A thorough test for this function should therefore test all 12 combinations of the mode parameter to verify the full breadth of behavior.
• Return value assertion. This form of testing ensures that a function returns correct results for different combinations of its input parameters. These results could be the return value of the function, but they could additionally include output parameters that are passed as pointers or references. For instance, a simple integer multiplication function,
could be tested by supplying a range of (x, y) inputs and checking the results against a table of known correct values.
• Getter/setter pairs. The use of getter/setter methods is extremely common in C++ APIs, and of course I’ve advocated that you should always prefer the use of these functions over directly exposing member variables in a class. You should therefore test that calling the getter before calling the setter returns an appropriate default result, and that calling the getter after the setter will return the appropriate value, for example,
AssertEqual(obj.GetValue(), 0, "test default");
AssertEqual(obj.GetValue(), 42, "test set then get");
• Operation order. Varying the sequence of operations to perform the same test (where this is possible) can help uncover any order of execution assumptions and non-orthogonal behavior, that is, if API calls have undocumented side effects that are being relied upon to achieve certain workflows.
• Regression testing. Backward compatibility with earlier versions of the API should be maintained whenever possible. It is therefore extremely valuable to have tests that verify this goal. For example, a test could try reading data files that were generated by older versions of the API to ensure that the latest version can still ingest them correctly. It’s important that these data files are never updated to newer formats when the API is modified. That is, you will end up with live data files, which are up to date for the current version, and legacy data files, which verify the backward compatibility of the API.
• Negative testing. This testing technique constructs or forces error conditions to see how the code reacts to unexpected situations. For example, if an API call attempts to read a file on disk, a negative test might try deleting that file, or making it unreadable, to see how the API reacts when it is unable to read the contents of the file. Another example of negative testing is supplying invalid data for an API call. For example, a credit card payment system that accepts credit card numbers should be tested with invalid credit card numbers (negative testing) as well as valid numbers (positive testing).
• Buffer overruns. A buffer overrun, or overflow, is when memory is written past the end of an allocated buffer. This causes unallocated memory to be modified, often resulting in data corruption and ultimately a crash. Data corruption errors can be difficult to track down because the crash may occur some time after the actual buffer overrun event. It is therefore good practice to check that an API does not write to memory beyond the size of a buffer. This buffer could be an internal private member of a class or it could be a parameter that you pass into an API call. For example, the string.h function strncpy() copies at most n characters from one string to another. This could be tested by supplying source strings that are equal to and longer than n characters and then verifying that no more than n characters (including the null terminator, �) are written to the destination buffer.
• Memory ownership. Memory errors are a common cause of crashes in C++ programs. Any API calls that return dynamically allocated memory should document whether the API owns the memory or if the client is responsible for freeing it. These specifications should be tested to ensure that they are correct. For example, if the client is responsible for freeing the memory, a test could request the dynamic object twice and assert that the two pointers are different. A further test could free the memory and then rerequest the object from the API multiple times to ensure that no memory corruption or crashes occur.
• NULL input. Another common source of crashes in C++ is passing a NULL pointer to a function that then immediately attempts to dereference the pointer without checking for NULL. You should therefore test all functions that accept a pointer parameter to ensure that they behave gracefully when passed a NULL pointer.
10.3.3 Focusing the Testing Effort
In all likelihood, it will be infeasible to test every possible code path in your API. You will therefore be faced with a decision over which subset of the overall functionality to test. To help you focus your testing effort, the following list enumerates seven ways to determine the biggest bang for your testing buck.
1. Focus on tests that exercise primary use cases or workflows of the API.
2. Focus on tests that cover multiple features or offer the widest code coverage.
3. Focus on the code that is the most complex and hence the highest risk.
4. Focus on parts of the design that are poorly defined.
5. Focus on features with the highest performance or security concerns.
6. Focus on testing problems that would cause the worst impact on clients.
7. Focus early testing efforts on features that can be completed early in the development cycle.
10.3.4 Working with QA
If you are fortunate enough to have a good QA team to support your testing efforts, then they can share responsibility for writing automated tests. For example, it’s standard practice for developers to write and own unit tests and for QA to write and own integration tests.
Different software development models produce different interactions with QA. For example, a traditional waterfall method, where testing is performed as a final step before release, means that QA is often treated as a distinct group whose goal of quality is often impacted negatively by delays during the development process. In contrast, more agile development processes, such as Scrum, favor embedding QA as part of the development process and including testing responsibilities within each short sprint or iteration.
In either case, the benefit of working with QA engineers is that they become your first users. As such, they can help ensure that the functional and business requirements of your API are met.
As noted earlier, API testing generally requires writing code because an API is software used to build end-user applications. This implies that your QA engineers must be able to write code in order to work on integration testing effectively. Related to this, Microsoft has traditionally used two broad terms to categorize QA engineers:
1. A Software Test Engineer (STE) has limited programming experience and may not even need a strong computer science background. An STE essentially performs manual black box testing.
2. A Software Design Engineer in Test (SDET) is able to write code and so is capable of performing white box testing, writing tools, and producing automated tests.
In terms of API testing, you will therefore want a QA engineer who is an SDET rather than an STE. However, even most SDETs will not be able to program in C++, although most will be able to write code in a scripting language. Providing script bindings for your API can therefore offer greater opportunity for your QA team to contribute automated integration tests (see Chapter 11 for details on adding scripting support). Another technique is to write programs that enable data-driven testing. The earlier reference to pngtest.c is an example of this: a single program written by a developer that can be used by QA engineers to produce a slew of data-driven integration tests.
10.4 Writing Testable Code
Testing an API shouldn’t be something that you leave until the end of the process. There are decisions that you make while you are designing and implementing an API that can improve your ability to write robust and extensive automated tests. In other words, you should consider how a class will be tested early on during its development. The following sections will cover various techniques for writing software that is more amenable to automated unit and integration testing.
10.4.1 Test-Driven Development
Test-Driven Development (TDD), or Test-First Programming, involves writing automated tests to verify desired functionality before the code that implements this functionality is written. These tests will of course fail initially. The goal is then to quickly write minimal code to make these tests pass. Then finally the code is refactored to optimize or clean up the implementation as necessary (Beck, 2002).
An important aspect of TDD is that changes are made incrementally, in small steps. You write a short test, then write enough code to make that test pass, and then repeat. After every small change, you recompile your code and rerun the tests. Working in these small steps means that if a test starts to fail, then in all probability this will be caused by the code you wrote since the last test run. Let’s take a look at an example to demonstrate this. I’ll start with a small test to verify the behavior of a MovieRating class (Astels, 2003).
MovieRating *nemo = new MovieRating("Finding Nemo");
Given this initial test code, you now write the simplest possible code to make the test pass. Here’s an example that satisfies this objective. (I will inline the implementation for the API methods in these examples to make it clearer how the code under test evolves.)
This API clearly doesn’t do a lot, but it does allow the test to pass. So now you can move on and add some more test code.
MovieRating *nemo = new MovieRating("Finding Nemo");
AssertEqual(nemo->GetAverageRating(), 4.5f, "nemo avg rating");
Now it’s time to write the minimal code to make this test pass.
MovieRating(const std::string &name) {}
int GetRatingCount() const { return 0; }
Writing another test will force us to make the implementation more general.
void TestAverageRatingAndCount
MovieRating *cars = new MovieRating("Cars");
AssertEqual(cars->GetRatingCount(), 3, "three ratings");
AssertEqual(cars->GetAverageRating(), 4.0f, "cars avg rating");
Now you should extend the implementation to return the number of ratings added and the average of those ratings. The minimal way to do this would be to record the current sum of all ratings and the number of ratings added. For example,
MovieRating(const std::string &name) :
float GetAverageRating() const
Obviously you can continue this strategy by adding further tests to verify that calling GetAverageRating() with zero ratings does not crash and to check that adding out-of-range rating values is treated appropriately, but I think you get the general principle.
One of the main benefits of test-driven development is that it forces you to think about your API before you start writing any code. You also have to think about how the API will be used, that is, you put yourself in the shoes of your clients. Another effect of TDD is that you only implement what your tests need. In other words, your tests determine the code you need to write (Astels, 2003). This can help you avoid premature optimization and keeps you focused on the overall behavior.
TDD does not have to be confined to the initial development of your API. It can also be helpful during maintenance mode. For example, when a bug is discovered in your API, you should first write a test for the correct behavior. This test will of course fail at first. You can then work on implementing the fix for the bug. You will know when the bug is fixed because your test will change to a pass state. Once the bug is fixed, you then have the added benefit of an ongoing regression test that will ensure that the same bug is not introduced again in the future.
10.4.2 Stub and Mock Objects
One popular technique to make your unit tests more stable and resilient to failures is to create test objects that can stand in for real objects in the system. This lets you substitute an unpredictable resource with a lightweight controllable replacement for the purpose of testing. Examples of unpredictable resources include the file system, external databases, and networks. The stand-in object can also be used to test error conditions that are difficult to simulate in the real system, as well as events that are triggered at a certain time or that are based on a random number generator.
These stand-in objects will obviously present the same interface as the real objects they simulate. However, there are a number of different ways to implement these objects. The following list presents some of the options and introduces the generally accepted terminology for each case.
• Fake object: An object that has functional behavior but uses a simpler implementation to aid testing, for example, an in-memory file system that simulates interactions with the local disk.
• Stub object: An object that returns prepared or canned responses. For example, a ReadFileAsString() stub might simply return a hardcoded string as the file contents rather than reading the contents of the named file on disk.
• Mock object: An instrumented object that has a preprogrammed behavior and that performs verification on the calling sequence of its methods. For example, a mock object (or simply a mock) can specify that a GetValue() function will return 10 the first two times it’s called and then 20 after that. It can also verify that the function was called, say, only three times or at least five times or that the functions in the class were called in a given order.
Because the difference between a stub and a mock is often poorly understood, let’s demonstrate this with an example. I’ll use the example of the children’s card game War. This is a simple game where a deck of cards is divided equally between two players. Each player reveals their top card and the player with the highest card takes both cards. If the cards have equal value, each player lays three cards face down and the fourth face up. The highest value card wins all of the cards on the table. A player wins the game by collecting all cards.
I’ll model this game with three classes:
1. Card: represents a single card, with the ability to compare its value against another card.
2. Deck: holds a deck of cards with functions to shuffle and deal cards.
3. WarGame: manages the game logic, with functions to play out the entire game and to return the winner of the game.
During actual game play, the Deck object will return a random card. However, for the purposes of testing, you could create a stub deck that returns cards in a predefined order. Assuming that the WarGame object accepts the deck to use as a parameter to its constructor, you can easily test the logic of WarGame by passing it a StubDeck that defines a specific and repeatable sequence of cards.
This StubDeck would inherit from the real Deck class, which means that you must design Deck to be a base class, that is, make the destructor virtual as well as any methods that need to be overridden for testing purposes. Here’s an example declaration for the Deck class.
Our StubDeck class can therefore inherit from Deck and override the Shuffle() method to do nothing because you don’t want to randomize the card order. Then the constructor of StubDeck could create a specific order of cards. However, this means that the stub class is hardcoded to a single card order. A more general solution would be to extend the class with an AddCard() method. Then you can write multiple tests using StubDeck and simply call AddCard() a number of times to prepare it with a specific order of cards before passing it to WarGame. One way to do this would be to add a protected AddCard() method to the base Deck class (because it modifies private state) and then expose this as public in the StubDeck class. Then you can write
So, that’s what a stub object would look like (in fact, this could even be considered a fake object too, as it offers complete functionality without the element of randomness). Let’s now take a look at what testing with a mock object looks like.
One of the main differences between mock and stub objects is that mocks insist on behavior verification. That is, a mock object is instrumented to record all function calls for an object and it will verify behavior such as the number of times a function was called, the parameters that were passed to the function, or the order in which several functions were called. Writing code to perform this instrumentation by hand can be tedious and error prone. It is therefore best to rely upon a mock testing framework to automate this work for you. I’ll use the Google Mock framework here (http://code.google.com/p/googlemock/) to illustrate how mocks can be used to test our WarGame class. The first thing you’ll want to do is define the mock using the handy macros that Google Mock provides.
The MOCK_METHOD0 macro is used to instrument functions with zero arguments, which is the case for all of the methods in the Deck base class. If instead you have a method with one argument, then you would use MOCK_METHOD1, and so on. Now, let’s write a unit test that uses this mock. As I’m using Google Mock to create our mock, I’ll also use Google Test as the testing framework. This looks like
The clever bits are those two EXPECT_CALL() lines. The first one states that the Shuffle() method of our mock object should get called at least once, and the second one states that the DealCard() method should get called exactly 52 times, and that the first call will return Card("JS"), the second call will return Card("2H"), and so on. Note that this approach means that you don’t need to expose an AddCard() method for your mock object. The mock object will implicitly verify all of the expectations as part of its destructor and will fail the test if any of these are not met.
In terms of how this affects the design of your APIs, one implication is that you may wish to consider a model where access to unpredictable resources is embodied within a base class that you pass into your worker classes, such as in the case given earlier where you pass the Deck object into the WarGame object. This allows you to substitute a stub or mock version in your test code using inheritance. This is essentially the dependency injection pattern, where dependent objects are passed into a class rather than that class being directly responsible for creating and storing those objects.
However, sometimes it is simply not practical to encapsulate and pass in all of the external dependencies for a class. In these cases, you can still use stub or mock objects, but instead of using inheritance to replace functionality, you can inject them physically at link time. In this case, you name the stub/mock class the same as the class you wish to replace. Then your test program links against the test code and not the code with the real implementation. Using our ReadFileAsString() example given earlier, you could create an alternate version of this function that returns canned data and then link the object .o file with this stub into our test program in place of the object file that holds the real implementation. This approach can be very powerful, although it does necessitate that you create your own abstractions for accessing the file system, network, and so on. If your code directly calls fopen() from the standard library, then you can’t replace this with a stub at link time unless you also provide stubs for all other standard library functions that your code calls.
10.4.3 Testing Private Code
The emphasis of this book has been the development of well-designed APIs that offer a logical abstraction while hiding implementation details. However, this can also make it difficult to write thorough unit tests. There will be times when you need to write a unit test that accesses private members of a class in order to achieve full code coverage. Given a class called MyClass, this can be done in two different ways:
1. Member function: Declaring a public MyClass::SelfTest() method.
2. Friend function: Creating a MyClassSelfTest() free function and declaring it as friend function in MyClass.
I detailed several reasons to avoid friend classes in Chapter 6, although in this case the friend function can be made relatively safe if the MyClassSelfTest() function is defined in the same library as the MyClass implementation, thus preventing clients from redefining the function in their own code. Of note, the Google Test framework provides a FRIEND_TEST() macro to support this kind of friend function testing. However, because the two options are functionally equivalent, and given our general preference to avoid friends unless absolutely necessary, I will concentrate on the first of these options: adding a public SelfTest() method to a class to test its internal details, although the discussion can be applied equally to the friend function solution too.
For example, here is a simple bounding box class that includes a self-test method.
BBox(const Point &a, const Point &b);
bool Contains(const Point &point) const;
bool Intersects(const BBox &bbox) const;
double CenterDistance(const BBox &bbox) const;
Point CalcMin(const Point &a, const Point &b);
The SelfTest() method can therefore be called directly from a unit test in order to perform extra validation of the various private methods. This is very convenient for testing, although there are some undesirable qualities of this approach. Namely, you have to pollute your public API with a method that your clients should not call and you may add extra bloat to your library by embedding the test code inside the BBox implementation.
In the first case, there are ways that you can discourage clients from using this function. One trivial way to do this would be to simply add a comment that the method is not for public use. Taking this one step further, you could remove the method from any API documentation you produce so that users never see a reference to it (unless they look directly at your headers of course). You can achieve this with the Doxygen tool by surrounding the function declaration with the cond and endcond commands.
As for the concern that the self-test function may add bloat to your code, there are a couple of ways to deal with this, if you feel it’s necessary. One way would be to implement the SelfTest() method in your unit test code, not in the main API code, for example, in test_bbox.cpp not bbox.cpp. Just because you declare a method in your .h file doesn’t mean that you have to define it. However, this opens up a similar security hole to using friends. That is, your clients could define the SelfTest() method in their own code as a way to modify the internal state of the object. While the interface of this function restricts what they can do, because they cannot pass in any arguments or receive any results, they can still use global variables to circumvent this.
An alternative would be to conditionally compile the test code. For example,
The downside of this approach is that you have to build two versions of your API: one with the self-test code compiled in (compiled with -DTEST or /DTEST) and one without the self-test code. If the extra build is a problem, you could compile the self-test code into debug versions of your library but remove it from release builds.
It’s worth noting that if you wish to provide a self-test function for a C API, then this is a much simpler proposition. For example, you could define an external linkage SelfTest() function in the .c file, that is, a non-static function decorated with __declspec(dllexport) on Windows, but provide no prototype for the function in the .h file. You then declare the function prototype in your test code so that you can call the function as part of your unit test. In this way, the function does not appear in your header file or any API documentation. In fact, the only way a client could discover the call is if they do a dump of all the public symbols in your shared library.
10.4.4 Using Assertions
An assertion is a way to verify assumptions that your code makes. You do this by encoding the assumption in a call to an assert function or macro. If the value of the expression evaluates to true, then all is well and nothing happens. However, if the expression evaluates to false, then the assumption you made in the code is invalid and your program will abort with an appropriate error (McConnell, 2004).
Assertions are essentially a way for you to include extra sanity tests for your program state directly in the code. As such, these are invaluable complementary aids to help testing and debugging.
Although you are free to write your own assertion routines, the C standard library includes an assert() macro in the assert.h header (also available in C++ as the cassert header). The following example uses this macro to show how you could document and enforce the assumption that a pointer you are about to dereference is non-NULL.
mStrPtr(new std::string("Hello"))
// mStrPtr should have been allocated in the constructor
It is common practice to turn off all assert() calls for production code so that an end-user application doesn’t abort needlessly when the user is running it. This is often done by making assert calls do nothing when they are compiled in release mode versus debug mode. (For this reason, you should never put code that must always be executed into an assertion.) Here’s an example of a simple assertion definition that is only active in debug builds.
Assertions should be used to document conditions that you as the developer believe should never occur. They are not appropriate for run-time error conditions that might occur legitimately. If you can recover gracefully from an error then you should always prefer that course of action rather than causing the client’s program to crash. For example, if you have an API call that accepts a pointer from the client, you should never assume that it is non-NULL. Instead, you should check to see if the pointer is NULL and return gracefully if that’s the case, potentially emitting an appropriate error message. You should not use an assertion for this case. However, if your API enforces the condition that one of your private member variables is always non-NULL then it would be a programming error for it to ever be NULL. This is an appropriate situation for an assertion. In summary, use assertions to check for programming errors; use normal error checking to test for user errors and attempt to recover gracefully in that situation.
Assertions are used commonly in commercial products as a way to diagnose errors. For instance, several years ago it was reported that the Microsoft Office suite is covered by over 250,000 assertions (Hoare, 2003). These are often used in conjunction with other automated testing techniques, such as running a large suite of unit and integration test cases on debug code with the assertions turned on. This test run will fail if any test code hits an assertion that fails, allowing a developer to follow up and investigate the reason for the failure before it leads to a crash in client code.
It’s worth noting that the C++11 standard added a new compile-time assertion called static_assert(). This is not part of the C++98 standard, however early support for this new feature is already available in some C++ compilers, such as Visual Studio 2010 and GNU C++ 4.3. Using static_assert(), if the constant expression resolves to false at compile time, then the compiler displays the provided error message and fails; otherwise, the statement has no effect. For example,
10.4.5 Contract Programming
Bertrand Meyer coined and trademarked the term “design by contract” as a way to prescribe obligations between an interface and its clients (Meyer, 1987). For function calls, this means specifying the preconditions that a client must meet before calling the function and the postconditions that the function guarantees on exit. For classes, this means defining the invariants that it maintains before and after a public method call (Hoare, 1969; Pugh, 2006).
The previous chapter showed you how to communicate these conditions and constraints to your users via your API documentation. Here I will illustrate how you can also implement them in code using assertion-style checks. For instance, continuing with the SquareRoot() function introduced earlier, the following code shows how to implement tests for its precondition and postcondition.
double SquareRoot(double value)
// assert the function’s precondition
… // calculate the square root
// assert the function’s postcondition
The require() and ensure() calls in this example can be implemented in a similar fashion to the assert() macro described in the previous section, that is, they do nothing if the condition evaluates to true, otherwise they abort or throw an exception. Just as in the use of assertions, it’s common to disable these calls for release builds to avoid their overhead in a production environment and to avoid aborting your clients’ programs. In other words, you could simply define these functions as follows.
// check that a precondition has been met
#define require(cond) assert(cond)
Furthermore, you may implement a private method for your classes to test its invariants, that is, that it’s in a valid state. You can then call this method from inside of your functions to ensure that the object is in a valid state when the function begins and ends. If you use a consistent name for this method (which you could enforce through the use of an abstract base class), then you could augment your require() and ensure() macros with a check_invariants() macro as follows.
// turn on contract checks in a debug build
#define require(cond) assert(cond)
#define ensure(cond) assert(cond)
#define check_invariants(obj) assert(obj && obj->IsValid());
Putting this all together, here is a further example of contract programming for a string append method.
void String::append(const std::string &str)
// no preconditions - references are always non-NULL
// ensure the consistency of this string and the input string
// perform the actual string append operation
ensure(size() == pre_size + str.size());
It’s interesting to note that when Meyer originally conceived contract programming he added explicit support for this technique in his Eiffel language. He also used an assertion model to implement this support, as I have done here. However, in Eiffel, these assertions would get extracted automatically into the documentation for the class. Because C++ does not have this innate capability, you must manually ensure that the assertions in your implementation match the documentation for your interface.
Nevertheless, one of the benefits of employing this kind of contract programming is that errors get flagged much closer to the actual source of the problem. This can make a huge difference when trying to debug a complex program, as very often the source of an error and the point where it causes a problem are far apart. This is of course a general benefit of using assertions.
One particularly important piece of advice to remember when employing this programming style is to test against the interface, not the implementation. That is, your precondition and postcondition checks should make sense at the abstraction level of your API. They should not depend on the specifics of your particular implementation, as otherwise you will find that you have to change the contract whenever you change the implementation.
10.4.6 Record and Playback Functionality
One feature that can be invaluable for testing (and many other tasks) is the ability to record the sequence of calls that are made to an API and then play them back again at will. Record and playback tools are fairly common in the arena of application or GUI testing, where user interactions such as button presses and keystrokes are captured and then played back to repeat the user’s actions. However, the same principles can be applied to API testing. This involves instrumenting every function call in your API to be able to log its name, parameters, and return value. Then a playback module can be written that accepts this log, or journal, file and calls each function in sequence, checking that the actual return values match the previously recorded responses.
Ordinarily this functionality will be turned off by default so that the overhead of creating the journal file does not impact the performance of the API. However, it can be switched on in a production environment to capture actual end-user activity. These journal files can then be added to your test suite as data-driven integration tests or can be played back in a debugger to help isolate problems. You can even use them to refine the behavior of your API based on real-world usage information, such as detecting common invalid inputs and adding better error handling for these cases. Your clients could even expose this functionality in their applications to allow their end users to record their actions and play them back themselves, that is, to automate repetitive tasks in the application. This is often called a macro capability in end-user applications.
There are several different ways that you could instrument your API in this fashion. One of the more clean ways to do this is to introduce a Proxy API that essentially forwards straight through to your main API, but which also manages all of the function call logging. In this way, you don’t need to pollute your actual API calls with these details and you always have the option of shipping a vanilla API without any logging functionality. This is demonstrated in the following simple example:
Of course, if you already have a wrapper API, such as a script binding or a convenience API, then you can simply reuse that interface layer. This is also a good place to perform your API contract tests, as described in the previous section.
Gerard Meszaros notes that on its face, record and playback techniques may appear to be counter to agile methodologies such as test-first development. However, he points out that it is possible to use record and playback in conjunction with test-first methodologies as long as the journal is stored in a human-readable file format such as XML (Meszaros, 2003). When this is the case, the record and playback infrastructure can be built early on and then tests can be written as data files rather than in code. This has the additional benefit that more junior QA engineers could also contribute data-driven integration tests to the test suite.
Adding robust record and playback functionality to your API can be a significant undertaking, but the costs are normally worth it when you consider the benefits of faster test automation and the ability to let your clients easily capture reproduction cases for bug reports.
10.4.7 Supporting Internationalization
Internationalization (i18n) is the process of enabling a software product to support different languages and regional variations. The related term localization (l10n) refers to the activity of using the underlying internationalization support to provide translations of application text into a specific language and to define the locale settings for a specific region, such as the date format or currency symbol.
Internationalization testing can be used to ensure that a product fully supports a given locale or language. This tends to be an activity limited to end-user application testing, that is, testing that an application’s menus and messages appear in the user’s preferred language. However, design decisions made during the development of your API can have an impact on how easily your clients can provide localization support in their applications.
For example, you may prefer to return integer error codes rather than error messages in a single language. If you do return error messages, then it would be helpful to define all of the potential error messages in an appropriate header file that your clients can access so that they can be localized appropriately. Also, you should avoid returning dates or formatted numbers as strings, as these are interpreted differently across locales. For example, “100,000.00” is a valid number in the United States and the United Kingdom, but in France the same number would be formatted as “100 000,00” or “100.000,00.”
Several libraries provide internationalization and localization functionality. You could use one of these libraries to return localized strings to your clients and let them specify the preferred locale for the strings that your API returns. These libraries are often very easy to use. For example, the GNU gettext library provides a gettext() function to look up the translation for a string and return it in the language for the current locale (assuming that a translation has been provided). Often, this gettext() function is aliased to _ so that you can write simple code such as
Similarly, the Qt library provides excellent internationalization and localization features. All QObject subclasses that use the Q_OBJECT macro have a tr() member function that behaves similarly to GNU’s gettext() function, for example,
10.5 Automated Testing Tools
This section takes a look at some of the tools that can be used to support your automated testing efforts. I will divide these into four broad categories:
1. Test harnesses. Software libraries and programs that make it easier to maintain, run, and report results for automated tests.
2. Code coverage. Tools that instrument your code to track the actual statements or branches that your tests executed.
3. Bug tracking. A database-driven application that allows defect reports and feature requests to be submitted, prioritized, assigned, and resolved for your software.
4. Continuous build systems. A system that rebuilds your software and reruns your automated tests whenever a new change is added.
10.5.1 Test Harnesses
There are many unit test frameworks available for C and C++. Most of these follow a similar design to the classic JUnit framework and provide support for features such as assertion-based testing, fixture setup, grouping of fixtures for multiple tests, and mock objects. In addition to being able to define a single test, a good test framework should also provide a way to run an entire suite of tests at once and report the total number of failures.
I will not attempt to describe all available test harnesses here; a Web search on “C++ test frameworks” will turn up many tools for you to investigate if that is your desire. However, I will provide details for a number of the more popular or interesting frameworks.
• CppUnit (http://cppunit.sourceforge.net/): A port of JUnit to C++ originally created by Michael Feathers. This framework supports various helper macros to simplify the declaration of tests, capturing exceptions, and a range of output formats, including an XML format and a compiler-like output to ease integration with an IDE. CppUnit also provides a number of different test runners, including Qt- and MFC-based GUI runners. Version 1 of CppUnit has reached a stable state and future development is being directed toward CppUnit 2. Michael Feathers has also created an extremely lightweight alternative version of CppUnit called CppUnitLite. Here is a sample test case written using CppUnit, based on an example from the CppUnit cookbook.
class ComplexNumberTest : public CppUnit::TestFixture
CPPUNIT_ASSERT(*m_10_1 == *m_10_1);
CPPUNIT_ASSERT(*m_10_1 != *m_11_2);
CPPUNIT_ASSERT(*m_10_1 + *m_1_1 == *m_11_2);
• Boost Test (http://www.boost.org/): Boost includes a Test library for writing test programs, organizing tests into simple test cases and test suites, and controlling their run-time execution. A core value of this library is portability. As such it uses a conservative subset of C++ features and minimizes dependencies on other APIs. This has allowed the library to be used for porting and testing of other Boost libraries. Boost Test provides an execution monitor that can catch exceptions in test code, as well as a program execution monitor that can check for exceptions and non-zero return codes from an end-user application. The following example, derived from the Boost Test manual, demonstrates how to write a simple unit test using this library.
#define BOOST_TEST_MODULE MyTest
#include <boost/test/unit_test.hpp>
// #2 throws an exception on error
BOOST_REQUIRE(add(2, 2) == 4);
// #4 throws an exception on error
// #5 throws an exception on error
BOOST_CHECK_MESSAGE(add(2,2) == 4, "add() result: " << add(2, 2));
BOOST_CHECK_EQUAL(add(2, 2), 4);
• Google Test (http://code.google.com/p/googletest/): The Google C++ Testing Framework provides a JUnit-style unit test framework for C++. It is a cross-platform system that supports automatic test discovery (i.e., you don’t have to enumerate all of the tests in your test suite manually) and a rich set of assertions, including fatal assertions (the ASSERT_* macros), non-fatal assertions (the EXPECT_* macros), and so-called death tests (checks that a program terminates expectedly). Google Test also provides various options for running tests and offers textual and XML report generation. As mentioned earlier, Google also provides a mock object testing framework, Google Mock, which integrates well with Google Test. The following code demonstrates the creation of a suite of unit tests using Google Test.
TEST(IsPrimeTest, NegativeNumbers)
EXPECT_FALSE(IsPrime(INT_MIN));
TEST(IsPrimeTest, TrivialCases)
TEST(IsPrimeTest, PositiveNumbers)
int main(int argc, char** argv)
::testing::InitGoogleTest(&argc, argv);
• TUT (http://tut-framework.sourceforge.net/): The Template Unit Test (TUT) Framework is a small portable C++ unit test framework. Because it consists only of header files, there is no library to link against or deploy. Tests are organized into named test groups, and the framework supports automatic discovery of all tests that you define. A number of test reporters are provided, including basic console output and a CppUnit-style reporter. It’s also possible to write your own reporters using TUT’s extensible reporter interface. Here is a simple canonical unit test written using the TUT framework.
tut::factory tf("basic test");
typedef test_group<basic> factory;
typedef factory::object object;
10.5.2 Code Coverage
Code coverage tools let you discover precisely which statements of your code are exercised by your tests, that is, these tools can be used to focus your testing activities on the parts of your code base that are not already covered by tests.
Different degrees of code coverage can be measured. I will define each of these with reference to the following simple code example.
void TestFunction(int a, int b)
if (a > 10 && b != 0) // Line 3
• Function coverage. In this coarsest level of code coverage, only function calls are tracked. In the example code, function coverage will only record whether TestFunction() was called at least once. The flow of control within a function has no effect on function code coverage results.
• Line coverage. This form of code coverage tests whether each line of code that contains an executable statement was reached. One limitation of this metric can be seen on Line 1 of our code example. Line coverage will consider Line 1 to be 100% exercised even if the a++ statement is not executed; it only matters if the flow of control hits this line. Obviously, you can get around this limitation by putting the if condition and the a++ statement on separate lines.
• Statement coverage. This metric measures whether the flow of control reached every executable statement at least once. The primary limitation of this form of coverage is that it does not consider the different code paths that can result from the expressions in control structures such as if, for, while, or switch statements. For example, in our code sample, statement coverage will tell us if the condition on Line 3 evaluated to true, causing Line 4 to be executed. However, it will not tell us if that condition evaluated to false because there is no executable code associated with that result.
• Basic block coverage. A basic block is a sequence of statements that cannot be branched into or out of. That is, if the first statement is executed then all of the remaining statements in the block will also be executed. Essentially, a basic block ends on a branch, function call, throw, or return. This can be thought of as a special case of statement coverage, with the same benefits and limitations.
• Decision coverage. This code coverage metric measures whether the overall result of the expression in each control structure evaluated to both true and false. This addresses the major deficiency of statement coverage because you will know if the condition in Line 3 evaluated to false. This is also called branch coverage.
• Condition coverage. Condition coverage determines whether each boolean subexpression in a control structure has evaluated to both true and false. In our example here, this means that Line 3 must be hit with a > 10, a <= 10, b != 0, and b == 0. Note that this does not necessarily imply decision coverage, as each of these events could occur in such an order that the overall result of the if statement always evaluates to false.
Various programs let you measure the code coverage of C++ code. Each of these supports different combinations of the metrics I’ve just listed, normally by instrumenting the code that your compiler generates. Most of these tools are commercial offerings, although there are some free and open source options too.
One feature in particular that can be very useful is the ability to exclude certain lines of code from the analysis, often done by adding special comments around those lines of code. This can be used to turn off coverage for lines that legitimately can never be hit, such as methods in a base class that are always overridden; although in these cases it’s important that the coverage tool raises an error if the excluded code is ever hit in the future as this may signal an unexpected change in behavior.
Another issue to bear in mind is that you should normally perform code coverage analysis on a build that has been compiled without optimizations, as compilers can reorder or eliminate individual lines of code during optimization.
The following list provides a brief survey of some of the more prominent code coverage analysis tools.
• Bullseye Coverage (http://www.bullseye.com/). This coverage tool, from Bullseye Testing Technology, provides function as well as condition/decision coverage, to give you a range of coverage precision. It offers features such as covering system-level and kernel mode code, merging results from distributed testing, and integration with Microsoft Visual Studio. It also gives you the ability to exclude certain portions of your code from analysis. Bullseye is a mature product that has support for a wide range of platforms and compilers.
• Rational PureCoverage (http://www.rational.com/). This code coverage analysis tool is sold as part of the PurifyPlus package from IBM. It can report coverage at executable, library, file, function, block, and line levels. PureCoverage can accumulate coverage over multiple runs and merge data from different programs that share the same source code. It offers both graphical and textual output to let you explore its results.
• Intel Code-Coverage Tool (http://www.intel.com/). This tool is included with Intel compilers and runs on instrumentation files produced by those compilers. It provides function and basic block coverage and can restrict analysis to only those modules of interest. It also supports differential coverage, that is, comparing the output of one run against another run. The Code-Coverage Tool runs on Intel processors under Windows or Linux.
• Gcov (http://gcc.gnu.org/onlinedocs/gcc/Gcov.html). This test coverage program is part of the open-source GNU GCC compiler collection. It operates on code generated by g++ using the -fprofile-arcs and -ftest-coverage options. Gcov provides function, line, and branch code coverage. It outputs its report in a textual format; however, the accompanying lcov script can be used to output results as an HTML report (see Figure 10.3).
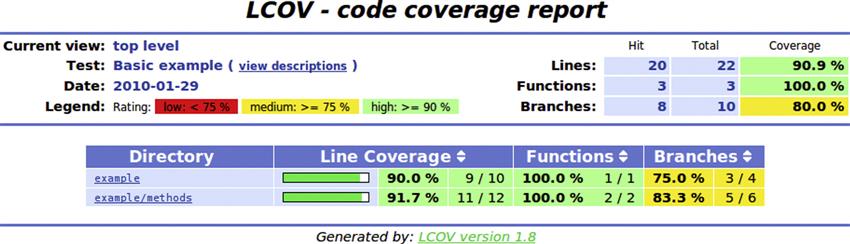
Once you have a code coverage build in place and can refer to regular coverage reports for your API, you can start instituting code coverage targets for your code. For example, you might specify that all code must achieve a particular threshold, such as 75, 90, or 100% coverage. The particular target that you select will depend greatly on the coverage metric that you adopt: attaining 100% function coverage should be relatively easy, whereas 100% condition/decision coverage will be far more difficult. From experience, a high and very respectable degree of code coverage would be 100% function, 90% line, or 75% condition coverage.
It’s also worth specifically addressing the issue of code coverage and legacy code. Sometimes your API must depend on a large amount of old code that has no test coverage at all. Recall that Michael Feathers defines legacy code as code without tests (Feathers, 2004). In these cases, it may be impractical to enforce the same code coverage targets for the legacy code that you impose for new code. However, you can at least put some basic tests in place and then enforce that no checkin should lower the current coverage level. This effectively means that any new changes to the legacy code should be accompanied with tests. Because enforcing this requirement on a per checkin basis can sometimes be difficult (because you have to build the software with the change and run all tests to know whether it should be accepted), another reasonable way to make this work is to record the legacy code coverage for the previous version of the library and ensure that coverage for the new version equals or exceeds this threshold at the time of release. This approach offers a pragmatic way to deal with legacy code and lets you gradually increase the code coverage to acceptable levels over time.
In essence, different modules or libraries in your API may have different code coverage targets. In the past, I have made this clear by updating the code coverage report to display the target for each module and use a color scheme to indicate whether the targets have been met in each case. You can then glance down the report quickly to know if your testing levels are on target.
10.5.3 Bug Tracking
A bug tracking system is an application that lets you keep track of bugs (and often suggestions) for your software project in a database. An efficient bug tracking system that can be mapped well to your development and quality processes is an invaluable tool. Conversely, a poor bug tracking system that is difficult to use and does not fully reveal the state of your software can be an albatross around the neck of your project.
Most bug tracking systems support the triage of incoming bugs, that is, setting the priority (and perhaps severity) of a bug and assigning it to a particular developer. It’s also standard practice to be able to define filters for the bugs in the system so that targeted bug lists can be created, such as a list of open crashing bugs or a list of bugs assigned to a particular developer. Related to this, some bug tracking systems will also provide report generation functions, often with the ability to display graphs and pie charts. This can be indispensible for generating quality metrics about your software, which together with code coverage results can be used to direct further testing efforts more efficiently.
It’s also worth noting what a bug tracking system is not. For one, it is not a trouble ticket or issue tracking system. These are customer support systems that are used to receive feedback from users, many of which may not be related to software problems. Valid software issues that are discovered by customer support will then be entered into the bug tracking system and assigned to an engineer to work on. Another thing that a bug tracking system is not is a task or project management tool, that is, a system that lets you track tasks and plan work. However, some bug tracking system vendors do provide complementary products that use the underlying infrastructure to provide a project management tool as well.
There are dozens of bug tracking systems on the market and the best one for your project will depend on several factors, such as:
• You may prefer an open source solution so that you have the option to customize it if necessary. For example, many large open source projects use Bugzilla, including Mozilla, Gnome, Apache, and the Linux Kernel. See http://www.bugzilla.org/.
• There are also many commercial packages that provide excellent and flexible bug tracking capabilities that come with support and optionally secure hosting. Atlassian’s JIRA is one such popular solution that provides an extremely customizable and robust bug tracking system. Atlassian also provides the related GreenHopper project management system for agile development projects, which lets you manage your user story backlog, task breakdowns, and sprint/iteration planning. See http://www.atlassian.com/.
• Alternatively, you may decide to go with a general project hosting solution that provides revision control features, disk storage quotas, discussion forums, and an integrated bug tracking system. Google Code Hosting is one popular option in this category. See http://code.google.com/hosting/.
10.5.4 Continuous Build System
A continuous build system is an automated process that rebuilds your software as soon as a new change is checked into your revision control system. A continuous build system should be one of the first pieces of technology you put in place for a large project with multiple engineers, independent of any testing needs. It lets you know the current state of the build and identifies build failures as soon as they happen. It is also invaluable for cross-platform development because even the most well-tested change for one platform can break the build for a different platform. There are several continuous build options on the market, including the following.
• Tinderbox (https://developer.mozilla.org/en/Tinderbox): An open source solution from the Mozilla team that runs builds and test suites. See Figure 10.4 for an example of the Tinderbox interface.
• Parabuild (http://www.viewtier.com/): An enterprise software build and release management system from Viewtier Systems.
• TeamCity (http://www.jetbrains.com/teamcity/): A distributed build management and continuous integration server from JetBrains.
• Electric Cloud (http://www.electric-cloud.com/): A suite of tools for build/test/deploy automation that supports build parallelization.
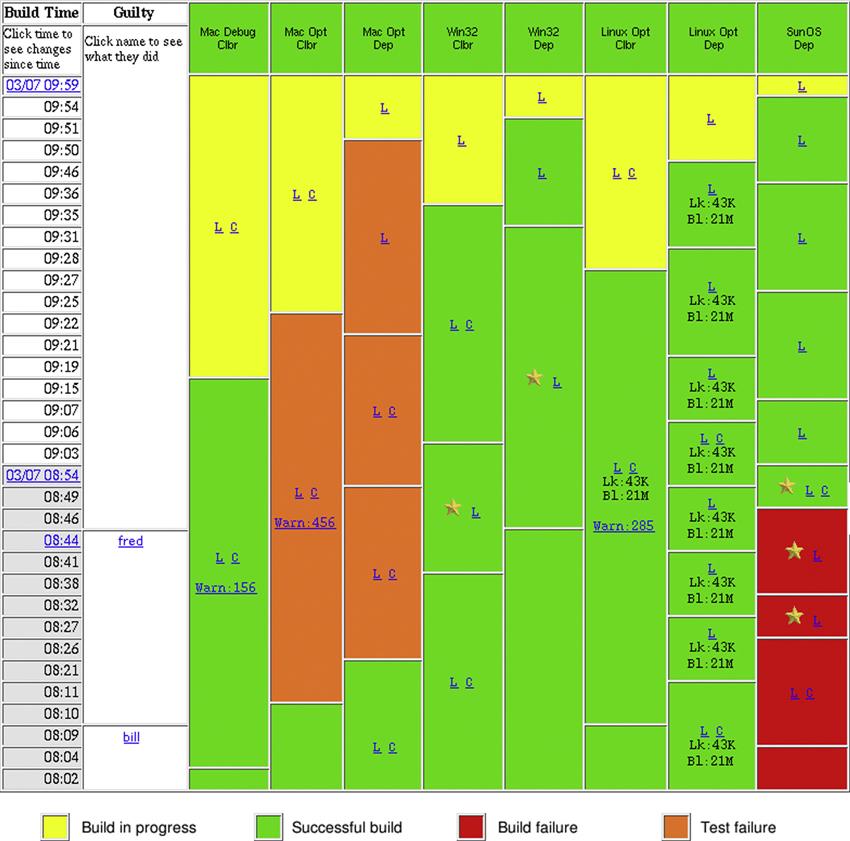
However, our focus here is on automated testing. The benefit of a continuous build system for testing is that it provides a mechanism for also running your automated tests on a regular basis and hence to discover test breakages quickly. That is, the result of the automated build can be in one of four states: in progress, pass, build failure, or test failure.
As your test suite grows, so will the time it takes to run all of your tests. It’s important that you receive fast turnaround on builds so that if your test run starts taking several hours to complete, then you should investigate some test optimization efforts. One way to do this is to segment your tests into different categories and only run the fast category of tests as part of the continuous build. Another solution is to have multiple automated builds: one that only builds the software and another that builds the software and then runs all tests. This gives engineers the ability to quickly receive feedback about build breakages while still ensuring that a full test suite is run as often as possible.