
4 Matching URLs to Razor Pages with routing
- Evaluating how URLs are matched to Razor pages
- Examining the use of route templates to control the matching process
- Working with data passed in URLs
- Overriding conventional routes
- Generating outbound URLs
In the last chapter, we looked at how to influence which handler method is invoked for a particular request by incorporating an HTTP method name into the name of a handler method—for example, OnGet, OnPost, and so on. Before the handler selection process can take place, the correct page must be selected. This chapter focuses on routing, which is the process that maps the incoming request to a specific page, or endpoint (incoming URLs), and generates URLs that map to those endpoints (outgoing URLs).
Many web application frameworks map URLs to a web page’s file path on disk based on matching the URL segments to a folder structure. Continuing the theme of a web application that provides vacation packages from the last chapter, table 4.1 provides some examples of this one-to-one match between some imagined segmented URLs and their file paths in a web application.
Table 4.1 It is common to find a one-to-one mapping between incoming URLs and page file paths.
This chapter will explore how Razor Pages uses page-based routing—mapping between URLs and file paths as the basis for routing within an application. It will also explore how you can use configuration to customize how URLs map to endpoints when a direct relationship between the URL and the location on disk is insufficient for your needs.
The one-to-one correspondence between the URL and the file path is easy to reason about, but it is very limiting on its own. The first example in table 4.1 hints at a page that provides information about London as a vacation destination. If you also wanted to provide information about Paris (https://domain.com/city/paris), you would have to add another page to the city folder named paris.cshtml. As discussed in previous chapters, this is not a sustainable way to build an application. In the last chapter, we looked at passing data in the URL as a query string value. This chapter will explore passing data as part of the URL itself and getting a single page to respond differently based on that data.
URLs are considered part of your web application’s UI. So you need to be able to exercise as much control over them as you have over the generation of HTML within your application. The routing system controls how the framework generates URLs to endpoints, but there are customization options available. You will see how to use them to ensure your URLs are descriptive and human readable.
In the last chapter, we looked at some examples of using Razor syntax to iterate over a list of cities. To demonstrate the concepts in this chapter and in subsequent chapters, we will continue with this scenario and start building an application that offers vacation packages in cities worldwide (we call them city breaks in the UK). If you would like to try the code samples featured in this and the following chapters, you should create a new Razor Pages application based on the instructions from chapter 2 and name it CityBreaks.
4.1 Routing basics
Routing is not part of the Razor Pages framework. It comes as separate components and, as such, is plugged into your application as middleware. The two key components that control routing in a Razor Pages application are the EndpointRouting middleware and the Endpoint middleware, illustrated in figure 4.1. They are added to the application pipeline via the UseRouting and MapRazorPages methods, respectively. Listing 4.1 shows the relevant lines of code in the Program class as a reminder.
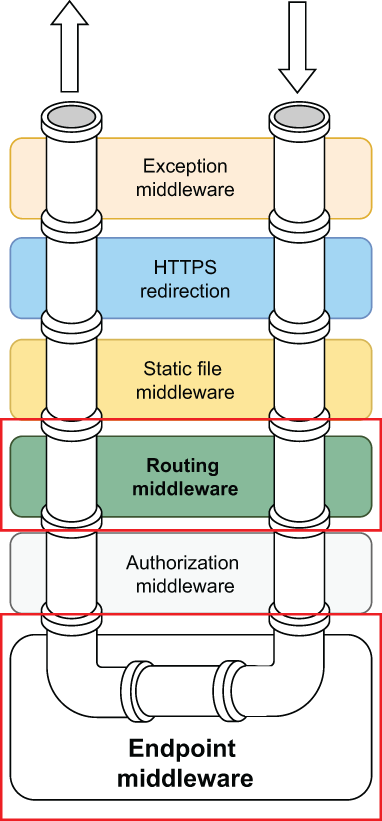
Figure 4.1 Routing middleware is registered after static file middleware. Endpoint middleware is registered at the end of the pipeline.
Listing 4.1 Calling UseRouting before UseEndpoints
app.UseStaticFiles();      ❶
app.UseRouting();          ❷
app.UseAuthorization();
app.MapRazorPages();       ❸
❶ Static files middleware is registered before routing.
❷ EndpointRouting middleware is registered in the UseRouting method.
❸ Endpoint middleware is registered at the end of the pipeline and registers endpoints based on Razor Pages conventions.
The role of EndpointRouting middleware is to match incoming URLs to endpoints. In the case of a Razor Pages application, an endpoint is generally a Razor page. If a match is made, information about the matched endpoint is added to the HttpContext, which is passed along the pipeline. Figure 4.2 illustrates this process. Once the endpoint has been added to the HttpContext, it can be accessed via the GetEndpoint method of the HttpContext.

Figure 4.2 The path of the incoming URL is matched to a collection of routes. The endpoint related to the matched route is added to the HttpContext.
The Endpoint middleware is responsible for executing the selected endpoint. If no matching endpoint is found, the last middleware, which is registered in the pipeline by the framework, returns a 404 Not Found HTTP status code.
Middleware that does not rely on routing, such as the static file middleware, should be placed prior to the call to UseRouting. Any middleware that needs to know about the selected endpoint is placed between UseRouting and UseEndpoints. Authorization middleware needs to know about the selected endpoint, for example, to determine whether the current user is authorized to access it.
4.1.1 Route templates
The EndpointRouting middleware attempts to match URLs to endpoints by comparing the path of the URL (the part after the domain) to route templates. A route template is a string representation of a route pattern. The call creates route templates to MapRazorPages in the Endpoint middleware registration, which instructs the framework to create endpoints based on Razor Pages conventions. Specifically, a collection of RouteEndpoint objects is created. A RouteEndpoint is a type of endpoint that can be used in URL matching and generation.
Route templates for Razor pages are created from the file path and name of Razor files found in the default root directory: the Pages folder.
For a Razor file to be seen as a navigable page, it needs to have an @page directive at the top, and it cannot have a leading underscore in its name. Table 4.2 shows the route templates generated for the default project template pages along with the URL that matches the generated template.
Table 4.2 Route templates are constructed from the filename and location
The Index.cshtml file is a special case. Two route templates are generated for it—one that includes the filename and another consisting of an empty string instead of Index. This happens because Index is seen as the default document. Therefore, it can be reached just by matching the folder name in the URL. If you are not careful, this can cause problems resulting from ambiguous routes. For example, if you add a folder named Privacy with an Index file in it, the route templates in table 4.3 will be generated.
Table 4.3 Ambiguous routes might be generated.
The last two route templates in table 4.3 are identical. There is no way for the endpoint selection process to distinguish which endpoint (page) should match, so the framework throws an AmbiguousMatchException when you attempt to navigate to http://domain.com/privacy. Sometimes this type of file configuration is unavoidable, so you will need to know how to resolve ambiguous routes, which is covered in this chapter.
4.2 Customizing route templates
The route template patterns you have seen so far consist of literal text. They require an exact match between characters in the URL and the route template if endpoint matching is to succeed. It would be rather pointless if the routing system was restricted to generating templates that matched existing file paths exactly. As you would expect from any real-world web application framework, Razor Pages provides plenty of scope to customize the route template generation process.
The principal entry point to route template customization is the @page directive in the Razor page itself. The only other thing permitted on the first line of a Razor page file, after the @page directive, is a string that is used to customize the route template for the page:
@page "route-template"
As well as literal text, route templates can include two other types of elements: parameters and separators, as shown in figure 4.3. Parameters are placeholders for dynamic values, like parameters for C# methods, and separators represent the boundary between segments in a URL. The difference between a literal and a parameter is that the latter is enclosed in curly braces. Parameters are an extremely powerful tool in terms of URL-to-endpoint matching. You will learn a lot more about working with parameters in routes soon, but before that, we will take a look at using literal text to override the default route template for a page.
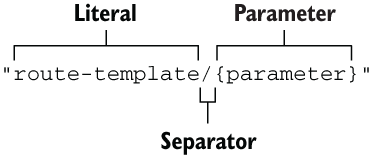
Figure 4.3 Demonstrates a literal within a route template, a separator character, and a placeholder for a parameter value within curly braces
4.2.1 Overriding routes
Suppose you find yourself in the kind of pickle illustrated in table 4.3, where two pages generate the same route template. In that case, you might want to override the template generated by one of them to prevent exceptions from being thrown at run time. You can do this by providing an alternative literal text value to the @page directive that starts with the separator character (/). For example, you can add "/privacy-policy" after the @page directive in the PagesPrivacy.cshtml file like this:
@page "/privacy-policy"
This will replace the default route template. The routes that get generated as a result of this change are shown in table 4.4.
Table 4.4 Using literal text in a route template to override default route generation
You can consider route templates as behaving the same way as URLs, in that those that do not begin with the path separator are relative to the current page, whereas those that start with the path separator are absolute and not appended to the current page’s route.
4.2.2 Route parameters
We saw at how the URL https://domain.com/city/london might map to a single file named london.cshtml located within a folder named City. Instead of representing a filename, london could represent data. In Razor Pages, data passed in the URL is known as route data and is represented in route templates by route parameters. The city is no longer a folder; it is a page that processes the incoming data. Parameters are added to route templates by specifying their name in curly braces { }. The name itself can be more or less anything, except the following reserved words:
If you would like to follow along, add a new Razor page to the Pages folder named City. The following line of code shows a parameter named cityName being added to the route template for the City page:
@page "{cityName}"The resulting route template that gets created for the page will be
City/{cityName}Any value passed in to the name parameter is added to a RouteValueDictionary object (literally a dictionary of route values), which is added to a RouteData object. Then, within the page, the value can be retrieved using RouteData.Values. Listing 4.2 shows how the product route parameter is defined and how the value of the parameter is retrieved in code within the City page.
Listing 4.2 Adding a route parameter to the page and retrieving its value for display
@page "{cityName}"                                ❶
@model CityBreaks.Pages.CityModel

<h2>@RouteData.Values["cityName"] Details</h2>    ❷
❶ The route template is added with a parameter in curly braces named "name".
❷ The value of the name parameter is obtained from RouteData.Values and displayed in the page.
Now if you navigate to /City, the first thing you notice is that you get a 404 Not Found error.
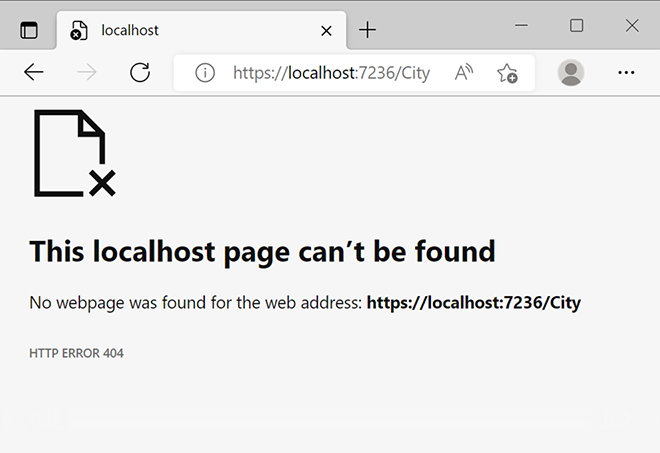
Figure 4.4 The application returns a 404 HTTP error code if no value is provided for a required route parameter.
The reason for this is that, by default, a value for the name parameter is required. The URL /City doesn’t match any existing route template on its own (figure 4.4). Navigate to /City/London instead, and the parameter value is retrieved and displayed (figure 4.5).
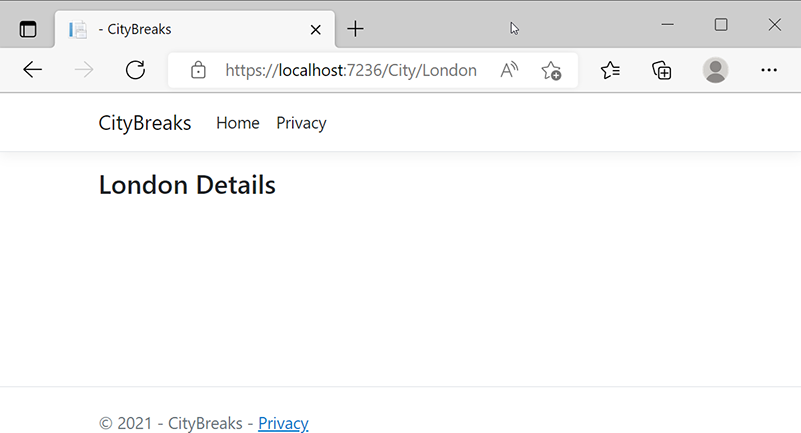
Figure 4.5 The parameter value is retrieved and displayed.
Parameters can be made optional by placing a question mark after the parameter name—for example, {cityName?}. Once the parameter has been made optional, you can navigate to the page without having to provide a value. Optional parameters can only be used as the last parameter in a route template. All other parameters must either be required or have a default value assigned to them.
Default values are assigned to route parameters in the same way they are assigned to normal C# method parameters, albeit without the quotes around string values:
"{cityName=Paris}"Now if you navigate to /City, the default value is displayed (figure 4.6).
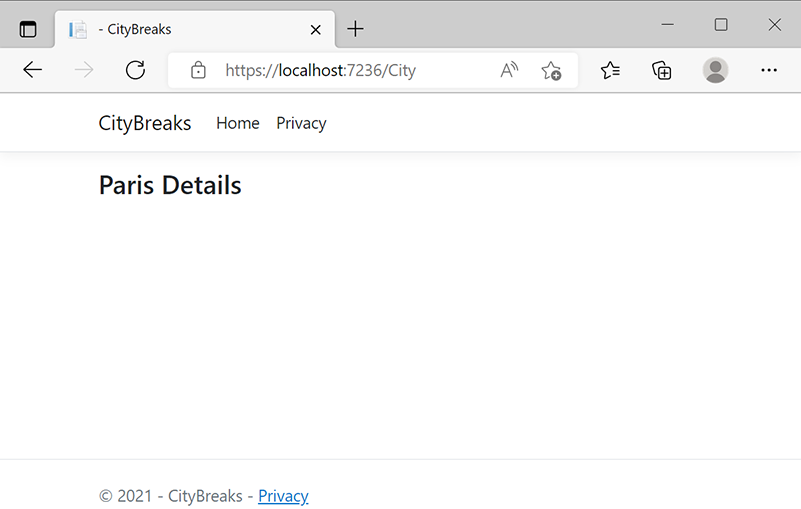
Figure 4.6 Default values can be assigned to route parameters.
4.2.3 Binding route data to handler parameters
You will recall from the previous chapter that query string values in URLs are automatically bound to parameters in PageModel handler methods if their names match. The same is true of route data. If a route parameter name matches, the incoming value is automatically assigned to a handler method parameter. You can then assign the parameter value to a PageModel property, which is the recommended way to work with route data, rather than accessing the route values dictionary. Listing 4.3 shows the CityModel OnGet method amended to take a parameter called cityName and assigning the incoming value to a public property, followed by the change in the City Razor page to work with it.
Listing 4.3 Binding route data to PageModel handler parameters
[City.cshtml.cs]
public class CityModel : PageModel
{
    public string CityName { get; set; }    ❶
    public void OnGet(string cityName)      ❷
    {
        CityName = cityName;                ❸
    }
}


[City.cshtml]
@page "{cityName=Paris}"
@model CityBreaks.Pages.CityModel
@{
}
<h3>@Model.CityName Details</h3>            ❹
❶ A public property is added to the PageModel.
❷ A parameter is added to the OnGet, which is named the same as the route parameter and is the same data type.
❸ The parameter value is assigned to the PageModel property.
❹ The PageModel property is referenced in the page instead of RouteData.Values.
You can specify multiple parameters in a route template. Often, each parameter will occupy its own segment in a URL. Listing 4.4 shows the City page and its PageModel updated to handle an additional optional parameter in a new URL segment that might enable the user to specify the minimum acceptable rating of potential venues within the specified city.
Listing 4.4 Multiple parameters in separate URL segments
[City.cshtml.cs]
public class CityModel : PageModel
{
    public string CityName { get; set; }
    public int? Rating { get; set; }
    public void OnGet(string cityName, int? rating)
    {
        CityName = cityName;
        Rating = rating;
    }
}


[City.cshtml]
@page "{cityName}/{rating?}"
@model CityBreaks.Pages.CityModel
@{
}
<h3>@Model.CityName Details</h3>
<p>Minimum Rating: @Model.Rating.GetValueOrDefault()</p>
Multiple parameters within the same segment are also permitted. Each parameter must be separated by literal text that doesn’t feature in the parameter value. Suppose your City page accepts a value representing the desired arrival date instead of a rating value being passed in. Since the hyphen doesn’t appear in the date parts, the route template can be constructed like this:
"{cityName}/{arrivalYear}-{arrivalMonth}-{arrivalDay}"This will match /City/London/2022-4-18, for example, but not /City/London/2022/ 4/18.
4.2.4 Catchall parameters
So far, the route parameters you have seen are used to match specific segments within the URL. There may be occasions when you don’t know how many segments the URL will consist of. For example, you may build a content management system that allows users to construct their own arbitrary URLs that don’t map to file paths. They map to database entries instead. You will need a route template that matches anything, so the endpoint that is selected can take care of looking up the URL in the database and displaying the related content. The routing system provides a catchall parameter to cater to this scenario.
A catchall parameter is declared by prefixing the name with one or two asterisks—for example, {*cityName} or {**cityName}. Catchall parameters match everything from the parameter position in the URL to the end, so it doesn’t make sense to include other parameters after a catchall parameter. The matching process is identical, regardless of whether you use one asterisk or two. The difference between using one or two asterisks is apparent when you use the route template to generate URLs (which you will see later in this chapter). If you use one asterisk, path separators within the generated URL will be URL-encoded—that is, they will be rendered as %2F. So for example, the URL /City/London/2022/4/18 will be rendered as /City%2FLondon%2F2022%2F4%2F18. When you use two asterisks, the encoding is decoded, or round-tripped, and the generated URL will include literal path separators: /City/London/2022/4/18.
4.2.5 Route constraints
As you should have gathered by now, route parameters are analogous to the method parameters you encounter in most programming languages. They are placeholders for variable data provided to parts of the application at run time. Therefore, it is inevitable that you will want to be able to perform some kind of processing on these inputs more often than not. You may want to construct a .NET DateTime object with the route values passed in to the arrival date example, so you can work with it in .NET code:
public DateTime Date { get; set; }
public void OnGet(string cityName, int arrivalYear, int arrivalMonth, int arrivalDay)
{
    Date = new DateTime(arrivalYear, arrivalMonth, arrivalDay);
}
A potential problem arises because there is no type of checking being performed against the incoming values. As far as routing is concerned, all URL data is a string type. Consequently, a request for /City/London/foo-bar-baz will match the route and result in an exception being raised when .NET attempts to construct a valid date in the year foo. Route constraints provide a solution to this problem. They enable you to specify the data type and range of acceptable values a route data item must comply with for it to be considered a match against the route template.
Route constraints are applied by separating them from the parameter name with a colon. The following example shows how to constrain each of the date parts to integer types:
"{cityName}/{arrivalYear:int}-{arrivalMonth:int}-{arrivalDay:int}"The URL City/London/foo-bar-baz no longer matches this template, but /City/ London/2022-4-18 does. However, the user can still fiddle with the URL and provide values that result in an invalid date being created, such as /City/London/2022-4004-18. To protect against this, you could use the range constraint to constrain the range of valid values. The range constraint accepts minimum and maximum acceptable values and can be applied to the month parameter as follows:
"{cityName}/{arrivalYear:int}-{arrivalMonth:range(1-12)}-{arrivalDay:int}"More likely, however, you would change the template altogether and constrain the incoming value to a datetime type:
"{cityName}/{arrivalDate:datetime}"A wide range of constraints is available that restrict matching to specific data types and ranges. The most commonly used constraints are listed in table 4.5. The full range of constraints is available at https://github.com/dotnet/aspnetcore/tree/main/src/Http/Routing/src/Constraints.
Table 4.5 Constraints available in routing templates
|
Matches uppercase or lowercase Latin alphabet characters (a-z or A-Z) | ||
|
Matches a string with the specified length or within a specified range of lengths | ||
Earlier in the chapter, you saw how ambiguous routes were created when an Index file was added to a Privacy folder. The same situation will arise if you add a City folder and place an Index file there. Last time, I provided an entirely new route template to one of the pages to prevent duplicate route templates being generated. Constraints can also be used to ensure each page is seen as different. A template of "{cityName:alpha}" requires parameters to consist only of letters (a-z or A-Z), while a template "{id:int}" will only match numbers.
It is possible to apply multiple constraints to a parameter. For example, you might want to specify that a value must be composed only of letters of the alphabet and must not exceed nine characters in length. This is achieved by appending additional constraints using the colon separator:
"{cityName:alpha:maxlength(9)}"As table 4.5 demonstrates, an extensive range of route constraints that should meet most of your needs is available to you. It is also possible to create your own custom route constraint and register that with the routing service for application-specific needs.
Eventually, your City page is likely to take the value passed in to the cityName parameter and use that to perform a lookup against a database to obtain more details for the specified location. This works fine, but you soon begin to realize that sometimes the database query doesn’t return a result. When you review your logs, you see that the value being passed to the database query is not what you expect to see in your URLs. It might be part of a city name, it might have some extra characters added, or, indeed, it might bear no resemblance to anything in your database at all. There are countless ways links to your site can get broken when shared or stored by a poorly written bot. Or savvy users might hack your URLs and add the name of a city that does not exist in your database.
It may be savvy to prevent the wasted processing these database lookups for nonexistent values incur and inform the requester that the page they are looking for doesn’t exist. In this case, you want to return a 404 Not Found status code.
The following steps show you how to create your own route constraint that checks the value for the cityName parameter against a predetermined collection of cities. If the route data item is not in the list, the match fails, and the application returns a 404 Not Found status code. The collection in this example is a simple array. In a real-world application, the data will reside in a database, but you would perform the lookup against a cached version of the cities to prevent the need to make a database call. In chapter 14, you will explore the use of the caching features offered by ASP.NET Core to query a collection stored in memory on the web server.
Route constraints are classes that implement the IRouteConstraint interface. So the first step is to create a C# class named CityRouteConstraint. This should be placed in a folder named RouteConstraints, so you don’t have miscellaneous code files cluttering up the root folder of your project. The code for the CityRouteConstraint class is detailed in the following listing.
Listing 4.5 The custom CityRouteConstraint class
using Microsoft.AspNetCore.Http;
using Microsoft.AspNetCore.Routing;
using System;
using System.Linq;

namespace CityBreaks.RouteContraints
{
    public class CityRouteConstraint : IRouteConstraint                    ❶
    {
        public bool Match(HttpContext httpContext, IRouter route,          ❷
        ➥ string routeKey, RouteValueDictionary values, RouteDirection    ❷
        ➥ routeDirection)                                                 ❷
        {
            var cities = new[] { "amsterdam", "barcelona", "berlin",       ❸
                                 ➥ ”copenhagen”, “dubrovnik”, “edinburgh”,❸
                                 ➥ "london", "madrid", "paris", "rome",   ❸
                                 ➥ "venice" };                            ❸
            return cities.Contains(values[routeKey]?.ToString()
➥ .ToLowerInvariant());                                       ❹
        }
    }
}
❶ The constraint must implement IRouteConstraint.
❷ The IRouteConstraint specifies a Match method that returns a Boolean.
❹ The code that determines if the match is valid.
The IRouteConstraint interface has one member—a method named Match that returns a Boolean. It takes a number of items as parameters, not all of which will be needed in order to perform the match in every case. In this example, only the RouteValuesDictionary and the routeKey are needed. The routeKey value is the name of the parameter to be checked. If there is a match between the incoming parameter value and an item in the cities array, the Match method returns true.
Note The Match method in IRouteConstraint is a synchronous method, which makes IRouteConstraint unsuitable for any requirement that should involve asynchronous processing. If you want to constrain incoming routes in a real-world application asynchronously, alternative mechanisms that support this include middleware (see chapter 2) and IEndPointSelectorPolicy (https://learn.microsoft.com/en-us/dotnet/api/microsoft.aspnetcore.routing.matching.iendpointselectorpolicy?view=aspnetcore-7.0), which is not covered in this book.
Custom route constraints must be registered. This is done in the Program class. The constraint is added to the ConstraintMap collection, as illustrated in the following listing, by passing in a name for the constraint and the matching type that should be used.
Listing 4.6 Custom route constraints registered using RouteOptions
builder.Services.AddRazorPages();
builder.Services.Configure<RouteOptions>(options =>
{
    options.ConstraintMap.Add("city", typeof(CityRouteConstraint));   ❶
});
❶ The constraint is registered with the name "city".
Once the constraint has been registered, it can be used just like any other by placing the name of the constraint after the parameter name:
@page "{cityName:city}"4.2.6 Creating additional routes
When you customize the route template through the @page directive, you affect the routing system’s resulting template. In addition to replacing the default route template, you can specify additional templates a page can match. The most direct way to do this is to use the AddPageRoute method when configuring RazorPagesOptions (which is similar to specifying an alternative root folder for pages), as shown in listing 4.7, where the Index page has an additional route applied to it, so it can be found at the URL /FindMe as well as the routes the system generates.
Listing 4.7 Adding additional route templates via configuration
builder.Services
    .AddRazorPages()
    .AddRazorPagesOptions(options =>
    {
        options.Conventions.AddPageRoute("/Index", "FindMe");
    });
There is no limit to the number of additional routes you can define for a particular page using this approach, which takes the name of the page to be mapped and a route template that matches the page. This particular example shows a route template with the literal value "FindMe", but the template applied to the AddPageRoute method can include parameters and constraints just like the ones you have been working with so far.
4.2.7 Working with PageRouteModel conventions directly
In the previous section, you declared an additional route template for a page through the AddPageRoute method. This method offers a convenient way to add new routing conventions to the application, albeit to one page at a time. But what if you wanted to apply a new routing convention to multiple pages, or even all the pages in the application? The AddPageRoute approach doesn’t scale very well. You could potentially end up with hundreds of lines of code in your ConfigureServices method, and you would have to remember to add a new registration for every new page.
When you use the AddPageRoute method, the framework creates a new PageRouteModelConvention and adds it to the PageConventionCollection represented by the RazorPagesOptions Conventions property. The convention is represented by the IPageRouteModelConvention interface, which you can work with directly to apply new conventions to multiple pages. To illustrate how this works, imagine that your budding application needs to support displaying content in multiple languages.
Note The process of providing support for content to be displayed in multiple languages is known as localization, which is a specialized topic and won’t be covered in any detail in this book beyond this example. If you would like to know more about localization in Razor Pages, check out my series of blog articles here: https://www.mikesdotnetting.com/category/41/localization.
To present a localized (translated) version of the content, the application needs to know which culture, or language, the user prefers. Often, this is determined by asking the user to select from a number of options and then tracking that selection in some way. One of the common ways to store the selection and pass it from page to page is in the URL as data. A typical example of a URL that includes the preferred culture might be https://domain.com/en/Welcome, where the /en/ segment specifies English as the culture, or https://domain.com/fr/Welcome for the French version.
As already established, you pass data in URLs as parameter values, and route templates that incorporate parameters need to be declared explicitly. If you want to support adding a route template to multiple pages, you can create a PageRoute- ModelConvention that can be applied to any number of pages.
PageRouteModelConventions implement the IPageRouteModelConvention interface, which specifies a single method that must be implemented—the Apply method, which takes a PageRouteModel as a parameter:
public interface IPageRouteModelConvention : IPageConvention
{
    void Apply(PageRouteModel model);
}
Notice that the IPageRouteModelConvention interface, in turn, implements the IPageConvention interface. This is a marker interface. It has no methods and is used as part of the route discovery process to denote the implementing class as one that contains route model conventions that should be applied to the application.
The PageRouteModel parameter provides a gateway for applying new conventions to generate routes for a Razor page. It is through this object that you can apply your custom convention. The PageRouteModel has a Selectors property, which represents a collection of SelectorModel objects. Each one of these has an AttributeRouteModel property, which, in turn, has a Template property representing a route template that enables mapping a URL to this particular page. The following is how this structure looks for the current Index page in our application:
PageRouteModel
    RelativePath: "/Pages/Index.cshtml"
    Selectors: [Count = 3]
        SelectorModel[0]:
            AttributeRouteModel:
                Template: "Index"
        SelectorModel[1]:
            AttributeRouteModel:
                Template: ""
        SelectorModel[2]:
            AttributeRouteModel:
                Template: "FindMe"
This is a massively simplified representation, focusing only on those properties that are of immediate interest. The PageRouteModel class and the classes that make up its properties are a lot more complex than this. Notice that there are three SelectorModel objects in this representation of the Index page. The final SelectorModel contains the FindMe route template, which was added in the previous section through the AddPageRoute method.
Within the Apply method, you can access the existing SelectorModel objects and amend the value of the Template property to change the existing templates, or you can add SelectorModel objects to the Selectors collection to add additional route templates. The following listing shows a PageRouteModelConvention that copies the existing route templates, inserts an optional route parameter called culture as the first segment, and then adds the copy to a new SelectorModel for every page that is discovered in the application.
Listing 4.8 Creating a PageRouteModelConvention to add a custom route convention
using Microsoft.AspNetCore.Mvc.ApplicationModels;                            ❶

namespace CityBreaks.PageRouteModelConventions
{
    public class CultureTemplatePageRouteModelConvention :
    ➥ IPageRouteModelConvention                                             ❷
    {
        public void Apply(PageRouteModel model)                              ❸
        {
            var selectorCount = model.Selectors.Count;

            for (var i = 0; i < selectorCount; i++)                          ❹
            {
                var selector = model.Selectors[i];

                model.Selectors.Add(new SelectorModel                        ❺
                {
                    AttributeRouteModel = new AttributeRouteModel
                    {
                        Order = 100,                                         ❻
                        Template =                                           ❻
                        ➥ AttributeRouteModel.CombineTemplates("{culture?}",❻
                        ➥ selector.AttributeRouteModel.Template)            ❻
                    }
                });
            }
        }
    }
}
❶ A using directive is required for the Microsoft.AspNetCore.Mvc.ApplicationModels namespace.
❷ You are calling this class CultureTemplatePage-RouteModelConvention and implementing the IPageRouteModelConvention interface.
❸ The class implements the Apply method.
❹ The PageRouteModel’s collection of SelectorModels is iterated over to obtain information about its route template.
❺ A new SelectorModel is added to the collection by combining a new parameter named culture with a copy of the existing selector.
❻ The order is set to a high number for the new template, so it doesn’t interfere with existing routes.
You register the CultureTemplatePageRouteModelConvention by adding it to the RazorPagesOptions Conventions collection similarly to how you called the AddPageRoute method previously:
builder.Services.AddRazorPages().AddRazorPagesOptions(options => {
    options.Conventions.AddPageRoute("/Index", "FindMe");
    options.Conventions.Add(new CultureTemplatePageRouteModelConvention());
});
Once the convention has been registered, it is invoked, and its Apply method is executed for every Razor page in the application at startup. The end result is that the total number of route templates within the application is doubled. For example, the total number of SelectorModels for the Index page is now six with the following route templates:
"Index"
""
"FindMe"
"{culture?}/Index"
"{culture?}"
"{culture?}/FindMe"
Now you can reach the home page with or without a culture included in the URL. If you wanted to make a culture mandatory, you would have updated the existing template instead:
foreach (var selector in model.Selectors)
{
    selector.AttributeRouteModel.Template = AttributeRouteModel.CombineTemplates("{culture}",
                selector.AttributeRouteModel.Template);
}
That completes our exploration into how URLs are mapped to individual Razor pages and how you can use a variety of ways to customize the process when necessary. The next section looks at the tools available for generating URLs based on the application’s route information.
4.3 Generating URLs
Anyone with a modicum of HTML knowledge knows you create links in your application just by adding anchor elements to a page with the destination URL applied to the href attribute as a hardcoded string, so why has this book devoted a section to the topic of generating URLs? If the URL you want to create links to is external to your site, a plain anchor element and a hardcoded href value are exactly what you will use. You could also use hardcoded URLs for internal links too, but as you have just been reading, you can alter how URLs map to pages very easily. If you need to adjust how a specific page or group of pages is found, you need to update the URLs that link to those pages in all the locations within the application. Now, that could present a maintenance headache—and the developers of the Razor Pages framework don’t like maintenance headaches, so they provided solutions to this issue.
Razor Pages includes some tools that generate URLs based on the application’s routing configuration. So if you change the routing, the links they generate are automatically updated. The main tools are the anchor tag helper, which we have looked at briefly before, and the LinkGenerator service. Those are what we will look at next.
4.3.1 The anchor tag helper
As established in the last chapter, tag helpers are components that automate the generation of HTML. The anchor tag helper is responsible for generating an anchor element that links to pages within the application. The href attribute’s value is the essential part of the anchor element. The anchor tag helper is responsible for generating this based on the routing configuration for the application. If you change the routing system configuration by adjusting a route template for a page or adding a new convention, the output from the tag helper is automatically adjusted accordingly. You don’t need to go through your Razor pages to update links all over the application.
As a reminder, following is the anchor tag helper for the Welcome page you added to the navigation in chapter 2:
<a class="nav-link text-dark" asp-area="" asp-page="/Welcome">Welcome</a>
This particular anchor tag helper includes two custom attributes, both prefixed with asp-. Notice that there is no href attribute. You cannot include an href attribute in an anchor tag helper. If you try to, your application will throw an InvalidOperationException at run time. The custom attributes supported by the anchor tag of most interests to Razor Pages applications are as follows:
The page, page-handler, and route-* attributes are the ones you will work with most often. The page attribute is the most important; it takes the name of the page (the path without the extension, rooted in the Pages folder) you want to generate a link to, preceded by a forward slash (e.g., /Welcome). You must pass in a valid page name, including path separators if the page is in a subfolder. So if the page you want to generate a link to is located at PagesAdminIndex.cshtml, the value you pass to the page attribute will be /Admin/Index. If the routing system cannot find a matching page, it will generate an href attribute with an empty string. Therefore, if you find that the rendered output of an anchor tag helper unexpectedly takes you to the home page of your application, you should double-check the value you assigned to the page attribute.
Some pages have multiple route templates. Where this is the case, the last template will be used to generate the href value (see figure 4.7). The default convention for files named Index.cshtml is to generate two route templates; the first is Index, and the last is an empty string, as you saw earlier. When you pass /Index or /Admin/Index to the asp-page attribute, the resulting output is href="/" or href="/Admin/". You added a third route template for the Index page earlier—"FindMe"—via the AddPageRoute method in Startup, which will generate the href value. Consequently, the rendered HTML for <a asp-page="/Index">Home</a> will be <a href="/FindMe">Home</a>.
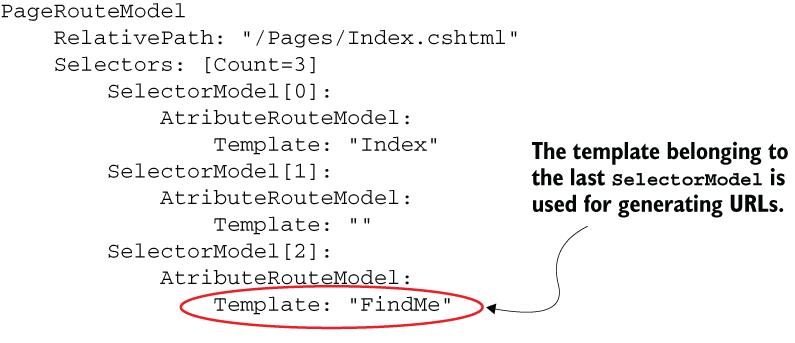
Figure 4.7 The template belonging to the last SelectorModel is used for generating URLs.
The page-handler attribute is used to specify the name of the named handler method that should be executed. This works in the same way it did in the form tag helper you saw in the last chapter when I discussed named handlers with the use of a Search handler and a Register handler. By default, the value passed to the page-handler attribute is applied to the query string with a key named "handler":
?handler=Search
You can change this behavior so that the name of the handler becomes part of the URL by altering the page’s route template to include a parameter named "handler". This is usually added as an optional parameter, so the regular OnGet and OnPost handlers can also be reached:
@page "{handler?}"The route-* attribute caters to route parameter values, where the * represents the name of the parameter. Following is a tag helper that generates a link to the city page for Rome using the cityName parameter you specified in the route template:
<a asp-page="/City" asp-route-cityName="Rome">Rome</a>
If the parameter is not part of the route template, the name and value passed to the route-* attribute is applied to the URL query string. So if you replace the route attribute in the previous example with asp-route-foo="bah", the resulting URL will be /City?foo=bah.
The all-route-data parameter takes a Dictionary<string, string> as a value, which is used to wrap multiple route parameter values. It is provided as a convenience that relieves you from having to add multiple route-* attributes:
var d = new Dictionary<string, string> { { "cityName", "Madrid" },{ "rating",
➥ "5" } };
<a asp-page="/City" asp-all-route-data="d">Click</a>
The default behavior of the anchor tag helper is to generate a relative URL based on the location of the target page. Suppose you choose to specify the protocol (e.g., HTTPS) using the protocol attribute or the hostname (domain) using the host attribute. In this case, the anchor tag helper will generate an absolute URL using the value(s) specified.
The final attribute in the list is the area attribute, which is used to specify the area the target page is in. The name of the area is included as the first segment of the generated URL.
4.3.2 Using the IUrlHelper to generate URLs
The anchor tag helper is used to generate URLs for internal links, but sometimes, you need to generate URLs that will be used for other purposes. You might need to generate a URL that will be included in an email—like the one that you are often required to click to validate your registration on a website, for example. Or you might need to generate a URL in an img tag on a Razor page. The IUrlHelper service can be used for this. It is made available to you in Razor Pages through the Url property of the PageModel class and the Razor page itself.
The Url property has a number of methods, two of which are of particular interest within a Razor Pages application: the Page method and the PageLink method. The Page method offers a number of versions or overloads that generate relative URLs as strings from the name of the page passed in to it, along with the name of a page handler method and route values. Other overloads can be used to generate absolute URLs. The PageLink method generates absolute URLs based on the current request. The following example shows how to use the Page method to generate a relative URL that includes route data, which is passed in to the Page method as an anonymous type, where the property names match route parameter names.
Listing 4.9 Generating a relative URL with the IUrlHelper
public class IndexModel : PageModel
{
    public void OnGet()
    {
        var target = Url.Page("City", new { cityName = "Berlin", rating = 4 });
    }
}
The value of the target variable, based on the "{cityName}/{rating?}" template from listing 4.4, is "/City/Berlin/4". Any properties within the anonymous type that don’t have names matching parameter names will be added to the URL query string.
The next listing demonstrates the use of the PageLink method to generate an absolute URL. The output, based on the same route template, is "https://localhost :5001/City/Berlin/4".
Listing 4.10 Generating an absolute URL with the IUrlHelper
public class IndexModel : PageModel
{
    public void OnGet()
    {
        var target = Url.PageLink("City", values: new { cityName = "Berlin",
        ➥ rating = 4 });
    }
}
4.3.3 Generating redirect URLs from ActionResults
At the end of the last chapter, we looked at different ActionResult types that can be used as a return type for handler methods and the helper methods for creating instances of the ActionResult class. Two of those helper methods generate URLs that are included in the location header as part of the response: RedirectToPage and RedirectToPagePermanent. Both of these methods are used to instruct the browser to redirect to the generated URL. The RedirectToPage method also generates an HTTP 302 status code, which indicates that the location change is temporary. In contrast, the RedirectToPagePermanent method generates a 301 HTTP status code, indicating that the redirection should be viewed as representing a permanent change. You would typically use the latter method when you want to inform search engines that a resource has been moved to a new URL. The following listing shows how to use the RedirectToPage method to generate a RedirectToPageResult that sends the user to a specific city page.
Listing 4.11 Generating an absolute URL with the IUrlHelper
public class IndexModel : PageModel
{
    public RedirectToPageResult OnGet()                                        ❶
    {
        return RedirectToPage("City", new { cityName = "Berlin", rating = 4 });❷
    }
}
❶ It is good practice to set the handler return type as specifically as possible—in this case, RedirectToPageResult.
❷ The user will be directed to /City/Berlin/4.
If you want to redirect the user to a page within an area, you must pass the name of the area as a route parameter:
return RedirectToPage("/Account/Login", new { area = "Identity" });4.3.4 Customizing URL generation
At the beginning of this chapter, I stated that URLs should be considered to be part of your web application’s UI. On that basis, you need to be able to exercise as much control over their generation as possible. You ideally want your URLs to be readable and memorable. The conventions used to generate URLs might not suit your purposes. For example, it is common to use Pascal casing (where the first letter of each word in a compound word is capitalized) for Razor page names. Page routes use the same case as the name of the page by default. If, like me, you prefer lowercase URLs in your application, you can use the RouteOptions object to configure this in the Program class. It is the same RouteOptions object you used to add your custom constraint earlier. It has a Boolean property named LowercaseUrls, which, when set to true, results in the path part of outbound URLs being generated in lowercase.
Listing 4.12 Configuring outbound URL paths to use lowercase
builder.Services.Configure<RouteOptions>(options =>
{
    options.LowercaseUrls = true;                               ❶
    options.ConstraintMap.Add("city", typeof(CityConstraint));
});
❶ Setting lowercase as the default for the path part of generated URLs.
The RouteOptions object enables you to apply the same case preference for your query strings through its LowercaseQueryStrings property, which is also a Boolean:
options.LowercaseQueryStrings = true;
Going forward, the application you will build while reading this book will have lowercase URLs set to true. You won’t apply lowercasing to query string values because that will break security tokens, which you will work with in chapter 9 as part of user management.
Some people prefer their URLs to end with a forward slash (/). Technically, there is no benefit to doing so, but if you do choose to implement this pattern, you have to be consistent because search engines see City/London and City/London/ as two different URLs. The RouteOptions object includes a property named AppendTrailingSlash, which will always result in the slash being appended when set to true:
options.AppendTrailingSlash = true;
4.3.5 Using parameter transformers to customize route and parameter value generation
You now have your URLs generated in lowercase, but there are still some aspects of URL generation you might want to customize. Let’s say you have a page named CityReview.cshtml. The generated URL for this page will be /cityreview, whereas you might prefer each word in the compound word CityReview to be separated with a hyphen: city-review. This is known as kebab case (think of skewers). You could achieve this by naming the page City-Review.cshtml, which will result in a PageModel named City_ReviewModel. You could change the name of the PageModel class if you don’t like the underscore in the name, but you might also be under some global naming constraints that prevent you from including the hyphen in the page name in the first place. Another possible solution is to use the AddPageRoute method to apply an additional route template, which will be used for URL generation, but you will need to remember to do that for all other pages that might have compound words in their names. So ideally, you want a global solution that affects all pages in the application. Parameter transformers provide a global solution.
Parameter transformers are classes that implement the IOutboundParameterTransformer interface that specifies one method: TransformOutbound. The method takes an object as a parameter and returns a string. Despite its name, a parameter transformer can be used to transform the generated page route as well as the parameter values, depending on how it is registered with the application. The transformation logic is placed in the TransformOutbound method.
The following listing shows a parameter transformer that inserts hyphens prior to the first letter of the second and subsequent words in a Pascal case compound word, so CityReview becomes City-Review, for example.
Listing 4.13 A parameter transformer that acts on a page route
using Microsoft.AspNetCore.Routing;                                        ❶
using System.Text.RegularExpressions;                                      ❷

public class KebabPageRouteParameterTransformer :                          ❸
➥ IOutboundParameterTransformer                                           ❸
{                                                                          ❸
    public string TransformOutbound(object value)                          ❸
    {
        if (value == null)                                                 ❹
        {
            return null;
        }
        return Regex.Replace(value.ToString(), "([a-z])([A-Z])", "$1-$2"); ❺
    }
}
❶ IOutboundParameterTransformer is in the Microsoft.AspNetCore.Routing namespace.
❷ You are using a regular expression in the method body, so you need to add a using directive for the appropriate namespace.
❸ The class implements the IOutboundParameterTransformer interface and its TransformOutbound method.
❹ A null check is needed, just in case the page name passed in is incorrect.
❺ A simple (if there is such a thing) regular expression to identify locations in a string where an uppercase letter follows a lowercase letter and insert a hyphen where they are found
This particular transformer is designed to work on the route of the page, not the parameter values, so it must be registered as a PageRouteTransformerConvention. Registration takes place in the Program class, like the CultureTemplatePageRouteModelConvention from earlier in the chapter:
builder.Services.AddRazorPages().AddRazorPagesOptions(options => {
    options.Conventions.AddPageRoute("/Index", "FindMe");
    options.Conventions.Add(new CultureTemplatePageRouteModelConvention());
    options.Conventions.Add(new PageRouteTransformerConvention(
        new KebabPageRouteParameterTransformer()));
});
The PageRouteTransformerConvention type implements the IPageRouteModelConvention interface. You were introduced to that interface and its Apply method earlier as part of the CultureTemplatePageRouteModelConvention. When the application starts up, your new parameter transformer is assigned to the PageRouteModel’s RouteParameterTransformer property within the Apply method of the PageRouteTransformerConvention. From there, its logic is applied whenever an outbound route is required.
Transforming route parameter values
The final part of our look at managing URLs generation focuses on customizing route parameter values. Imagine you have a list of cities, and you want to generate links for each one as the route parameter value for the City page. Putting into practice what you have learned over the last couple of chapters, you might come up with some code that looks like the following listing in your PageModel class.
Listing 4.14 Generating an array of cities in the PageModel
public class IndexModel : PageModel
{
    public string[] Cities { get; set; }                           ❶
    public void OnGet()
    {
        Cities = new[] { "London", "Berlin", "Paris", "Rome" };    ❷
    }
}
❶ An array of string is declared as a public property on the PageModel.
❷ It is assigned the values of a number of cities.
You will iterate over the array within the Razor page and use the anchor tag helper to render links for each city.
Listing 4.15 Generating a list of links to each city
<ul>
@foreach (var city in Model.Cities)
{
    <li><a asp-page="/City" asp-route-cityName="@city">@city</a></li>
}
</ul>
Remember, you have LowercaseUrls set to true, so the generated HTML looks like figure 4.8.
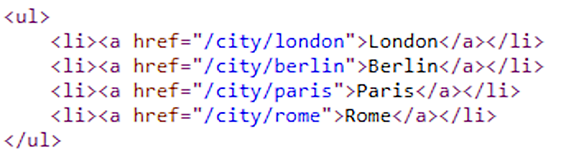
Figure 4.8 The links rendered by the anchor tag from the data
This is just what you want, but what happens if you include New York in the collection? Well, the space between the two words is URL encoded to %20 when the anchor tag is rendered (figure 4.9).
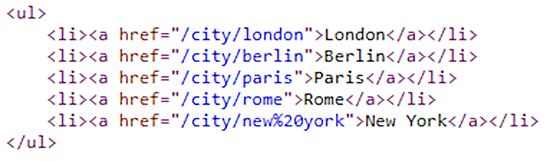
Figure 4.9 Spaces in URLs are encoded to %20 by default.
This isn’t such a great look, especially if your links start appearing in search engine results with lots of what can best be described by the average visitor as gobbledygook in them. You really want to render these route values using the same kebab case as routes to make them more readable, this time replacing spaces in the parameter values with hyphens. You often see this type of thing when a URL includes content like a blog post headline or the name of a book—take, for example, the URL for this book: www.manning.com/books/asp-net-core-razor-pages-in-action. The bold part of the URL is often referred to as a slug.
You will now transform the parameter value using another parameter transformer. The code for this is shown in the following listing.
Listing 4.16 Transforming spaces into hyphens within a route parameter value
public class SlugParameterTransformer :                ❶
➥ IOutboundParameterTransformer                       ❶
{                                                      ❶
    public string TransformOutbound(object value)      ❶
    {
        return value?.ToString().Replace(" ", "-");    ❷
    }
}
❶ The class implements IOutboundParameterTransformer and its TransformOutbound method.
❷ The processing logic simply replaces spaces with hyphens.
This particular implementation is very naive. For instance, it doesn’t take account of any existing hyphens in the value being transformed or any double spaces, but it is sufficient to serve as an example. The registration process for parameter transformers that act on route parameter values is very similar to the one used to register your custom route constraint earlier. The parameter transformer is added to the ConstraintMap property of the RouteOptions object, and it is assigned to the target route parameter in the same way as a route constraint. The next listing shows how the SlugParameterTransformer is registered as part of RouteOptions.
Listing 4.17 Registering a parameter transformer like a constraint
builder.Services.Configure<RouteOptions>(options =>
{
    options.LowercaseUrls = true;
    options.ConstraintMap.Add("city", typeof(CityConstraint));
    options.ConstraintMap.Add("slug", typeof(SlugParameterTransformer));
});
Having registered the parameter transformer, you apply it to selected route parameters in the same way as a route constraint with the name that was specified at registration:
@page "{name:slug}/{rating?}"Note Despite the fact that you registered and applied the parameter transformer in a way similar to a route constraint, the parameter transformer does not act in the same way as a constraint. It plays no part in mapping URLs to route templates.
Now when you rerun the application, the link to the New York page looks a lot better (figure 4.10).
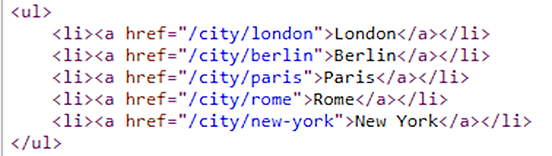
Figure 4.10 The parameter transformer works on outbound routes.
That ends our exploration of the routing system within Razor Pages. You have learned about the default behavior of mapping URLs to route templates, which are generated from the location of the Razor page within an application. You have also learned how to customize this behavior on an individual page basis and a global basis as well as how to pass data in URLs using route parameters.
You have seen how to use the anchor tag helper to generate URLs for links and use the IUrlHelper via the Razor page and the PageModel’s Url property to generate URLs for potential use for other purposes. Finally, you looked at customizing the generated URLs using RouteOptions and parameter transformers. The next chapter focuses on using forms within a Razor Pages application to capture and process data.
Summary
-
Routing is the process that maps incoming URLs to endpoints and generates outgoing URLs.
-
Routing is added as middleware with the UseRouting and UseEndpoints methods.
-
Route templates represent the endpoint to be matched. They consist of literals, separators, and parameters, which represent data in URLs.
-
Routes are generated from the location of the Razor page on the disk.
-
You can customize individual page routes by providing a new template to the @page directive.
-
You can use route constraints to disambiguate between similar route patterns.
-
Alternatively, you can create your own PageRouteModelConvention to customize routing for multiple pages.
-
The anchor tag helper generates outgoing URLs based on the routing system, as does the IUrlHelper.
-
The RouteOptions object provides some ways to customize the URL generation process.
-
You can use parameter transformers to take full control over the URL generation process.