
3 Working with Razor Pages
- Generating HTML with Razor templates
- Learning the Razor syntax
- Working with layouts, partials, and tag helpers
- Understanding the PageModel as a controller and view model
- Working with handler methods and IActionResult
At this point, you should have a good understanding of the working parts of a Razor Pages application—how to create one, the role of the generated files, and how to configure the application’s behavior through the request pipeline. Now you are ready to take a deep dive into working with the principal actor within a Razor Pages application: the Razor page itself.
As you work through the chapter, you will learn how to use Razor syntax to generate dynamic HTML and coordinate layouts and partial files to reduce your repetition of code and improve reuse. You have already had a brief introduction to layouts and partials, but to remind you, layouts act as a kind of master template for multiple pages, and partial files consist of snippets of UI that can be plugged into a host page or layout.
You will also learn about the PageModel class—a fundamental feature of Razor Pages that acts as both an MVC controller and a view model, or a container for data specific to a particular view or page. You will explore how to use the view model aspect of the PageModel to expose data to the Razor page in a strongly typed manner, which will improve your efficiency as a developer. Doing this will also enable you to work effectively with tag helpers, or components that enable server-side code to participate in the HTML generation process. You will learn about some of the different types of tag helpers available within ASP.NET Core and how to use them.
Finally, you will see how the PageModel object acts as a page controller, handling the request for a page and deciding which model and view to use. Handler methods play a significant role in the request processing, and you will learn the important conventions behind their use and the return types, or IActionResults, they commonly work with.
3.1 Working with Razor syntax
All web development frameworks need to be able to generate HTML dynamically. Almost exclusively, they rely on a design pattern called Template View. This pattern involves using markers or placeholders consisting of server-side code embedded in HTML that resolve to calls to process and render dynamic content.
Dynamic content can take many forms. Often it will take the form of data extracted from a data store, such as a database, but as you have seen, it can also simply be the result of some computation, such as the time of day. In addition to the content itself, you will need to embed server-side code to control the presentation of the content. For example, if the dynamic content is a collection, such as a list, you will need to iterate over it in code to display each item. Or you might need to only show the data under certain conditions, such as if the user has permission to see it. So in addition to enabling you to embed instances of data into a page, the templating syntax must also enable you to include statement blocks that control processing within the page.
Many frameworks, such as older versions of ASP.NET, PHP, Ruby on Rails, and Java Server Pages, use HTML-like tags as markers to let the template processor know where the transitions are between HTML and server-side code. Razor syntax uses the @ symbol as a transition marker and has several simple rules. The first rule is that Razor syntax is only applicable to the contents of Razor files that have a .cshtml extension. That’s an amalgam of cs for C Sharp and html for Hypertext Markup Language. Further rules are covered in the following sections, which examine specific scenarios in which Razor syntax is used, starting with how to add directives and code blocks to Razor pages.
3.1.1 Directives and code blocks
Let’s start by taking another look at the code you used to calculate the part of the day in the previous chapter to see how Razor syntax is used to include server side C# code within the Razor page. The example in listing 3.1 demonstrates three facets of Razor syntax: how to include directives within the page, how to include standalone blocks of C# code, and how to include the result of C# expressions or the value of variables in the rendered HTML.
Listing 3.1 Reviewing Razor syntax in the Welcome page
@page                                                               ❶
@model WebApplication1.Pages.WelcomeModel                           ❶
@{                                                                  ❷
    ViewData["Title"] = "Welcome!";                                 ❷

    var partOfDay = "morning";                                      ❷
    if(DateTime.Now.Hour > 12){                                     ❷
        partOfDay = "afternoon";                                    ❷
    }                                                               ❷
    if(DateTime.Now.Hour > 18){                                     ❷
        partOfDay = "evening";                                      ❷
    }                                                               ❷
}                                                                   ❷
<h1>Welcome</h1>
<p>It is @partOfDay on @DateTime.Now.ToString("dddd, dd MMMM")</p>  ❸
❸ C# inline expressions rendered as part of the output
The first instance of the @ symbol in this example demonstrates how directives are added to a page. Directives are C# expressions that start with the @ symbol followed by a reserved word (e.g., page or model) and enable functionality within the page or change how the content is parsed. Several directives are supported. The page directive denotes this file as representing a navigable page, and it must appear on the top line of the CSHTML file if it represents a page that is intended to be browsed. The model directive specifies the data type that acts as a model for this page, which, by default, is the PageModel class that accompanies the page. The PageModel is the focus of attention later in this chapter.
The next most commonly used directive is likely to be the using directive, which brings namespaces into scope, so their types can be referenced without using their fully qualified names. The next listing illustrates the using static directive being used to simplify working with the static Path class in System.IO, which would otherwise conflict with the Path property of the Razor page.
Listing 3.2 Adding a using directive with Razor syntax
@page
@model WebApplication1.Pages.WelcomeModel
@using static System.IO.Path                       ❶
@{
    var extension = GetExtension("somefile.ext");  ❷
}
❶ A using static directive makes the static Path class available without having to specify the class name. Notice there is no semicolon at the end of the using directive as there would be in a C# code file. The semicolon is optional in Razor files.
❷ The static Path.GetExtension method is called without needing to include the class name.
Razor pages support many directives. Some are page-specific, such as the page and model directives, but others, including the using directive, can be applied to multiple pages by including them in a ViewImports file.
The ViewImports file, a special kind of file named _ViewImports.cshtml, provides a mechanism for centralizing directives that apply to CSHTML files, so you don’t have to add them to Razor pages individually like you did with System.IO.Path in the preceding example. The default ViewImports file includes three directives:
-
A using directive that references the project namespace (WebApplication1, in our example)
-
A namespace directive that sets the namespace for all pages affected by the ViewImports (WebApplication1.Pages)
Tag helpers are components that work with tags in markup to automate HTML generation. They are covered in more detail later in the chapter.
The directives in a ViewImports file affect all .cshtml files located in the same folder and its subfolders. There is no limit to the number of ViewImports files a Razor Pages application can support. You can place additional ViewImports files in subfolders to either add to the top-level ViewImports file’s directives or override its settings. Certain directives, such as those for managing tag helpers, the using directive, and the inject directive (used for making services—covered in chapter 7—available to the page), are additive, while the other directives override each other the closer you get to the page. So, for example, the namespace specified in the ViewImports in the Pages folder will be overridden for pages in a subfolder if a different value is assigned to the namespace directive in a ViewImports file in that subfolder.
The second highlighted item in listing 3.1 is a code block. Code blocks begin with the @ symbol, followed by an opening curly brace, then a closing curly brace:
@{
    ... C# code goes here
}
Anything placed within the code block is pure C# code and must follow the rules of C# syntax. You can include multiple code blocks within a Razor page, but you should aim to keep them to the bare minimum, restricting them only to logic for managing presentation. Having too many code blocks in a Razor page is often a sign that you might have application logic within your UI, which you should avoid because it is very difficult to test when it is mixed in the HTML. For example, the logic for calculating the time of day should not be in the Razor page. It should be in the PageModel class, which can be tested in isolation, or if the algorithm is likely to be used in multiple places, it should be placed in its own class. You will move the algorithm to the PageModel class later in the chapter.
Razor also supports another type of code block: a functions block. A functions block is created by adding a functions directive followed by opening and closing curly braces:
@functions{
    ... C# code goes here
}
Again, the code within the functions block is pure C#. You can refactor the algorithm that calculates the part of the day to the functions block as a method as follows.
Listing 3.3 Declaring a method in a functions block
@functions{
    string GetPartOfDay(DateTime dt)
    {
        var partOfDay = "morning";
        if (dt.Hour > 12)
        {
            partOfDay = "afternoon";
        }
        if (dt.Hour > 18)
        {
            partOfDay = "evening";
        }
        return partOfDay;
   }
}
<p>It is @GetPartOfDay(DateTime.Now)</p>
You could also add this method to a standard code block. The difference between a standard code block and a functions block is that the functions block supports the declaration of public members, whereas they are not supported within a standard code block. However, it is generally advisable to minimize the use of functions blocks for the same reason that you should minimize code blocks altogether. They encourage mixing application code with HTML, making it difficult to reuse, isolate, and test.
An appropriate use of a functions block in a Razor page file would include small routines that manage presentation logic and only apply to the page in which they are placed. They are also useful for your current purpose, which is to simplify the learning of Razor syntax without having to switch between files.
3.1.2 Rendering HTML with expressions
The main purpose of Razor is to render dynamic content as HTML. You have already seen how the value of variables or expressions can be rendered to the browser by placing them inline within the HTML where the value is to be output and prefixing them with the @ symbol:
<p>It is @partOfDay on @DateTime.Now.ToString("dddd, dd MMMM")</p>Expressions like this example are known as implicit expressions. Another type of expression you will often use within a Razor file is an explicit expression, where the expression itself is placed within parentheses and prefixed with the @ symbol. You typically use explicit expressions where there is a space in the expression or where the expression includes angle brackets (i.e., < and >), such as in a generic method. If you don’t place such an expression within parentheses, the angle brackets will be seen as HTML. Here’s an example of an expression that involves the use of the ternary operator. The expression has spaces within it, so it must be included within the Razor file as an explicit expression:
<p>It is @(DateTime.Now.Hour > 12 ? "PM" : "AM")</p>
This example will render either "PM" or "AM" to the browser, depending on the time of day that the expression is executed.
3.1.3 Control blocks in Razor
Server-side code is mainly used in Razor files to control presentational output. Consequently, most of the Razor syntax you use will consist of control blocks—selection and iteration statements such as if-else, foreach, and so on in a page that apply processing logic to conditionally render output or loop through collections of items, for example. These control blocks differ from the code blocks you saw earlier in that they are embedded within the HTML content to be rendered rather than being isolated from the markup within braces.
C# selection and iteration statements are supported within Razor by prefixing the keyword that opens the block with the @ symbol. The following listing demonstrates how this applies to an if-else statement.
Listing 3.4 Selection statement support in Razor
@if(DateTime.Now.Hour <= 12)
{
    <p>It is morning</p>
}
else if (DateTime.Now.Hour <= 18)
{
    <p>It is afternoon</p>
}
else
{
    <p>It is evening</p>
}
The if-else statement works in this example by only rendering one of the paragraphs based on the condition being tested—in this case, the time of day when the page is executed. Note that there is no need for @ symbols prior to the else keywords. In fact, it will cause an error if you attempt to do so.
Listing 3.5 illustrates the use of a switch statement as an alternative to the if-else block in listing 3.4. Once again, the @ symbol is only required before the opening switch keyword.
Listing 3.5 Switch statement example in Razor
@switch (DateTime.Now.Hour)
{
    case int _ when DateTime.Now.Hour <= 12:
        <p>It is morning</p>
        break;
    case int _ when DateTime.Now.Hour <= 18:
        <p>It is afternoon</p>
        break;
    default:
        <p>It is evening</p>
        break;
}
You will often find yourself needing to use iteration statements in Razor pages as you iterate collections for rendering. Let’s imagine you are creating a vacation package website, and you need to render a list of possible destinations. The code in the following listing demonstrates the use of the foreach statement to render the members of an array of city names as an unordered list.
Listing 3.6 foreach statement example in Razor
@functions{
    public class City
    {
        public string Name { get; set; }
        public string Country { get; set; }
    }
    List<City> cities = new List<City>{
        new City { Name = "London", Country = "UK" },
        new City { Name = "Paris", Country = "France" },
        new City { Name = "Rome", Country = "Italy" } ,
        new City { Name = "Berlin", Country = "Germany" },
        new City { Name = "Washington DC", Country = "USA" }
    };
}

<ul>
    @foreach (var city in cities)
    {
        <li>@city.Name</li>
    }
</ul>
3.1.4 Rendering literal strings
All of the examples so far show Razor transitioning between HTML and C# code. Anything after an @ symbol is considered C# code, until an HTML tag is encountered. Sometimes you might need to render literal strings instead of HTML. There are two ways to tell Razor that a value is a literal string and not C# code. The first way is to prefix the first instance of a literal string on each line with @:.
Listing 3.7 Rendering literal strings in Razor
@foreach (var city in cities)
{
    if (city.Country == "UK")
    {
        @:Country:  @city.Country, Name: @city.Name
    }
}
Alternatively, you can use the <text> tag to surround the content. This works particularly well if you are working with multiline content, as shown in the following listing.
Listing 3.8 Using the text tag to render multiline literal strings
@foreach (var city in cities)
{
    if (city.Country == "UK")
    {
        <text>Country:  @city.Country<br />
        Name: @city.Name</text>
    }
}
The text tags are not rendered as part of the output; only their content is rendered. In addition, using text tags results in whitespace being removed from the output that appears before or after them.
3.1.5 Rendering literal HTML
The default behavior of Razor is to render any markup within the Razor page literally but to apply HTML encoding to the result of all expressions that resolve to strings. Any non-ASCII characters, as well as potentially unsafe characters (those that could facilitate the injection of malicious scripts into a web page), such as <, >, &, and “, are encoded to their HTML equivalents: <, >, &, ", and so on. The following listing shows some HTML being assigned to a variable that is rendered to the browser.
Listing 3.9 HTML assigned to the output variable that is rendered
@{
    var output = "<p>This is a paragraph.</p>";
}
@output
The resulting HTML that gets generated is
<p>This is a paragraph.</p>
Figure 3.1 demonstrates how this appears in the browser.

Figure 3.1 Non-ASCII and special HTML characters are encoded for output by default.
If you have an HTML string and do not want Razor to encode it, you can use the Html.Raw method to prevent encoding:
@Html.Raw(“<p>This is a paragraph.</p>”)
This is useful for scenarios in which, for example, you are storing HTML in a database for display—a typical requirement for most content management systems and the like. However, you should ensure that the HTML is sanitized prior to including it in your page. Otherwise, you could open your site up to script injection attacks. You will learn about these and other vulnerabilities in chapter 13.
The aggressive level of encoding that is applied by default may not be desirable for developers of sites that store and output content in languages that make heavy or exclusive use of non-ASCII characters. Take this snippet of German as an example (it translates to “Charges for oversized luggage”):
var output = "Gebühren für übergroßes Gepäck";
This is encoded to the following when it is embedded in the markup as @output:
Gebühren für übergroßes Gepäck
For non-Latin based languages, such as Cyrillic, Chinese, and Arabic, every character is encoded to its HTML equivalent, potentially increasing the number of characters in the generated source code significantly. While the output renders correctly, the page’s resulting size and overall site performance can be affected adversely.
It is possible to arrange for a broader range of characters, so they are not encoded. You can do this in Program.cs by setting the WebEncoderOptions. By default, the allowed range of characters (i.e., those not encoded) is restricted to the Basic Latin character set. Listing 3.10 demonstrates how to configure the options to add the Latin-1 Supplement character set to the allowed ranges, which includes accented vowels and the German eszett character (ß).
Listing 3.10 Configuring the WebEncoderOptions to add the Latin-1 Supplement
builder.Services.Configure<WebEncoderOptions>(options =>
{
    options.TextEncoderSettings = new TextEncoderSettings(UnicodeRanges.BasicLatin, UnicodeRanges.Latin1Supplement);
});
Note that whatever you set here will override the default settings, which is why you need to include the BasicLatin range. If you are unsure which character sets you should include, you can check here: http://www.unicode.org/charts/. Alternatively, you can simply specify UnicodeRanges.All.
The templated Razor delegate feature enables you to use a delegate to create Razor templates and assign them to a variable for reuse. You may remember from our discussion on middleware in the previous chapter that a delegate is a type that represents a method signature and a return type. Razor template delegates are expressed as a Func<dynamic, object> (a generic delegate). The body of the method contains a snippet of Razor, with the opening HTML tag prefixed with an @ symbol. The input parameter represents data and is a dynamic type, so it can represent anything. The data is accessible within the template through a parameter named item.
In listing 3.6, we created a list of cities and then rendered it to the browser using a foreach statement embedded in HTML to render an unordered list. In listing 3.11, we will extract the rendering of the unordered list into a template, which forms the body of the delegate.
The myUnorderedListTemplate variable is defined as a Func<dynamic, object>, matching the definition of a templated Razor delegate. Within it, the item parameter is assumed to represent a collection of cities. These are iterated over and rendered as an unordered list. The following listing shows how to assign the generation of the list to a Razor template delegate.
Listing 3.11 Defining a templated Razor delegate
@{
    Func<dynamic, object> myUnorderedListTemplate = @<ul>
        @foreach (var city in item)
        {
            <li>@city.Name</li>
        }
    </ul>;
}
Once the template has been defined, you can pass the data generated in listing 3.6 into it:
@myUnorderedListTemplate(cities)
This example relies on a dynamic input parameter, leading to potential errors that only surface at run time if you misspelled the name of a property, for example, or tried to access members that don’t exist. You can use strong typing to confine the types that your template accepts, as shown in the following listing, where the dynamic parameter has been replaced with a List<City>.
Listing 3.12 Narrowing the data item’s type in a templated Razor delegate
@{
    Func<List<City>, object> myUnorderedListTemplate = @<ul>
        @foreach (var city in item)
        {
            <li>@city.Name</li>
        }
    </ul>;
}
One of the drawbacks of the templated Razor delegate is that it only accepts one argument representing the data item, although there is no restriction on the data type. It can represent a complex type, so if your template is designed to work with more than just a list of cities, you can create a wrapper type that includes everything your template needs.
There is an alternative that enables you to define a template that can take any number of parameters. To take advantage of this feature, create a method in a code or functions block that returns void (or Task, if async processing is required), and just include HTML markup in the body of the method.
Listing 3.13 Alternative way to declare a template within a Razor page
@{
   void MyUnorderedListTemplate(List<City> cities, string style)    ❶
    {
        <ul>                                                        ❷
        @foreach(var city in cities)
        {
            <li class="@(city.Name == "London" ? style : null)">@city.Name</li>
        }
        </ul>
    }
}
@{ MyUnorderedListTemplate(cities, "active"); }                     ❸
❶ Markup is allowed in methods that return void or Task.
❷ The opening tag is not prefixed with the @ symbol.
❸ Since the method returns void or Task, it must be called within a code block.
Notice that, unlike the template delegate, the method can specify any number of parameters, and the leading HTML tag is not prefixed with the @ symbol. This method takes two parameters—the second one representing the name of a CSS class that should be applied conditionally to the list items. If you wanted to be able to achieve something similar with a template delegate, you would need to create a new type that wrapped the List<City> and the string.
Whether you use this approach or the template delegate, these helpers are only intended for reuse within the same Razor page. If you want to reuse snippets of HTML in multiple pages, there are much more flexible alternatives, including partial pages, tag helpers, and view components. We will look at partial pages and tag helpers in more detail later in this chapter. View components are covered in chapter 14.
Razor page files support standard HTML comments within the markup area of the page and C# comments within code blocks. They also support Razor comments, which begin with @* and end with *@. Anything between Razor comments is not rendered to the browser, unlike the content within HTML comments. The code in listing 3.14 shows a C# foreach statement within HTML comments. When the page is rendered, the Razor code is processed, and the resulting list of items appears as a comment in the source code.
Listing 3.14 HTML comments resulting in the content being rendered
<!--<ul>
    @foreach(var city in cities)
    {
        <li>@city.Name</li>
    }
</ul>-->
The following listing features the same foreach statement within Razor comments. None of the contents are included in the source code.
Listing 3.15 Excluding content within Razor comments from source code
@*<ul>
    @foreach(var city in cities)
    {
        <li>@city.Name</li>
    }
</ul>*@
That completes your look at the Razor syntax, which demonstrates how to embed server-side code within HTML to form a template for a single page. In the following sections, you will find out how to use layout pages and partials to create code templates that are reused across multiple pages.
3.2 Layout pages
It is a rare website that doesn’t share common content across multiple pages. Later in the book, you will build a web application that offers vacation packages. An outline sketch of this type of site might well look something like figure 3.2.

Figure 3.2 The header, navigation, Deal of the Day widget, and footer in this example are intended to appear on all pages. The main content area represents the content specific to each page.
In the sample sketch, the header, navigation, Deal of the Day widget, and footer are intended to appear on all pages in the site. The actual content of some of those elements might vary from page to page, but the basic structure will apply to all pages. The main content area represents the page-specific content, which might be a contact form and a postal address on a Contact Us page, or it might be details of breaks on offer in a specific location. The following listing shows how the image might be translated to HTML, using basic Bootstrap styles.
Listing 3.16 A basic outline of a web page containing content that will be repeated
<!DOCTYPE html>
<html>
<head>
    <title></title>
    <link rel="stylesheet" href="~/lib/bootstrap/dist/css/bootstrap.min.css"
    ➥ />
</head>
<body>
    <div class="container">
        <header class="card alert-success border-5 p-3 mt-3">Header</header>
        <nav class="card alert-primary border-5 p-3 mt-2">Navigation</nav>
        <div class="row mt-2">
            <div class="col-3">
                <div class="card alert-warning p-5 border-5">
                    Deal Of The Day Widget 1
                </div>
            </div>
            <div class="col-9 card border-5">
                Main Content
            </div>
        </div>
        <footer class="card border-5 p-3 mt-2">Footer</footer>
    </div>
</body>
</html>
If you created multiple pages that included this common content in each page separately, the burden of maintaining it would likely become intolerable. Every time you added a new page to the site, you would have to update the navigation in all the existing pages. Ideally, you want to centralize these pieces of repeating content in one location to be easy to maintain. This approach is known as DRY (don’t repeat yourself). DRY is one of the essential principles in software development.
Layout pages enable a DRY approach to managing common page content. They act as a parent or master template for all content pages that reference it. You have already looked briefly at the layout page in the sample application when you added your new page to the site navigation. A layout is a regular Razor file with a .cshtml extension, but what makes it act as a layout is that it contains a call to the RenderBody method, where the page-specific content is rendered, as shown in the following listing.
Listing 3.17 A Razor layout page including a call to RenderBody
<!DOCTYPE html>
<html>
<head>
    <title></title>
    <link rel="stylesheet" href="~/lib/bootstrap/dist/css/bootstrap.min.css"
    ➥ />
</head>
<body>
    <div class="container">
        <header class="card alert-success border-5 p-3 mt-3">Header</header>
        <nav class="card alert-primary border-5 p-3 mt-2">Navigation</nav>
        <div class="row mt-2">
            <div class="col-3">
                <div class="card alert-warning p-5 border-5">
                    Deal Of The Day Widget 1
                </div>
            </div>
            <div class="col-9 card border-5">
                @RenderBody()                   ❶
            </div>
        </div>
        <footer class="card border-5 p-3 mt-2">Footer</footer>
    </div>
</body>
</html>
❶ This is the point at which the output from the content page is injected into the layout.
The RenderBody method call is the only requirement for a layout page. Everything else within the layout page is included in all content pages that reference it, which makes managing it very easy. Any changes you make to the layout are immediately applied to all pages that reference it.
3.2.1 Assigning the Layout property
The layout for a specific page is assigned programmatically via the page’s Layout property. The value that you pass to the Layout property is a string, representing either the name of the layout file without its extension or the path to the layout file. Either of the approaches in the following listing will work.
Listing 3.18 Setting the layout page via the Layout property
@{
    Layout = “_Layout”;
    Layout = “/Pages/Shared/_Layout.cshtml”;
}
When you use the first approach to set the layout by name, the framework searches a number of predefined locations for a file with the matching name and a preconfigured extension, which is .cshtml by default. The folder containing the calling page is searched first, and if applicable, all folders in the hierarchy up to the root Pages folder will be searched. Finally, two further locations are searched: PagesShared and ViewsShared. The latter of these is a legacy of applications built using the MVC framework itself. If you placed the calling page in PagesAdminDestinationsOrders, for example, the search locations will be as follows:
Setting the layout on a page-by-page basis is not a very efficient approach if you want to assign the same layout to multiple pages for the same reason that you use a layout in the first place: updating it in multiple locations becomes a chore. To solve this problem, you can use a ViewStart file. This is a special Razor file named _ViewStart.cshtml, which you will find an example of located in the Pages folder. This file usually consists of a code block only, although it can contain markup too. The code within the ViewStart file is executed before any page that it affects, which is any Razor page in the same folder and all subfolders. Figure 3.3 shows the order of execution as a request comes in. First is the ViewStart file, then the content page, followed by any code in the layout file.

Figure 3.3 Order of execution of Razor files: ViewStart, followed by the content page, then the layout page
ViewStart is executed before any pages it affects, making it the ideal way to set the layout for all those pages. If you take a look at the contents of the existing ViewStart file, you will see that is exactly what it does:
@{
    Layout = “_Layout”;
}
I mentioned that the ViewStart code is executed before the code in the page, enabling you to alter the global setting on a page-by-page basis if you need to. Any layout assignment that takes place in an individual page will override the ViewStart. Equally, if you place additional ViewStart files lower down the Pages folder hierarchy, layout assignments in those will override any assignments in ViewStart files higher up the hierarchy.
One final note about layouts: it is possible to nest layout files, so one layout references another. To achieve this, you need to explicitly assign a layout in a child layout. Figure 3.4 shows the relationship between a page, a nested (child) layout, and the main layout. The Index content is injected into the nested layout wherever RenderBody is placed. The merged content is injected into the layout file.

Figure 3.4 The Index page references the _ChildLayout file, which, in turn, references the main _Layout file.
You can’t rely on the ViewStart file for setting the parent layout file in a child layout. The ViewStart file has no effect over layouts within its folder or subfolders. Nested layouts can enable some valuable scenarios in which you have additional content you want to display for a subset of pages, for example, which you would apply to the child layout.
3.2.2 Injecting optional content with sections
There will likely be occasions when you want some of your content pages to be able to optionally provide additional HTML-based content to be rendered as part of the layout. Figure 3.5 shows the previous layout with a different widget: Things to Do. You can imagine this widget containing additional information about attractions of interest at the vacation location you are currently viewing—for example, visiting the Eiffel Tower if you chose Paris as a destination. This widget is included in the layout area, which is common to all pages, but it will only appear when a destination has been selected, and its content will depend on the selected destination.

Figure 3.5 The Things to Do widget represents page-specific content that is positioned within the layout.
Razor includes sections that enable this scenario, defined using the @section directive within the content page. The following listing shows a section named ThingsToDoWidget being defined along with some HTML content.
Listing 3.19 Defining a Razor section with the @section directive
@section ThingsToDoWidget{
    <p>Visit Eiffel Tower</p>
}
You render the content of a section within the layout page by placing a call to the RenderSectionAsync method at the location you want the content to appear. The method has two versions: one that takes the section’s name as a string and another that also takes a Boolean indicating whether all content pages are required to define the section (true) or optional (false). In the next example, only the destination page will provide content for the section, so it is optional for all other pages. Consequently, you will use the overload that enables you to pass false to the second parameter:
@await RenderSectionAsync(“ThingsToDoWidget”, false)
As it happens, there is already a call to the RenderSectionAsync method that refers to the scripts section in the default project layout file, located just before the closing body element:
    <script src="~/lib/jquery/dist/jquery.min.js"></script>
    <script src="~/lib/bootstrap/dist/js/bootstrap.bundle.min.js"></script>
    <script src="~/js/site.js" asp-append-version="true"></script>

    @await RenderSectionAsync("Scripts", required: false)
</body>
The purpose of this section is including page-specific JavaScript files within the layout, so they appear after global script files. That way page-specific files can make use of the content of the global files.
The IsSectionDefined method can be used in the layout page to determine whether the content page has defined a specific section. This method can be useful, for example, if you want to display some default content if the calling page doesn’t define the section.
Listing 3.20 Using IsSectionDefined to determine if the calling page defined a section
<div class="card alert-danger p-5 border-5 mt-2">
@if (IsSectionDefined("ThingsToDoWidget"))
{
    @await RenderSectionAsync("ThingsToDoWidget")
}
else
{
    <p>Things To Do Widget default content</p>
}
</div>
If a content page defines a section, it must be handled within the layout page, usually with a call to RenderSectionAsync. However, you might have conditions when you don’t want to render the content of a section. In those cases, you can use the IgnoreSection method to prevent rendering.
Listing 3.21 Using IgnoreSection to prevent the rendering of section content
@if(!IsAdmin)
{
    IgnoreSection(“admin”);
}
else
{
    @await RenderSectionAsync(“admin”)
}
Note that the IgnoreSection method returns void, so it is not prefixed with the @ symbol and must be terminated with a semicolon.
3.3 Reusable HTML with partial views, tag helpers, and view components
Layouts are one way of achieving reusable HTML. You define the site layout in one place, and it is used by all pages referencing the layout. ASP.NET Core provides other Razor-based mechanisms for working with reusable HTML: partial views, tag helpers, and view components. In this section, I introduce all three features and explain how they are used.
3.3.1 Partial views
A partial view is a Razor (.cshtml) file that contains a chunk of HTML and, optionally, some Razor syntax. It differs from a standard Razor page in that a partial view does not include an @page directive because it is not intended to be browsed directly. Partial views can be used
Strangely, there is no partial view template in Visual Studio. You can use any of the options that generate a single Razor file. I usually use the Razor View > Empty template and then remove the default content. VS Code users can just add a new file with a .cshtml suffix or use the CLI to generate a new ViewStart or ViewImports file, then change the filename and remove the default content:
dotnet new viewimports
dotnet new viewstart
Conventionally, partial views are named with a leading underscore in the filename—_myPartial.cshtml, for example. This convention is not required, but it might help differentiate partials from other files. You can place a partial view anywhere within the Pages folder. The discovery process for partials is the same as for layouts: the folder containing the current page and all parents followed by the PagesShared and ViewsShared folders.
The layout file in the application we built so far is very simple, but it could grow to become more complex. Separate sections of the UI are all candidates for partial views. Take the navigation, for example. The code for this area can be separated out into another file, which is then referenced from within the layout file.
To test out creating a partial view, you can cut the nav element from the example layout file in listing 3.16 and paste it into a new Razor file named _NavigationPartial .cshtml, which you should place in the PagesShared folder. Now that you have a hole in your layout, you need to reference the partial view. The recommended mechanism for including partial views is the partial tag helper. We will cover tag helpers in more detail shortly, but for now, it is enough to know that the following will render the contents of a partial view in a calling page:
<partial name=”_NavigationPartial” />
The tag helper must be placed in the location you want to output from the partial view to be rendered. In the default template, it goes under the header element within the layout.
Listing 3.22 The partial tag helper used to include the content of a partial view
<body>
    <div class="container">
        <header class="card alert-success border-5 p-3 mt-3">Header</header>
        <partial name="_NavigationPartial" />
        <div class="row mt-2">
            <div class="col-3">
                <div class="card alert-warning p-5 border-5">
                    Deal Of The Day Widget 1
                </div>
Figure 3.6 provides an illustration of the process where the contents of the partial file (_NavigationPartial.cshtml) are inserted into the calling page at the point where the partial tag helper is placed. In this example, the navigation goes under the header, rather than inside it, as in the default project template (figure 3.6).
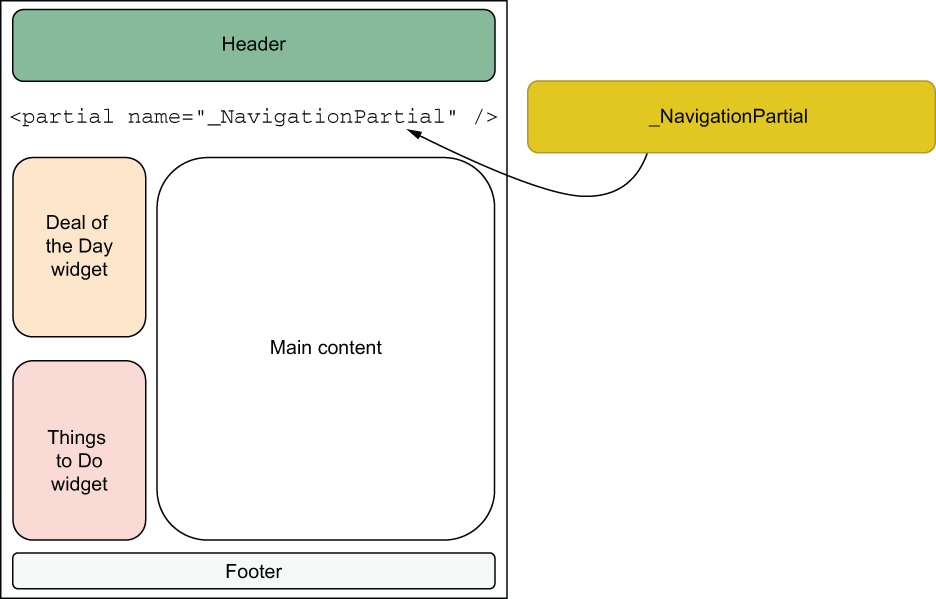
Figure 3.6 The contents of _NavigationPartial are inserted into the Razor file at the point they are referenced via the partial tag helper.
Partial views can also be used to avoid repetition of code. The standard project template includes a partial file in the PagesShared folder named _ValidationScriptsPartial.cshtml. It contains two script elements that reference scripts for validating form values. You will use this partial in chapter 5 when you look at form validation.
The partial in the example and the validation scripts partial consist of static content. Partials can also work with dynamic content. The nature of the dynamic content is specified using the @model directive at the top of the partial file. For example, imagine that the data for your navigation menu is generated by the parent page and consists of a Dictionary<string, string>, where the keys represent the name of the page to link to, and the values represent the text for the link, perhaps. This is how the first line of the _NavigationPartial.cshtml file will look:
@model Dictionary<string,string>
The data itself will be generated by the page that references the partial and included in its own model as a property. You will see how this is done a bit later when you explore the PageModel. For the time being, you can assume that the data for this partial is represented by a property of the host page named Nav. You will pass this data to the partial tag helper’s model attribute:
<partial name=”_NavigationPartial” model=”Model.Nav” />
Alternatively, you can use the for attribute to specify the data for the partial. This time, the Model is implicit:
<partial name=”_NavigationPartial” for=”Nav” />
You will see how you can also use partial views to generate HTML for use in partial page updates in AJAX scenarios in chapter 11.
3.3.2 Tag helpers
Tag helpers are components that automate the generation of HTML. They are designed to act on tags within the HTML of a Razor page. Many tag helpers are built into the ASP.NET Core framework, most of which target standard HTML tags, such as the anchor (you worked with one of these when you added the Welcome page to the navigation), input, link, form, and image tags. Others, like the partial tag helper you just saw, target custom tags you create yourself. Each tag helper is designed to act on a specific tag and parse attribute values for data used during server-side processing to generate the resulting HTML. Most of the attributes the tag helper parses are custom and begin with asp-. As a reminder, the following is the anchor tag helper you added to the site navigation for the Welcome page:
<a class="nav-link text-dark" asp-area="" asp-page="/Welcome">Welcome</a>
The asp-area and asp-page attributes are custom attributes. Their role is to provide information to the anchor tag helper about the area and page the tag helper should use to generate a URL. You will look at areas in the next chapter, when you explore routing and URLs. When the anchor tag helper has finished processing and the tag is rendered as HTML, the generated URL will appear as a standard href attribute. The custom attributes are not rendered.
Tag helpers are an opt-in feature. They are not enabled by default; although, if you start with the standard project template, they are enabled globally within the _ViewImports .cshtml file located in the Pages folder by the following line of code:
@addTagHelper *, Microsoft.AspNetCore.Mvc.TagHelpers
The addTagHelper directive takes two arguments: the tag helpers to enable and the name of the assembly containing the tag helpers to enable. The wildcard character (*) specifies that all tag helpers in the specified assembly should be enabled. The framework tag helpers are located in Microsoft.AspNetCore.Mvc.TagHelpers, which is why you see the name of this assembly added by default. You can create your own custom tag helpers. This book won’t cover that, but if your custom tag helper belonged to the WebApplication1 project, you would enable it as follows:
@addTagHelper *, WebApplication1
Guidance on building your own custom tag helper can be found in the official documentation (https://learn.microsoft.com/en-us/aspnet/core/mvc/views/tag-helpers/authoring?view=aspnetcore-7.0) or Andrew Lock’s ASP.NET Core In Action, Second Edition (Manning, 2021).
The addTagHelper directive has a twin, removeTagHelper, that enables you to selectively opt certain tags out of processing. The following line of code opts out of anchor tag helper processing:
@removeTagHelper "Microsoft.AspNetCore.Mvc.TagHelpers.AnchorTagHelper,
➥ Microsoft.AspNetCore.Mvc.TagHelpers"
You can opt individual tags out of processing by placing the ! prefix just prior to the tag name. For instance, you might want to do this if the specific element is only to be used by client-side code. Then there is no need to waste cycles having it processed on the server. The following example illustrates how that is applied to an anchor tag to prevent it from being processed unnecessarily:
<!a href="https://www.learnrazorpages.com">Learn Razor Pages</!a>
The prefix is placed in both the start and end tags. Any tag without the ! prefix will be processed by an associated tag helper. The alternative is to opt specific tags into processing at parse time. You achieve this by registering a custom prefix with the @tagHelperPrefix directive and then applying your chosen prefix to tags you want to take part in the processing. You can register your prefix in the ViewImports file where you initially enabled tag helper processing:
@tagHelperPrefix x
You can use pretty much any string you like as a prefix. Then you apply it to both the start and end tags, just like the ! prefix:
<xa asp-page="/Index">Home</xa>
Only those tags that feature the prefix will be processed. For the sake of clarity, most developers are likely to use punctuation to separate the prefix from the tag name—for example:
@tagHelperPrefix x:
<x:a asp-page="/Index">Home</x:a>
This should reduce any visual confusion, especially for designers when they look at the HTML content.
3.3.3 View components
View components are a more advanced solution for generating reusable HTML. They are similar to partial views in that they can be used to help break up and simplify complex layouts, or they can represent part of a UI that can be used in multiple pages. View components are recommended instead of partial pages whenever any type of server-side logic is required to obtain or process data for inclusion in the resulting HTML snippet (specifically, calls to an external resource, such as a file, database, or web service). Typical scenarios in which view components work well include database-driven menus, tag clouds, and shopping carts—widgets that usually appear in a layout page and rely on their own source of data. View components also lend themselves to unit testing.
Since view components rely on advanced concepts that have not been covered so far, further discussion on the topic will have to wait if it is to make any sense. But rest assured, you will build a view component in chapter 14.
3.4 The PageModel
You have now been introduced to the primary mechanisms for generating HTML within a Razor Pages application—the Razor page and the Razor syntax that enables dynamic content generation by mixing HTML with server-side C# code. You have also learned about some of the components that aid UI code reuse, including layouts, partial views, tag helpers, and view components. Now it is time to learn about the partner to the Razor page: the PageModel class.
In this section, you will learn about the two primary roles of a PageModel: controller and view model. Recall from the discussion in chapter 1 about the controller in MVC. You will remember that its role is to take requests, use the information in the bid to perform commands on the model, and then take the result of that processing and pass it to the view for display. Figure 3.7 shows the relevant part of the process.

Figure 3.7 The controller takes the input, acts on the model, and passes the resulting data to the view.
As part of request processing, the controller has to prepare the view’s data and make that available to the view in a form the view can work with. This form is referred to as a view model and is the focus of the first part of this section. Before that, I discuss ViewData, which also provides a way to pass data to view pages.
The PageModel class is generated automatically when you add a new Razor page to your application. It is named after the page, with the word Model, so the PageModel class for your Welcome page is WelcomeModel. PageModel classes are derived from the PageModel type, which has a lot of properties and methods related to working with HTTP requests within the PageModel class itself. Public PageModel properties are exposed to the Razor page through the inclusion of an @model directive that references the PageModel type.
3.4.1 Passing data to pages
You have many options for passing data to pages. The recommended approach is working with data in a strongly typed manner as a view model. There is another option which, while it is weakly typed, is also of use sometimes. You have already used this approach to pass the Welcome page’s title to the layout in the previous chapter. It is called ViewData.
ViewData is a dictionary-based feature. Items are stored within the ViewDataDictionary as key-value pairs and accessed by referencing the case-insensitive string key of the ViewData property within the page. The following is how you used ViewData to assign the Welcome page’s title:
ViewData["Title"] = "Welcome!";
This value is accessed in the layout page as follows:
<title>@ViewData["Title"] - WebApplication1</title>
The values within the ViewDataDictionary are object types, which means you can store anything you like there. Non-string types need to be cast to their correct types if you want to work with them (e.g., to call type-specific methods). This may not be necessary if all you want to do is render the values and the type’s ToString() method results in a suitable value for rendering. The following assignment adds a DateTime type to ViewData:
ViewData["SaleEnds"] = new DateTime(DateTime.Now.Year, 6, 30, 20, 0, 0);
If you want to render that value, you can do so simply:
<p>Sale ends at @ViewData[“SaleEnds”]</p>
The output is rendered according to the default settings of the server. In my case, that’s English (United Kingdom), which results in Sale Ends at: 30/06/2021 20:00:00 being rendered. If I want to use date and time formatting strings to control the rendering, I need to cast to a DateTime:
Sale Ends at: @(((DateTime)ViewData["SaleEnds"]).ToString("h tt, MMMM dd"))Now I get the output I want: Sale Ends at: 8 PM, June 30.
You can set the value of ViewData items in the PageModel class. The next listing shows the title of the page being assigned to ViewData in a handler method called OnGet; you will learn about handler methods shortly.
Listing 3.23 Assigning the ViewData value in OnGet in a PageModel class
public class WelcomeModel : PageModel
{
    public void OnGet()
    {
        ViewData["Title"] = "Welcome!";
    }
}
For this assignment to take effect in the Razor page, you must ensure that the Razor page includes an @model directive referencing the WelcomeModel type:
@model WelcomeModel
You should also be aware that assignments made within the PageModel will be overridden if it is also set in the Razor page itself.
Another way to access ViewData values is via a property called ViewBag. This property is a wrapper around ViewData that enables you to treat it as a dynamic object. Consequently, you access items through property names that match their key. Because the values are dynamic, there is no need to explicitly cast when working with non-string types:
@ViewBag.SaleEnds.ToString("h tt, MMMM dd")ViewBag is only available in Razor files. It is not available in the PageModel class, although it is available in MVC controllers, where it was carried over from an old framework called ASP.NET Web Pages. The ASP.NET Core team decided not to implement ViewBag in Razor Pages PageModel classes because, being dynamic, it produced a measurable performance impact on views and pages that used it. For that reason, use of ViewBag is not recommended at all.
ViewData is weakly typed, so you get no compile-time checking or IntelliSense support. It relies on referencing items using a string-based key—an approach that is sometimes referred to as working with magic strings. Consequently, working with ViewData can cause errors because it is so easy to mistype a string or rename it in one place and forget to update other references. If you try to render an item that doesn’t exist, nothing is rendered. If you attempt to call a method on a ViewData entry that doesn’t exist, a NullReferenceException will be raised. If you attempt to cast a ViewData entry to the wrong type, you will generate an InvalidCastException. These exceptions will occur at run time.
ViewData itself should only be used sparingly. It is useful for passing small pieces of simple data to layout pages, such as the page’s title. For all other scenarios in which you need to pass data from a PageModel class to a Razor page, you should use public PageModel properties, which we will look at next.
3.4.2 The PageModel as a view model
If there is one thing that consistently seems to confuse developers who are new to any form of MVC with ASP.NET, it is the concept of a view model—what it is, its purpose, and how to create one. In essence, a view model is an extremely simple thing. It is a class that encapsulates the data required for a particular view or page. Conceptually, it performs the same function as a static database view. A view model contains a subset of data from one or, usually, more objects.
Think about an order summary page on a website, for example. It usually contains a subset of the details related to the product or service that you are ordering—perhaps, just its identifier, name, and price. It might also include your name, billing address, and a check box to indicate that you also want to ship to that address. Those pieces of information will come from the Products table and the Customers table in the website’s database. However, none of the rest of the information in those database tables is required by the order summary view. The order summary page doesn’t display the customer’s password or the date they created their account, for example. Nor does it show in-house details of the product that might be stored in the Products table, such as the supplier’s details or the reorder level.
Figure 3.8 provides an indication of how little of the total information held by the Products and Customers tables is required for the view. This subset of data forms the basis of your OrderSummaryViewModel—the model for the order summary view, which might look like the content of listing 3.24.

Figure 3.8 Only the outlined columns or properties are required by the order summary view
Listing 3.24 An example view model class
public class OrderSummaryViewModel
{
    public int CustomerId { get; set; }
    public string CustomerName { get; set; }
    public string BillingAddress { get; set; }
    public bool UseBillingForShipping { get; set; }
    public int ProductId
    public string Name { get; set; }
    public decimal Price { get; set; }
}
And there you have it: a view model—a container for only the data required for a view. View models are used extensively by developers who work with the MVC framework. Their views typically include an @model directive that references the ViewModel class designed for the specific view:
@model OrderSummaryViewModel
You have already seen the @model directive in your Razor page files. It references the PageModel class that accompanies the Razor page. So the PageModel in Razor Pages is a view model in the MVC sense. Any public properties added to the PageModel will be accessible to the Razor page that references the PageModel via a special Model property within the page.
Listing 3.25 shows the WelcomeModel, the PageModel class for the Welcome page you created in the last chapter. This version has a public property named SaleEnds, which is the equivalent of the ViewData value you saw earlier.
Listing 3.25 Public properties in a PageModel
public class WelcomeModel : PageModel
{
    public DateTime SaleEnds { get; set; } = new DateTime(DateTime.Now.Year,
    ➥ 6, 30);
    public void OnGet()
    {
    }
}
Listing 3.26 shows the Welcome Razor page, which includes the @model directive referencing the WelcomeModel type and the SaleEnds value being accessed via the page’s Model property.
Listing 3.26 PageModel properties being exposed via the page’s Model property
@page
@model WebApplication1.Pages.WelcomeModel                          ❶
@{
}
<p>Sale ends at @Model.SaleEnds.ToString("h tt, MMMM dd")</p>      ❷
❶ The PageModel type is referenced by the @model directive.
❷ The SaleEnds property of the PageModel is accessible via the special Model property of the Razor page.
Unlike ViewData, which is weakly typed, you get IntelliSense support for PageModel properties, as you can see in figure 3.9, which shows IntelliSense kicking into life in VS Code to help with code completion.

Figure 3.9 PageModel properties are supported by IntelliSense.
This is the primary reason PageModel properties are recommended over ViewData as a mechanism for passing data to pages. Tooling support in both Visual Studio and VS Code makes you more productive and minimizes the chances of errors creeping into your code.
3.4.3 The PageModel as a controller
The primary role of a controller is to process requests. Request processing in a PageModel is performed within handler methods. For readers familiar with MVC frameworks that support them, PageModel handler methods are analogous to controller actions. By convention, handler method selection is based on matching the name of the HTTP method that was used for the request with the name of the handler method using the On[method] pattern with Async appended optionally to denote that the method is intended to run asynchronously. The OnGet or OnGetAsync method is selected for GET requests, and the OnPost or OnPostAsync method is selected for POST requests.
Listing 3.27 shows the WelcomeModel class with a simple string property, Message, added to it, along with both OnGet and OnPost handler methods. Each handler sets the value of the Message property to report which handler was executed.
Listing 3.27 Different handler methods assigning different values to the Message property
public class WelcomeModel : PageModel
{
    public string Message { get; set; }    ❶

    public void OnGet()
    {
        Message = "OnGet executed";        ❷
    }

    public void OnPost()
    {
        Message = "OnPost executed";       ❸
    }
}
❶ The public property is added, which will be accessible in the Razor page via the Model property.
❷ If the OnGet handler is executed, the message includes "OnGet".
❸ If the OnPost handler is executed, the message includes "OnPost".
Listing 3.28 shows the Welcome Razor page. The page includes an anchor tag helper and a form with its method attribute set to post. Clicking the link generated by the anchor tag helper will result in a GET request, and submitting the form will result in a POST request. The Message property value, which is set in the respective handler method, is rendered to the output. Figure 3.10 illustrates the differing output based on which method was used to request the page.

Figure 3.10 Handler methods are selected by matching their name to the HTTP method.
Listing 3.28 Welcome page including mechanisms for generating GET and POST
@page
@model WebApplication1.Pages.WelcomeModel                ❶
@{
}
<p>@Model.Message</p>                                    ❷
<a asp-page="/Welcome">Get</a>                           ❸
<form method="post"><button>Post</button></form>         ❹
❶ The WelcomeModel is referenced via the @model directive.
❷ The WelcomeModel’s Message property is accessed via the Model property of the page.
❸ The anchor tag helper causes a GET request.
❹ Submitting the form causes a POST request.
Handler methods can take parameters. Data passed in the URL will be bound to handler method parameters based on a match between the parameter’s name and the name associated with the URL data item. To understand how this works, take a look at the next listing, where the OnGet method has been altered to accept a parameter named id, and the Message property incorporates the value that is bound to the id parameter.
Listing 3.29 Adding a parameter to the OnGet handler method
public void OnGet(int id)                         ❶
{
    Message = $"OnGet executed with id = {id}";   ❷
}
❶ A numeric parameter named id is added to the OnGet method.
❷ The value of the parameter is incorporated into the value assigned to the Message property.
The anchor tag in the Razor page is updated to include an asp-route-id attribute with a value of 5, as shown in listing 3.30. The asp-route-* attribute is used to pass data in the URL. By default, the data is passed in the query string, with the name of the query string item taken from the part of the attribute represented by the asterisk.
Listing 3.30 Using the asp-route-* attribute on the anchor tag helper to pass a value
<a asp-page="/Welcome" asp-route-id="5">Get</a>
There is no query string value when you first run the page, so the handler parameter is set to its default value of 0. The generated value for the anchor tag’s href attribute is /Welcome?id=5. When you click the link, the message is updated to include the parameter value, as shown in figure 3.11.

Figure 3.11 The query string value is bound to the parameter based on matching their names.
The magic that is responsible for matching incoming data to parameters is called model binding. I go into detail on model binding in chapter 5 when we look at working with forms.
C# allows you to create overloads of methods by varying the number and type of parameters they accept. While it is possible to create multiple versions of the OnGet or OnPost methods that vary by parameters in a single PageModel class and have them compile successfully, the Razor Pages framework does not allow it. You can only have one OnGet or one OnPost method in a PageModel. In fact, you can’t even have an OnGet and an OnGetAsync method in the same PageModel class. Razor Pages ignores the Async suffix when it matches a handler to an HTTP method name. If more than one handler matches a given request, you will get an AmbiguousActionException at run time.
There may be times you want different code to execute for the same HTTP method. For example, you might have a page with multiple forms in it. The Manning home page features both a search form and a registration form. One takes a search term, and the other one takes an email address. Assuming they both post back to the same page, how will you know which one the user submitted? You could add some logic in the OnPost handler to try to identify whether the user was attempting to register for a newsletter or searching for an author by their email address—or you can use named handler methods.
Named handler methods start with the same convention as standard handler methods: On followed by the HTTP method name. This is followed by the name of the handler method and is used to disambiguate it from standard handler methods and other named handler methods. For example, you might want to create a method named OnPostSearch to process a search form submission and another named OnPost- Register to process the registration form submission. The following listing shows how you would implement these in the WelcomeModel of your sample application.
Listing 3.31 Showing two named handler methods
public class WelcomeModel : PageModel
{
    public string Message { get; set; }                         ❶
    public void OnPostSearch(string searchTerm)                 ❷
    {
        Message = $"You searched for {searchTerm}";             ❸
    }

    public void OnPostRegister(string email)                    ❹
    {
        Message = $"You registered {email} for newsletters";    ❺
    }
}
❶ The Message property is added.
❷ The OnPostSearch method takes a string named searchTerm.
❸ The message incorporates the searchTerm parameter value.
❹ The OnPostRegister method processes a registration, with a parameter named email.
❺ The message incorporates the email parameter value.
Two handler methods are created: one is named OnPostSearch, and the other OnPostRegister. Search and Register represent the name part of the named handler methods. Both methods take a string parameter, but they each set the Message property to a different value based on which method was invoked.
Listing 3.32 shows two simple forms in the Index page—one for searching and the other for registering. The form tag is one of those that a tag helper targets, so custom attributes are made available. The page-handler attribute accepts the name of a page handler method to be used to process the request when the form is submitted.
Listing 3.32 The page-handler attribute enables targeting of different handler methods
@page
@model WelcomeModel
@{
}

<div class="col">
    <form method="post" asp-page-handler="Search">     ❶
        <p>Search</p>
        <input name="searchTerm" />                    ❷
        <button>Search</button>
    </form>

    <form method="post" asp-page-handler="Register">
        <p>Register</p>
        <input name="email" />
        <button>Register</button>
    </form>
    <p>@Model.Message</p>                              ❸
</div>
❶ The name part of handler methods is assigned to the page-handler attribute of the form tag helper.
❷ The input name attribute matches the parameter name on the targeted handler method.
❸ The value of Message is rendered to the browser.
Figure 3.12 shows what happens when the page is rendered and the user searches for Razor Pages. The form tag helper appends the name of the handler to the query string using the key handler:
?handler=Search

Figure 3.12 Named handler method selection in action
Based on the successful match between the handler query string value and the name of a handler method, Razor Pages selected the OnPostSearch handler to process the request, and the resulting output is generated accordingly.
All the examples of handler methods you have seen so far have a return type of void. The other supported return types are Task and any type that implements the IActionResult interface, known as action results, which have the role of generating the response. A variety of action results are available for different types of response. For example, instead of rendering a Razor page, you might want to return a file. Or you might want to return an empty response with a specific HTTP status code. Or you might want to redirect the user to a different location.
At this point, you might be wondering how your pages have generated responses when your handler methods haven’t returned IActionResult types. This is because handler methods that have a return type of void or Task implicitly return a PageResult, an action result that renders the associated Razor page. The following listing shows the OnPostSearch handler updated to include an explicit return type of PageResult.
Listing 3.33 A handler method explicitly returning an action result
public PageResult OnPostSearch(string searchTerm)    ❶
{
    Message = $"You searched for {searchTerm}";
    return new PageResult();                         ❷
}
❶ The OnPostSearch method has been altered to return PageResult.
❷ A new PageResult instance is created and returned.
The PageModel class includes a number of helper methods that provide a shorthand way of creating action results to save you from using the new operator. The next listing shows the use of the Page() helper method, which is a wrapper around the expression new PageResult().
Listing 3.34 Page() method shorthand for new PageResult()
public PageResult OnPostSearch(string searchTerm)   ❶
{
    Message = $"You searched for {searchTerm}";
    return Page();                                  ❷
}
❶ The OnPostSearch method has been altered to return PageResult.
❷ The Page() method acts as a wrapper around a call to new PageResult().
Generally, if your handler only ever results in the current page being processed and rendered, there is no need to explicitly return a PageResult. Table 3.1 shows the action result types you are most likely to work with in a Razor Pages application, along with their helper methods.
Table 3.1 Action results in Razor Pages
You should be as specific as possible when specifying the return type of your handler methods. There will be occasions when you need to return one of two or more action result types, based on application logic. For example, you might use the parameter value to look up an entry in a database, and if that entry doesn’t exist, you will want to return a NotFoundResult. Otherwise, you will return a PageResult. In that case, you should specify IActionResult as the return type for the handler method.
Listing 3.35 Returing IActionResult to represent any ActionResult type
public IActionResult OnGet(int id)    ❶
{
    var data = database.Find(id);     ❷
    if (data == null)
    {
        return NotFound();            ❸
    }
    else
    {
        return Page();                ❹
    }
}
❶ The method returns an IActionResult.
❷ An attempt to locate data matching the parameter value is made.
❸ The NotFound helper method is used to create a NotFoundActionResult if no matching data is returned from the database.
❹ The page is rendered if data was obtained.
At the beginning of this chapter, I mentioned that the @page directive denotes a Razor file representing a navigable page that is intended to be browsed. In the next chapter, we will look at the process known as routing, which is responsible for ensuring that URLs are mapped to Razor files that include this directive.
Summary
-
Razor is templating syntax that enables you to embed server-side code within HTML markup.
-
Razor syntax is placed in Razor files, which have a .cshtml extension.
-
Variables and expressions are rendered to the output when they are prefixed with @.
-
Control blocks can be embedded within the markup section of a Razor file by prefixing them with @.
-
Razor HTML encodes all output it renders for security reasons.
-
Layout pages are used to eliminate duplication of common content across multiple pages.
-
Tag helpers target specific tags and automate the generation of HTML.
-
The @model directive makes the PageModel available to the Razor page.
-
The Model property of the Razor page provides access to PageModel properties.
-
Handler methods within PageModels are responsible for processing requests. They target specific HTTP methods and can return void, Task, or an IActionResult.
-
Handler method parameters can get their values from query strings parameters that have the same name.
-
Named handler methods allow you to specify multiple handlers for the same HTTP method.