
Chapter 8. Implementing Entity Validation
In This Chapter
• Customizing Entity Framework Code Generation
• Validating Entity State Changes
Validation of entities is one of the key aspects of business logic. The .NET Framework introduced a new validation framework in Service Pack 1 of version 3.5, at the same time the first version of Dynamic Data was released. This framework is implemented in the System.ComponentModel.DataAnnotations namespace and contains a set of attributes and classes for validating objects and their properties.
The Data Annotations namespace is defined in a separate assembly called System.ComponentModel.DataAnnotations, installed in the global assembly cache. This assembly is referenced by default when you create a new Dynamic Data project in Visual Studio. If, however, your entity classes are located in a separate project, make sure it references this assembly as well.
Validation Framework
At the core of the validation framework is an abstract base class called ValidationAttribute. It defines a virtual method called IsValid, which takes an object to validate and returns true if it is valid and false if it is not. Concrete descendants of this class, such as the RequiredAttribute, override the IsValid method to perform the actual validation.
The validation attributes are applied to the things they validate, such as properties, fields, or entire classes. Consider the following example that defines a simple Product entity class with a required property called ProductName:
public class Product
{
[Required]
public string ProductName { get; set; }
}
The .NET runtime does not invoke the validation attributes automatically. Some code in your application must detect them and invoke the validation logic explicitly. As you might recall from the discussion in Chapter 3, “Field Templates,” and Chapter 6, “Page Templates,” the DynamicValidator is responsible for doing this in ASP.NET Dynamic Data applications, when this control is used in field templates and its ColumnName property specifies the name of the entity property to which validation attributes might have been applied.
The Data Annotations namespace also provides a helper class, called Validator that uses .NET reflection to validate any object based on the validation attributes applied to its class and individual properties. Here is how to validate an instance of the Product entity class we just defined:
var product = new Product();
var context = new ValidationContext(product, null, null);
Validator.ValidateObject(product, context, true);
The ValidationContext object contains information about the object being validated. The ValidateObject method passes it to each validation attribute along with the property value to validate. ValidationContext allows implementation of sophisticated validation logic that is not limited to a single property value. Following is the constructor used in the preceding example to create this object:
ValidationContext(object instance, IServiceProvider serviceProvider,
IDictionary<object, object> items)
The first parameter, instance, is the object being validated. The second, serviceProvider, and third, items, parameters of the constructor are used in advanced scenarios, some of which will be discussed later. For simple cases, they can be null.
The ValidateObject method of the Validator class takes the object to validate as its first parameter and throws a ValidationException for the first validation attribute whose IsValid method returns false. The actual signature of the ValidateObject method is shown here:
void ValidateObject(object instance, ValidationContext validationContext,
bool validateAllProperties)
Despite what its name implies, the validateAllProperties parameter of the ValidateObject method actually determines whether all validation attributes will be evaluated or only the instances of the RequiredAttribute. You want to specify true in most circumstances.
Validation attributes applied to properties and fields are evaluated before the attributes applied to the class. However, you should not rely on the order of validation within these two groups. The .NET Framework does not guarantee that the order of properties or attributes returned by the reflection APIs will match the order of their appearance in the source code. Even though, in many cases, the order of validation appears to match the order of attributes, there will be exceptions. If the order of validation rules is important, instead of attributes, you need to rely on coded validation discussed in the Imperative Validation section of this chapter.
If you want to validate an object without throwing a ValidationException, you can call the TryValidateObject method of the Validator class instead:
bool TryValidateObject(object instance, ValidationContext validationContext,
ICollection<ValidationResult> validationResults, bool validateAllProperties)
This method returns a Boolean value that indicates whether or not the object is valid and populates the collection you supply in the validationResults parameter with a separate ValidationResult object for each error detected.
Validation Error Messages
In addition to performing the validation itself, the validation attributes are responsible for generating error messages if the validation fails. Each concrete validation attribute, such as RequiredAttribute, discussed so far, provides a default error message. For instance, with the following definition of the ProductName property, the RequiredAttribute generates an error message “The ProductName field is required.”
[Required]
public string ProductName { get; set; }
Obviously, this error message is very technical and might not be appropriate for business users. You can replace the internal name of the field in the error message with its human-readable form by applying the DisplayAttribute as shown here:
[Required]
[Display(Name = "Product Name")]
public string ProductName { get; set; }
With this updated definition, the RequiredAttribute generates the error message as “The Product Name field is required,” which in many instances will be acceptable for display. However, if this is still not enough, you can completely replace the error message by specifying the ErrorMessage property in the validation attribute explicitly:
[Required(ErrorMessage = "Product Name cannot be empty")]
public string ProductName { get; set; }
Both the Validator class and the DynamicValidator control rely on the DisplayAttribute and the ErrorMessage property of validation attributes when generating error messages. If you chose to specify error messages explicitly, keep in mind that you might still need to specify the DisplayAttribute for properties displayed in any dynamically generated pages of your application.
In web applications with localization requirement, display names and error messages cannot be hard-coded as string literals in the entity model. Data annotation attributes support the traditional .NET approach to localization based on assembly resources. You can define display names and error messages as string resources in a RESX file, typically located in the same assembly where the entity classes themselves reside. Visual Studio automatically generates a resource helper class based on the contents of the RESX file. For each string resource, this class has a static property with the matching name, which looks similar to the following pseudo-code:
public class Resources
{
public static string ProductNameDisplayName { get; }
public static string ProductNameRequiredErrorMessage { get; }
}
For a data annotation attribute to retrieve a string from resources, you need to specify the type of the resource class and the name of the property that returns it. For the DisplayAttribute, specify the type via its ResourceType property and the Name property, which normally contains the actual string value but now specifies the name of the resource property that returns it:
[Display(ResourceType = typeof(Resources), Name = "ProductNameDisplayName")]
public string ProductName { get; set; }
Data annotation attributes use reflection to access string resources through a helper class such the one just shown and assume that the class as well as its static properties have public visibility. By default, visibility of the generated resource class is internal, which results in a runtime error in Dynamic Data pages. You can change this using the Visual Studio resource designer.
Validation attributes also rely on the helper classes to retrieve error messages from string resources. The base class, ValidationAttribute, defines two properties that allow you to specify this information—ErrorMessageResourceType and ErrorMessageResourceName. Here is how to change the RequiredAttribute applied to the ProductName property to retrieve the error message using the ProductNameRequiredErrorMessage property of the Resources class:
[Required(ErrorMessageResourceType = typeof(Resources),
ErrorMessageResourceName = "ProductNameRequiredErrorMessage")]
public object ProductName { get; set; }
Validation in Entity Framework
As of version 4, the Entity Framework offers only limited support for validation attributes and requires additional work from developers. On one hand, the Entity Data Model designer does not allow you to specify data annotations for entity classes and their properties, and on the other, the ObjectContext class does not validate entities before they are saved.
In version 4.1, the Entity Framework introduced support for validating entities when they are saved. Unfortunately, it also introduced an entirely new API, which is not 100% compatible with Dynamic Data at this time. The differences will not be fully reconciled until the 4.5 release of the .NET Framework comes out. If you choose to use the interim release, you need to make some of the same changes discussed in this chapter.
Specifying Validation Attributes for Entity Classes
Because the Entity Data Model designer generates the entity classes in the .Designer.cs file automatically, you cannot simply apply the validation attributes directly to the classes and properties; they will get overwritten next time you update the entity model. Instead, rely on the partial class syntax in C# and Visual Basic to extend the generated classes. The code that follows shows an excerpt of the Product entity class as if it has been generated by the Entity Framework and therefore does not have the RequiredAttribute applied to its ProductName property:
public partial class Product
{
public string ProductName { get; set; }
}
Notice that the class is declared as partial. This allows a separate file to extend the generated class and apply the MetadataTypeAttribute to specify an alternative type that will supply validation attributes and other data annotations for the generated class:
using System.ComponentModel.DataAnnotations;
[MetadataType(typeof(Metadata))]
public partial class Product
{
private abstract class Metadata
{
[Required]
public object ProductName { get; set; }
}
}
From a validation standpoint, placing any .NET attributes on fields or properties of the metadata class has the same effect as placing them on their counterparts in the real class. Only the name of the field or property matters from the matching prospective, so the metadata class could declare ProductName as a field of type object even though it is a property of type string in the real class. However, if the metadata class has a property or field that does not have a property with the same name in the real class, you get an InvalidOperationException whenever you try to access its attributes for the first time, such as when passing an object to the ValidateObject method of the Validator class.
The compiler does not issue an error when a partial class contains only one definition, which makes it easy to create partial classes that do not match their generated counterparts. You could mistype the name of the class itself or place it in a different namespace. If you notice that additional metadata attributes you applied in the metadata type seem to have no effect on the Dynamic Data pages, double-check that all partial class definitions match, or better yet, create an automated test to verify it, as you learn about later in this chapter.
Notice that the Metadata class was made abstract, private, and nested intentionally. The metadata classes are never instantiated by the application. In addition to violating object-oriented design principles, making metadata classes public unnecessarily pollutes the IntelliSense information in Visual Studio. This becomes more and more noticeable as the number of metadata classes in your application grows.
To eliminate the confusion of having a different type specified for a property as well as to avoid mistakes caused by incorrect property names in the metadata classes, you can use metadata interfaces instead. Here is the same partial Product class extended with a metadata interface instead of a metadata class:
using System.ComponentModel.DataAnnotations;
internal interface IProduct
{
[Required]
string ProductName { get; set; }
}
[MetadataType(typeof(IProduct))]
public partial class Product : IProduct
{
}
Notice that the Product class not only implements the IProduct interface, but also specifies it as the metadata type. Unlike the untyped metadata class in the previous example, the metadata interface has to declare the ProductName property of type string for it to match its actual implementation in the real Product class. Should they ever get out of sync, you get an immediate compiler error as opposed to an InvalidOperationException at runtime.
Neither of the two approaches to metadata types discussed here is perfect. The nested classes approach results in the best encapsulation; there are no additional types that are introduced at the assembly level. This helps to reduce confusion and makes metadata classes impossible to misuse. The interfaces approach makes maintaining the metadata types easier but results in additional interface types introduced in the data model assembly. The interfaces can be declared as internal, but they will still be visible and possible to misuse in the data model assembly itself. In the end, the decision on whether to use nested classes or interfaces for data annotations will probably depend on your personal taste.
Registering Metadata Provider with TypeDescriptor
If you try to compile and run the following code in a console application separate from a Dynamic Data web application, you might be surprised to find that the RequiredAttribute applied to the ProductName property of the Product class using the metadata class is completely ignored, and the ValidateObject method does not throw the ValidationException, as you would expect:
var product = new Product();
var context = new ValidationContext(product, null, null);
Validator.ValidateObject(product, context, true);
Behind the scenes, the Validator uses TypeDescriptor, a static class from the System.ComponentModel namespace, to determine the list of attributes applied to each property of the object it needs to validate. The MetadataTypeAttribute applied to the Product class actually does not have any effect unless it has been configured for a specific object or its entire class. Dynamic Data does this automatically for all entity classes during context registration, but to perform validation in other types of applications, you need to do this explicitly by calling TypeDescriptor’s static AddProviderTransparent method and passing it an instance of the AssociatedMetadataTypeTypeDescriptionProvider class as shown here:
TypeDescriptor.AddProviderTransparent(
new AssociatedMetadataTypeTypeDescriptionProvider(typeof(Product)),
typeof(Product));
Because this code needs to run only once, you can place it in the static constructor of the Product entity class itself, where it will be in close proximity to the MetadataType attribute the extended class still needs. Here is a complete version of the Product class extended using the same metadata interface used in the previous example:
using System.ComponentModel;
using System.ComponentModel.DataAnnotations;
[MetadataType(typeof(IProduct))]
public partial class Product : IProduct
{
static Product()
{
TypeDescriptor.AddProviderTransparent(
new AssociatedMetadataTypeTypeDescriptionProvider(typeof(Product)),
typeof(Product));
}
}
Validating Entities Before Saving
Although Dynamic Data takes care of validating the individual properties of entities when they are created and modified through the dynamic web pages, this approach does not protect you against errors when the entities are manipulated programmatically. Imagine a console application that runs at a scheduled interval to import Products from flat files this imaginary company, Northwind Traders, receives from suppliers. Because you have already created the NorthwindEntities data model for the website itself, it would be beneficial to reuse it in the import application, as it would allow you to reuse the business logic it implements.
Suppose that even though the database schema allows you to store NULL values in the UnitPrice column of the Products table, you decide that from the business point of view, each product requires a UnitPrice before you can start offering it on the Northwind Trader’s website. Based on this decision, you could go ahead and modify the Product entity metadata to apply the RequiredAttribute to the UnitPrice property as shown here:
[MetadataType(typeof(Product.Metadata))]
partial class Product
{
static Product()
{
TypeDescriptor.AddProviderTransparent(
new AssociatedMetadataTypeTypeDescriptionProvider(typeof(Product)),
typeof(Product));
}
private abstract class Metadata
{
[Required]
public object ProductName { get; set; }
[Required]
public object UnitPrice { get; set; }
}
}
The following is pseudo-code from the imaginary import application, which creates a new Product entity in the Northwind database. This code actually compiles and runs without error; however, in a real application, the product name would not be hard-coded but loaded form an import file instead:
using (NorthwindEntities context = new NorthwindEntities())
{
var product = new Product();
product.ProductName = "Test Product";
product.UnitPrice = null;
context.Products.AddObject(product);
context.SaveChanges();
}
Because this code does not validate the new Product instance explicitly, the RequiredAttribute, newly added to the UnitPrice property, will have no effect, and an invalid product record will be created in the database without the unit price. Although you could fix the problem in this particular case, having to call the static ValidateObject method every time you create or modify an entity instance is repetitive and prone to errors.
In most scenarios, it is logical to assume that when a developer saves entities to the database, he wants them to be valid, so having to validate them explicitly simply increases the volume of code without adding any new logic to it. Based on this assumption, you can override the SaveChanges method of the Entity Framework’s ObjectContext to perform validation for all entities before they are submitted to the database. Listing 8.1 shows how this can be done.
Listing 8.1. Overriding SaveChanges Method to Implement Validation
using System.Collections.Generic;
using System.ComponentModel.DataAnnotations;
using System.Data;
using System.Data.Objects;
using System.Linq;
namespace Unleashed.EntityFramework
{
public class UnleashedObjectContext : ObjectContext
{
private const EntityState ChangedEntityStates =
EntityState.Added ¦ EntityState.Modified ¦ EntityState.Deleted;
public override int SaveChanges(SaveOptions options)
{
IEnumerable<ObjectStateEntry> stateEntries = this.ObjectStateManager
.GetObjectStateEntries(ChangedEntityStates)
.Where(stateEntry => !stateEntry.IsRelationship);
foreach (ObjectStateEntry stateEntry in stateEntries)
this.BeforeSaveChanges(stateEntry);
return base.SaveChanges(options);
}
private void BeforeSaveChanges(ObjectStateEntry stateEntry)
{
if (stateEntry.State != EntityState.Deleted)
this.Validate(stateEntry);
}
private void Validate(ObjectStateEntry stateEntry)
{
object entity = stateEntry.Entity;
var context = new ValidationContext(entity, null, null);
Validator.ValidateObject(entity, context, true);
}
}
}
First, the overridden SaveChanges method gets a list of state entries for all changed entities from the ObjectStateManager that keeps track of all entities in the ObjectContext. For each of the changed state entries, it calls the BeforeSaveChanges method responsible for performing all entity-specific actions that need to occur before the changes are saved to the database. As we continue expanding Entity Framework capabilities to solve real-world business problems, this method will grow. At this point, however, it is only responsible for validation of the changed entities. The Validate method extracts the actual entity from an ObjectStateEntry and calls the familiar ValidateObject method of the Validator class. If the entity object is invalid, the ValidateObject method throws a ValidationException, preventing the SaveChanges method from saving the changes to the database.
The BeforeSaveChanges method intentionally excludes deleted entities from validation because most rules would not be applicable and cause unnecessary errors. Chapter 9, “Implementing Business Logic,” includes a detailed discussion of this topic.
Customizing Entity Framework Code Generation
The UnleashedObjectContext class shown in Listing 8.1 is available with the sample project accompanying this book. It is defined in a separate assembly called Unleashed.EntityFramework and includes a substantial amount of general-purpose code that any Entity Framework application could reuse. Although you could simply copy its code, you might want to have the Entity Framework context class, such as the NorthwindEntities in the ongoing example, inherit from it instead. This helps to keep the infrastructure code out of the application, which was beneficial even with the sample entity model discussed in this book.
With the database-first and model-first approaches to Entity Framework model development, the NorthwindEntities class is generated by the Entity Designer. By default, it inherits from the ObjectContext. You cannot change its declaration directly because any modifications would be lost next time the code is regenerated. Instead, you need to change the code generator itself. This section shows how you can replace the built-in Entity Framework code with a text template that can be customized to change how the code is generated.
Customizing the code generated by Entity Framework can solve other common problems as well. For instance, Chapter 9 relies on this approach to provide information about default values of entity properties to Dynamic Data.
Replacing Built-in Code Generator with Text Template
To replace the built-in code generator the Entity Designer uses, right-click the design surface and select Add Code Generation Item from the context menu. In the Add New Item Dialog (see Figure 8.1), choose the ADO.NET Entity Object Generator and give it a name matching the name of the EDMX file.
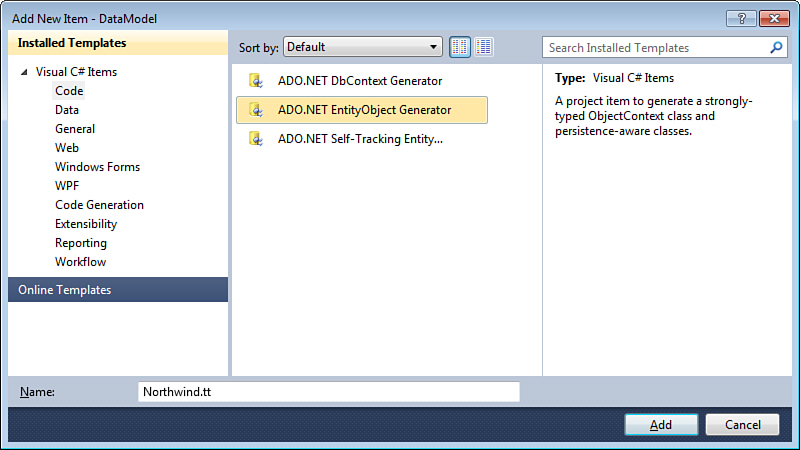
Figure 8.1. Add New Code Generation Item dialog.
When you click Add in the Add New Code Generation Item dialog, Visual Studio adds a new text template (.TT file) to the project and associate it with the EDMX file. Figure 8.2 shows how this looks in Solution Explorer. Notice that the context and entity classes are now generated in the Northwind.cs under the TT file instead of the default Northwind.Designer.cs under the EDMX.
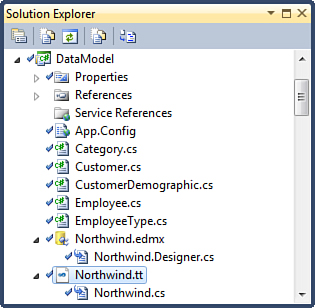
Figure 8.2. Text template in Solution Explorer.
Customizing Text Template to Change Context Base Class
Text templates use ASP.NET-like syntax to generate any code at design time in Visual Studio. This particular text template generates Entity Framework context and entity classes identical to the ones produced by the default code generator. However, unlike the latter, text templates come with complete source code that be customized to fit the unique needs of your project.
Complete discussion of text template is outside the scope of this book. You can find detailed information on this topic at http://www.olegsych.com/2007/12/text-template-transformation-toolkit.
You can modify TT files using any text editor, such as the one that comes with Visual Studio. To accomplish the immediate goal of changing the base class of the generated NorthwindEntities, search for the word ObjectContext in the template and replace it with UnleashedObjectContext, as shown in Figure 8.3. When you save the TT file, the Northwind.cs under it is automatically regenerated and the NorthwindEntities class will inherit from the new base class.
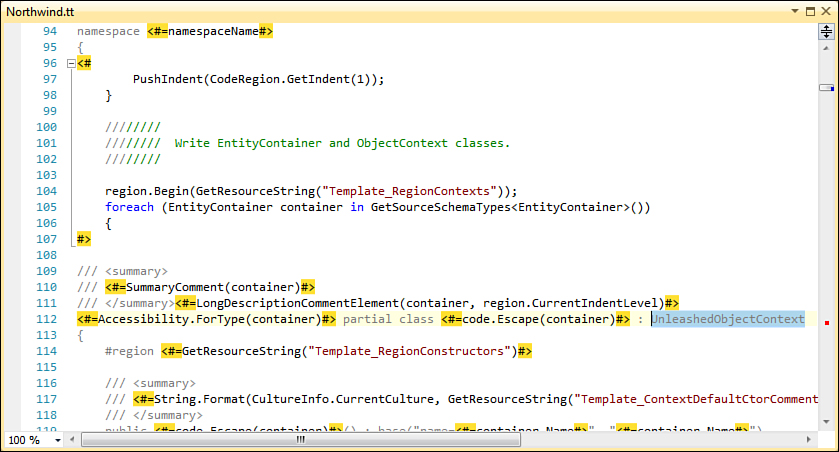
Figure 8.3. Changing context base class in the text template.
Visual Studio does not offer color syntax highlighting and IntelliSense for TT files. You can download one of several third-party add-ons that provide these capabilities. Figure 8.3 shows the Devart T4 Editor available for download at http://www.devart.com/t4-editor.
Customizing Text Template to Generate Static Constructors
The Entity Framework text template in the sample solution has been further customized to automatically generate static constructors for every entity type as discussed in the Registering Metadata Provider with TypeDescriptor section. The following code is now a part of the generated classes and does not need to be hand-coded:
static Product()
{
TypeDescriptor.AddProviderTransparent(
new AssociatedMetadataTypeTypeDescriptionProvider(typeof(Product)),
typeof(Product));
}
Figure 8.4 shows where the text template was modified. Notice the WriteStaticConstructor method call that was added to the template code responsible for generation of entity type declarations. This method is implemented in the end of this method in the Northwind.tt file in the sample solution.
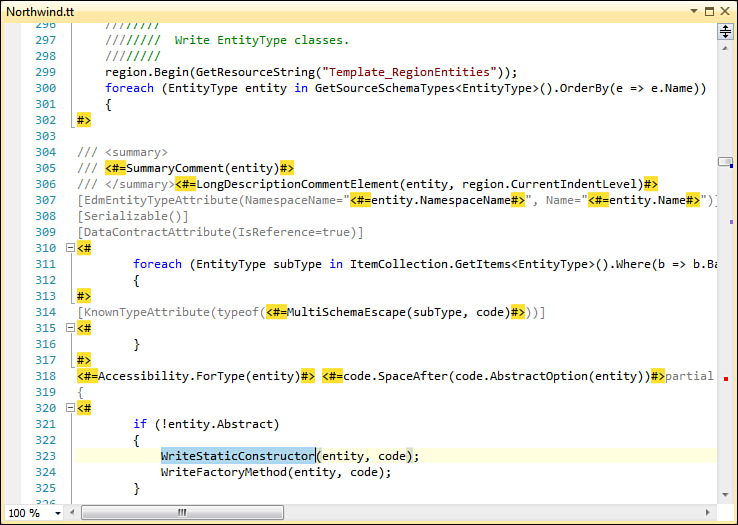
Figure 8.4. Generating static constructor in the text template.
Automated Testing
Due to its importance and relatively low rate of change, business logic in general and the validation logic in particular are good candidates for automated testing. Encapsulating the business logic in the context and entity classes partially generated by the Entity Framework enables focused testing directly at the business level. Unlike testing through the user interface, which depends on a particular presentation layer, such as the ASP.NET WebForms, and often requires manual testing or use of specialized tools, testing at the business level can be done through the application’s internal APIs with general-purpose frameworks, such as NUnit or the Visual Studio unit-testing framework.
Automated testing is one of the most powerful tools you can use to improve and maintain the quality of your application. However, like many expensive and powerful tools, automated testing is difficult to apply cost-effectively. Many teams and individual developers have tried automated testing only to find that the significant increase in effort required to implement and maintain the tests does not justify the perceived quality improvements. In many instances, these attempts fail because developers try to apply the “best practices” intended to tackle algorithmic complexity of some of the largest software applications and frameworks. These practices do not scale down to the needs of the majority of the information systems where the biggest challenge is the size of the domain (the number of tables in the database, the number of human workflows, and so on) and not the complexity of its individual algorithms.
Although the topic of automated testing is simply too big to cover in detail here, this section presents a practical approach you can use to get started. To reinforce the importance of automated testing of business logic and to prove its practical value on application development projects, the code examples in the remainder of this chapter demonstrate validation logic in the form of automated tests.
Creating a Unit Test
To start implementing automated tests on your project, you need to create a test project first. In most circumstances, you want your automated tests to be in separate assemblies to avoid having them deployed in production environment. This example uses the Visual Studio unit-testing framework, available in all editions, except Express. Visual Studio provides a special project template, which you can choose using the Add New Project dialog shown in Figure 8.5. By convention, the test project has the same name as the project it tests, followed by the .Tests suffix. In this case, the project under test is DataModel, which is where the NorthwindEntities context class is defined along with the entity classes, so the test project is called DataModel.Tests.
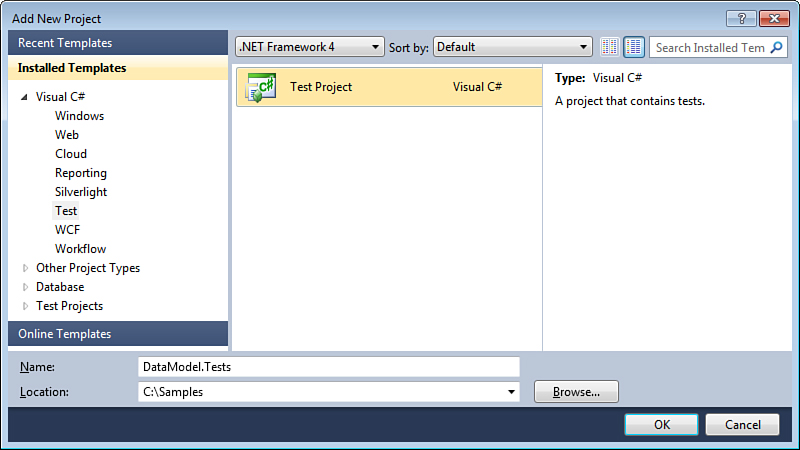
Figure 8.5. Adding a new test project to the solution.
When the new test project is created, you need to change it to add a reference to the project under test, DataModel in this example. Another change you might want to make is changing its root namespace to match the root namespace of the project under test. Although for regular projects, it is a good idea to have the root namespace of the project match the name of the assembly, for test projects such as the DateModel.Tests, changing the root namespace to DataModel helps you avoid having to add extra using statements to each file in the test project. The root namespace option can be changed using the project properties window in Visual Studio.
The new test project is created with a single empty test file in it—UnitTest1.cs. A test file contains a class, marked by the TestClassAttribute defined in the Microsoft.VisualStudio.TestTools.UnitTesting namespace. A test class can define one or more public methods marked with the TestMethodAttribute. These methods are the actual tests. In other words, a single test file can have multiple tests in it.
using Microsoft.VisualStudio.TestTools.UnitTesting;
namespace DataModel
{
[TestClass]
public class UnitTest1
{
[TestMethod]
public void TestMethod1()
{
}
}
}
Also by convention, each test file, as well as the test class in it, is named with the name of the class under test followed by the Test suffix, so a test class for the Product entity class is called ProductTest. You can either rename the empty test file initially created from the project template or simply delete it and add a new test to the project. You can do that with the Add New Test dialog shown in Figure 8.6, which you can open by selecting AddÆ New Test from the context menu of the test project in the Solution Explorer. In the Add New Test dialog, unless you know the specific test template you need, it is best to start with the Basic Unit Test.
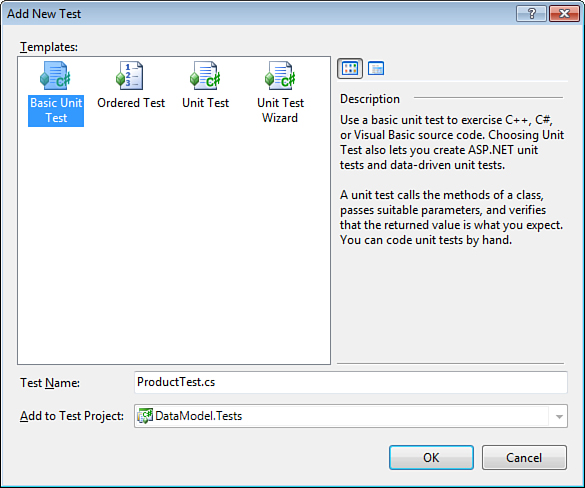
Figure 8.6. Adding a new unit test to the project.
You can now create your first test, or test method, to verify that the UnitPrice property of the Product entity is required at the same time the entity instance is saved to the database. Listing 8.2 shows the complete implementation of this test. As you can see, the test method is called UnitPrice_IsRequired, with an underscore serving as a separator between the name of the property under test and the description of the test itself. Because you could have multiple tests for the same property, using underscores helps to organize the test methods in logical groups.
Listing 8.2. Testing Required UnitPrice Property of the Product Entity
using System.ComponentModel.DataAnnotations;
using System.Transactions;
using Microsoft.VisualStudio.TestTools.UnitTesting;
namespace DataModel
{
[TestClass]
public class ProductTest
{
[TestMethod]
[ExpectedException(typeof(ValidationException))]
public void UnitPrice_IsRequired()
{
using (new TransactionScope())
using (NorthwindEntities context = new NorthwindEntities())
{
var product = new Product();
product.UnitPrice = null;
context.Products.AddObject(product);
context.SaveChanges();
}
}
}
}
The test creates a new NorthwindEntities context object and tries to submit a new Product instance to the database without a valid UnitPrice. You expect a ValidationException to be thrown by the SaveChanges method, which is why the ExpectedException attribute was applied to the test method. Visual Studio reports success if this test method if the test does throws the expected exception. If the test does not throw an exception or throws an exception of an unexpected type, a failure is reported.
You can run this and all other tests defined in this test project with the help of the Test View window shown in Figure 8.7. You can find it under TestÆ Windows in the main menu of Visual Studio.
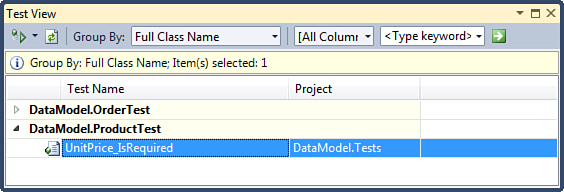
Figure 8.7. Running tests using the Test View window.
The results of test execution are shown in the Test Results window (see Figure 8.8).
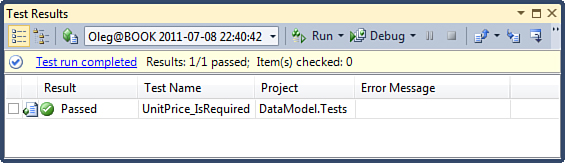
Figure 8.8. Examining execution results in the Test Results window.
Test Isolation
Poor encapsulation can cause tests that previously completed successfully to fail. It is one of the most common reasons developers abandon automated tests. Notice that in the test shown in Listing 8.2, a TransactionScope around the NorthwindEntities context was used. As you recall from Chapter 2, “Entity Framework,” a TransactionScope groups multiple data access operations in a single database transaction. If its Complete method is called before the TransactionScope object is disposed, all changes are committed to the database. However, if the TransactionScope object is disposed without calling Complete, all changes are rolled back. This test method takes advantage of this behavior and wraps all database changes in an anonymous TransactionScope, which is always rolled back to ensure that no junk data was left in the database by the previous test runs.
It is important to ensure that tests can run repeatedly and independently of each other in order to be effective quality improvement measures. If tests report false errors because data they expect to be in the database is missing or was changed by other tests, developers will stop running them and eventually stop maintaining them. Do not assume that any test data is already available in the database. If you are testing the Order entity, do not assume that particular Customer or Product entities are readily available. Instead, create them in your test and let the TransactionScope rollback the changes at the end of the test. It is fine to rely on seed data that must be available in any valid database for your application and implemented in your database deployment script; so, if you have a table that contains all 50 U.S. states your application uses to verify address information, you can probably assume that Florida is there:
Testing Validation of Different Properties
Testing validation logic of different properties presents another challenge—how do you distinguish a ValidationException thrown by one property from another? The ExpectedExceptionAttribute simply asserts that an exception of a certain type is thrown but cannot distinguish an exception thrown for the UnitPrice property from an exception thrown for the ProductName property. To verify validation exceptions down to the property level, you could modify the test, catch the validation exceptions, and examine the member names explicitly:
[TestMethod]
public void UnitPrice_IsRequired()
{
using (new TransactionScope())
using (var context = new NorthwindEntities())
{
var product = new Product();
product.UnitPrice = null;
context.Products.AddObject(product);
try
{
context.SaveChanges();
Assert.Fail();
}
catch (ValidationException e)
{
Assert.IsNotNull(e.ValidationResult.MemberNames);
Assert.IsTrue(e.ValidationResult.MemberNames.Contains("UnitPrice"));
}
}
}
Unfortunately, you would also need to ensure that an exception is indeed thrown and that it is of the expected type. This requires almost a dozen lines of code to do what the ExpectedExceptionAttribute did in just one and makes automated tests verbose, discouraging developers from doing it.
Luckily, the Visual Studio unit-testing framework supports custom assertion attributes, and you can create one specifically to verify ValidationException instances. Instead of using the try/catch block, you can replace the ExpectedExceptionAttribute in the original version of the UnitPrice_IsRequired test method with the custom ExpectedValidationExceptionAttribute, shown in Listing 8.3, and implement the same test logic:
[TestMethod]
[ExpectedValidationException(MemberName = "UnitPrice")]
public void UnitPrice_IsRequired()
Listing 8.3. ExpectedValidationExceptionAttribute
using System;
using System.Collections.Generic;
using System.ComponentModel.DataAnnotations;
using System.Linq;
using Microsoft.VisualStudio.TestTools.UnitTesting;
namespace DataModel
{
[AttributeUsage(AttributeTargets.Method, AllowMultiple = false, Inherited = true)]
public class ExpectedValidationExceptionAttribute: ExpectedExceptionBaseAttribute
{
public string MemberName { get; set; }
protected override void Verify(Exception exception)
{
this.RethrowIfAssertException(exception);
IEnumerable<string> memberNames = null;
var validationException = exception as ValidationException;
if (validationException != null)
memberNames = validationException.ValidationResult.MemberNames;
if (memberNames != null && memberNames.Contains(this.MemberName))
return;
string message = "ValidationException was expected";
message += " with member name " + this.MemberName;
message += ". Instead " + exception.GetType().FullName + " was thrown";
if (memberNames != null && memberNames.Any())
message += " with member name(s) " + string.Join(", ", memberNames);
message += ".";
throw new AssertFailedException(message);
}
}
}
The custom assertion attribute inherits from the base class, ExpectedExceptionBaseAttribute, provided by the Visual Studio unit-testing framework in the Microsoft.VisualStudio.TestTools.UnitTesting namespace. It defines a property called MemberName, which specifies the name of the property for which a ValidationException is expected. The ExpectedValidationExceptionAttribute also overrides the Verify method, which takes the actual exception that was thrown by the test method and throws the AssertFailedException if the actual exception is not a ValidationException or if it specifies an unexpected MemberName.
Integration Testing Versus Unit Testing
Developers familiar with automated testing will quickly point out that tests created with the approach described here are integration tests and not unit tests. Testing purists frequently frown upon the idea of testing the business and data access logic together like this, citing poor precision, performance, and reliability of tests and their results. By design, the integration tests are less precise than unit tests because they exercise multiple units of code and might not allow you to differentiate between test failures caused by data access errors and those caused by business logic errors. Because integration tests access an external database, they are slower than unit tests that access only objects in memory. When implemented incorrectly, the integration tests might be dependent on shared test data, which leads to incorrect or unrepeatable test execution results.
In theory, testing the business logic with pure unit tests, separately from the data access logic, improves test precision, performance, and reliability. With this approach, the data access logic needs to be replaced with test doubles, such as stubs or mocks, allowing you to differentiate business logic errors from data access errors. However, by making tests more precise, you also reduce the test coverage. The unit tests of the business logic alone will not let you know when something breaks due to a problem in the data access layer, which is a much more common problem in applications created with object-relational mappers like the Entity Framework. The rulebook answer to this problem is that you should create unit tests for your data access in addition to the unit tests for the business logic. In practice, the resulting volume and complexity of automated tests created with the pure unit testing approach quickly grows out of control, often exceeding the size of the business logic itself by a factor of five or more. Many development teams try and quickly abandon the idea of automated testing because they cannot justify the effort required to implement and maintain the unit tests that, due to their narrow focus, do not significantly reduce the effort required perform the traditional system testing manually.
By starting with integration tests that exercise both business and data access logic, you immediately begin receiving benefits of automated testing with a minimal investment of effort. You know when your business logic fails either due to algorithmic errors or due to configuration errors in the O/R mapping. As long as you create data required for your tests programmatically, just as you would do in a unit test, the TransactionScope solves the problem of keeping the database, a shared test environment, clean and ready for repeated and reliable test execution. If developers on your team have local database environments, you will be able run hundreds of integration tests per minute.
With the integration-first approach, you still have the option of introducing unit testing for business logic when or if you discover that the number of tests has grown to the point where running the entire suite takes too long. By then, the sheer number of the integration tests will serve as proof of success of automated testing on this project. You will also have a good understanding of which integration tests are critical enough to be refactored into unit tests to be executed by every developer locally and which can be left as-is for your automated build to run on the server.
Declarative Validation
The System.ComponentModel.DataAnnotations namespace offers a number of validation attributes discussed in this section. By placing validation attributes on the individual properties of entity classes, you can implement business logic declaratively. Aside from being one of the quickest methods, declarative implementation of the business logic keeps it at the highest level of abstraction—as close to the conceptual level in the Entity Data Model designer as possible, helping the entity classes to stay easy to understand and maintain.
RequiredAttribute
The RequiredAttribute ensures that a value is not null and if the value is of type string, it ensures that it is not empty as well:
[Required]
public object ProductName { get; set; }
Using the property definition just given, you can create the following test to verify that a ValidationException will be thrown by the SaveChanges method if a valid ProductName has not been specified for a new Product instance:
[TestMethod]
[ExpectedValidationException(MemberName = "ProductName")]
public void ProductName_IsRequired()
{
using (new TransactionScope())
using (var context = new NorthwindEntities())
{
var product = new Product();
product.ProductName = string.Empty;
context.Products.AddObject(product);
context.SaveChanges();
}
}
In dynamically generated web pages, the RequiredAttribute is typically enforced by the RequiredFieldValidator controls created by the field templates.
From a business point of view, requiring each product to have a name probably means that that it should not be empty. Unlike the not null constraint you can use in the database column definition, the RequiredAttribute has additional logic for strings that not only ensures that a string value is not null, but also that it does not contain only white-space characters. If a non-null, blank string were a valid product name, you could modify the property definition to set the AllowEmptyStrings property of the RequiredAttribute to true:
[Required(AllowEmptyStrings = true)]
public object ProductName { get; set; }
With this new definition of the ProductName property, the RequiredAttribute prevents null values but is happy to accept empty strings as product names. The test method just shown would now fail because ValidationException will not be thrown for the ProductName property.
All other validation attributes discussed throughout the remainder of this section treat null values as valid. If a property cannot be null, you have to place a RequiredAttribute on it to prevent null values in addition to any other validation attributes it might need.
RangeAttribute
The RangeAttribute verifies that a value falls within a particular range, or more specifically, that the value is greater than or equal to the minimum value and less than or equal to the maximum value. In the Product entity, unless you are paying your customers to take merchandise off your hands, the UnitPrice property cannot be less than zero. You can implement this business rule by applying the RangeAttribute to it as shown here:
[Required]
[Range(0, int.MaxValue)]
public object UnitPrice { get; set; }
The following test verifies the implementation of the new business rule:
[TestMethod]
[ExpectedValidationException(MemberName = "UnitPrice")]
public void UnitPrice_MustBeGreaterThanZero()
{
using (new TransactionScope())
using (var context = new NorthwindEntities())
{
var product = new Product();
product.UnitPrice = -1;
context.Products.AddObject(product);
context.SaveChanges();
}
}
In dynamically generated web pages, the RequiredAttribute is typically enforced by the RangeValidator controls created by the field templates.
The RangeAttribute offers two strongly typed constructors that take range values of Double and Int32 types. These constructors should be sufficient for most numeric data types, including the Decimal type used by the UnitPrice property. In addition to the numeric values, the Range attribute can also validate values of any type that can be converted from string and implements the IComparable interface such as the DateTime. The following RangeAttribute verifies that values of the BirthDate property of the Employee entity fall between 1/1/1900 and 12/31/2050:
[Range(typeof(DateTime), "1/1/1900", "12/31/2050")]
public object BirthDate { get; set; }
The following test method verifies the RangeAttribute applied to the BirthDate property by trying to set it to year 74, which could be a problem if user interface code fails to add century to a two-digit year entered by the user:
[TestMethod]
[ExpectedValidationException(MemberName = "BirthDate")]
public void BirthDate_Between1900And2050()
{
using (new TransactionScope())
using (var context = new NorthwindEntities())
{
var employee = new Employee();
employee.BirthDate = new DateTime(74, 1, 1);
context.Employees.AddObject(employee);
context.SaveChanges();
}
}
StringLengthAttribute
SQL Server allows you to specify the maximum length of values that can be stored in columns of string types such as CHAR and VARCHAR. However, the errors it reports when encountering values that are too long to be stored in the underlying database column without data truncation do not include the actual column name. This makes debugging of truncation errors unnecessarily difficult. Fortunately, the StringLengthAttribute can be used to validate the string length before the data is sent to the database server. Here is how you can extend the ProductName property of the Product entity class:
[Required]
[StringLength(40, MinimumLength = 2]
public object ProductName;
The StringLengthAttribute allows you to specify both minimum and maximum length that a string value can have. The maximum length is required and specified as the first argument of the constructor. The minimum length is optional and has to be specified explicitly by including the name of the MinimumLength property in the constructor.
The following test method verifies how the StringLengthAttribute works by initializing the ProductName property with a string that consists of 41 characters—one character too long. As you would expect from a validation attribute, this code throws a ValidationException, which unlike the low-level SqlException includes the display name of the column that caused the problem:
[TestMethod]
[ExpectedValidationException(MemberName = "ProductName")]
public void ProductName_MustBe40CharactersOrLess()
{
using (new TransactionScope())
using (var context = new NorthwindEntities())
{
var product = new Product();
product.ProductName = new String('T', 41);
context.Products.AddObject(product);
context.SaveChanges();
}
}
In dynamically generated web pages, the StringLengthAttribute is enforced by the DynamicValidator controls created by the field templates. Some field templates also set the MaxLength property of the TextBox controls to limit the number of characters users can enter.
One downside to using the StringLengthAttribute is that it duplicates information about the size of the column. Normally, this information is stored in a single place in your application—the Entity Data Model. When it is duplicated in a hand-written StringLengthAttribute, you need to remember to update it in addition to the EMDX if the actual size of the database column changes. It would be a good idea to change the text template to have this attribute automatically as discussed in the “Customizing Entity Framework Code Generation” section earlier in this chapter.
RegularExpressionAttribute
The RegularExpresionAttribute can be used to ensure that string values match a particular pattern, such as a phone number or a URL. Here is how you can ensure that the HomePage property of the Supplier entity contains a valid URL:
[RegularExpression(
@"(?i)(http¦https)://[a-z0-9-.]+.(com¦org¦net¦mil¦edu)")]
public object HomePage { get; set; }
The RegularExpressionAttribute constructor takes a string that contains a regular expression pattern that the values are expected to match. In this example, the pattern expects the URL to start with either http or https, followed by a “://,” followed by a sequence of alpha-numeric symbols, dashes, and periods and one of five predefined top-level domains (.com, .org, and so on).
Detailed discussion of regular expressions would take another book of this size. Please visit the following web page to learn more:
http://msdn.microsoft.com/en-us/library/hs600312.aspx.
In dynamically generated web pages, the RegularExpressionAttribute is typically enforced by the RegularExpressionValidator controls created by the field templates.
Due to the power and inherent complexity of regular expressions, it is a good idea to invest more effort in testing them. In particular, you might want to write both positive and negative tests to ensure not only that your regular expression rejects invalid values, but also that it accepts the valid ones:
[TestMethod]
public void HomePage_AcceptsValidUrl()
{
using (new TransactionScope())
using (var context = new NorthwindEntities())
{
var supplier = new Supplier();
supplier.CompanyName = "Test Supplier";
supplier.HomePage = "http://www.contoso.com";
context.Suppliers.AddObject(supplier);
context.SaveChanges();
}
}
[TestMethod]
[ExpectedValidationException(MemberName = "HomePage")]
public void HomePage_RejectsInvalidUrl()
{
using (new TransactionScope())
using (var context = new NorthwindEntities())
{
var supplier = new Supplier();
supplier.CompanyName = "Test Supplier";
supplier.HomePage = "invalid://url";
context.Suppliers.AddObject(supplier);
context.SaveChanges();
}
}
Unlike with most other validation attributes that manage to generate reasonably good error messages by default, the RegularExpressionAttribute cannot decipher the original intent and simply includes the entire regular expression pattern in the error message. You definitely don’t want to display those error messages to the business users. As discussed in the Validation Error Messages section of this chapter, you can specify an alternative error message by setting the ErrorMessage property in the attribute constructor, for example:
[RegularExpression(
@"(?i)(http¦https)://[a-z0-9-.]+.(com¦org¦net¦mil¦edu)",
ErrorMessage = "Home Page must be a valid URL")]
public object HomePage { get; set; }
EnumDataTypeAttribute
Consider the OrderStatus enumerated type (or enum for short) defined in the sample project for the Order entity:
public enum OrderStatus: byte
{
Draft = 0,
Submitted = 1,
Paid = 2,
Fulfilled = 3
}
Due to the limitations in the current version of the Entity Framework, the OrderStatus property of the Order entity class is actually of type Byte and allows values other than the 0, 1, 2, and 3 defined in the enum. Even without the limitation, you could cast any value of a compatible numeric type, such as 10 of type Byte in this case, to the enum type, OrderStatus, and store it a variable or property of the enum type.
The .NET Framework specifically allows variables of an enum type to store values that are not defined in the enum. This allows class library developers to add new items to existing enum types without breaking binary compatibility with applications that were compiled with the original version of a class library.
The EnumDataTypeAttribute verifies that a value is actually defined in the specified enumerated type. You can apply it to the OrderStatus property of the Order class to ensure that only values defined in the OrderStatus enum can be stored in it:
[EnumDataType(typeof(OrderStatus))]
public object OrderStatus { get; set; }
You can verify that this attribute works by writing the following test. It sets the OrderStatus property with the value 10, which is not defined in the OrderStatus enum. As expected, the validation code in the SaveChanges method detects this error and throws the ValidationException:
[TestMethod]
[ExpectedValidationException(MemberName = "OrderStatus")]
public void OrderStatus_RejectsInvalidValues()
{
using (new TransactionScope())
using (var context = new NorthwindEntities())
{
var order = CreateOrder();
order.OrderStatus = 10;
context.Orders.AddObject(order);
context.SaveChanges();
}
}
The EnumDataTypeAttribute supports not only the integral data types, such as Byte used in this example, but also enum and string data types. For properties of enum types, the EnumDataTypeAttribute ensures that the enum value is actually defined in the enum type. For string properties, the EnumDataTypeAttribute parses the enum value from the string and then checks if the enum type defines it. Keep in mind that it uses case-sensitive logic for string parsing, which might not be appropriate for validating string values entered by the users directly.
DataTypeAttribute
Although the DataTypeAttribute inherits from the ValidationAttribute class, it does not perform any actual validation. Its IsValid method only checks the attribute’s own parameters. Dynamic Data uses the DataTypeAttribute when looking for a field template appropriate for a given property. For example, the HomePage property of the Supplier entity stores URLs, and by applying the DataTypeAttribute as shown next, you can make Dynamic Data use the URL field template, which generates a hyperlink:
[DataType(DataType.Url)]
public object HomePage { get; set; }
The DataTypeAttribute can help you to implement client-side validation in Dynamic Data web applications if you provide appropriate Edit mode field templates for the different values of the DataType enumeration, such as Currency, Time, or PhoneNumber. For details, please see Chapter 3.
Imperative Validation
The simple declarative validation discussed so far is a good first step but is rarely sufficient. Most enterprise applications require more complex validation logic that can span multiple properties, multiple entities, and require custom code.
CustomValidationAttribute
The CustomValidationAttribute allows you to specify a static method that will be invoked to validate a particular property. As an example, suppose that at Northwind Traders, all orders are entered electronically, directly into the system, so the OrderDate property of the Order entity should never be in the past. You cannot express this condition using the RangeAttribute because today’s date is not a constant and cannot be specified in an attribute. Here is how you could accomplish this task with the CustomValidationAttribute:
[Display(Name = "Order Date")]
[CustomValidation(typeof(Order), "ValidateOrderDate")]
public object OrderDate { get; set; }
The first parameter of the CustomValidationAttribute constructor specifies the type of class that implements the custom validation method, and the second specifies the name of the method itself. Here is the definition of the ValidateOrderDate method taken from the Order class:
public static ValidationResult ValidateOrderDate(
DateTime? orderDate, ValidationContext context)
{
if (orderDate != null && orderDate.Value < DateTime.Today)
{
return new ValidationResult(
string.Format("{0} cannot be in the past", context.DisplayName),
new string[] { context.MemberName });
}
return ValidationResult.Success;
}
A validation method must be static and must return a ValidationResult. As its first parameter, the validation method takes the value that needs to be validated, such as the value of the OrderDate property. The type of the first method parameter must either have the same type as the property, Nullable<DateTime> in this example, or be of type object. The validation method can also have an optional second parameter of type ValidationContext, which provides additional information about the property being validated.
ValidationResult
If the value is correct, the validation method should return ValidationResult.Success, a special constant for null, defined to make validation methods easier to understand. If the value is invalid, the method should return an instance of the ValidationResult class with detailed information about the error. The Validator class will use the information in the ValidationResult to initialize the ValidationException it will throw when the errors are detected.
The ErrorMessage property of the ValidationResult contains the error message that is reported by the exception. This property is initialized by the first argument of the ValidationResult constructor. This same error message is displayed to the users by the DynamicValidator controls in Dynamic Data web applications. Notice how in this validation method, the DisplayName property of the ValidationContext object is used instead of hard-coding the property name in the error message. The DisplayName is initialized with the display name specified in the DisplayAttribute applied to the entity property or the name of the property itself if no display name was specified explicitly.
The MemberNames property of the ValidationResult contains the names of the property or properties that have invalid values. It is initialized by the second argument of the ValidationResult constructor. The member names are used by the DynamicValidator controls in Dynamic Data web application to determine if their associated column is valid. This helps to report validation errors coming from custom validation code consistently with the errors coming from the validation attributes applied declaratively. You can also avoid hard-coding the property name here and rely on the MemberName property of the ValidationContext object, which has the name of the property being validated, OrderDate in this example.
Following is a test you can use to verify the initial implementation of the ValidateOrderDate validation method. Notice how it tries to create an order with a date that was five days ago. The error is detected by the ValidateOrderDate method, and a ValidationException is thrown by the SaveChanges method:
[TestMethod]
[ExpectedValidationException(MemberName = "OrderDate")]
public void OrderDate_CannotBeInThePast()
{
using (new TransactionScope())
using (var context = new NorthwindEntities())
{
var order = CreateOrder();
order.OrderDate = DateTime.Today.AddDays(-5);
context.Orders.AddObject(order);
context.SaveChanges();
}
}
Handling Null Values
When creating validation methods for nullable properties, check to see if the value is null before performing additional checks. If null values are valid according to your business rules, the method must return ValidationResult.Success. Otherwise, you need to decide if you want to rely on the RequiredAttribute or implement this logic in the custom validation method itself. Relying on the RequiredAttribute, as in the previous example, makes the CustomValidationAttribute behave consistently with the declarative validation attributes.
Placing the entire validation logic for a given property in a single validation method is typically more verbose; however, it might be easier to follow, especially as the validation rules get more and more complicated. Here is how you could rewrite this custom validation method to verify that the OrderDate is not in the past and that it is not null, making a separate RequiredAttribute unnecessary:
public static ValidationResult ValidateOrderDate(
DateTime? orderDate, ValidationContext context)
{
if (orderDate == null)
{
return new ValidationResult(
string.Format("{0} is required", context.DisplayName),
new string[] { context.MemberName });
}
if (orderDate.Value < DateTime.Today)
{
return new ValidationResult(
string.Format("{0} cannot be in the past", context.DisplayName),
new string[] { context.MemberName });
}
return ValidationResult.Success;
}
Each of these two approaches of handling null values in custom validation methods has its own advantages. You are in the best position to decide what makes sense on your project; however, you might want to consider starting with the RequiredAttribute as it offers the easiest and smallest solution for the simple scenarios. You can always change your mind later if you need to.
Class-Level Validation Methods
You might have noticed that the VerifyOrderDate method actually creates a problem for orders that have already been placed. Imagine that a customer placed an order on Monday night, and on Tuesday morning, an employee ships the order and needs to change its status to Fulfilled. Because the OrderDate is already in the past, the application will not allow the employee to change the order.
The flaw in the original implementation of the VerifyOrderDate is that the value of OrderDate is checked separately from other properties of the Order entity. You still want to make sure that new orders are not submitted with a date in the past, but you also want to allow employees to update the order status later. One possible way to solve this problem is to check the OrderDate property only when the OrderStatus is null, which should be the case for the newly created Order entities before they are marked Submitted.
To perform a validation check that involves more than one property, change the VerifyOrderDate method so that instead of the OrderDate property value, it validates the entire Order entity instance. Begin by moving the CustomValidationAttribute from the OrderDate property to the Metadata class inside of the Order entity:
[CustomValidation(typeof(Order), "ValidateOrderDate")]
private abstract class Metadata
{
[Required]
[Display(Name = "Order Date")]
public object OrderDate { get; set; }
}
You could also have placed the CustomValidationAttribute on the Order class itself to achieve the same effect. It is largely a matter of personal preference. Placing data annotation attributes on the private Metadata class helps keep the entity class clean and prevents unnecessary details from leaking into help files you might be generating from the documentation comments using tools like Sandcastle.
Here is the updated version of the validation method itself:
public static ValidationResult ValidateOrderDate(
Order order, ValidationContext context)
{
if (order.OrderStatus == null)
{
if (order.OrderDate != null &&
order.OrderDate.Value < DateTime.Today)
{
return new ValidationResult(
"Order Date cannot be in the past",
new string[] { "OrderDate" });
}
}
return ValidationResult.Success;
}
The new version of the validation method takes an Order as its first parameter and uses this instance to access values of the OrderStatus and OrderDate properties. Unfortunately, now that the method is validating the Order entity, you can no longer use DisplayName and MemberName properties of the ValidationContext object to generate the ValidationResult. For simplicity, they are hard-coded in this example, although it would have been better to either use string constants or resources.
The ValidationContext object the custom validation methods receive as a second parameter has a property called ObjectInstance, which allows you to access the entity instance even in property validation methods. Although this works fine in the programmatic tests, when a property validation method is invoked during a web page post-back by DynamicValidator controls, the original entity instance does not exist, and all you have is a property value. In other words, if you need to access multiple entity properties to perform validation, you have to use class-level validation methods.
Validating Multiple Rules
You can use multiple validation methods and multiple instances of the CustomValidationAttribute to implement different validation rules. However, if some of the validation rules are related, it might be easier to implement them together in a single method. Continuing this example of validating orders, suppose the Northwind Traders Company allows customers to specify a date they want to have their orders delivered; however, the orders cannot be delivered in fewer than three days. Validation of the RequiredDate property of the Order entity is closely related to the validation of the OrderDate property because both properties must be validated when the order is submitted.
The System.ComponentModel.DataAnnotations namespace defines a special interface, IValidatableObject that you can implement in entity classes to validate multiple rules at once. The interface defines a single method called Validate, which takes a ValidationContext object as a parameter and returns a collection of ValidationResult objects:
public interface IValidatableObject
{
IEnumerable<ValidationResult> Validate(
ValidationContext validationContext);
}
Notice how similar this method is to the custom validation methods created earlier. Because Validate is an instance method, it does not need a separate parameter to receive the object to validate, and because it can validate multiple rules, it returns an IEnumerable instead of a single ValidationResult. Listing 8.4 shows how you implement it in the Order entity class to verify the rules related to both OrderDate and RequiredDate properties.
Listing 8.4. Implementing IValidatableObject Interface
using System;
using System.Collections.Generic;
using System.ComponentModel;
using System.ComponentModel.DataAnnotations;
partial class Order : IValidatableObject
{
public IEnumerable<ValidationResult> Validate(
ValidationContext validationContext)
{
var results = new List<ValidationResult>();
if (this.OrderStatus != null)
{
if (this.OrderDate == null)
{
results.Add(
new ValidationResult("Order Date is required", new[] { "OrderDate" }));
}
else
{
if (this.OrderDate.Value < DateTime.Today)
{
results.Add(
new ValidationResult("Order Date cannot be in the past",
new[] { "OrderDate" }));
}
if (this.RequiredDate != null &&
this.RequiredDate <= this.OrderDate.Value.AddDays(3))
{
results.Add(
new ValidationResult(
"Required Date must be greater than Order Date + 3 days",
new[] { "RequiredDate" }));
}
}
}
return results;
}
}
As you can see, the method performs a number of checks and returns zero or more ValidationResult objects in a List.
You can also take advantage of the C# iterators, which allow using the yield return statement and eliminate the need to maintain a list of ValidationResult objects. You can find more details on iterators at http://msdn.microsoft.com/en-us/library/dscyy5s0.aspx.
When validating an object that implements the IValidatableObject interface, the Validator class calls its Validate method after invoking any validation attributes that might have been applied to the class or its properties.
Reporting Multiple Errors
As you recall from Listing 8.1, the Validate method of the UnleashedObjectContext class calls the static ValidateObject method of the Validator class to validate all new and modified entity objects. This method throws a ValidationException for the first validation error it encounters. Even though the Validate method of the Order class might report two errors at the same time (one for the OrderDate and one for the RequiredDate properties), only the first one is reported through the exception.
Although reporting a single error at a time might not be a problem in simple pages, like the Order entry form in the sample application, as the number of fields on the form increases, fixing one error only to get another is not very user friendly. Figure 8.9 illustrates the problem.
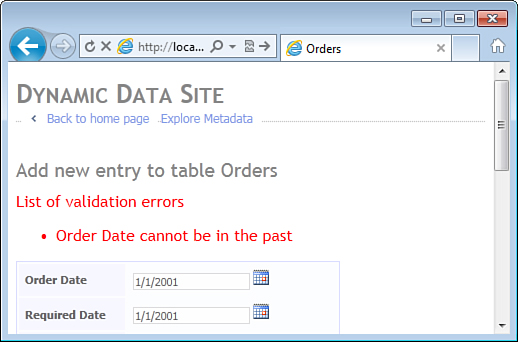
Figure 8.9. First of multiple errors reported in a Dynamic Data web page.
This is not a problem with the built-in validation attributes such as the RequiredAttribute or the CustomValidationAttribute applied to individual properties because they are invoked directly by separate DynamicValidator controls inside the field templates on the web page. In other words, all property-level validation attributes are evaluated independently, and all errors are reported to the user at the same time. However, class-level CustomValidationAttribute instances and the Validate method of the IValidatableObject interface are invoked only by the ValidateObject method called in the SaveChanges method of the UnleashedObjectContext class, and only the first error is reported.
IDynamicValidatorException Interface
Dynamic Data defines a special interface, IDynamicValidatorException, that allows exception classes to supply information about multiple errors that might have occurred during a single operation. This interface defines a single property, InnerExceptions, which returns a dictionary of entity property names and exceptions encountered for these properties.
public interface IDynamicValidatorException
{
IDictionary<string, Exception> InnerExceptions { get; }
}
The built-in EntityDataSource control takes advantage of this interface when reporting errors that occur when it tries to assign field values received from the form controls to the properties of entity objects. The Entity Framework implements its own, limited, validation based on the rules embedded directly in the entity data model (EDMX), such as preventing assignment of a null value to an entity property that does not allow it. When these errors are detected, the EntityDataSource control collects all errors for a given entity object and throws the EntityDataSourceValidationException, which implements the IDynamicValidatorException interface. In the presentation layer, the DynamicValidator controls check all exceptions thrown by the data source control, and if a particular exception implements the IDynamicValidatorException interface, the validator controls use its InnerExceptions dictionary to find exceptions that apply to the entity properties they validate.
Unfortunately, the IDynamicValidatorException is defined in the System.Web.Extensions assembly and where the EntityDataSourceValidationException is defined in the System.Web.Entity. This is not a problem for web applications; however, for other types of applications, using these types means taking a dependency on ASP.NET, which is only included in the full version of the .NET framework and not in the client profile.
Modifying ObjectContext to Report Multiple Errors
To avoid adding a dependency on the presentation framework to the business layer of the application, you can use another built-in exception type - AggregateException. The .NET Framework version 4 introduced this class in the System namespace to support reporting of multiple errors in the Parallel Task Library (TPL). AggregateException also defines a property called InnerExceptions, although it stores a ReadOnlyCollection of Exception objects instead of a Dictionary. Here is how declaration of this class looks in simplified form:
public class AggregateException : Exception
{
public ReadOnlyCollection<Exception> InnerExceptions { get; }
}
Here is a new version of the Validate method of the UnleashedObjectContext class that reports multiple validation errors in a single AggregateException:
private void Validate(ObjectStateEntry stateEntry)
{
object entity = stateEntry.Entity;
var context = new ValidationContext(entity, null, null);
var results = new List<ValidationResult>();
if (!Validator.TryValidateObject(entity, context, results, true))
ThrowValidationException(entity, results);
}
The new version calls the TryValidateObject method of the static Validator class. Unlike the ValidateObject method used previously, which throws a single ValidationException for the first error it detects, the TryValidateObject method invokes all validation attributes and implementations of the IValidatableObject interface. The TryValidateObject method collects the errors in the list of ValidationResult objects it receives as the third parameter and returns false if any errors were detected.
The ThrowValidationException method (shown next) uses the validation results to create a list of ValidationException objects. If multiple validation results were reported, it throws the AggregateException. Otherwise, it throws the ValidationException to mimic the simple behavior implemented earlier:
protected static void ThrowValidationException(
object entity, IEnumerable<ValidationResult> results)
{
var exceptions = new List<ValidationException>();
foreach (ValidationResult result in results)
exceptions.Add(new ValidationException(result, null, entity));
if (exceptions.Count == 1)
throw exceptions[0];
throw new AggregateException(exceptions);
}
The AggregateException does not inherit from the ValidationException class. Now that the SaveChanges method can throw two different exception types, many of the automated tests written so far will fail because they only expect the ValidationException. To make them pass, change the ExpectedValidationExceptionAttribute to support both types of validation exceptions. You can find the updated implementation of this attribute in the source code accompanying this book.
Extending DynamicValidator to Support AggregateException
As discussed in Chapter 3 and Chapter 6, Dynamic Data relies on the DynamicValidator control for exception handling. When used in a field template, this control is responsible for evaluating the validation attributes applied to the entity property the template instance represents. In field and page templates, this control also handles any exceptions Entity Framework may throw. Here is the part of this class that implements exception handling:
public class DynamicValidator : BaseValidator
{
protected virtual Exception ValidationException { get; set; }
protected virtual void ValidateException(Exception exception);
}
The control calls the ValidateException method whenever the EntityDataSource fires its Exception event. The method receives an Exception object and determines whether it represents an error condition expected by the DynamicValidator control. If it does, the ValidateException method assigns the exception object to the ValidationException property. If this property is not null during page validation, the DynamicValidator uses it to display the exception’s error message.
Out of the box, DynamicValidator supports only ValidationException and exception types, like EntityDataSourceValidationException, that implement the IDynamicValidatorException interface. Because AggregateException used in this example does not implement this interface, the DynamicValidator controls simply ignore it and let the ASP.NET runtime from generate a yellow page of death. To handle AggregateException and other types of expected exceptions your business layer may throw, you need to subclass the DynamicValidator control and override its ValidateException method.
When overriding the ValidateException method, remember that a single web page can contain a number of dynamic validators. The validators created by field templates are associated with specific entity properties (for these controls, the Column property defined in the DynamicValidator base class returns a MetaColumn object describing their entity property). These validators should report only the exceptions related to their respective entity properties. However, the validator at the top of the page is not associated with any particular entity property (its Column property is null) and should report only the exceptions related to the entire entity.
The ValidationException class used in this example allows you to determine if an error is related to a particular entity property by examining its ValidationResult. The MemberNames property of the ValidationResult can be empty if the error is not related to any particular entity property or contain multiple property names depending on how the validation logic was implemented by the entity class.
For complete details on how to extend the DynamicValidator control and implement support for AggregateException that contains multiple ValidationException instances, please refer to the UnleashedValidator control in the sample solution accompanying this book. Figure 8.10 shows how multiple validation errors are reported in the sample web application where all field and page templates have been modified to use the UnleashedValidator control instead of the built-in DynamicValidator.
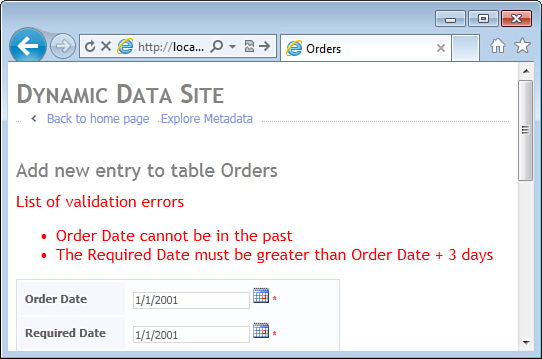
Figure 8.10. Multiple errors correctly reported on a Dynamic Data web page.
Validating Entity State Changes
Sometimes validating current state of an entity is insufficient. Consider the Order entity and its OrderStatus property, which indicates whether an order has been submitted, paid, or fulfilled. It would be bad if someone could change the status of a fulfilled order back to paid and receive a second product free. Here is a code example that illustrates the problem:
using (var context = new NorthwindEntities())
{
var order = CreateOrder();
order.OrderStatus = (byte)OrderStatus.Fulfilled;
context.Orders.AddObject(order);
context.SaveChanges();
order.OrderStatus = (byte)OrderStatus.Paid;
context.SaveChanges();
}
The current implementation of the validation logic in the Order class has no knowledge of the previous state of the entity and cannot distinguish a valid order, for which a payment had just been processed, from a rogue order that was tampered with.
Accessing Original Property Values with ObjectStateManager
As discussed in Chapter 2, the Entity Framework keeps track of all changes made to entities in order to support optimistic concurrency. Each ObjectContext, such as the NorthwindEntities in these examples, has an ObjectStateManager, which uses ObjectStateEntry objects to keep track of both current and original property values for each entity. Here is how you can take advantage of this capability and compare the current value of the OrderStatus property with the original:
using (var context = new NorthwindEntities())
{
var order = CreateOrder();
order.OrderStatus = (byte)OrderStatus.Fulfilled;
context.Orders.AddObject(order);
context.SaveChanges();
order.OrderStatus = (byte)OrderStatus.Paid;
var stateEntry = context.ObjectStateManager.GetObjectStateEntry(order);
byte originalStatus = (byte)stateEntry.OriginalValues["OrderStatus"];
if (originalStatus == (byte)OrderStatus.Fulfilled &&
order.OrderStatus != (byte)OrderStatus.Fulfilled)
{
// We have a problem
}
context.SaveChanges();
}
In this new version, the code first calls the GetObjectStateEntry method of the ObjectStateManager to retrieve an ObjectStateEntry, which allows accessing original property values of the entity via its OriginalValues property. This property returns an object of type DbDataRecord defined in the System.Data namespace by the ADO.NET framework. You can use its indexer to access the original property values by name. Having retrieved the original value of the OrderStatus property, you can compare it against the current value in the entity object itself.
Accessing Original Property Values in Validation Methods
Out of the box, validation methods, whether they are defined by applying the CustomValidationAttribute or implementing the IValidatableObject interface, do not have access to the ObjectStateEntry, the ObjectStateManager, or even the ObjectContext for that matter. To access the original property values inside the validation methods, this information needs to be supplied to them by the Validate method of the UnleashedObjectContext class. Luckily, ValidationContext (which all validation methods can receive as a parameter) defines the Items property of type IDictionary<object, object> specifically for that purpose.
Here is how the Validate method in the UnleashedObjectContext was modified to create the Items dictionary and place an ObjectStateEntry instance in it for the validation methods to find:
private void Validate(ObjectStateEntry stateEntry)
{
object entity = stateEntry.Entity;
var items = new Dictionary<object, object>();
items[typeof(ObjectStateEntry)] = stateEntry;
var context = new ValidationContext(entity, null, items);
var results = new List<ValidationResult>();
if (!Validator.TryValidateObject(entity, context, results, true))
{
ThrowValidationException(entity, results);
}
}
Notice the ObjectStateEntry instance is stored in the dictionary using its own type as the key. This is not a strict requirement; you simply need a well-known value to serve as the key so that validation methods can find it in the dictionary. Using the type itself simply avoids having to define an extra constant just for this purpose. The dictionary is passed to the ValidationContext constructor as the third parameter.
Having changed the validation infrastructure to store the ObjectStateEntry instances in the ValidationContext, you can now implement a validation method in the Order class that takes advantage of it:
[MetadataType(typeof(Order.Metadata))]
partial class Order
{
private abstract class Metadata
{
[CustomValidation(typeof(Order), "ValidateOrderStatus")]
public object OrderStatus { get; set; }
}
public static ValidationResult ValidateOrderStatus(
byte? newStatus, ValidationContext context)
{
var stateEntry = (ObjectStateEntry)
context.Items[typeof(ObjectStateEntry)];
if (stateEntry.State == EntityState.Modified)
{
byte? oldStatus = (byte?)stateEntry.OriginalValues["OrderStatus"];
if (oldStatus == (byte?)DataModel.OrderStatus.Fulfilled &&
newStatus != (byte?)DataModel.OrderStatus.Fulfilled)
{
return new ValidationResult(
"Status of fulfilled orders should not be modified",
new string[] { "OrderStatus" });
}
}
return ValidationResult.Success;
}
}
In this example, a custom validation method called ValidateOrderStatus is associated with the OrderStatus property in the metadata class. The validation method first retrieves the ObjectStateEntry instance that contains the Order entity being validated from the Items dictionary of the ValidationContext object. It then checks the current State of the entity and only performs the validation if the entity is Modified. Because the entity state could also be Added, Deleted, Detached, or Unchanged, you only want to check the OrderStatus property when it is appropriate based on your business rules. You also want to access the OriginalValues property only when the original values are actually available; the property throws the InvalidOperationException when the entity state is Added.
Handling DBNull Values
The OriginalValues property of the ObjectStateEntry class returns an object of type DbDataRecord, which is shared by the Entity Framework with classic ADO.NET. Unfortunately, this means that the original null values are returned as objects of type DBNull and the code has to be prepared to handle them accordingly. In particular, this means that you cannot simply cast the original OrderStatus value to type Nullable<Byte> because DBNull values cannot be converted to this type and throw an InvalidCastException.
One workaround for this problem is to store OrderStatus values in variables of type Object and to use the static Object.Equals method to compare them. Because it takes the object type into account, you can safely compare values of type DBNull and Nullable<Byte> for equality. Here is a new version of the ValidateOrderStatus method, which now correctly handles the scenario where the original value of the OrderStatus is DBNull:
public static ValidationResult ValidateOrderStatus(
byte? newStatus, ValidationContext context)
{
var stateEntry = (ObjectStateEntry)
context.Items[typeof(ObjectStateEntry)];
if (stateEntry.State == EntityState.Modified)
{
object oldStatus = stateEntry.OriginalValues["OrderStatus"];
if (object.Equals(oldStatus, (byte)DataModel.OrderStatus.Fulfilled)
&& !object.Equals(newStatus, (byte)DataModel.OrderStatus.Fulfilled))
{
return new ValidationResult(
"Status of fulfilled orders should not be modified",
new string[] { "OrderStatus" });
}
}
return ValidationResult.Success;
}
Although this approach works, accessing values in the weakly typed object form prevents you from taking advantage of the additional validation that compiler could provide for the values in their original (Nullable<Byte>) form. The DbDataRecord object returns values of type DBNull because this class was designed in ADO.NET version 1, which did not support nullable types that were added to the .NET Framework in version 2. Luckily, with lambda expressions and extension methods introduced in version 3 of the .NET Framework, you can bring the DbDataRecord class into the twenty-first century.
Listing 8.5 shows a static class called DbDataRecordExtensions that defines an extension method called Get for the DbDataRecord class. This class is available in the Unleashed.EntityFramework project of the sample solution accompanying this book.
Listing 8.5. DbDataRecord Extensions Methods
using System;
using System.Data.Common;
using System.Linq.Expressions;
namespace Unleashed.EntityFramework
{
public static class DbDataRecordExtensions
{
public static T Get<T>(this DbDataRecord record, Expression<Func<T>> property)
{
string propertyName = ((MemberExpression)property.Body).Member.Name;
object value = record[propertyName];
if (value == DBNull.Value)
return default(T);
else
return (T)value;
}
}
}
The first parameter of the Get method is declared with the keyword this, which allows you to call this static method as if it were an instance method of the DbDataRecord class. The second parameter is a lambda expression that you can use instead of hard-coding the property name as a string. Here’s how to change the ValidateOrderStatus method to take advantage of this:
public static ValidationResult ValidateOrderStatus(
byte? newStatus, ValidationContext context)
{
var stateEntry = (ObjectStateEntry)
context.Items[typeof(ObjectStateEntry)];
if (stateEntry.State == EntityState.Modified)
{
var order = (Order)stateEntry.Entity;
byte? oldStatus = stateEntry.OriginalValues
.Get(() => order.OrderStatus);
if (oldStatus == (byte)DataModel.OrderStatus.Fulfilled)
&& newStatus != (byte)DataModel.OrderStatus.Fulfilled))
{
return new ValidationResult(
"Status of fulfilled orders should not be modified",
new string[] { "OrderStatus" });
}
}
return ValidationResult.Success;
}
Here, the Get extension method uses the () => order.OrderStatus lambda expression to determine the name of the property, OrderStatus, which it passes to the indexer of the DbDataRecord object to retrieve the original property values. If the original value is DBNull, the Get method returns a default value of the property type—a value that an uninitialized variable of that type would have if you tried to access it. In case of the OrderStatus property, whose type is Nullable<Byte>, the default value is null; for a non-nullable type, such as Byte, the default value would have been 0. If, however, the original value retrieved from the DbDataRecord object is not DBNull, the Get method returns the actual value after casting it to the type of the property itself.
The Get extension method offers several advantages. On one hand, it allows you to avoid having to write special logic to handle DBNull values. On the other hand, it allows you to specify properties as strongly-typed lambda expressions as opposed to hard-coded string literals or constants. They are not only easier to write (with the help from IntelliSense in the Visual Studio editor), but if you ever need to rename the property, the compiler ensures that all references are properly updated.
Summary
The System.ComponentModel.DataAnnotations namespace offers a robust validation framework, which allows implementing validation rules declaratively by placing data annotation attributes, or imperatively, by writing code.
The validation framework is fully integrated in Dynamic Data web applications; a helper class, Validator, can be used to integrate validation with other frameworks as well. Version 4.0 of Entity Framework does not support the validation framework out of the box, and additional steps are necessary to extend object context classes to automatically validate entity objects before they are submitted to the database.
Automated testing allows you to improve the quality of your applications without significant additional effort. With integration tests, you begin reaping the benefits of automated testing almost immediately. However, care should be taken to isolate tests and make sure that they can run repeatedly and independently of each other. TransactionScope is the simplest way to isolate integration tests that access the database.
A number of built-in validation attributes is included in the framework out of the box, including attributes for performing required, string length, range, enum, and regular expression checks. Additional validation attributes can be implemented by inheriting from the ValidationAttribute class.
Imperative validation logic can be implemented by placing CustomValidationAttribute on individual properties or entire classes and implementing special validation methods that return ValidationResult objects. Classes can also implement the IValidatableObject interface to validate multiple rules and return multiple validation results.