
Chapter 1. EC2 and CloudFormation Crash Course
Every tool is a hammer
Adam Savage
Launched in 2006, Elastic Compute Cloud (or EC2, as it is universally known) is a core part of AWS, and perhaps its best-known service. It allows customers to rent computing resources by the hour in the form of virtual machines (known as instances) that run a wide range of operating systems. These instances can be customized by users to run any software applications supported by their operating system of choice.
The idea of renting computing resources by the hour goes back to the 1960s, when it was simply not financially feasible for a company or university department to own a dedicated computer (the idea of an individual owning a computer seeming, at that point, to be the stuff of science fiction). This changed as computers became cheaper and more popular, and dedicated, personal computing resources became the norm.
The explosive growth of the consumer internet, and thus of the services and applications that make up the motivation for its ever-increasing use, has helped the pendulum swing back the other way, to the point where being able to elastically increase or decrease your computing resources (and therefore costs) has become a key financial advantage.
In the pre-cloud days, capacity planning required a large amount of time and forward thinking. Bringing new servers online was a multistep process with the potential for delays at every step: ordering hardware from the supplier, waiting for its arrival, visiting the datacenter to unpack and rack the server, and installing and configuring the operating system and software. Renting a virtual private server, while usually quicker than provisioning physical hardware, also had its own set of challenges and potential delays. With the launch of EC2, all of this was replaced by a single API call.
Particularly in the consumer-driven web application market, it is possible for new companies to experience month after month of exponential growth. This can lead to service interruption as system administrators struggle valiantly to ensure that the demands of their users do not surpass their supply of computing power. This process is often one of the key factors in the success of young companies and also presents one of their most acute challenges—if you do not have enough computing capacity, your users will quickly tire of seeing error pages and move on to a competitor. But oversupply can be equally terminal, as you will be paying for unused computing capacity. This contributed to the failure of many companies in the 2000 dot-com bubble: they spent a huge amount of money in capital expenses building datacenter capacity to support users who never materialized.
Note
Amazon AWS launches new services, announces new features, or extends the availability of existing services to new regions nearly daily. Keeping up with this firehose of announcements is almost a full time job. The humorous and somewhat snarky summaries delivered weekly by Corey Quinn in his Last Week in AWS newsletter are a succint update that distills the most important news of the previous week. A greater level of detail (including more bad jokes!) is available in his merciless podcast series.
EC2 provides a particularly interesting approach to solving this problem. As instances can be launched and terminated automatically based on your current traffic levels, it is possible to dynamically design your infrastructure to operate at (for example) 80% utilization. Large upfront hardware purchases are then replaced by a much smaller, ongoing operational expense exactly matching your capacity needs.
Flexibility is at the heart of the AWS product offering, and this flexibility also extends to the way one interacts with AWS. For most people, the first steps with EC2 are taken via the Management Console, which is the public face of EC2. This web application lets you control most aspects of your infrastructure, although some recently introduced features may initially require the use of API calls or command-line tools. Historically, Amazon has usually provided command-line tools and API access to new features before they appear in the Management Console.
At the lowest level, AWS is “simply” an HTTP-based API. You can submit a request asking for 10 t3a.micro instances, the API request is processed, and 10 instances are launched. The Management Console is merely another way of interacting with this API.
This chapter uses all the available methods provided by AWS to provision EC2 instances. In nearly all cases the methods are interchangeable, but the CLI is more broadly used for automating tasks. If a feature specifically requires you to use the command-line tools, we will indicate this. If you are already familiar with AWS, you should feel free to ignore our recommendations and use whichever method you feel most comfortable with.
AWS Regions and Availability Zones
AWS services operate in multiple geographic regions around the world. At the time of this writing, there are 21 public AWS regions, each of which is further divided into 63 availability zones. This geographic disparity has two main benefits: you can place your application resources close to your end users for performance or legal reasons, and you can design your application so that it is resilient to loss of service in one particular region or availability zone. AWS provides the tools to build automatic damage control into your infrastructure, so if an availability zone fails, more resources can be provisioned in the other availability zones to handle the additional load.
Each availability zone (AZ) is located in a physically separate datacenter within its region. There are three datacenters in or around Dublin, Ireland, that make up the three availability zones in the EU West 1 region—each with separate power and network connections. In theory, this means that an outage in one AZ will not have any effect on the other AZs in the region. In practice, however, an outage in one AZ can trigger a domino effect on its neighboring AZs, and not necessarily due to any failing on Amazon’s part.
Availability Zone names don’t map to the same datacenter across accounts. Meaning that us-east-1a as defined by Federico’s AWS account may or may not correspond to the same datacenter as seen by Mike’s account. Or, as JB likes to say, “my AZ is not your AZ”. Zone names appear to be randomly assigned to balance account loads, as most users inevitably start by creating resources in the first zone of their region of choice.
Tip
The Resource Access Manager view in the AWS console provides a shared understanding of which actual datacenters different accounts are using. Zone IDs listed for a region provide a consistent way to identify resources across accounts. The equivalent ZoneId information can be obtained from the aws ec2 describe-availability-zones command when specifying the appropriate --region. Using zone IDs can greatly simplify sharing resources across multiple accounts.
Consider a well-architected application that, in the event of an AZ failure, will distribute traffic to the remaining AZs. This will result in new instances being launched in the AZs that are still available. Now consider what happens when hundreds of well-architected applications all failover at the same time—the rush for new instances could outstrip the capability of AWS to provide them, leaving some applications with too few instances.
This is an unlikely event—although AWS has service outages like any other cloud provider, deploying your application to multiple AZs will usually be sufficient for most use cases. To sustain the loss of a significant number of AZs within a region, applications must be deployed to multiple regions. This is considerably more challenging than running an application in multiple AZs.
Chapter 8 demonstrates an example application that can survive the loss of one or more AZs, while reserved and spot instances (see “Processing Power”) can provide improved economics for the sprawling deployments required to protect from local outages.
Warning
A final reminder that AWS services are not uniformly available across all regions. New regions are often launched with a subset of services representing the latest technology, and legacy offerings may not be hosted yet (or ever) in the newest regions-validate deployment plans involving regions you are not familiar with against the newest version of the official Region Table.
What Is an Instance?
At the simplest level, an instance can be thought of as a virtual server, the same as you might rent on a monthly basis from a virtual private server (VPS) provider. Indeed, some people are using EC2 in exactly the same way as they would a VPS. While perfectly serviceable in this respect, to use it in this way ignores several interesting features and technologies that can make your job a lot more convenient.
Amazon Machine Images (AMIs) are the main building blocks of EC2. They allow you to configure an instance once (say, installing Apache or Nginx) and then create an image of that instance. The image can be used to launch more instances, all of which are functionally identical to the original. Of course, some attributes—such as the IP address or instance ID—must be unique, so there will be some differences.
Instance Types
EC2 instances come in a range of sizes,
referred to as instance types, to suit various use cases. Instance types differ wildly in the amount of resources allocated to them and, correspondingly, their pricing. The M6g.medium instance type has 4.0 GB of memory and 1 virtual CPU core, whereas its significantly bigger brother C5.18xlarge has 144 GB of memory and 72 virtual CPU cores. Each virtual CPU is a hyperthread of an Intel Xeon core in the C5 instance class, or a dedicated core of an Amazon Graviton2 ARM processor in the case of the M6g class. AMD chips have also recently returned to the forefront of EC2 offerings, with instance types like the very cost-effective t3a.micro (1 GB or memory, 2 vCPUs).
For most of the examples in the book, we will use the t3.micro instance type, among the smaller and one of the cheapest instance types suitable for any operating system choice, making it ideally suited to our demonstrations.

Figure 1-1. Using EC2instances.info to compare the type options available in class m6g
Note
The sheer number and extensive variety of instance types available on EC2 makes the head spin. How to choose even where to start? A convenient resource is the Easy EC2 Instance Comparison site, a convenient interface to narrow down your selection based on hardware capabilities and other properties. The tool defaults to the us-east region, but any AWS region can be selected, enabling accurate cost comparisons as well as filtering older instance types not available in the newer regions.
In production, picking the right instance type for each component in your stack is important to minimize costs and maximize performance, and benchmarking can be the key when optimizing this decision.
You want to invest a few minutes doing your due diligence selecting the appropriate instance type as you design an EC2 workload, but you also need to be wary of excessive optimization. While supplying a workload with unnecessary CPU cores or RAM will just pad your monthly AWS bill, pursuing the perfect fit is bound to run into limits well outside the realm of simple benchmarking.
Tip
In Right Sizing Your Instances Is Nonsense, the irrepressible Corey Quinn makes a compelling case for the contrarian view that other factors can easily outclass the hardware cost ratio, such as the compatibility of older releases of Linux with the new hypervisor required by recent instance classes, or a software vendor requiring dated library versions as part of their package. Upgrade problems are compounded by cost dynamics when an existing EC2 Instance Savings plan committment cannot be readily converted to the desired instance class. Right-sizing an existing workload will be beneficial, but it is often not easy.
Processing Power
EC2, along with the rest of AWS, is built using increasingly customized hardware running Amazon’s software to provide the services and APIs. Because Amazon adds this hardware incrementally, several hardware generations are in service at any one time.
Warning
When it comes to discussing the underlying hardware that makes up the EC2 cloud, Amazon used to play the cards close to its chest and reveal relatively little information about the exact hardware specifications. This led to the creation of a dedicated compute unit:
One EC2 Compute Unit provides the equivalent CPU capacity of a 1.0-1.2 GHz 2007 Opteron or 2007 Xeon processor.
It is easy to encounter this metric in older AWS benchmarks. Amazon now openly identifies what hardware underlies the EC2 compute layer, and these abstract units are obsolete and no longer in use.
Amazon provides a rather vast selection of instance types, the current generation of which is described at the EC2 Instance Types page. The previously mentioned t3a.micro instance type therefore refers to a third generation (3) general-purpose burstable performance instance (t), backed by and AMD processor (a). An immediate update of already running applications is generally not required as older generations remain available for provisioning, with their original functionality intact. We advise operators to adopt instances of the latest generation whenever designing a new or updated application, so as to benefit from the increased capabilities of newer hosting hardware. Amazon’s relentless drive to reduce costs is also often reflected in the improved pricing offered for newer instance classes.
Few EC2 instance types have ever been discontinued in almost 15 years, including cc1, cg1, and hi1. This record is made possible by market forces: as newer instance types become available, their significantly better price/performance ratio induces a user migration away from the previous generation. A reduced demand base in turn allows Amazon to continue to supply those deprecated instance types without having to add capacity with old hardware that may be unavailable. Eventually, AWS reaches out to the few remaining users of the type to help them migrate to a newer instance type-no official deprecation announcements are made.
Tip
Older instance types are, however, not available in the newer AWS regions they predate—for example, the first generation to be deprecated, cc1, was never found in the newer region ap-northeast-2 hosted in Seoul, Korea. If our spirited advice and the cost savings produced by migrating to newer instance generations are not sufficient to entice you to regularly update your instance selection, perhaps your global expansion plans will.
AWS machine images may make use of either of the two virtualization types originally supported by the Xen hypervisor: paravirtualized or hardware virtual machine (HVM). Recent instance classes use Amazon’s own Nitro hypervisor under the hood, a lightweight, speed-optimized variant of KVM which uses the HVM-style format in combination with NVMe and SR-IOV drivers. It is not necessary to be conversant in the finer differences of virtualization technology1 to make effective use of AWS, but the two approaches present boot-time differences to the guest OS environment. A given Linux machine image will only support booting one virtualization type as a result, a requirement easily met by filtering any image search with the appropriate virtualization type.
Amazon recommends using HVM virtualization on current-generation AMIs. Where that approach is not suitable, it becomes necessary to determine what virtualization type is supported by the older generation of a specific instance type. This is quickly accomplished by launching a test HVM instance from the AWS CLI and watching for a helpful error message. The AWS documentation also provides insight into what virtualization type is supported by what older instance type.
Different combinations of CPU, memory, network bandwidth, and even custom hardware differentiate AWS instance types. There are forty-two instance type classes in the current generation at the time of writing,
including general
purpose (the m4, m5, m5a, m5n, m5zn, m6g, a1, mac), burstable performance (t2, t3, t3a, t4g),
compute optimized (c4, c5, c5a, c5n, c6),
memory optimized (the r5, r6, x2),
storage optimized (i3 for random I/O performance, d3 for sequential I/O, h1 for aggregate throughput
or d2 for cost), and a range of accelerated types
(p2 with GPUs, p3, p4, and inf1 with dedicated machine learning tensor cores, g3 and g4 with advanced graphics, and f1 with programmable FPGA cores). These in turn include a multitude of types with resource allotments of increasing size, bringing the total number of choices we can select from to above three hundred. This wide range includes a number of bare-metal options (the .metal subtype), hosting workloads as varied as macOS (mac1.metal) and SAP HANA (u-24tb1.metal with 24 TB of memory, the instance type with most RAM yet).
With such dizzing variety, the operator configuring a new workload can find solace in limits: unless a very specific need (like hardware acceleration) is specified, one will do well to remember that very high CPU or greedy memory requirements characterize legacy workloads. Modern workload design scales out over multiple nodes, not up within a single instance’s specs.
Note
Jeff Barr of Amazon has published an interesting timeline of EC2’s instance generations. Nicolas Rollier hosts a graphic rendering of this history on GitHub.
Taking a scientific approach to benchmarking is the only way to really be sure you are using the right instance type. AWS makes it really simple to run the very same workload configuration with a succession of different instance types, considerably simplifying this task. The most common approach in the AWS user community is to start with an instance type considered high-CPU for the workload under consideration. While running top, drive the CPU to 100% using your application’s load generator of choice. Now examine memory use: if you observe the instance running out of
memory before the CPU is at full throttle, switch to a higher-memory instance type. Continue this process until you achieve a reasonable balance.
Alongside fixed-performance instance classes, including the M5, C5, and R5 types, EC2 offers burstable performance instances like the t2 and t3 classes. Burstable performance instances generally receive a CPU performance baseline but can “burst” above this limit for a time. Bursting is governed by CPU credits that are accumulated when the instance runs without its full allotment of CPU. A CPU credit represents use of a full CPU core for one minute.
A practical example will illustrate the accounting mechanism EC2 employs: the t3.micro instance type allocates two virtual CPUs to your cloud instance, with twelve CPU credits earned each hour, representing a 20% share of a virtual CPU core. Let’s assume our workload is a web server, often idling while waiting for requests. If the CPU load falls below the allocated 20% baseline, CPU credits not spent are added to that instance’s credit up to a maximum of 288, an instance-type specific limit representing 24 hours of CPU credits. If a recently-launched instance does not yet have a credit balance to spend (or has run out of credits), in unlimited mode it will accrue an additional flat-rate charge per CPU hour-this is the t3 class’s default behavior.
Burstable performance is particularly useful for workloads that do not consistently use their full share of the CPU, but benefit from having access to additional, fast CPUs when the occasion arises—applications include small databases, web servers, and development systems.
Specific instance types may provide the latest advanced features found in Intel hardware, including on-chip support for AES encryption and the Advanced Vector Extensions instruction set. The P3 instance type is currently the most prominent example of enhanced compute support, featuring 2496 NVIDIA K80 cores and 12 GB of GPU memory. Advanced compute options are rapidly evolving; their most recent iteration is documented in the instance types page, which we recommend you review often.
EC2 instances can be purchased in three ways. Allocated by the hour and requiring no upfront commitment, on-demand instances are the default and are used exclusively throughout this book. Reserved instances represent a prepaid commitment on the part of a customer, which is usually rewarded by AWS with very steep discounts, up to 75% of on-demand pricing. Spot instance pricing requires no upfront commitment, and their pricing and availability fluctuates according to the supply and demand of EC2 compute capacity. The customer may define a maximum hourly price not to be exceeded, and EC2 will automatically shut those instances down if their spot pricing tops the set threshold.
Tip
At the end of 2019, AWS introduced Savings Plans pricing, a flexible model providing deeply discounted rates for EC2, Lambda and Fargate usage in exchange for a simple one or three year committment to spend at least a certain amount hourly on those services.
Plans come in two varieties: the Compute Savings Plan offers discounts up to 66% and allows AWS customers to move workloads across instance classes and even services, the dollar committment applying to EC2, Lambda and Fargate. The more restrictive EC2 Savings Plan instead commits the customer to specific instance classes in a pre-determined region in exchange for even higher discounts, reaching 72% off on-demand pricing.
Storage
There are two options when it comes to virtual disk storage for your instances: instance storage (also known as ephemeral storage) and Elastic Block Store (or EBS). Both are simply block storage devices that can be attached to instances. Once attached, they can be formatted with your operating system’s tools and will act like a standard disk. AWS storage comes in two flavors: magnetic disks and solid-state drives (SSDs). SSDs provide higher read and write performance when compared to magnetic disks, but the cost is slightly higher.
There are some key differences between instance storage and EBS. Instance storage is directly attached to the physical host that runs your instance, whereas EBS is attached over the network. This has implications in terms of disk latency and throughput, so we recommend performing another series of benchmarks to see which is best if your application is sensitive to latency or I/O jitter.
I/O speeds are not the only difference—EBS has features that make it preferable to instance storage in nearly all usage scenarios. One of the most useful is the ability to create a snapshot from an EBS. A snapshot is a copy of an EBS volume at a particular point in time. Once you have created a snapshot, you can then create additional EBS volumes that will be identical copies of the source snapshot. You could, for example, create a snapshot containing your database backups. Every time a new instance is launched, it will have a copy of the data ready for use. EBS snapshots form the backbone of many AWS backup strategies.
When an instance is terminated, any data stored on instance storage volumes is lost permanently. EBS volumes can persist after the instance has been terminated. Given all of the additional features, using EBS volumes is clearly preferable except in a few cases, such as when you need fast temporary storage for data that can be safely discarded.
Multiple volumes (of either type) can be attached to an instance, leading to pretty flexible storage configurations. The Block Device Mapping facility allows multiple volumes to be associated with an instance at boot time. It is even possible to attach multiple volumes to an instance and build a software RAID array on them—an advantage of volumes appearing as block storage devices to the operating system.
Tip
The disk_setup and mounts modules of Cloud-init allow
customization of all disks associated with an instance upon boot, including partitioning and formatting disks as well as configuring mount points in /etc/fstab. The official documentation also sheds light on the details of how many public clouds can initialize their instance storage using Cloud-init.
In June 2012, AWS began offering SSDs as a higher-performance alternative to magnetic storage, and over time introduced multiple options with different performance levels and cost. Some instance types now include an SSD-backed instance store to deliver very-high random I/O performance, with types I2 and R3 being the first to support TRIM extensions. Instance types themselves have evolved to include high-I/O instances (type I3), aimed at delivering high IOPS from up to 8 local SSD drives, while dense storage instances (type D3) offer the lowest price per-disk throughput in EC2 and balance cost and performance, using 24 local magnetic drives.
EBS Magnetic and SSD volumes are currently limited to 16 TB in size, limits easily exceeded by dense storage (d3) instances, which can boot with 48 TB of local disk storage. Whereas EBS volumes can be provisioned at any time and in arbitrary configurations, the number and size of available instance store volumes varies with instance type, and can only be attached to an instance at boot time. In addition, EBS volumes can be dynamically resized, which is also used to redefine their performance at runtime.
Tip
Instances should be managed with automation, and are usually not repaired manually by human operators. Nevertheless, we find that the time-old question “what is taking all that space?” is still with us on the public cloud, most often as a post-mortem question on a retired instance. Yoran Heling’s ncdu is a most convenient resource to rapidly assess an instance’s storage footprint. In Figure 1-2, we observe that the 2 GB size of Ubuntu 20.04’s image is dominated by system contents in /usr and some containerized applications pre-installed in /snap.

Figure 1-2. ncdu can tally a 2 GB solid-state EBS filesystem in under one second
EBS SSD options include a number of performance flavors. General-purpose SSD volumes (gp2) are provisioned with 3 IOPS per GB, with burst performance reaching 3,000 IOPS for extended periods, while gp3 volumes can provision IOPS independent of capacity. Provisioned IOPS SSD volumes allow the user to define the desired level of performance, up to 64,000 IOPS and 1000 MB/s of throughput. A less costly option is offered by the EBS-optimized instances
, which include dedicated EBS bandwidth between 500 and 4,000 Mbps depending on the specific instance type. At the time of writing M6g, M5, M4, C6g, C5, C4, R6g, P3, P2, G3, and D2 instance types are launched as EBS-optimized by default, with no additional charges. EBS-optimized instances use a tuned configuration stack requiring corresponding support on the machine image’s part for optimal performance (see “Finding Ubuntu Images” for details on locating optimized images).
Long-term storage options are best supported by the S3 service, but a block storage option is available through Cold HDD EBS volumes. Backed by magnetic drives, Cold HDD volumes offer the lowest cost per GB of all EBS volume types, and still provide enough performance to support a full-volume scan at burst speeds. EBS also supports native at-rest encryption that is transparently available to EC2 instances and requires very little effort on the administrator’s part to deploy and maintain. EBS encryption has no IOPS performance impact and shows very limited impact on latency, making it a general-purpose architectural option even when high security is not strictly required.
AWS storage options also include EFS, a scalable, cloud-native implementation of NFS. While not suitable as a boot device, EFS filesystems can be mounted and shared by multiple instances, even across regions, unlike filesystems built on a block EBS device. Just as is the case for some provisioned IOPS volumes, throughput and IOPS of EFS shares scale with the size of a filesystem and can provide burst performance to accomodate the quirky performance needs of file workloads-EFS can support performance over 10 GB/sec and peaks at 500000 IOPS.
Shared persistent storage across cloud-native workloads should rely on an object store-Amazon S3 in the case of AWS. Period. Shared filesystems are the telltale sign of legacy applications migrated into a cloud datacenter, and that is the bread-and-butter use case for EFS: the lift-and-shift transfer of an older application designed to share data over NFS. EFS can help you shoehorn a legacy workload into EC2, but that a cloud workload does not make. If you are to carry out such a migration, our advice is to make sure the effort required does not exceed that of redesigning the application with a modern architecture.
Networking
At its simplest, networking in AWS is straightforward—launching an instance with the default networking configuration will give you an instance with a public IP address. Many applications will require nothing more complicated than enabling SSH or HTTP access. At the other end of the scale, Amazon offers more-advanced solutions that can, for example, give you a secure VPN connection from your datacenter to a Virtual Private Cloud (VPC) within EC2.
At a minimum, an AWS instance has one network device attached. The maximum number of network devices that can be attached depends on the instance type.
Running ip addr show on your instance will show that it has a private IP address in the default 172.31.0.0/16 range. Every instance
has a private IP and may have a public IP; this can be configured at launch time or later, with the association of an Elastic-IP address. Elastic IP addresses remain associated with your account, and can be carried between instances.
Warning
AWS accounts created after December 2013 no longer have access to the legacy EC2-classic networking model. This book covers the current EC2-VPC networking model exclusively.
Amazon Virtual Private Cloud enables you to provision EC2 instances in a virtual network of your own design. A VPC is a network dedicated to your account, isolated from other networks in AWS, and completely under your control. You can create subnets and gateways, configure routing, select IP address ranges, and define its security perimeter—a series of complex tasks that are bypassed by the existence of the default VPC. The default VPC includes a default subnet in each availability zone, along with routing rules, a DHCP setup, and an internet gateway (Figure 1-3). The default VPC enables new accounts to immediately start launching instances without having to first master advanced VPC configuration, but its security configuration will not allow instances to accept connections from the internet until we expressly give our permission, by assigning our own security group settings.

Figure 1-3. The default VPC in the newest rendition of the Console UI
The default security group allows all outbound traffic from instances to reach the internet, and also permits instances in the same security group to receive inbound traffic from one another, but not from the outside world. Instances launched in the default VPC receive both a public and a private IP address. Behind the scenes, AWS will also create two DNS entries for convenience.
For example, if an instance has a private IP of 172.31.16.166 and a public IP of 54.152.163.171, their respective DNS entries will be ip-172-31-16-166.ec2.internal and ec2-54-152-163-171.compute-1.amazonaws.com. These DNS entries are known as the
private hostname and
public hostname.
It is interesting to note that Amazon operates a split-view DNS system, which means it is able to provide different responses depending on the source of the request. If you query the public DNS name from outside EC2 (not from an EC2 instance), you will receive the public IP in response. However, if you query the public DNS name from an EC2 instance in the same region, the response will contain the private IP:
# From an EC2 instance $dig ec2-54-152-163-171.compute-1.amazonaws.com +short172.31.16.166 # From Digital Ocean $dig ec2-54-152-163-171.compute-1.amazonaws.com +short54.152.163.171
The purpose of this is to ensure that traffic does not leave the internal EC2 network needlessly. This is important as AWS has a highly granular pricing structure when it comes to networking, and Amazon makes a distinction between traffic destined for the public internet and traffic that will remain on the internal EC2 network. The full breakdown of costs is available on the EC2 Pricing page.
Warning
Resource limits become critical when it comes to networking. In particular, AWS accounts are limited by default to five Elastic IP addresses per region, and five VPCs. Many other networking-specific VPC limits may apply, including ACL rules, security groups, and routes..
If two instances in the same availability zone communicate using their private IPs, the data transfer is free of charge. However, using their public IPs will incur internet transfer charges on both sides of the connection. Although both instances are in EC2, using the public IPs means the traffic will need to leave the internal EC2 network, which will result in higher data transfer costs.
By using the private IP of your instances when possible, you can reduce your data transfer costs. AWS makes this easy with their split-horizon DNS system: as long as you always reference the public hostname of the instance (rather than the public IP), AWS will pick the cheapest option.
Most of the early examples in the book use a single interface with default DNS arrangements, but we will look at more sophisticated topologies in later chapters.
Note
It is sometimes useful to identify traffic coming from Amazon’s IP addresses. The range of addresses served by AWS is ever changing yet readily accessible through the ip-ranges file. Let’s apply what we learned in earlier sections to manipulate the data in the file to generate specific answers:
$curl -O https://ip-ranges.amazonaws.com/ip-ranges.json &> /dev/null# Find the IP address ranges served by us-east-1 $jq '.prefixes[] | select(.region=="us-east-1")' < ip-ranges.json{ "ip_prefix": "3.2.0.0/24", "region": "us-east-1", "service": "AMAZON", "network_border_group": "us-east-1-iah-1" } { "ip_prefix": "15.230.137.0/24", "region": "us-east-1", [ output truncated ] # Find the IP address ranges used by EC2 $jq -r '.prefixes[] | select(.service=="EC2") | .ip_prefix' < ip-ranges.json3.5.140.0/22 35.180.0.0/16 3.2.0.0/24 [ output truncated ]
Launching Instances
The most useful thing one can do with an instance is launch it, which is a good place for us to start. As an automation-loving sysadmin, you will no doubt quickly automate this process and rarely spend much time manually launching instances. Like any task, though, it is worth stepping slowly through it the first time to familiarize yourself with the process.
Launching from the Management Console
Most people take their first steps with EC2 via the Management Console, which is the public face of EC2. Our first journey through the Launch Instance Wizard will introduce a number of new concepts, so we will go through each page in the wizard and take a moment to look at each of these in turn. Although there are faster methods of launching an instance, the wizard is certainly the best way to familiarize yourself with related concepts.
Launching a new instance of an AMI
To launch a new instance, first log in to Amazon’s web console, open the EC2 section, and click Launch Instance. This shows the first in a series of pages that will let us configure the instance options. The first of these pages is shown in Figure 1-4.

Figure 1-4. AMI selection
As described earlier, Amazon Machine Images (AMIs) are used to launch instances that already have the required software packages installed, configured, and ready to run. Amazon provides AMIs for a variety of operating systems, and the Community and Marketplace AMIs provide additional choices. For example, Canonical provides officially supported AMIs for various versions of its Ubuntu operating system. Other open source and commercial operating systems are also available, both with and without support. The AWS Marketplace lets you use virtual appliances created by Amazon or third-party developers. These are Amazon Machine Images already configured to run a particular set of software; for example, many variations of AMIs running the popular WordPress blogging software exist. While some of these appliances are free to use (i.e., you only pay for the underlying AWS resources you use), others require you to pay an additional fee on top of the basic cost of the Amazon resources.
If this is your first time launching an instance, the My AMIs tab will be empty. Later in this chapter, we will create our own custom AMIs, which will subsequently become available in this tab. The Quick Start tab lists several popular AMIs that are available for public use.
Click the Select button next to the Amazon Linux 2 AMI, while leaving the architecture selector on its x86 default. This presents you with a selection of instance types to choose from (Figure 1-5).
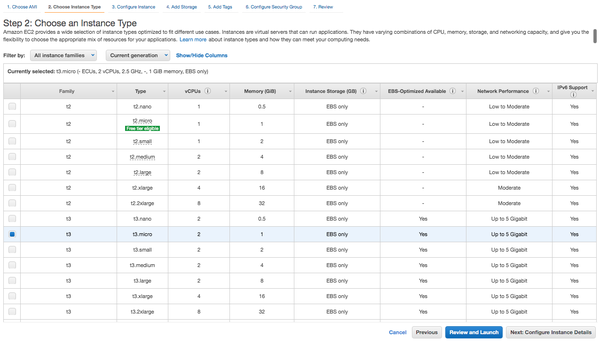
Figure 1-5. Selecting the instance type
EC2 instances come in a range of shapes and sizes to suit many use cases. In addition to offering increasing amounts of memory and CPU power, instance types also offer differing ratios of memory to CPU. Different components in your infrastructure will vary in their resource requirements, so it can pay to benchmark each part of your application to see which instance type is best for your particular needs. The instance family selector at the top of the web page can help reduce clutter by narrowing down selection to a specific instance class. The Instance Type Explorer can provide some higher level insight to start your search from. You can also find useful community-developed resources to quickly compare instance types at EC2instances.info.
The t2.micro instance
type is part of Amazon’s free usage tier in the us-east-1 region. New customers can use 750 instance-hours free of charge each month of the Linux and Windows instance types labeled “free tier elegible” in the wizard. This varies by region, as Amazon has been generously upgrading the free tier to the more powerful t3.micro. After exceeding these limits, normal on-demand prices will apply.
Select the checkbox next to t3.micro and click Review and Launch to move directly to the final screen, taking a shortcut from step 2 to step 7. Do feel free to use the slower t2.micro type if you have free credits to spend. Now you are presented with the review screen, which gives you a chance to confirm your options before launching the instance.
After reviewing the options, click Launch to spin up the instance. At the time of this writing, the wizard’s Quick Start process will automatically create a
convenient launch-wizard-1 security group granting the instance SSH access from the internet at large. This is not the default security group previously discussed, and this helpfulness is not present when using the AWS CLI or API interfaces to create
instances (Figure 1-6).

Figure 1-6. The Review screen (the prominent security warning is alerting you that SSH access has been opened with a default security group)
Key pairs
After clicking Launch, one last screen presents the available key pairs options (Figure 1-7).

Figure 1-7. Key pair selection
Key pairs provide secure access to your instances. To understand the benefits of key pairs, consider how we could securely give someone access to an AMI that anyone in the world can launch an instance of. Using default passwords would be a security risk, as it is almost certain some people would forget to change the default password at some point. Amazon has implemented SSH key pairs to help avoid this eventuality. Of course, it is possible to create an AMI that uses standard usernames and passwords, but this is not the default for AWS-supplied AMIs.
All AMIs have a default user: when an instance is booted, the public part of your chosen key pair is copied to that user’s SSH authorized keys file. This ensures that you can securely log in to the instance without a password. In fact, the only thing you need to know about the instance is the default username and its IP address or hostname.
This also means that only people with access to the private part of the key pair will be able to log in to the instance. Sharing your private keys is against security best practices, so to allow others access to the instance, you will need to create additional user accounts and configure them with passwords or (better yet) SSH authorized keys.
Note
The name of the default user varies between AMIs. For example, Amazon’s own AMIs use ec2-user, whereas Ubuntu’s official AMIs use ubuntu.
If you are unsure of the username, one trick you can use is to try to connect to the instance as root. The most friendly AMIs present an error message informing you that root login is disabled, and letting you know which username you should use to connect instead.
Changing the default user of an existing AMI is not recommended, but can be easily done. The details of how to accomplish this have been documented by Eric Hammond of Alestic. The following table enumerates default usernames for most popular Linux distributions:
| Distribution | Default Username |
|---|---|
| Amazon Linux | ec2-user |
| Ubuntu | ubuntu |
| Debian | admin |
| RHEL | ec2-user (since 6.4),
root (before 6.4) |
| CentOS | root |
| Fedora | ec2-user |
| SUSE | root |
| FreeBSD | ec2-user |
| BitNami | bitnami |
You can create a new SSH key pair through the EC2 Key Pairs page in the AWS Management Console—note that key pairs are region-specific, and this URL refers to the US East 1 region. Keys you create in one EC2 region cannot be immediately used in another region, although you can, of course, upload the same key to each region instead of maintaining a specific key pair for each region. After creating a key, a .pem file will be automatically downloaded.
Alternatively, you can upload the public part of an existing SSH key pair to AWS. This can be of great help practically because it may eliminate the need to add the -i /path/to/keypair.pem option to each SSH command where multiple keys are in use (refer
to ssh-agent’s man page if you need to manage multiple keys). It also means that the private part of the key pair remains entirely private—you never need to upload this to AWS, it is never transmitted over the internet, and Amazon does not need to generate it on your behalf, all of which have security
implications.
Tip
Alestic offers a handy Bash script to import an existing public SSH key into each region.
Please note that EC2 does not accept the use of deprecated DSA keys. Imported keys need to be generated for the RSA algorithm.
From the Key Pairs screen in the launch wizard, you can select which key pair will be used to access the instance, or to launch the instance without any key pair. You can select from your existing key pairs or choose to create a new key pair. It is not possible to import a new key pair at this point—if you would like to use an existing SSH key that you have not yet uploaded to AWS, you will need to upload it first, just proceed following the instructions outlined on the EC2 Key Pairs page.
Once you have created a new key pair or imported an existing one, click “Choose from your existing Key Pairs,” select your key pair from the drop-down menu, and continue to the next screen. You have now completed the last step of the wizard—click Launch Instances to create the instance.
Tip
If you are a Windows user connecting with PuTTY, you will need to convert this to a PPK file using PuTTYgen before you can use it. To do this, launch PuTTYgen, select Conversions → Import Key, and follow the on-screen instructions to save a new key in the correct format. Once the key has been converted, it can be used with PuTTY and PuTTY Agent.
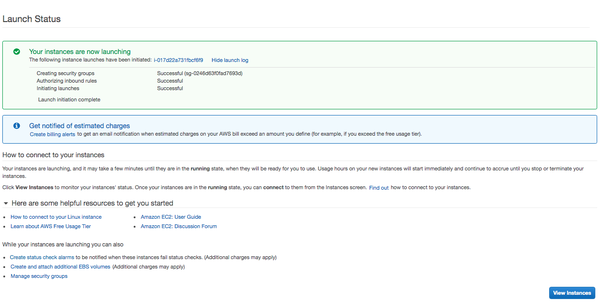
Figure 1-8. The expanded Launch Log details confirm a successful instance launch
Waiting for the instance
Phew, we made it. Launching an instance can take a few seconds, depending on the instance type, current traffic levels on AWS, and other factors. The confirmation page includes launch status information that can be expanded by clicking View Launch Log (Figure 1-8).
The Instances page of the Management Console shows the status of your new instance, which can be reached directly by clicking the instance ID on the confirmation page. Initially, this will
be pending, while the instance is being created on the underlying physical hardware. Once the instance has been created and has begun the boot process, the page will show
the running state. This does not mean your instance is servicing requests or ready for you to log in to, merely that the instance has been created.
Selecting an instance in the Management Console (Figure 1-9) will show you its public DNS name, as well as more detail about the settings and status of the instance. At this point, you can try to SSH to the public hostname. If the connection fails, it means SSH is not yet ready to accept connections, so wait a moment and try again. Once you manage to log in to the instance, you will see a welcome screen specific to the AMI you launched.
Tip
If you are not already familiar with SSH, you will need to learn in a hurry. The Connect button at the top of the instance page will provide you with all the essentials to get started.
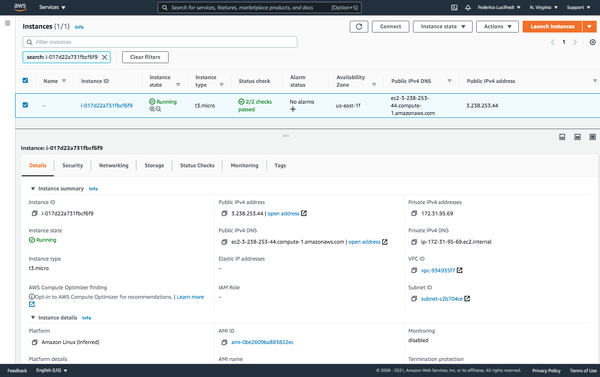
Figure 1-9. The instance details view in the AWS Console
Querying information about the instance
Now that you have an instance, what can you do with it? The answer is—anything you can do with an equivalent Linux server running on physical hardware. Later chapters demonstrate some of the more useful things you can do with EC2 instances. For now, let’s take a look at the ec2 metadata tools, which are included on most well-designed AMIs.
Warning
In the infancy of AWS, EC2 had no real style guide; the question of how to name something was up to the developer. A few different but equivalent tools parsing instance metadata appeared: ec2metadata in the case of Ubuntu’s, and ec2-metadata in the case of Amazon Linux’s variant.
ec2metadata is installed by default in all official Ubuntu AMIs, and is found in the cloud-utils package for remote environments.
The ec2-metadata tool is useful for quickly
accessing the metadata attributes of your instance: for example, the instance ID, or the ID of the AMI from which this instance was created. Running ec2-metadata without arguments will display all available metadata.
If you are interested in specific metadata attributes, you can read the values one at a time by passing the name of the attribute as a command-line option. For example:
$ec-2metadata --instance-idinstance-id: i-017d22a731fbcf6f9 $ec2-metadata --ami-idami-id: ami-0be2609ba883822ec
This is useful if you are writing shell scripts that need to access this information. Rather than getting all the metadata and parsing it yourself, you can do this to import values into a shell script:
#! /bin/bash
INSTANCE_ID=$(ec2-metadata --instance-id | cut -f2 -d' ')
AMI_ID=$(ec2-metadata --ami-id | cut -f2 -d' ')
echo "The instance $INSTANCE_ID was created from AMI $AMI_ID"
Note
Every instance downloads its metadata from the following URL:
http://169.254.169.254/latest/meta-data/<attribute_name>
So to get the instance ID, you could request the URL http://169.254.169.254/latest/meta-data/instance-id.
This URL is accessible only from within the instance, while the IP address maps to the hostname http://instance-data, which is easier for users to remember. See AWS’s Documentation for full details on instance metadata.
If you want to query the metadata from outside the instance, you will need to
use the aws ec2 describe-instances command.
Terminating the instance
Once you have finished testing and exploring the instance, you can terminate it. In the Management Console, right-click the instance and select Terminate Instance.
Next, we will look at some of the other available methods of launching instances.
Tip
Since early 2013, Amazon has supplied operators with a mobile app interface to the AWS Management Console with versions supporting both iOS and Android devices. After multiple updates and enhancements, the app has become a reliable tool for administrators who need a quick look at the state of their AWS deployment while on the move.
The app’s functionality is not as comprehensive as the web console’s, but it showcases remarkable usability in its streamlined workflows (see Figure 1-10 for an example), and operators enjoy the quick access to select functionality it provides for over 15 services. Some users now even pull up their mobile phone to execute certain tasks rather than resorting to their trusted terminal!

Figure 1-10. Three side-by-side views of the AWS console mobile app
Launching with Command-Line Tools
If you followed the steps in the previous section, you probably noticed a few drawbacks to launching instances with the Management Console. The number of steps involved and the variety of available options engender complex documentation that takes a while to absorb. This is not meant as criticism of the Management Console—EC2 is a complex beast, thus any interface to it requires a certain level of complexity. Because AWS is a self-service system, it must support the use cases of many users, each with differing requirements and levels of familiarity with AWS itself. By necessity, the Management Console is equivalent to an enormous multipurpose device that can print, scan, fax, photocopy, shred, and collate.
This flexibility is great when it comes to discovering and learning the AWS ecosystem, but is less useful when you have a specific task on your to-do list that must be performed as quickly as possible. Interfaces for managing production systems should be streamlined for the task at hand, and not be conducive to making mistakes.
Documentation should also be easy to use, particularly in a crisis, and the Management Console does not lend itself well to this. Picture yourself in the midst of a downtime situation, where you need to quickly launch some instances, each with different AMIs and user data. Would you rather have to consult a 10-page document describing which options to choose in the Launch Instance Wizard, or copy and paste some commands into the terminal?
Fortunately, Amazon gives us precisely the tools required to do the latter. The EC2 command-line tools can be used to perform any action available from the Management Console, in a fashion that is much easier to document and much more amenable to automation.
Warning
As you start exploring dynamic infrastructure provisioning with AWS CLI, we recommend you set up a billing alarm. Leveraging the CloudWatch and Simple Notification services, billing alerts will notify you if you exceed preset spending thresholds.
While not ruinously expensive, forgetting to shut down a few of your test instances and letting them run for the rest of the month (until you notice as you are billed) will easily exceed your personal phone bill. It is a snap to inadvertently make this mistake; we have slipped up ourselves and advise you let the system help keep track with these friendly notifications.
If you have not already done so, you will need to set up the EC2 command-line tools according to the instructions in before continuing. Make sure you have
set the AWS_ACCESS_KEY and AWS_SECRET_KEY environment variables or the equivalent values in the .aws/credentials file in your home directory.
Access key IDs and secrets
When you log in to the AWS Management Console, you will use your email address and password to authenticate yourself. Things work a little bit differently when it comes to the command-line tools. Instead of a username and password, you use an access key ID and secret access key. Together, these are often referred to as your access credentials.
Although access credentials consist of a pair of keys, they are not the same as an SSH key pair. The former is used to access AWS’s APIs, while the latter is used to SSH into an instance to perform work on the shell.
When you created your AWS account, you also generated a set of access credentials for your root account identity. These keys have full access to your AWS account—keep them safe! You are responsible for the cost of any resources created using these keys, so if a malicious person were to use these keys to launch some EC2 instances, you would be left with the bill.
Later sections discuss how you can set up additional accounts and limit which actions they can perform, as defined by current security best practices. For the following examples, we will just use the access keys you have already created during CLI setup.
AWS lets you inspect all active access credentials for your account through the Security Credentials page of the Management Console, but for increased security you will be unable to retrieve their secret access keys after creation. This stops any unauthorized access to your account from resulting in a compromise of your API credentials, but has the annoying side effect of requiring you to replace your access keys if they ever were lost.
Working from the CLI
To launch an instance from the command line, you need to provide values that correspond to the options you can choose from when using the Management Console. Because all of this information must be entered in a single command, rather than gathered through a series of web pages, it is necessary to perform some preliminary steps so you know which values to choose. The Management Console can present you with a nice drop-down box containing all the valid AMIs for your chosen region, but to use the command line, you need to know the ID of the AMI before you can launch it.
The easiest way to get a list of available images is in the Instances tab of the Management Console, which lets you search through all available AMIs. Keep in mind that AMIs exist independently in EC2 regions—the Amazon Linux AMI in the US East region is not the same image as the Amazon Linux AMI in Europe, although they are functionally identical. Amazon, Canonical, and other providers make copies of their AMIs available in each region as a convenience to their users, but the same AMI will show a different ID in different regions.
If you need to find an
AMI using the command-line tools, you can do so with the aws ec2 describe-images command. A
few examples follow:
# Describe all of your own images in the US East region
aws ec2 describe-images --owners self --region us-east-1

# Find Amazon-owned images for Windows Server 2019, 64-bit version
aws ec2 describe-images --owners amazon --filters Name=architecture,Values=x86_64 | grep Server-2019

# List the AMIs that have a specific set of key/value tags
aws ec2 describe-images --owners self --filters Name=tag:role,Values=webserver Name=tag:environment,Values=production
The first query should of course yield no results, unless you have already created some AMIs of your own. Later examples showcase combining the tool’s own filtering and grep to find the image you are really looking for. In our second example we are searching for a Windows Server image created by another party. Note that we explicitly searched for Amazon-owned images, as any AWS customer can decide to make her AMIs accessible to all other customers. Image names are freely chosen by their creator just like their contents, thus not only complicating our search with a very large number of results, but potentially posing a security problem if one carelessly selects an unknown party’s bits.
Note
At the time of writing, the most popular Ubuntu long-term support (LTS) version on AWS is 20.04, going by the nickname of Focal Fossa. In the Eastern US’ first EC2 region, the latest version of Canonical’s official AMI is ami-0be3f0371736d5394 (64b, HVM, EBS storage), which is used in many of the examples. Make sure to update this with your chosen AMI. If you are not sure which to use, or have no real preference, the authors recommend using the latest LTS version of Ubuntu for 64-bit systems.
The command used to launch an
instance is aws ec2 run-instances. The most basic invocation is simply aws ec2 run-instances --image-id ami-6d060707, which will launch an older m1.small instance in the default us-east-1 region. If you are paying attention, you noticed we used a different AMI ID with paravirtualization support as the older m1.small instance type does not support the
newer HVM virtualization style. However, if you run this command and attempt to log in to the instance, you will soon notice a rather large problem: because no key pair name was specified, there is no way to log in to the instance. Instead, try running the command with the --key option to specify one of the SSH key pairs you created earlier. In the following example, we have also changed the instance type to t2.micro, the smallest instance type all AWS operating systems are currently comfortable with:
$ aws ec2 run-instances --image-id ami-0be3f0371736d5394 --region us-east-1
--key federico --instance-type t2.micro --output text
740376006796	r-088ffb963f76af643
INSTANCES	0	x86_64	789c6f18-af67-435d-b4dd-75552b81a2f4	False	True	xen	ami-0be3f0371736d5394	i-0a71dbbba93ec6881	t2.micro	federico	2021-01-03T16:08:41.000Z	ip-172-31-36-115.ec2.internal	172.31.36.115		/dev/sda1	ebs	True		subnet-86a83ebb	hvm	vpc-934935f7
[ output truncated ]
Once EC2 receives the request to launch an instance, it prints some information about the pending instance. The value we need for the next command is the instance ID, in this case, i-0a71dbbba93ec6881.
Although this command returns almost immediately, you will still need to wait a short while before your instance is ready to accept SSH connections. You can check on the status of the instance while it is booting with
the aws ec2
describe-instance-status command. While the instance is still booting, its status will be listed as pending. This
will change to running once the instance is ready. Remember that ready in this context means that the virtual instance has been created, and the operating system’s boot process has started. It does not necessarily mean that the instance is ready to receive an SSH connection, which is important when writing scripts that automate these commands.
Tip
Granting access to an already running image can involve multiple manual steps adding the new user’s SSH credentials to the authorized keys file. Juggling files can be avoided working with Ubuntu images thanks to the ssh-import-id command. Just invoking the following:
ssh-import-id lp:f2
will retrieve Federico’s SSH identity from Launchpad.net and grant him access, since he’s the user the command was run under. You can accomplish the same for Mike and JB by using their GitHub user IDs:
ssh-import-id gh:mikery gh:jbz
All that is required is the user ID from either site. This is roughly equivalent to running the following shell command (which could be used to derive alternative import strategies for other sites):
wget https://launchpad.net/~f2/+sshkeys -0 - >>
~/.ssh/authorized_keys && echo >> ~/.ssh/authorized_keys
Once your instance is running, the output should look similar to this:
$ aws ec2 describe-instance-status --instance-ids i-0a71dbbba93ec6881
--region us-east-1 --output text
INSTANCESTATUSES	us-east-1e	i-0a71dbbba93ec6881
INSTANCESTATE	16	running
INSTANCESTATUS	ok
DETAILS	reachability	passed
SYSTEMSTATUS	ok
DETAILS	reachability	passed
Another way to display information about your instance is
with aws ec2 describe-instances, which will show much more detail. In particular, it will show the public DNS name (for example, ec2-3-90-65-67.compute-1.amazonaws.com ), which you can use to SSH into your instance:
$ aws ec2 describe-instances --instance-ids i-0a71dbbba93ec6881
--region us-east-1 --output text
RESERVATIONS	740376006796	r-088ffb963f76af643
INSTANCES	0	x86_64	789c6f18-af67-435d-b4dd-75552b81a2f4	False	True	xen	ami-0be3f0371736d5394	i-0a71dbbba93ec6881	t2.micro	federico	2021-01-03T16:08:41.000Z	ip-172-31-36-115.ec2.internal	172.31.36.115	ec2-3-90-65-67.compute-1.amazonaws.com	3.90.65.67	/dev/sda1	ebs	True		subnet-86a83ebb	hvm	vpc-934935f7
BLOCKDEVICEMAPPINGS	/dev/sda1
EBS	2021-01-03T16:08:42.000Z	True	attached	vol-02497364a07d7b45f
[ output truncated ]
MONITORING	disabled
NETWORKINTERFACES		interface	06:89:16:4e:21:bb	eni-099ae3a3deede2346	740376006796	ip-172-31-36-115.ec2.internal	172.31.36.115	True	in-use	subnet-86a83ebb	vpc-934935f7
ASSOCIATION	amazon	ec2-3-90-65-67.compute-1.amazonaws.com	3.90.65.67
ATTACHMENT	2021-01-03T16:08:41.000Z	eni-attach-008a0c0b75b768929	True	0	0	attached
GROUPS	sg-384f3a41	default
PRIVATEIPADDRESSES	True	ip-172-31-36-115.ec2.internal	172.31.36.115
ASSOCIATION	amazon	ec2-3-90-65-67.compute-1.amazonaws.com	3.90.65.67
PLACEMENT	us-east-1e		default
SECURITYGROUPS	sg-384f3a41	default
STATE	16	running
To terminate the running instance,
issue aws ec2 terminate-instance. To verify that this instance has indeed been terminated, you can use the aws ec2 describe-instances command again:
$aws ec2 terminate-instances --instance-ids i-0a71dbbba93ec6881 --region us-east-1 --output textTERMINATINGINSTANCES i-0a71dbbba93ec6881 CURRENTSTATE 32 shutting-down PREVIOUSSTATE 16 running $aws ec2 describe-instances --instance-ids i-0a71dbbba93ec6881 --region us-east-1 --output textRESERVATIONS 740376006796 r-088ffb963f76af643 INSTANCES 0 x86_64 789c6f18-af67-435d-b4dd-75552b81a2f4 False True xen ami-0be3f0371736d5394 i-0a71dbbba93ec6881 t2.micro federico 2021-01-03T16:08:41.000Z /dev/sda1 ebs User initiated (2021-01-03 17:09:18 GMT) hvm [ output truncated ] STATE 48 terminated STATEREASON Client.UserInitiatedShutdown Client.UserInitiatedShutdown: User initiated shutdown
As you find yourself using the command-line tools more frequently, and for more complex tasks, you will probably begin to identify procedures that are good candidates for automation. Besides saving you both time and typing, automating the more complex tasks has the additional benefits of reducing the risk of human error and simply removing some thinking time from the process.
The command-line tools are especially useful when it comes to documenting these procedures. Processes become more repeatable. Tasks can be more easily delegated and shared among the other members of the team.
Tip
Trying to connect multiple times as an instance boots is inelegant. Fortunately, we can one-line script our way out of this. The BSD version of ping, notably found
on macOS, includes a convenient “one ping only” option (-o) that we like to think honors Sean Connery’s famous quote in Hunt for Red October. The option terminates ping once the first reply is received. Like Captain Marko Ramius, we can use this to ask for “one ping only, please”:
$ ping -o 52.90.56.122; sleep 2; ssh [email protected]
PING 52.90.56.122 (52.90.56.122): 56 data bytes
Request timeout for icmp_seq 0
Request timeout for icmp_seq 1
Request timeout for icmp_seq 2
64 bytes from 52.90.56.122: icmp_seq=3 ttl=48 time=40.492 ms
[ output truncated ]

Welcome to Ubuntu 20.04.1 LTS (GNU/Linux 5.4.0-1029-aws x86_64)
Perhaps less steeped in movie lore, but nonetheless equally effective is this GNU-compatible version that waits in a loop for the SSH service to start up:
$ until ssh [email protected]; do sleep 1; done
ssh: connect to host 52.90.56.122 port 22: Connection refused
ssh: connect to host 52.90.56.122 port 22: Connection refused
[ output truncated ]

Welcome to Ubuntu 20.04.1 LTS (GNU/Linux 5.4.0-1029-aws x86_64)
Launching from Your Own Programs and Scripts
The command-line tools are useful from an automation perspective, as it is easy to call them from Bash or any other scripting language. While the output for some of the services can be rather complex, it is relatively straightforward to parse this output and perform dynamic actions based on the current state of your infrastructure. At a certain level of complexity, though, calling all of these external commands and parsing their output becomes time-consuming and error prone. At this point, it can be useful to move to a programming language with a client library to help you work with AWS directly.
Officially supported client libraries are available for many programming languages and platforms, including:
Go
Java
PHP
Python
Ruby
.NET
iOS
Android
The full set of AWS programming resources can be found at the AWS Sample Code site.
Most of the API coding examples in this book use the popular Python-based Boto library although other, equally capable libraries exist. Even if you are not a Python developer, the examples should be easy to transfer to your language of choice, because each library is calling the same underlying AWS API.
Regardless of your language choice, the high-level concepts for launching an instance remain the same: first, decide which attributes you will use for the instance, such as which AMI it will be created from, and then issue a call to
the RunInstances method of the EC2 API.
When exploring a new API from Python, it can often be helpful to use the interactive interpreter. This lets you type in lines of Python code one at a time, instead of executing them all at once in a script. The benefit here is that you have a chance to explore the API and quickly get to grips with the various functions and objects that are available. We will use this method in the upcoming examples. If you prefer, you can also copy the example code to a file and run it all in one go with python .filename.py
If you do not already have the Boto library installed, you will need to install it with
pip (pip3 install boto) before continuing with the examples. Once this is done, open the Python interactive interpreter by running python without any arguments:
$ python
Python 3.8.5 (default, Jul 28 2020, 12:59:40)
[GCC 9.3.0] on linux
Type "help", "copyright", "credits" or "license" for more information.
>>>
When you connect to an AWS service with Boto, Boto needs to know which
credentials it should use to authenticate. You can
explicitly pass the aws_access_key_id and aws_secret_access_key keyword arguments when calling connect_to_region, as shown here:
>>>AWS_ACCESS_KEY_ID = ">>>your-access-key"AWS_SECRET_ACCESS_KEY = ">>>your-secret-key"from boto.ec2 import connect_to_region>>>ec2_conn = connect_to_region('us-east-1',...aws_access_key_id=AWS_ACCESS_KEY_ID,...aws_secret_access_key=AWS_SECRET_ACCESS_KEY)
Alternatively, if the AWS_ACCESS_KEY_ID and AWS_SECRET_ACCESS_KEY environment
variables are set, Boto will use these automatically:
$export AWS_SECRET_ACCESS_KEY='$your access key'export AWS_ACCESS_KEY_ID='$your secret key'pythonPython 3.8.5 (default, Jul 28 2020, 12:59:40) [GCC 9.3.0] on linux Type "help", "copyright", "credits" or "license" for more information. >>>from boto.ec2 import connect_to_region>>>ec2_conn = connect_to_region('us-east-1')
Boto will also automatically attempt to retrieve your credentials from the file ~/.aws/credentials if one is present, in which case exporting them to environment variables is not necessary.
Once you have connected to the EC2 API, you can issue a call
to run_instances to launch
a new instance. You will need two pieces of information before you can do this—the ID of the AMI you would like to launch, and
the name of the
SSH key pair you will use when connecting to the
instance:
>>>ssh = ec2_conn.create_security_group('ssh', 'SSH access group')>>>sshSecurityGroup:ssh >>>ssh.authorize('tcp', 22, 22, '0.0.0.0/0')True >>>reservation = ec2_conn.run_instances('ami-0be3f0371736d5394',...instance_type='t3.micro', key_name='...your-key-pair-name',security_group_ids=['ssh'])>>>instance = reservation.instances[0]
The call to run_instances does not, as might initially be suspected, return an object representing an instance. Because you can request more than one instance when calling the run_instances function, it returns a reservation, which is an object representing one or more instances. The reservation object lets you iterate over the instances. Here, we requested only one instance, so we simply took the first element of the list of instances in the reservation (in Python, that is done with reservation.instances[0]) to get our instance.
Now the instance is launching, and we have an instance (in the programming sense) of the instance (in the EC2 sense), so we can begin to query its attributes. Some of these are available immediately, whereas others do not get set until later in the launch process. For example, the DNS name is not available until the instance is nearly running. The instance will be in
the pending state initially. We can check on the current state by calling
the update() function:
>>>instance.state'pending' >>>instance.update()'pending'# After some time…>>>instance.update()'running'
Once the instance reaches
the running state, we should be able to connect to it via SSH. But first we need to know its hostname or IP address, which are available as attributes on the instance object:
>>>instance.public_dns_name'ec2-3-214-215-179.compute-1.amazonaws.com' >>>instance.private_ip_address'172.31.91.174' >>>instance.id'i-0bf338951ba9b23f8'
Terminating a running instance is just a matter of calling
the terminate() function. Before we do that, let’s take a moment to look at how Boto can work with EC2 tags to help make administration easier. A tag is a key/value pair that you can assign to any number of instances to track arbitrary properties. The metadata stored in tags can be used as a simple but effective administration database for your EC2 resources. Setting a tag is simple:
>>> ec2_conn.create_tags([instance.id], {'environment': 'staging'})
True
Once an instance has been tagged, we can use
the get_all_instances() method to find it again. get_all_instances() returns a list of reservations, each of which, in turn, contains a list of instances. These lists can be iterated over to perform an action on all instances that match a specific tag query. As an example, we will terminate any instances that have been tagged as being part of our staging environment:
>>>tagged_reservations = ec2_conn.get_all_instances(filters={...'tag:environment': 'staging'})>>>tagged_reservations[Reservation:r-066e2f09d3ea91640] >>>tagged_reservations[0]Reservation:r-066e2f09d3ea91640 >>>tagged_reservations[0].instances[0]Instance:i-0bf338951ba9b23f8 >>>for res in tagged_reservations:...for inst in res.instances:...inst.terminate()>>>
Note
Given that nearly all resource types support tagging, and that Amazon provides this feature free of charge, it would be a shame not to take advantage of the many ways this can help you automate and control your infrastructure. Think of it as an incredibly simple query language for your infrastructure. Conceptually, our previous example was similar to SELECT * FROM instances WHERE tag_environment='staging'.
The previous example iterated over all the matching instances (only one, in this case) and terminated them. We can now check on the status of our instance and see that it is heading
toward the terminated state:
>>>instance.update()'shutting-down'# After a moment or two…>>>instance.update()'terminated'
This example only scratches the surface of what Boto and other client libraries are capable of. The Boto documentation provides a more thorough introduction to other AWS services. Having the ability to dynamically control your infrastructure is one of the best features of AWS from a system administration perspective, and it gives you plenty of opportunities to automate recurring processes.
Note
Managing AWS with Python is the subject of Mitch Garnaat’s Python and AWS Cookbook (O’Reilly). Written by the very author of Boto, this cookbook gets you started with more than two dozen complete recipes.
Introducing CloudFormation
There is another method of launching instances that deserves its own section. Among the many Amazon Web Services features, a favorite is CloudFormation. It fundamentally changes how AWS infrastructure is managed, and is something whose absence is strongly felt when working in non-AWS environments. In a nutshell, CloudFormation is a resource-provisioning tool that accepts a JSON file describing the resources you require and then creates them for you. Such a simple idea, yet so powerful.
Consider these steps for launching an instance:
Launch a
t3.microinstance ofami-0be3f0371736d5394in theus-east-1region. The instance should have a 10 GB EBS volume attached to thesdfdevice and belong to the security group namedwebservers. It should be given the stringwebserveras user data and have aroletag with the value ofwebserver.Create a CNAME for www.example.com that points to the public hostname of the instance.
Using the three methods of launching instances we have already looked at, how could you most efficiently perform these tasks? More importantly, how would you document the process so it is repeatable?
If the task is a one-off procedure, it might make sense to perform it using the Management Console, but the documentation would be time-consuming to write and tedious to follow. Automating the task through programming (either by calling the EC2 command-line tools, or using one of the client libraries) means the documentation could be reduced to a single command: “run this script.” While benefiting the person following the documentation, this comes at a cost to whomever must write and maintain the script.
Using CloudFormation, the burden of maintaining the tool itself is shifted to Amazon, with the user retaining responsibility solely for maintaining the configuration itself. You simply create a JSON-formatted file (a stack template) describing the attributes of the instance, and then let AWS do the rest. The documentation is reduced to one step: “Create a stack named webservers, using the stack template webserver.json.” A stack can be thought of as a collection of resources, along with a list of events associated with changes to those resources and the stack itself.
Successfully submitting a stack template to CloudFormation will result in the creation of a stack, which will, in turn, create one or more AWS resources (such as EC2 instances or Elastic Load Balancers). There are no additional scripts to write or maintain, although writing and maintaining stack templates can become rather complicated as well once your infrastructure starts growing. The CloudFormation stack template language has its own learning curve.
Being plain-text files, stack templates can be stored in your version control system alongside your application code and server configurations. The same processes used to review changes to your code can be applied to changes in your infrastructure. By browsing the history of commits to your stack templates, you can quickly audit changes to your infrastructure, as long as you have a consistent policy in place to run stacks only after they have been committed to version control.
An additional benefit of stack templates is that they can be reused: it is possible to create multiple stacks from the same template. This can be used to give each developer a self-contained copy of their development stack. When new members join the team, they simply need to launch a new copy of the stack, and they can start familiarizing themselves with the application and infrastructure almost immediately.
The same stack template can also be used to create multiple copies of a stack in different AWS regions. Operating an application across multiple AWS regions requires a lot of careful planning at both the application and infrastructure layers, but CloudFormation makes one aspect of the task very easy: by deploying a stack template to multiple regions, you can be sure that your infrastructure is identical in each region, without needing to manually configure a series of resources in each one.
Aside from the cost of the underlying resources, CloudFormation is free of charge. Although it adds a bump in the AWS learning curve, it is well worth taking the time to deploy your infrastructure with CloudFormation, especially if you find yourself managing complicated or frequently changing infrastructures. Routing all changes to your infrastructure through a single process (i.e., updating the CloudFormation stack) is imperative when working with a team, as it gives you an easy way to answer those questions about “who changed what, and when.”
For more examples of what can be achieved with CloudFormation, have a look at the example templates provided by Amazon.
Warning
Just how many servers can you request from AWS? On-demand instances are bound by the number of vCPUs simultaneously run by standard instance classes, with a separate dynamic spot request size enforced. The limit is currently at 1920 vCPUs per region for standard classes, with additional restrictions placed on certain classes. Reserved instances are limited to 20 by default, and newly opened accounts are further restricted, their limits rising automatically over time.
Filing a support request, preferably before hitting a hard cap, is really all that is necessary to increase your account limits.
Working with CloudFormation Stacks
CloudFormation stacks are themselves a type of AWS resource, and can thus be managed in similar ways. They can be created, updated, and deleted via the same methods we use for interacting with other AWS services—the Management Console, command-line tools, or client libraries. They can also be tagged for ease of administration.
Creating the Stack
In this section, we will start with a basic stack template that simply launches an EC2 instance. Example 1-1 shows one of the simplest CloudFormation stacks.
Example 1-1. Basic CloudFormation stack in JSON
{
  "AWSTemplateFormatVersion" : "2010-09-09",
  "Description" : "A simple stack that launches an instance.",
  "Resources" : {
    "Ec2Instance" : {
      "Type" : "AWS::EC2::Instance",
      "Properties" : {
        "InstanceType": "t3.micro",
        "ImageId" : "ami-0be3f0371736d5394"
      }
    }
  }
}
Warning
CloudFormation requires stack templates to be strictly valid JSON, so keep an eye out for trailing commas when copying or modifying templates.
Templates can be validated and checked for errors with the AWS command-line tool. For example:
aws cloudformation validate-template
--template-body file://MyStack.json
Some editors, including Eclipse and Vim, can be extended with plug-ins to help produce and validate JSON files.
The Resources section is an object that can contain multiple children, although this example includes only one (EC2Instance). The EC2Instance object has attributes that correspond to the values you can choose when launching an instance through the Management Console or command-line tools.
CloudFormation stacks can be managed through the Management Console, with the command-line tools, or with scripts leveraging client-side libraries such as Boto.
One advantage of using the Management Console is that a list of events is displayed in the bottom pane of the interface. With liberal use of the refresh button, this will let you know what is happening when your stack is in the creating or updating stages. Any problems encountered while creating or updating resources will also be displayed here, which makes it a good place to start when debugging CloudFormation problems. These events can also be read by using the command-line tools, but the Management Console output is a much more friendly human interface.
It is not possible to simply paste the stack template file contents into the Management Console. Rather, you must create a local text file and upload it to the Management Console when creating the stack. Alternatively, you can make the stack file accessible on a website and provide the URL instead. The same applies when using the command-line tools and API.
To see the example stack in action, copy the JSON shown in Example 1-1 into a text file. You may need to substitute the AMI (ami-0be3f0371736d5394) with the ID of an AMI in your chosen EC2 region (our preset value comes from the ever-popular default us-east-1). Use the command-line tools or Management Console to create the stack. Assuming you have stored your stack template in a file named example-stack.json, you can create the stack with this
command:
 aws cloudformation create-stack --template-body file://example-stack.json
--stack-name example-stack
If your JSON file is not correctly formed, you will see a helpful
message letting you know the position of the invalid portion of the
file. If CloudFormation accepted the request, it is now in the process
of launching an EC2 instance of your chosen AMI. You can verify this
with
the aws cloudformation describe-stack-resources and aws cloudformation describe-stack-events commands:
$aws cloudformation describe-stack-events --stack-name example-stack --output textSTACKEVENTS 6e21cdf0-4ead-11eb-9b7d-0a78092beb51 example-stack arn:aws:cloudformation:us-east-1:740376006796:stack/example-stack/609b47b0-4ead-11eb-a444-12cd418968c5 CREATE_COMPLETE AWS::CloudFormation::Stack arn:aws:cloudformation:us-east-1:740376006796:stack/example-stack/609b47b0-4ead-11eb-a444-12cd418968c5 example-stack 2021-01-04T16:53:54.883Z STACKEVENTS Ec2Instance-CREATE_COMPLETE-2021-01-04T16:53:53.311Z Ec2Instance i-0863b9fb0712d6437 {"ImageId":"ami-0be3f0371736d5394","InstanceType":"t3.micro"} CREATE_COMPLETE AWS::EC2::Instance arn:aws:cloudformation:us-east-1:740376006796:stack/example-stack/609b47b0-4ead-11eb-a444-12cd418968c5 example-stack 2021-01-04T16:53:53.311Z STACKEVENTS Ec2Instance-CREATE_IN_PROGRESS-2021-01-04T16:53:37.683Z Ec2Instance i-0863b9fb0712d6437 {"ImageId":"ami-0be3f0371736d5394","InstanceType":"t3.micro"} CREATE_IN_PROGRESS Resource creation Initiated AWS::EC2::Instance arn:aws:cloudformation:us-east-1:740376006796:stack/example-stack/609b47b0-4ead-11eb-a444-12cd418968c5 example-stack 2021-01-04T16:53:37.683Z STACKEVENTS Ec2Instance-CREATE_IN_PROGRESS-2021-01-04T16:53:35.910Z Ec2Instance {"ImageId":"ami-0be3f0371736d5394","InstanceType":"t3.micro"} CREATE_IN_PROGRESS AWS::EC2::Instance arn:aws:cloudformation:us-east-1:740376006796:stack/example-stack/609b47b0-4ead-11eb-a444-12cd418968c5 example-stack 2021-01-04T16:53:35.910Z STACKEVENTS 609db8b0-4ead-11eb-a444-12cd418968c5 example-stack arn:aws:cloudformation:us-east-1:740376006796:stack/example-stack/609b47b0-4ead-11eb-a444-12cd418968c5 CREATE_IN_PROGRESS User Initiated AWS::CloudFormation::Stack arn:aws:cloudformation:us-east-1:740376006796:stack/example-stack/609b47b0-4ead-11eb-a444-12cd418968c5 example-stack 2021-01-04T16:53:32.249Z $aws cloudformation describe-stack-resources --stack-name example-stack --output textSTACKRESOURCES Ec2Instance i-0863b9fb0712d6437 CREATE_COMPLETE AWS::EC2::Instance arn:aws:cloudformation:us-east-1:740376006796:stack/example-stack/609b47b0-4ead-11eb-a444-12cd418968c5 example-stack 2021-01-04T16:53:53.311Z DRIFTINFORMATION NOT_CHECKED
aws cloudformation describe-stack-events prints a list of events associated with the stack, in reverse chronological order. Following the chain of events, we can see that AWS first created the stack, and then spent less than 20 seconds launching the instance, before declaring the stack creation complete. The second command shows us the ID of the newly launched
instance: i-0863b9fb0712d6437.
Tip
The cfn-lint tool validates CloudFormation templates in JSON or YAML format against all supported resources and valid properties. It can be installed in your environment with pip install cfn-lint, and is trivial to use, exiting silently if no errors are found.
cfn-lint should be set-up as a pre-commit hook for your CloudFormation Git repository. Refer to the project page for the configuration details.
Updating the Stack
Updating a running stack is an equally straightforward task. But before doing this, a brief digression into the way AWS handles resource updates is called for.
Some attributes of AWS resources cannot be modified once the instance has been created. Say, for example, you launch an EC2 instance with some user data. You then realize that the user data was incorrect, so you would like to change it. Although the Management Console provides the option to View/Change User Data, the instance must be in
the stopped state before the user data can be modified. This means you must stop the instance, wait for it to enter the stopped state, modify the user data, and then start the instance again.
This behavior has an interesting implication for CloudFormation. Using the previous example, imagine you have a CloudFormation stack containing an EC2 instance that has some user data. You want to modify the user data, so you update the stack template file and run
the aws cloudformation update-stack command. Because CloudFormation is unable to modify the user data
on a running instance, it must instead either reload or replace the instance, depending on whether this is an EBS-backed or instance store−backed instance.
If this instance was your production web server, you would have had some unhappy users during this period. Therefore, making changes to your production stacks requires some planning to ensure that you won’t accidentally take down your application. We won’t list all of the safe and unsafe types of updates here, simply because there are so many permutations to consider that it would take an additional book to include them all. The simplest thing is to try the operation you want to automate by using the Management Console or command-line tools to find out whether they require stopping the instance.
We already know that user data cannot be changed without causing the instance to be stopped, because any attempt to change the user data of a running instance in the Management Console will fail. Conversely, we know that instance tags can be modified on a running instance via the Management Console; therefore, updating instance tags with CloudFormation does not require instance replacement.
Changing some other attributes, such as the AMI used for an instance, will also require the instance to be replaced. CloudFormation will launch a new instance using the update AMI ID and then terminate the old instance. Obviously, this is not something you want to do on production resources without taking care to ensure that service is not disrupted while resources are being replaced. Mitigating these effects is discussed later, when we look at Auto Scaling and launch configurations.
If in doubt, test with an example stack first. CloudFormation lets you provision your infrastructure incredibly efficiently—but it also lets you make big mistakes with equal efficiency. With great power (which automation offers) comes great responsibility.
Warning
Be careful when updating stacks that provide production resources. Once you submit the request to modify the stack, there is no going back. Furthermore, you cannot request any additional changes until the update is complete, so if you accidentally terminate all of your production resources, you will have no option but to sit back and watch it happen, only after which you can begin re-creating the stack… as quickly as possible.
To remove any doubt, review the CloudFormation documentation for the resource type you are modifying. The documentation will let you know if this resource can be updated in place, or if a replacement resource is required in order to apply changes.
To see the update process in action, we will first update the instance to include some tags. Update the example-stack.json file so that it includes the following line in bold—note the addition of the comma to the end of the first line:
…
        "InstanceType": "t3.micro",
        "Tags": [ {"Key": "foo", "Value": "bar"}],
        "ImageId": "ami-0be3f0371736d5394"
      }
…
Now we can update the running stack with aws cloudformation update-stack and watch the
results of the update process with aws cloudformation describe-stack-events:
$aws cloudformation update-stack --template-body file://example-stack.json --stack-name example-stack --output textarn:aws:cloudformation:us-east-1:740376006796:stack/example-stack/609b47b0-4ead-11eb-a444-12cd418968c5 $aws cloudformation describe-stack-events --stack-name example-stack --output textSTACKEVENTS 4496d650-4ec2-11eb-9a26-12324404f95d example-stack arn:aws:cloudformation:us-east-1:740376006796:stack/example-stack/609b47b0-4ead-11eb-a444-12cd418968c5 UPDATE_COMPLETE AWS::CloudFormation::Stack arn:aws:cloudformation:us-east-1:740376006796:stack/example-stack/609b47b0-4ead-11eb-a444-12cd418968c5 example-stack 2021-01-04T19:23:04.620Z STACKEVENTS 44350740-4ec2-11eb-ad89-0e22fadd816f example-stack arn:aws:cloudformation:us-east-1:740376006796:stack/example-stack/609b47b0-4ead-11eb-a444-12cd418968c5 UPDATE_COMPLETE_CLEANUP_IN_PROGRESS AWS::CloudFormation::Stack arn:aws:cloudformation:us-east-1:740376006796:stack/example-stack/609b47b0-4ead-11eb-a444-12cd418968c5 example-stack 2021-01-04T19:23:03.977Z STACKEVENTS Ec2Instance-UPDATE_COMPLETE-2021-01-04T19:23:01.921Z Ec2Instance i-0863b9fb0712d6437 {"ImageId":"ami-0be3f0371736d5394","InstanceType":"t3.micro","Tags":[{"Value":"bar","Key":"foo"}]} UPDATE_COMPLETE AWS::EC2::Instance arn:aws:cloudformation:us-east-1:740376006796:stack/example-stack/609b47b0-4ead-11eb-a444-12cd418968c5 example-stack 2021-01-04T19:23:01.921Z STACKEVENTS Ec2Instance-UPDATE_IN_PROGRESS-2021-01-04T19:22:46.344Z Ec2Instance i-0863b9fb0712d6437 {"ImageId":"ami-0be3f0371736d5394","InstanceType":"t3.micro","Tags":[{"Value":"bar","Key":"foo"}]} UPDATE_IN_PROGRESS AWS::EC2::Instance arn:aws:cloudformation:us-east-1:740376006796:stack/example-stack/609b47b0-4ead-11eb-a444-12cd418968c5 example-stack 2021-01-04T19:22:46.344Z STACKEVENTS 3708d600-4ec2-11eb-8902-0e39579e7d83 example-stack arn:aws:cloudformation:us-east-1:740376006796:stack/example-stack/609b47b0-4ead-11eb-a444-12cd418968c5 UPDATE_IN_PROGRESS User Initiated AWS::CloudFormation::Stack arn:aws:cloudformation:us-east-1:740376006796:stack/example-stack/609b47b0-4ead-11eb-a444-12cd418968c5 example-stack 2021-01-04T19:22:41.882Z $aws cloudformation describe-stack-resources --stack-name example-stack --output textSTACKRESOURCES Ec2Instance i-0863b9fb0712d6437 UPDATE_COMPLETE AWS::EC2::Instance arn:aws:cloudformation:us-east-1:740376006796:stack/example-stack/609b47b0-4ead-11eb-a444-12cd418968c5 example-stack 2021-01-04T19:23:01.921Z DRIFTINFORMATION NOT_CHECKED
Finally, the aws ec2 describe-tags command
will show that the instance is now tagged
with foo=bar:
$ aws ec2 describe-tags --filters Name=resource-type,Values=instance
Name=resource-id,Values=i-0863b9fb0712d6437 --output text
TAGS	aws:cloudformation:logical-id	i-0863b9fb0712d6437	instance	Ec2Instance
TAGS	aws:cloudformation:stack-id	i-0863b9fb0712d6437	instance	arn:aws:cloudformation:us-east-1:740376006796:stack/example-stack/609b47b0-4ead-11eb-a444-12cd418968c5
TAGS	aws:cloudformation:stack-name	i-0863b9fb0712d6437	instance	example-stack
TAGS	foo	i-0863b9fb0712d6437	instance	bar
Notice the additional tags in the aws:cloudformation namespace.
When provisioning resources that support tagging, CloudFormation will automatically apply tags to the resource. These tags
let you keep track of that stack, which “owns” each
resource, and make it easy to find CloudFormation-managed resources in the
Management Console.
Looking Before You Leap
When you have more than one person working on a stack template, it can be easy to find yourself in a situation where your local copy of the stack template does not match the template used by the running stack.
Imagine that two people are both making changes to a stack template stored in a Git repository. If one person makes a change and updates the stack without committing that change to Git, the next person to make an update will be working with an out-of-date stack template. The next update will then revert the previous changes, which, as previously discussed, could have negative consequences. This is a typical synchronization problem whenever you have two independent activities that could be happening concurrently: in this case, updating Git and updating the actual AWS stack.
Happily, Amazon has provided a tool that, in combination with a couple of shell commands, will let you make certain that your local copy of the stack does indeed match the running version. Use the aws cloudformation get-template command
to get a JSON file describing the running template, clean the
output with sed and head, and finally use diff to compare the local and remote versions. If we did this before updating the example stack to include tags, we would have obtained the following results:
$aws cloudformation get-template --stack-name example-stack | jq .TemplateBody > example-stack.running$diff <(jq '.' example-stack.running) <(jq '.' example-stack.json)8a9,14 > "Tags": [ > { > "Key": "foo", > "Value": "bar" > } > ],
Warning
We use jq to pretty-print the JSON in a consistent format that saves diff from getting caught up in formatting or whitespace differences. Element ordering is still a factor; however, one easily addressed by making your initial git commit of a new stack with the format exported by aws cloudformation get-template.
These commands could be wrapped in a simple script to save typing. Changes to production CloudFormation stacks should always be preceded by a check like this, especially if working in a team. This check should be incorporated into the script used for updating the stack: if it happens automatically, there is no chance of forgetting it.
Tip
Joseph Burnett has been developing what promises to be the ultimate shell diffing and patching tool for JSON: jd. Built in Go, jd outputs diff-formatted output. Here is an example of it comparing the before and after manifests of our test stack:
$ jd example-stack.running example-stack.json
@ ["Resources","Ec2Instance","Properties","Tags"]
+ [{"Key":"foo","Value":"bar"}]
A web version is also available online.
Deleting the Stack
Deleting a running stack will, by
default, result in the termination of its associated resources. This is quite frequently the desired behavior, so it makes for a sensible default, but at times, you would like the resources to live on after the stack itself has been terminated. This is done by
setting the DeletionPolicy attribute on the resource. This attribute has a default value of Delete.
All resource types also support the Retain value. Using this means that the resource will not be automatically deleted when the stack is deleted. For production resources, this can be an added safety net to ensure that you don’t accidentally terminate the wrong instance. The downside is that, once you have deleted the stack, you will need to manually hunt down the retained resources if you want to delete them at a later date.
The final option for the DeletionPolicy attribute is Snapshot, which is applicable only to the subset of resources that support snapshots. Currently, these include the
Relational Database Service (RDS) instances, Amazon Redshift data warehousing clusters, ElastiCache Memcached clusters, AWS Neptune graph database instances, and EC2’s EBS volumes. With this value, a snapshot of the database or volume will be taken when the stack is terminated.
Remember that some resources will be automatically tagged with the name of the CloudFormation stack to which they belong. This can save some time when searching for instances that were
created with the Retain deletion policy.
Deleting a stack is done with
the aws cloudformation delete-stack command. Again, you can view the changes made to the
stack with aws cloudformation describe-stack-events:
$aws cloudformation delete-stack --stack-name example-stack$aws cloudformation describe-stack-events --stack-name example-stack --output textSTACKEVENTS Ec2Instance-DELETE_IN_PROGRESS-2021-01-04T20:27:40.827Z Ec2Instance i-0863b9fb0712d6437 {"ImageId":"ami-0be3f0371736d5394","InstanceType":"t3.micro","Tags":[{"Value":"bar","Key":"foo"}]} DELETE_IN_PROGRESS AWS::EC2::Instance arn:aws:cloudformation:us-east-1:740376006796:stack/example-stack/609b47b0-4ead-11eb-a444-12cd418968c5 example-stack 2021-01-04T20:27:40.827Z [ output truncated ]
Events are available only until the stack has been deleted. You will be able to see the stack while it is in the DELETE_IN_PROGRESS state,
but once it has been fully deleted, aws cloudformation describe-stack-events will fail.
termination protection
Just like individual EC2 instances, CloudFormation stacks can be protected from accidental termination by setting a flag that will halt any deletion operation and force the operator to examine the situation again. This is easily accomplished at stack creation time, but we find the interactive command perhaps even more helpful to add an additional guard rail dynamically whenever the need arises. For example, the command
aws cloudformation update-termination-protection
--stack-name example-stack --enable-termination-protection
would have saved our example stack from termination.
Which Method Should I Use?
As we have already seen, AWS provides a lot of choices. When deciding which method is best for your use case, there are several things to consider. One of the most important is the return on investment of any effort spent automating your system administration tasks.
The main factors to consider are as follows:
How frequently is the action performed?
How difficult is it?
How many people will have to perform it?
If you are part of a small team that does not make frequent changes to your infrastructure, the Management Console might be all you need. Personal preference will also play a part: some people are more at home in a web interface than they are on the command line. Once you have a complicated infrastructure or a larger team, it becomes more important that processes are documented and automated, which is not a strong point of the Management Console.
For production services, we cannot recommend using CloudFormation strongly enough. Given the benefits outlined in the previous section—an audit trail, stack templates stored in source control—how could any sysadmin not immediately fall in love with this technology? Unless you have a compelling reason not to, you should be using CloudFormation for any AWS resources that are important to your infrastructure.
Mike’s golden rule for any infrastructure he is responsible for is “If it’s in production, it’s in Git.” Meaning that if a resource—application code, service configuration files, and so on—is required for that infrastructure to operate, it must be under version control. CloudFormation ties into this philosophy perfectly.
No matter how useful CloudFormation is, at times you will need to perform tasks that fall outside its capabilities. For these occasions, some combination of the command-line tools and client libraries are the next best thing in terms of ease of documentation and automation.
Combining the AWS client libraries with existing system management software can be a powerful tool. Packages such as Fabric (Python) and Capistrano (Ruby) make it easier to efficiently maintain large numbers of systems. By combining these with the respective language’s client library, you can use them to administer a fleet of EC2 instances. At the opposite end of the spectrum, higher-level infrastructure-as-code tools like Hashicorp Terraform can support powerful cross-service automation.
Automating too early can waste as much time as automating too late, as demonstrated in Figure 1-12. Especially at the beginning of a project, processes can change frequently, and updating your automation scripts each time can be a drain on resources. For this reason, we recommend using the Management Console when first learning a new AWS service—once you have performed the same task a few times, you will have a clear idea of which tasks will provide the most “automation ROI.”

Figure 1-12. XKCD’s take on automation, courtesy of Randall Munroe
Note
If you are interested in strategies to help decide which tasks warrant automation, the authors would like to recommend Time Management for System Administrators by Thomas A. Limoncelli (O’Reilly).
Regardless of which method you choose, it is important to have a documented process describing how to perform updates. Errors will inevitably occur if there is no policy in place to organize everyone in a coherent fashion.
1 Brendan Gregg navigates the seven generations of EC2 virtualization to date.