13
Containers in AWS
In this chapter, you will learn about various patterns commonly used by many top technology companies worldwide, including Netflix, Microsoft, Amazon, Uber, eBay, and PayPal. These companies have survived and thrived by adopting cloud technologies and the design patterns that are popular on the cloud. It is hard to imagine how these companies could exist in their present form if the capabilities delivered by the cloud did not exist. In addition, the patterns, services, and tools presented in this chapter make the cloud much more powerful.
Containers are an evolution of virtualization technology – virtualized hardware and virtualized machines are what you have been used to for many years. Many vendors provide this kind of virtualization, including AWS.
In this chapter, you will first learn about the concept of containerization with the most popular container platforms, Docker, Kubernetes, OpenShift, and the related offerings in AWS.
In this chapter, we will cover the following topics:
- Understanding containerization
- Virtual machines (VMs) and virtualization
- Containers versus VMs
- Learning about Docker
- Learning about Kubernetes
- Learning about AWS Fargate
- Red Hat OpenShift Service on AWS (ROSA)
- Choosing between container services
Let’s get started.
Understanding containerization
It’s almost 6 o’clock, and dinner time is getting close. You are getting hungry. And you feel like cooking some roasted vegetables. Time to fire up the grill. But think about everything that’s going to be required:
- Vegetables
- A grill
- Matches
- Charcoal or gas
- Condiments
- Tongs
So, it’s more than just roasted vegetables.
Some companies specialize in bundling all the necessary elements to facilitate this process and you can buy everything in a package. A similar analogy would be if you went to a restaurant. The cook handles all of the elements listed here for you; all you have to do is eat.
It’s the same with software. Installing something like a website is much more than just installing your code. It might require the following:
- An Operating System (OS)
- A database
- A web server
- An app server
- Configuration files
- Seeding data for the database
- The underlying hardware
In the same way, the restaurant chef handles everything for you, and container technology can help create a standalone bundle that can take care of everything related to deployment and simplify your life. Containers enable you to wrap all the necessary components into one convenient little package and deploy them all in one step.
Containers are standardized packages of software that include all dependencies, enabling applications to run smoothly, uniformly, and reliably regardless of how many times they are deployed. Container images are lightweight, independent, standalone, and executable software bundles that include all that is needed to run an application:
- Source code
- The runtime executable
- System tools
- System libraries and JAR files
- Configuration settings
Containerization is bundling your application into containers and running them in isolation, even if other similar containers are running on the same machine. Containers enable you to innovate faster and innovate better. Containers are portable – all app dependencies are packaged in the container and are consistent – they run the same way on all Linux OSes. This portability and consistency enable you to build end-to-end automation, which speeds up the delivery of software and delivers efficiency such as cost and less resource overhead. Containers are used to make it easier to develop, deploy, and run applications. They are popular because they allow developers to create and deploy applications quickly, and they make it easy to run those applications in a variety of different environments, including on-premises, in the cloud, and in hybrid environments.
Let’s now look at the advantages of containers.
Advantages of containers
There is a reason that containers are so popular. They have many advantages over non-containerized software deployed on bare metal. Let’s analyze the most relevant advantages.
Containers enable you to build modern applications
Containers allow us to deploy applications more efficiently for a variety of reasons. Many applications today require a loosely coupled and stateless architecture. A stateless architecture doesn’t store any state within its boundaries. They simply pass requests forward. If the state is stored, it is stored outside of the container, such as in a separate database. Architectures like this can be designed to easily scale and handle failures transparently because different requests can be handled independently by different servers. A loosely coupled architecture is one where the individual components in the architecture have little or no knowledge of other components in the system. Containers are ideally suited for this type of application.
Using containers to build modern applications can help developers create and deploy applications more efficiently, while also making it easier to run those applications in a variety of different environments. Some reasons why containers are ideal for building modern applications are:
- Improved efficiency and enhanced portability: Containers allow developers to build an application once and run it on any other Linux machine, regardless of any customized settings that the machine might have. This makes it easy to deploy applications in a variety of environments, including on-premises, in the cloud, and in hybrid environments.
- Simplified deployment: Containers can be used to package and run existing applications without the need for modification, which makes it easier to migrate these applications to the cloud and integrate them into newer development processes and pipelines. While using containers in this way can be beneficial, it is often more effective to refactor the application in order to take full advantage of the benefits that containers offer. This may involve reworking certain aspects of the application or building new features on top of the existing application. By containerizing and refactoring the application, it becomes more portable and can be more easily integrated into modern development workflows.
Fewer infrastructure wastes
With the low cost and speed associated with bringing instances up and down, resources such as memory can be allocated more aggressively. If we can spin up a server quickly if traffic spikes, we can run our servers at a higher CPU utilization rate without the risk of overloading our systems. Think of web applications having fluctuating user traffic, this traffic depends on many factors (such as the time of day, day of the week, and so on). If we use containers, we can spin up new instances whenever traffic increases. For example, think about Amazon.com. It would be surprising if their web traffic were not considerably higher during the holidays and weekends than on weekdays as most people shop more over holiday periods. Containers allow you to isolate applications and run multiple applications on a single host, which can lead to better resource utilization. They also make it easier to scale applications up or down, as needed, by allowing you to deploy additional containers as needed to meet demand.
Containers are simple
Containers enable isolated, autonomous, and independent platforms without the overhead of an OS. Developers can redeploy a configuration without managing the application state across multiple virtual machines. Some containers are cross-platform and can be deployed on Mac, Windows, or Linux environments. Containers can be deployed and managed using a container orchestration tool, such as Kubernetes, which simplifies the process of deploying and managing applications at scale.
Containers can increase productivity by accelerating software development
The fast and interactive nature of the deployment of containers can offer fast feedback to accelerate the development cycle. The deployment of containers can be automated, further enhancing productivity. Containers can be started in a repeatable and consistent manner in one instance or multiple instances, regardless of the instance type or size. Containers allow developers to package an application with all its dependencies and ship it as a single package, making it easier to develop, deploy, and run the application.
As more and more applications are designed with cloud-native and microservices architectures, containers have become a popular way to package and deploy these components. In order to support agile development practices, such as DevOps and continuous integration/continuous deployment (CI/CD), it is important to have tools that can automate the process of deploying and managing distributed cloud-native applications. Container orchestration and management systems are designed to do just that, and they are essential for managing applications at scale. By using containers to package code and leveraging container orchestration and management systems, it is possible to build and deploy modern, cloud-native applications efficiently and effectively.
Using containers to deploy applications can enable you to deploy your application across an array of servers. It doesn’t matter if that server array has ten servers, 100 servers, or 1,000 servers.
Disadvantages of containers
There is always a downside to every technology. There is no silver bullet. In the case of containers, these are some of the disadvantages.
Container speeds are slightly slower compared to bare-metal servers
A bare-metal server is a server that one user can utilize. Before the age of virtualization, there was no other kind of server. There was no way to slice a server and have multiple users on each slice. Multiple users could use a server but without any real separation. Virtualization enables us to slice up a server and provide dedicated slices to individual users.
In this case, the user will think they have complete and exclusive use of the server when, in actuality, they are only using a portion of the server. In this case, a performance penalty is paid compared to the bare-metal approach.
The performance of containers has higher overhead constraints compared to bare metal due to the following:
- Overlay networking: To provide virtualization, an extra network layer must be overlaid on top of the OS. This overlay creates overhead.
- Interfacing with other containers: The connections between containers will not be as fast if they exist within the same container engine as opposed to connecting containers that are running on separate hosts. This is because communication between containers within the same engine typically involves some level of virtualization, which can add latency and reduce throughput.
- Connections to the host system: There are also connections between the containers and the underlying host system. There will also be some latency with these connections compared to intra-process connections.
The overhead is small, but if your application requires you to squeeze performance to gain the edge no matter how small, you will want to use bare metal instead of containers. An example of this use case is high-frequency trading platforms, where performance is measured in microseconds.
Ecosystem inconsistencies
Although the popular Docker platform is open-source and pervasive, it is not fully compatible with other offerings such as Kubernetes and Red Hat’s OpenShift. This is due to the normal push/pull forces between competitors and their desire to grow the market together (by offering compatible and uniform features) while at the same time growing their market share (by offering proprietary features and extensions).
For example, Docker and Kubernetes are not fully compatible. Docker uses its own container runtime, while Kubernetes supports multiple container runtime options, including Docker. This means that certain features and functionality that are available in the Docker runtime may not be available when using Kubernetes. Both platforms have different approaches to volume management, which can make it difficult to use persistent storage with containers in certain environments. They also have different approaches to security, which can make it difficult to secure containers in certain environments.
While it is possible to use Docker and Kubernetes together, there may be some limitations and challenges to consider. It is important to carefully evaluate the specific needs and requirements of your application when deciding which platform to use.
In summary, containers can be great for certain use cases, but they are not a magic bullet for all scenarios. Containers are well suited to running microservices that don’t require microsecond performance. Containers can simplify microservice delivery by enabling a packaging mechanism around them.
Virtualization has been a popular method for optimizing the use of IT infrastructure for several years, with virtual machines being widely used to run multiple applications on a single physical server. In recent years, containers have gained popularity as a way to further optimize idle resources within VMs by allowing multiple applications to be run in isolated environments on a single OS. Before discussing containers in more detail, it is important to understand the basics of virtual machines and virtualization.
Virtual machines (VMs) and virtualization
In order to understand VMs and virtualization, let’s first look at an analogy. For many of us, one of our goals is to own a house. Can you picture it? Three bedrooms, a beautiful lawn, and a white picket fence, maybe? For some of us, at least for now, that dream may not be achievable, so we must settle on renting an apartment in a big building.
You can think of the beautiful house as a normal standalone server that serves only one client or application. The apartment, in this case, is the VM. The apartment serves its purpose by providing housing with some shared services. It might not be as beautiful and convenient as the house, but it does the job. With the house, you are wasting resources if you live alone because you can only use one room at a time. Similarly, with a standalone server, especially if you have an application with variable traffic, you will have lulls in your traffic where a lot of the capacity of the machine is wasted.
As you can see from the example, both approaches have advantages and drawbacks, and your choice will depend on your use case. However (unlike in the houses versus apartments metaphor), from the perspective of VM users, they would be hard-pressed to know whether they are using a dedicated machine or a VM.
To create virtualization and isolation on top of a bare-metal physical server, VMs use a hypervisor. A VM manager, also called a hypervisor, is a software application that enables several OSes to utilize a single hardware host concurrently. It creates a layer of abstraction between the hardware and the OSes, allowing multiple VMs to run on a single physical machine. Hypervisors allow you to share and manage hardware resources and provide you with multiple isolated environments all within the same server. Many of today’s hypervisors use hardware-enabled virtualization and hardware designed explicitly for VM usage.
The two primary categories of hypervisors are Type 1, also referred to as bare-metal or native hypervisors, which operate directly on the hardware of the host, and Type 2, also known as hosted hypervisors, which operate on top of a host OS.
Hypervisors are used for a variety of purposes, including server consolidation, testing and development, and enabling legacy applications to run on modern hardware. They are an important tool for maximizing the utilization of hardware resources and enabling organizations to run multiple applications on a single physical machine. You can have two VMs running alongside each other on the same physical machine and have each one running a different OS. For example, one could be running Amazon Linux, and the other VM could be running Ubuntu.
Now that we have learned about these concepts, let’s compare containers and VMs.
Containers versus VMs
There is a definite line of distinction between VMs and containers. Containers allow you to isolate applications within an OS environment. VMs allow you to isolate what appears to the users and represent it as a completely different machine to the user, even with its own OS.
The following diagram illustrates the difference:
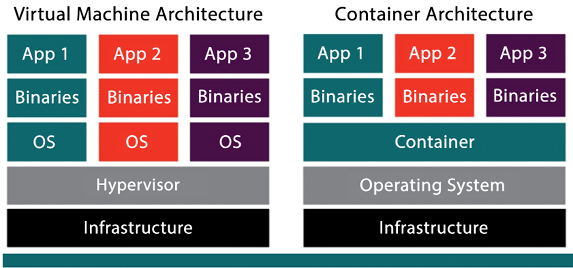
Figure 13.1: VMs versus containers
As we can see in Figure 13.1, in the case of VM architecture, each virtual slice has its own OS and all the slices sit on top of the hypervisor. In the case of container architecture, there is only one OS installed for all the instances. There is only one container engine, but multiple binaries and applications can be installed for each slice.
Containers share a kernel at the OS level; all components are built into the OS kernel, which makes containers fast to start and, when compared to VMs, they generally have lower overhead.
VMs have a more defined isolation boundary; you must run a full OS (and kernel) to use a VM. Each VM handles boot processes, including device initialization, which requires more overhead than containers.
It’s also useful to highlight that, in most cases, when you run containers in AWS (and in most cloud environments, for that matter), you will run these containers on a VM. Therefore, there will be multiple containers running in a VM. In turn, that VM will be running alongside a set of other VMs in the same hypervisor on top of a physical machine. The only exception to this rule might be if you pay extra to get a dedicated instance.
You can see in the following diagram the foundation layer of the infrastructure. You can have a bare-metal physical server sitting in the data center. On top of that, you have a hypervisor that creates VMs with OSes installed. In this case, you can see three VMs on top of a single physical server. Now, here comes the beauty of containers; you can see that each VM has two containers, so that’s a total of 6 in one physical server. Now without containers, you can only deploy three applications, one in each VM, but the container provides environment-level isolation, so now you can utilize your VMs fully by deploying two applications in each VM even though the underlying OS is the same.
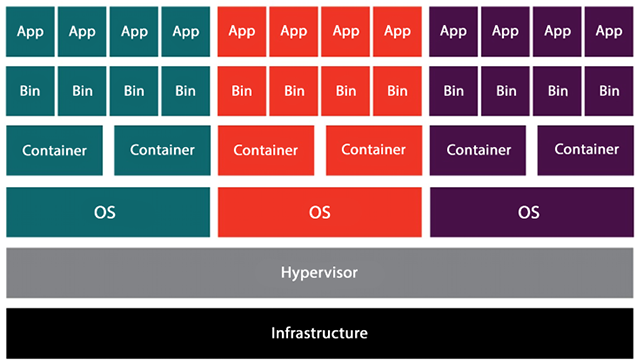
Figure 13.2: Architecture for container virtualization
VMs and hypervisors are transparent to you when using AWS. Whenever you launch an Elastic Compute Cloud (EC2) instance at the hypervisor layer, AWS does a lot of work for you behind the scenes. The EC2 instance appears to you as your own dedicated instance, but in truth, the new instance is just another VM in an army of VMs that AWS has launched for other AWS users.
When utilizing a VM, you run an application within a virtualized OS, along with the necessary binaries and libraries, all of which are encapsulated within a virtual environment. In contrast, containers operate at a higher level in the stack, where OS-level components are virtualized instead of the entire OS and hardware. The OS makes processes believe they are running in their own dedicated environment. They cannot see the other processes running on that OS and have access to their own virtualized resources, including the file system tree.
So far, we have learned about the general concepts of containerization and virtualization. In the next sections, we will drill down into more specific topics and learn about actual implementations of these concepts, starting with the popular open-source software Docker, and then moving onto Kubernetes and OpenShift.
Learning about Docker
It would be a disservice to you, reader, for us to talk about containers and not mention Docker. Docker is not the only way to implement containers, but it is a popular container software; perhaps the most popular one. Docker has almost become synonymous with the term container. Docker, Inc., the product maker, follows a freemium model, offering both a free and a premium version. Docker was released to the public in 2013 at the PyCon Conference.
As container software, Docker can package an application with its libraries, configuration files, and dependencies. Docker can be installed in Linux environments as well as on Windows. The virtual containers that Docker enables allow applications to run in isolation without affecting any other processes running on the same physical machine.
Docker is often used by both developers and system administrators, making it an essential tool for many DevOps teams. Developers like using it because it allows them to focus on writing code without worrying about the system’s implementation and deployment details where it will eventually be deployed. They can be assured that the characteristics of the environment will be identical regardless of the physical machine. Developers can also leverage many of the programs and extensions that come bundled with Docker. System administrators use Docker frequently because it gives them flexibility and its light footprint allows them to reduce the number of servers needed to deploy applications at scale.
The complete Docker documentation, installation instructions, and a download link for the Community edition of Docker can be found here: https://docs.docker.com/.
Docker components
Docker does not have a monolithic architecture. It has a set of well-defined components, each in charge of an individual function and fully dedicated to performing only that function.
The following architecture shows the major Docker components.
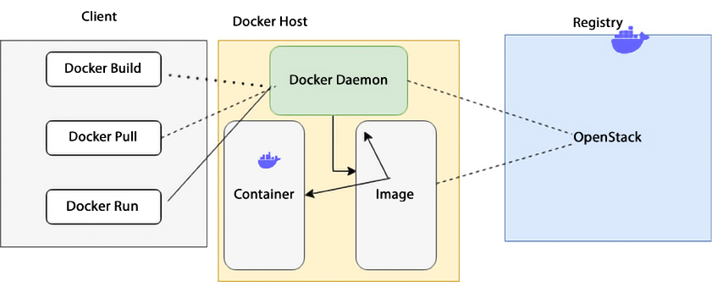
Figure 13.3: Docker architecture
As shown in the preceding diagram, the Docker system operates on a client-server model where the Docker client communicates with the Docker daemon. The Docker daemon handles the complex tasks associated with building, running, and administering Docker containers. The daemon has the flexibility to run on the same host as the client or establish a connection with a remote host. The Docker client and daemon can run on a variety of OSes, including Windows and Linux. Let’s go through the Docker components in detail to increase our understanding of Docker.
Dockerfile
Every Docker container needs to have a Dockerfile. A Dockerfile is a plain old text file containing instructions showing how the Docker image will be built. Don’t worry; we’ll cover Docker images in a second.
Some of the instructions that a Dockerfile will contain are the following:
- The OS supporting the container: What is the OS associated with the container? For example, Windows, Linux, and so on.
- Environmental variables used: For example, most deployments require a list of variables. Also, is this a production or test deployment? What department is this deployment for? What department should be billed?
- Locations of files used: For example, where are the data files located? Where are the executable files?
- Network ports used: For example, what ports are open? Which port is used for HTTP traffic?
Let’s now move on to the Docker image component.
Docker images
After creating the Dockerfile, the next step is creating an image. The Docker build utility can take a Dockerfile and create an image. The Docker build utility’s purpose is to create ready-for-deployment container images. The Dockerfile contains instructions that specify how the Docker image will be built.
The Docker image is portable across environments and instance types, and that’s one of the reasons for Docker’s popularity. You can deploy the same image in a Linux or Windows environment, and Docker will handle the details to ensure that the deployment functions correctly in both environments. One recommended best practice is to ensure that any external dependencies specified in the Dockerfile have the version of the dependency explicitly declared. If this is not done, inconsistencies may result from the same Dockerfile because a different library version may be picked up.
Docker run
Docker run is a utility where commands can be issued to launch containers. In this context, a container is an image instance. Containers are designed to be transient and temporary. The Docker run utility can restart, stop, or start containers. The utility can launch several instances of the same image, and those instances can run simultaneously to support additional traffic. For example, if you have ten similar instances taking traffic and the traffic increases, you can use the Docker run utility to launch an additional instance.
Docker Hub
When you build a container, you can configure it from scratch, creating your own Dockerfile and configuring it yourself. However, many times, it is not necessary to reinvent the wheel. If you want to leverage the work that others have done already, you can use Docker Hub. Docker Hub is a collection of previously created containers shared by Docker users. In Docker Hub, you will find Docker images created by Docker and by other vendors who sometimes support those containers. Also, other Docker users publish versions of the containers they have created that they have found useful.
You can also share your containers with the public if you choose to do so. However, if you choose, you can also upload containers into a local Docker registry, keep them private, and only share them with select groups and individuals.
Docker Engine
Docker Engine is the heart of Docker. When someone says they are using Docker, it is shorthand for saying “Docker Engine.” Docker Engine instantiates and runs containers. The company offers two versions of Docker Engine: the open-source version, dubbed Docker Engine Community Edition, and Docker Engine Enterprise Edition.
Docker launched Docker Engine Enterprise Edition in 2017. However, as with many companies that use the freemium model, the original open-source version is still available and maintained. It is now called Docker Engine Community Edition. The Enterprise Edition has added advanced features, such as vulnerability monitoring, cluster management, and image management.
Docker Compose
Docker Compose is another Docker tool that can be used to configure and instantiate multi-container Docker applications. In order to configure it, a YAML file is used. Once the YAML configuration is defined, the service can be started with one command. Some of the advantages of using Docker Compose are as follows:
- More than one isolated environment can be deployed per instance
- Volume data can be preserved as new containers are instantiated
- Only containers that have been modified need to be instantiated
- Variables can be passed in via the configuration file
A common use case for Docker Compose is setting up development, testing, and UAT environments on one host.
Docker Swarm
Docker Swarm groups VMs or physical machines that are running Docker Engine and are configured to run as a cluster. Once the machines have been clustered, you can run regular Docker commands, and those commands will be executed on the cluster rather than on individual services. The controller for a swarm is called the swarm manager. The individual instances in the cluster are referred to as nodes.
The process of managing nodes in a cluster in unison is called orchestration.
Operating instances as a cluster or a swarm increases application availability and reliability. Docker swarms consist of multiple worker nodes and at least one manager node. The worker nodes perform the application logic and handle the application traffic, and the manager oversees the management of the worker nodes, thus managing resources efficiently.
Let’s look into the AWS-managed container service for hosting Docker in the cloud.
Amazon Elastic Container Service (ECS)
The core of container management is automation, which includes container build/deploy pipelines, observability for ensuring health, Service Level Agreements (SLAs), and security at all steps. Container orchestration is an important piece that manages computers, networking, and storage and handles critical aspects such as scheduling and auto-scaling. This is where ECS comes in, providing an end-to-end orchestration service for containers.
Amazon Elastic Container Service (ECS) is a container orchestration service. It enables users to launch EC2 containers in the form of tasks. In this case, a task is one or more EC2 instances with a Docker container. These EC2 instances can send traffic to other AWS services, such as AWS RDS. A cluster of EC2 instances may run within an ECS Auto Scaling group with predefined scaling rules. For this to happen, the ECS container agent will constantly poll the ECS API, checking whether new containers need to be launched and whether old containers need to be made idle depending on traffic. All of this may seem fine and dandy, but a degree of EC2 instance management still needs to happen, which increases complexity.
ECS is a fully managed orchestration platform and control plane where you don’t have to manage, patch, or upgrade anything. It is fully integrated with all the core services that are needed for end-to-end orchestration. It operationalizes your container workload at an immense scale without having you install any software. It’s a multi-tenant service that can spin up many clusters, services, and tasks.
Scheduling and orchestration are key components of ECS, and the cluster manager and placement engine play specific roles in helping with this. Let’s learn about the working of ECS.
Amazon ECS architecture
The cluster manager manages the health of the instances within your cluster. You set up an Auto Scaling group and register your instances with your cluster. ECS is then aware of the capacity you desire for your containers.
Placement engines, on the other hand, enable much more advanced techniques for how you want to place your tasks onto the EC2 instance. For example, if you have certain tasks that you want to land on certain instance types or if you desire super-efficient bin-packing for better economics, the placement engine enables you to do that. The following diagram shows ECS constructs:
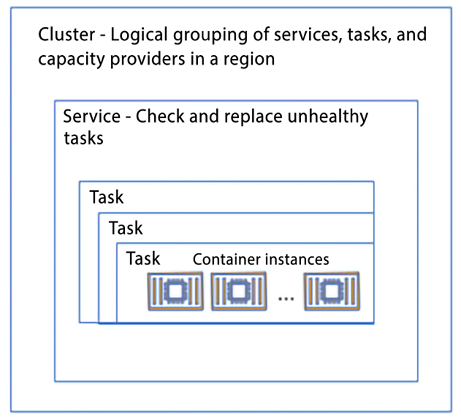
Figure 13.4: Amazon ECS architecture
As shown in the diagram above, the following are the components of ECS:
- An ECS container instance refers to an EC2 instance that runs the ECS container agent and is registered with an ECS cluster. When tasks are launched using the EC2 launch type or an Auto Scaling group capacity provider, they are deployed on active container instances. These instances are responsible for executing the containers specified in the task definition and communicating with the ECS service to receive updates and report their status. The EC2 launch type provides the flexibility to configure and scale instances according to the application’s needs.
- A task represents an instantiation of a task definition that runs on a container instance. A task definition serves as a blueprint for a task and includes details such as the task’s name, revisions, container definitions, and volume information.
- An Amazon ECS service allows for the simultaneous operation and maintenance of a specified number of instances of a task definition within an ECS cluster. The service scheduler automatically launches, terminates, and maintains the desired number of tasks for the service.
This guarantees that the application runs the intended number of tasks continuously and automatically recovers from failures. To create a service, you specify the number of tasks to run and the task definition to use. The service scheduler then launches the necessary number of tasks and maintains that count. If a task stops or fails, the service scheduler deploys another instance of the task definition to replace it and keep the desired count. Moreover, if you scale your service, the service scheduler adjusts the number of running tasks correspondingly. This relieves you of the responsibility of managing the underlying infrastructure and scaling, allowing you to concentrate on your application code.
- An Amazon ECS cluster represents a logical grouping of tasks or services that help to manage and organize containerized applications. When running tasks or services that use the EC2 launch type, a cluster groups container instances together. When you start using Amazon ECS, a default cluster is created automatically for you. However, you can also create additional clusters within your account to segregate your resources. These clusters are secured by IAM permissions that regulate access to the resources within the cluster.
Let’s look at a scenario where you had 20 container instances. To start, you’ll request to run some tasks or create a service. You’ll specify the CPU, memory, or port requirements as part of that request. In addition, you’ll also provide other constraints, such as a specific Availability Zone (AZ), Amazon Machine Image (AMI), or instance type. Finally, you will define a strategy when starting the tasks, which could range from the spread for availability, optimization, placing them together or placing them apart, and so on. At the end of that process, ECS identifies a set of instances that satisfies the task you want to run and places those tasks across your cluster based on the specified requirements.
Now, AWS has launched ECS Anywhere (ECS-A), using which you can run a container anywhere regardless of the environment, whether it is cloud or on-premises. ECS-A is managed, cloud-delivered ECS control plane that is infrastructure-agnostic and works with both VMs and on-premises bare metal. You can use the same control plane to run, update, and maintain container orchestrators on-premises.
You only need to send information for managing tasks to the ECS-A control plane. Even in disconnected scenarios, ECS-A tasks will continue to run. ECS-A offers uniform APIs and tools for all applications, irrespective of the operating environment. It also simplifies the management of your hybrid footprint by enabling the deployment of applications in on-premises environments.
For a serverless option, AWS Fargate provides a serverless compute engine for containers that are a part of ECS. It allows customers to run containerized applications without having to manage the underlying infrastructure.
With Fargate, customers can simply specify the resources that their application requires, such as CPU and memory, and Fargate will take care of provisioning the necessary resources, scaling them as needed, and managing the underlying infrastructure. You will learn about Fargate in much more detail later in this chapter, but first, let’s learn about the components of ECS.
ECS components
Multiple factors come into play when running containers in ECS, like networking, storage, and security. Let’s learn about them in detail.
Networking
There are four primary modes of networking available for containers running on ECS (on EC2, AWS Fargate, and ECS-A):
- Bridge – The bridge mode in an Amazon ECS task uses Docker’s built-in virtual network, which runs inside each container instance. In this mode, containers connect to the Docker virtual bridge, which allows multiple containers on the same host to use the same ports without conflict. This is because a range of dynamic ports maps the container ports to the host ports. However, this mode does not offer the best performance compared to other networking modes like
awsvpcmode. In bridge mode, containers on the same host share the same network namespace, which can lead to increased network latency and reduced network throughput. Additionally, because the containers share the host’s IP address, it can be more difficult to secure communication between containers and external networks. - Host – In host mode, container ports are mapped directly to the EC2 instance’s network interface. This bypasses Docker’s built-in virtual network, which can result in better performance, as the containers have direct access to the host’s network resources. However, this mode has some limitations compared to other networking modes. If port mappings are being used, running multiple instances of the same task on a single container instance is not possible in host mode. This is because the ports are mapped directly to the host’s network interface, so multiple tasks cannot use the same ports on the same host. Additionally, because the containers share the host’s IP address, it can be more difficult to secure communication between containers and external networks. It’s also important to note that host mode is not compatible with many of the features of Amazon ECS, like service discovery and load balancing. Because of this, it’s generally recommended to use other networking modes like
awsvpcfor most use cases. Containers configured to run in host mode share the EC2 instances network namespace.Containers can share the same IP as your host; this also means that you cannot have multiple containers on the same host using the same port. In other words, a port used by one container cannot be used by another container on the same host if host networking mode is configured.
- Task networking or awsvpc – When using the
awsvpcnetworking mode, every task launched from the corresponding task definition is assigned its own Elastic Network Interface (ENI) and a primary private IP address. This grants tasks running on Amazon ECS, on either EC2 or Fargate, networking properties similar to those of Amazon EC2 instances. By using theawsvpcnetwork mode in task definitions, container networking is simplified, and more control is offered over how containerized applications interact with each other and other services within your Virtual Private Cloud (VPC). This mode also provides enhanced security for your containers by enabling the use of security groups and network monitoring tools at a more granular level within your tasks. With theawsvpcmode, you can assign a specific IP address and security group to each task, and also control the ingress and egress traffic of each task through security groups and Network Access Control Lists (NACLs). - None – In none mode, the task has no external network connectivity.
Let’s look at storage, a critical component of hosting containers.
Storage
The following are the storage modes for ECS.
- Ephemeral storage – For Amazon ECS on Fargate, tasks running platform version 1.4.0 or later are allocated 20 GiB of ephemeral storage, which can be configured as needed. This temporary storage is free for up to 20 GiB, with any additional storage incurring charges. By increasing the ephemeral storage for tasks on AWS Fargate, various workloads, such as machine learning inference, ETL, and data processing, can be run. This feature also allows you to run tasks on Fargate with container images larger than 20 GiB, as these must be downloaded locally before starting the task.
- Amazon Elastic File System (EFS) storage – Containers running on either ECS or AWS Fargate can use EFS as a shared storage option. This enables the deployment and execution of containerized applications that require shared storage, including content management systems, internal DevOps tools, and machine learning frameworks, among others.
Enabling ECS and Fargate to use EFS allows a wide range of workloads to take advantage of the benefits of containers, including faster deployment, better use of infrastructure, and more resilient systems. This can help customers to improve their application’s performance and reduce their operational costs.
Security
You learned about the cloud shared responsibility security model in Chapter 8, Best Practices for Application Security, Identity, and Compliance. Let’s look at it in the context of Amazon ECS with EC2 instances.
With IAM roles for Amazon ECS tasks, you can specify an IAM role that the containers in a task can use. The IAM role allows the containers to access AWS resources that are specified in the permissions of the role. This functionality enables you to handle credentials for your applications in a similar way to how Amazon EC2 instance profiles grant credentials to EC2 instances. Rather than generating and distributing your AWS credentials to the containers or relying on the EC2 instance’s role, you can assign an IAM role to an ECS task definition or RunTask API operation. This allows you to grant your containerized applications permission to access AWS services and resources without having to hardcode the credentials in the application.
IAM roles for tasks also enable you to manage and rotate the credentials used by the containerized applications, keeping them secure and ensuring that access is granted only to the resources that are required by the task. This improves the security of your applications and makes it easier to manage the access control of your AWS resources. With IAM roles for tasks, permissions can be applied at the task level, ensuring containers only have privileges to do the things they need to do.
With Fargate, AWS takes care of the underlying infrastructure, including the EC2 instances and the OS, so that you can focus on running your containerized applications. Fargate isolates each task within its cluster, providing a secure and managed environment for running containers. AWS Fargate does not allow privileged mode for containers, which gives them more access to the Docker daemon and host, improving security. Instead, it uses the awsvpc network mode, which provides an isolated network interface for each task. This allows you to leverage security group ingress and egress rules to control the network traffic for each task. This improves security and allows you to define more granular network access controls for your containerized applications.
Amazon Elastic Container Registry (ECR) is a container registry service provided by AWS that simplifies the sharing and deployment of container images and artifacts via public or private repositories.
ECR stores your images in a scalable and highly available architecture, ensuring reliable container deployment for your applications. By integrating with AWS Identity and Access Management (AWS IAM), ECR provides resource-level control over each repository, enabling image sharing within your organization or with individuals worldwide. You can use the CLI to push, pull, and manage Docker images, Open Container Initiative (OCI) images, and OCI-compatible artifacts.
In the next section, we will learn about Kubernetes, an alternative to Docker Swarm and another way to handle node orchestration.
Learning about Kubernetes
Kubernetes is an open-source container orchestration platform that is popular for managing and deploying containerized applications. It automates many of the manual tasks involved in deploying, scaling, and maintaining containerized applications. Kubernetes can be thought of as a train conductor; it orchestrates and manages all the rail cars (containers), making sure that they reach their destination reliably and efficiently. Kubernetes provides features such as automatic scaling, self-healing, and rolling updates, which can help to improve the availability and performance of your containerized applications.
Kubernetes also provides a rich set of APIs that can be used to automate the deployment and management of containerized applications. This makes it easy to integrate Kubernetes with other tools and platforms, such as CI/CD pipelines and monitoring systems.
Kubernetes, often abbreviated as K8s, was invented by Google. Kubernetes was developed by engineers at Google, led by Joe Beda and Craig McLuckie, based on the experience of running containers at scale in production. The project was originally called “Borg” and was used internally at Google to orchestrate the deployment of containerized applications. In 2014, Google open-sourced the Kubernetes project, which is now maintained by the Cloud Native Computing Foundation and has become one of the most popular open-source projects for container orchestration.
AWS also has its own Kubernetes service called Amazon Elastic Kubernetes Service (EKS), which allows you to run and manage Kubernetes clusters on AWS. EKS provides many of the same features and benefits as Kubernetes, but with the added benefit of being fully integrated with other AWS services, making it easy to build and run highly available and scalable applications on AWS.
In addition to Google and AWS, Kubernetes has the backing and support of a cadre of big players:
- Microsoft
- IBM
- Intel
- Cisco
- Red Hat
Kubernetes enables the deployment of a container-based infrastructure in production environments. Some of the functionality that Kubernetes enables includes the following:
- The orchestration of containers across multiple hosts and data centers
- The optimization of hardware utilization and enablement
- The control and automation of application deployments
- The scaling of containerized applications
- Declarative language for service management
- Enhanced application reliability and availability by minimizing single points of failure
- Health checks and self-healing mechanisms, including auto-restart, auto-replication, auto-placement, and auto-scaling
Kubernetes leverages a whole ecosystem of ancillary applications and extensions to enhance its orchestrated services. Some examples include:
- Registration services: Atomic Registry, Docker Registry
- Security: LDAP, SELinux, Role-Based Access Control (RBAC), and OAuth
- Networking services: Open vSwitch and intelligent edge routing
- Telemetry: Kibana, Hawkular, and Elastic
- Automation: Ansible playbooks
Some benefits of Kubernetes are as follows:
- Give teams control over their resource consumption.
- Enable the spread of the workload evenly across the infrastructure.
- Automate load balancing over various instances and AZs.
- Facilitate the monitoring of resource consumption and resource limits.
- Automate the stopping and starting of instances to keep resource usage at a healthy level.
- Automate deployments in new instances if additional resources are needed to handle the load.
- Effortlessly perform deployments and rollbacks and implement high availability.
You will learn more benefits of Kubernetes later in this chapter. Let’s first look at the components of Kubernetes in more detail.
Components of Kubernetes
The fundamental principle that Kubernetes follows is that it always works to make an object’s “current state” equal to its “desired state.” Let’s learn about the key components of Kubernetes.
- Pod – In Kubernetes, a Pod is the smallest deployable unit that can be created, scheduled, and managed. It is a logical collection of one or more containers that belong to the same application, and these containers share the same network namespace. This allows the containers in the Pod to communicate with each other using localhost. A Pod is also created in a namespace, which is a virtual cluster within a physical cluster. Namespaces provide a way to divide the resources in a cluster and control access to them. Pods within the same namespace can communicate with each other without any network address translation, and Pods in different namespaces can communicate through network address translation. Pods have their storage resources, which are shared among all containers inside the Pod; these resources are called Volumes, which can provide shared storage for all containers inside the Pod, such as configuration files, logs, and data.
- DaemonSet – In Kubernetes, a DaemonSet is a controller that ensures that all (or some) of the nodes in a cluster run a copy of a specified Pod. A DaemonSet is useful for running Pods that need to run on every node, such as system daemons, log collectors, and monitoring agents. When you create a DaemonSet, Kubernetes automatically creates a Pod on every node that meets the specified label selector criteria and makes sure that a specified number of replicas are running at all times. If a node is added to the cluster, Kubernetes automatically creates a Pod on the new node, and if a node is removed from the cluster, Kubernetes automatically deletes the corresponding Pod. DaemonSet also ensures that the Pods are running on the nodes that match the given nodeSelector field. This allows us to have the Pod running only on specific nodes.
- Deployment – A Deployment is a declarative way to manage a desired state for a group of Pods, such as the number of replicas, updates, and rollbacks. The Deployment controller in a Kubernetes cluster ensures that the desired state, as defined in the Deployment configuration, matches the actual state of the Pods. When you create a Deployment, it creates a ReplicaSet, which is a controller that ensures that a specified number of Pod replicas are running at all times. The deployment controller periodically checks the status of the replicas and makes necessary adjustments to match the desired state.
If a Pod dies or a worker node fails, the deployment controller automatically creates a new replica to replace it. A Deployment also provides a way to perform rolling updates and rollbacks to your application. This allows you to update your application with zero downtime and roll back to a previous version if needed.
- ReplicaSet – A ReplicaSet is a controller that ensures that a specified number of replicas of a Pod are running at all times. It is used to ensure the high availability and scalability of applications. A ReplicaSet can be created by a Deployment or can be created independently. It watches for the Pods that match its label selector and makes sure that the desired number of replicas are running. If a Pod dies or is deleted, the ReplicaSet automatically creates a new replica to replace it. If there are extra replicas, the ReplicaSet automatically deletes them. ReplicaSet also provides a way to perform rolling updates and rollbacks to your application. This allows you to update your application with zero downtime and roll back to a previous version if needed.
- Job – A Job is a Kubernetes controller that manages the creation and completion of one or more Pods. Its primary function is to ensure that a specified number of Pods are successfully created and terminated. Jobs are used to run batch workloads, long-running tasks, or one-off tasks that don’t need to run continuously. Upon creation, a Job controller initiates the creation of one or more Pods and ensures that the specified number of Pods complete successfully. Once the specified number of Pods has been completed successfully, the Job is marked as completed. If a Pod fails, the Job automatically creates a new replica to replace it. Jobs are complementary to ReplicaSet. ReplicaSet is used to manage Pods that are expected to run continuously, such as web servers, and a Job controller is designed to manage Pods that are expected to complete or terminate after running, such as batch jobs.
- Service – A Service in Kubernetes is an abstraction that defines a logical set of Pods and a policy for accessing them. It provides a stable endpoint for a group of Pods, independent of their individual IP addresses or network locations. Services abstract the underlying Pods and enable load balancing across the Pods. They can also route traffic to specific subsets of Pods based on labels. Kubernetes simplifies Service discovery by giving Pods their IP addresses and a single DNS name for a group of Pods without requiring modifications to your application. This simplifies access to an application running on a set of Pods and improves the availability and scalability of your application.
- Labels – Labels in Kubernetes are utilized to attach key-value pairs to various objects like Services, Pods, and Deployments. They allow users to assign identifying attributes to objects that hold significance for them, but do not affect the core system’s semantics directly.
These labels can be utilized for organizing and grouping objects within a Kubernetes cluster. They can be used to specify attributes such as the environment (production, staging, development), version, and component type. Labels can also be used to select a subset of objects. This is done by using label selectors, which are used to filter sets of objects based on their labels. For example, you can use a label selector to select all Pods with the label
env=productionand expose them as a Service.
- kubectl (Kubernetes command-line tool) – It is a CLI for running commands against Kubernetes clusters. It is the primary way to interact with a Kubernetes cluster, and it allows you to manage and troubleshoot your applications running on a cluster. With
kubectl, you can perform a wide range of operations on a Kubernetes cluster, such as creating and managing resources, scaling your application, and troubleshooting issues.kubectlcan be used to deploy and manage resources, inspect and troubleshoot the cluster, and gather detailed information about the state of the cluster and its components. It can also be used to view and update the configuration of resources and to access the logs and metrics of your applications.
Let’s now look at the advantages of Kubernetes.
Kubernetes advantages
As more enterprises move their workloads to the cloud and leverage containers, Kubernetes keeps getting more and more popular. Some of the reasons for Kubernetes’ popularity are as follows.
Faster development and deployment
Kubernetes facilitates the enablement of self-service Platform-as-a-Service (PaaS) applications. Kubernetes provides a level of abstraction between the bare-metal servers and your users. Developers can quickly request only the resources they require for specific purposes. If more resources are needed to deal with additional traffic, these resources can be added automatically based on the Kubernetes configuration. Instances can easily be added or removed, and these instances can leverage a host of third-party tools in the Kubernetes ecosystem to automate deployment, packaging, delivery, and testing.
Cost efficiency
Container technology, in general, and Kubernetes in particular, enables better resource utilization than that provided just by hypervisors and VMs. Containers are more lightweight and don’t need as many computing and memory resources.
Cloud-agnostic deployments
Kubernetes can run on other environments and cloud providers, not just on AWS. It can also run on the following:
- Microsoft Azure
- Google Cloud Platform (GCP)
- On-premises
Kubernetes enables you to migrate workloads from one environment to another without modifying your applications, and it avoids vendor lock-in. This means that you can easily move your workloads between different environments, such as between different cloud providers or between a cloud and on-premises environment, without having to make any changes to your application code or configuration. It also provides you with the flexibility to choose the best infrastructure that suits your needs without being locked into a specific vendor.
In that case, if the whole cloud provider stops delivering functionality, your application still won’t go down.
Management by the cloud provider
It is hard to argue that Kubernetes is not the clear leader and standard bearer regarding container orchestration when it comes to the open-source community. For this reason, all the major cloud providers, not just AWS, offer managed Kubernetes services. Some examples are these:
- Amazon EKS
- Red Hat OpenShift
- Azure Kubernetes Service
- Google Cloud Kubernetes Engine
- IBM Cloud Kubernetes Service
These managed services allow you to focus on your customers and the business logic required to serve them, as shown in the following figure:
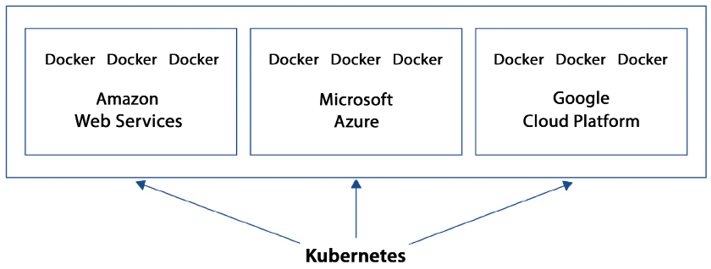
Figure 13.5: Sample architecture for a multi-cloud Kubernetes deployment
As shown in the figure, as long as there is connectivity, Kubernetes can sit on one cloud provider and orchestrate, manage, and synchronize Docker containers across multiple cloud provider environments. Some of those Docker containers could even sit in an on-premises environment.
Kubernetes works with multiple container runtimes like Docker, containerd, and CRI-O. Kubernetes is designed to work with any container runtime that implements the Kubernetes Container Runtime Interface (CRI). Kubernetes provides a set of abstractions for containerized applications, such as Pods, Services, and Deployments, and it does not provide a container runtime of its own. Instead, it uses the container runtime that is installed and configured on the nodes in the cluster. This allows Kubernetes to work with any container runtime that implements the CRI, giving users the flexibility to choose the runtime that best suits their needs.
Docker is the most commonly used container runtime, and it is the default runtime in Kubernetes. Docker is a platform that simplifies the process of creating, deploying, and running applications in containers. Containers in Docker are portable and lightweight, enabling developers to package their application and its dependencies together into a single container. containerd is an industry-standard container runtime that provides an API for building and running containerized applications. It is designed to be a lightweight, high-performance container runtime that is easy to integrate with other systems. It is an alternative runtime to Docker that is gaining popularity among Kubernetes users. CRI-O is a lightweight container runtime for Kubernetes that is designed to be an alternative to using Docker as the container runtime. CRI-O only implements the Kubernetes CRI and focuses on providing a stable and secure runtime for Kubernetes.
Let’s look at a comparison between Kubernetes and Docker Swarm as both are popular orchestration platforms.
Kubernetes versus Docker Swarm
So, at this point, you may be wondering when to use Kubernetes and when it’s a good idea to use Docker Swarm. Both can be used in many of the same situations. In general, Kubernetes can usually handle bigger workloads at the expense of higher complexity, whereas Docker Swarm has a smaller learning curve but may not be able to handle highly complex scenarios as well as Kubernetes. Docker Swarm is recommended for speed and when the requirements are simple. Kubernetes is best used when more complex scenarios and bigger production deployments arise.
Amazon Elastic Kubernetes Service (Amazon EKS)
AWS provides a managed service called Amazon Elastic Kubernetes Service (EKS) that simplifies the deployment, scaling, and management of containerized applications using Kubernetes on AWS. EKS eliminates the need to provision and manage your own Kubernetes clusters, which simplifies the process of running Kubernetes workloads on AWS. It automatically scales and updates the Kubernetes control plane and worker nodes, and it integrates with other AWS services, such as ELB, RDS, and S3.
Amazon EKS is simply a managed wrapper around the Kubernetes kernel, which ensures that existing Kubernetes applications are fully compatible with Amazon EKS. This allows you to use the same Kubernetes APIs, tooling, and ecosystem that you use for on-premises or other cloud-based deployments, with the added benefits of the AWS infrastructure and services.
Amazon EKS facilitates running Kubernetes with effortless availability and scalability. It greatly simplifies restarting containers, setting up containers on VMs, and persisting data. Amazon EKS can detect unhealthy masters and replace them automatically. You never have to worry about Kubernetes version management and upgrades; Amazon EKS handles it transparently. It is extremely simple to control when and if certain clusters are automatically upgraded. If you enable EKS to handle these upgrades, Amazon EKS updates both the masters and nodes.
The combination of AWS with Kubernetes allows you to leverage the performance, scalability, availability, and reliability of the AWS platform. EKS also offers seamless integration with other AWS services, such as Application Load Balancers (ALBs) for load balancing, AWS IAM for fine-grained security, AWS CloudWatch for monitoring, AWS CloudTrail for logging, and AWS PrivateLink for private network access.
In the following sections, we will explore the various features of EKS.
EKS-managed Kubernetes control plane
Amazon EKS provides a system that offers high scalability and availability that can run over multiple AWS AZs. It is referred to as the managed Kubernetes control plane. Amazon EKS can handle the availability and scalability of the Kubernetes masters and individual clusters. Amazon EKS automatically instantiates three Kubernetes masters using multiple AZs for fault tolerance. It can also detect if a master is down or corrupted and automatically replace it.
The following diagram shows the architecture of the EKS control plane:

Figure 13.6: Amazon EKS control plane architecture
As shown in the preceding diagram, EKS operates a dedicated Kubernetes control plane for each cluster, ensuring that the cluster is secure and isolated. The control plane infrastructure is not shared across clusters or AWS accounts, meaning that each cluster has its own control plane. This control plane is composed of at least two API server instances and three etcd instances, which are distributed across three AZs within an AWS Region. This provides high availability for the control plane and allows for automatic failover in the event of a failure.
Amazon EKS continuously monitors the load on control plane instances and automatically scales them up or down to ensure optimal performance. It also detects and replaces any unhealthy control plane instances, restarting them across the AZs within the AWS Region if necessary. This ensures that the control plane is always available and running optimally.
Amazon EKS is designed to be highly secure and reliable for running production workloads. To ensure security, EKS uses Amazon VPC network policies to restrict communication between control plane components within a single cluster. This means that components of a cluster cannot communicate with other clusters or AWS accounts without proper authorization through Kubernetes RBAC policies. This helps provide an additional layer of security to your clusters.
Additionally, EKS uses a highly available configuration that includes at least two API server instances and three etcd instances running across three AZs within an AWS Region. EKS actively monitors the load on the control plane instances and automatically scales them to ensure high performance. It also automatically replaces unhealthy control plane instances, ensuring that your clusters remain healthy and reliable. With its automatic monitoring and scaling capabilities, and the ability to run across multiple AZs, it ensures the high availability of your Kubernetes clusters, and it also provides an additional layer of security for your application by using VPC network policies and Kubernetes RBAC policies.
EKS EC2 runtime options
If you use EC2 as a runtime option, you can choose one of two options for your node groups:
- Self-managed node groups – One of the options for managing the worker nodes in an EKS cluster is to use self-managed node groups. With this option, EKS nodes are launched in your AWS account and communicate with your cluster’s control plane via the API server endpoint. A node group refers to a collection of one or more Amazon EC2 instances that are deployed within an Amazon EC2 Auto Scaling group. The instances in the node group run the Kubernetes worker node software and connect to the EKS control plane. The instances are managed by an Auto Scaling group, which ensures that the desired number of instances is running at all times and automatically scales the number of instances based on demand. Self-managed node groups give you more control over the instances, such as the ability to choose the instance types and sizes, configure the security groups, and customize the user data. It also allows you to connect to existing resources such as VPCs, subnets, and security groups.
- Managed node groups – Another option for managing the worker nodes in an EKS cluster is to use managed node groups. With this option, Amazon EKS handles the automatic creation and management of the EC2 instances that serve as nodes for the Kubernetes clusters running on the Service. Managed node groups automate the process of creating, scaling, and updating the EC2 instances that make up the worker nodes in your EKS cluster. This eliminates the need to manually create and manage the Auto Scaling groups and EC2 instances that make up the worker nodes. With managed node groups, you can specify the desired number of nodes, the instance type, and the AMI to use for the instances, and Amazon EKS takes care of the rest. It automatically provisions the instances, updates them when needed, and scales the number of instances based on demand.
You can choose the compute options/instance types that suit your workload characteristics. If you want more control over the instances and have specific requirements, such as using specific instance types, configuring security groups, or connecting to existing resources such as VPCs, subnets, and security groups, self-managed node groups would be a better option. On the other hand, if you want to minimize the management overhead of your worker nodes and have a more simplified experience, managed node groups would be a better option.
Bring Your Operating System (BYOS)
BYOS is a feature that allows you to run your own custom OS on top of a cloud provider’s infrastructure. This feature is typically used when you want to run an application on an OS that is not supported by the cloud provider, or when you want to use a specific version of an OS that is not available as a pre-built image.
In the case of EKS, AWS provides open-source scripts on GitHub for building an AMI that is optimized for use as a node in EKS clusters. The AMI is based on Amazon Linux 2 and includes configurations for components such as kubelet, Docker, and the AWS IAM authenticator for Kubernetes. Users can view and use these scripts to build their own custom AMIs for use with EKS. These build scripts are available on GitHub – https://github.com/awslabs/amazon-eks-ami.
The optimized Bottlerocket AMI for Amazon EKS is developed based on Bottlerocket, an open-source Linux-based OS tailored by AWS for running containers. Bottlerocket prioritizes security by including only essential packages for container operations, thereby minimizing its attack surface and the impact of potential vulnerabilities. As it requires fewer components, it is also easier to meet node compliance requirements.
Kubernetes application scaling
There are three main types of auto-scaling in EKS.
- Horizontal Pod Autoscaler (HPA) – An HPA is a built-in Kubernetes feature that automatically scales the number of Pods in a Deployment based on resource utilization. The HPA constantly monitors the CPU and memory usage of the Pods in a Deployment, and when the usage exceeds a user-defined threshold, the HPA will automatically create more Pods to handle the increased load. Conversely, when resource utilization falls below a certain threshold, the HPA will automatically remove Pods to reduce the number of running instances. This allows for better utilization of resources and helps to ensure that the Pods in a Deployment can handle the current load. The HPA can be configured to scale based on other metrics as well, such as custom metrics, in addition to the standard metrics like CPU utilization and memory usage.
- Vertical Pod Autoscaler (VPA) – A VPA is a Kubernetes add-on that automatically adjusts the resources (such as CPU and memory) allocated to individual Pods based on their observed usage. A VPA works by analyzing the resource usage of Pods over time and making recommendations for the target resource usage. The Kubernetes controller manager will then apply these recommendations to the Pods by adjusting their resource requests and limits. This allows for more efficient resource usage, as Pods are only allocated the resources they actually need at any given time. A VPA can also be integrated with other Kubernetes add-ons such as an HPA to provide a more complete autoscaling solution.
- Cluster Autoscaler – This is a Kubernetes tool that automatically increases or decreases the size of a cluster based on the number of pending Pods and the utilization of nodes. It is designed to ensure that all Pods in a cluster have a place to run and to make the best use of the available resources. When there are Pods that are pending, due to a lack of resources, the Cluster Autoscaler will increase the size of the cluster by adding new nodes. Conversely, when there are nodes in the cluster that are underutilized, the Cluster Autoscaler will decrease the size of the cluster by removing unnecessary nodes. The Cluster Autoscaler can be configured to work with specific cloud providers such as AWS, GCP, and Azure.
It’s important to note that a Cluster Autoscaler is different from an HPA or VPA; a Cluster Autoscaler focuses on scaling the cluster, while HPA and VPA focus on scaling the number of Pods and resources allocated to them respectively.
AWS created an open-source offering for cluster auto-scaling called Karpenter. Karpenter is a cluster auto-scaler for Kubernetes that is built with AWS and is available as open-source software. It is designed to enhance the availability of applications and the efficiency of clusters by quickly deploying compute resources that are correctly sized for changing application loads. Karpenter works by monitoring the combined resource requests of unscheduled Pods and making decisions about launching new nodes or terminating them, in order to reduce scheduling delays and infrastructure expenses. It is designed to work with AWS and it’s built on top of the AWS Auto Scaling Groups and the Kubernetes API. It aims to provide an alternative to the built-in Kubernetes Cluster Autoscaler and other cloud-provider-specific solutions. When deciding whether to use Karpenter or the built-in Kubernetes Cluster Autoscaler, there are a few factors to consider:
- Cloud Provider: Karpenter is built specifically for use with AWS, while the built-in Cluster Autoscaler can be configured to work with various cloud providers. If you are running your Kubernetes cluster on AWS, Karpenter may be a better choice.
- Features: Karpenter provides additional features such as just-in-time compute resources, automatic optimization of cluster’s resource footprint, and more flexibility on scaling decisions.
- Scalability: Karpenter is built to scale with large, complex clusters and can handle a high number of nodes and Pods.
- Customization: Karpenter allows for more customization in terms of scaling decisions and can be integrated with other Kubernetes add-ons.
In general, if you are running your Kubernetes cluster on AWS and need more control over your scaling decisions and want to optimize costs, Karpenter might be a good choice. On the other hand, if you are running your cluster on other cloud providers, or don’t need those extra features, the built-in Cluster Autoscaler may be sufficient. In the end, it’s good to test both options and see which one works best for your specific use case.
Security
EKS provides a number of security features to help secure your Kubernetes clusters and the applications running on them. Some of the key security features include:
- Network isolation: EKS creates a dedicated VPC for each cluster, which isolates the cluster from other resources in your AWS account. This helps to prevent unauthorized access to the cluster and its resources.
- IAM authentication: EKS integrates with AWS IAM to provide fine-grained access control to the cluster’s resources.
This allows you to grant or deny access to specific users, groups, or roles.
- Encryption: EKS encrypts data in transit and at rest, using industry-standard AES-256 encryption. This helps to protect sensitive data from unauthorized access.
- Kubernetes RBAC: EKS supports Kubernetes RBAC to define fine-grained access controls for Kubernetes resources. This allows you to grant or deny access to specific users, groups, or roles based on their role within the organization.
- Cluster security groups: EKS allows you to create and manage security groups for your cluster to control inbound and outbound traffic to the cluster.
- Pod security policies: EKS supports Pod Security policies that specify the security settings for Pods and containers. This can be used to enforce security best practices, such as running containers as non-root users, and to restrict access to the host’s network and devices.
- Kubernetes audit: EKS provides an integration with the Kubernetes audit system. This allows you to log and examine all API requests made to the cluster, including who made the request, when, and what resources were affected.
- Amazon EKS Distro (EKS-D): Amazon EKS-D is a Kubernetes distribution that provides a secure and stable version of Kubernetes optimized for running on AWS, which makes the cluster more secure and stable.
By using these security features, EKS helps to protect your clusters and applications from unauthorized access and data breaches and helps to ensure that your clusters are running securely and compliantly. You can learn more about EKS security best practices by referring to the AWS GitHub repo – https://aws.github.io/aws-eks-best-practices/security/docs/.
PrivateLink support
Amazon EKS supports PrivateLink as a method to provide access to Kubernetes masters and the Amazon EKS service. With PrivateLink, the Kubernetes masters and Amazon EKS service API endpoint display as an ENI, including a private IP address in the Amazon VPC. This provides access to the Kubernetes masters and the Amazon EKS service from inside the Amazon VPC without needing public IP addresses or traffic through the internet.
Automatic version upgrades
Amazon EKS manages patches and version updates for your Kubernetes clusters. Amazon EKS automatically applies Kubernetes patches to your cluster, and you can also granularly control things when and if certain clusters are automatically upgraded to the latest Kubernetes minor version.
Community tools support
Amazon EKS can integrate with many Kubernetes community tools and supports a variety of Kubernetes add-ons. One of these tools is KubeDNS, which allows users to provision a DNS service for a cluster. Like AWS offers console access and a CLI, Kubernetes also has a web-based UI, and a CLI tool called kubectl. Both of these tools offer the ability to interface with Kubernetes and provide cluster management. EKS provides a number of add-ons that can be used to enhance the functionality of your Kubernetes clusters. Some of the key add-ons include:
- ExternalDNS: ExternalDNS is an add-on that allows you to automatically create and manage DNS entries for services in your cluster.
- Kubernetes Dashboard: Kubernetes Dashboard is a web-based UI for managing and monitoring your Kubernetes clusters.
- Prometheus: Prometheus is an open-source monitoring system that allows you to collect and query metrics from your Kubernetes clusters.
- Fluentd: Fluentd is an open-source log collector that allows you to collect, parse, and forward logs from your Kubernetes clusters.
- Istio: Istio is an open-source service mesh that allows you to manage the traffic and security of your microservices-based applications.
- Helm: Helm is an open-source package manager for Kubernetes that allows you to easily install and manage Kubernetes applications.
- Linkerd: Linkerd is an open-source service mesh that allows you to manage the traffic, security, and reliability of your microservices-based applications.
- Kured: Kured is a Kubernetes reboot daemon that allows you to automatically reboot worker nodes during maintenance windows.
By using these add-ons, EKS allows you to enhance the functionality of your clusters and to better manage and monitor your applications running on them.
This section completes our coverage of Kubernetes. We now move on to a service offered by AWS that can also be used to manage massive workloads. When using ECS or EKS to manage complex containerized applications, you still need to manage more than just containers; there are additional layers of management. To overcome this challenge, AWS launched the serverless offering AWS Fargate.
Learning about AWS Fargate
AWS Fargate is a serverless way to run containers. ECS and EKS support running containerized workloads using AWS Fargate.
Let’s look at an example to better understand how Fargate helps you run serverless containers. Without Fargate, you have an EC2 instance with multiple tasks running on it. So here, to support the tasks, you have to manage the underlying instance, such as the instance OS, the container runtime, and the ECS agent, in the case of Amazon ECS. This is still quite a bit of operational overhead. You have to patch and update the OS, ECS/EKS agent, and so on, while also scaling the instance fleet for optimal utilization. All of these tasks are still required, adding management layers to your application.
AWS Fargate simplifies the management of ECS/EKS services and enables users to focus on application development rather than infrastructure management. With AWS Fargate, the provisioning of infrastructure and the management of servers is handled by AWS.
The benefits of using AWS Fargate are as follows:
- Obviate the provisioning and management of servers
- Reduce costs by matching resources with workloads
- Enhance security with an application isolation architecture
Why isn’t Amazon ECS or Amazon EKS enough by itself, and why would we use AWS Fargate to manage these workloads?
AWS Fargate is not a container management service in itself; it is a method to launch container services. It simplifies the management of Kubernetes and Docker deployments. Without AWS Fargate, setting up these two services would require a good understanding of how to provision, schedule, and manage Pods, services, containers, masters, and minions, as well as how to administer server orchestration. Typically, you would need a skilled DevOps engineer to set this up. AWS Fargate takes the burden away from your engineers and greatly simplifies these deployments. Importantly, you don’t have to commit to using AWS Fargate from the start.
You can start by using Amazon ECS or Amazon EKS, test it out, and once the process is working, your containers can then be migrated to Amazon Fargate. This can simplify your operations and reduce the cost of running your application. Migrating to Fargate can be done by creating a new task definition, and then updating your service to use that task definition. Once that is done, you can then monitor your application to make sure it’s running correctly and make any necessary adjustments.
If AWS EC2 offers Infrastructure as a Service (IaaS), then AWS Fargate offers Containers as a Service (CaaS). This means that we do not need to worry about setting up containers. All the details involved in their launching are handled by AWS Fargate, including networking, security, and, most importantly, scaling. The details of how this happens are abstracted away. AWS Fargate further simplifies the management of containers in the cloud while leveraging Amazon ECS and Amazon EKS.
Choosing between Fargate and EC2
When deciding whether to use Fargate or EC2 for running your containerized applications on ECS/EKS, there are a few factors to consider:
- Control: If you want more control over the underlying infrastructure and the ability to customize it to meet your specific needs, EC2 might be the better choice. With EC2, you can choose the instance type and configure the OS and other software to meet your requirements. With Fargate, you don’t have direct access to the underlying infrastructure, and the resources are managed by AWS.
- Ease of use: Fargate is a serverless compute engine for containers, which eliminates the need to manage the underlying infrastructure, making it easier to use. With Fargate, you don’t need to worry about provisioning and scaling resources, as this is handled automatically by the service. With EC2, you are responsible for managing the underlying infrastructure.
- Cost: Fargate can be more cost-effective than EC2 when you have a varying workload. With Fargate, you only pay for the resources that you actually use, whereas with EC2, you pay for the resources whether you are using them or not. However, if your workload is consistent and always on then Fargate can be costly.
- Flexibility: EC2 instances can be used for more than just running containers and can be more flexible. Fargate is designed specifically for running containers, therefore it may not be a good fit for workloads that are not containerized.
In general, if you have specific requirements that aren’t met by Fargate or you want more control over the underlying infrastructure, EC2 is the way to go. If you want to minimize the operational overhead and focus on running your application, Fargate is the best option.
Red Hat OpenShift Service on AWS (ROSA)
OpenShift is another container platform developed and supported by Red Hat. It’s built on top of Red Hat Enterprise Linux and Kubernetes, two of the world’s largest and fastest-growing open-source projects, and adds several services to offer a well-rounded platform experience out of the box. These include cluster services such as monitoring, managing, and updating the cluster; cluster services such as built-in CI/CD pipelines and logging; application services such as databases, language runtimes, and many others through what’s known in Kubernetes as Operators; and developer services such as a rich console, CLI, and tools for code editors, IDEs and more.
Red Hat OpenShift Service on AWS (ROSA) is a fully managed service provided by Red Hat and jointly supported by AWS. ROSA offers pay-as-you-go billing options (hourly and annual) on a single invoice through AWS and provides the option to contact either Red Hat or AWS for support. With ROSA, users can enjoy the benefits of a fully managed Red Hat OpenShift environment without having to worry about infrastructure management. It provides a simple and easy way to deploy, manage, and scale containerized applications using Kubernetes and Red Hat OpenShift.
ROSA provides the full functionality of Red Hat OpenShift, including built-in support for Kubernetes, as well as additional features such as automated scaling, self-healing, and automatic updates. It also provides integration with other AWS services such as Amazon Elastic Block Store (EBS) for storage and Amazon VPC for networking. ROSA is fully compatible with other Red Hat OpenShift services, such as OpenShift Container Platform and OpenShift Dedicated, and allows you to use the same tools and APIs for deploying and managing your applications. Additionally, it provides a full set of monitoring and logging tools to help you troubleshoot and debug issues with your applications.
ROSA is built on top of AWS, meaning that it benefits from the security, compliance, and global infrastructure of AWS; this allows you to take advantage of the security features and compliance certifications of AWS and also the scalability and reliability of the AWS infrastructure. ROSA can run Docker containers as it is built on top of Kubernetes, which is a container orchestration system that supports Docker. In ROSA, you can use the standard Kubernetes tooling, such as kubectl and oc (the OpenShift CLI) to deploy and manage your Docker containers as part of a Kubernetes cluster. This means that you can use standard Docker images and container registries to deploy your applications, and use the Kubernetes API to manage and scale your containers.
ROSA provides a set of custom resources and controllers for deploying and managing Red Hat OpenShift and Kubernetes clusters on AWS, but it does not provide any additional functionality for running and managing Docker containers. Instead, it utilizes Kubernetes as the underlying container orchestration system to run and manage Docker containers as part of a Kubernetes cluster. The following diagram shows a ROSA cluster in AWS.
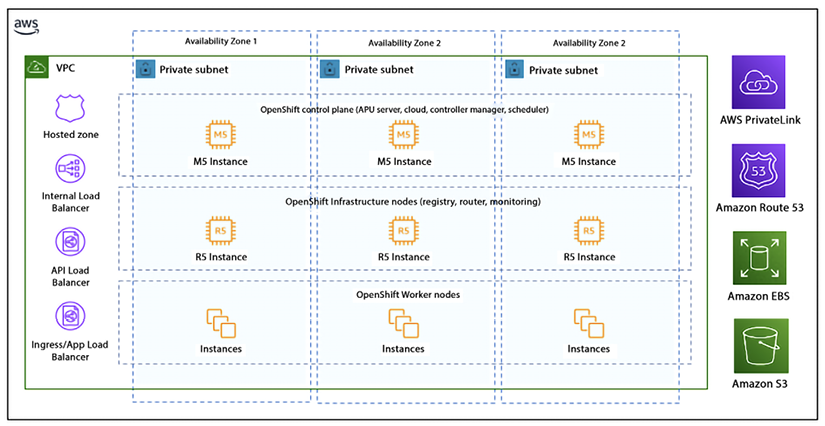
Figure 13.7: ROSA private cluster architecture
The preceding diagram shows the simplified architecture of a private, multi-AZ ROSA cluster deployed in an AWS account, which is the most common configuration. ROSA clusters can also be deployed in single-AZ mode and with a public subnet to expose application ingress and the API endpoint directly to the internet.
ROSA is a fully managed service that allows you to deploy and manage containerized applications using Red Hat OpenShift and Kubernetes on the AWS cloud; it provides the full functionality of Red Hat OpenShift and benefits from the security, compliance, and global infrastructure of AWS.
Choosing between AWS container services
So, at this point, you are probably asking yourself when you should choose Amazon ECS, EKS, or ROSA as the right solution. When choosing between ECS, EKS, and ROSA, it’s important to consider the specific requirements of your application and use case:
- EKS is a managed Kubernetes service that allows you to easily deploy, manage, and scale containerized applications on the AWS cloud. It provides a fully managed Kubernetes control plane and integrates with other AWS services such as Elastic Load Balancing and Amazon RDS. If you are already familiar with Kubernetes and want to leverage its flexibility and scalability, EKS is a good choice.
- ECS is a container orchestration service that allows you to deploy, manage, and scale containerized applications on the AWS cloud. It provides a simple and easy-to-use interface for deploying and managing containerized applications and integrates with other AWS services such as Elastic Load Balancing and Amazon RDS. If you are looking for a simpler and more integrated service that is tightly integrated with the AWS ecosystem, ECS is a good choice.
- ROSA is a fully managed service that allows you to run Red Hat OpenShift clusters on the AWS cloud. It provides a simple and easy way to deploy, manage, and scale containerized applications using Kubernetes and Red Hat OpenShift. It also provides integration with other AWS services such as Amazon EBS for storage and Amazon VPC for networking. If you are looking for a fully managed service that provides the full functionality of Red Hat OpenShift and benefits from the security, compliance, and global infrastructure of AWS, ROSA is a good choice.
Ultimately, it’s important to evaluate the features and capabilities of each service, and how well they align with your specific use case and requirements. The following table shows a comparison between these three container services in AWS.
|
ECS |
EKS |
ROSA |
|
An AWS-native platform to provide simplicity when running containers |
Provides open flexibility for running Kubernetes clusters |
Provides a turnkey platform to run the container with Open Redshift |
|
The AWS way to run containers at scale |
AWS-optimized managed Kubernetes clusters |
An integrated Kubernetes-based application platform with built-in CI/CD, monitoring, and developer tools |
|
Reduces decision-making without sacrificing scale or features |
Builds your custom platform for compliance and security with AWS services and community solutions |
Activate ROSA and continue with existing OpenShift skills and processes, from on-prem environments to the cloud |
|
Reduces the time to build, deploy, and migrate applications |
Accelerates your containerization and modernization with canonical patterns using AWS Blueprints |
Accelerates application migration and modernization by re-hosting, re-platforming, or re-factoring workloads |
Table 13.1: Comparison between AWS container services
The total costs of building and operating container platforms start with the choice of container orchestrators and add-on tools for end-to-end application development, deployment, and operations. EKS and ECS provide flexibility to mix and match with both AWS and best-in-class solutions from the community. ROSA offers an out-of-the-box integrated platform ready for developers and DevOps engineers.
Amazon ECS is usually a good option for simple use cases. Amazon ECS provides a quick solution that can host containers at scale. For simple workloads, you can be up and running quickly with Amazon ECS. Amazon EKS is a favorable choice due to its active ecosystem and community, uniform open-source APIs, and extensive adaptability. It is capable of managing more intricate use cases and demands, but it may require more effort to learn and utilize effectively.
If you are currently running OpenShift applications on-premises and intend to migrate your application to the cloud, ROSA provides fully managed Red Hat OpenShift. You can take advantage of an integrated approach for creating and scaling clusters, along with a unified billing system that supports on-demand pricing. It may also be beneficial to test and deploy a proof of concept with each service before making a final decision.
AWS also offers the App2Container (A2C) service, which is a command-line tool that helps migrate and modernize Java and .NET web applications into container format. A2C analyzes and inventories all applications running on physical machines, Amazon EC2 instances, or in the cloud; packages application artifacts and dependencies into container images; configures network ports; and generates the necessary deployment artifacts for Amazon ECS and Amazon EKS. With A2C, you can efficiently manage the container and benefit from a unified and streamlined deployment process.
You can learn more about A2C service by visiting the AWS page – https://aws.amazon.com/app2container/.
Summary
In this chapter, you explored in depth what containers are. You also learned about the different types of container tools that are available. In particular, you investigated Docker. Docker is quite a popular container tool today, and it is a foundational piece of software for many successful companies. You learned about Amazon ECS, AWS’s way of managing containers at scale. You learned about how it helps to run Docker containers.
You also learned about the orchestration tool Kubernetes, which is quite popular and helps many companies simplify their DevOps processes. You looked at how Kubernetes and Docker can work together, as well as with other AWS services. These tools were specifically created to host and maintain containers. You also spent some time reviewing Amazon EKS and how it works with Kubernetes.
You learned about running the serverless container option Fargate and when to choose running containers with EC2 or Fargate. Furthermore, you learned about ROSA and finally learned when to use EKS, ECS, or ROSA.
The software and services covered in this chapter will be instrumental in ensuring the success of your next project. The more complex the project, the more important it is to use the tools covered in this chapter.
In the next chapter, we will learn about the microservices architecture pattern, which builds upon the concepts we learned about in this chapter.