
You have some reports on which you’d like to print alternate rows with gray bars in the background. Printing these bars makes the reports easier to read, especially when there’s lots of data or the report is very wide. Is there a way to create these bars in Access?
There are a number of ways to print alternate rows with gray and white backgrounds. The simplest method is to alternate the background color of the detail section for each new record. This solution shows you how to use this method to achieve the desired effect on your reports.
To create your own reports with alternating gray bars in the detail section, follow these steps:
Create your report. Because this method will fill the entire detail section with gray shading, the effect will work best if your detail section is one line high. (It will work with taller detail sections, but it won’t look as good.)
Make sure that every control in the detail section has its BackStyle property set to Transparent. You can quickly change this property for all the controls in the section by marquee-selecting all the controls and then changing the BackStyle property in the properties sheet, which will now have the title Multiple Selection (see Figure 3-28).
Edit the report’s module (click on the Code button on the Report Design toolbar or choose the View → Code menu option) and enter the following lines of code in the module’s declarations area:
' Shade this row or not?
Dim fShade As Boolean
Create an event procedure attached to the OnPrint event property of your report’s detail section and add the code that follows. This code must be attached to the OnPrint event property because the Line method for reports will not work when called during the Format event.
Private Sub Detail1_Print(Cancel As Integer, PrintCount As Integer)

    Const acbcColorGray = 14540253

    If fShade Then
        Me.Detail1.BackColor = acbcColorGray
    Else
        Me.Detail1.BackColor = vbWhite
    End If

    ' Alternate the value of fShade.
    fShade = Not fShade
End Sub
If it matters whether the first row on a page is shaded, create an event procedure attached to the OnPrint property of the report’s page header. Replace the
Falsevalue withTrueif you want the first row on each page to be shaded.Sub PageHeader0_Print (Cancel As Integer, PrintCount As Integer) ' Make sure the first row on the page isn't shaded. ' Use True if you want the first row on each page shaded. fShade = False End Sub
Save and print the report. Every other row in the detail section will be printed with a gray background, the same size as the detail section.

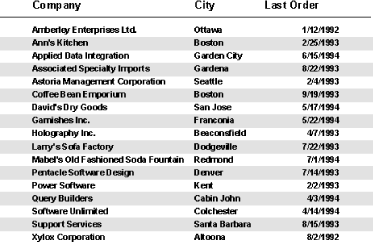
Now load 03-12.MDB and open the rptGrayBar
report in preview view. This report may not look very good on your
screen (it depends on the screen resolution and the color depth of
your screen driver), but printed it will look something like the
report shown in Figure 3-29. (The exact output will
depend on your printer; you may need to modify the color setting for
the gray bar to optimize it.)
The code shown in Step 4 relies on a module-level variable,
fShade, that alternates between
True and False. If you followed
the instructions for Step 5, you set the value of
fShade to a particular value every time
you print the page header (before any rows are printed on that page).
From then on, every time Access prints the detail section, it decides
what to do based on the value in fShade.
What’s more, every time it prints the detail section, it
alternates the value of fShade using this
line of code:
fShade = Not fShade
That is, if fShade was
False, now it will be True, and
vice versa.
Once the code has decided whether to
shade the section, it sets the background color to the color value of
gray or white, based on the value of
fShade, using the following
If...Then...Else statement:
If fShade Then
     Me.Detail1.BackColor = acbcColorGray
   Else
     Me.Detail1.BackColor = vbWhite
End If
We used the built-in VBA constant for
white, but there is no constant for gray, so we defined that one
ourselves earlier in the procedure. An easy way to determine the
numeric values for colors is by selecting a section or a control in
design view and using the color palette to set the desired color.
Then you can read the color value off of the properties sheet.
Another option is to use vbGreen, which looks good
when previewing the report and also results in a pleasing gray color
when printed on a black-and-white printer.
The settings you choose for your printer driver can affect the appearance of the gray bars. For example, with the HP LaserJet 4 driver, the bars will look better if you choose the Line Art Images value for the Dithering option in the Graphics tab of the properties dialog for the printer. You may find that changing settings like this for your own printer driver can make a marked difference in the appearance of grayscale colors.