
IN THIS CHAPTER
In the last number of years, video on the Web has truly come into its own. From online video's humble beginnings as a grainy, jerky, quarter-screen-sized moving image to the full-screen, high-fidelity movie-like imagery of today, video is an essential element for many Web sites.
Adobe Flash video, QuickTime, RealVideo, and Windows Media Player are the most popular formats on the Web, and all are cross-platform. Adobe recently entered the fray itself with the Adobe Media Player. With all of these players, video can be downloaded to the user and then automatically played with a helper application, or it can be streamed to the user so that it plays while it's downloading.
This chapter describes the many different methods for incorporating video — whether you're downloading an MPEG file or streaming a movie — into your Web pages through Dreamweaver.
While there are several different ways to add video to your Dreamweaver pages, by far the most popular is Flash video, specifically Flash progressive video, which doesn't require a special server. Here's the quickest way to get this type of video up and running:
Make sure your page is saved and place your cursor where you'd like Flash video to appear.
From the Common category of the Insert panel, click Media: FLV.

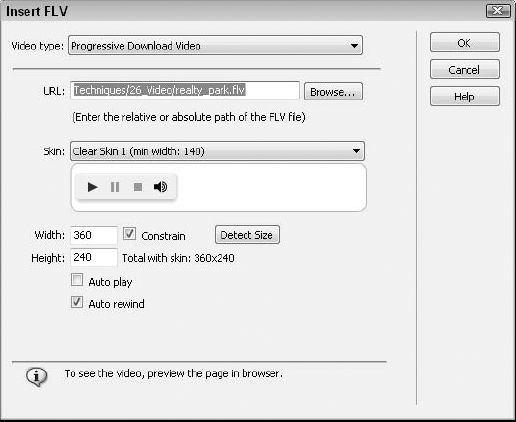
When the Insert FLV dialog box appears, make sure Video Type is set to Progressive Download Video and click Browse to locate the FLV file.
Choose the type of player controls you'd like from the Skin list, the size of the movie and the desired options. Click OK.
When you publish your files online, be sure to upload the JavaScript files necessary to display the Flash video as well as the associated FLV and SWF files.
Web video in general and Flash video in particular is a very rich field to explore as you'll learn moving ahead in this chapter.
With the introduction of video in Flash MX, Adobe planted the seeds of a revolution. Suddenly, video on the Web was easy. Although early Flash video did not have the same quality as the more established players like QuickTime, it had one major advantage: ubiquity. With a cross-platform player proliferation of more than 90 percent, Flash video's accessibility outweighed its drawbacks. Adobe built on the intense interest generated by the early player's capabilities and improved the video output and experience with each subsequent release. Video output by the current version, Flash Professional CS5, is certainly as good as video displayed by any other Web method — and, in many ways, superior: Flash Player 9 introduced the ability to play high-definition video and high-end audio.
Any Dreamweaver Web designer or developer has the power to easily incorporate high-quality video into any site. Ease of entry is a key factor and Dreamweaver makes it drop-in simple; designers can even gain the majority of benefits of Flash video without incurring the additional expense of a specialized server. For those clients and projects that require a higher-end experience, Flash offers a streaming alternative. As you learn later in this chapter, Dreamweaver's Insert Flash Video feature handles either option easily.
To incorporate Flash video on your site, you'll need to first acquire the video, either by importing it directly from a digital camcorder or by retrieving a file in a video format, such as .avi, .mpg, .mov, or .wmv. After you have a video file, you'll need to convert it to a Flash Video file (FLV) in a process called encoding. Encoding a video compresses it using a specific algorithm or codec. FLV files encoded with Sorenson Spark can be played in Flash Player 6 and higher, whereas VP6-encoded FLV files require Flash Player 8 or higher. High-definition video must be encoded in FLV format with the H.264 codec and needs Flash Player 9 or higher.
Numerous paths to encoding FLV files are available, including the following:
Flash Video Import Wizard: A feature of Flash Professional CS5, the Flash Video Import Wizard works with all popular video formats, including QuickTime movies, Video for Windows (
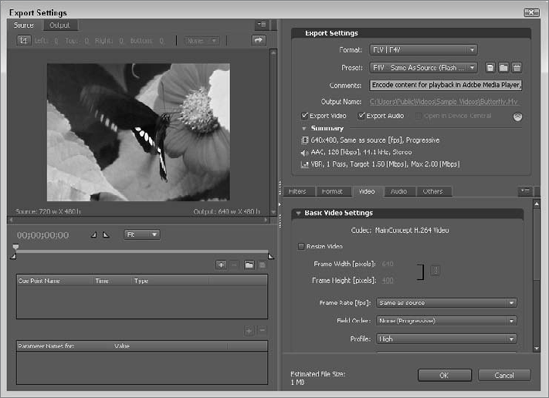
.avi), Windows Media (.wmv), and video directly retrieved from your camera (.dvor.dvi). The Flash Video Import Wizard works with one video file at a time.Adobe Media Encoder CS5: The Adobe Media Encoder CS5 is a separate program included with Flash Professional CS5 (see Figure 26-1). The key advantage to the Media Encoder is that it allows you to encode many video files (again, from all formats) to an FLV-compatible codec. Encoding a video file can be time-intensive: a 35-second video took 23 minutes to encode in On2 VP6 format at medium quality.
Third-party applications: A number of third-party batch encoding tools now support the FLV format as well. For example, you can convert video to FLV format with Autodesk Cleaner, Riva VX, or Anystream Agility. As of this writing, these third-party applications are only capable of applying the older Sorenson Spark codec.
When encoding, you'll need to decide which type of video output to use: streaming or progressive. The relative pros and cons are discussed in the next section.
Tip
There is a third type of Flash video output to use: embedding. When you embed video in a Flash movie (which would then be inserted into the Web page), you're combining both video and Flash animation in a single movie. This process results in a much larger file and is only really useful for videos lasting 5 seconds or less. It is strongly recommended that your video remain an external file and not be embedded.
One of the first questions you'll need to address when adding Flash video to your Web page is: How will the video be delivered? The two core methods available are progressive download and streaming. Both methods are alike in that they use external video files in FLV format in conjunction with a .swf file that acts as a video player.
Progressive download begins playing as soon as the first segment has been received by the site visitor and continues to download while the video is playing. Typically, the delay is relatively short, but there is often a perceived delay. There is, however, a major plus for progressive download over streaming: you can host the files on any kind of server. Because progressive download does not require a specialized server, such as Flash Media Server (formerly Flash Communication Server), it is much less expensive to display.
Tip
You'll need to require at least Flash Player 7 if you use the progressive download method; streaming video can use Flash Player 6 or better.
Streaming video, however, can definitely be worth the cost. Video begins playing almost immediately and is more efficient for both the network in general and the viewer's computer specifically. Streaming video is also fully seekable — in other words, the video playhead can be moved anywhere to instantly view video from that point; with progressive download, you can only seek portions of the video that have already been downloaded. The truly advanced features of Web video — live feed, interactive control, video messaging, and so on — are only possible with streaming video.
Note
A couple of hosted streaming services are available for Flash video. Adobe has partnered with a number of content delivery providers under their Flash Video Streaming Service umbrella aimed at enterprise customers; learn more by visiting www.adobe.com/products/flashmediaserver/fvss. One of the content providers, VitalStream, has a separate hosting service for small business called VitalStream Small Business Services (www.playstream.com). A free extension to insert PlayStream streaming videos is available from WebAssist (www.webassist.com) and is included on the website for this book.
The FLV object makes it as easy to add Flash video to your Web page as it is to add any other Flash movie — with even greater flexibility and control. Not only is your video added to the page, but it's accompanied by your choice of built-in controller. Flash detection code is automatically added to your page so that the user is alerted if they don't have the required version.
As noted before, your choice of delivery method for your video — either progressive download or streaming — is a key one. The importance of this choice is reflected in the Insert FLV dialog box; depending on your choice, different options appear and the steps for including a video object vary. For this reason, instructions for including an FLV object of each type are presented separately.
To add a progressive download FLV object to your page, follow these steps:
Place your cursor where you'd like the FLV object to appear.
From the Insert panel's Common category, choose Media: FLV.
The Insert FLV dialog box appears, as shown in Figure 26-2.
Make sure that Progressive Download Video is selected in the Video Type list.
Click Browse to locate the desired
FLVvideo file or enter the path directly into the URL field.Choose the type of controller you'd like from the Skin list.
You have three basic choices (Clear Skin, Corona Skin, and Halo Skin), each in three variations. Each variation within a given style offers a different set of controls and requires a different minimum width. The preview area gives you a clear idea of what to expect and the minimum widths are listed for each entry.
Enter the dimensions of the movie (including controller) either by clicking Detect Size or entering the values directly into the Width and Height fields.
If you'd like the movie to begin as soon as possible when the page loads, select the Auto Play option.
If you'd like the movie to rewind to the beginning after it has played, enable the Auto Rewind option.
Click OK when you're done.
You can see your video in action by previewing the page in a browser.
Tip
To see the message displayed for a site visitor without the proper Flash Player version installed, click the Eye icon on the tab above the inserted FLV object. The default message is: "Content on this page requires a newer version of Adobe Flash Player." You're free to change it if you like, although it's a good idea to keep the Get Adobe Flash Player graphic and corresponding link so folks can see your video properly.
To add a streaming FLV object to your page, follow these steps:
Place your cursor where you'd like the FLV object to appear.
From the Insert panel's Common category, choose Media: FLV.
In the Insert FLV dialog box, choose Streaming Video from the Video Type list. The options in the dialog box change, as shown in Figure 26-3.
Enter the path to the streaming server, application, and instance in the URI field.
Streaming servers like the Flash Media Server use the Real Time Messaging Protocol, designated by
rtmp://. An example of a full URI isrtmp://123.45.678.90/bigVid/bv.Enter the name of the
FLVfile you'd like to display in the Stream Name field. (You can leave off theFLVfile extension if you like; it's understood by the server.)Choose the type of controller you'd like from the Skin list. There are three basic choices (Clear Skin, Corona Skin, and Halo Skin), each in three variations. Each variation within a given style offers a different set of controls and requires a different minimum width. The preview area gives you a clear idea of what to expect and the minimum widths are listed for each entry.
Enter the dimensions of the movie (including controller) either by clicking Detect Size or entering the values directly into the Width and Height fields.
If you're broadcasting live video, click the Live Video Feed option.
If you'd like the movie to begin as soon as possible when the page loads, select the Auto Play option.
If you'd like the movie to rewind to the beginning after it has played, enable the Auto Rewind option.
Enter the number of seconds of video you'd like to buffer before it begins playing. The default buffer value is
0, which means the video will be available for playing immediately after the page loads. Extend the buffer value if your video is encoded at a higher bit rate than the site visitor's connection speed or if connectivity problems persist.Click OK when you're done.

You'll need to publish your files to the server, as described in the next section, before you can view the streaming video in your Web page.
An FLV object actually requires a number of files to be viewed on the HTML page. In addition to the encoded video file with the .flv extension, it requires a container file either called FLVPlayer_Progressive.swf or FLVPlayer_Streaming.swf, depending on your choice of delivery method; this container file is the actual Flash movie called by the Flash Player. A file holding the video controls or skin is also used; for example, Clear_Skin_1.swf. Both of these support files are created for you by the Insert Flash Video object in the same folder as the HTML page the video is inserted in. Streaming video also requires that another generated file, main.asc, be placed in the Application folder of your Flash Media Server or Flash Communications Server. Finally, because Dreamweaver automatically writes the Flash code to Web standards and makes an express install available if the page visitor doesn't have the right version of Flash installed, you'll also need to upload the swfobject_modified.js and expressInstall.swf files found in the Scripts folder of your site root.
Note
If you'd like to learn more about Dreamweaver's fix for Internet Explorer's Active Content requirements and Flash media, see Chapter 25, "Inserting Flash Elements."
Publishing the files to the server for either type of Flash video delivery can be accomplished in a simplified operation. If you are publishing a progressive download video, make sure that Dreamweaver Preferences are set to prompt you to upload dependent files when your page is put or checked in. Both .swf support files and the FLV video file are considered dependent files by Dreamweaver and will be published to their correct locations when you click OK to upload dependent files.
Warning
If you don't rely on Dreamweaver's capability to publish dependent files, make sure that you publish all the associated files or your video will not be visible to your site visitors.
A similar publishing ability is available for streaming Flash videos, but in a totally different way. When you select the inserted streaming video object, a custom Property inspector is displayed. In addition to permitting the modification of most Flash Video object attributes, the Property inspector also contains an Upload Media button. When you click Upload Media, the two created .swf files for the container and the skin are uploaded to the specified Web server; as noted by a Dreamweaver alert, you will be required to publish the main.asc and the FLV file to your streaming server Applications folder.
Tip
Should you choose not to take advantage of the Upload Media feature, you can select the Show Required Files link in the Property inspector to see what files need to go where for your streaming video.
Each of the different types of Flash Video object has its own Property inspector. Both allow easy modification of most previously set attributes; only the type of delivery, progressive video or streaming, is omitted. If you need to change a movie from one delivery type to another, you'll need to delete the inserted object and re-select Insert Flash Video to choose a different type.
With a streaming Flash Video object, you have the option of altering the dimensions, the skin, the options to Auto Play or Auto Rewind, and, most important, the video source (see Figure 26-4). Because the FLV video source file is external to the video container, database-driven applications can even set the source dynamically.
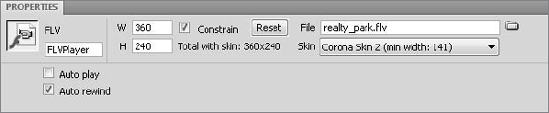
Figure 26-4. Once a progressive download video object has been inserted into the page, you can alter almost all the parameters through the custom Property inspector.
Warning
As noted earlier, the Insert Flash Video object stores the additional dependent files it creates in the same location at the current Web page. If you want to move either the skin .swf or the source FLV to a more appropriate folder, you'll have to adjust the inserted code. Although Dreamweaver will ask if you want to update the .swf and Web page, the <object> and <embed> tags that compose the Flash movie are not changed. If you move the skin .swf file, change the Skin value in the FlashVars param statement of the <object> tag and equivalent flashvars attribute of the <embed> tag. Likewise, if you move the source FLV file, change the streamName value in both tags.
Adding Flash Video
In this Dreamweaver Technique, you insert a progressive download video into a Web page, complete with overlaid video controls.
From the Techniques site, expand the 26_Video folder and open the
flash_startfile.Place your cursor at the start of the placeholder paragraph, below the Explore the Neighborhood headline.
From the Common category of the Insert panel, choose Media: FLV.
When the Insert FLV dialog box opens, make sure that Video Type is set to Progressive Download Video.
Click Browse and locate the
realty_park.flvfile in the 26_Video folder.From the Skin list, choose Corona Skin 2 (min width: 141).
Click Detect Size to retrieve the original video dimensions.
Select the Auto Rewind option and click OK to close the dialog box.
From the Property inspector Class list, choose imageRight.
Save the file and then press F12 (Option+F12) to preview the file in your primary browser.
Technologies — and the companies that create them — come and go on the Internet. Over the past few years, quite a few different streaming media solutions have presented themselves and then faded away, leaving us with the current Big Three: RealMedia, QuickTime, and Windows Media. These three technologies together represent almost the entire streaming media market — outside of the already covered Flash video — and the vast majority of Internet users have at least one of the corresponding players; many have two or even all three.
RealNetworks released the first streaming media system — RealAudio — in 1995. Over the years, RealAudio has evolved into RealMedia and now supports video, images, text, Flash movies, and standard audio types such as AIFF and MP3. All these media types can be combined into a single presentation using Synchronized Multimedia Integration Language (SMIL). The three primary software components of RealMedia are:
RealPlayer SP: This is the newest client software for viewing RealMedia content. RealPlayer SP is free and offers a full set of basic RealMedia viewing features. RealPlayer SiteAssist Professional Plus is an enhanced player available for around $40 or bundled with a subscription service called SuperPass that costs about $15 per month. RealPlayer SP is available at
www.real.com. The RealPlayer SiteAssist Professional interface is shown in Figure 26-5.
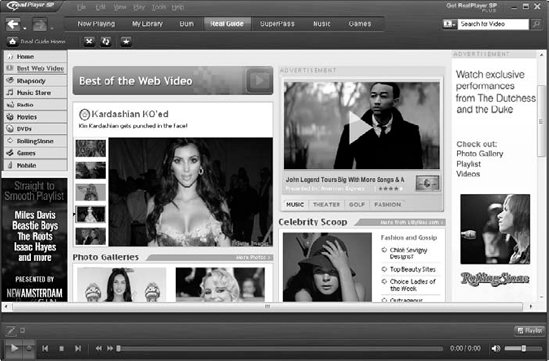
Figure 26-5. RealPlayer SP's interface enables the user to forego a Web browser completely when browsing for streaming media.
RealProducer: This encoding software converts most types of audio and video (MPEG, QuickTime, and so forth) files to RealMedia (
.rm) files. You can get Helix Producer Basic for free or the full-featured Helix Producer Plus for around $200. Read all about it atwww.realnetworks.com/products/producer.Helix Server: This server software serves up RealMedia over Real-Time Streaming Protocol (RTSP). Helix Server Basic, which is free, is limited to 1 Mbps throughput. For a larger throughput, move up to one of the commercial versions of the Helix Universal Server (available as Advanced, Edge, or Relay, depending on your needs). For more information, go to
www.realnetworks.com/products/media_delivery.html.
Note
You can still offer RealMedia to your users over the Web's regular HTTP without any special server software. HTTP streaming is, however, far more limited than RTSP streaming.
RealNetworks has led the way in cross-platform authoring and playback. Versions of RealPlayer are available for Windows, OS X, and the full range of available mobile devices. The previous version of the player is also available for Macintosh OS 9, Unix, Linux, and even OS/2. MSN TV even plays RealAudio 3.0. By contrast, QuickTime is limited to Windows and Macintosh, and Microsoft's streaming video solution is basically Windows-only.
RealNetworks has also led the way in terms of users; for years it was the only option for large-scale streaming media sites. Even now, when it faces the stiffest competition it has ever had, its market share is very high. RealPlayer is included with major browsers, as well as with Windows and Red Hat Linux.
Tip
See www.real.com for examples of RealMedia content.
What QuickTime refers to is widely misunderstood. Some people mix up the video format QuickTime Video with QuickTime itself. But QuickTime Video is just one of the things a QuickTime movie might contain. Sometimes the high-profile QuickTime Player is confused with QuickTime, but it is just one dependent application.
The best way to explain QuickTime is to say that it's a multimedia operating system, enabling applications such as CD-ROM titles to run on top of it and use the features it provides. These features include support for audio, video, images, 3D objects, MIDI music (including a software wavetable synthesizer), streaming video, Flash movies, and MP3 audio. After you have QuickTime 4 or greater installed on your computer, Adobe Director can access digital video, Flash can export complete QuickTime presentations, and otherwise pedestrian applications can play synthesized music.
With the inclusion of streaming video in QuickTime, Apple dressed up the QuickTime MoviePlayer with an eye-catching brushed metal look and changed its name to QuickTime Player. QuickTime movies have a .mov filename extension.
Like RealMedia, QuickTime streaming has three main software components:
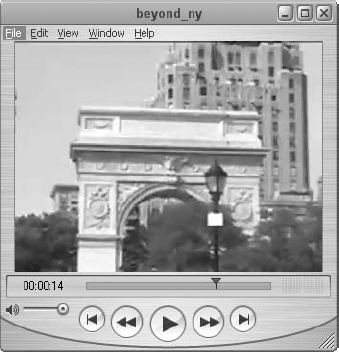
QuickTime and QuickTime Player: All the viewing goodness of QuickTime and QuickTime Player (see Figure 26-6) is free and available for Macintosh and Windows at
www.apple.com/quicktime. QuickTime is also included with all Macintosh computers, and installed on Windows by CD-ROM titles. As with RealPlayer, users can spend more time in QuickTime Player and less in a browser because of the favorites storage and Flash navigation elements in many streaming presentations.QuickTime Streaming Server: QuickTime Streaming Server delivers video over the Web using the standard RTSP, just like RealPlayer. Apple released QuickTime Streaming Server as open source software, and it is available completely free — no per-stream charge, either — for Mac OS X 10.4 and higher. See
www.apple.com/quicktime/streamingserver.
Note
You can find examples of QuickTime streaming content on the QuickTime home page at www.apple.com/quicktime.
Microsoft has released a succession of media technologies over the years in an effort to gain some sort of foothold in content creation and delivery. The history of Microsoft multimedia is an incredible story of acquisitions, rebranding, orphaned technologies, and outright copying of everybody else.
With Windows Media, however, Microsoft has gone all out, providing a solid solution with lots of partners. Still, Windows Media's greatest asset is its automatic inclusion with every Windows PC, virtually guaranteeing it a huge installed base as time goes on. Windows Media files have filename extensions of .asf or .asx. The software involved in Windows Media includes the following:
Windows Media Player: The supercharged Windows Media Player (see Figure 26-7) received a complete face-lift when it evolved from version 6 to version 7 — and with the new changeable skins feature, it's quite the literal face-lift. Now, at version 11, it's even more powerful. In addition to Web streaming, the Windows Media Player accesses many other media types, including audio CDs, Internet radio, and portable devices. It supports many file extensions, including
.asf,.asx,.avi,.mpg,.mpeg,.mp3,.qt,.aif,.mov, and.au. The Windows Media Player home page is atwww.microsoft.com/windows/windowsmedia/download/default.asp.Content creation and server software: You can find a directory of tools for working with Windows Media at
www.microsoft.com/windows/windowsmedia. Most are from Microsoft, and all are Windows-only.
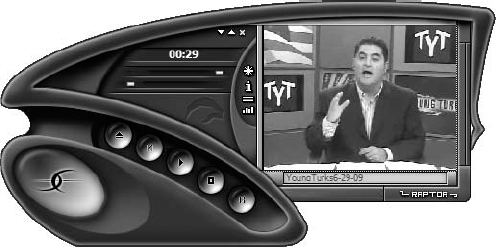
Figure 26-7. The Windows Media Player offers instant access to many media types as well as switchable skins (shown here is the sexy Raptor skin).
Note
The Windows Media home page is located at www.windowsmedia.com and includes sample content. If you're a Mac user wanting to play some of the file types that are typically supported by Windows Media Player, you need to install the Flip4Mac® WMV Components for QuickTime ™. These components, available from www.telestream.net/flip4mac-wmv/overview.htm, are for use with QuickTime 7.0 (and later) and allow you to view Windows Media Player content freely but you need to purchase one of the various packages offered, ranging in price from $29 to $179, in order to export your video to these formats. These components are not compatible with QuickTime X in Snow Leopard so you would need to install QuickTime 7.6.4 from the Snow Leopard DVD or download it from www.apple.com/quicktime/.
If you have short video clips you'd like to put on the Web, you may not need the industrial strength — or the hassle and expense — of a streaming media solution. Short video clips can be included in a Web page just by linking to them or embedding them.
Depending on the viewer's software setup, video clips either download completely and then start playing right away, or start playing as soon as enough of the video has arrived to make uninterrupted playback possible, as shown in Figure 26-8.
Video clips come in a few common formats, described in Table 26-1. In addition to the video format itself, what codec (encoder/decoder) a particular video clip uses is also important. A codec provides video compression, and it is required for decompression at playback time. Many codecs are included with Windows and with QuickTime, so codecs are not usually a problem unless you're authoring for platforms other than Windows and Macintosh.
Figure 26-8. QuickTime Player starts playing video clips when it has downloaded enough to ensure that playback is uninterrupted.
Warning
One codec to watch for if you're making cross-platform movies is the Intel Indeo Video codec, sometimes used for Video for Windows (AVI) files. The Indeo codec for Macintosh is not included with QuickTime and must be installed manually by Macintosh users.
Table 26-1. Video Clip File Formats
MPEG, QuickTime Video, or AVI clips are good candidates for linking or embedding because a wide variety of players on multiple platforms can play them. QuickTime movies are best aimed squarely at the QuickTime Player because of the multiple media types that they contain.
To keep twenty-first century TV/movie-addicted users interested in your site, you might want to spice things up by including a (low-bandwidth!) video or two. To add a video clip to your Dreamweaver Web page, follow these steps:
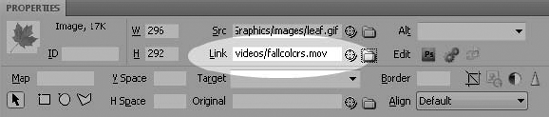
Select the text, image, or dynamic element that you want to serve as the link to the video file.
Tip
If you use an image as a link, you might want to use a frame from the video clip in order to provide a preview.
In the Property inspector, enter the name of the video file in the Link text field or click the Folder icon to browse for the file. To choose a dynamic source, choose the Select File Name From Data Sources option in the Select File dialog box. Be sure your selected data source contains either relative or absolute links to a video file.
Because video files can be quite large, it's also good practice to note the file size next to the link name or enter it in the Alt text field, as shown in Figure 26-9.
You can gain more control over the way your video clip plays by embedding it in the Web page with the <embed> tag. Modifying the attributes of the <embed> tag enables you to modify how the video is presented. Video clips inserted this way play back in whatever players are available, just as linked video clips do.
The Assets panel includes a Movies category that holds QuickTime movies, MPEG videos, and Windows Media file types. As with all the other Assets panel categories, you must click the Refresh Site List button (the curved arrow at the bottom of the Assets panel) to initially populate the panel with all the movies in the current site. The preview pane includes a Play button for displaying the movies before they are inserted in the page.
To embed a simple video clip in a Web page, follow these steps:
Choose Insert

If you inserted a Plugin object, select the video file in the Select File dialog box. Movies dragged onto the page from the Assets panel already include the source path. The Plugin placeholder is displayed as a 32 × 32 icon.
In the Plugin Property inspector, enter the dimensions of your video clip in the width and height boxes, marked W and H, respectively, or size the Plugin object directly by dragging one of its selection handles.
Dreamweaver can access and use Firefox (or, more generally, Mozilla) plugins to display video right in the Document window at design time. These plugins can be installed in Firefox's Plugins folder, in Internet Explorer's Plugins folder, or in Dreamweaver's own Plugins folder. Dreamweaver checks all three every time it starts up. Many plugins come with browser-specific installation programs. You can maintain your plugins more easily if you install the correct plugins into Netscape and enable Dreamweaver to use them from there.
Whenever a file is embedded for playback via a plugin, a green Play button appears in the Property inspector. To play a particular video in Dreamweaver's Document window, all you have to do is select the Plugin placeholder and click the Play button. The video begins playing, and the green Play button becomes a red Stop button. To stop playback, just click the Stop button.
Tip
How can playing a video during the design phase be useful? I've used this capability to sample the background color of the page from the background of a video's title or ending frame so that the video clip fits seamlessly into the page.
You can also use the menus and the corresponding keyboard shortcuts to control the digital video in the Document window: View
Warning
Unsupported plugins are listed in the UnsupportedPlugins.txt file in Dreamweaver's Configuration/Plugins folder. As of this writing, no plugins are listed in this file. If you continue to have problems playing plugins in Dreamweaver, check the file for compatibility.
The HTML command for incorporating a QuickTime movie (or any other medium that requires a plugin) is the <embed> tag. Because so many different types of plugins exist, Dreamweaver uses a generic Plugin inspector that enables an unlimited number of parameters to be specified.
Only three <embed> tag parameters are absolutely required for a QuickTime movie: the source of the file, the movie's width, and the movie's height. The QuickTime Plugin, however, also offers an amazing array of additional <embed> tag attributes to enable you to fine-tune the way content is presented.
Note
The QuickTime Plugin is used by both Netscape and Internet Explorer on both Windows and Macintosh to enable the browser to interface with QuickTime.
To insert a QuickTime movie in your Web page, follow these steps:
Choose Insert
If you insert a Plugin object, select the QuickTime movie file in the Select File dialog box. If you drag the movie file from the Assets panel, the Plugin's Src attribute is automatically set to the QuickTime movie file pathname.
Tip
If you're working on a Macintosh and your QuickTime movie doesn't have a filename extension, add
.movto the end of its name before embedding it or placing it on the Web.In the Plugin Property inspector (shown in Figure 26-10), enter the dimensions of your QuickTime movie in the width (W) and height (H) fields, or size the Plugin object directly by dragging one of its selection handles.
Tip
If you don't know the dimensions of your QuickTime movie, open it in the QuickTime Player, choose Movie
In the Plg URL text field, enter
http://www.apple.com/quicktime/. This is the Web address to which users who don't have QuickTime are directed by their browser.Click the Parameters button in the Plugin Property inspector panel to open the Parameters dialog box (see Figure 26-11), where you can enter additional
<embed>tag attributes: the name in the left column and the value in the right column. Use Tab to move between the columns. Table 26-2 lists the most commonly used<embed>tag parameters for QuickTime movies. Use this list to add any parameters, and click OK when you're done.
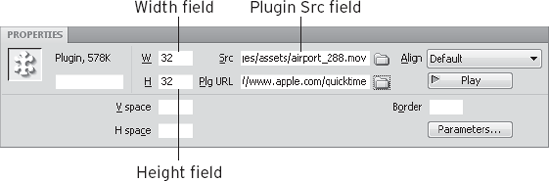
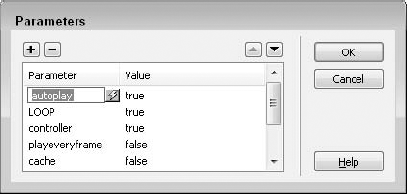
Figure 26-11. Use the Parameters dialog box to enter attributes for any plugin. Dynamic values can be entered by clicking the lightning-bolt icon and choosing a field from a defined recordset.
Note
Any of the parameters or their values can be linked to a data source by clicking the lightning-bolt icon in the value field and choosing an appropriate data field from the Dynamic Data dialog box that opens.
Table 26-2. QuickTime Plugin Parameters
QuickTime Plugin Parameter | Possible Values | Description |
|---|---|---|
| True or false; default set by user in QuickTime Plugin Settings | When this is set to false, a movie won't play until the user clicks Play in the controller. Otherwise, it starts playing as soon as enough data is downloaded to ensure uninterrupted playback. |
| RGB colors in hexadecimal, such as "#FFFFFF"; or valid HTML color names, such as "red" | Specifies the color of the space set aside by the width and height attributes but not taken up by the QuickTime movie. Add a border to a QuickTime movie by setting the appropriate |
| True or false; default set by user in QuickTime Plugin Settings | Specifies whether the browser should store the movie in its cache for later retrieval. Doesn't work in IE. |
True (default for most movies) or false (default for QuickTime VR, Flash, and image files) | Displays the controller panel attached to the bottom of the movie. | |
| (does not take a value) | When included, using the Save As QuickTime option on the QuickTime Plugin's controller menu saves the movie without resolving references (not self-contained). |
| 30-frame SMPTE time-code — hours:minutes:seconds:frames (30ths of a second) | Indicates the point in the movie where playback should stop. |
| A value in pixels; usually the height of the movie | Reserves a space in the page for the QuickTime movie. |
| (does not take a value) | Tells the QuickTime Plugin not to show the movie. Audio is played, however. |
| URL | A link to go to when the movie is clicked. You can supply either an absolute or a relative URL. QuickTime movies replace the current movie in-place; Web pages open in the browser. |
| True or false (default) | Eliminates the QuickTime Plugin's controller menu when set to true. |
| True, false (default), or palindrome | Causes the movie to loop continuously when set to true. The palindrome value causes the QuickTime Player to play alternately forward and backward. |
| A number | A number identifying the movie so that another wired sprite movie can control it. |
| A name | A name identifying the movie so that another wired sprite movie can control it. |
True or false (default) | When set to true, forces the movie to play every frame, even if it must do so at a slower rate than real time. Disables audio and QuickTime Music tracks. | |
|
| Where users who don't have QuickTime should be sent to get it. |
| URL | Specifies a movie as being n in a sequence of movies. The movie specified in the |
| goton | Tells the QuickTime Plugin to open movie n in an already specified sequence of movies. |
| URL | Tells the QuickTime Plugin to open this URL instead of the one specified by the |
| Movie-rate, or a number in bytes per second | Downloads the movie specified in the |
| to fit, aspect, or a number (default is 1) | Resizes the QuickTime Player movie. By setting scale to fit, you can scale the movie to the dimensions of the embedded box as specified by the height and width values. Setting scale to aspect resizes the movie to either the height or the width, while maintaining the proper aspect ratio of the movie. Set to a number; the size of the movie is multiplied by that number. |
30-frame SMPTE time-code — hours:minutes:seconds:frames (30ths of a second) | Indicates the point in the movie where playback should start. | |
| Name of a valid frame or window (_self, _parent, _top, _blank, or an explicit frame/window name) or QuickTimePlayer | Enables the link specified in the |
| True or false (default) | Same as the |
| 0 to 100 (default) | Controls the volume of the audio track(s). 0 is softest; 100 is loudest. |
| A value in pixels; usually the width of the movie | Reserves a space in the page for the QuickTime movie. |
Tip
Dreamweaver's Plugin Property inspector enables you to enter several additional attributes generally used with other objects, such as images. These include Align (alignment), V Space (vertical space), H Space (horizontal space), and Border (border). You can also enter a name in the Plugin text field if you plan to refer to your QuickTime movie in JavaScript or another programming language.
Before inserting a QuickTime movie into a Web page, it's helpful to know what version of QuickTime your movie requires. Because QuickTime movies can contain a variety of track types, each with a different type of medium, some movies may play back with QuickTime 6, whereas others require QuickTime 7 or higher.
You can identify the different tracks in a QuickTime movie if you have QuickTime Pro. QuickTime Pro is Apple's premium player experience, which enables a great many features when installed. To see a video's tracks, open it in QuickTime Player and choose Window
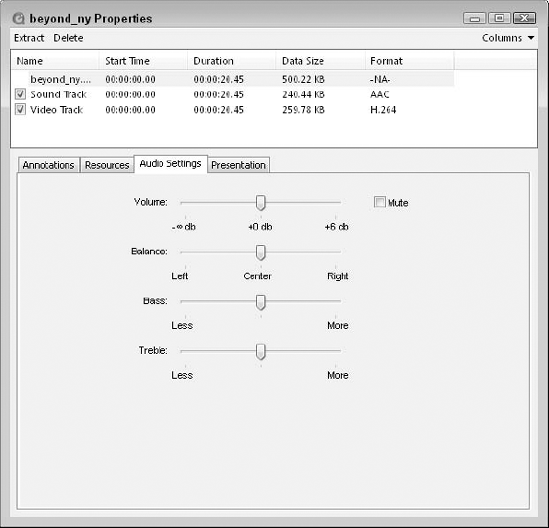
Figure 26-12. In addition to the streaming video track, this QuickTime movie has an audio track that can be fine-tuned.
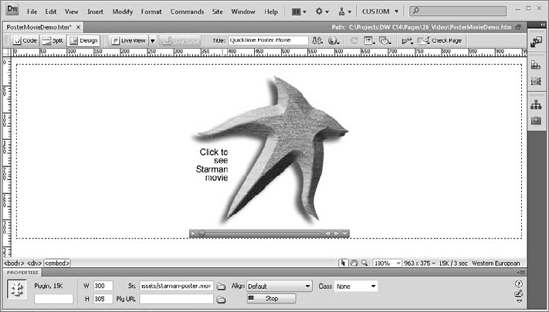
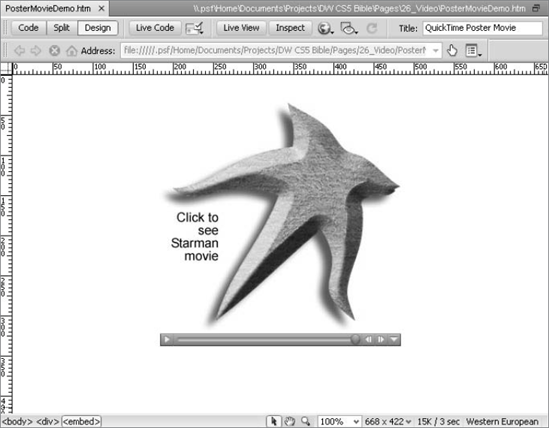
Using a Poster Movie
One of the nicest features of the QuickTime Plugin is the capability to have one movie replace itself with another. This enables you to place very lightweight (small file size), single-image poster movies into your Web pages instead of the full clips, so that the rest of the elements in your page load quickly. When the user clicks a poster movie, it replaces itself with your full movie, which begins downloading or streaming immediately. A poster movie can be a preview of the full movie that replaces it or a generic QuickTime image, as shown in the following figure. It's even possible to use poster movies to place a number of movies in a single page, enabling the user to choose which ones to view without downloading the rest, as shown in the following figure.
Creating a poster movie requires QuickTime Pro. Simply open your movie in QuickTime Player Pro and move to the frame you'd like to use as a preview. Choose File
Embed your poster movie in your Web page as described previously in this chapter and use the Plugin Property inspector's Parameters button to add the href attribute with the value set to the URL of your full movie, so that the <embed> tag looks like the following:
<embed src="my_poster_movie.mov" width="360" height="180"
       href="my_full_movie.mov">
</embed>
You can also make multiple-frame poster movies. As long as you keep the file size low, your pages will seem to load more quickly, and you provide your users more control over the way they experience them.
If you've ever downloaded a few minutes of digital video over a slow modem connection, you know the reason why streaming video was invented. In an age when immediacy rules, the wait until the complete video file is transferred and then loaded into the video player can seem to last an eternity. Streaming, on the other hand, enables the multimedia content to begin playing as soon as the first complete packet of information is received, and then to continue playing as more digital information arrives. Video is just one form of media to get the streaming treatment: You can also stream audio, animation, text, and other formats.
Regardless of which streaming video protocol you use, the procedure for incorporating the file on your Web page is basically the same, although the details (such as filename extensions) differ. To demonstrate the general technique and still offer some specific information you can use, the next section shows you how to include streaming RealMedia clips with Dreamweaver. Check with the developer of the streaming video format you plan to use to get the precise installation details. Typically, a great deal of information is available for free on the developers' Web sites.
When incorporating RealMedia into your Web pages, you have a variety of playback options. You can set the video so that a free-floating RealPlayer is invoked, or you can specify that the video appears inline on your Web page. You can also customize the controls that appear on your Web page so that only the ones you want — at the size you want — are included.
RealMedia uses its own specialized server software called RealServer to transmit encoded video files. Rather than call this server and the digital video file directly, RealMedia uses a system of metafiles to link to the RealMedia server and file. A metafile is an ordinary text file containing the appropriate URL pointing to the RealServer and video file. The metafiles are distinguished from the media files by their filename extensions:
RealMedia files:
.rm,.ra,.rp,.rt,.swfMetafile that launches the independent RealPlayer:
.ramMetafile that launches the RealPlayer Plugin:
.rpm
To create the metafile, open your favorite text editor and insert one or more lines pointing to your server and the video files. Instead of using the http:// locator seen with most URLs, RealMedia files address the RealServer with an rtsp:// (Real-Time Streaming Protocol) indicator. The contents of the file should take the following form:
rtsp://hostname/path/filewhere hostname is the domain name of the server on which the RealMedia files are stored, path is the path to the file, and file is the name of the RealMedia file. For example, to display a training video, the metafile contents might look like the following:
rtsp://www.trainers.com/videos/training01.rm
You can include multiple video clips by putting each one on its own line, separated by a single return. RealMedia plays each clip in succession, and the user can skip from one clip to another.
After you've created both the encoded RealMedia file and the metafiles, you're ready to insert them into your Web page. You have two basic techniques for including RealMedia: as a link or by using the <embed> tag.
Generally, if you want to invoke the free-floating RealPlayer, you use a link; the href attribute is set to an address for a metafile, as follows:
<a href="videos/howto01.ram">Demonstration</a>
When the link is selected, it calls the metafile that, in turn, calls the video file on the RealServer. As the file begins to download to the user's system, the RealPlayer program is invoked and starts to display the video as soon as possible through the independent video window. The link can be inserted in Dreamweaver through either the Text or Image Property inspector.
If, on the other hand, you'd like to make the video appear inline with the Web page's text or graphics, you use Dreamweaver's Plugin object to insert an <embed> tag. Position the pointer where you want the RealMedia to be displayed, and either choose Insert
When the Plugin object representing the RealMedia clip is selected, you can enter values for the <embed> tag in the Property inspector. The only attributes required for a RealMedia clip, as with the QuickTime Player object, are the file source and the width and height of the movie. Similarly, as you can with QuickTime Player, you can control your RealMedia movie with a healthy number of attributes. Enter attributes by clicking the Parameters button on the Plugin Property inspector and entering attributes and their values in the Parameters dialog box (shown earlier in Figure 26-9). RealMedia parameters are listed in Table 26-3.
Table 26-3. Parameters for RealMedia Movies
Possible Values | Description | |
|---|---|---|
| True or false (default) | Tells RealPlayer to start playing as soon as content is available. |
| name, _master, _unique | Determines the console name for each control in a Web page that has multiple controls. Forces controls on a page to refer to the same file by giving them all the same name. A value of |
| All (default), controlpanel, imagewindow, infovolumepanel, infopanel, playbutton, positionslider, positionfield, statuspanel, statusbar, stopbutton, statusfield, volumeslider | Enables the placement of individual control panel elements in the Web page. You can use multiple controls in one attribute or multiple |
| True or false (default) | Suppresses the Title, Author, and Copyright labels in the Status panel. If you set |
Digital video on the Web is in its infancy. Bandwidth is still too restricted to enable full-screen, full-motion movies, no matter what the format. However, you can include downloadable as well as streaming video content through Dreamweaver's Plugin object and Plugin Property inspector. If you're considering adding video to your Web pages, keep these points in mind:
Even with compression, digital video has steep storage and download requirements.
Flash Video is an easy-to-use, comprehensive solution now immediately available in Dreamweaver in either progressive download or streaming delivery modes.
You can include a digital video movie to be downloaded in your Web page by linking to it as if it were a Web page.
Use Dreamweaver's Plugin object when you want your video to be presented inline on your Web page. The Plugin Property inspector then enables you to alter the video's parameters for any video architecture.
QuickTime is a cross-platform, multimedia architecture that offers much more than just video. QuickTime movies can include QuickTime VR, MIDI music, 3D objects, Flash movies, and more.
To enable your visitors to view your digital video clips as soon as possible, use a streaming video technology such as Flash, RealMedia, QuickTime, or Windows Media. Streaming video files can be displayed in a separate player or embedded in the Web page.
In the next chapter, you learn how Dreamweaver helps you incorporate sound and music into your Web pages.