
Learning about tables in HTML
Setting up a table in Dreamweaver
Dreamweaver Technique: Adding a Table to the Page
Customizing tables
Sorting table contents
Dreamweaver Technique: Inserting Table Content
Dreamweaver Technique: Adjusting Table Properties
Importing tabular data
Tables bring structure to a Web page, and they are especially important when displaying data for Web applications. Whether it is used to align numbers in a spreadsheet or arrange columns of information on a page, an HTML table brings a bit of order to otherwise free-flowing content. Tables are the preferred method for presenting structured information.
Dreamweaver's implementation of tables reflects this trend in Web page design. Drag-and-drop table sizing, easy organization of rows and columns, and instant table reformatting all help get the job done in the shortest time possible. Table editing features enable you to select and modify anything in a table — from a single cell to multiple columns. Moreover, using Dreamweaver's commands, you can sort static table data in a variety of ways or completely reformat it.
Note
This chapter covers everything you need to know to get started creating HTML tables in Dreamweaver. You can also dynamically add data to tables from an external data source using server-side processing. Using dynamic data is covered in Chapter 19.
If you're familiar with HTML tables and just want to know how to add a table in Dreamweaver, follow these steps:
Place your cursor on the page where you'd like the table to appear.

From the Common category of the Insert panel, click Table.
When the Table dialog box appears, enter the number of rows and columns you want to start within the appropriate fields.
Set the width of the table in pixels or percentage.
Specify any of the other parameters you want, such as border width, cell padding, cell spacing, header placement, and caption.
Click OK.
Add content to the table by clicking into any cell and typing or inserting images or other media. As you'll learn in the rest of this chapter, there's a lot you can do with tables, but this should get you started.
A table is basically a grid that expands as you add text or images. Tables consist of three main components: rows, columns, and cells. Rows extend across a table from left to right, and columns run up and down. A cell is the area within the intersection of a row and a column; it's where you enter your information. Cells expand to fit whatever they hold. If you have enabled the table border, your browser shows the outline of the entire table and each cell.
In HTML, the structure and all the data of a table are contained between the table tag pair, <table> and </table>. The <table> tag can take numerous attributes, determining a table's width (which can be given in absolute pixel measurement or as a percentage of the screen) as well as the border, alignment on the page, and background color. You can also control the size of the spacing between cells and the amount of padding within cells.
Note
You can insert a <table> . . . </table> pair directly in your code by choosing Insert
HTML uses a strict hierarchy when describing a table. You can see this clearly in Listing 12-1, which shows the HTML generated from a simple table in Dreamweaver.
Example 12-1. Code for an HTML Table
<table border="1" width="75%">
<tr>
<td> </td>
<td> </td>
<td> </td>
</tr>
<tr>
<td> </td>
<td> </td>
<td> </td>
</tr>
<tr>
<td> </td>
<td> </td>
<td> </td>
</tr>
</table>Note
The in the table code is HTML for a non-breaking space. Dreamweaver inserts this code in each empty table cell because some browsers collapse the cell without it. Enter any text or image in the cell, and Dreamweaver automatically removes the code.
After the opening <table> tag comes the first row tag <tr> . . . </tr> pair. Within the current row, you can specify attributes for horizontal alignment or vertical alignment. In addition, browsers recognize row color as an added option.
If you are working directly in Code view, you can insert a <tr> . . . </tr> pair by choosing Insert
Cells are marked in HTML with the <td> . . . </td> tag pair. No specific code exists for a column; rather, the number of columns is determined by the maximum number of cells within a single table row. For example, in Listing 12-1, notice the three sets of <td> tags between each <tr> pair. This means the table has three columns.
Note
Most <tr> attributes are better set up using CSS; attributes such as bgcolor were deprecated under HTML 4.0 and XHTML 1.0 specifications and have been removed from XHTML 1.1 entirely.
A cell can span more than one row or column — in these cases, you see a rowspan=value or colspan=value attribute in the <td> tag, as illustrated in Listing 12-2. This code is also for a table with three rows and three columns, but the second cell in the first row spans two columns.
Example 12-2. HTML Table with Column Spanning
<table width="75%" border="0">
<tr>
<td> </td>
<td colspan="2"> </td>
</tr>
<tr>
<td> </td>
<td> </td>
<td> </td>
</tr>
<tr>
<td> </td>
<td> </td>
<td> </td>
</tr>
</table>Cells can also be given horizontal or vertical alignment attributes, which override any similar attributes specified by the table row. When you give a cell a particular width, all the cells in that column are affected. Width can be specified either in an absolute pixel measurement or as a percentage of the overall table.
Note
Again, modern Web designers prefer to use CSS rather than HTML attributes to format and style table cells. Both the align and bgcolor attributes have been deprecated and recent browsers don't support other attributes such as height.
In Code view, you can insert a <td> . . . </td> pair to define a single table cell by choosing Insert
HTML uses a special type of cell called a table header for column and row headings. Information in these cells is marked with a <th> tag and is generally rendered in boldface, centered within the cell.
To insert a <th> . . . </th> pair for a table heading cell, choose Insert
Tip
After the initial <table> tag, you can place an optional caption for the table. In Dreamweaver, you can enter the <caption> tag in the Code view or Code inspector by choosing Insert
The following example shows how the tag works:
<caption valign="bottom">Table of Periodic Elements</caption>
You can control almost all of a table's HTML features through Dreamweaver's point-and-click interface. To insert a table in the current cursor position, use one of the following methods:
Choose Insert

Click the Table button in either the Common or Layout category of the Insert panel.
Use the keyboard shortcut: Ctrl+Alt+T (Command+Option+T).
Depending on your preference settings, any one of these methods either immediately inserts a table into your page or opens the Table dialog box. The dialog box is bypassed — and the previous settings used — if the Show Dialog When Inserting Objects option in Preferences is not enabled. The Table dialog box, shown in Figure 12-1, contains the values shown in Table 12-1 when it is first displayed.
Table 12-1. Default Values for the Table Dialog Box
Default | Description | |
|---|---|---|
Rows | 3 | Sets the number of horizontal rows. |
Columns | 3 | Sets the number of vertical columns. |
Width | 200 pixels | Sets the preset width of the table. This can be specified as a percentage of the containing element (screen, AP element, or another table) or an absolute pixel size. |
Border | 1 pixel | Sets the width of the border around each cell and the entire table. |
Cell Padding | 0 | Sets the space between a cell's border and its contents, measured in pixels. A value of 0 indicates no margin space within the cell. |
Cell Spacing | 0 | Sets the number of pixels between each cell. A value of 0 indicates no space between cells. |
Header | None | Determines whether the top row and/or column is designated as a header cell. In addition to simply creating the header cell with |
Caption | Blank | Sets a brief description for the table. |
Align Caption | default | Enables you to specify whether the table caption appears at the top, bottom, left, or right of the table. Choosing default does not add an |
Summary | Blank | Enables you to add the summary attribute to your |
If you aren't sure of the number of rows and/or columns you need, put in your best guess — you can add or delete rows or columns later as necessary.
The default table is sized to take up 200 pixels of the browser window. You can alter this percentage by changing the value in the Width text box. The table maintains this proportion as you add text or images, except in the following situations:
When an image is larger than the specified percentage
When the
nowrapattribute is used for the cell or table row and there is too much text to fit
In either case, the percentage set for the table is ignored, and the cell and table expand to accommodate the text or image. (For further information on the nowrap attribute, see the "Cell wrap" section later in this chapter.)
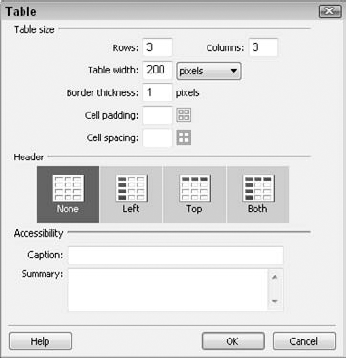
Figure 12-1. The Table dialog box starts out with a default table of three columns and three rows; you can adjust it as needed and Dreamweaver will remember your last choices.
Note
The Table dialog box uses what are called sticky settings, displaying your previously used settings the next time you open the dialog box. This handy feature enables you to set the border width to 0, for example, and forget about resetting it each time.
If you prefer to enter the table width as an absolute pixel value, instead of the relative percentage, type the number of pixels in the Width text box and select Pixels in the drop-down list of width options.
With Dreamweaver's Table Widths feature, you can tell at a glance whether your table and cells are set to percentages or pixels — and exactly what these values are. The Table Widths feature is a design-time visual aid that appears above or below (depending on its position in the window) a table when one or more table cells are active. The widths are presented in two lines: the outermost line shows the width of the entire table, and the innermost line displays cell-width measurements.
With the Table Widths feature enabled, tables or cells using percentages actually display two values. The first value shown is the actual percentage; it is followed by a second value in parentheses that indicates the current size in pixels. For example, if a table is set to 75% and placed in a browser window where the interior screen width is 970 pixels, the actual width of the table is 693 pixels. Dreamweaver displays 75% (693), as shown in Figure 12-2. The same figure shows two other tables: one at 100%, which takes up the full width of the browser window, minus any margins. The third table is fixed at 400 pixels — approximately half of an 800 × 600 window.
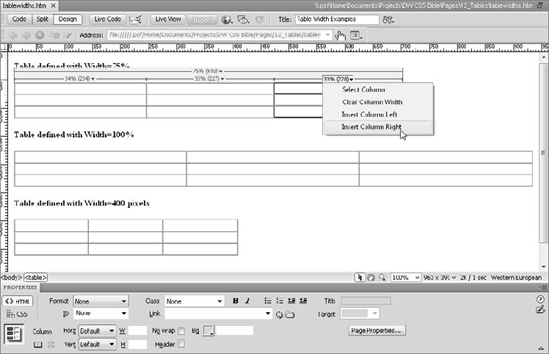
Figure 12-2. In addition to displaying overall table and column widths, the Table Width visual aid provides a quick method for working with columns.
Although viewing Table Widths definitely helps with certain stages of the design process, it can impede others. To turn off the dimensioning, deselect View
Tip
You don't have to declare a width for your table at all. If you delete the value in the Width text box of the Table dialog box, your table starts out as small as possible and only expands to accommodate inserted text or images. However, this can make it difficult to position your cursor inside a cell to enter content — a situation Expanded Tables mode (covered later in this chapter) is intended to alleviate.
The Table Widths feature also offers a number of context menus to make table operations even easier. Click the down arrow next to the table width measurement to select the table, clear all heights and/or widths, make all widths consistent, or hide the table widths. Choose the down arrow over a column to select that column, clear the column width, or insert columns to either side.
Adding a Table to the Page
In this first Technique of the chapter, you practice inserting two tables and setting their initial values.
In the Files panel, switch to the Dreamweaver Bible working site previously created.
Expand the 13_Tables folder and open the file
table_start.htm.Place your cursor at the end of the first paragraph under the About Us heading and press Enter (Return) to create a new line.
From the Insert panel's Common category, click the Table object.
When the Insert Table dialog box opens, set the following parameters:
Rows: 4
Columns: 2
Table Width: 500 pixels
Border Thickness: 0
In the Header area, select Left.
Leave all the fields in the Accessibility area at their defaults and click OK.
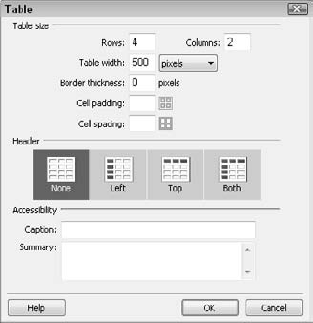
The first table is inserted at the cursor position, ready for data. Now, add a second table near the bottom of the page.
Place your cursor at the end of the paragraph under the Our Top Staff heading and press Enter (Return).
Click the Table object on the Insert panel.
When the Insert Table dialog box opens, set the following parameters:
Rows: 4
Columns: 4
Table width: 75 percent
Border Thickness: 0
Leave both the Cell Padding and Cell Spacing fields blank.
In the Header area, select Top.
Leave all the fields in the Accessibility area at their defaults and click OK.
Save your page.
In the next Techniques, you continue working with these practice tables, adding content and changing their structure.
Most modifications to tables start in the Property inspector. Dreamweaver helps you manage the basic table parameters — width, border, and alignment — and provides attributes for other useful but more arcane features of a table. These include converting table width from pixels to percentage of the screen, and vice versa.
As with text or images, the first step in altering a table (or any of its elements) is selection. Dreamweaver simplifies the selection process, making it easy to change both the properties and the contents of entire tables, selected rows or columns, and even non-adjacent cells. You can change the vertical alignment of a row, for example, with a click or two of the mouse — instead of highlighting and modifying each individual cell.
Note
All the following discussions about table selections pertain only to Standard mode; they are not applicable in Layout mode.
In Dreamweaver, you can select the following elements of a table:
The entire table
single row
Multiple rows, either adjacent or separate
single column
Multiple columns, either adjacent or separate
single cell
Multiple cells, either adjacent or separate
After you select a table element, you can modify its properties.
It's fairly easy to select table elements when the table is fully expanded — but tables aren't always set to a 100% width. In fact, designers often remove all table width values for their layouts, thus collapsing the table to fit the content. Although this is often necessary, you may have difficulty placing your cursor in the right cell in a collapsed table. You can speed up the selection and design process considerably by temporarily entering into Expanded Tables mode.
To enable Expanded Tables mode, choose View
Expanded Tables mode makes cell selection easier by temporarily adding a border (if there is none) and increasing the cell padding and spacing. These visual changes effectively make the table view much more apparent and selection far easier. All changes take place only in Dreamweaver's Design view — no code is ever rewritten. While you are in Expanded Tables mode, an outline (red, by default) appears around the table or any cells your cursor moves over. The outline color is controlled by the Mouse-Over option found on the Highlighting category of the Preferences. Ctrl+click (Command+click) an outlined cell or table to select it.
Tip
You don't need to be in Expanded Tables mode to see the table outlines. If the Mouse-Over option is enabled, the outlines appear when you're in Standard mode when you hold down the Ctrl (Command) key and move over the table.
Expanded Tables mode is best used on an as-needed basis, and you can quickly toggle between it and Standard mode by pressing F6 (Option+F6).
Several methods are available for selecting the entire table, whether you're a menu- or mouse-oriented designer. To select the table via a menu, do one of the following:
With the cursor positioned in the tables, choose Modify
With any table row already selected, choose Edit
Right-click (Control+click) inside a table to display the context menu and choose Table
To select an entire table with the mouse, use one of the following techniques:
Click the bottom or right border of the table. You can also click anywhere along the table border when the pointer becomes a four-sided arrow.
Select the
<table>tag in the Tag Selector.Click immediately to one side of the table and drag the mouse over the table.
The selected table is surrounded by a black border, with sizing handles on the right, bottom, and bottom-right corner (as shown in Figure 12-3), just like a selected graphic.
Altering rows or columns of table text without Dreamweaver is a major, time-consuming chore. Each cell has to be individually selected, and the changes applied. Dreamweaver has an intuitive method for selecting single or multiple columns and rows, comparable — and in some ways, superior — to major word processing programs.

Figure 12-3. A selected table can be identified by the black border outlining the table and the three sizing handles.
As with entire tables, you have several methods for selecting columns or rows. None of the techniques, however, uses the main menus; row and column selections are handled primarily with the mouse. In fact, you can select an entire row or column with one click.
The one-click method for selecting a single column or row requires that you position your pointer directly above the column or to the left of the row you want to choose. This is similar to the way you select a row or column in a Microsoft Word table. Move the pointer slowly toward the table — when the pointer becomes a single arrow, with the arrowhead pointing down for columns and to the right for rows, click the mouse. All the cells in the selected column or row are bounded with a black border. Any changes now made in the Property inspector, such as a change in font size or color, affect all of the cells in the selected column or row.
You can select multiple, contiguous columns or rows by dragging the single-arrow pointer across several columns or rows. To select a number of columns or rows that are not next to one another, press the Ctrl (Command) key while selecting each individual column, using the one-click method.
Tip
If you have trouble positioning the mouse so that the single-arrow pointer appears, you can use two other methods to select columns or rows. In the first method, you click and drag across all the cells in a column or row. The second method uses another keyboard modifier, the Shift key. With this technique, click once in the first cell of the column or row. Then, hold down the Shift key while you click in the final cell of the column or row (in Mac OS X, you must perform two single-clicks in the final cell). You can also use this technique to select multiple adjacent columns or rows; just click in the last cell of another column or row.
Sometimes you need to change an attribute of just a few cells in a table, but not the entire row — or you might need to merge several cells to form one wide column span. In these situations, and many others, you can use Dreamweaver's cell selection capabilities. As with columns and rows, you can select multiple cells, whether or not they are adjacent.
Individual cells are generally selected by dragging the mouse across one or more cell boundaries. To select a single cell, click anywhere in the cell and drag the mouse into another cell. As you pass the border between the two cells, the initial cell is highlighted. If you continue dragging the mouse across another cell boundary, the second cell is selected, and so on. Note that you have to drag the mouse into another cell and not cross the table border onto the page. For example, to highlight the lower-right cell of a table, you drag the mouse up or to the left.
Tip
You can also select a single cell by pressing the Ctrl (Command) key and clicking once in the cell, or you can select the rightmost <td> tag in the Tag Selector.
Extended cell selection in Dreamweaver is handled identically to extended text selection in most word processing programs. To select adjacent cells, click in the first desired cell, press and hold the Shift key, and click in the final desired cell. Dreamweaver selects everything in a rectangular area, using the first cell as the upper-left corner of the rectangle and the last cell as the lower-right corner. You could, for instance, select an entire table by clicking in the upper-left cell and then Shift+clicking the lower-right cell.
Just as the Shift key is used to make adjacent cell selections, the Ctrl (Command) key is used for all non-adjacent cell selections. You can highlight any number of individual cells — whether or not they are next to one another — by pressing the Ctrl (Command) key while you click in each cell.
Before you learn how to change a table's attributes, let's look at basic editing techniques. Editing table text in Dreamweaver is slightly different from editing text outside of tables. When you begin to enter text into a table cell, the table borders expand to accommodate your new data, assuming no width has been set. The other cells appear to shrink; but they, too, expand after you start typing in text or inserting an image. Unless a cell's width is specified, the cell currently being edited expands or contracts, and the other cells are forced to adjust their width. Figure 12-4 shows a table (with one row and three columns) in three different states. In the top table, only the first cell contains text; notice how the other cells have contracted. In the middle table, text has been entered into the second cell as well, and you can see how the first cell is now smaller. Finally, in the bottom table, all three cells contain text, and the other two cells have adjusted their width to compensate for the expanding third cell.
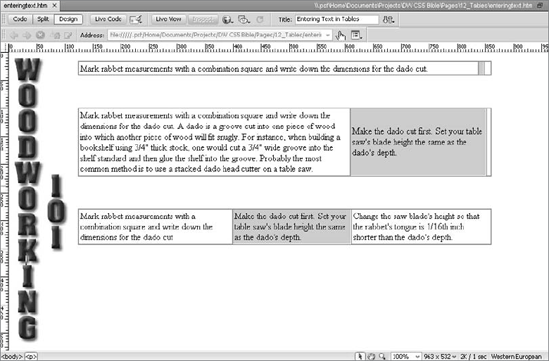
Figure 12-4. As text is entered into a cell, the cell expands and other cells contract, even if they already contain text.
If you look closely at the middle table in Figure 12-4, you can see that the text doesn't line up vertically. That's because the default vertical alignment in Dreamweaver, as in most browsers, provides for entries to be positioned in the middle of the cell. (Later in this section, you learn how to adjust the vertical alignment.)
Note
The expandability of table cells is very significant when you are inserting information from a data source because the data is often of varying length. See Chapter 21 for details about how to use Dreamweaver's Live Data view to check your layout.
When you've finished entering your text in the first cell, you can move to the next cell in the row by pressing the Tab key. When you reach the end of a row, pressing Tab takes your cursor to the first cell of the next row. To go backward, cell to cell, press Shift+Tab.
Tip
Pressing Tab has a special function when you're in the last cell of a table — it adds a new row, with the same column configuration as the current one.
The Home and End keys take you to the beginning and end, respectively, of the cursor's current line. If a cell's contents are large enough for the text to wrap in the cell, move to the top of the current cell by pressing Ctrl+Home (Command+Home). To get to the bottom of the current cell in such a circumstance, press Ctrl+End (Command+End).
When you're at the beginning or end of the contents in a cell, you can also use the arrow keys to navigate from cell to cell. Use the left and right arrows to move from cell to cell in a row, and the up and down arrows to move from cell to cell in a column. When you come to the end of a row or column, the arrow keys move to the first cell in the next row or column. If you're moving left to right, the cursor goes from the end of one row to the beginning of the next row — and vice versa if you move from right to left. When moving from top to bottom, the cursor goes from the end of one column to the start of the next, and vice versa when moving bottom to top.
Tip
To enter a table without using the mouse, position the cursor directly before the table, press Shift+right arrow to select the table, and then press the down arrow key to move into the first cell. To move out of a table without using the mouse, move the cursor to the first or last cell in the table, press Ctrl+A (Command+A) to select the cell, and then press the left arrow if the cursor is in the first table cell, or the right arrow if the cursor is in the last cell. Alternatively, press Ctrl+A (Command+A) twice to select the entire table and then use either the left or right arrow to exit the table.
In the early days of Web design, woe to you if you accidentally left out a cell of information. It was often almost faster to redo the entire table than to make room by meticulously cutting and pasting everything, one cell at a time. Dreamweaver ends that painstaking work forever with its advanced cutting and pasting features. You can copy a range of cells from one table to another and maintain all the attributes (such as color and alignment as well as the content — text or images). You can also copy just the contents and ignore the attributes.
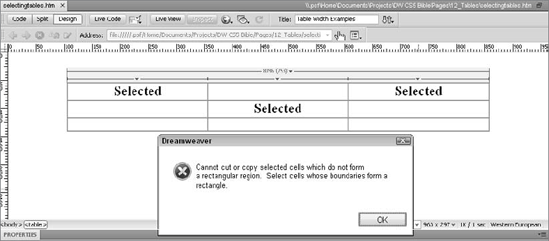
Dreamweaver has one basic restriction to table cut-and-paste operations: your selected cells must form a rectangle. In other words, although you can select non-adjacent cells, columns, or rows and modify their properties, you can't cut or copy them. Should you try, you get a message from Dreamweaver like the one shown in Figure 12-5; the table above the notification in this figure illustrates an incorrect cell selection.
When you copy or cut a cell using the regular commands, Dreamweaver automatically copies everything — content, formatting, and cell format — in the selected cell. Then, pasting the cell reproduces it; however, you can get different results depending on where the cell (or column or row) is pasted.
To cut or copy both the contents and the attributes of any cell, row, or column, follow these steps:
Select the cells you want to cut or copy. Remember that to cut or copy a range of cells in Dreamweaver, they must form a solid rectangular region.
To copy cells, choose Edit
To cut cells, choose Edit
Position your cursor to paste the cells in the desired location:
To replace a cell with a cell on the clipboard, click anywhere in the cell to be replaced. If you cut or copy multiple cells that do not make up a full column or row, click in the upper-left corner of the cells you want to replace. For example, a range of six cells in a 2 × 3 configuration replaces the same configuration when pasted. Dreamweaver alerts you if you try to paste one configuration of cells into a different cell configuration.
To insert a new row with the row on the clipboard, click anywhere in the row immediately below where you'd like the new row to appear.
To insert a new column with the column on the clipboard, click anywhere in the column immediately to the right of where you'd like the new column to appear.
To replace an existing row or column in a table, select the row or column. If you've cut or copied multiple rows or columns, you must select an equivalent configuration of cells to replace.
To insert a new table based on the copied or cut cells, click anywhere outside of the table.
Paste the copied or cut cells by choosing Edit
Tip
To move a row or column that you've cut from the interior of a table to the exterior (the right or bottom), you have to first expand the number of cells in the table. To do this, first select the table by choosing Modify
You often need to move data from one cell to another, while keeping the destination cell's attributes, such as its background color or border, intact. For this, use Dreamweaver's facility for copying just the contents of a cell.
To copy only the contents, select a cell and copy as previously described; then, instead of choosing Edit
You can copy the contents only one cell at a time, and you can paste those contents into only one cell at a time.
You can't replace the entire contents of one cell with another and maintain all the text attributes (font, color, and size) of the destination cell in Design view. If you select all the text to be replaced, Dreamweaver also selects the CSS styles or
<font>tag that holds the attributes and replaces those as well; instead of applying the CSS style to the<td>tag, however, it wraps the text in a similarly styled<span>tag. The workaround for HTML-formatted text is to select and copy the source text as usual, and then select all but one letter or word in the destination cell, paste the contents, and delete the extra text. With CSS, cut and paste the entire text and then right-click (Control+click) the<span>tag in the Tag Selector and choose Remove Tag.
The <table> tag has a large number of attributes, and most of them can be modified through Dreamweaver's Property inspector. As with all objects, you must select the table before it can be altered. Choose Modify
After you've selected the table, the Property inspector presents the table properties, as shown in Figure 12-6. If the inspector isn't open, choose Window

Figure 12-6. The expanded Table Property inspector gives you control over all the table-wide attributes.
Aligning a table in Dreamweaver goes beyond the expected left, right, and center options. You can also make a table into a free-floating object, around which you can wrap text — to the left or right.
Figure 12-7 illustrates some of the different results you can get from aligning your table.
Figure 12-7. Tables can be centered, as well as aligned left or right — with or without text wrapping.
Because the <table> tag is a block element, CSS can be used to float the table on the page to the left or right. Subsequent text wraps around the table to one side or the other. Although Dreamweaver lets you align the table left or right from the Property inspector to achieve a similar effect in older browsers, the align attribute in tables has been deprecated.
To align the table without allowing text to wrap, you need to put the table within a <div> tag and set the <div> tag's align style to left, right, or center values with CSS. Although you may be tempted to use the <div> tag's align attribute, that attribute also has been deprecated.
The primary sizing control on the Table Property inspector is the W (Width) text box. You can assign a new width for the entire table in either a screen percentage or pixels. Just enter your value in the W text box and then select % or Pixels in the drop-down list of options.
Dreamweaver also provides a quick and intuitive way to resize the overall table width, and the column widths. Pass your pointer over any of the table's borders, and the pointer becomes a two-headed arrow; this is the resizing pointer. When you see the resizing pointer, you can click and drag any border to new dimensions.
As noted earlier, tables are initially sized according to their contents. After you move a table border in Dreamweaver, however, the new sizes are written directly into the HTML code, and the column width is adjusted — unless the contents cannot fit. If, for example, an inserted image is 115 pixels wide and the cell has a width of only 90 pixels, the cell expands to fit the image. The same is true if you try to fit an extremely long, unbroken text string, such as a complex URL, into a cell that's too narrow to hold it.
Note
What about height? The height attribute for the <table> tag has been removed in HTML 4.0 and higher by the W3C, and its further use is highly discouraged. Although rendered in Dreamweaver, the attribute no longer functions properly in most modern browsers, including Firefox, Safari, and Netscape 6.x. You'll need to use CSS (described in Chapter 6) to set the height and, preferably, the width.
Changes to the width of a cell or column are shown in the <td> tags, as are changes to a row's width, using the width attribute. You can see these changes by selecting the table, cell, column, or row affected and looking at the W text box values.
For an overall view of what happens when you resize a cell, row, or column, it's best to look at the HTML. Here's the HTML for an empty table, resized:
<table border="1" width="70%">
<tr>
<td width="21%"> </td>
<td width="34%"> </td>
<td width="45%"> </td>
</tr>
<tr>
<td width="21%"> </td>
<td width="34%"> </td>
<td width="45%"> </td>
</tr>
<tr>
<td width="21%"> </td>
<td width="34%"> </td>
<td width="45%"> </td>
</tr>
</table>Notice how the width for both the cells and the entire table are expressed as percentages. If the table width were initially set at a pixel value, the cell widths would have been, too.
You can switch from percentages to pixels in all the table measurements, and even clear all the values at once, with the click of a button. Several measurement controls appear in the lower-left portion of the expanded Table Property inspector, as shown in Figure 12-8.
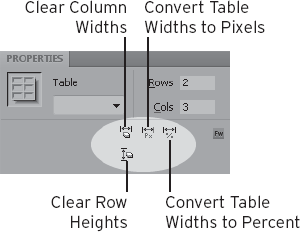
Figure 12-8. You can make table-wide changes with the control buttons in the Table Property inspector.
Table 12-2 shows the measurement controls provided in the Table Property inspector.
Table 12-2. Table Property Inspector Measurement Controls
Measurement Control Button | Description |
|---|---|
Clear Column Widths | Deletes all the |
Convert Table Widths To Pixels | Translates the current width of all cells and the entire table from percentages to pixels |
Convert Table Widths To Percent | Translates the current width of all cells and the entire table from pixels to percentages |
Clear Row Heights | Erases all the |
Note
Selecting Clear Row Heights doesn't affect the table height value.
If you clear both row heights and column widths, the table goes back to its "grow as needed" format and, if empty, shrinks to its smallest possible size.
Note
When converting width percentages to pixels, and vice versa, keep in mind that the percentages are relative to the size of the browser window — and in the development phase that browser window is Dreamweaver. Use the Window Size option on the status bar to expand Dreamweaver's Document window to the size you expect your website to be seen at in various browser settings.
You can change the number of rows and columns in a table at any time. Dreamweaver provides a variety of methods for adding and removing rows and columns; you can either add them directly or by invoking a dialog box.
You have several options for adding a single row directly:
Position the cursor in the last cell of the last row and press Tab to add a new row below the present one.
Choose Modify
Right-click (Control+click) in the table to open the context menu and choose Table
You have two ways to add a new column to your table directly:
Choose Modify
Right-click (Control+click) to open the context menu and choose Table
You can add multiple rows and columns in either of the following ways:
Increase the number of rows indicated in the Rows text box of the Table Property inspector. All new rows added in this manner appear below the last table row. Similarly, you can increase the number of columns indicated in the Cols text box of the Table Property inspector. Columns added in this way appear to the right of the last column.
The Insert Rows or Columns feature enables you to include any number of rows or columns anywhere relative to your current cursor position.
To add multiple columns using the Insert Rows or Columns dialog box, follow these steps:
Position the cursor anywhere in the row or column next to where the new row or column will be inserted.
Open the Insert Rows or Columns dialog box (shown in Figure 12-9) by choosing Modify
Select either Rows or Columns.
Enter the number of rows or columns you want to insert — you can either type in a value or use the arrows to increase or decrease the number.
Select where you want the rows or columns to be inserted.
If you have selected the Rows option, you can insert the rows either above or below the selection (the current row).
If you have selected the Columns option, you can insert the columns either before or after the current column.
Click OK when you're finished.
The easiest way to delete a row or column is to select it and press the Delete key. You can also use the context menu to remove the current column or row by choosing Delete Column or Delete Row, respectively.
Alternatively, you can use the Table Property inspector to delete multiple columns and rows by reducing the numbers in the Cols or Rows text boxes. Columns are deleted from the right side of the table, and rows are removed from the bottom.
Borders are the solid outlines of the table itself. A border's width is measured in pixels; the default width is 1 pixel. You can alter this width in the Border field of the Table Property inspector.
To make the border invisible, specify a border of 0 width. You can still resize your table by clicking and dragging the borders, even when the border is set to 0. When the View
When the border is visible, you can also see each cell outlined. The width of the outline around the cells stays constant, regardless of the border's width. However, you can control the amount of space between each cell with the CellSpace value in the Table Property inspector, covered in the section "Working with cell spacing and cell padding" later in this chapter.
To change the width of a border in Dreamweaver, select your table and enter a new value in the Border text box. With a wider border, you can see the default shading: The top and left sides are a light shade, and the bottom and right sides are darker, giving the table border a pseudo-3D appearance. Figure 12-10 shows single-cell tables with borders of various widths, contrasting background attribute and CSS style usage as rendered in Live View.
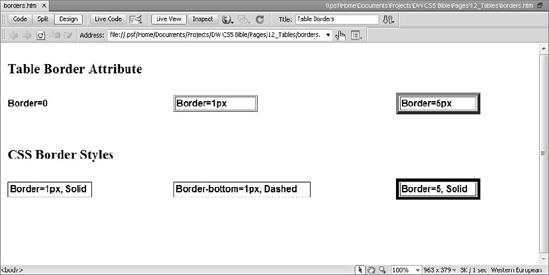
In Dreamweaver, you can directly assign colors to the border. To choose a color for the border, select the Brdr color box or enter a color name or hexadecimal color value in the adjacent text box. Again, you get much greater control and standards compliance if you use CSS.
In addition to colored borders, a table can also have a colored background. (By default, the table is initially transparent.) Choose the background color in the Table Property inspector by selecting a color in the Bg color box or entering a color name or hexadecimal color value in the adjacent text box. As you learn later in this chapter, in "Setting cell, column, and row properties," you can also assign background colors to rows, columns, and individual cells — if used, these specific colors override the background color of the entire table.
HTML gives you two methods to add whitespace in tables. Cell spacing controls the width between each cell, and cell padding controls the margins within each cell. You can set these values independently through the Table Property inspector.
Tip
If no cell spacing or padding value is indicated in the Table Property inspector, most browsers use a default value of 2 pixels for cell spacing and 1 pixel for cell padding. If your Web page design calls for a close arrangement of cells, change either (or both) the CellSpace or CellPad values to 1 or 0.
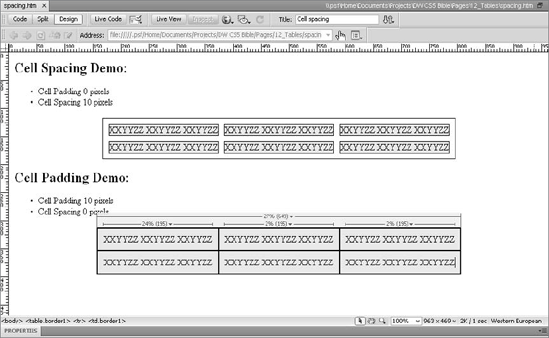
To change the amount of whitespace between each cell in a table, enter a new value in the CellSpace text box of the Table Property inspector. If you want to adjust the amount of whitespace between the borders of the cell and the actual cell data, alter the value in the CellPad text box of the Table Property inspector. Figure 12-11 shows an example of tables with wide (10 pixels) cell spacing and cell padding values (the shaded space is the actual cell size).
You have seen how cells in HTML tables can extend across (span) multiple columns or rows. By default, a cell spans one column or one row. Increasing a cell's span enables you to group any number of topics under one heading. You are effectively merging one cell with another to create a larger cell. Likewise, a cell can be split into multiple rows or columns.
Dreamweaver enables you to combine and divide cells in two different ways. If you're more comfortable with the concept of merging and splitting cells, you can use two handy buttons on the Property inspector. If, on the other hand, you prefer the older method of increasing and decreasing row or column span, you can still access these commands through the main menu and the context menus.
To combine two or more cells, first select the cells you want to merge. Then, from the Property inspector, click the Merge Cells button or press the keyboard shortcut, M. If the Merge button is not available, multiple cells have not been selected.
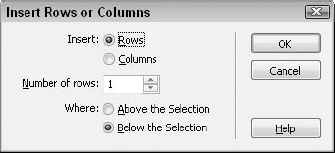
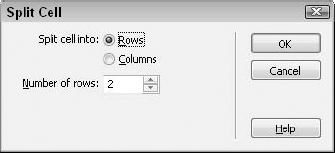
To divide a cell, follow these steps:
Position your cursor in the cell to be split.
From the Property inspector, click the Split Cell button or press the keyboard shortcut, Ctrl+Alt+S (Command+Option+S). The Split Cell dialog box (shown in Figure 12-12) appears.
Select either the Rows or Columns option to indicate whether the cell is to be split horizontally or vertically.
Enter the number of rows or columns in the text box or use the arrows to change the value.
Click OK when you're finished.
You can achieve the same effect by using the menus. To do so, first position the cursor in the cell to be affected and then choose one of the commands shown in Table 12-3 from the Modify
Table 12-3. Commands for Merging and Splitting Cells
Description | |
|---|---|
Increase Row Span | Joins the current cell with the cell below it |
Increase Column Span | Joins the current cell with the cell immediately to its right |
Decrease Row Span | Separates two or more previously spanned cells from the bottom cell |
Decrease Column Span | Separates two or more previously spanned cells from the right edge |
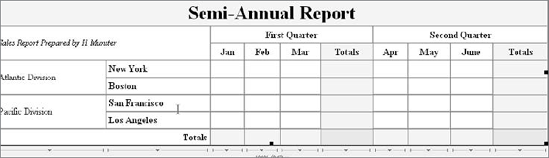
Existing text or images are put in the same cell if the cells containing them are joined to span rows or columns. Figure 12-13 shows a table containing both row and column spanning.
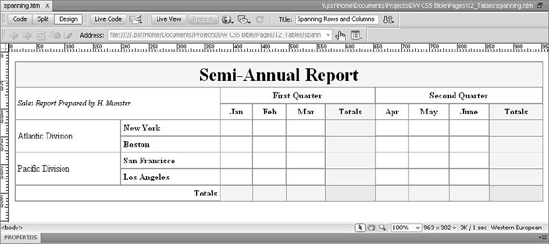
Figure 12-13. This spreadsheet-like report was built using Dreamweaver's row- and column-spanning features.
Tip
Show restraint when splitting and merging cells, or your table will be difficult to maintain. When you are building a complex table such as the one in Figure 12-13, it's best to map out your table before you begin constructing it and to complete it prior to entering your data.
Adjusting Table Properties
In this Technique, you practice aligning tables to achieve two different effects as well as merging cells and clearing column widths.
Open the
table_start.htmfile previously worked upon.From the CSS Styles panel, click New CSS Rule.
In the New CSS Rule dialog box, choose the Class option and enter .rightTable in the Name field; click OK when you're done.
Switch to the Box category and, from the Float list, choose Right and click OK.
Select the first table by dragging your mouse across the right border into the table.
From the Property inspector's Style list, choose rightTable.
Notice that the table is instantly positioned to the right, and the following paragraph flows to the left. Now position the bottom table in the center without wrapping.
Select the bottom table.
From the Layout category of the Insert panel, choose Insert Div Tag.
The necessary CSS rules (discussed earlier in the "Centering a Table in CSS" sidebar) are already in the attached CSS style sheet.
When the Insert Div Tag dialog box opens, leave the Insert list entry set to Wrap Around Selection.
Choose centerDiv from the Class list and click OK when you're done.
Dreamweaver creates a surrounding <div> tag and centers the table within it.
Your final task is to remove the widths from the lower table columns so that they tightly fit the data.
Select the bottom table again, if necessary.
From the lower portion of the Property inspector, click Clear Column Widths.
Save your page.
The table columns collapse to just the widths needed.
In addition to the overall table controls, Dreamweaver helps you set numerous properties for individual cells one at a time, by the column or by the row. When attributes overlap or conflict, such as different background colors for a cell in the same row and column, the more specific target has precedence. The hierarchy, from most general to most specific, is as follows: tables, rows, columns, and cells.
You can call up the specific Property inspector by selecting the cell, row, or column you want to modify. The Cell, Row, and Column Property inspectors each affect similar attributes. The following sections explain how the attributes work, both in general and — if any differences exist — specifically (in regard to the cell, column, or row).
You can set the horizontal alignment attribute, align, to specify the default alignment, or left, right, or center alignment, for the contents of a cell, column, or row. This attribute can be overridden by setting the alignment for the individual line or image. Generally, left is the default horizontal alignment for cells.
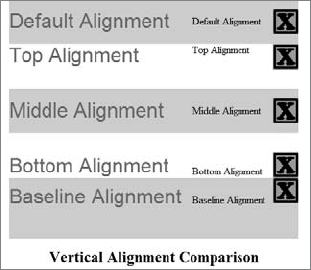
The HTML valign attribute specifies whether the cell's contents are vertically aligned to the cell's top, middle, or bottom, or along the baseline. Typically, browsers align cells vertically in the middle by default. Select the Vertical Alignment option arrow in the Cell, Column, or Row Property inspector to specify a different alignment.
Top, middle, and bottom vertical alignments work pretty much as you would expect. A baseline vertical alignment displays text near the top of the cell and positions the text — regardless of font size — so that the baselines of all the text in the affected row, column, or cell are the same. Figure 12-14 illustrates how images and text of various sizes are displayed under the different vertical alignment options.
Normal behavior for any cell is to automatically wrap text or a series of images within the cell's borders. You can turn off this automatic feature by selecting the No Wrap option in the Property inspector for the cell, column, or row.
You might use this option, for example, if you need three images to appear side by side in one cell. In analyzing the results, however, you might find that, on some lower-resolution browsers, the last image wraps to the next line.
Note
A preferred method of preventing the contents of a cell from wrapping is to use Cascading Style Sheets to define a style with the white-space attribute set to nowrap; the nowrap attribute has been deprecated for <td> tags.
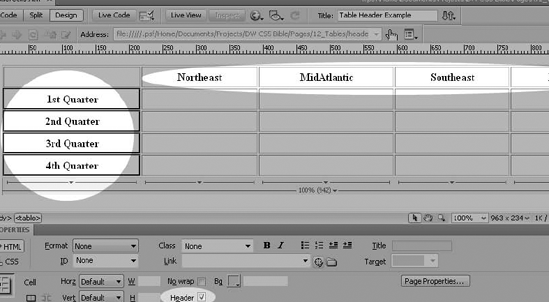
Quite often in tables, a column or row functions as the heading for that section of the table, labeling all the information in that particular section. Dreamweaver has an option for designating these cells: the Header option. Table header cells are usually rendered in boldface and centered in each cell. Figure 12-15 shows an example of a table in which both the first row and first column are marked as table header cells.
The gridlike structure of a table makes it impossible to resize only one cell in a multicolumn table. Therefore, the only way you can enter exact values for a cell's width is through the W text box available in the Column Property inspector. You can enter values in pixels or as a percentage of the table. The default enables cells to automatically resize with no restrictions outside of the overall dimensions of the table.
Similarly, whenever you change a cell's height, the entire row is altered. If you drag the row to a new height, the value is written into the H text box for all cells in the row. On the other hand, if you specify a single cell's height, the row resizes, but you can see the value only in the cell you've changed. If different cells in the same row are assigned different heights, the row is sized to the tallest height.
Just as you can specify color backgrounds and borders for the overall table, you can do the same for columns, rows, or individual cells. Corresponding color swatches and text boxes are available in the Property inspector for the following:
Bg (Background Color): Specifies the color for the selected cell, row, or column. Selecting the color box opens the standard color picker. This tag has been deprecated for all table elements — including
<table>,<tr>, and<td>— and it is strongly advised that CSS be used to apply coloring.Brdr (Border Color): Controls the color of the single-pixel border surrounding each cell.
As with all Dreamweaver color pickers, you can use the Eyedropper tool to select a color from the Web-safe palette or from any item on a page. You can also click the Default color button to delete any previously selected color. Finally, click the System Color Picker button to open the Color dialog box and select any available color.
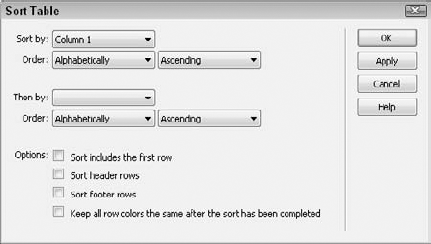
Have you ever painstakingly built a table, alphabetizing every last entry by last name and first name, only to have the client call with a list of 13 additional names? "Oh, and could you sort them by ZIP Code instead of last name?" Dreamweaver contains a Table Sort command designed to make short work of such requests. All you do is select your table, and you're ready to do a two-level–deep sort, either alphabetically or numerically.
The Sort Table command can rearrange a table of any size; more important, it's HTML-savvy, and gives you the option of keeping the formatting of your table rows. This capability enables you to maintain a table with alternating row colors and still sort the data — something not even the most powerful word processors can handle. The Sort Table command is useful for generating different views of the same data without having to use a database.
The Sort Table command is straightforward to use; just follow these steps:
Position the cursor inside the table.
Choose Commands
Select the primary sort column from the Sort By option list. Dreamweaver automatically lists every column in the selected table in the option list.
Set the type of the primary sort by picking either Alphabetically or Numerically from the first Order option list.
Select the direction of the sort by selecting either Ascending or Descending from the second Order option list.
If you want to add a second level of sorting, repeat Steps 3 through 5 in the Then By section.
If your selected table does not include a header row, select the Sort Includes The First Row option.
If your selected table includes one or more rows coded within
<thead>. . .</thead>or<tfoot>. . .</tfoot>tags, and you want those rows to be included in the sort, select the appropriate option.Note
The
<thead>and<tfoot>HTML tags designate one or more table rows as forming a table heading or footer. The footer displays at the bottom of the table. It is typically used to duplicate the heading for long tables. These tags are not supported on all browsers.If you have formatted your table with alternating row colors, choose the Keep All Row Colors The Same After The Sort Has Been Completed option.
Click OK when you're finished.
In the computer age, there's nothing more frustrating than having information in a digital format and still having to enter it manually — either by typing it in or by cutting and pasting — to get it on the Web. This frustration is multiplied when it comes to table data, whether created in a spreadsheet or database program. You have to transfer numerous small pieces of data, and it all has to be properly related and positioned.
Dreamweaver's Import Table Data command goes a long way toward alleviating the tedium — not to mention the frustration — of dealing with tabular information. The Import Table Data command reads any delimited text file and inserts the information in a series of rows and columns. You can even set most characteristics for the table to be created, including the width, cell padding, cell spacing, and border.
Quite often, the first step in the process of importing table data into Dreamweaver is exporting it from another program. Most spreadsheet and database programs have some capability to output information to a text file. Each bit of data (whether it's from a cell of a spreadsheet or a field of a database) is separated — or delimited — from every other bit of data by a special character, typically a tab or comma. In Dreamweaver, you can use the Import Table Data dialog box to choose which delimiter is used, ensuring a clean transfer with no loss of data.
Tip
Although you have many types of delimiters to choose from, you might want to default to exporting tab-delimited files. With a tab-delimited file, you usually don't have to worry if any of your data contains the delimiter — which would throw off the import. However, testing has shown that Dreamweaver correctly handles comma-delimited files with and without quotes, so you can also use that format safely.
To import a tabular data file, follow these steps:
Be sure the data you want to import has been saved or exported in the proper format: a delimited text file.
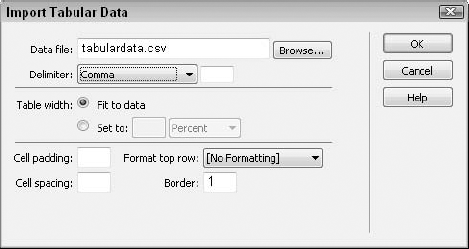
Open the Import Tabular Data dialog box, shown in Figure 12-17, in one of the following ways:
Choose File
Choose Insert
Click the Tabular Data button in the Common category of the Insert panel.
Click the Browse button to find the desired file.
Select the delimiter used to separate the fields or cells of data from the Delimiter option list. The options are Tab, Comma, Semicolon, Colon, and Other.
Tip
If you select a file with a
.csvextension, the comma delimiter is automatically chosen, although you can change the option if necessary. CSV is short for Comma-Separated Values.If you choose Other from the Delimiter list, a blank field appears to the right of the list. Enter the special character, such as the pipe (
|), used as the delimiter in the exported file. Now that the imported file characteristics are set, you can predefine the table into which the information will be imported.If you want to set a particular table width, enter a value in the Set To field and select either Pixels or Percent from the option list. If you want the imported file to determine the size of the table, keep the Fit To Data option selected.
Enter any Cell Padding or Cell Spacing values desired, in their respective fields. As with standard tables, if you don't enter a value, most browsers interpret Cell Padding as 2 pixels and Cell Spacing as 1 pixel.
If you'd like to style the first row, pick Bold, Italic, or Bold Italic from the Format Top Row option list. This option is typically used when the imported file contains a header row.
Set the Border field to the desired width, if any. If you don't want a border displayed at all, set the Border field to 0.
Click OK when you're finished.
Although the Import Table Data option is under the File menu, it doesn't open a new file — the new table is created at the current cursor position.
Tables are extremely powerful Web page design tools. Dreamweaver enables you to modify both the appearance and the structure of your HTML tables through a combination of Property inspectors, dialog boxes, and click-and-drag mouse movements. Mastering tables is an essential skill for any modern Web designer and worth the somewhat challenging learning curve. When working with tables, here are the key points to keep in mind:
An HTML table consists of a series of rows and columns presented in a gridlike arrangement. Tables can be sized absolutely, in pixels, or as a percentage, relative to the width of the browser's window.
Dreamweaver inserts a table whose dimensions can be altered through the Insert panel or the Insert
Table editing is greatly simplified in Dreamweaver. You can select multiple cells, columns, or rows — and modify all their contents in one fell swoop.
You can assign certain properties — such as background color, border color, and alignment — for a table's columns, rows, or cells through their respective Property inspectors. The properties of a cell override those set for its column or row.
Dreamweaver brings power to table-building with the Sort Table command, as well as a connection to the outside world with its Import Tabular Data option.
In the next chapter, you learn how to create and use forms in your Web pages.