1. Getting to Know the Work Area
CLICK HERE TO GAIN ACCESS TO THE LESSON FILES.
Lesson overview
In this lesson, you’ll learn how to do the following:
• Open Adobe Photoshop files.
• View files in Adobe Bridge.
• Select and use some of the tools in the Tools panel.
• Set options for a selected tool using the options bar.
• Use various methods to zoom in on and out from an image.
• Select, rearrange, and use panels.
• Choose commands in panel and context menus.
• Open and use a panel in the panel dock.
• Undo actions to correct mistakes or to make different choices.
• Customize the workspace.
This lesson will take about an hour to complete. Download the Lesson01 project files from the Lesson & Update Files tab on your Account page at www.peachpit.com, if you haven’t already done so.
As you work on this lesson, you’ll preserve the start files. If you need to restore the start files, download them from your Account page.
PROJECT: BOOK COVER DESIGN
As you work with Adobe Photoshop, you’ll discover that you can often accomplish the same task in several ways. To make the best use of the extensive editing capabilities in Photoshop, you must first learn to navigate the work area.
Starting to work in Adobe Photoshop
The Adobe Photoshop work area includes menus, toolbars, and panels that give you quick access to a variety of tools and options for editing and adding elements to your image. You can also add commands and filters to the menus by installing third-party software known as plug-ins.
In Photoshop, you primarily work with bitmapped, digitized images (that is, continuous-tone images that have been converted into a series of small squares, or picture elements, called pixels). You can also work with vector graphics, which are drawings made of smooth lines that retain their crispness when scaled. You can create original artwork in Photoshop, or you can import images from many sources, such as:
• Photographs from a digital camera or mobile phone
• Commercial CDs of digital images
• Scans of photographs, transparencies, negatives, graphics, or other documents
• Captured video images
• Artwork created in drawing programs
Starting Photoshop and opening a file
To begin, you’ll start Adobe Photoshop and reset the default preferences.
1. On the desktop, double-click the Adobe Photoshop icon to start Adobe Photoshop, and then immediately hold down Ctrl+Alt+Shift (Windows) or Command+Option+Shift (Mac OS) to reset the default settings.
If you don’t see the Photoshop icon on your desktop, choose Start > All Programs > Adobe Photoshop CC (Windows) or look in either the Applications folder or the Dock (Mac OS).
2. When prompted, click Yes to confirm that you want to delete the Adobe Photoshop Settings file.
![]() Note
Note
Typically, you won’t need to reset defaults when you’re working on your own projects. However, you’ll reset the preferences before working on most lessons in this book to ensure that what you see onscreen matches the descriptions in the lessons. For more information, see “Restoring default preferences” on page 4.
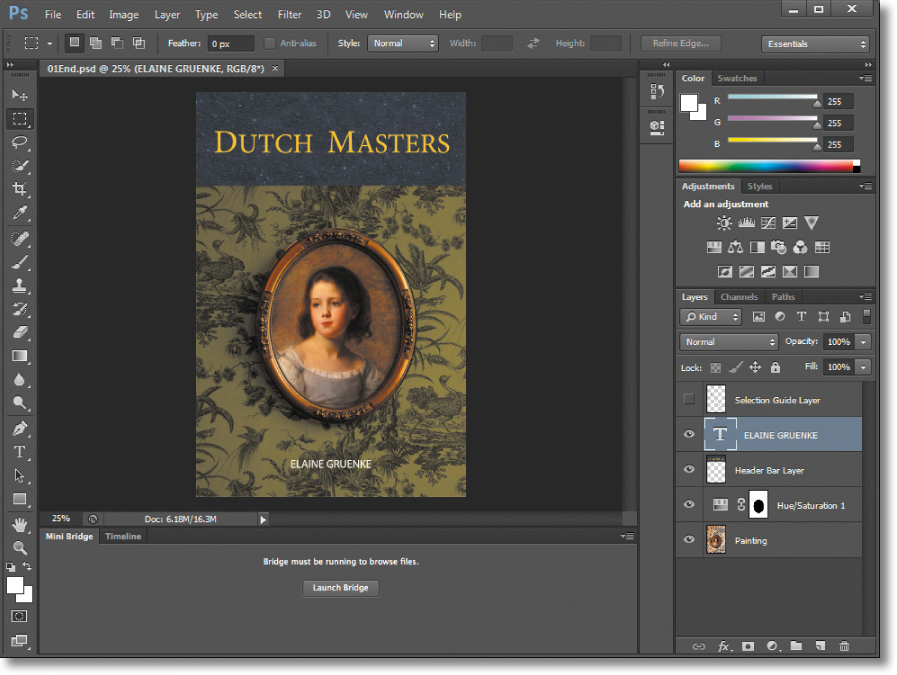
The Photoshop work area appears as shown in the following illustration.
A. Menu bar
B. Options bar
C. Tools panel
D. Mini Bridge tab
E. Timeline tab
F. Workspaces menu
G. Panels
![]() Note
Note
This illustration shows the Windows version of Photoshop. The arrangement is similar on Mac OS, but operating system styles may vary.
The default workspace in Photoshop consists of the menu bar and options bar at the top of the screen, the Tools panel on the left, and several open panels in the panel dock on the right. When you have documents open, one or more image windows also appear, and you can display them at the same time using the tabbed interface. The Photoshop user interface is very similar to the one in Adobe Illustrator®, Adobe InDesign®, and Adobe Flash®—so learning how to use the tools and panels in one application means that you’ll be familiar with them when you work in the others.
There is one main difference between the Photoshop work area on Windows and that on Mac OS: Windows always presents Photoshop in a contained window. On Mac OS, you can choose whether to work with an application frame, which contains the Photoshop application’s windows and panels within a frame that is distinct from other applications you may have open; only the menu bar is outside the application frame. The application frame is enabled by default; to disable the application frame, choose Window > Application Frame.
On Mac OS, the application frame keeps the image, panels, and menu bar together.
3. Choose File > Open, and navigate to the Lessons/Lesson01 folder that you copied to your hard drive from the peachpit.com website. (If you haven’t downloaded the files, see “Accessing the Classroom in a Book files” on page 3.)
4. Select the 01End.psd file, and click Open. Click OK if you see the Embedded Profile Mismatch dialog box.
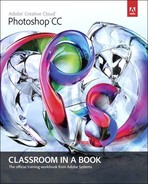
The 01End.psd file opens in its own window, called the image window. The end files in this book show you what you are creating in each project. In this project, you’ll finish the layout for a book cover.
5. Choose File > Close, or click the close button on the title bar of the image window. (Do not close Photoshop.)

Opening a file with Adobe Bridge
In this book, you’ll work with different start files in each lesson. You may make copies of these files and save them under different names or locations, or you may work from the original start files and then download them from the peachpit.com website again if you want a fresh start.
In the previous exercise, you used the Open command to open a file. Now you’ll open another file using Adobe Bridge, a visual file browser that helps take the guesswork out of finding the image file that you need.
1. Choose File > Browse In Bridge. If you’re prompted to enable the Photoshop extension in Bridge, click OK.
![]() Note
Note
If Bridge isn’t installed, you’ll be prompted to install it when you choose Browse In Bridge. For more information, see page 3.
Adobe Bridge opens, displaying a collection of panels, menus, and buttons.
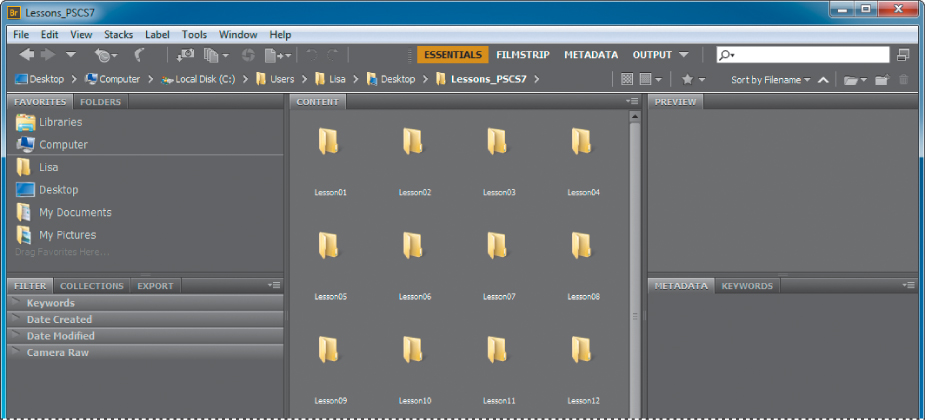
2. Select the Folders tab in the upper left corner, and then browse to the Lessons folder you downloaded onto your hard disk, so that the Lessons folder appears in the Content panel.
3. Select the Lessons folder, and choose File > Add To Favorites.
Adding files, folders, application icons, and other assets that you use often to the Favorites panel lets you access them quickly.
4. Select the Favorites tab to open the panel, and click the Lessons folder to open it. Then, in the Content panel, double-click the Lesson01 folder.
Thumbnail previews of the folder contents appear in the Content panel.
5. Double-click the 01Start.psd thumbnail in the Content panel to open the file, or select the thumbnail and choose File > Open.
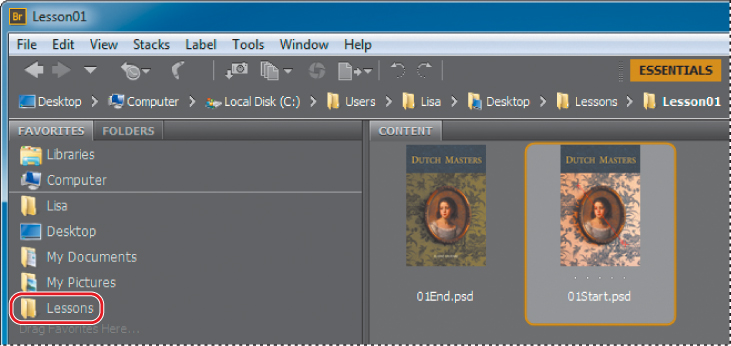
The 01Start.psd image opens in Photoshop. You can leave Bridge open or close it; you won’t need it again in this lesson.
Using the tools
Photoshop provides an integrated set of tools for producing sophisticated graphics for print, web, and mobile viewing. We could easily fill the entire book with details on the wealth of Photoshop tools and tool configurations. While that would certainly be a useful reference, it’s not the goal of this book. Instead, you’ll start gaining experience by configuring and using a few tools on a sample project. Every lesson will introduce you to more tools and ways to use them. By the time you finish all the lessons in this book, you’ll have a solid foundation for further explorations of the Photoshop toolset.
Selecting and using a tool from the Tools panel
The Tools panel is the long, narrow panel on the far left side of the work area. It contains selection tools, painting and editing tools, foreground- and background-color selection boxes, and viewing tools.
You’ll start by using the Zoom tool, which also appears in many other Adobe applications, including Illustrator, InDesign, and Acrobat.
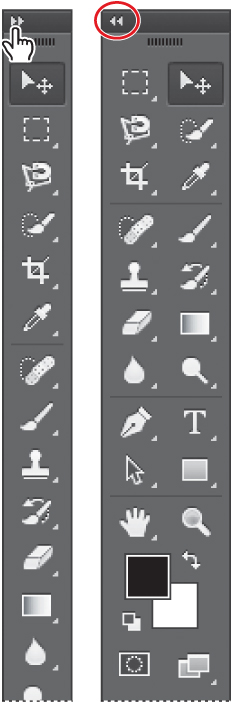
1. Click the double arrows just above the Tools panel to toggle to a double-column view. Click the double arrows again to return to a single-column Tools panel and use your screen space more efficiently.
2. Examine the status bar at the bottom of the work area (Windows) or image window (Mac OS), and notice the percentage that appears on the far left. This represents the current enlargement view of the image, or zoom level.
3. Move the pointer over the Tools panel, and hover it over the magnifying-glass icon until a tool tip appears. The tool tip displays the tool’s name (Zoom tool) and keyboard shortcut (Z).

4. Click the Zoom tool (![]() ) in the Tools panel, or press Z to select it.
) in the Tools panel, or press Z to select it.
5. Move the pointer over the image window. The pointer now looks like a tiny magnifying glass with a plus sign in the center of the glass (![]() ).
).
6. Click anywhere in the image window.
The image enlarges to a preset percentage level, which replaces the previous value in the status bar. The location you clicked when you used the Zoom tool is centered in the enlarged view. If you click again, the zoom advances to the next preset level, up to a maximum of 3200%.
7. Hold down the Alt key (Windows) or Option key (Mac OS) so that the Zoom tool pointer appears with a minus sign in the center of the magnifying glass (![]() ), and then click anywhere in the image. Then release the Alt or Option key.
), and then click anywhere in the image. Then release the Alt or Option key.
Now the view zooms out to a lower preset magnification, so that you can see more of the image, but in less detail.
![]() Note
Note
You can use other methods to zoom in and out. For example, when the Zoom tool is selected, you can select the Zoom In or Zoom Out mode on the options bar. You can choose View > Zoom In or View > Zoom Out. Or, you can type a new percentage in the status bar and press Enter or Return.
8. If Scrubby Zoom is selected in the options bar, click anywhere on the image and drag the Zoom tool to the right. The image enlarges. Drag the Zoom tool to the left to zoom out.
When Scrubby Zoom is selected, you can drag the Zoom tool across the image to zoom in and out. Scrubby Zoom is available only if Use Graphics Processor is enabled in the Performance panel of the Photoshop Preferences dialog box. (Choose Edit > Preferences > Performance or Photoshop > Preferences > Performance to open the dialog box.)
9. Deselect Scrubby Zoom in the options bar if it’s selected. Then, using the Zoom tool, drag a rectangle to enclose the area of the image that includes the oval painting and the red crosshairs.

The image enlarges so that the area you enclosed in your rectangle now fills the entire image window.
You have now used four methods with the Zoom tool to change the magnification in the image window: clicking, holding down a keyboard modifier while clicking, dragging to zoom in and out, and dragging to define a magnification area. Many of the other tools in the Tools panel can be used with keyboard combinations and options, as well. You’ll have opportunities to use these techniques in various lessons in this book.
Selecting and using a hidden tool
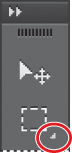
Photoshop has many tools you can use to edit image files, but you will probably work with only a few of them at a time. The Tools panel arranges some of the tools in groups, with only one tool shown for each group. The other tools in the group are hidden behind that tool.
A small triangle in the lower right corner of a button is your clue that other tools are available but hidden under that tool.
1. Position the pointer over the second tool from the top in the Tools panel until the tool tip appears. The tool tip identifies the Rectangular Marquee tool (![]() ), with the keyboard shortcut M. Select that tool.
), with the keyboard shortcut M. Select that tool.
2. Select the Elliptical Marquee tool (![]() ), which is hidden behind the Rectangular Marquee tool, using one of the following methods:
), which is hidden behind the Rectangular Marquee tool, using one of the following methods:
• Press and hold the mouse button over the Rectangular Marquee tool to open the pop-up list of hidden tools, and select the Elliptical Marquee tool.
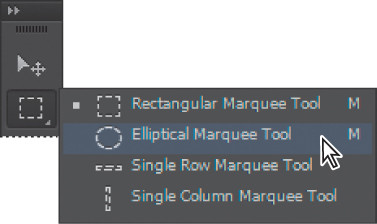
• Alt-click (Windows) or Option-click (Mac OS) the tool button in the Tools panel to cycle through the hidden marquee tools until the Elliptical Marquee tool is selected.
• Press Shift+M, which switches between the Rectangular and Elliptical Marquee tools.
3. Move the pointer over the image window, to the red cross positioned above and to the left of the portrait.
When the Elliptical Marquee tool is selected, the pointer becomes cross-hairs (+).
4. Click the upper left red cross, and drag the pointer down and to the right to the lower red cross to draw an ellipse around the frame, and then release the mouse button.
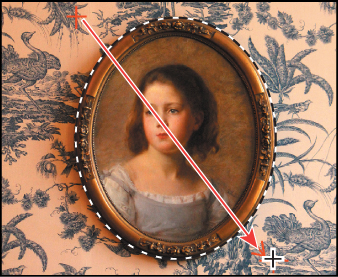
An animated dashed line indicates that the area inside it is selected. When you select an area, it becomes the only editable area of the image. The area outside the selection is protected.
You’ll learn more about making different kinds of selections and adjusting the selection contents in Lesson 3, “Working with Selections.”
Applying a change to a selected area
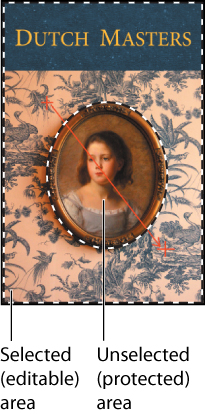
In most cases, you’d change the area within the selection. But in this project, you want to change the color of the wallpaper without affecting the painting. To do that, you’ll need to invert the selection, so that everything but the painting is selected in the image.
1. Choose Select > Inverse.
![]() Tip
Tip
The keyboard shortcut for this command, Ctrl+Shift+I (Windows) or Command+Shift+I (Mac OS), appears by the command name in the Select menu. In the future, you can just press that keyboard combination to invert a selection.
Although the animated selection border around the oval frame looks the same, notice that a similar border appears all around the edges of the image. Now everything in the image is selected except the area within the oval. The unselected area (the painting) cannot be changed while the selection is active.
2. In the Adjustments panel, click the Hue/Saturation icon to add a Hue/Saturation adjustment layer. The Hue/Saturation options appear in the Properties panel.
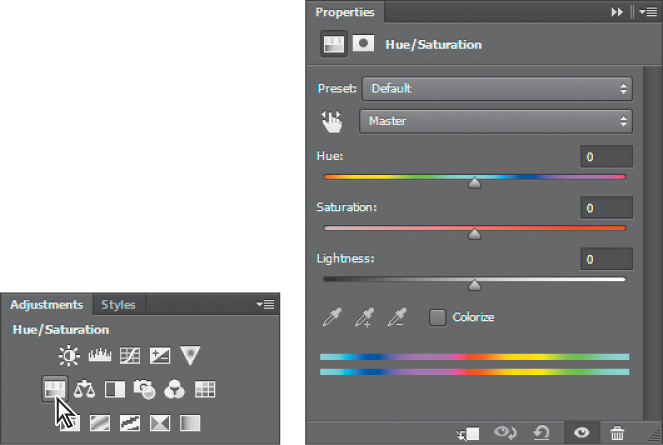
3. In the Properties panel, select Colorize. Then change the Hue value to 200 to adjust the color in the selected area.
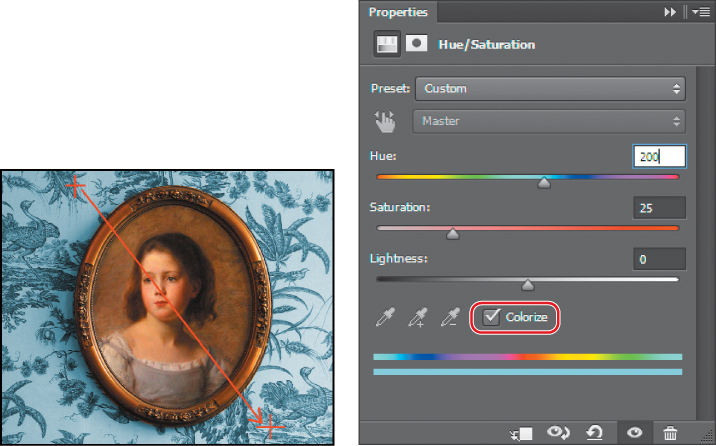
The wallpaper color changes to shades of blue.
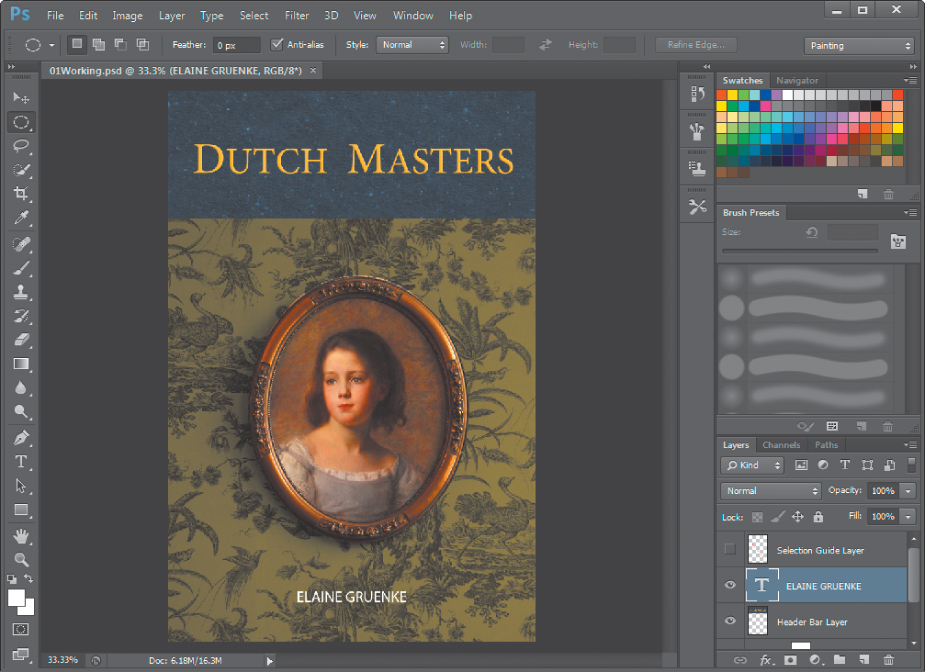
4. In the Layers panel, click the eye icon next to Selection Guide Layer to hide the red guides. (If the Layers panel isn’t open, click its tab or choose Window > Layers.)
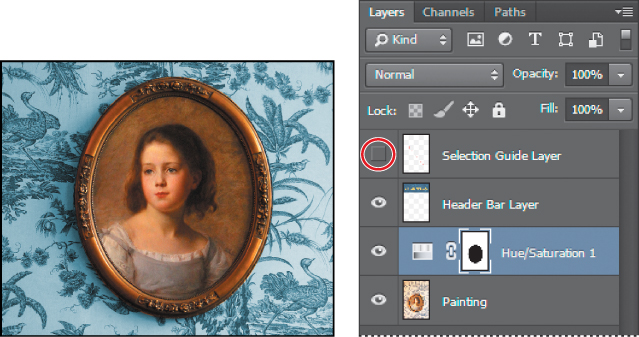
Layering is one of the fundamental and most powerful features in Photoshop. Photoshop includes many kinds of layers, some of which contain images, text, or solid colors, and others that simply interact with layers below them. You’ll learn more about layers in Lesson 4, “Layer Basics,” and Lesson 9, “Advanced Compositing.”
5. In the Layers panel, examine the Hue/Saturation adjustment layer.
Adjustment layers let you make changes to your image, such as adjusting the color of the wallpaper, without affecting the actual pixels. Because you’ve used an adjustment layer, you can always return to the original image by hiding or deleting the adjustment layer—and you can edit the adjustment layer at any time. You’ll use adjustment layers in several lessons in this book.
6. Choose File > Save As, name the file 01Working.psd, and click OK or Save.
7. Click OK in the Photoshop Format Options dialog box.
You’ve just completed your first task in Photoshop. The wallpaper now matches the blue bar at the top of the book cover. You’ll make another adjustment to the color later in the lesson, but first you’ll add the author’s name.
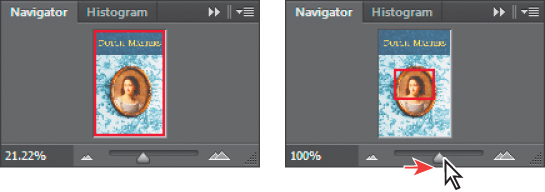
Zooming and scrolling with the Navigator panel
The Navigator panel is another speedy way to make large changes in the zoom level, especially when the exact percentage of magnification is unimportant. It’s also a great way to scroll around in an image, because the thumbnail shows you exactly what part of the image appears in the image window. To open the Navigator panel, choose Window > Navigator.
The slider under the image thumbnail in the Navigator panel enlarges the image when you drag to the right (toward the large mountain icon) and reduces it when you drag to the left.
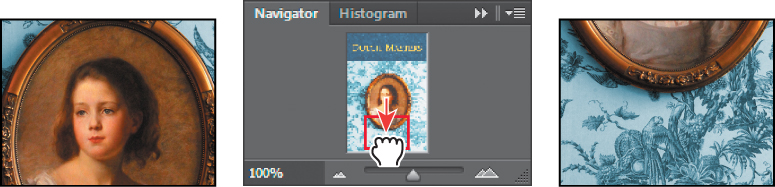
The red rectangular outline represents the area of the image that appears in the image window. When you zoom in far enough that the image window shows only part of the image, you can drag the red outline around the thumbnail area to see other areas of the image. This is also an excellent way to verify which part of an image you’re working on when you work at very high zoom levels.
Setting tool properties
When you selected the Zoom tool in the previous project, you saw that the options bar provided ways for you to change the view of the current image window. Now you’ll learn more about setting tool properties using context menus, the options bar, panels, and panel menus. You’ll use all of these methods as you work with tools to create a colored bar with the author’s name.
Using context menus
Context menus are short menus that contain commands and options appropriate to specific elements in the work area. They are sometimes referred to as “right-click” or “shortcut” menus. Usually, the commands on a context menu are also available in some other area of the user interface, but using the context menu can save time.
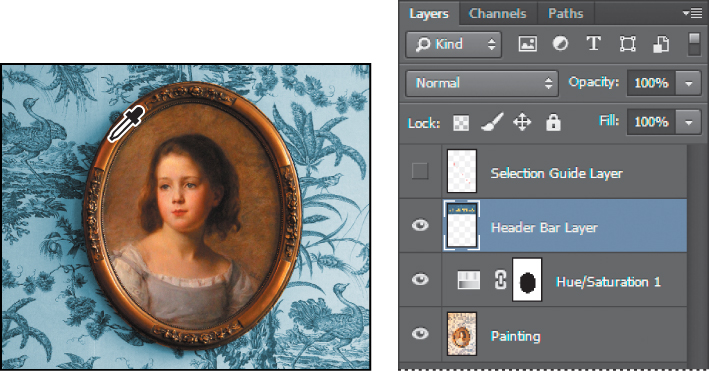
1. Select the Header Bar Layer in the Layers panel so that it’s the active layer.
2. Select the Eyedropper tool (![]() ) in the Tools panel, and then click the oval frame to sample a brown color.
) in the Tools panel, and then click the oval frame to sample a brown color.
You’ll use this color to create a colored bar for the author’s name.
3. Select the Zoom tool (![]() ), and zoom in on the area below the blue title bar.
), and zoom in on the area below the blue title bar.
4. Select the Rectangular Marquee tool (![]() ), hidden beneath the Elliptical Marquee tool (
), hidden beneath the Elliptical Marquee tool (![]() ), and then select a rectangular area overlapping the blue title bar and the wallpaper beneath it.
), and then select a rectangular area overlapping the blue title bar and the wallpaper beneath it.
5. Select the Brush tool (![]() ) in the Tools panel.
) in the Tools panel.
6. In the image window, right-click (Windows) or Control-click (Mac OS) anywhere in the image to open the Brush tool context menu.
Context menus vary with their context, of course, so what appears can be a menu of commands or a panel-like set of options, which is what happens in this case.
7. Select the first brush (Soft Round), and change the size to 65 pixels.

![]() Note
Note
Clicking anywhere in the work area closes the context menu.
8. Paint the selected area until it’s fully painted. Don’t worry about staying within the selection; you can’t affect anything outside the selection as you paint.
9. When the bar is colored in, choose Select > Deselect so that nothing is selected.
Setting tool properties in the options bar
Next you’ll use the options bar to select the text properties and then to type the author’s name.
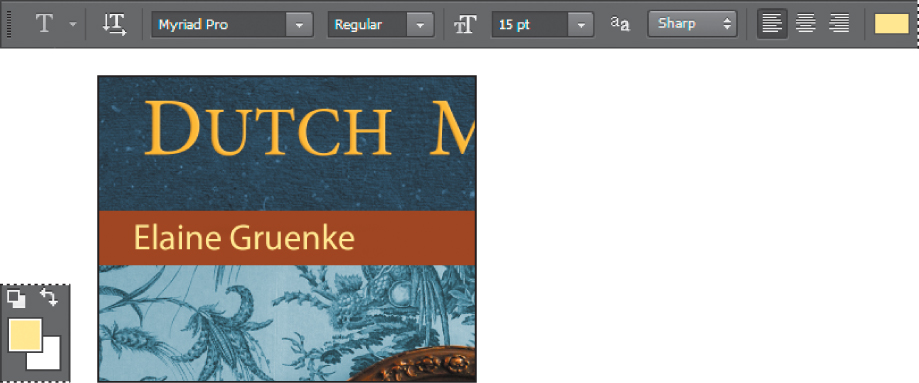
1. In the Tools panel, select the Horizontal Type tool (![]() ).
).
The buttons and menus in the options bar now relate to the Type tool.
2. In the options bar, select a font you like from the first pop-up menu. (We used Myriad Pro, but you can use another font if you prefer.)
3. Specify 15 pt for the font size.

![]() Tip
Tip
You can place the pointer over the labels of most numeric settings in the tool options bar, in panels, and in dialog boxes in Photoshop to display a “scrubby slider.” Dragging the pointing-finger slider to the right increases the value; dragging to the left decreases the value. Alt-dragging (Windows) or Option-dragging (Mac OS) changes the values in smaller increments; Shift-dragging changes them in larger increments.
You can specify 15 points by typing directly in the font-size text box and pressing Enter or Return, or by scrubbing the font-size menu label. You can also choose a standard font size from the font-size pop-up menu.
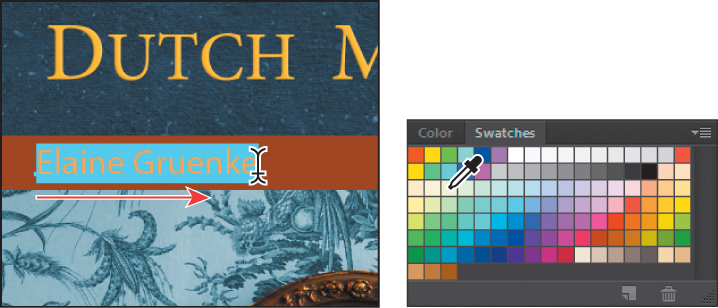
4. Click once anywhere on the left side of the colored bar, and type Elaine Gruenke.
The text is the same color as the bar you typed it on. You’ll fix that next.
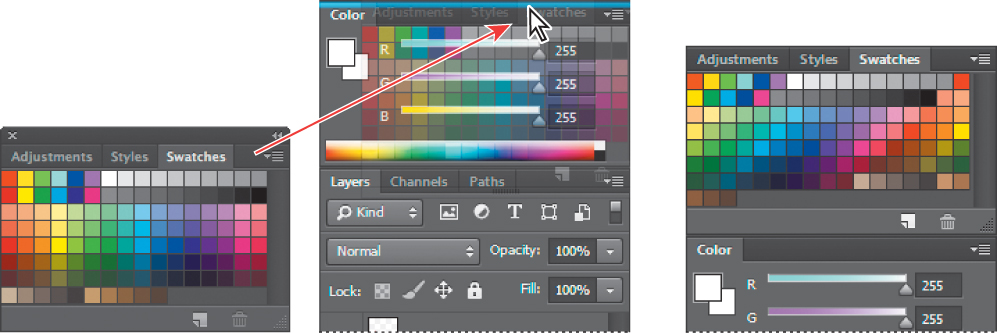
Using panels and panel menus
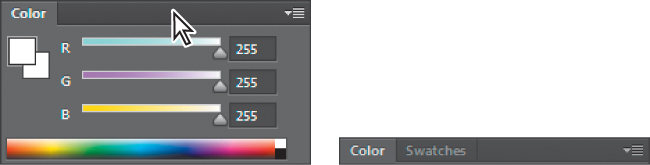
The text color is the same as the Foreground Color swatch in the Tools panel, which is the brown color you used to paint the bar. You’ll select the text and choose another color from the Swatches panel.
1. Make sure the Horizontal Type tool (![]() ) is selected in the Tools panel.
) is selected in the Tools panel.
2. Drag the Horizontal Type tool across the text to select the full name.
3. Click the Swatches tab to bring that panel forward, if it’s not already visible.
4. Select any light-colored swatch.
![]() Note
Note
When you move the pointer over the swatches, it temporarily changes into an eyedropper. Set the tip of the eyedropper on the swatch you want, and click to select it.
The color you select appears in three places: as the Foreground Color in the Tools panel, in the text color swatch in the options bar, and in the text you selected in the image window.
5. Select another tool in the Tools panel, such as the Move tool (![]() ), to deselect the Horizontal Type tool, so you can see the text color.
), to deselect the Horizontal Type tool, so you can see the text color.
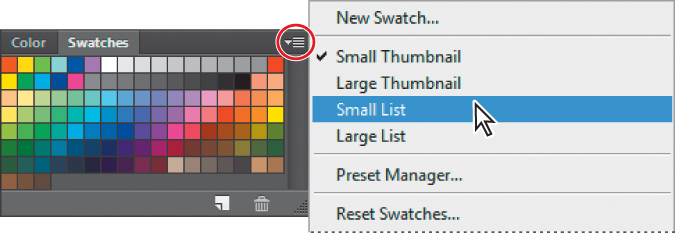
That’s how easy it is to select a color, although there are other methods in Photoshop. However, you’ll use a specific color for this project, and it’s easier to find it if you change the Swatches panel display.
6. Click the menu button (![]() ) on the Swatches panel to open the panel menu, and choose Small List.
) on the Swatches panel to open the panel menu, and choose Small List.
7. Select the Type tool and reselect the text, as you did in steps 1 and 2.
8. In the Swatches panel, scroll about halfway down the list to find the Pure Blue swatch, and then select it.
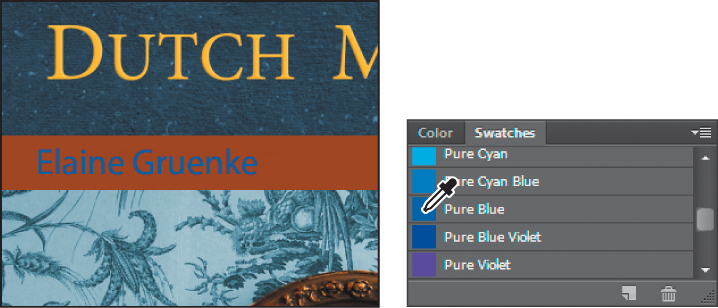
Now the text appears in the blue color.
9. Select the Move tool and drag the name so it’s centered in the brown bar. Then click the Default Foreground And Background Colors button in the Tools panel to make Black the foreground color.

![]() Note
Note
Don’t select the Move tool using the V keyboard shortcut, because you’re in text-entry mode. Typing V will add the letter to your text in the image window.
Resetting the default colors does not change the color of the text in the image, because that text is no longer selected.
Undoing actions in Photoshop
In a perfect world, you’d never make a mistake. You’d never click the wrong object. You’d always correctly anticipate how specific actions would bring your design ideas to life exactly as you imagined them. You’d never have to backtrack.
For the real world, Photoshop gives you the power to step back and undo actions so that you can try other options. You can experiment freely, knowing that you can reverse the process.
Undoing a single action
Even beginning computer users quickly come to appreciate the familiar Undo command. You’ll use it to move back one step, and then step further backward.
1. Choose Edit > Undo Move, or press Ctrl+Z (Windows) or Command+Z (Mac OS) to undo your last action.
![]() Note
Note
The Undo command isn’t available if you’ve already saved your changes. However, you can still use the Step Backward command and the History panel, as long as you haven’t closed the project.
The name moves back to its original position.
2. Choose Edit > Redo Move, or press Ctrl+Z (Windows) or Command+Z (Mac OS) to center the name again.

The Undo command in Photoshop reverses only one step. This is a practicality, because Photoshop files can be very large, and maintaining multiple Undo steps can tie up a lot of memory, which tends to degrade performance. If you press Ctrl+Z or Command+Z again, Photoshop restores the step you removed initially.
3. Choose Edit > Step Backward, or press Ctrl+Alt+Z (Windows) or Command+Option+Z (Mac OS) to move back one step. The name moves back to its original position.
4. Repeat step 3. The color changes to the first swatch you selected.
Undoing multiple actions
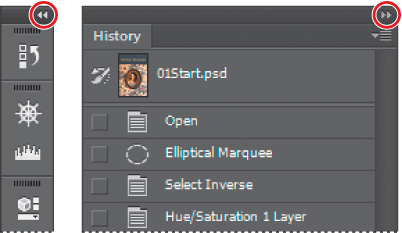
While you could use the Step Backward command to undo steps one at a time, it’s faster and easier to reverse multiple actions using the History panel.
1. Choose Window > History to open the History panel. Then drag the bottom of the History panel to resize it so that you can see more steps.
The History panel records the recent actions you’ve performed on the image. The current state is selected. Because you’ve already moved backwards several steps, there are dimmed steps at the end of the list.
2. Select Move, the last step in the list in the History panel.
![]() Tip
Tip
By default, the History panel retains only the last 20 actions. You can change the number of levels in the History panel by choosing Edit > Preferences > Performance (Windows) or Photoshop > Preferences > Performance (Mac OS), and entering a different value for History States.
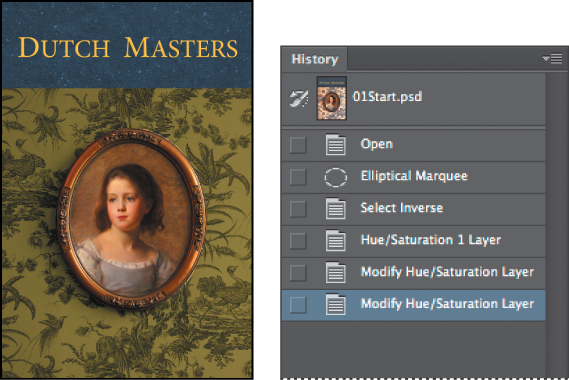
The steps you’ve undone are restored. The name is in its final color, centered on the brown bar. This book cover will look better with the author’s name in white at the bottom, though, so you’ll remove the brown bar and the current text.
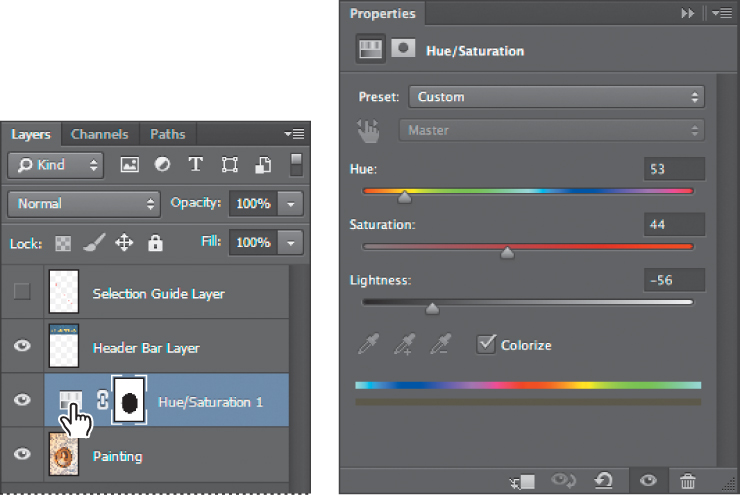
3. In the History panel, select Modify Hue/Saturation Layer.
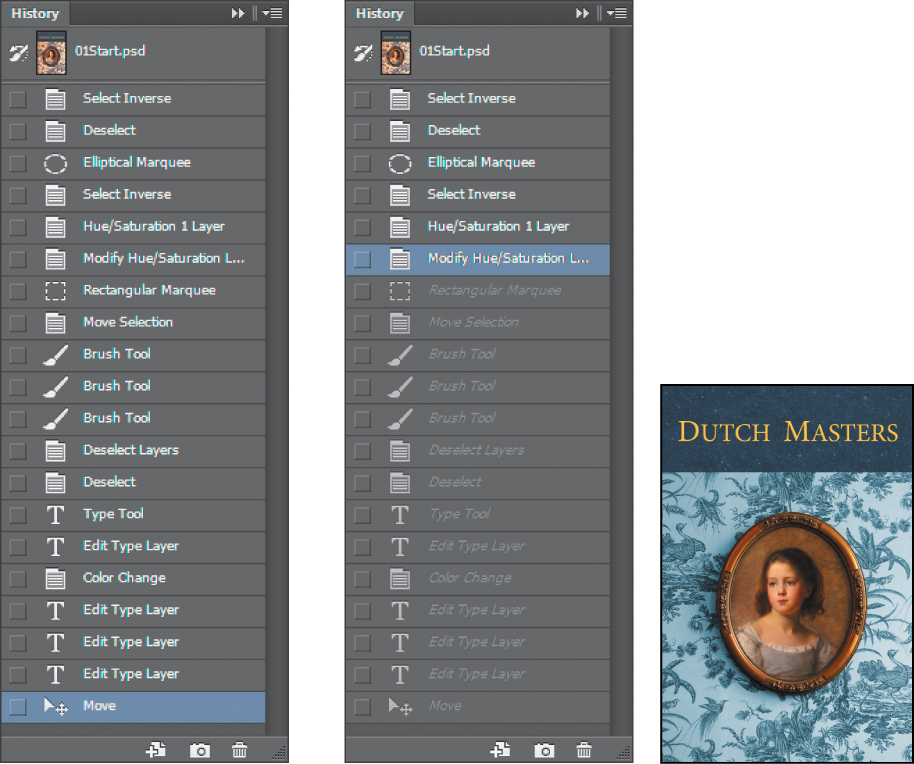
The brown bar and the author’s name disappear from the image window. All the steps beneath the one you selected are dimmed in the History panel. You can click any step to return to that point in the process, but as soon as you perform a new task, Photoshop deletes all dimmed steps.
4. Double-click the Hue/Saturation adjustment thumbnail (the first thumbnail) in the Hue/Saturation layer in the Layers panel to open the Hue/Saturation options in the Properties panel.
5. In the Properties panel, enter the following values to change the wallpaper to shades of green:
• Hue: 53
• Saturation: 44
• Lightness: -56
6. Open the History panel again by choosing Window > History, or by clicking the History panel icon (![]() ).
).
Notice that the History panel no longer displays the dimmed actions that were listed after the selected history state and has added a new one.
7. Select Header Bar Layer in the Layers panel.
This is the layer that contains everything except the painting. You’ll add text to it.
8. Select the Horizontal Type tool (![]() ) from the Tools panel.
) from the Tools panel.
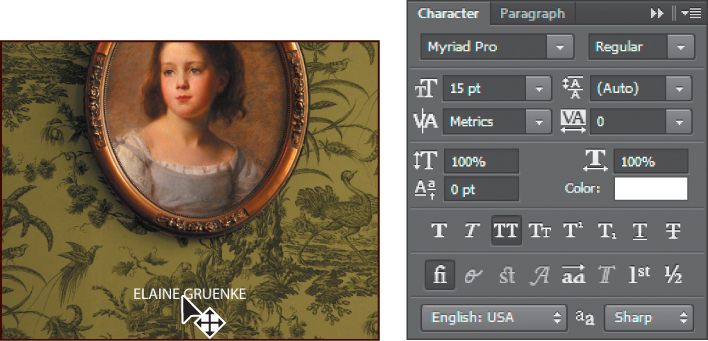
9. Choose Window > Character to open the Character panel. Then select a font (we chose Myriad Pro), and choose 15 pt for the font size. Click the color swatch, select white in the Color Picker, and click OK. Finally, select All Caps (![]() ).
).
Many type settings are available in the options bar, but there are additional settings in the Character panel.
10. Click with the type tool toward the bottom of the book cover, and type Elaine Gruenke.
11. Select the Move tool, and position the text so it is centered beneath the painting.
12. Choose File > Save to save your work.
Congratulations! You’ve completed your first Photoshop project.
More about panels and panel locations
Photoshop panels are powerful and varied. Rarely would you need to see all panels simultaneously. That’s why they’re in panel groups, and why the default configurations leave some panels unopened.
The complete list of panels appears in the Window menu. Check marks appear next to the names of the panels that are open and active in their panel groups. You can open a closed panel or close an open one by selecting the panel name in the Window menu.
![]() Note
Note
When panels are hidden, a thin, semitransparent strip is visible at the edge of the document. Hovering the pointer over the strip displays its contents.
You can hide all panels at once—including the options bar and Tools panel—by pressing the Tab key. To reopen them, press Tab again.
You already used panels in the panel dock when you used the Layers and Swatches panels. You can drag panels to or from the panel dock. This is convenient for bulky panels or ones that you use only occasionally but want to keep handy.
You can arrange panels in other ways, as well:
• To move an entire panel group, drag the title bar to another location in the work area.
• To move a panel to another group, drag the panel tab into that panel group so that a blue highlight appears inside the group, and then release the mouse button.

• To dock a panel or panel group, drag the title bar or panel tab onto the top of the dock.
• To undock a panel or panel group so that it becomes a floating panel or panel group, drag its title bar or panel tab away from the dock.
Expanding and collapsing panels
You can resize panels to use screen space more efficiently and to see fewer or more panel options, either by dragging or clicking to toggle between preset sizes:
• To collapse open panels to icons, click the double arrow in the title bar of the dock or panel group. To expand a panel, click its icon or the double arrow.
• To change the height of a panel, drag its lower right corner.
• To change the width of the dock, position the pointer on the left edge of the dock until it becomes a double-headed arrow, and then drag to the left to widen the dock, or to the right to narrow it.
• To resize a floating panel, move the pointer over the right, left, or bottom edge of the panel until it becomes a double-headed arrow, and then drag the edge in or out. You can also pull the lower right corner in or out.
• To collapse a panel group so that only the dock header bar and tabs are visible, double-click a panel tab or panel title bar. Double-click again to restore it to the expanded view. You can open the panel menu even when the panel is collapsed.
![]() Note
Note
You can collapse, but not resize, the Color, Character, and Paragraph panels.
Notice that the tabs for the panels in the panel group and the button for the panel menu remain visible after you collapse a panel.
Special notes about the Tools panel and options bar
The Tools panel and the options bar share some characteristics with other panels:
• You can drag the Tools panel by its title bar to a different location in the work area. You can move the options bar to another location by dragging the grab bar at the far left end of the panel.
• You can hide the Tools panel and options bar.
However, some panel features are not available or don’t apply to the Tools panel or options bar:
• You cannot group the Tools panel or options bar with other panels.
• You cannot resize the Tools panel or options bar.
• You cannot stack the Tools panel or options bar in the panel dock.
• The Tools panel and options bar do not have panel menus.
Customizing the workspace
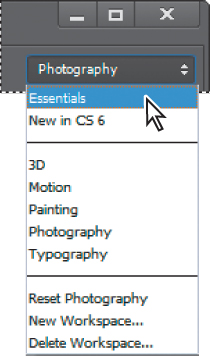
It’s great that Photoshop offers so many ways to control the display and location of the options bar and its many panels, but it can be time-consuming to drag panels around the screen so that you can see some panels for certain projects and other panels for other projects. That’s why Photoshop lets you customize your workspace, controlling which panels, tools, and menus are available at any time. In fact, it comes with a few preset workspaces suitable for different types of workflows—typography, painting, and so on. You’ll experiment with them.
![]() Note
Note
If you closed 01Working.psd at the end of the previous exercise, open it—or open any other image file—to complete the following exercise.
1. Choose Window > Workspace > Painting. If prompted, click Yes to apply the workspace.
If you’ve been experimenting with opening, closing, and moving panels, you’ll notice that Photoshop closes some panels, opens others, and stacks them neatly in the dock along the right edge of the workspace.
2. Choose Window > Workspace > Photography. If prompted, click Yes to apply the workspace. Different panels appear in the dock.
3. Click the Workspace Switcher in the options bar, and choose Essentials.
![]() Note
Note
Selecting the Essentials workspace changes the panel configuration, but doesn’t restore the menus to their defaults. You can do that now, or leave them altered. You’ll reset defaults as you begin work on most lessons that follow.
Photoshop returns to the default workspace, which is arranged as you left it. (To return the Essentials workspace to its original configuration, choose Reset Essentials from the Workspace Switcher menu.)
You can choose workspaces from the Window menu or from the pop-up menu in the options bar.
For times when presets don’t suit your purposes, you can customize the workspace to your specific needs. Say, for example, that you do lots of web design, but no digital video work. You can specify which menu items to display in the workspace.
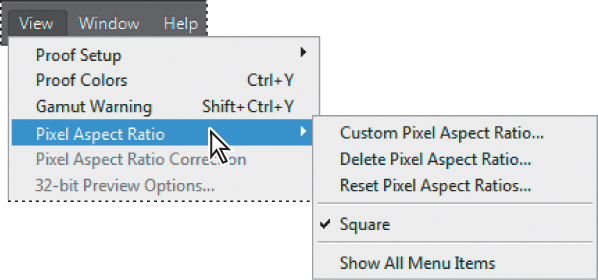
4. Click the View menu, and choose Pixel Aspect Ratio to see the submenu.
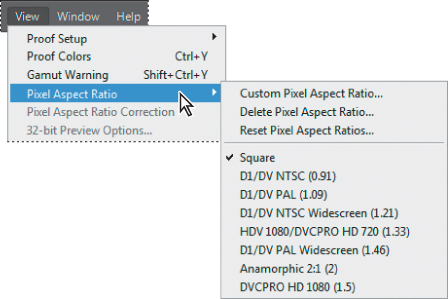
This submenu includes several DV formats that many print and web designers don’t need to use.
5. Choose Window > Workspace > Keyboard Shortcuts & Menus.
The Keyboard Shortcuts And Menus dialog box lets you control which application and panel menu commands are available, as well as create custom keyboard shortcuts for menus, panels, and tools. You can hide commands that you use infrequently, or highlight commonly used commands to make them easier to see.
6. Click the Menus tab in the Keyboard Shortcuts And Menus dialog box, and then choose Application Menus from the Menu For pop-up menu.
7. Scroll down to the View menu, and click the triangle to reveal its commands.
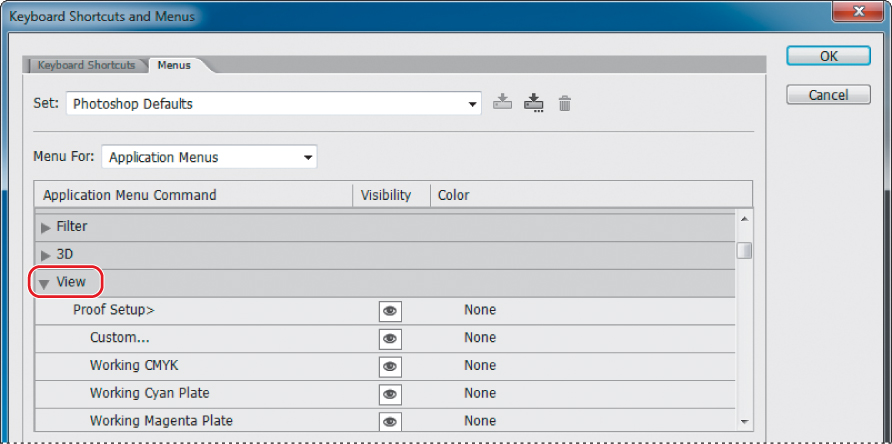
Photoshop displays the View menu commands and subcommands.
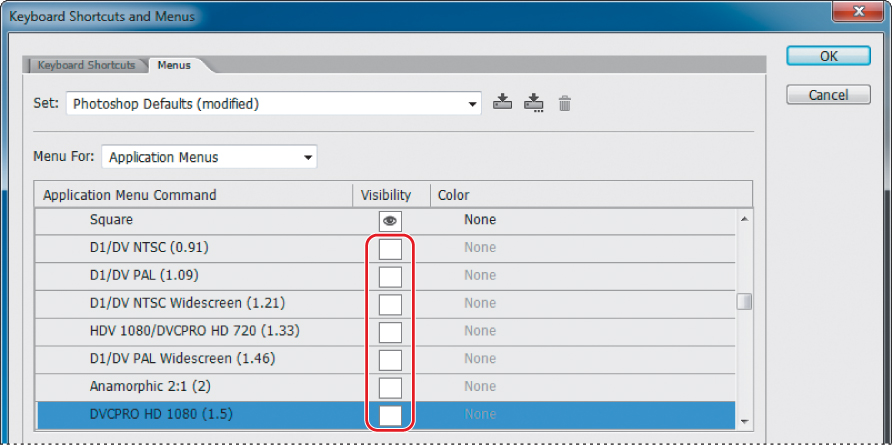
8. Scroll down to Pixel Aspect Ratio, and click the eye icon to turn off visibility for all of the DV and video formats—there are seven of them, beginning with D1/DV NTSC (0.91) and ending with DVCPro HD 1080 (1.5).
Photoshop removes them from the menu for this workspace.
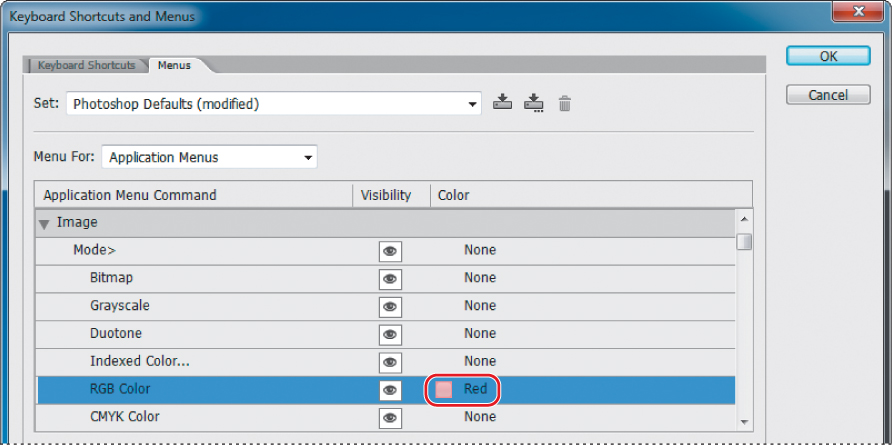
9. Collapse the View menu, and then expand the Image menu commands.
10. Scroll down to the Image > Mode > RGB Color command, and click None in the Color column. Choose Red from the pop-up menu to highlight this command in red.
11. Click OK to close the Keyboard Shortcuts And Menus dialog box.
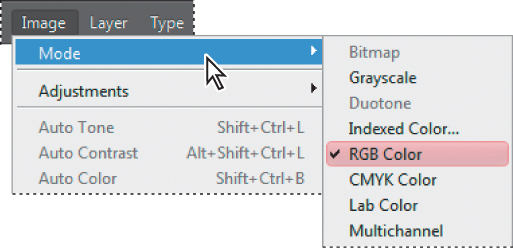
12. Choose Image > Mode. RGB Color is now highlighted in red.
13. Choose View > Pixel Aspect Ratio. The DV and video formats are no longer included in this submenu.
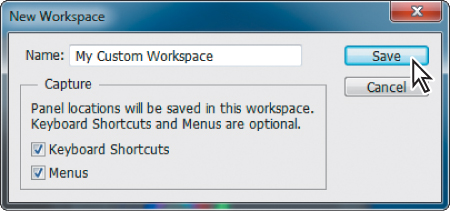
14. To save a workspace, choose Window > Workspace > New Workspace. In the New Workspace dialog box, give your workspace a name, select the Keyboard Shortcuts and Menus options, and then click Save.
The custom workspace you save is listed in the Window > Workspace submenu and in the Workspace Switcher on the options bar.
For now, return to the default workspace configuration.
15. Choose Essentials from the Workspace Switcher on the options bar. Then choose Reset Essentials from the Workspace Switcher to revert to the original workspace definition. Don’t save the changes in the current workspace.
16. Close the file, but leave Photoshop open.
Congratulations again. You’ve finished Lesson 1!
Now that you’re acquainted with the basics of the Photoshop work area, you can begin learning how to create and edit images. Once you know the basics, you can complete the Adobe Photoshop CC Classroom in a Book lessons either in sequential order or according to the subjects you find most interesting.
Finding resources for using Photoshop
For complete and up-to-date information about using Photoshop panels, tools, and other application features, visit the Adobe website. To search for information in Photoshop Help and support documents, as well as other websites relevant to Photoshop users, choose Help > Photoshop Online Help. You can narrow your search results to view only Adobe Help and support documents.
For additional resources, such as tips and techniques and the latest product information, check out the Adobe Community Help page at community.adobe.com/help/main.
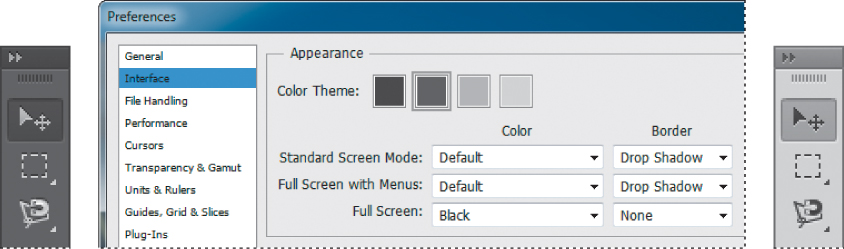
Changing interface settings
By default, the panels, dialog boxes, and background in Photoshop CC are dark. You can lighten the interface or make other changes in the Photoshop Preferences dialog box.
To make changes:
1. Choose Edit > Preferences > Interface (Windows) or Photoshop > Preferences > Interface (Mac OS).
2. Select a different color theme, or make other changes.
When you select a different theme, you can see the changes immediately. You can also select specific colors for different screen modes and change other interface settings in this dialog box.
3. When you’re satisfied with the changes, click OK.
Review questions
1. Describe two types of images you can open in Photoshop.
2. How do you open image files using Adobe Bridge?
3. How do you select tools in Photoshop?
4. Describe two ways to change your view of an image.
5. What are two ways to get more information about Photoshop?
Review answers
1. You can scan a photograph, transparency, negative, or graphic into the program; capture a digital video image; or import artwork created in a drawing program. You can also import digital photos.
2. Choose File > Browse In Bridge in Photoshop to jump to Bridge. Then, locate the image file you want to open, and double-click its thumbnail to open it in Photoshop.
3. Click a tool in the Tools panel, or press the tool’s keyboard shortcut. A selected tool remains active until you select a different tool. To select a hidden tool, either use a keyboard shortcut to toggle through the tools, or hold down the mouse button on the tool in the Tools panel to open a pop-up menu of the hidden tools.
4. Choose commands from the View menu to zoom in on or out from an image, or to fit it onscreen, or use the zoom tools and click or drag over an image to enlarge or reduce the view. You can also use keyboard shortcuts or the Navigator panel to control the display of an image.
5. The Photoshop Help system includes full information about Photoshop features plus keyboard shortcuts, task-based topics, and illustrations. Photoshop also includes a link to the Adobe Systems Photoshop web page for additional information on services, products, and tips pertaining to Photoshop.