
Lesson 7. Creating Classes
Objects are the core of any object-oriented language. So far you have used objects provided for you by Adobe; however, to accomplish anything of even marginal complexity in Flex, you need to be comfortable creating your own. Objects are the realization of classes. Another way to state this is that a class is a blueprint for an object that will be created. In this lesson, you will first create several classes and then use them throughout the application.

The finished Product data structure built in ActionScript 3.0 and integrated into the application
Building a Custom ActionScript Class
As mentioned at the end of Lesson 2, “Getting Started,” this book does not aspire to teach object-oriented programming (OOP), but every Flex developer needs at least a working knowledge of OOP terminology. So if you are not familiar with terms like class, object, property, and method, now is a good time to take advantage of the hundreds, if not thousands, of OOP introductions around the web and in books.
You have already been building custom ActionScript classes in this book but may not have been aware of it because Flex initially hides this fact from you. When you build an application in MXML, you are actually creating a new ActionScript class. Your MXML is combined with the ActionScript in the Script block, and a pure ActionScript class is created, which is then compiled into a SWF file for Flash Player. In the previous exercise, when you compiled FlexGrocer.mxml, a file named FlexGrocer-generated.as was created behind the scenes that contained the following code:
public class FlexGrocer extends spark.components.Application
You extended the Application class when you built FlexGrocer.mxml and Checkout.mxml. The same is true for every application you create using Flex.
Tip
![]()
If you wish to see the ActionScript created, you can add a compiler argument in Flash Builder. Navigate to Project > Properties > Flex Compiler > Additional compiler arguments, and add -keep-generated-actionscript to the end of the existing arguments. A folder named bin-debug/generated will be created automatically in your project, and many ActionScript files will be placed there. Your application files will be in the form Name-generated.as. Don’t forget to remove the compiler argument when you’ve finished exploring.
In the first exercise of this lesson, you will build a class directly in ActionScript, without relying on Flex to convert MXML into ActionScript. Ultimately this will give you much more granular control over your final code and encourage code reuse.
Building a Value Object
Value objects, also called data transfer objects (DTOs), or just transfer objects, are objects intended to hold data. Unlike other objects you have used so far, such as Labels and DataGrids, value objects are free from any logic other than storing and retrieving their data. These objects are implemented as ActionScript classes.
The name data transfer object comes from the fact that DTOs are often used for data transfer to the back end (server) of an application, often for permanent storage in a database. In this lesson, you will build a value object for a grocery product, along with objects for both a ShoppingCart and a ShoppingCartItem.
Before you get started, the basics of building an ActionScript class need to be understood. A very simple class is shown here, and labeled for discussion:

On line A, the package represents the path where the class is stored. In this example, you know the file is stored in a valueObjects.grocery package. On your hard drive, this means that the ActionScript file is stored in the valueObjects/grocery/ directory under your project.
On line B, the class is named Fruit. This is the name used to represent the class throughout an application (much like DataGrid or Label), and it must correspond to the name of the file. The Fruit class will be stored in a Fruit.as file on your drive.
On line C, the properties of the class are declared. This particular class has only a single public property, named productName, of type String. Multiple properties may be declared for any class.
Line D contains the constructor of the class. The constructor is called when a new object is instantiated from the class. The name of the constructor function must match the name of the class, which must match the name of the file. This function must be public, and it does not have a return type listed.
In line E, the methods of the class are defined. This particular class has only a single method named toString(), but multiple methods may be declared.
Note
![]()
The terms method and function will often be used synonymously throughout the book. A function is a block of code that needs to be executed at some point in your application. A method is a function that belongs to a particular class, like the Fruit class here. In Flex it is possible to create functions and methods; however, every function you create in this book can also appropriately be called a method.
Throughout the FlexGrocer application, you will need to display and manage typed data and send this data to different objects in the application. In this exercise, you will build a value object to hold information about a grocery product.
- Open the FlexGrocer.mxml file that you used in the previous exercise.
Alternatively, if you didn’t complete the previous lesson or your code is not functioning properly, you can import the FlexGrocer.fxp project from the Lesson07/start folder. Please refer to Appendix A for complete instructions on importing a project should you ever skip a lesson or if you ever have a code issue you cannot resolve.
- Create a new ActionScript class file by choosing File > New > ActionScript class. Set the Package to valueObjects and the class Name to Product, and leave all other fields with the defaults. Click Finish to create the file.
This process accomplished several things. First, it created a package named valueObjects, which you can now see in your Package Explorer. Next, it created a file named Product.as on your behalf. Finally, it populated that file with the required code for an ActionScript class.
Within the code, the words
packageandclassare both keywords used in defining this class. Remember that this class will be a blueprint for many objects that you will use later to describe each grocery product. - In the Product.as file you need to add a
[Bindable]metadata tag on the line between thepackagedefinition and the class statement.
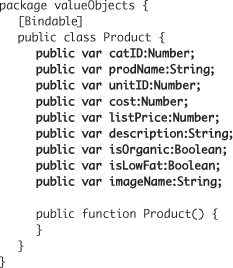
package valueObjects {
[Bindable]
public class Product {
public function Product() {
}
}
}The
[Bindable]metadata tag, when specified before the line with theclasskeyword, means that every property in this class can be used in data binding (that is, it can be monitored for updates by various Flex controls). Instead of specifying the whole class as[Bindable], you can specify individual properties by locating the[Bindable]metadata tag over each property. For this application, you want every property in this class to be bindable. - Inside the Product class definition, add a public property with the name
catIDand the typeNumber.
package valueObjects {
[Bindable]
public class Product {
public var catID:Number;
public function Product() {
}
}
}All properties of a class must be specified inside the class definition in ActionScript.
- Create additional public properties with the names
prodName(String),unitID(Number),cost(Number),listPrice(Number),description(String),isOrganic(Boolean),isLowFat(Boolean), andimageName(String). Your class should appear as follows:
You are creating a data structure to store inventory information for the grocery store. You have now created all the properties that will be used in the class.
- When you created this class, Flash Builder created a default constructor on your behalf. Edit this constructor to specify the parameters that need to be provided when a new instance of the Product class is created. These parameters will match the names and types of the properties you defined in the last step.

The constructor function is called when an object is created from a class. You create an object from a class by using the
newkeyword and passing the class arguments. In this case the parameter names match the property names of the class. This was done to keep things clear, but it is not necessary.Note

Two words are often used in discussions of methods: parameter and argument. They are often used interchangeably, but technically, functions are defined with parameters, and the values you pass are called arguments. So a function is defined to accept two parameters, but when you call it, you pass two arguments.
- Inside the constructor, set each property of your object to the corresponding constructor parameter. When you are referring to the property of the class, you use the
thiskeyword to avoid name collision (when the same name can refer to two separate variables).

This code will set each property of the object to the corresponding argument passed to the constructor. The first line of the constructor reads: “Set the
catIDproperty of this object to the value that was passed to thecatIDparameter of the constructor.”Tip

You could name the constructor parameters differently from the properties (for example,
categoryIDinstead ofcatID). In that case, each property listed to the left of the equals sign could have done without thethis. prefix (for example,catID = categoryID;). The prefix is added when you wish to be specific when referencing a property. Thethisprefix refers to the class itself and is implicit when there is no possibility of name collision. - Create a new method directly below the constructor function with the name
toString()and the return type String. It will return the string[Product]and the name of the product. Your class should read as follows:
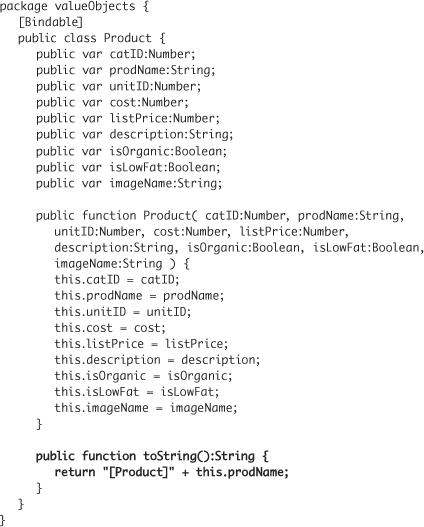
toString()is a special method of objects in ActionScript. Whenever you use an instance of your Product in a place where Flex needs to display a String, this method will be automatically invoked by Flash Player. A good example of this concept is thetrace()method, which can be used to output data to the console. Running the codetrace ( someProduct )would call thetoString()method of that Product instance and output the string it returns to the Console view. This can be very useful for debugging and displaying data structures. - Return to the FlexGrocer.mxml file and locate the Script block at the top of the page. Inside the Script block, declare a private variable named
theProducttyped as a Product. Add a[Bindable]metadata tag above this single property.
[Bindable]
private var theProduct:Product;If you used code completion, Flash Builder imported the
Productclass for you. If you did not, then addimport valueObjects.Product;before continuing.All MXML files ultimately compile to an ActionScript class. You must follow the same conventions when creating an MXML class as when creating an ActionScript class. For example, you must import any classes that are not native to the ActionScript language, such as the Product class you have built, and you must declare any properties that you will use in your MXML class.
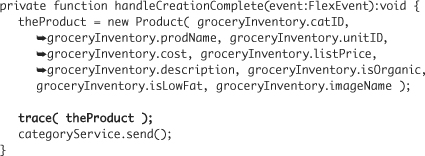
- Within the
handleCreationComplete()method, but above thecategoryService.send();statement, create a new instance of the Product class and assign it to thetheProductproperty. When creating the new Product, you will need to pass a value for each constructor argument. For these arguments you will use the data from the<fx:XML>tag namedgroceryInventory. Type the code as follows:

Here you are instantiating a new object of that Product class you built. You are passing the data from the
<fx:XML>tag as constructor arguments. If you were to review the XML in thegroceryInventoryvariable, you would note that it doesn’t presently have a node forcatIDandunitID. However, in this context, Flash Player will just interpret them as 0 (zero) for the Product value object. These values will be used extensively when you begin loading more complicated data from the server.Note
When you’re accessing properties from the groceryInventory XML, Flash Builder cannot help you with code completion or even compile-time checking. The nodes inside the XML aren’t checked, hence the reason Flash Builder does not complain when you type
groceryInventory.catIDeven though it is not present in the XML. This means it is extremely easy to make a typo that can be difficult to debug. For now check your code carefully, but as we continue to use strongly typed objects, you will see how Flash Builder can help and why typed objects can make debugging easier. - On the next line, add a
trace()statement and trace the propertytheProductout to the console. This statement will automatically execute thetoString()method of your object and output the results. Your finished method should look like the following:
- Save and debug the application.
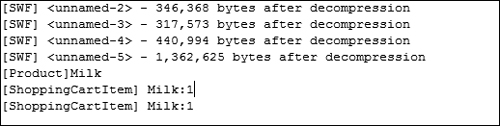
You should see
[Product]Milkin the Console view, which indicates that you have created a Product value object successfully.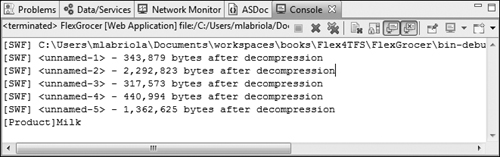
Building a Method to Create an Object
As you just did in the previous exercise, you can instantiate an instance of the Product class by passing values as arguments to the constructor. In this exercise, you will build a method that will accept any type of object that contains all the properties and values needed for a product, and return an instance of the Product class populated with this data. This type of method is often referred to as a factory method, as its job is creating other objects.
Note that for this method to function correctly, the object passed to the method must contain property names that correspond exactly to the names you will hard-code into this method.
- Be sure the Product class in the valueObjects package is open. Locate the
toString()method. Immediately after this method, add the skeleton of a newpublic staticmethod calledbuildProduct(). Be sure that the return type of the method is set toProduct, and that it accepts a parameter namedotyped asObject, as shown:
public static function buildProduct( o:Object ):Product {
}A static method is a method that belongs to a class, not to an instance. The methods you have worked with so far are called instance methods; they can be used only with instantiated objects.
Consider for a moment your
toString()method. That method usesproductNameto display the name of the product represented by that object. If you have n product objects (where n is any number of product objects), each should display a different name when thetoString()method is called. Since this method uses data from the object, it is logical that the object must exist before the method can be called.Conversely, you may have a method that doesn’t need (or care) about any of the data inside a specific instance. In fact, it could just be a utility method that does work independent of any particular instance. This is called a static method.
Static methods are often used for utilities such as the
buildProduct()method. You will be able to call this method without creating an instance of the Product first. Used appropriately, static methods can increase the legibility and usefulness of your objects. To reference a static method with the namebuildSomething()from the Product class, you would use the codeProduct.buildSomething(), which uses the class name before the method, as opposed to the instance. - Inside the
buildProduct()method, create a new local variable namedpof typeProduct.
var p:Product;
- Below the local variable declaration, instantiate an instance of the Product class assigning it to
pusing thenewkeyword. Pass thecatID,prodName,unitID,cost,listPrice,description,isOrganic,isLowFat, andimageNameproperties of the objectoas arguments to the constructor. TheisOrganicandisLowFatvariables will be compared against the String'true'before being passed as the code below demonstrates:

Remember that the data used here is retrieved from the
<fx:XML>tag. When data is retrieved this way, all the data is XML: Thetrueandfalsevalues for these fields are just treated as a type of String. ComparingisOrganicandisLowFatto the String'true'will return a Boolean value, either atrueof afalse. In this way, you are converting the value contained in the XML to the Boolean value that the newly created object is expecting for these properties. Converting and the related concept of casting allow you to treat a variable of a given property as another type. - Return the object you just created by using the
returnkeyword with the name of the object,p. Your finalbuildProduct()method should appear as follows:
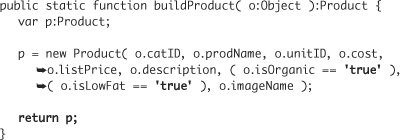
This method will create and return a new Product value object and populate it with data from the object passed as an argument.
- Save the Product.as file.
The class file is saved with the new method. No errors should appear in the Problems view.
- Return to FlexGrocer.mxml. In the
handleCreationComplete()method, remove the code that buildstheProductand replace it with code that uses the static method to buildtheProduct. Remember to remove thenewkeyword.
theProduct = Product.buildProduct( groceryInventory );
This code calls the static method that builds an instance of the Product class, which returns a strongly typed Product value object from any type of object that has correspondingly named properties.
- Locate the VGroup container, which, in the expanded state, displays the product description (whether the product is organic, and whether it is low fat). Change the
textproperty of the<s:RichText>tag to reference thedescriptionproperty of thetheProductobject you created in thehandleCreationComplete()method. Also, add avisibleproperty to both labels, and bind each to the appropriatetheProductobject properties, as shown in the following code.
Tip
Remember, because Product is now an imported class, you can get code hinting for both the class name and its properties. When you are in the braces creating the binding, press Ctrl-Spacebar to get help for inserting the Product instance,
theProduct. Then, after you enter the period, you will get the properties listed.<s:VGroup includeIn="expanded" width="100%" x="200">
<s:RichText text="{theProduct.description}" width="50%"/>
<s:Label text="Certified Organic"
visible="{theProduct.isOrganic}"/>
<s:Label text="Low Fat"
visible="{theProduct.isLowFat}"/>
</s:VGroup>
You are now referencing the value object you created. You also just gained one more benefit: Flash Builder is now helping you debug. If you were to make a typo—for example, if you were to type
theProduct.isLowerFat—Flash Builder would alert you to the error when you saved. Now that Flash Builder knows the types of the objects you are using, it can verify that you are accessing properties that exist. What might have taken you a few minutes to reread, check, and perhaps even debug, Flash Builder found in moments. Over the course of a project, that becomes days and weeks of time. - Save and debug the application.
You should see that the
trace()method performs just as before, and the correct data should still appear when you roll over the image.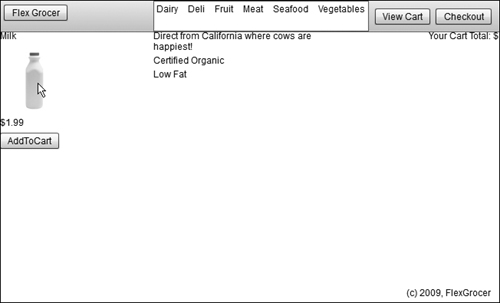
Building Shopping Cart Classes
In this exercise, you will build a new class called ShoppingCartItem. This class will contain an item added to a shopping cart that you will also build shortly. The new class will keep track of a product added and its quantity. You will also build a method that calculates the subtotal for that item.
You will then build the skeleton for a ShoppingCart class that will handle all the logic for the shopping cart, including adding items to the cart.
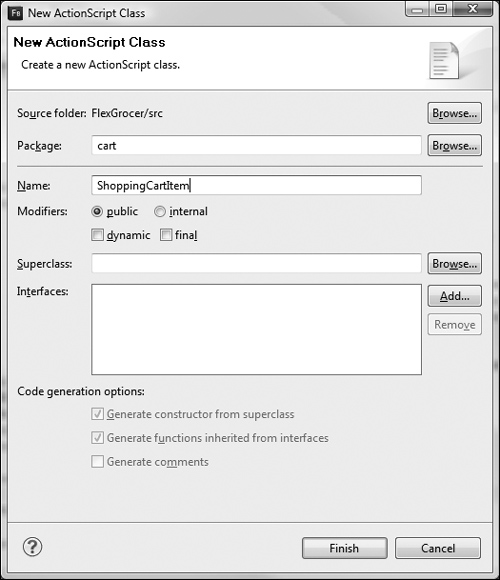
- Create a new ActionScript class file by choosing File > New > ActionScript class. Set the Package to cart, which automatically adds this class to a folder named cart inside your project. Enter ShoppingCartItem as the Name and leave all other fields with default values.
In this class, you will calculate the quantity of each unique item as well as the subtotal.
- Within the
classdefinition, define a public property with the nameproductand the type Product, as shown:
package cart {
public class ShoppingCartItem {
public var product:Product;
public function ShoppingCartItem() {
}
}
}The
productis the most important piece of data in the ShoppingCartItem. - Define a public property with the name
quantityof the type uint, as shown:
package cart {
public class ShoppingCartItem {
public var product:Product;
public var quantity:uint;
public function ShoppingCartItem() {
}
}
}The data type uint means unsigned integer, which is a nonfractional, non-negative number (0, 1, 2, 3, ...). The quantity of an item added to the shopping cart will be either zero or a positive number, so uint is the perfect data type.
- Define a public property with the name
subtotaland the data typeNumber, as shown:
package cart {
public class ShoppingCartItem {
public var product:Product;
public var quantity:uint;
public var subtotal:Number;
public function ShoppingCartItem() {
}
}
}Each time a user adds an item to the shopping cart, you will want the subtotal for that item to be updated. In this case, you are using Number as the data type. As the product’s price is not likely to be an integer, the Number class allows for fractional numbers. Eventually, you will display this data in a visual control.
- Edit the signature of the constructor of this class and specify the parameters that will be passed to this function. These parameters will include
producttyped as aProductandquantitytyped as auint. You will provide a default value of1for the quantity. If the developer calling this method does not provide a quantity, you will assume 1.
public function ShoppingCartItem( product:Product, quantity:uint=1 ) {
}Remember that a constructor function must be public and that it never specifies a return type.
- In the constructor, assign the object’s properties to the values passed into the constructor’s parameters. The names used are the same, so prefix the properties on the left side of the equal sign with
this.
public function ShoppingCartItem( product:Product, quantity:uint=1 ){
this.product = product;
this.quantity = quantity;
}Remember that the constructor is called every time an object is created from a class. The constructor will set the properties that are passed in—in this case, an instance of the Product class, and the quantity, which is set to 1 as a default. This object will be used only when an item is added to the shopping cart, so a default quantity of 1 seems reasonable.
- Create a public method with the name
calculateSubtotal()that will calculate the subtotal of each item by multiplying thelistPriceof the product by thequantity, as follows:
public function calculateSubtotal():void{
this.subtotal = product.listPrice * quantity;
}When the user adds items to the shopping cart, you need to perform calculations so that the subtotal can be updated. Eventually, you also need to check whether the item has already been added to the cart; if so, you will update the quantity. You will learn how to do this in the next lesson.
- Call the
calculateSubtotal()method on the last line of the constructor. This will ensure that the subtotal is correct as soon as the object is created.
public function ShoppingCartItem( product:Product, quantity:uint=1 ) {
this.product = product;
this.quantity = quantity;
calculateSubtotal();
} - Create a public method with the name
toString()that will return a nicely formatted string with the product’s name and quantity. The returned string will read[ShoppingCartItem], followed by a space, the product’s name, a colon, and finally the quantity of that product in this ShoppingCartItem.
public function toString():String {
return "[ShoppingCartItem] " + product.prodName + ":" + quantity;
}As you learned previously,
toString()methods are automatically called when Flash Player needs to represent this object as a String, such as when you use it in atrace()statement. This will provide you a lot of valuable debugging information. - You will now create another new class. Start by choosing File > New > ActionScript class. Set the package to cart. Name the class ShoppingCart and leave all other fields with default values.
Your new class will be the actual shopping cart, filled with ShoppingCartItem objects. This class will handle the manipulation of the data in the shopping cart. You have already created the visual look and feel of the shopping cart, and you will place all your business logic in this new class. This business logic includes work that must occur when adding an item to the cart, deleting an item from the cart, updating an item in the cart, and so on.
- Create the skeleton of a public
addItem()method, which returnsvoid. The method will accept a parameter nameditem, of typeShoppingCartItem. In the method, add atracestatement that will trace theitemadded to the cart:

This is the method in which you will add a new item to the shopping cart. You will add more business logic to this method later. For now, you will just trace the item added to the cart. Remember that the
toString()method you wrote earlier is called automatically whenever an instance of the ShoppingCartItem class is traced. - Open FlexGrocer.mxml in Flash Builder and locate the Script block. Just below the
importstatement for the Product value object, import the ShoppingCartItem and ShoppingCart classes from the cart folder, as shown:
import cart.ShoppingCartItem;
import cart.ShoppingCart;To use a class in a different package, your application needs an
importstatement that references the location or package in which the class is located. - Just below the
importstatements, instantiate a public instance of the ShoppingCart class, name the instanceshoppingCart, and add a[Bindable]metadata tag, as follows:
[Bindable]
public var shoppingCart:ShoppingCart = new ShoppingCart();Pay attention to the differences in case here. Variables, such as shoppingCart, usually start with a lowercase letter. Classes, such as ShoppingCart, start with an uppercase letter.
When the user clicks the AddToCart button, you want to call the
addItem()method of the ShoppingCart class you just created. You will pass theaddItem()method an instance of the ShoppingCartItem class. By instantiating the class here, you ensure that you have access to it throughout the application. - Locate the
handleViewCartClick()method in the<mx:Script>block. Immediately after this method, add a new private function with the nameaddToCart()that returnsvoid. Have the method accept a parameter namedproducttyped asProduct, as shown:
private function addToCart(product:Product):void {
}This method will be called when the user clicks the AddToCart button, and you will pass an instance of the Product value object. As you do not intend anyone to call this method from outside this MXML class, you can use the private identifier. Using the keyword
privatehere prevents others from calling this method unexpectedly. - Inside the
addToCart()method, create a new instance of the ShoppingCartItem class with the namesciand pass theproductparameter as an argument to the constructor.
private function addToCart( product:Product ):void {
var sci:ShoppingCartItem = new ShoppingCartItem( product );
}Notice that you passed the
productbut you did not pass the second parameter of the constructor (quantity). This is okay, as you provided a default value for the quantity when creating this class. - On the next line of the
addToCart()method, call theaddItem()method of theshoppingCartinstance of the ShoppingCart class. Be sure to pass thesciobject you just created to the method, as follows:
private function addToCart( product:Product ):void {
var sci:ShoppingCartItem = new ShoppingCartItem( product );
shoppingCart.addItem( sci );
}This code will call the
addItem()method of the ShoppingCart class you built earlier. In the next sections, you will learn how to loop through the data structure to see whether the item is added. For now, this method simply traces the name of the product added to the cart. - Find the AddToCart button and add a handler for the
clickevent that calls theaddToCart()method, passing an instance oftheProduct:
<s:Button label="AddToCart" id="add"
click="addToCart( theProduct )"/>Remember, the
addToCart()method creates an instance of the ShoppingCartItem class and then passes that object to the shopping cart. - Save and debug the application.
Each time you click the AddToCart button, you should see [ShoppingCartItem] Milk:1 appear in the Console view.
Manipulating Shopping Cart Data
The next several exercises all deal with manipulating data in the shopping cart. You will work extensively with the Array class. In Lesson 8, “Using Data Binding and Collections,” you will add even more functionality to this class and allow it work with Flex controls to update the display dynamically.
Adding Items to the Cart
In this exercise you will write the code to add items to the shopping cart.
- Open the ShoppingCart.as file from the cart package that you used in the previous exercise.
Alternatively, if you didn’t complete the previous exercise or your code is not functioning properly, you can import the FlexGrocer-PreCartData.fxp project from the Lesson07/intermediate folder. Please refer to Appendix A for complete instructions on importing a project should you ever skip a lesson or if you ever have a code issue you cannot resolve.
- On the line after the
classdefinition, define a public property with the nameitems, typed as anArrayand set equal to a new Array instance.
package cart {
public class ShoppingCart {
public var items:Array = new Array();This instantiates an Array object and assigns it to the
itemsproperty. You will use this Array to track all the objects in the shopping cart. - Define a public property with the name
total, typed as aNumber. It will hold the total price of the items in this class. When the class is first instantiated, there won’t be any items, so set the value to0as shown:
public var total:Number=0;
Anytime a user adds an item to the cart, you will update this property with the price of the item. This will enable you to track the total cost of the end user’s order.
- Locate the
addItem()method of the ShoppingCart class and remove thetracestatement. Use thepush()method of the Array class to add ShoppingCartItem to theitemsarray. Thepush()method of the Array adds an element to the end of the array, after any existing items.
public function addItem( item:ShoppingCartItem ):void {
items.push( item );
}In the previous exercise, you built a ShoppingCartItem class to hold data associated with items in a shopping cart. This class has properties to hold the product (an instance of the Product class), the quantity (an unsigned integer), and the subtotal (a number derived by multiplying the quantity by the price). When the user clicks the AddToCart button, you pass a ShoppingCartItem to this method and place it in the Array using
addItem(). - Create a public method with the name
toString()that will return a nicely formatted string representing the items in the shopping cart. The returned string will be [ShoppingCart, followed by a space, a dollar sign, the closing right bracket, another space and theitemsarray as shown:
public function toString():String {
return "[ShoppingCart $" + total + "] " + items;
}As you learned previously,
toString()methods are called automatically when Flash Player needs to represent this object as a String, such as when you use it in atrace()statement. You addedtoString()methods to several of your objects already. When this statement executes, it is going to display[ShoppingCart $0]and then the array. The Array also has atoString()method, so when you trace this array, it will actually call thetoString()method on each item in the array. - Switch back to FlexGrocer.mxml and locate the
addToCart()method. To the last line of this method add atrace()statement that traces theshoppingCart.
private function addToCart( product:Product ):void {
var sci:ShoppingCartItem = new ShoppingCartItem( product );
shoppingCart.addItem( sci );
trace( shoppingCart );
}Each time you click the AddToCart button, the entire shopping cart will be traced to the console.
- Save and debug the application.
Each time you click the AddToCart button, you will see another line appear in the Console view. For example, clicking it three times will yield:

The number of items grows each time another Milk product is added to the cart. However, this uncovers an error in your ShoppingCart. If you add Milk a second time, you likely mean to increase the quantity by 1, not actually add a new item. You will address this over the next few exercises.
Adding an Item or Updating the Quantity
The code you are about to write conditionally places a new item, or updates an existing item, in the shopping cart. It is not difficult line by line, but the logic involved can seem complex at first. To be sure you understand the big picture before you try to implement the details, let’s walk through the logic required for the implementation.
- The user clicks a button to add an item to the shopping cart.
- The
addItem()method is called. - The cart is checked to see if the item already exists.
• If the item does not exist, it is added.
• If the item does exist, you find and update the existing item.
- The cart’s total is updated.
Conditionally Adding a ShoppingCartItem
A key point in the logic of this exercise is determining whether a newly added ShoppingCartItem is already in the existing array of ShoppingCartItems. In this section, you will simply loop through the array looking for the correct item. In the next lesson, you will learn to use collections and cursors to make this faster and more elegant.
Finding an Item in the Cart
The desired behavior is to have only new items added to the cart. If an item is clicked more than once, it should update the quantity of the item. You will need to write a method that can check whether an existing product is in the cart already.
- In the ShoppingCart.as file, add a new private function named
getItemInCart(). This method will accept a single parameter nameditemof typeShoppingCartItem. The method will return a ShoppingCartItem.
private function getItemInCart( item:ShoppingCartItem ):ShoppingCartItem {
}This method will accept a ShoppingCartItem and then look through all existing items to see if the represented product already exists in the cart.
- On the first line of the
getItemInCart()function, declare a new local variable namedexistingItemof typeShoppingCartItem.
private function getItemInCart( item:ShoppingCartItem ):ShoppingCartItem {
var existingItem:ShoppingCartItem;
} - Directly below that variable declaration, create a
forloop. Loops are blocks of code that are executed repeatedly using a series of values. In this loop, declare a variableiof typeuintand loop from0to less than the length of theitemsarray. In ActionScript, this loop appears like the following code:
private function getItemInCart( item:ShoppingCartItem ):ShoppingCartItem {
var existingItem:ShoppingCartItem;
for ( var i:uint=0; i<items.length; i++ ) {
}
}The code inside this
forloop will be executed for each item in the array, allowing you to inspect each value for a matching product. The loop will continue to execute as long asi(the iterant) is less than the length of theitemsarray. Each time the loop executes, the iterant is increased by 1 (++is shorthand for increment). - Inside the
forloop, assign the localexistingItemvariable to the next item in the array. In ActionScript, the basic array contains data of an unknown type. This means that we will need to give the compiler a hint about the type of data in the array by casting it.
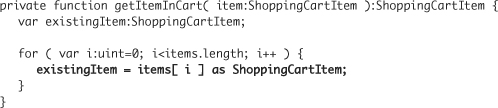
- Still inside the loop, check whether
existingItem.productis equal toitem.product. If they are equal, return theexistingItemvariable. Finally, returnnullat the end of the method.
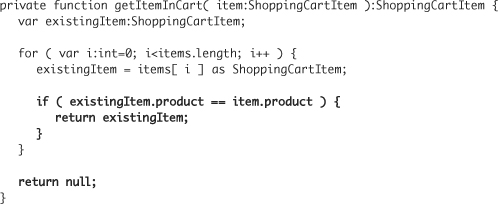
This code will now loop through the existing items and look for a matching product. If one is found, the code returns it. If a matching product is not found, null is returned.
Checking for an Item’s Existence
While the getItemInCart() method allows us to find a given item in the cart, it would be nice to have a method that simply indicates whether or not the item is there. In other words, a method that returns a Boolean value indicating the item’s existence.
- Create a new private function named
isItemInCart()that will return aBoolean. The method will accept a parameter nameditemof typeShoppingCartItem. Within the method, create a new variable local to the method with the namesci, which will hold a matchedShoppingCartItem, returned by thegetItemInCart()method.
private function isItemInCart( item:ShoppingCartItem ):Boolean {
var sci:ShoppingCartItem = getItemInCart( item );
}The
getItemInCart()method returns anitemif it is found; else it will returnnull. - Add a
returnstatement that returns the Boolean expression( sci != null ). Your completed method should look as follows:
private function isItemInCart( item:ShoppingCartItem ):Boolean {
var sci:ShoppingCartItem = getItemInCart( item );
return ( sci != null );
}
The expression ( sci != null ) will evaluate to either true or false; therefore, the isItemInCart() method will now return true if the added item is in the cart and false if the added item is not found in the cart.
Updating the Quantity of an Item Already in the Cart
The previous methods will help you to determine whether an item is in the cart. However, if that item is already in the cart, it shouldn’t be added to the cart again. Rather, the item’s quantity should be updated.
- Create a skeleton for a new private
updateItem()method, returningvoid. Have it accept a parameter nameditem, typed asShoppingCartItem. On the first line of the method, define a local variable with the nameexistingItem, typed as aShoppingCartItem. Set that local variable equal to the result of thegetItemInCart()method, passing theitem.
private function updateItem( item:ShoppingCartItem ):void {
var existingItem:ShoppingCartItem = getItemInCart( item );
} - Still in the
updateItem()method, update thequantityproperty of theexistingItemobject to its current value plus the value located in theitemproperty.
existingItem.quantity += item.quantity;
Remember, whenever the AddToCart button is clicked, a new item is added to the cart with the
quantityvalue set to1. - Still in the
updateItem()method and immediately after you set thequantity, call thecalculateSubtotal()method of theexistingItem ShoppingCartIteminstance. The finalupdateItem()method should look like this:
private function updateItem( item:ShoppingCartItem ):void {
var existingItem:ShoppingCartItem = getItemInCart( item );
existingItem.quantity += item.quantity;
existingItem.calculateSubtotal();
}When you first created the ShoppingCartItem class, you added a method with the name
calculateSubtotal(), which updated asubtotalproperty with thelistPriceof each product multiplied by thequantityof each product. Anytime you update thequantity, you need to recalculate thatsubtotalvalue. - Directly after the
updateItem()method, create a skeleton for a privatecalculateTotal()method, with a return typevoid. In the method, create a local variable namednewTotalof typeNumberand set it to an initial value of0. Create a second local variable namedexistingItemof typeShoppingCartItem.
private function calculateTotal():void{
var newTotal:Number = 0;
var existingItem:ShoppingCartItem;
}In this method, you will loop over the entire shopping cart and eventually update the
totalproperty of the ShoppingCart with the total of the user’s items. - Still in the
calculateTotal()method, create a skeleton of aforloop that will loop through theitemsarray. Use the variableias the iterant for the loop, with a data typeuint. Use thelengthproperty ofitemsas the terminating condition, and use the++operator to increment the iterant.
for ( var i:uint=0; i<items.length; i++ ) {
}Like the loop you wrote before, this enables you to loop through the entire shopping cart. The loop will continue to execute as long as
i(the iterant) is less than the length of the array. Each time the loop executes, the iterant is increased by 1 (++is shorthand for this increase). - Inside the loop, set the
existingItemvariable equal toitems[ i ]cast as a ShoppingCartItem. Update thenewTotalvariable with thesubtotalof each existing item stored in theitemsarray. Be sure to use the+=operator so it will add the new value to the existing one. YourcalculateTotal()method should appear as follows:
private function calculateTotal():void{
var newTotal:Number = 0;
var existingItem:ShoppingCartItem;
for ( var i:uint=0; i<items.length; i++ ) {
existingItem = items[ i ] as ShoppingCartItem;
newTotal += existingItem.subtotal;
}
}This loops through the entire shopping cart and updates the
newTotalvariable by adding thesubtotal (price * quantity)of each item in the cart to the currentnewTotal. Now anytime you need to calculate the total price of all the items, you can simply call this method. - As the final step of your
calculateTotal()method, assign the value in thenewTotalvariable to thetotalproperty of the ShoppingCart instance.
private function calculateTotal():void{
var newTotal:Number = 0;
var existingItem:ShoppingCartItem;
for ( var i:uint=0; i<items.length; i++ ) {
existingItem = items[ i ] as ShoppingCartItem;
newTotal += existingItem.subtotal;
}
this.total = newTotal;
}
Tip
![]()
In the next lesson, you will tell the display to update each time the total property changes. By performing the calculation using the local newTotal property and then assigning it to the total at the end of the method, you will cause the display to update only once. Had you used the total property throughout, Flex would have tried to update the display once for every item in the array.
Checking Conditions in the addItem() Method
You now have all the building blocks to finish your addItem() method and ensure that the total remains consistent as items are added or updated.
- Find the
addItem()method. On the first line add anif-elsestatement. Use theisItemInCart()method to check whether the item is currently in the cart.
public function addItem( item:ShoppingCartItem ):void {
if ( isItemInCart( item ) ) {
} else {
}
items.push( item );
} - From within the
ifblock, call theupdateItem()method, passing theitem. Move the code that pushes the new item into theitemsarray into theelseblock.
public function addItem( item:ShoppingCartItem ):void {
if ( isItemInCart( item ) ) {
updateItem( item );
} else {
items.push( item );
}
}When the
addItem()is called, it will check to see whether the item is already in the cart. If it is, then the existing item will be updated. Else, the new item will be added. - Finally, call the
calculateTotal()method to recalculate the shopping cart’s total after any add or update occurs.
public function addItem( item:ShoppingCartItem ):void {
if ( isItemInCart( item ) ) {
updateItem( item );
} else {
items.push( item );
}
calculateTotal();
} - Save and debug the application.
Each time you click the AddToCart button, you will see another line appear in the Console view. For example, clicking it three times will yield:
[ShoppingCart $1.99] [ShoppingCartItem] Milk:1
[ShoppingCart $3.98] [ShoppingCartItem] Milk:2
[ShoppingCart $5.97] [ShoppingCartItem] Milk:3Instead of adding a new item each time, the cart now updates the quantity of the item (as indicated by the last number). Also, note the total in the shopping cart changes as you modify the cart. You will add more functionality, including the ability to remove items, in the next lesson.
What You Have Learned
In this lesson, you have:
• Created a Product class (pages 141–147)
• Created a static factory to build Product instances (pages 141–149)
• Populated a Product instance with data (pages 146–149)
• Created a ShoppingCartItem class (pages 150–153)
• Created a ShoppingCart class (pages 153–155)
• Used an ActionScript loop to move through an array (pages 159–160)
• Added and updated items in the ShoppingCart (pages 161–165)