
Appendix A. Setup Instructions
Minimum System Requirements
General Requirements:
You must have a recent version of one of the following browsers installed:
• Internet Explorer
• Mozilla Firefox
• Safari
• Opera
• Netscape Navigator
Windows Requirements:
• 2 GHz or faster processor
• 1 GB of RAM (2 GB recommended)
• Microsoft Windows XP with Service Pack 3, Windows Vista Ultimate or Enterprise (32 or 64 bit running in 32-bit mode), Windows Server 2008 (32 bit), or Windows 7 (32 or 64 bit running in 32-bit mode)
• 1 GB of available hard disk space
• Java Virtual Machine (32 bit): IBM JRE 1.5, Sun JRE 1.5, IBM JRE 1.6, or Sun JRE 1.6
• 1024×768 display (1280×800 recommended) with 16-bit video card
• Flash Player 10 or higher
Macintosh Requirements:
• Intel processor–based Mac
• OS X 10.5.6 (Leopard) or 10.6 (Snow Leopard)
• 1 GB of RAM (2 GB recommended)
• 1 GB of available hard disk space
• Java Virtual Machine (32 bit): JRE 1.5 or 1.6
• 1024×768 display (1280×800 recommended) with 16-bit video card
• Flash Player 10 or higher
Tip
![]()
To check your Flash Player version, go to www.adobe.com, right-click the main ad banner, and select About Flash Player; or visit www.adobe.com/software/flash/about.
Be sure to complete the installation of all required files before working through the lessons in the book.
Software Installation
There are three phases of the installation:
• Installing Flash Debug Player (if a problem exists)
Installing Flash Builder
If you do not have Flash Builder 4 installed, step through the following installation directions:
- Browse to http://www.adobe.com/products/flashbuilder/ and click Get the Trial.
- Download Flash Builder 4 for your operating system.
- Install Flash Builder 4, accepting all the default options. The trial period on Flash Builder 4 is 60 days.
Note
![]()
If you happen to be:
• A student, faculty, or staff of eligible education institution
• A software developer who is currently unemployed
then you are eligible for a free Flash Builder license. Visit https://freeriatools.adobe.com/.
Installing Lesson Files
Once again, it is important that all the required files are in place before working through the lessons in the book.
From the CD included with your book, copy the flex4tfs directory to the root of your drive.
In this directory, there is a subdirectory named flexGrocer, in which you will be doing most of your work. Also included are directories for each lesson in the book with starting code and completed code for the work you do in the lesson. Some lessons may also have an intermediate directory, which highlights major steps in the lesson, or an independent directory, which holds projects that are unrelated to the main application but demonstrate an important technique or concept.
Installing Flash Debug Player
At various times in the book, you will be using features of Flash Debug Player. If you receive a notice saying you do not have Flash Debug Player installed, follow these steps to install it:
Windows
- Locate the Flash Player (Player) install directory:
applicationInstallDirectory/Adobe/Adobe Flash Builder 4/Player/win.
- To install Flash Debug Player for Internet Explorer, run the Install Flash Player 10 ActiveX.exe program. For other versions of web browsers, run the Install Flash Player 10 Plugin.exe program.
Macintosh
- Locate the Flash Player (Player) install directory:
applicationInstallDirectory/Adobe/Adobe Flash Builder 4/Player/mac.
- To install Flash Debug Player, run the Flash Player 10 Silent Installer program.
Tip
![]()
In rare instances, you might run the appropriate installer and still get the message that you don’t have the debug version of the player. In this case, uninstall the version you currently have by using the information you’ll find at
http://kb.adobe.com/selfservice/viewContent.do?externalId=tn_14157
and then follow the steps above to reinstall.
Importing Projects
Anytime during the course of this book that your code is no longer working, or you simply wish to jump ahead or revisit a lesson, you can import the appropriate FXP (Flex Project) for that lesson.
The FXP format is an archive file that includes project information, files, and folders. The project includes all assets and dependencies for your Flex project.
Each lesson of the book minimally has start and complete files representing the code for that lesson at its beginning and end if all steps are executed. The FXP files for the lessons have this format:
driveRoot/flex4TFS/LessonXX/start/FlexGrocer.fxp
driveRoot/flex4TFS/LessonXX/complete/FlexGrocer.fxp
Some lessons have intermediate files that represent major steps internal to the lesson. Those follow this format:
driveRoot/flex4TFS/LessonXX/intermediate/FlexGrocer-NameOfStep.fxp
Finally, a few lessons have independent files that represent small applications intended to demonstrate a singular concept but that are not directly related to the code in your FlexGrocer project. Those follow this format:
driveRoot/flex4TFS/LessonXX/independent/projectName.fxp
Importing Lesson Files
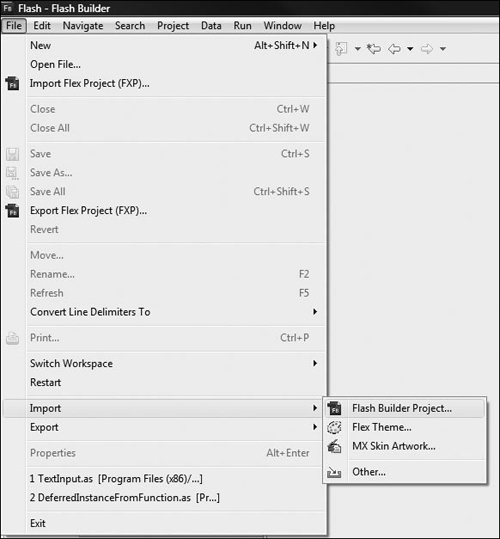
You import an FXP file by choosing File > Import > Flash Builder Project.
When you attempt to import a project in Flash Builder, the IDE determines whether you already have a project with the same Universally Unique Identifier (UUID). This will occur if you have previously imported any lesson.
When You Have an Existing Project
In this case, Flash Builder will allow you to overwrite the existing project with a fresh copy. You simply need to choose the Overwrite existing project radio button and choose the FlexGrocer project from the drop-down menu. Then click Finish.
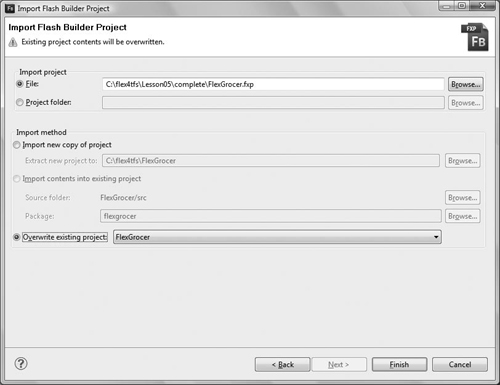
This is the ideal way to import a new lesson as it simply overwrites the older code and leaves you with a single FlexGrocer project.
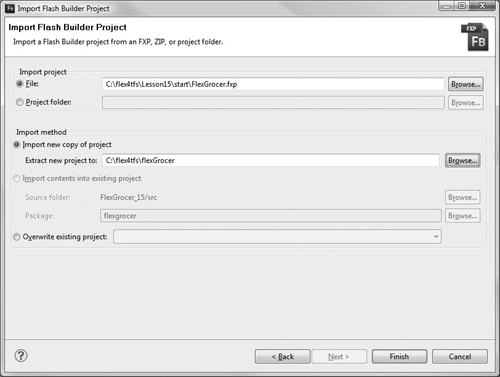
When You Don’t Have an Existing Project
If you have never imported the FlexGrocer project before, the overwrite option will not be available.
In this case, choose the Import new copy of project radio button and set the Extract new projects to input field to driveRoot/flex4tfs/flexGrocer. Then click Finish.
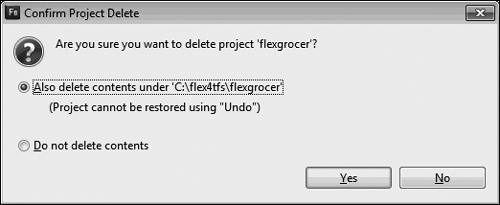
When Flash Builder Prevents Overwriting an Existing Project
If you already have a project named FlexGrocer in your workspace, and Flash Builder does not recognize this as the same project identifier, it will not allow you to overwrite that project. In this case simply right-click the FlexGrocer project and choose Delete from the Package Explorer.
A dialog box will appear and ask if you want to delete the FlashBuilder project only or also the files for the project from the file system. Choose the Also delete contents radio button.
After deleting these files, repeat these directions to import the needed project.