3. Working with Selections
Lesson overview
In this lesson, you’ll learn how to do the following:
Make specific areas of an image active using selection tools.
Reposition a selection marquee.
Move and duplicate the contents of a selection.
Use keyboard-mouse combinations that save time and hand motions.
Deselect a selection.
Constrain the movement of a selected area.
Adjust the position of a selected area using the arrow keys.
Add to and subtract from a selection.
Rotate a selection.
Use multiple selection tools to make a complex selection.
This lesson will take about an hour to complete. To get the lesson files used in this chapter, download them from the web page for this book at www.adobepress.com/PhotoshopCIB2021. For more information, see “Accessing the lesson files and Web Edition” in the Getting Started section at the beginning of this book.
As you work on this lesson, you’ll preserve the start files. If you need to restore the start files, download them from your Account page.
PROJECT: SHADOWBOX COLLAGE
Learning how to select areas of an image is of primary importance—you must first select what you want to affect. As long as a selection is active, only the area within the selection can be edited.
About selecting and selection tools
Making changes to an area within an image in Photoshop is a two-step process. You first use one of the selection tools to select the part of an image you want to change. Then you use another tool, filter, or other feature to make changes, such as moving the selected pixels to another location or applying a filter to the selected area. You can make selections based on size, shape, and color. When a selection is active, changes you make apply only to the selected area; other areas are unaffected.
![]() Tip
Tip
The concept of selecting the content you want to change is common across many image-editing applications. As soon as you understand how selections work in one application, you can use that knowledge in other similar applications.
The best selection tool for a specific area often depends on the characteristics of that area, such as shape or color. There are four primary types of selections:
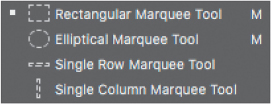
Geometric selections The Rectangular Marquee tool (![]() ) selects a rectangular area in an image. The Elliptical Marquee tool (
) selects a rectangular area in an image. The Elliptical Marquee tool (![]() ), which is hidden under the Rectangular Marquee tool, selects elliptical areas. The Single Row Marquee tool (
), which is hidden under the Rectangular Marquee tool, selects elliptical areas. The Single Row Marquee tool (![]() ) and Single Column Marquee tool (
) and Single Column Marquee tool (![]() ) select either a 1-pixel-high row or a 1-pixel-wide column, respectively.
) select either a 1-pixel-high row or a 1-pixel-wide column, respectively.
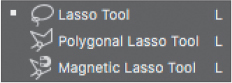
Freehand selections The Lasso tool (![]() ) traces a freehand selection around an area. The Polygonal Lasso tool (
) traces a freehand selection around an area. The Polygonal Lasso tool (![]() ) sets anchor points in straight-line segments around an area. The Magnetic Lasso tool (
) sets anchor points in straight-line segments around an area. The Magnetic Lasso tool (![]() ) works something like a combination of the other two lasso tools, and gives the best results when good contrast exists between the area you want to select and its surroundings.
) works something like a combination of the other two lasso tools, and gives the best results when good contrast exists between the area you want to select and its surroundings.
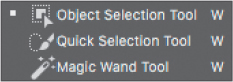
Edge-based selections The Quick Selection tool (![]() ) quickly “paints” a selection by automatically finding and following defined edges in the image. The Object Selection tool (
) quickly “paints” a selection by automatically finding and following defined edges in the image. The Object Selection tool (![]() ) identifies and selects a subject within an approximate area that you define.
) identifies and selects a subject within an approximate area that you define.
Color-based selections The Magic Wand tool (![]() ) selects parts of an image based on the similarity in pixel color. It is useful for selecting odd-shaped areas that share a specific range of colors.
) selects parts of an image based on the similarity in pixel color. It is useful for selecting odd-shaped areas that share a specific range of colors.
Getting started
First, you’ll look at the image you will create as you explore the selection tools in Photoshop.
Start Photoshop, and then simultaneously hold down Ctrl+Alt+Shift (Windows) or Command+Option+Shift (Mac) to restore the default preferences. (See “Restoring default preferences” on page 5.)
When prompted, click Yes to confirm that you want to delete the Adobe Photoshop Settings file.
Choose File > Browse In Bridge to open Adobe Bridge.
 Note
NoteIf Bridge isn’t installed, the File > Browse In Bridge command in Photoshop will start the Creative Cloud desktop app, which will download and install Bridge. After installation completes, you can start Bridge.
In the Favorites panel, click the Lessons folder. Then double-click the Lesson03 folder in the Content panel to see its contents.
Study the 03End.psd file. Move the thumbnail slider to the right if you want to see the image in more detail.
NoteIf Bridge asks you if you want to import preferences from a previous version of Bridge, click No.
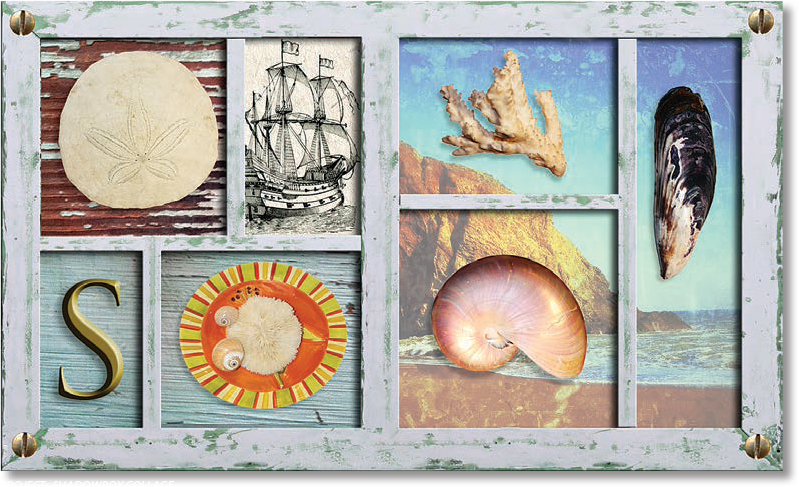
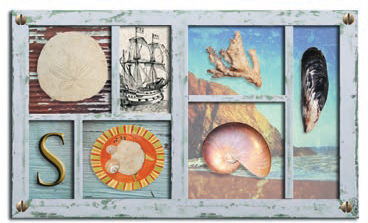
The project is a shadowbox that includes a piece of coral, a sand dollar, a mussel, a nautilus, and a plate of small shells. The challenge in this lesson is to arrange these elements, which were scanned together on the single page you see in the 03Start.psd file.

Using Cloud Documents
Photoshop document sizes can become large, especially for high-resolution images that use many layers. When you work with documents stored online, large file sizes upload and download more slowly; on a limited mobile data plan you may reach the data limit more quickly. Adobe Cloud Documents help you edit online documents efficiently by using file formats optimized for networks. For example, editing a Photoshop file as a Cloud Document means only the parts affected by an edit are transmitted, instead of the entire file. If you use Photoshop on both a computer and on an Apple iPad and you save an image as a Cloud Document, you’ll find it in the Photoshop Home screen on both devices, always updated with your latest changes.
![]() Tip
Tip
Using Cloud Documents can be more efficient than putting a Photoshop file on a cloud-based file sharing service. A Cloud Document transfers only the parts of a file that change, and you can open it in one click on the Photoshop Home screen.
Using Cloud Documents is easy; the only thing you have to do is save it to Cloud Documents. After you do this, your Photoshop document filename will have a .psdc filename extension to indicate that it’s now a Cloud Document, and you will now find it listed in the Cloud Documents section in the Photoshop Home screen. The conversion to the PSDC format is automatic, so you don’t have to think about it.
In Bridge, double-click the 03Start.psd thumbnail to open the image file in Photoshop. You’ve opened the document from your local storage.
Choose File > Save As. If you see the conventional Save As dialog box, click the Save To Cloud Documents button.
NoteIf Photoshop displays a dialog box about the difference between saving to Cloud Documents and Your Computer, click Save To Cloud Documents. You can also select Don’t Show Again, but that setting will deselect after you reset Photoshop preferences.

Rename the file 03WorkingCloud, and click Save. The file is uploaded to Cloud Documents. In the document window tab, you can see a cloud icon before the filename, and the filename now ends in .psdc.
 Tip
TipYou can also find your Cloud Documents in the Creative Cloud app (mobile or desktop) and website, in the Your Work tab in the Cloud Documents panel. The list may also contain Cloud Documents from other Adobe applications.

Close the document.
NoteAdobe Cloud Documents are stored in a different online area than Creative Cloud Files or Creative Cloud Libraries.
Now you’ll open the Cloud Document. Again, this will be slightly different than opening a document from local storage.
In the Photoshop Home screen, make sure Cloud Documents is selected on the left side. The Cloud Documents list shows all Cloud Documents you have uploaded using your Adobe ID. You’ll see your Cloud Documents list in Photoshop on any device when you’re signed in with your Adobe ID.
TipYou can organize your Cloud Documents in folders. When viewing Cloud Documents on the Photoshop Home screen, click the folder icon near the top to create and name a new folder within Cloud Documents.
 Tip
TipIf you want to manage or delete a Cloud Document, click the ellipsis (…) button for the document in the Cloud Documents list on the Photoshop Home screen, and choose Open, Rename, Delete, or Move To.
Click 03WorkingCloud, the file you just saved. This downloads the file to your computer and opens it in Photoshop.
If you’re editing a Photoshop Cloud (PSDC) Document, how can you provide that file to a client who requires a PSD file? By saving the Cloud Document to your own local storage. Again, the conversion is automatic, so it’s easy and seamless.
NoteYou can’t find a Cloud Document on your computer by looking through folders on your desktop; you see Cloud Documents in the Home screen in Photoshop. A Cloud Document is stored on Adobe servers and only cached to your local storage. If you need a local copy of a Cloud Document, choose File > Save As and save it to your computer as described to the left.
Choose File > Save As. If you see the Cloud Documents dialog box, click Save On Your Computer at the bottom to see the conventional Save As dialog box. Notice that the filename extension is now .psd, because you are now saving this document to your local storage, not Cloud Documents.
Name the document 03Working.psd, and save it into the Lesson03 folder. Now you have your own local PSD format copy that you can distribute to others and back up, like any other local document.
For this lesson, you can continue with your local copy (03Working.psd), or you can close the local PSD copy and instead open and work with your Cloud Documents copy (03WorkingCloud.psdc).
Using the Magic Wand tool
The Magic Wand tool selects all the pixels of a particular color or color range. It’s most useful for selecting an area of similar colors surrounded by areas of very different colors. As with many of the selection tools, after you make the initial selection, you can improve it by adding to or subtracting from the selection.
The Tolerance option sets the sensitivity of the Magic Wand tool. This value limits or extends the range of pixel similarity. The default tolerance value of 32 selects the color you click plus 32 lighter and 32 darker tones of that color. You may need to adjust the tolerance level up or down depending on the color ranges and variations in the image.
Select the Zoom tool in the Tools panel, and then zoom in so that you can see the entire sand dollar in detail.
Select the Magic Wand tool (
 ), hidden under the Object Selection tool (
 ).
).In the options bar, confirm that the Tolerance value is 32. This value determines the range of colors the wand selects.
Position the Magic Wand tool over the red background outside the sand dollar, and click.
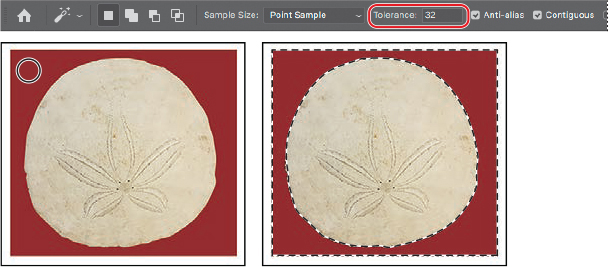
The Magic Wand tool perfectly selected the red background, because all of the colors in the background are similar enough to the position where you clicked (within the 32 levels specified in the Tolerance setting). But it’s the shell we want, so let’s start over.
Choose Select > Deselect.
Position the Magic Wand tool over the sand dollar, and click.

Look carefully at the animated selection marquee that appears over the sand dollar. If this was a perfect selection, the selection marquee would tightly follow the outer edge of the sand dollar. But notice that some interior areas of the sand dollar show selection marquees, because their colors differ from the color you clicked by more than 32 levels (the Tolerance setting). That means the current selection isn’t ideal, because it doesn’t include all interior areas.
When you want to select a subject that is mostly the same color and value, against a relatively solid background, you can often solve this by increasing the Tolerance value. But the more complex the subject or background, the more likely a wide Tolerance value will also select unwanted parts of the background. In that case, it’s usually better to use a different selection tool, such as the Quick Selection tool. You’ll do that next, but first let’s deselect the current selection.
Choose Select > Deselect.
Using the Quick Selection tool
The Quick Selection tool is one of the easier ways to make a selection. You simply click or drag it within a subject, and the tool automatically finds the edges. You can add or subtract areas of the selection until you have exactly the area you want. This works better than the Magic Wand tool because the Quick Selection tool is more aware of image content, instead of relying on color similarity alone. Let’s see if the Quick Selection tool does a better job selecting the sand dollar.
Select the Quick Selection tool (
 ) in the Tools panel. It may be hidden under the Magic Wand tool ().
Select Enhance Edge in the options bar.
When Enhance Edge is selected, the Quick Selection tool creates better quality selections, with edges that are truer to the object. The selection process is slightly slower than using the Quick Selection tool without Enhance Edge, but the results are superior.
Click or drag within the sand dollar (do not cross over into the background).
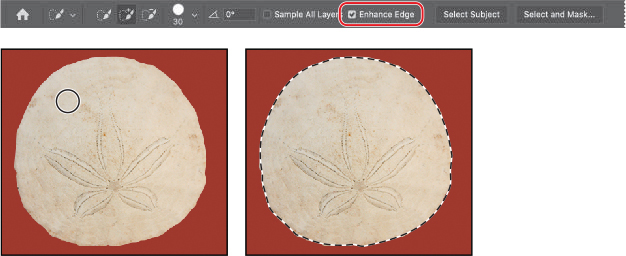
The Quick Selection tool looks at what content is probably connected to the area where you clicked or dragged and finds the full edge automatically, selecting the entire sand dollar. The sand dollar is simple enough that the Quick Selection tool can isolate it easily. When the Quick Selection tool doesn’t complete the selection initially, click or drag over areas you want to add to the selection.
TipIf the Quick Selection tool includes areas outside the subject, you can remove unwanted areas from the selection by clicking or dragging over them while holding down the Alt (Windows) or Option (Mac) key. That’s the shortcut for selecting the Subtract From Selection icon in the options bar.
Leave the selection active so that you can use it in the next exercise.
Moving a selected area
Once you’ve made a selection, any changes you make apply exclusively to the pixels within the selection. The rest of the image is not affected by those changes.
To move the selected area to another part of the composition, you use the Move tool. This image has only one layer, so the pixels you move will replace the pixels beneath them. This change is not permanent until you deselect the moved pixels, so you can try different locations for the selection you’re moving before you make a commitment.
If the sand dollar is not still selected, repeat the previous exercise to select it.
TipIf you deselect an area by accident, you may be able to restore the selection by choosing Edit > Undo or Select > Reselect.
Zoom out so you can see both the shadowbox and the sand dollar.
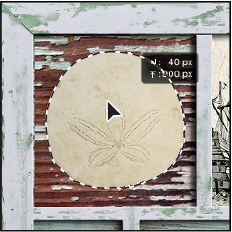
Select the Move tool (
 ). Notice that the sand dollar remains selected.
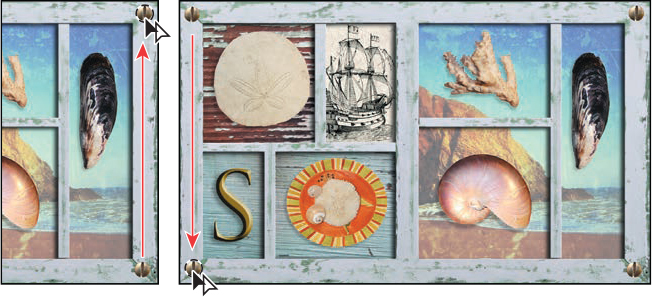
Drag the selected area (the sand dollar) to the upper-left area of the frame, which is labeled “A.” Position it over the silhouette in the frame, leaving the lower-left part of the silhouette showing as a shadow.
Choose Select > Deselect, and then choose File > Save.
In Photoshop, it’s not easy to lose a selection. Unless a selection tool is active, clicking elsewhere in the image will not deselect the active area. To deliberately deselect a selection, you can choose Select > Deselect, press Ctrl+D (Windows) or Command+D (Mac), or click outside the selection with any selection tool.
Using the Object Selection tool
The Object Selection tool is similar to the Quick Selection tool, but it’s a little smarter. All you have to do is draw a rough selection around the object you want to select, and the Object Selection tool identifies and selects the object. The Object Selection tool can save you the most time with an object that has a complicated outline that would take a lot of time to select by hand, such as the coral.
Select the Object Selection tool (
), hidden under the Quick Selection tool (). TipThe Object Selection tool works best on a simple background. On a busy background its selection may not be perfect, but you’ll probably be able to clean it up with the Quick Selection tool faster than drawing your own manual selection from scratch.
Drag a selection around the piece of coral. It doesn’t have to be precise or centered. What’s important is that it’s a relatively tight selection with a small amount of space between the coral and the edges of the selection marquee. You’re simply showing Photoshop which object you want to select.
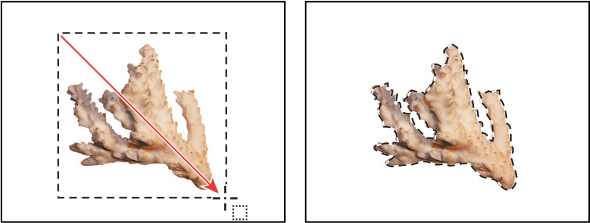
The Object Selection tool analyzes the area inside the rectangular selection, finds the object, and creates a selection marquee along its complicated edge.
TipIn a busy image, drawing a rectangular area with the Object Selection tool might include other objects or background patterns, making it hard to isolate the object you want. To more precisely indicate the object you want, choose Lasso from the Mode menu in the options bar, and drag the Object Selection tool more closely along the object’s outline. Again, it doesn’t have to be exact.
Select the Move tool (
), and drag the coral to the area of the shadowbox labeled “B,” positioning it so that a shadow appears to the left of and below the coral.Choose Select > Deselect, and then save your work.

Manipulating selections
You can move selections, reposition them as you create them, and even duplicate them. In this section, you’ll learn several ways to manipulate selections. Most of these methods work with any selection; you’ll use them here with the Elliptical Marquee tool, which lets you select ovals or perfect circles.
One of the most useful things you may find in this section is the introduction of keyboard shortcuts that can save you time and arm motions.
Repositioning a selection marquee while creating it
Selecting ovals and circles can be tricky. It’s not always obvious where you should start dragging, so sometimes the selection will be off-center, or the ratio of width to height won’t match what you need. In this exercise, you’ll learn techniques for managing those problems, including two important keyboard-mouse combinations that can make your Photoshop work much easier.
As you perform this exercise, be careful to follow the directions about keeping the mouse button or specific keys pressed. If you accidentally release the mouse button at the wrong time, simply start the exercise again from step 1.
Select the Zoom tool (
 ), and click the plate of shells at the bottom of the image window to zoom in to at least 100% view (use 200% view if the entire plate of shells will still fit in the image window on your screen).
Select the Elliptical Marquee tool (
 ), hidden under the Rectangular Marquee tool (
 ). Note
You don’t have to include every pixel in the plate of shells, but the selection should be the shape of the plate, and should contain the shells comfortably.
Move the pointer over the plate of shells, and drag diagonally across the oval plate to create a selection, but do not release the mouse button. It’s OK if your selection does not match the plate shape yet.
If you accidentally release the mouse button, draw the selection again. In most cases—including this one—the new selection replaces the previous one.
Still holding down the mouse button, press the spacebar, and continue to drag the selection. Instead of resizing the selection, now you’re moving it. Position it so that it more closely aligns with the plate.
Carefully release the spacebar (but not the mouse button) and continue to drag, trying to make the size and shape of the selection match the oval plate of shells as closely as possible. If necessary, hold down the spacebar again, and drag to move the selection marquee into position around the plate of shells.
TipThe technique of holding down the spacebar to reposition as you draw also works with other drawing tools in Photoshop, such as the shape tools and the Pen tool.

When the selection border is positioned appropriately, release the mouse button.
TipIf you want to resize a selection after you’ve drawn it (after releasing the mouse button), choose Select > Transform Selection.
Choose View > Fit On Screen or use the slider in the Navigator panel to reduce the zoom view so that you can see all of the objects in the image window.
Leave the Elliptical Marquee tool and the selection active for the next exercise.
Moving selected pixels with a keyboard shortcut
Now you’ll use a keyboard shortcut to move the selected pixels onto the shadowbox. The shortcut temporarily switches the active tool to the Move tool, so you don’t need to select it from the Tools panel.
![]() Note
Note
If you try to move the pixels but Photoshop displays an alert saying “Could not use the Move tool because the layer is locked,” make sure you start dragging by positioning the pointer inside the selection.
If the plate of shells is not still selected, repeat the previous exercise to select it.
With the Elliptical Marquee tool (
) selected in the Tools panel, press Ctrl (Windows) or Command (Mac), and hover the pointer within the selection. Continue to hold down the key for the next step.The pointer icon now includes a pair of scissors (
 ), indicating that the selection will be cut from its current location.
While continuing to hold down the Ctrl or Command key, drag the plate of shells onto the area of the shadowbox labeled “C.” (You’ll use another technique to nudge the oval plate into the exact position in a minute.)
NoteYou can release the Ctrl or Command key after you start dragging, and the Move tool remains active. Photoshop reverts to the previously selected tool when you deselect, whether you click outside the selection or use the Deselect command.

Release the mouse button and the key, but don’t deselect the plate of shells.
Moving a selection with the arrow keys
You can make minor adjustments to the position of selected pixels by using the arrow keys. You can nudge the selection in increments of either one pixel or ten pixels.
When a selection tool is active in the Tools panel, the arrow keys nudge the selection border, but not the contents. When the Move tool is active, the arrow keys move both the selection border and its contents.
You’ll use the arrow keys to nudge the plate of shells. Before you begin, make sure that the plate of shells is still selected in the image window.
Select the Move tool (
), and press the Up Arrow key ( ) on your keyboard a few times to move the oval upward.
Notice that each time you press the arrow key, the plate of shells moves one pixel. Experiment by pressing the other arrow keys to see how they affect the selection.
Hold down the Shift key as you press an arrow key.
When you hold down the Shift key, the selected pixels move ten pixels every time you press an arrow key.
Sometimes the selection marquee can distract you as you make adjustments. You can hide the edges of a selection temporarily without actually deselecting and then display the selection border once you’ve completed the adjustments.
Choose View > Show > Selection Edges to deselect the command, hiding the selection border around the plate of shells.
TipSelection edges, guidelines, and other visible items that aren’t actual objects are called extras, so another way to hide the selection edges is to deselect the View > Extras command or press its keyboard shortcut, Ctrl+H (Windows) or Command+H (Mac).
Use the arrow keys to nudge the plate of shells until it’s positioned over the silhouette so that there’s a shadow on the left and bottom of the plate. Then choose View > Show > Selection Edges to reveal the selection border again.

Choose Select > Deselect, or press Ctrl+D (Windows) or Command+D (Mac).
Choose File > Save to save your work so far.
Selecting with the lasso tools
As we mentioned earlier, Photoshop includes three lasso tools: the Lasso tool, the Polygonal Lasso tool, and the Magnetic Lasso tool. You can use the Lasso tool to make selections that require both freehand and straight lines, using keyboard shortcuts to move back and forth between the Lasso tool and the Polygonal Lasso tool. You’ll use the Lasso tool to select the mussel. It takes a bit of practice to alternate between straight-line and freehand selections—if you make a mistake while you’re selecting the mussel, simply deselect and start again.
![]() Tip
Tip
Because the lasso tools are manual, they can be the most time-consuming way to create a selection. They are typically most useful for selecting simple shapes or adjusting an existing selection.
If the window magnification is below 100%, select the Zoom tool (
), and click the mussel to zoom in to at least 100%.Select the Lasso tool (
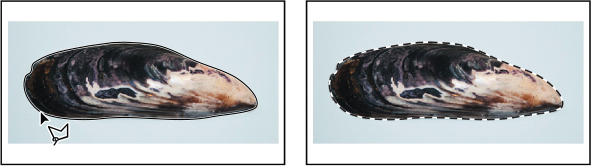
 ). Starting at the lower-left section of the mussel, drag around the rounded end of the mussel, tracing the shape as accurately as possible. Do not release the mouse button. Tip
Go slowly until you become comfortable with the Lasso tool. If you make a mistake or accidentally release the mouse button during steps 2–8, choose Edit > Undo, and start again at step 2.
When you reach a corner or straight part of the edge, press the Alt (Windows) or Option (Mac) key, and then release the mouse button so that the lasso pointer changes to the polygonal lasso shape (
 ). Do not release the Alt or Option key.
Begin clicking along the end of the mussel to place anchor points, following the contours of the mussel. Be sure to hold down the Alt or Option key throughout this process. This lets you create perfectly straight segments along the selection.

The selection border automatically stretches like a rubber band between anchor points.
When you reach the tip of the mussel, hold down the mouse button as you release the Alt or Option key. The pointer again appears as the lasso icon.
Carefully drag around the tip of the mussel, holding down the mouse button.
When you finish tracing the tip and reach the straight segments along the lower side of the mussel, first press Alt or Option again, and then release the mouse button. Click along the straight segments of the lower side of the mussel as needed. Continue to trace the straight and curved mussel edges until you arrive back at the starting point of your selection at the left end of the mussel.
Click the starting point of the selection, and then release Alt or Option. The mussel is now entirely selected. Leave the mussel selected for the next exercise.
NoteTo make sure that the selection is the shape you want when you use the Lasso tool, end the selection by dragging across the starting point of the selection. If you start and stop the selection at different points, Photoshop draws a straight line between the start and end points of the selection.
Rotating a selection
Now you’ll rotate the mussel.
Before you begin, make sure that the mussel is still selected.
Choose View > Fit On Screen to resize the image window to fit on your screen.
Press Ctrl (Windows) or Command (Mac) as you drag the selected mussel to the section of the shadowbox labeled “D.”
The pointer changes to the Move tool icon when you press Ctrl or Command.
Choose Edit > Transform > Rotate.
The mussel and selection marquee are enclosed in a bounding box.
TipYou can constrain rotation to common angles such as 90 degrees by holding down the Shift key as you drag the bounding box.
Move the pointer outside the bounding box so that it becomes a curved, two-headed arrow (
 ). Drag to rotate the mussel to a 90-degree angle. You can verify the angle in the transformation values display next to the pointer, or in the Rotate box in the options bar. Press Enter or Return to commit the transformation.
If necessary, select the Move tool (
), and drag to reposition the mussel, leaving a shadow to match the others. When you’re satisfied, choose Select > Deselect.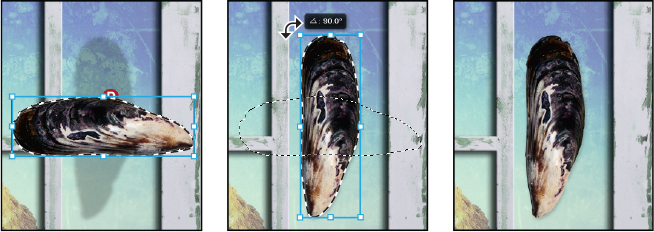
Choose File > Save.
Selecting with the Magnetic Lasso tool
You can use the Magnetic Lasso tool to make freehand selections of areas with high-contrast edges. When you draw with the Magnetic Lasso tool, the selection border automatically snaps to the edge between areas of contrast. You can also control the selection path by occasionally clicking the mouse to place anchor points in the selection border.
You’ll use the Magnetic Lasso tool to select the nautilus so that you can move it to the shadowbox.
Select the Zoom tool (
), and click the nautilus to zoom in to at least 100%.Select the Magnetic Lasso tool (
 ), hidden under the Lasso tool ().
Click once along the left edge of the nautilus, and then move the Magnetic Lasso tool along the edge to trace its outline.
TipIn low-contrast areas, you may want to click to place your own fastening points. You can add as many as you need. To remove the most recent fastening point, press Delete, and then move the mouse back to the remaining fastening point and continue selecting.

Even though you’re not holding down the mouse button, the tool snaps to the edge of the nautilus and automatically adds fastening points.
When you reach the left side of the nautilus again, double-click to return the Magnetic Lasso tool to the starting point, closing the selection. Or you can move the Magnetic Lasso tool over the starting point and click once.

Double-click the Hand tool (
 ) to fit the entire image in the window.
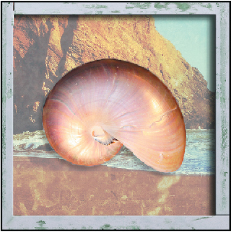
Select the Move tool (
), and drag the nautilus onto its silhouette in the section of the frame labeled “E,” leaving a shadow below it and on the left side.Choose Select > Deselect, and then choose File > Save.
Selecting from a center point
In some cases, it’s easier to make elliptical or rectangular selections by drawing a selection from an object’s center point. You’ll use this technique to select the head of the screw for the shadowbox corners.
Select the Zoom tool (
), and zoom in on the screw to a magnification of about 300%. Make sure that you can see the entire screw head in your image window.Select the Elliptical Marquee tool (
) in the Tools panel.Move the pointer to the approximate center of the screw.
Click and begin dragging. Then, without releasing the mouse button, press Alt (Windows) or Option (Mac) as you continue dragging the selection to the outer edge of the screw.
The selection is centered over its starting point.
TipTo select a perfect circle, press Shift as you drag. Hold down Shift while dragging the Rectangular Marquee tool to select a perfect square.
When you have the entire screw head selected, release the mouse button first, and then release Alt or Option (and the Shift key if you used it). Do not deselect, because you’ll use this selection in the next exercise.

If necessary, reposition the selection border using one of the methods you learned earlier. If you accidentally released the Alt or Option key before you released the mouse button, select the screw again.
Resizing and copying a selection
Now you’ll move the screw to the lower-right corner of the wooden shadowbox and then duplicate it for the other corners.
Resizing the contents of a selection
You’ll start by moving the screw, but it’s too large for the space. You’ll need to resize it as well.
Before you begin, make sure that the screw is still selected. If it’s not, reselect it by completing the previous exercise.
Choose View > Fit On Screen so that the entire image fits within the image window.
Select the Move tool (
) in the Tools panel.Position the pointer within the screw selection.
The pointer becomes an arrow with a pair of scissors (
), indicating that dragging the selection will cut it from its current location and move it to the new location.Drag the screw onto the lower-right corner of the shadowbox.
Choose Edit > Transform > Scale. A bounding box appears around the selection.
TipIf the screw won’t move or resize smoothly, as if it gets “stuck,” hold down the Control key to temporarily disable snapping to magenta Smart Guides as you drag. Or permanently disable them by deselecting the View > Show > Smart Guides command.
Drag one of the corner points inward to reduce the screw to about 40% of its original size or until it is small enough to sit on the shadowbox frame.
As you resize the object, the selection marquee resizes, too. Both resize proportionally by default.
Press Enter or Return to commit the change and remove the transformation bounding box.
Use the Move tool to reposition the screw after resizing it so that it is centered in the corner of the shadowbox frame.
 Tip
TipIf you don’t want to maintain original proportions while resizing, press the Shift key as you drag a corner handle of a transformation bounding box.
Leaving the screw selected, choose File > Save to save your work.
Moving and duplicating a selection simultaneously
You can move and duplicate a selection at the same time. You’ll copy the screw for the other three corners of the frame. If the screw is no longer selected, reselect it now, using the techniques you learned earlier.
With the Move tool (
) selected, press Alt (Windows) or Option (Mac) as you position the pointer inside the screw selection.The pointer changes, displaying the usual black arrow and an additional white arrow, which indicates that a duplicate will be made when you move the selection.
Continue holding down the Alt or Option key as you drag a duplicate of the screw straight up to the top-right corner of the frame. Release the mouse button and the Alt or Option key, but don’t deselect the duplicate image.
Hold down Alt+Shift (Windows) or Option+Shift (Mac), and drag a new copy of the screw straight left to the upper-left corner of the frame.
Pressing the Shift key as you move a selection constrains the movement horizontally or vertically in 45-degree increments.
Repeat step 3 to drag a fourth screw to the lower-left corner of the frame.
When you’re satisfied with the position of the fourth screw, choose Select > Deselect, and then choose File > Save.
Cropping an image
Now that your composition is in place, you’ll crop the image to a final size. You can use either the Crop tool or the Crop command to crop an image.
Select the Crop tool (
 ), or press C to switch from the current tool to the Crop tool. Photoshop displays a crop boundary around the entire image.
In the options bar, make sure Ratio is selected in the Preset pop-up menu and that there are no ratio values specified. (If there are, click Clear.) Then confirm that Delete Cropped Pixels is selected.
When Ratio is selected but no ratio values are specified, you can freely crop the image to any proportions.
Drag the crop handles so that the shadowbox is in the highlighted area, omitting the backgrounds from the original objects at the bottom of the image. Crop the frame so that there’s an even area of white around it.
TipTo crop an image with its original proportions intact, choose Original Ratio from the Preset pop-up menu in the options bar.

When you’re satisfied with the position of the crop area, click the Commit Current Crop Operation button (
 ) in the options bar.
Choose File > Save to save your work.
You’ve used several different selection tools to move all the seashells into place. The shadowbox is complete!
Review questions
1. Once you’ve made a selection, what area of the image can be edited?
2. How do you add to and subtract from a selection when using a tool such as the Quick Selection tool?
3. How can you move a selection while you’re creating it?
4. What does the Quick Selection tool do?
5. How does the Magic Wand tool determine which areas of an image to select? What is tolerance, and how does it affect a selection?
Review answers
1. Only the area within an active selection can be edited.
2. To add to a selection, click the Add To Selection button in the options bar, and then click the area you want to add. To subtract from a selection, click the Subtract From Selection button in the options bar, and then click the area you want to subtract. You can also add to a selection by pressing Shift as you drag or click; to subtract, press Alt (Windows) or Option (Mac) as you drag or click.
3. To reposition a selection as you’re creating it, keep holding down the mouse button as you also hold down the spacebar and drag.
4. The Quick Selection tool expands outward from where you click to automatically find and follow defined edges in the image.
5. The Magic Wand tool selects adjacent pixels based on their similarity in color. The Tolerance value determines how many color tones the Magic Wand tool will select. The higher the tolerance setting, the more tones are selected.