
4. Image Editing Basics
Lesson overview
Photoshop Elements offers a comprehensive suite of easy-to-use tools and a choice of three editing modes, so it’s easy to achieve impressive results, whatever your experience level. Guided edit mode helps novices to learn as they work, Quick edit presents an array of one-touch controls for correcting common image problems, and Expert mode delivers all the power and sophistication experienced users expect.
This lesson begins with an overview of the core concepts behind image correction, and then introduces a range of quick and easy techniques to help you get more from your photos in just a few clicks:
• Making quick and easy edits in the Organizer
• Batch-processing photos and using automatic fixes
• Understanding the histogram, levels, and white balance
• Making Quick Fix adjustments
• Working in Guided edit mode
• Applying editing presets selectively with the Smart Brush
• Correcting an image using Smart Fix
• Working with camera raw images
You’ll probably need between one and two hours to complete this lesson. If you haven’t already done so, download the Lesson 4 work files from the Lesson & Update Files tab of your Account page at www.peachpit.com.

Explore the many powerful and versatile editing tools that make it easy to get more from your photos in Photoshop Elements—even if you’re a beginner. Start with a few of the easy-to-use, one-step image-correction features, and then experiment with some more advanced techniques, such as layering preset adjustments with the Smart Brush.
![]() Note
Note
Before you start this lesson, make sure that you’ve set up a folder for your lesson files and downloaded the Lesson 4 folder from your Account page at www.peachpit.com, as detailed in “Accessing the Classroom in a Book files” in the chapter “Getting Started” at the beginning of this book. You should also have created a new work catalog (see “Creating a catalog for working with this book” in Lesson 1).
1. Start Photoshop Elements, and click Organizer in the Welcome Screen. Check the lower-right corner of the Organizer workspace to make sure the CIB Catalog is loaded—if not, choose File > Manage Catalogs, and select it from the list.
2. Click the Import button at the upper left of the Organizer workspace, and choose From Files and Folders from the drop-down menu. In the Get Photos and Videos from Files and Folders dialog, locate and select your Lesson 4 folder. Disable the automatic processing options; then, click Get Media.
3. In the Import Attached Keyword Tags dialog, click Select All; then, click OK.
Editing photos in the Organizer
You can fix a range of common image problems without even leaving the Organizer.
![]() Note
Note
The most recent version always appears at the left in an expanded version set, and becomes the image displayed on top of the collapsed version set.
1. In the Media Browser, select the image DSCN0532.jpg. Click the Instant Fix button (![]() ) at the right of the Taskbar to open the Photo Fix Options panel; then, click the Contrast button (
) at the right of the Taskbar to open the Photo Fix Options panel; then, click the Contrast button (![]() ). The edited file is grouped with the original in a version set. In the Media Browser, the edited version appears as the top image in the collapsed (or closed) version set. Click the arrow at the right of the image frame to expand the version set.
). The edited file is grouped with the original in a version set. In the Media Browser, the edited version appears as the top image in the collapsed (or closed) version set. Click the arrow at the right of the image frame to expand the version set.
![]() Tip
Tip
Each of the Instant Fix adjustments can be used in combination with others. Some combinations will produce different results when the order of the automatic adjustments is varied.
2. In the expanded version set, select the unedited original, DSCN0532.jpg. Click the Color button (![]() ). Making sure that you select the original image each time, repeat the process for Levels (
). Making sure that you select the original image each time, repeat the process for Levels (![]() ), and then for Smart Fix (
), and then for Smart Fix (![]() ).
).
3. Double-click the original image to see it in the single-image view. Use the left arrow key on your keyboard to compare the unedited photo with the results of your single-click adjustments. Double-click the enlarged image to return to the thumbnail view. Select all four edited versions; then, right-click/Control-click any of the selected thumbnails, and choose Delete Selected Items from Catalog.
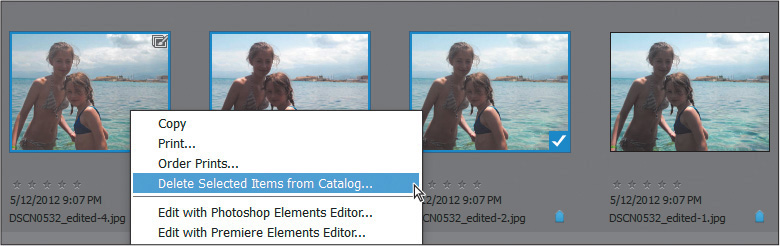
4. In the Confirm Deletion from Catalog dialog, click to activate the option Also Delete Selected Item(s) from the Hard Disk; then, click OK. You’ll work more with this photo later in the lesson.
Editing in Full Screen mode
In the Organizer’s Full Screen mode, you’ll find the same Instant Fix buttons as in the Quick Edit panel, enabling you to make substantial improvements to an image with just a click or two and assess the results at a conveniently high zoom level.
1. In the Media Browser, select DSC_0006.jpg; then, choose View > Full Screen.
2. Hold the Ctrl/Command key, and press the plus key (+) on your keyboard to zoom in. Drag the magnified photo to view a different part of the image. Double-click the photo to fit it to the screen.
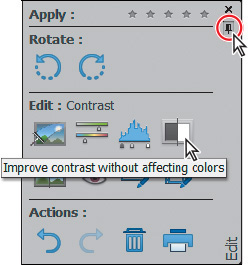
3. Move the pointer to the upper-left edge of the screen to show the Quick Edit panel; then, click the Pin button at the upper right of the panel (circled in the illustration at the right), so that the Quick Edit panel stays open while you work.
4. In the Quick Edit panel, hold the pointer over each instant fix button in turn to see a tool tip describing the effect it will have on the image. Click the Color button (![]() ), and then click the Contrast button (
), and then click the Contrast button (![]() ).
).
5. Click to disable the Pin button at the upper right of the Quick Edit panel, and then move the pointer away; the Quick Edit panel closes after a second or so.
You’ve improved this photo dramatically with just two clicks in the Quick Edit panel, without even leaving the Organizer.

![]() Tip
Tip
You can use the Quick Edit panel to correct image problems even while reviewing your photos as a full-screen slide show.
6. Press the Esc key, or click the Exit button (X) in the control bar to exit the Full Screen mode. In the Media Browser, expand the new version set; then, right-click/Control-click the edited image, DSC_0006_edited-1.jpg, and choose Delete from Catalog. In the Confirm Deletion from Catalog dialog box, activate the option Also Delete Selected Item(s) from the Hard Disk. Click OK. You’ll work more with this photo in the next exercise.
Recognizing what your photo needs
For some photos, applying one-click fixes in the Organizer will be enough, but when you want more control—and access to the full power of Photoshop Elements editing, adjustment, and correction tools—you’ll work in the Editor.
Before you explore the Editor’s three working modes, we’ll look at some of the basic concepts behind image adjustment and correction.
Recognizing and understanding a photo’s problems and deficiencies makes the task of correcting and enhancing the image much faster and easier—even when you’re simply choosing from automatic fixes, as you did in the Full Screen view.
1. Ctrl-click/Command-click to select both of the photos that you’ve already worked with in this lesson; then add the image DSC_0212.jpg to the selection. Click the Editor button (not the arrow beside it) in the Taskbar.

![]() Note
Note
The first time you launch the Editor, it opens in Quick edit mode; after that, it will reopen to whichever edit mode was active when you last exited the application.
2. If you’re not already in Expert edit mode, click Expert in the mode picker at the top of the Editor workspace; then, choose Window > Reset panels.
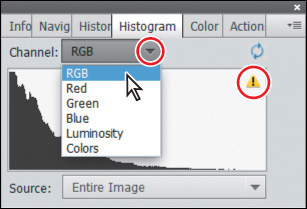
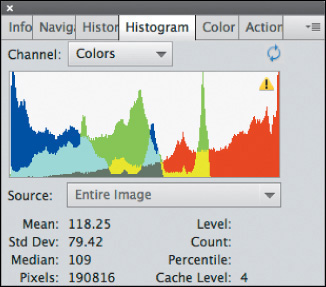
3. Click the arrow beside the More button (![]() ) at the right of the Taskbar, and choose Histogram from the panel menu.
) at the right of the Taskbar, and choose Histogram from the panel menu.
![]() Note
Note
The triangular alert icon will reappear on the histogram each time you change an image; click the icon to refresh the graph.
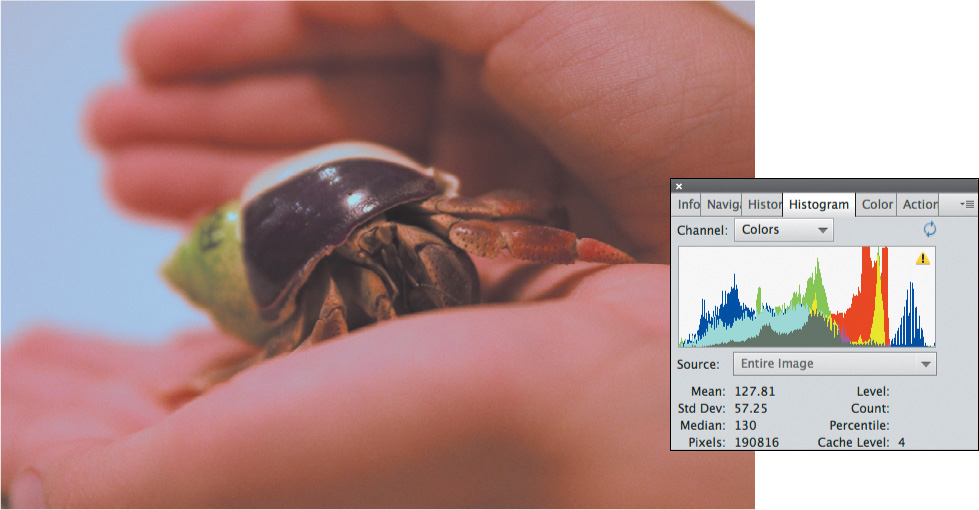
4. If necessary, change the Channel setting in the Histogram panel from the default (Colors) to RGB; then, click the triangular alert icon (![]() ) at the upper right of the black-and-white Histogram curve to refresh the histogram graph with un-cached information.
) at the upper right of the black-and-white Histogram curve to refresh the histogram graph with un-cached information.
Understanding the histogram
A histogram is a graph that maps the distribution of tonal values in an image, from the shadows (at the left end of the curve), through the midtones, to the highlights (at the right of the curve).
A peak in the curve shows that the corresponding part of the tonal range is well represented—in other words, the image contains plenty of detail in that area. Inversely, a trough in the histogram curve can indicate a deficiency of image detail.
You can use the histogram both as a “diagnostic” tool that can help you recognize where corrections need to be made, and also as a source of dynamic feedback that enables you to assess how effective an adjustment will be, even as you set it up.
1. If you don’t see the Photo Bin at the bottom of the Editor workspace, click the Photo Bin button (![]() ) in the Taskbar.
) in the Taskbar.

![]() Tip
Tip
Refresh the histogram for each image as it becomes active.
2. Watch the curve in the Histogram panel as you double-click each of the thumbnails in the Photo Bin in turn to bring that image to the front in the Edit pane.

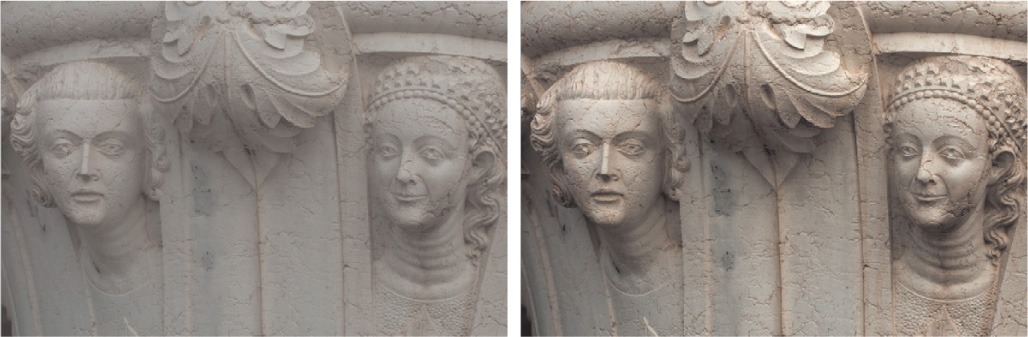
3. For each of the photos that you’ve already worked with, double-click the thumbnail in the Photo Bin to bring the image window to the front; then, choose Enhance > Adjust Smart Fix. Watch the image and its histogram change as you drag the Fix Amount slider to set a value of 60% (for Auto Smart Fix, the value is 40%). Click OK to close the Adjust Smart Fix dialog.

The changes in the images are reflected in their histograms (shown here with the original curves overlaid in gray for comparison). In both cases, there is more information in the midtone range, boosting detail and definition in skin tones, and a better spread of tones from dark to light, improving the overall contrast.
![]() Tip
Tip
If you can’t find the My CIB Work folder, refer to “Creating a work folder” in the “Getting Started” chapter at the beginning of this book.
4. Bring the image DSC_0006.jpg to the front, and choose File > Save As. Name the new file DSC_0006_AutoSmart.jpg, to be saved to the My CIB Work folder and included in the Organizer, but not in a version set. Click Save; then, click OK to accept the JPEG quality setting and close the file. Repeat the process for the image DSCN0532.jpg, making sure to add _AutoSmart to the filename.
Adjusting levels
Once you’re familiar with the histogram, the Levels dialog provides a very direct way to adjust the distribution curve in order to improve an image’s tonal range.
1. You should still have the photo DSC_0212.jpg open from the previous exercise. Choose Enhance > Adjust Lighting > Levels. In the Levels dialog, make sure that the Preview option is activated.

In the Levels dialog, you can use the shadows, midtones, and highlights sliders below the Input Levels histogram graph (left, middle, and right respectively), or the Set Black Point, Set Gray Point, and Set White Point eyedroppers at the right, to redefine the endpoints of the curve and adjust the distribution of image information along its length.
Although the midtones range is most in need of adjustment in this image, it’s important to get the shadows and highlights right first.
2. Select the Set Black Point Eyedropper tool; then, watch the histogram as you click the dark area in the lower-left corner of the image. The white line and gray area in the histogram indicate the shape of the curve prior to this adjustment.

The black point eyedropper has not worked well on our lesson photo; it should ideally be used to sample a black area, rather than a colored shadow. The deeper shadows have been “clipped” to black, and the color has become much cooler, as the warm hues have been removed to produce a pure black at the sampled point.
3. In the Levels dialog, click Reset, and we’ll try another method for adjusting the shadows. Hold down the Alt/Option key as you drag the shadows slider to the right to set a value of 70 (just inside the leftmost end of the tonal curve). The clipping preview shows where the darkest parts of the image are.
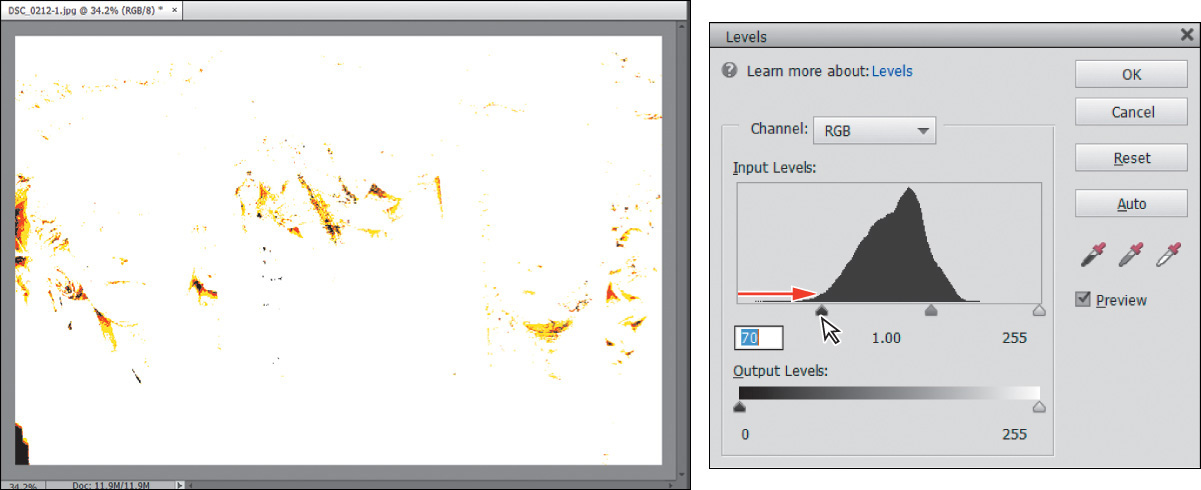
4. Watch the histogram as you release first the Alt/Option key and then the mouse button. The histogram curve shifts to the left—possibly a little too much. You can see that the left end of the curve has become truncated. In the Levels dialog, use the shadows slider to reduce the value to 45. The curve in the histogram is adjusted so that there is minimal truncation (clipping).
5. Hold down the Alt/Option key; then, drag the highlights slider to 185. The clipping preview begins to show significant clipping of image detail in the brighter parts of the photo. Drag the highlights slider back to 195, where the clipping is minimal; then release the Alt/Option key and the mouse button.

6. In the Levels controls, drag the midtones slider (the gray triangle below the center of the graph) to the right to set the midtone value to 0.80.

![]() Tip
Tip
Your edits have caused some gaps and spikes in the histogram curve. Where possible, avoid adjustments that create large gaps; even if the image still looks good on screen, gaps indicate a loss of image data that may be apparent as color banding when printed.
7. In the Histogram panel, click the yellow alert icon to refresh the display.
8. Compare the original histogram (the red overlay) to the adjusted curve. Information has spread outwards, widening the midtone range as well as filling out both the highlights and shadows.

9. Click OK to close the Levels dialog. Choose Edit > Undo Levels, or press Ctrl+Z/Command+Z, to see how the image looked before editing. Choose Edit > Redo Levels, or press Ctrl+Y/Command+Y to reinstate your corrections.
10. Choose File > Save As. Name the new file DSC_0212_Levels.jpg, and set your Lessons/My CIB Work folder as the destination. Select the option Include in the Elements Organizer, and deselect Save in Version Set with Original. Click Save; then click OK to accept the JPEG settings. Choose File > Close.
Assessing a photo’s color balance
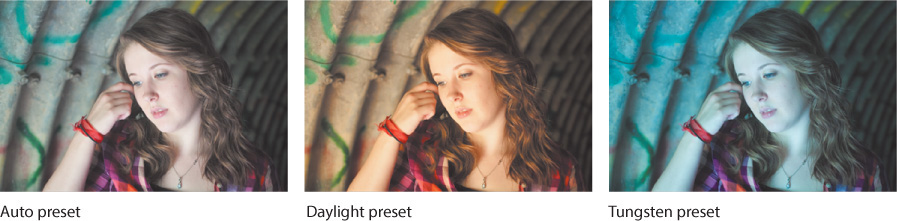
Artificial light, unusual shooting conditions, and incorrect camera settings can all result in unwelcome color casts in an image. Unless your camera is properly set up to compensate for current weather conditions, photos shot on an overcast day may have a flat, bluish cast due to a deficiency in the warmer colors, while the “golden” light of late-afternoon sunshine can produce an overly warm appearance. Fluorescent lighting is notorious for producing a dull, greenish tint.
In this exercise, you’ll work with an image that has the opposite problem: a warm yellow-red cast commonly seen in indoor shots captured under tungsten lighting. We’ll start with a look at the Balance controls in the Quick edit mode.
1. To switch to Quick edit mode, click Quick in the mode picker above the Editor workspace. In Quick edit mode, choose Window > Reset panels.
2. Choose File > Open. Navigate to your Lesson 4 folder; then, select the image DSC_0273.jpg, and click Open.
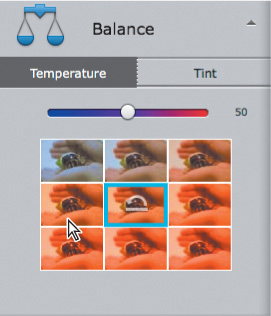
3. In the Adjustments panel at the right of the Quick edit workspace, expand the Balance panel. Color imbalances are defined in terms of an image’s temperature and tint; the Balance panel has a separate control pane for adjusting each of these attributes. For now, make sure that the Temperature tab is selected just below the panel’s header.
The grid of preview thumbnails shows the full range of variation possible with this control. Clicking the central thumbnail resets an image to its original state—a blue frame highlights the currently selected setting.
4. Move the pointer over each preview thumbnail in the grid in turn to see that level of adjustment applied temporarily to the image in the work area. A white frame highlights the setting currently previewed.
![]() Tip
Tip
You can preview and apply incremental settings between the levels represented by the preview thumbnails by dragging the slider left or right.

5. Click the Tint tab above the slider control, and explore the variations.

The color temperature of an image accounts for casts ranging from cool blue to hot orange-red; “tint” refers to casts ranging from yellow-green to magenta-pink.
Working with the Temperature and Tint settings
If you’re new to color correction, the preview thumbnails provide a useful visual reference for understanding what’s behind an unwanted color cast. Before we take a closer look at the issue in the Expert edit mode, you can correct this photo using the Balance controls and save the results for comparison to other techniques.
1. In the Temperature pane, click the preview to the left of the central thumbnail.

2. Switch to the Tint pane. Move the pointer over the preview to the left of the central thumbnail. For the Tint controls, moving by one preview in this direction reduces the value by an increment of 25—a little too far for our lesson photo. Instead, drag the slider to set a value of -10.
3. Choose File > Save As. Activate the option As A Copy. Name the copy DSC_0273_QuickBalance.jpg, to be saved to your My CIB Work folder, and included in the Organizer, but not in a version set; then, click Save. Click OK to accept the default JPEG quality settings.
4. In the Adjustments panel header, click the Reset Image button to reset all the controls, reverting the image to its original state.
Consulting the color histogram
Let’s see what the histogram has to say about this photo.
1. Click Expert in the mode picker at the top of the Editor workspace.
2. If the Histogram panel is not already open, choose Window > Histogram. If necessary, set the Channel menu at the top of the Histogram panel to Colors.
The histogram corroborates the visual evidence: This photo has a serious imbalance in the spread of color information. Rather than a largely unified curve, there is a very marked separation of colors; reds and yellows are over-represented in the upper midtones and highlights, while greens and blues are lacking.
In the next exercise, you’ll learn how to correct a color cast by adjusting the photo’s white balance—or redefining the white point—to recalibrate the image’s color.
Adjusting the white balance
A color cast has the appearance of a tinted transparency overlaid on all the colors in your photograph. For example, the blue-green tint commonly associated with fluorescent lighting will be visible even on objects that should appear white, and even white paper photographed under tungsten lighting will have a yellow-red cast, as can be clearly seen in our lesson image.
To adjust the white point, or white balance, you need to identify what should be a neutral tone in your photo—either a white object, or an area of gray that should appear neither noticeably cool nor warm. Photoshop Elements will then recalculate the color values across the entire image in relation to whatever pixels you’ve defined as the new, color-neutral benchmark.
1. Choose Enhance > Adjust Color > Remove Color Cast. The Remove Color Cast dialog appears, and the pointer becomes an eyedropper (![]() ).
).

2. Click with the eyedropper to sample the pale stripe on the crab’s shell. If this introduces too much blue, click the Reset button in the Remove Color Cast dialog, and try again. Try targeting a slightly lighter or darker tone. When you’re satisfied with the results, click OK to close the Remove Color Cast dialog.
3. Examine the color histogram. The histogram curve is much more balanced, though the photo could still be improved. For now, save the corrected image as DSC_0273_WhiteBalance.jpg, with all the usual settings; then, close the file.
Although blue and cyan are still predominant in the shadows, the histogram curve is now more unified, without the dramatic separation of colors you saw earlier.
Making easy color and lighting adjustments
In this section, we’ll begin our exploration of the Editor, taking a closer look at the tools and techniques that will enable you to get the best from your photos. Now that you’ve soaked up a little theory, you’ll find it easier to understand the processes, whether you’re using one-click fixes or making detailed selective edits.
Whether the problem is inadequate exposure, a lack of contrast, or an unsightly color cast, you can make fast fixes using the simple controls in Quick edit mode, let the Guided edit mode step you through a wide range of editing tasks, make detailed adjustments in Expert edit mode—or even arrange for Photoshop Elements to batch-process your photos, applying your choice of automatic corrections.
Fixing photos automatically in batches
In this exercise, you’ll batch-process all of the image files used in this lesson, saving the auto-adjusted photos as copies so that you can compare the results of the automatic processing to the edits you make using other techniques.

1. If the Editor is not still in Expert mode, click Expert in the mode picker. Choose File > Process Multiple Files. In the Quick Fix options, at the upper right of the Process Multiple Files dialog, click the checkboxes to activate all four auto-fix options: Auto Levels, Auto Contrast, Auto Color, and Sharpen.
2. At the upper left of the dialog, choose Folder from the Process Files From menu. Under Source, click the Browse button. Locate and select the Lesson 4 folder as the source folder for the images to be processed. Click OK/Choose. Under Destination, click Browse to set the My CIB Work folder as the destination for the processed copies.
3. Under File Naming, activate the Rename Files option. Choose Document Name from the menu on the left, and then type _AutoFix in the second field. This will add the appendix “_AutoFix” to the existing document names as the processed copies are saved.
![]() Note
Note
For Windows users: Ignore any alert warning that files could not be processed. This is caused by a hidden system file and will have no impact on the success of your project.
4. Review the settings in the dialog. Make sure that the resizing and file conversion options under Image Size and File Type are disabled, and then click OK.
Photoshop Elements opens, processes, and closes the images. The newly created copies are automatically tagged with the same keywords as the source files.
Adding auto-corrected files to your catalog
When you modify an image in the Editor, the Include in Organizer option in the Save or the Save As dialog is activated by default. However, when you batch-edit files with the Process Multiple Files command, this option isn’t part of the process—you must add the automatically edited copies to the Organizer manually.
1. Switch to the Organizer by clicking the Organizer button (![]() ) in the Taskbar; then, click the Import button at the upper left of the Organizer workspace, and choose From Files and Folders from the drop-down menu.
) in the Taskbar; then, click the Import button at the upper left of the Organizer workspace, and choose From Files and Folders from the drop-down menu.
2. In the Get Photos and Videos from Files and Folders dialog, locate and open your My CIB Work folder. Ctrl-click/Command-click or marquee-select all the files with the suffix “_AutoFix.” Disable any automatic processing option that is currently active; then, click Get Media.
3. In the Import Attached Keyword Tags dialog, click Select All; then, click OK. The files are imported to your CIB Catalog and displayed in the Media Browser. Click the Back button (![]() ) to display all the images in your catalog.
) to display all the images in your catalog.
Correcting photos in Quick edit mode
In Quick edit mode, Photoshop Elements conveniently groups easy-to-use controls for the most common basic image-correction operations in the Adjustments panel.
Earlier in this lesson, you tried some one-click fixes in the Organizer’s Instant Fix panel. Later, you applied a combination of the same automatic fixes while batch-processing files. The Adjustments panel presents similar automatic adjustment options, but also gives you the opportunity to preview and fine-tune the settings.
![]() Note
Note
In this illustration, the Lesson 04 tag icon has been customized: you may see a different thumbnail.
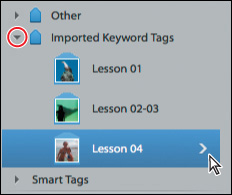
1. You should still be in the Organizer from the last exercise. If you don’t see the right panel group, click the Tags/Info button at the far right of the Taskbar. If you don’t see the list of keywords, click the Tags tab at the top of the right panel. Expand the Imported Keyword Tags category; then, move the pointer over the Lesson 04 tag, and click the checkbox at its left.
2. Select the original photo of the colored perfume bottles, DSC_2474.jpg, making sure not to confuse the unedited file with the AutoFix copy; then, click the Editor button (![]() )—not the arrow beside it—in the Taskbar.
)—not the arrow beside it—in the Taskbar.
3. Use the mode picker to switch the Editor to Quick mode. If you don’t see the Adjustments panel at the right, click the Adjustments button in the Taskbar.
Applying quick fixes
All of the Quick Edit adjustments have manual controls. Automatic fixes are available for Smart Fix, Levels, Color, and Sharpen, but not for Exposure or Balance.
![]() Note
Note
Smart Fix is a combination of several adjustments; it corrects overall color balance and improves shadow and highlight detail.
1. Choose Before & After - Horizontal from the View menu above the Edit pane. In the Adjustments panel, expand the Smart Fix pane, and click the Auto button. Notice the immediate effect on the image in the After view.
2. Expand the Lighting pane, and then click both Auto Levels and Auto Contrast, noting the effects of the adjustments in the After view.
3. Expand the Color pane, and click the Auto button.

4. Choose File > Save As. In the Save As dialog, type DSC_2474_QuickFix as the name of the new file, to be saved to your My CIB Work folder in JPEG format and included in the Organizer, but not as part of a version set. Click Save. In the JPEG Options dialog, accept the default quality, and click OK.

![]() Tip
Tip
Click a thumbnail in the preview grid to apply that level of adjustment; then, use the slider to fine-tune the effect. The preview grids not only provide an intuitive editing interface, but also serve as a great way to learn the effects of the various adjustment controls as you work with them.
5. Expand the Color pane once again, and click the Saturation tab. A grid of preview thumbnails shows the range of variation possible with the Saturation slider. A blue frame highlights the central thumbnail, which represents the image in its current state. Move the pointer slowly over each thumbnail in the grid to preview your image with that level of saturation in the work area.
6. Repeat the process for the Color pane’s Hue and Vibrance controls.

7. Return to the Lighting panel, and explore the Shadows, Midtones, and Highlights panes in the same way. To reset a control, click the thumbnail with the Reset icon (not always the central preview).
8. To discard any changes you’ve made and revert the image to its last saved state, click the Reset Image button in the header of the Adjustments pane.

9. Choose File > Close.

Working with Auto Smart Tone
The Auto Smart Tone feature provides a highly intuitive way to make the most of your photos with just a few clicks. Even if you begin with no clear idea of what adjustments an image needs, the Auto Smart Tone dialog provides visual clues and simple controls that make the process easy.
Called “smart” for a good reason, the Auto Smart Tone feature uses “intelligent” algorithms to analyze and correct an image automatically—and then actually learns from whatever adjustments you make.
Auto Smart Tone begins by comparing your image to a database drawn from hundreds of images of all types; it then references information about how those images were corrected by different photographic professionals in order to calculate an automatic adjustment uniquely suited to the particular photo you’re editing. Auto Smart Tone adjustments combine corrections to different aspects of both tone and color, depending on the deficiencies of the image at hand.
1. In the Organizer, isolate the photos for this lesson, if necessary, by clicking the Lesson 4 folder in the list at the left, or the checkbox beside the Lesson 04 tag in the Tags panel. Select the unedited images DSC_0006.jpg, DSC_0212.jpg, DSC_4881.jpg, and DSCN0532.jpg; then, click the Editor button in the Taskbar.

2. In the Editor, click Expert in the mode picker at the top of the workspace to switch to Expert edit mode; then bring the image DSC_4881.jpg to the front by clicking its name tab at the top of the Edit window. Choose Auto Smart Tone from the Enhance menu to open the Auto Smart Tone dialog.
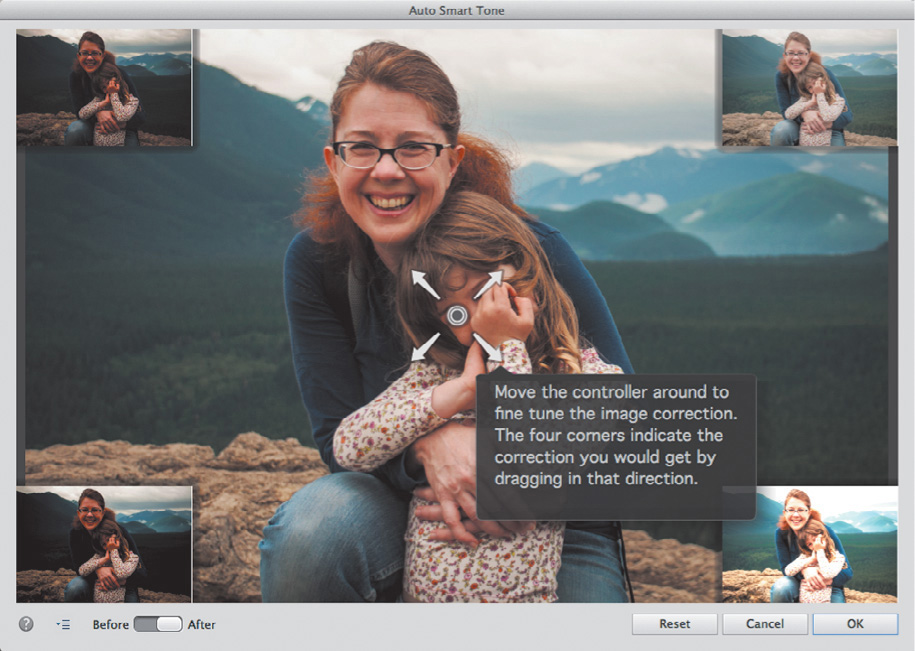
The Auto Smart Tone dialog opens with the automatic adjustment pre-applied. In the center is a “joystick” control that can be dragged in any direction: a preview in each corner shows what to expect from dragging in that direction. For this photo, the upper-left preview is dark, low-contrast, and saturated; the thumbnail at the lower left is also dark, but has more contrast and less saturated color. At the right, the upper preview is brighter, with more neutral colors; the lower is even brighter, with more contrast.
3. Toggle the Before/After switch at the lower left of the dialog to see the photo with and without the pre-applied automatic adjustment.

4. Click the upper-right preview—the closest to a technically balanced solution; the joystick control moves to the limit of its range in that direction. Click and hold the control; a reference grid appears. Drag the control downwards by two grid divisions to increase saturation, and one square left to deepen the shadows. As you drag, the display defaults to the After view to reflect your changes.
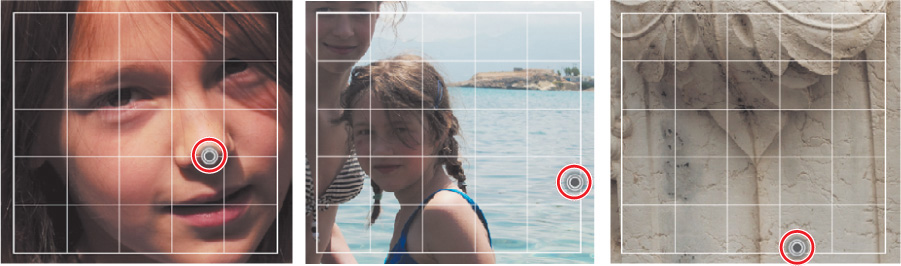
5. Click OK, and then repeat the process from step 2 for each of the other three open images. If you’re unsure, drag the joystick left to right and top to bottom to become accustomed to the effects; then, refer to the illustrations below as a rough guide. Start from the points indicated, and then season to taste. Leave the last photo open in the Auto Smart Tone dialog, and read on.
As you tweak the automatic adjustment, Auto Smart Tone learns from your actions. Each time you use the feature, your adjustments are recorded, and then taken into consideration when Smart Tone is calculating a solution for the next photo. Over time, Auto Smart Tone remembers whether you tend to favor a high-contrast, color-saturated look or dreamy, high-key treatments, and begins to tailor its automatic adjustments accordingly for similar images.

![]() Tip
Tip
Once you’re comfortable with Auto Smart Tone, you can hide the corner thumbnails for a clear view of your photo. You can also disable learning for the current image.
6. Click the small menu icon (![]() ) at the lower left of the Auto Smart Tone dialog to see the options available. For now, leave both options activated. Click OK to confirm your adjustment and return to the Editor.
) at the lower left of the Auto Smart Tone dialog to see the options available. For now, leave both options activated. Click OK to confirm your adjustment and return to the Editor.
If you feel that Auto Smart Tone may be picking up your beginner’s bad habits, you can reset the learning feature on the General tab in Preferences.
7. For each of the four images, choose Save As; then add the suffix _SmartTone to the filename, and save a JPEG file to your work folder, to be included in the Organizer, but not in a version set. When you’re done, choose File > Close All.
Adjusting images in Guided edit mode
If you’re a newcomer to digital image editing, the Guided edit mode is a great place to start. By letting Photoshop Elements step you through the process of improving your photos, you’ll not only achieve impressive results quickly, but also learn a lot about image problems and solutions as you work. Even experienced users will enjoy the ease of working in Guided edit mode—and may just pick up some new tricks.
![]() Note
Note
As you try more advanced tasks in Photoshop Elements, you may find that you need more information to solve any common problems you might have while working through the lessons in this book. For help, see the section “Why won’t Photoshop Elements do what I tell it to do?” in Lesson 5.
For this exercise, you’ll work once again with the image of the old perfume bottles, which has an obvious color cast as a result of inadequate artificial lighting.
1. Switch to the Organizer by clicking the Organizer button (![]() ) in the Taskbar. If necessary, click the checkbox to the left of the Lesson 04 tag in the Keyword Tags panel to isolate the Lesson 4 images in the Media Browser.
) in the Taskbar. If necessary, click the checkbox to the left of the Lesson 04 tag in the Keyword Tags panel to isolate the Lesson 4 images in the Media Browser.
2. Locate the photo of the perfume bottles, DSC_2474.jpg, making sure not to confuse the original with the edited copies. Right-click/Control-click the image, and choose Edit with Photoshop Elements Editor from the context menu.
3. In the Editor, click Guided in the mode picker at the top of the Editor workspace to switch to Guided edit mode. Choose the Before & After - Horizontal view from the View menu at the left of the bar above the Edit pane. If the Photo Bin is open below the Edit pane, click the Photo Bin button (![]() ) at the far left of the Taskbar to hide it.
) at the far left of the Taskbar to hide it.
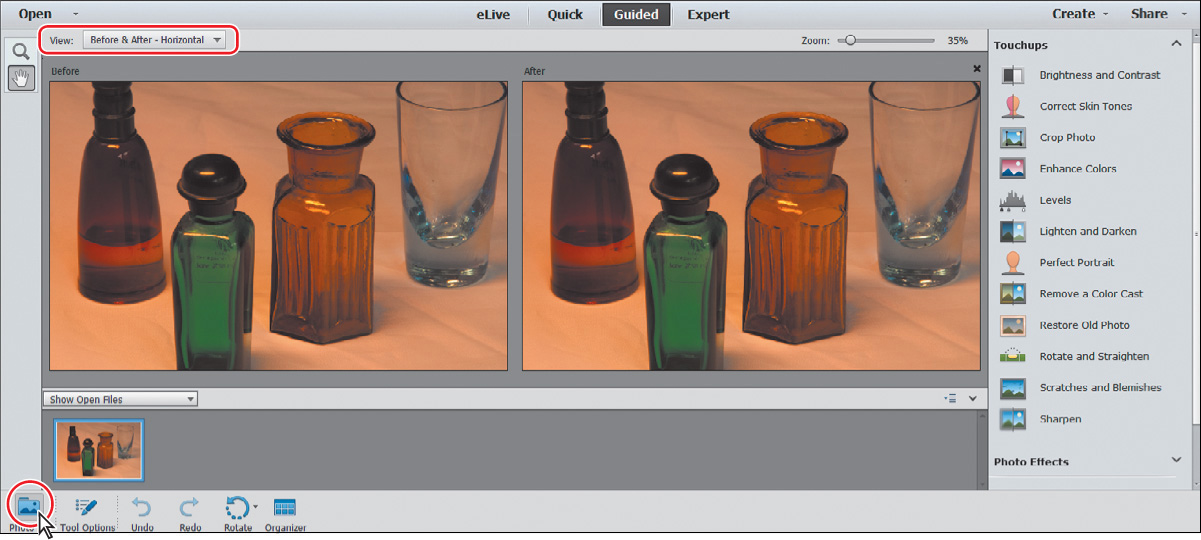
In the Guided edit mode, the Zoom and Hand tools are the only items in the toolbar; everything you’ll need for a long list of image-editing tasks—including the long list itself—can be found in the guided edit panel at the right.
4. Scroll down in the guided edit panel, expanding the Touchups, Photo Effects, and Photo Play categories, if necessary, to see the all of the procedures and projects for which the Guided edit mode offers step-by-step assistance.
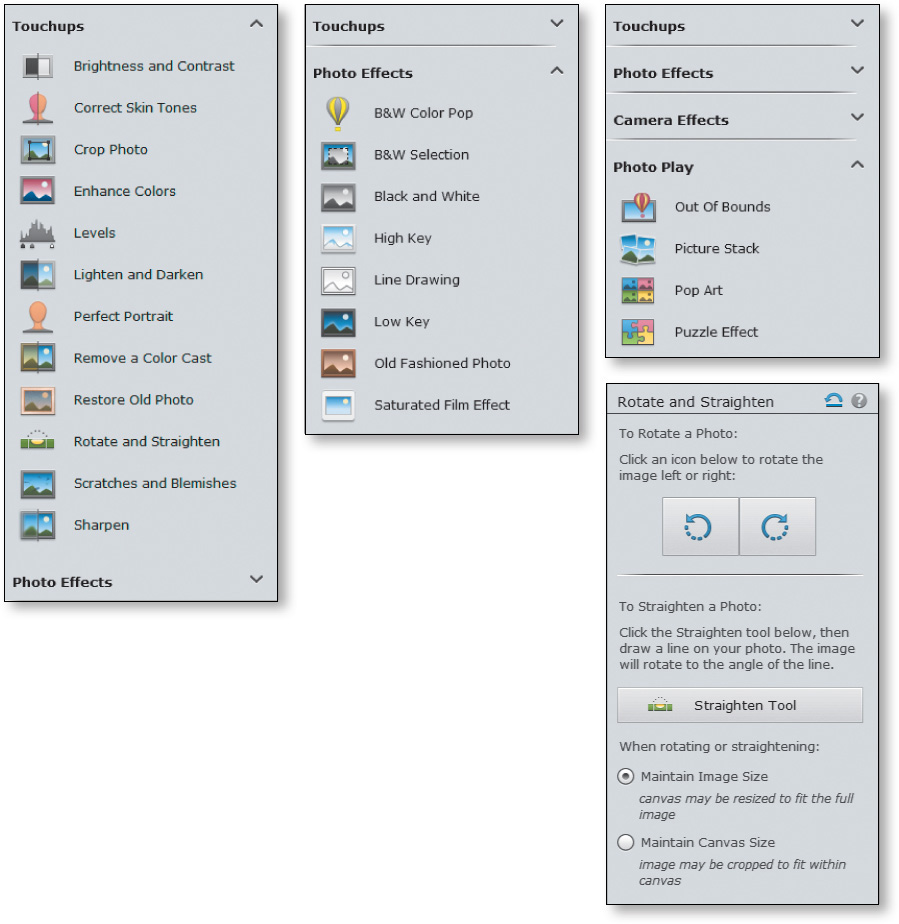
In the Touchups category, you’ll find a comprehensive menu of all the most common image- correction tasks, some of which involve several separate operations. The Photo Effects and Photo Play categories host an array of stylish photographic treatments and eye-catching special effects that will help you to introduce a little variety and creative flair in your image library, and to add atmosphere and sophisticated high notes to your photo albums, prints, projects, and presentations.
5. Click a few of the editing tasks listed in each of the three categories in the guided edit panel to see easy-to-follow steps, instructions, and informative tips, presented together with any tools and controls that you’ll need for the procedure. Click Cancel to exit each guided task and return to the list.
In the exercises to follow, we’ll concentrate on the Guided Touchups category; you’ll have some fun with the Photo Effects and Photo Play edits in Lesson 7.
Guided color and lighting corrections
You’re already familiar with the process of correcting a color cast by adjusting the white balance, so rather than looking at the Remove a Color Cast guided edit in the Touchups list, we’ll explore some other ways to manipulate a photo’s colors.
![]() Note
Note
As is often the case with poorly exposed photos, this photo has more than just one problem. If you had applied the Remove a Color Cast adjustment, you would still need to correct the lighting, as the image is dull and underexposed. The automatic Enhance Colors fix takes care of both problems.
1. Choose Enhance Colors from the Touchups category. Click twice on the Auto Fix button to correct the color and contrast; the photo improves dramatically. For photos with less extreme problems, a single click produces satisfactory results.
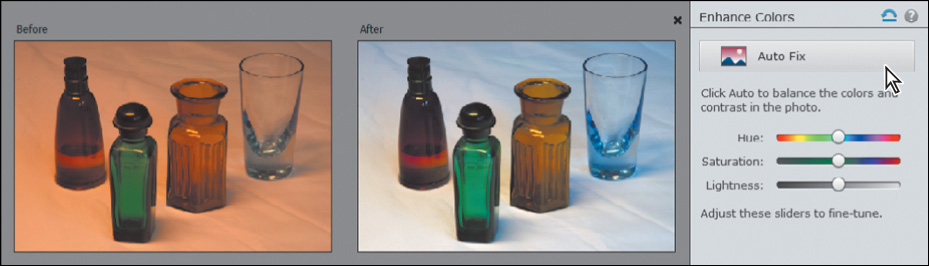
2. In the Enhance Colors pane, drag the Hue slider to the left to set a value of -33.

All the colors in the image are shifted along the spectrum: the red bottle becomes purple, the blue-green glass is warmed to yellow-green, the orange bottle turns red, and the violet-blue reflections in the clear glass are shifted to cyan.
3. Set the Saturation value to 40, and the Lightness to 10. Click Done at the bottom of the guided edit panel. The new colors become more vibrant, but the overall contrast is still inadequate.

4. Still in the Touchups category, click Lighten and Darken. Drag the Shadows slider to 33 to retrieve detail in the dark bottlecaps and bases; then set the Midtones to 100 to increase contrast by shifting the tonal spread. Click Done.

5. Choose Save As. Name the file DSC_2474_EC-LD (for Enhance Colors, Lighten and Darken), and save it to the My CIB Work folder with all the usual settings. In the JPEG options, set the Quality to 10; then, click OK. Choose File > Close.
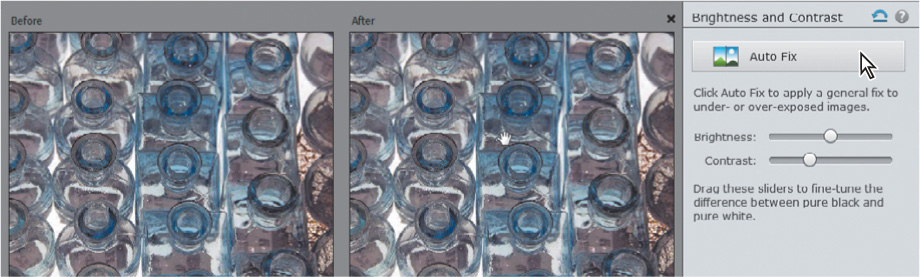
1. In the Organizer, select the image DSC_0347.jpg; then, click the Editor button.

Fluorescent backlighting behind the translucent surface on which the bottles are standing has caused a combination of problems in this photo. The image not only has a dull, yellow-green color cast, but like many backlit photos, it’s also underexposed—in auto-exposure mode, the camera has reduced the exposure in order to compensate for the brightness of the background.
2. In the guided edit panel, choose the Remove a Color Cast adjustment from the Touchups category. Move the eyedropper over the image, and click the translucent background between the bottles to reset the white point; then, click Done.
3. Choose the Brightness and Contrast guided touchup in the guided edit panel. Click the Brightness and Contrast Auto Fix button, and then click Done.
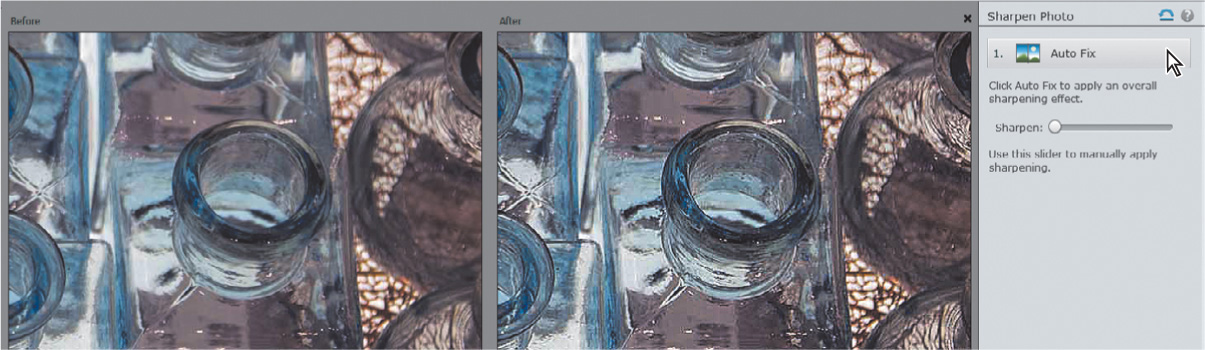
4. Click the Sharpen edit in the Touchups list. Drag the Zoom slider to 100%, or choose View > Actual Pixels; working at 1:1 zoom level will help you to avoid the image artifacts that can result from oversharpening. Click the Auto Fix button in the Sharpen Photo pane. Click Done; then, choose Save As. Save the new file as DSC_0347_CC-BC.jpg, with all the usual settings, and then close it.
Selective editing with the Smart Brush
Sometimes the best way to enhance a photo is to modify just part of the image, or to treat separate areas—such as background and foreground elements—differently, rather than applying an adjustment to the photo overall.
![]() Tip
Tip
For images with a subject that is backlit, like our lesson photo, overall adjustments will never suit both the shaded subject and the brightly lit background. In such cases, using the Smart Brush to adjust differently lit areas in the image separately is the perfect solution.
The quickest and easiest way to do this is to paint your adjustments directly onto the image with the Smart Brush tool. The Smart Brush is both a selection tool and an image-adjustment tool—as you paint, it creates a selection based on similarities in color and texture, through which your choice of editing preset is applied.
1. Isolate the Lesson 4 images in the Media Browser. Select the unedited image DSCN0532.jpg, and then click the Editor button (![]() ) in the Taskbar.
) in the Taskbar.
2. In the Editor, click Expert in the mode picker, if necessary. In Expert mode, choose Window > Reset Panels. Click the Photo Bin button (![]() ) at the left of the Taskbar to hide the Photo Bin; then, choose View > Fit on Screen.
) at the left of the Taskbar to hide the Photo Bin; then, choose View > Fit on Screen.
3. Select the Smart Brush (![]() ) from the toolbox. If the Tool Options pane doesn’t open automatically at the bottom of the workspace, click the Tool Options button (
) from the toolbox. If the Tool Options pane doesn’t open automatically at the bottom of the workspace, click the Tool Options button (![]() ) in the Taskbar.
) in the Taskbar.
![]() Tip
Tip
You’ll use the Tool Options pane several times in this exercise. If you prefer, you can hide it as you work, and then show it again as needed by clicking the Tool Options button in the Taskbar.
4. In the Tool Options pane, use the slider to set a brush size of 25 px (pixels); then, click the colored thumbnail to open the Smart Brush presets picker. Choose the Nature category from the Presets menu at the top of the pop-up menu, and then select the Make Dull Skies Blue preset.

![]() Tip
Tip
Press the left bracket key ( [ ) to decrease the brush size, and the right bracket key ( ] ) to increase it. While you’re fine-tuning the selection, use a small brush and make slow, short strokes.
5. Press the Esc key on your keyboard to close the preset picker. Starting above and to the left of the taller girl’s head, drag across the sky. If your selection expands too far, subtract areas such as the distant shoreline from the selection by holding down the Alt/Option key and painting carefully back over them. When you’re happy with the adjustment area, choose Select > Deselect, so that a new stroke will create a new adjustment, rather than add to the current one.
6. Starting at the left, drag to select the water. As long as the adjustment remains active, your strokes will add to the current adjustment area. Hold Alt/Option if you need to paint out submerged legs and the highlights on the girls’ arms.
7. If you don’t see tabs for the Layers, Effects, Graphics, and Favorites panels at the top of the Panel Bin, click the arrow beside the More button (![]() ) at the right of the Taskbar and choose Custom Workspace. Drag the Layers panel out of the Panel Bin by its name tab, and then hide the Panel Bin by deselecting its name in the Window menu.
) at the right of the Taskbar and choose Custom Workspace. Drag the Layers panel out of the Panel Bin by its name tab, and then hide the Panel Bin by deselecting its name in the Window menu.
Two new layers have been created for the adjustments; each displays a colored icon representing the gradient used for the Blue Skies effect and a black-and-white thumbnail representing the layer mask through which the adjustment has been applied. Colored markers—Smart Brush adjustment pins—mark the points in the photo where you started dragging with the Smart Brush for each adjustment.

Each Smart Brush edit occupies its own layer, where it remains active and separate from the image itself—so you can add to or subtract from the selection, tweak the effect, or even change which preset is applied, without permanently affecting your original photo. The adjustment pins will be visible whenever the Smart Brush is active.
8. Deselect the Blue Skies 2 adjustment by clicking the Background layer in the Layers panel. Open the Smart Brush presets picker by clicking the Blue Skies thumbnail in the Tool Options pane. Select the Lighten Skin Tones preset from the Portrait category. Press Esc to close the Smart Brush presets picker.

9. Drag over the two girls, including their hair and swimsuits. If your selection expands to include areas of water, hold Alt/Option as you paint out the unwanted areas. Make sure the selection includes hands, elbows, and at least a little of the base of some of the windswept wisps of hair. You won’t see a dramatic effect in the selected areas yet; you’ll tweak the adjustment a little later.
A new adjustment pin appears on the image; in the Layers panel, a new adjustment layer is added for the Lighten Skin Tones effect. To the left of its layer mask thumbnail, the new adjustment layer displays a different icon from the Blue Skies effect, indicating that it applies a different type of adjustment through the painted mask.
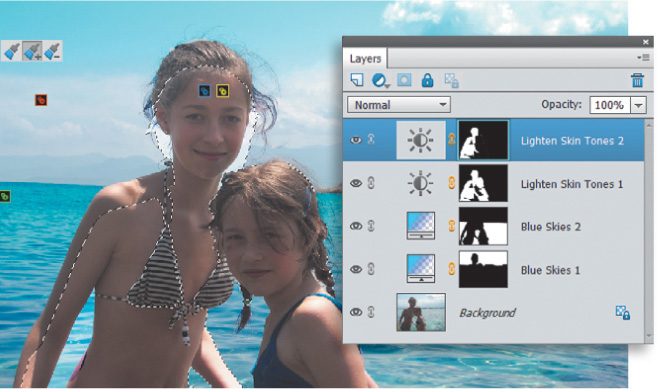
10. Right-click/Control-click the new adjustment layer (not its black-and-white layer mask icon), and choose Duplicate Layer. Type Lighten Skin Tones 2 to name the new layer; then, click OK.
11. Hold down the Alt/Option key as you carefully paint the girl on the right out of the selection completely; then, drag the new Smart Brush adjustment pin aside a little to see the marker for your original Lighten Skin Tones adjustment.
Tweaking Smart Brush adjustments
Each Smart Brush adjustment has its own set of controls that let you customize the effect—even in a later editing session—as long as you’ve saved the file with its layers.
![]() Note
Note
You can use the Smart Brush on the same area in an image as many times as you wish. If you reapply the same preset, the effects are usually cumulative; if you apply more than one effect to the same image area, their effects are combined. Adjustment layers affect all lower layers in the Layers panel; rearranging the order of different adjustments applied to the same area can alter the combined effect.
1. In the Layers panel, double-click the gradient icon (![]() ) on the Blue Skies 1 layer. In the Gradient Fill dialog, you can modify the gradient’s colors, angle, and fade rate. Watch the sky as you choose Reflected from the gradient Style menu; then, click OK.
) on the Blue Skies 1 layer. In the Gradient Fill dialog, you can modify the gradient’s colors, angle, and fade rate. Watch the sky as you choose Reflected from the gradient Style menu; then, click OK.
2. Use the Opacity slider at the top of the Layers panel to decrease the opacity of the Blue Skies 1 layer from 75% to 30%. You can use the adjacent menu to change the blending mode, but for now, leave it set to Color Burn.
3. Select the layer Blue Skies 2—the adjustment for the sea. Double-click the gradient icon (![]() ) for Blue Skies 2; then, deselect the Reverse option. Click OK. Reduce the opacity of the Blue Skies 2 layer from 75% to 40%.
) for Blue Skies 2; then, deselect the Reverse option. Click OK. Reduce the opacity of the Blue Skies 2 layer from 75% to 40%.
4. Double-click the Brightness/Contrast icon (![]() ) on the Lighten Skin Tones 1 layer to open the Adjustments panel in Brightness/Contrast mode. Set the Brightness value to +60 and the Contrast to +25. Repeat the process for the layer Lighten Skin Tones 2 at the top of the layers list. Set both the Brightness and Contrast to a value of 15; then, close the Brightness/Contrast controls.
) on the Lighten Skin Tones 1 layer to open the Adjustments panel in Brightness/Contrast mode. Set the Brightness value to +60 and the Contrast to +25. Repeat the process for the layer Lighten Skin Tones 2 at the top of the layers list. Set both the Brightness and Contrast to a value of 15; then, close the Brightness/Contrast controls.
5. Click the Hand tool to deselect the Smart Brush and hide the pins. In the Layers panel, toggle the eye icon (![]() ,
, ![]() ) beside each adjustment layer’s name to show and hide its effect so that you can assess just how the image has changed.
) beside each adjustment layer’s name to show and hide its effect so that you can assess just how the image has changed.

6. Choose File > Save As. Name the file DSCN0532_SmartBrush, and set up the usual save options. This time, choose the Photoshop file format, and activate the Layers option so that you can edit your adjustment layers later. Close the file.
Working with camera raw images
Raw images are high-quality image files that record the maximum amount of image data possible, in a relatively small file size. Though larger than compressed formats such as JPEG, raw images contain more data than TIFF files and use less space.
![]() Note
Note
Although not all digital cameras can capture raw images, the newer and more advanced models do offer this option. To see an up-to-date list of the camera models and proprietary raw file formats currently supported by Photoshop Elements, visit the Adobe website.
Many common file formats involve in-camera processing of the incoming image data that can effectively degrade the quality of the image. In creating a compressed file, data deemed superfluous is discarded; in mapping the spread of captured data to a defined color space, the range of the color information can be narrowed. In contrast, raw images retain all of the data captured for each and every pixel.
Capturing your photos in raw format gives you more flexibility and control when it comes to editing your images. Raw files do incorporate camera settings such as exposure, white balance, and sharpening, but this information is stored separately from the image data. When you open a raw image in Photoshop Elements, these recorded settings effectively become “live;” the Camera Raw plug-in enables you to adjust them to get more from the raw image data. With 12 bits of data per pixel, it’s possible to retrieve shadow and highlight detail from a raw image that would have been lost in the 8 bits/channel JPEG or TIFF formats.
In the following exercises, you’ll work with a raw image in Nikon’s NEF format as you explore the Camera Raw window. This section will also serve as a review of the image-editing concepts and terminology that you learned earlier.

1. In the Organizer, isolate the Lesson 4 images in the Media Browser, if necessary, by choosing the Lesson 4 folder in the My Folder panel. In the thumbnail grid, locate the camera raw image DSC_7536.NEF. Right-click/Control-click the thumbnail, and choose Edit with Photoshop Elements Editor from the context menu. Photoshop Elements opens the image in the Camera Raw window. For now, click the Done button.
![]() Note
Note
The Camera Raw plug-in, used by Photoshop Elements to open raw files, is updated as new cameras are added to the list of those supported. Check for updates and download the latest version of the plug-in at www.adobe.com.
When you open a camera raw file the first time, the Camera Raw plug-in creates a sidecar file in the same folder as the raw image file. That file takes the name of the raw file, with the extension “.xmp.” Any modification that you make to the raw photo is written to the XMP (Extensible Metadata Platform) file, rather than to the image file itself, which means that the original image data remains intact, while the XMP file records every edit.
2. Use the Windows System Tray or Notification Area, or the Dock on Mac OS, to switch back to the Elements Organizer. In the Folders panel at the left, within the My Folder list, right-click/Control-click the Lesson 4 folder, and choose Reveal in Finder from the menu. A window opens to show your Lesson 4 folder. Click the folder, if necessary, to see the contents; the newly created XMP sidecar file, DSC_7536.xmp, is listed beside the NEF image file.
3. Repeat Step 1 above to open the raw file in the Camera Raw window.
Getting to know the Camera Raw window
On the right side of the Camera Raw window is a control panel headed by three tabs: Basic, Detail, and Camera Calibration. For this set of exercises, you’ll work with the Basic tab—the default—which presents controls for making adjustments that are not possible with the standard editing tools in Photoshop Elements.
![]() Tip
Tip
Click the Detail tab to access controls for sharpening image detail and reducing the grainy digital artifacts known as noise.
1. Make sure that the Preview checkbox above the image window is activated.

2. Hold the pointer over each tool in the toolbar to see a tool tip with the name of the tool and the respective keyboard shortcut. Click the Toggle Full Screen Mode button (![]() ) at the right of the toolbar to switch to Full Screen mode.
) at the right of the toolbar to switch to Full Screen mode.

3. Click the menu icon at the right of the Basic tab’s header bar to see the choices available from the control panel Options menu. You can apply the same settings you used for the last image you worked with, have Photoshop Elements revert to the default Camera Raw profile for your camera by choosing Reset Camera Raw Defaults, or save your own custom settings as the new default for the camera that captured this image.
Adjusting the white balance
The white balance presets can help you to rectify a color cast caused by lighting conditions. You could correct the white balance of a photo shot on an overcast day, for example, by choosing the Cloudy preset. Other presets compensate for artificial lighting. The As Shot preset uses the settings recorded by your camera, while the Auto setting recalculates the white balance based on an analysis of the image data.
1. Switch between the presets in the White Balance menu, comparing the effects to the default As Shot setting. In the following pages, you’ll discover why setting the appropriate white balance is so important to the overall look of the image.
2. For now, choose As Shot from the White Balance presets menu.
![]() Tip
Tip
In some images it can be difficult to identify a neutral tone; in the absence of a definitive visual reference, you may at times rely on what you know about the photo: that it was taken on a cloudy day, for example, or under fluorescent lighting. It may help to look for references such as white paper, clothing, or paint, and then sample a shaded area.
For many photos, the right preset will produce satisfactory results or at least serve as a basis for manual adjustment. When none of the presets takes your image in the right direction, you can use the White Balance tool (![]() ) to sample a neutral color in the photo, in relation to which Camera Raw will recalculate the white balance. The ideal target is a light to medium gray that is neither discernibly warm nor cool. In our sample photo, the corrugated metal in the background looks like a good option, but a closer look reveals all sorts of color. Instead, use the pendant as a neutral gray.
) to sample a neutral color in the photo, in relation to which Camera Raw will recalculate the white balance. The ideal target is a light to medium gray that is neither discernibly warm nor cool. In our sample photo, the corrugated metal in the background looks like a good option, but a closer look reveals all sorts of color. Instead, use the pendant as a neutral gray.
3. Zoom in to the image by choosing 100% from the Zoom Level menu in the lower-left corner of the image window or by double-clicking the Zoom tool. Select the Hand tool (![]() ), and drag the image up so that you can see the pendant hanging from the woman’s necklace.
), and drag the image up so that you can see the pendant hanging from the woman’s necklace.
4. Select the White Balance tool (![]() ), right beside the Hand tool in the toolbar. Sample a medium gray from the top of the pendant where it crosses a relatively dark area. If you see little effect, click a slightly different point.
), right beside the Hand tool in the toolbar. Sample a medium gray from the top of the pendant where it crosses a relatively dark area. If you see little effect, click a slightly different point.

5. Zoom out by choosing Fit in View from the Zoom Level menu in the lower-left corner of the preview window.
The White Balance is now set to Custom, and the image has become cooler. The metal in the background is a more neutral gray, and the green tinge is gone.
![]() Note
Note
Depending on where you clicked to set the white balance, you may see different values from those illustrated.
6. Use the White Balance menu to alternate between your custom settings and the As Shot preset, noting the change in the preview window as well as the differences in the Temperature and Tint settings.
Adjusting the Temperature and Tint settings
The White Balance tool can accurately remove any color cast or tint from an image, but you may still want to tweak the Temperature and Tint settings. In this case, the skin tones are now a little too cool; that can be corrected by fine-tuning the blue/yellow balance using the Temperature control.
![]() Tip
Tip
There are no hard and fast rules in color correction; there might be times when you choose to retain a slight color cast for aesthetic purposes. For example, although technically in need of correction, you might prefer the original, too-warm cast of our lesson image (caused by late afternoon sunlight) for its evocative, summery look. Although most often used for fine color correction, the white-balance settings can also be applied creatively to achieve surprising and dramatic atmospheric effects.
1. Use the Zoom tool or the Zoom Level menu in the lower-left corner of the preview window to focus closely on the woman’s face.
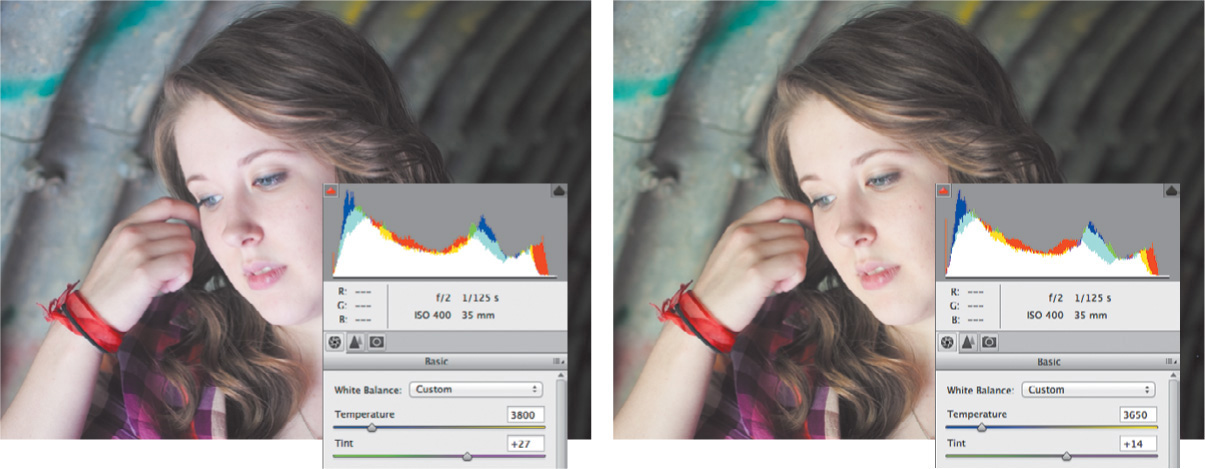
2. Test the Temperature slider by dragging it from one end of its range to the other. You’ll see that the colors of the image become cooler or warmer as you move the slider. Reset the Temperature control a little above the edited value of 3650 (your value may differ, depending on where you clicked to set the white balance) either by dragging the slider or typing the value 3950 into the text box.
3. Double-click the Hand tool, or choose Fit in View from the Zoom Level menu. Now that the temperature has been adjusted towards yellow, the automatically corrected tint of the image has brought back some of the green.
4. Increase the Tint setting to +30 with the slider, or type +30 in the Tint text box. Press Ctrl+Z/Command+Z to toggle between the new Tint setting and the value set with the White Balance tool, comparing the effect.
At the left, the skin tones produced by the White Balance tool look a little too green. On the right, the skin tones look more natural once the Temperature and Tint values have been adjusted manually.
Using the tone controls on a raw image
Below the White Balance sliders on the Basic tab are sliders for improving a photo’s tonal range and presence, or image definition.
Exposure adjusts the overall lightness or darkness of an image. Its effect is most apparent through the middle of the histogram; an increased Exposure setting will move the body of the curve to the right, compressing the highlights if possible, rather than shifting them off the end of the curve. Tweak the Exposure to brighten a dull, underexposed photo or correct the flat, faded look of an overexposed image.
Contrast is the amount of difference between the lightest and darkest areas of an image. The Contrast control has the most effect at the ends of the histogram; an increased setting moves information outwards from the center of the curve. Adjust Contrast to add definition to a flat image, or to soften one that is too harsh or stark.
Highlights recovers detail from overexposed highlights and improves midtone definition by shifting image information inward from the far right of the curve.
Shadows recovers details from shadowed areas—something close to the inverse of the action of the Highlights control—and adds depth to the midtone range.
Whites specifies which input levels are mapped to pure white in the final image. Lowering the Whites value decreases clipping at the right end of the histogram. Clipping occurs when a pixel’s color values are higher or lower than the range that can be represented in the image; over-bright values are clipped to output white, and over-dark values are clipped to output black.
Blacks specifies which input levels will be mapped to black in the final image. Raising the Blacks value decreases clipping at the left end of the histogram.
Clarity increases the local contrast between adjacent light and dark areas, sharpening detail without producing halo effects, and enhancing the midtone contrast.
Vibrance boosts color saturation selectively, having most effect on the muted colors in an image, while avoiding oversaturation of bolder colors and skin tones.
Saturation is the purity, or strength, of a color. Increasing the Saturation reduces the amount of black or white mixed with the color, making it more vivid. Reducing the Saturation increases the amount of black or white, making it more muted.
First you’ll adjust the overall exposure and contrast; then you’ll set the white and black points to avoid clipping at the ends of the histogram before tweaking the highlights and shadows to bring out as much image detail as you can.
1. Press the letter O on your keyboard to activate the white clipping warning; then, keep an eye on the histogram as you drag the Exposure slider slowly all the way to the right. The red areas that appear in the preview warn you which parts of the image are being clipped to white.
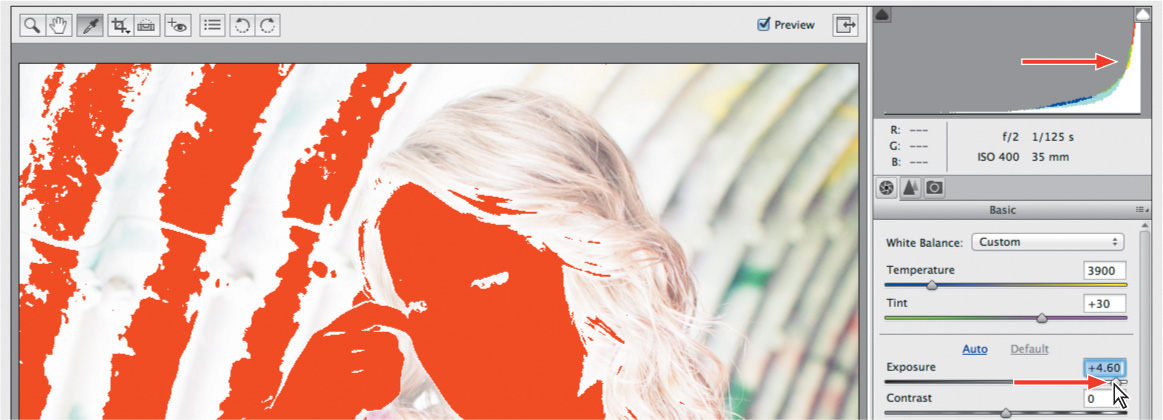
![]() Note
Note
The values at which clipping appears may differ slightly for you, depending on where you clicked with the White Balance tool.
2. Drag the slider to the left until all the red areas disappear. The Exposure control doesn’t cause white clipping until the setting is extreme; for now, set the Exposure value to –0.40.
3. Watch the histogram as you drag the Contrast slider through its full range before setting it to a value of +20.

4. Put the Whites slider through its paces. White clipping is beginning to appear when the setting reaches +35. Return the Whites to a zero setting.
5. Press U on your keyboard to activate the black clipping warning, and then play with the Blacks slider. Set the Blacks to -75—you’ll see the blue clipping warning appear in the darkest areas of the image. Now set it back to zero.
6. Move the Highlights slider all the way to the right. Although the effect on the image is quite extreme, there is no clipping, now that you’ve set the white point. Watch the detail reappear in her face as you reduce the Highlights setting to -50. Drag the Shadows slider to set a value of +50, watching as detail is retrieved from the darkest areas to the right in the photo. Press the U and O keys on your keyboard to disable the clipping warnings.
7. Choose a magnification level of 100% from the Zoom menu at the lower left of the image window, or double-click the Zoom tool. Use the Hand tool to center your view on the woman’s face; then, drag the Clarity slider to +30. Double-click the Hand tool to see the entire image, and then set the Vibrance value to +25.
8. To compare the adjusted photo to the raw image, toggle the Preview checkbox at the right of the toolbar above the preview.
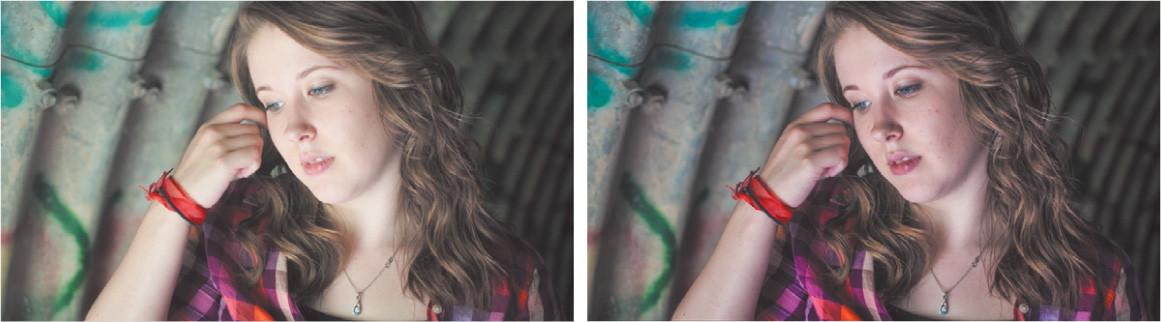
The photo originally looked a little overexposed and had a green tint. It now shows a broader range of detail and is more vivid; the colors are brighter and the tones are more realistic. For the sake of clarity in our demonstration, however, some of the adjustments you made were quite extreme. If you wish, you can now tone down the corrections to balance the image to your taste.
Saving the image in the DNG format
Each camera manufacturer has its own proprietary raw format, and not every raw file can be read or edited by software other than that provided with the camera. There is also the possibility that manufacturers might not support every format indefinitely. To help alleviate these problems, Photoshop Elements gives you the option to save raw images in the DNG format, a publicly available archival format for raw images that provides an open standard for files created by different camera models, ensuring that you’ll still be able to access your images in the future.
1. To convert and save the image, click the Save Image button at the lower left of the Camera Raw dialog. Under Destination in the Save Options dialog, click Select Folder. Navigate to and open your Lessons folder; then, highlight your My CIB Work folder, and click Select.
2. Under File Naming, leave Document Name selected in the menu on the left. Click the menu on the right, and choose 1 Digit Serial Number. This will add the number 1 to the end of the filename.
3. Click Save. The file, together with all your current settings, will be saved in DNG format, which you can reprocess repeatedly without losing the original data.
4. Click the Open Image button in the lower-right corner of the Camera Raw dialog. Your image will open in a regular image window in Photoshop Elements. Choose File > Save. Navigate to your My CIB Work folder, name the file DSC_7536_Work, and choose the Photoshop format. Make sure that the new file will be included in the Organizer, but not in a version set.
5. Click Save, and then choose File > Close.
Congratulations! You’ve completed the lesson; take a look in the Media Browser to see how much you’ve learned.
Before you move on, take a moment to read through the review on the facing page.
Review questions
1. What are the key differences between adjusting images in Expert mode, Quick edit mode, and Guided edit mode?
2. Can you apply automatic fixes when you are in Expert mode?
3. What is the purpose of the Photo Bin?
4. What is the Smart Brush tool?
5. What do the terms temperature and tint refer to in image editing?
Review answers
1. Expert mode provides the most flexible and powerful image-correction environment, with lighting and color-correction commands and tools for fixing image defects, making selections, adding text, and painting on your images. Quick edit provides easy access to a range of basic image-editing controls for quickly making common adjustments and corrections. If you’re new to digital photography, Guided edit steps you through each procedure to help you get professional-looking results.
2. Yes; the Enhance menu in Expert mode contains commands that are equivalent to the Auto buttons in the Quick Edit adjustments panel: Auto Smart Fix, Auto Levels, Auto Contrast, Auto Color Correction, as well as Auto Red Eye Fix. The Enhance menu also provides an Adjust Smart Fix command, which opens a dialog in which you can specify settings for automatic adjustments.
3. The Photo Bin provides easy access to the photos you want to work with, without needing to leave the Editor workspace. You can set the Photo Bin to display all the photos that are currently selected in the Media Browser, just those images that are open in the Editor (helpful when some of the open images are hidden behind the front window), or the entire contents of any album in your catalog.
4. The Smart Brush is both a selection tool and an image-adjustment tool—it creates a selection based on similarities in color and texture, through which your choice of editing preset is applied. You can choose from close to seventy Smart Brush presets, each of which can be customized, applied repeatedly for a cumulative effect, or layered with other adjustment presets to produce an almost infinite variety of results.
5. If an image’s color temperature is too warm or too cool, it will have either a orange-red or blue color cast. A yellow-green or magenta color cast is referred to as a tint.