4. Image Editing Background and Basics
Lesson overview
Photoshop Elements offers a comprehensive suite of easy-to-use tools and a choice of three editing modes, so it’s simple to achieve impressive results, whatever your experience level. Guided Edit mode helps novices learn as they work, Quick Edit mode presents an array of one-touch controls for correcting common image problems, and Expert Edit mode delivers all the power and sophistication experienced users expect.
This lesson begins with an overview of the core concepts behind image correction, and then introduces a range of approachable techniques to help you get more from your photos in just a few clicks:
Making quick and easy edits in the Organizer
Understanding the histogram, levels, and white balance
Working in the Quick Edit, Guided Edit, and Expert Edit modes
Correcting an image using Smart Fix and Auto Smart Tone
Turning frowns into smiles and opening closed eyes
Applying editing presets selectively with the Smart Brush
Working with camera raw images

This lesson will take about 90 minutes to complete. To get the lesson files used in this chapter, download them from the web page for this book at www.adobepress.com/PSECIB2021. For more information, see “Accessing the lesson files and Web Edition” in the Getting Started section at the beginning of this book.

Explore the many powerful and versatile editing tools that make it easy to get more from your photos in Photoshop Elements—even if you’re a beginner. Start with a few of the easy-to-use one-step image-correction features, and then experiment with some more advanced techniques, such as layering preset adjustments with the Smart Brush.
Getting started
You’ll start by importing the sample images for this lesson to your CIB Catalog.
Start Photoshop Elements and click Organizer in the Home screen. Check the lower-right corner of the Organizer workspace to make sure the CIB Catalog is loaded—if not, choose File > Manage Catalogs and select it from the list.
Click the Import button at the upper left of the Organizer workspace and choose From Files And Folders from the drop-down menu. In the Get Photos And Videos From Files And Folders dialog box, locate and select your Lesson 4 folder. Disable the option Get Photos From Subfolders and the automatic processing options; then, click Get Media.
In the Import Attached Keyword Tags dialog box, click Select All and then click OK.
![]() Note
Note
Before you start this lesson, make sure you’ve set up a folder for your lesson files and downloaded the Lesson 4 folder from your Account page at www.peachpit.com, as detailed in “Accessing the lesson files and Web Edition” and “Creating a work folder” in the “Getting Started” section at the beginning of this book. You should also have created a new work catalog (see “Creating a catalog for working with this book” in Lesson 1).
Editing photos in the Organizer
You can fix a range of common image problems without even leaving the Organizer.
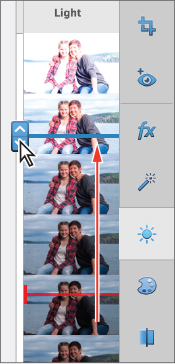
In the Media Browser, select the image DSCF6658.jpg. Click the Instant Fix button (
 ) in the taskbar to open the image in Instant Fix mode, and then click the Light button (
 ) in the actions bar at right.
Experiment with the slider; as you work, the original state of the image is indicated by a red marker. Drag the slider upward from its original position about two thirds of the way to the top. Click Save at the lower right of the workspace, and then click Done.
![]() Tip
Tip
On a small screen, the entire range of an Instant Fix adjustment may be represented by only seven preview thumbnails, whereas a larger screen may show 11; what you see onscreen may differ from the illustrations.
The edited file is grouped with the original in a version set and will appear in the media browser as the top image.
Click the arrow at the right of the image frame to expand the version set. In the expanded version set, select the unedited original, DSCF6658.jpg. Click the Instant Fix button (
 ) in the taskbar; then, click the Color button (
 ) in the actions bar. Experiment with the slider; then, drag it upward from its original position about two thirds of the way to the top. Click Save, and then click Done.
 Note
NoteThe most recent version always appears at the left in an expanded version set and becomes the image displayed on top of the collapsed version set.
Making sure that you select the original image each time, repeat the process for the Clarity (
 ) and Smart Fix (
 ) adjustments, saving the results as you did in step 3. Drag the Clarity slider to about one quarter from the bottom to give the image a soft, “dreamy” look. There is no slider for the Smart Fix edit; Smart Fix is a one-click tool that analyzes the image and then combines multiple adjustments to correct exposure, contrast, color balance, and saturation automatically.
Double-click the original image to see it in the single image view. Use the left arrow key on your keyboard to compare the unedited photo with the results of your single-click adjustments. Double-click the enlarged image to return to the thumbnail view. Select all four edited versions; then, right-click any of the selected thumbnails and choose Delete Selected Items From Catalog.

In the Confirm Deletion From Catalog dialog box, click to activate the option Also Delete Selected Item(s) From The Hard Disk; then, click OK. You’ll use different techniques to edit this photo later in the lesson.
 Tip
TipIf you have a group of photos that all need to be cropped to the same size or converted to antique sepia—or a series of shots from the same shoot that all require similar lighting adjust-ments—select them and then click the Instant Fix button to work on them as a set.
In the Media Browser, select the image DSC06379.jpg, and then click the Instant Fix button (
 ). Click the Light button (
 ), and then drag the slider up about halfway to the top from where it started. Click the Color button (
 ), then drag the slider down about halfway to the bottom. Toggle the switch in the taskbar to compare before and after views.
You’ve improved this photo dramatically in just a few moments—without even leaving the Organizer.

Click the Back button (
 ) at the upper left of the Instant Fix workspace; then, click No in the Save Changes dialog. You’ll work more with this photo in the next exercise.
Recognizing what your photo needs
For some photos, the instant fixes in the Organizer will be enough, but for more control—and access to the full power of Photoshop Elements editing tools—you’ll work in the Editor. Before you explore the Editor’s three working modes, we’ll look at some of the basic concepts behind image adjustment and correction.
Recognizing and understanding a photo’s problems and deficiencies makes the task of correcting and enhancing the image much faster and easier—even when you’re simply choosing from automatic fixes as you did in the full screen view.
In the actions bar above the Media Browser, make sure the Sort By order is set to Oldest. Ctrl-click / Command-click to select both of the photos that you’ve already worked with in this lesson; then add the image DSC_0212.jpg to the selection. Click the Editor button (not the arrow beside it) in the taskbar.

 Note
NoteThe Editor opens in whichever edit mode was active when you last exited the application.
If you’re not already in Expert Edit mode, click Expert in the mode picker at the top of the Editor workspace; then, choose Window > Reset panels.

Click the arrow beside the More button (
 ) at the right of the taskbar and choose Histogram from the menu.
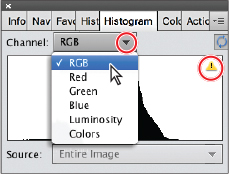
If necessary, change the Channel setting in the Histogram panel from the default Colors to RGB; then click the triangular alert icon (
 ) at the upper right of the black and white Histogram curve to refresh the histogram graph with uncached information.
![]() Note
Note
The triangular alert icon will reappear on the histogram each time you change an image; click the icon to refresh the graph.
Understanding the histogram
A histogram is a graph that maps the distribution of tonal values in an image, from the shadows (at the left end of the curve) through the midtones to the highlights (at the right of the curve).
A peak in the curve shows that the corresponding part of the tonal range is well represented—in other words, the image contains plenty of detail in that area. Inversely, a trough in the histogram curve can indicate a deficiency of image detail.
You can use the histogram both as a “diagnostic” tool that can help you recognize where corrections need to be made and also as a source of dynamic feedback that enables you to assess how effective an adjustment will be, even as you set it up.
If you don’t see the Photo Bin at the bottom of the Editor workspace, click the Photo Bin button (
 ) in the taskbar.
Watch the curve in the Histogram panel as you click each of the thumbnails in the Photo Bin in turn to bring that image to the front in the Edit pane.
 Tip
TipRefresh the histogram for each image as it becomes active.
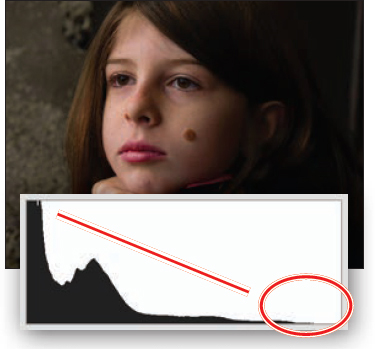
This histogram is heavily weighted toward the left and deficient in the midtones; the image is overly dark, with a lack of tonal depth and definition in the girl’s face.
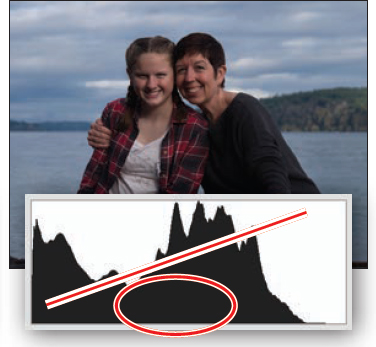
Still overly dark, there’s plenty of information at the ends of the curve. The trough in the middle, though, indicates a lack of midtone detail that makes the subjects bland and too dark.
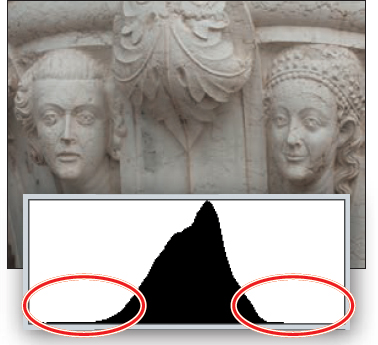
The histogram for this photo shows almost no information at either end and a somewhat lopsided spread of midtones. The image lacks contrast; it appears flat and slightly overexposed.
For each of the photos you’ve already worked with, click the thumbnail in the Photo Bin to bring the image window to the front; then, choose Enhance > Adjust Smart Fix. Watch the image and its histogram change as you drag the Fix Amount slider to set a value of 60% (for Auto Smart Fix, the value is 40%). Click OK to close the Adjust Smart Fix dialog box.
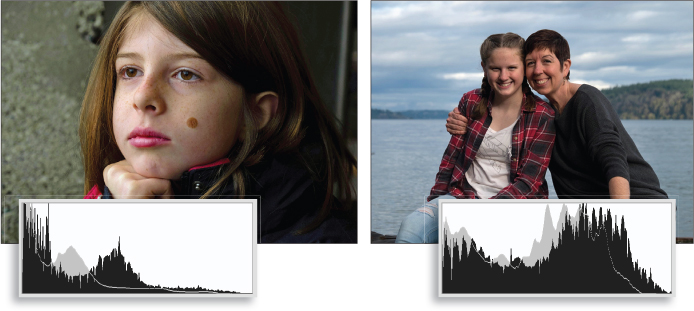
The changes in the images are reflected in their histograms (shown here with the original curves in gray for comparison). In both cases there is more information in the midtone range, boosting detail and definition in skin tones, and a better spread of tones from dark to light, improving the overall contrast.
Bring the image DSC06379.jpg to the front and choose File > Save As. In the Save Your Photos screen, choose On My Computer (see the next page), then click Continue. Name the new file DSC06379_AutoSmart.jpg; choose the My CIB Work folder as the destination, select the Include In The Elements Organizer box, and turn off the Save In Version Set With Original box. Click Save, then click OK to accept the JPEG quality setting and close the file. Repeat the process for the image DSCF6658.jpg, making sure to add _AutoSmart to the file name.
![]() Note
Note
If you’re using Photoshop Elements during a trial period, you won’t see the Save Your Photos screen. Saving and opening photos from Creative Cloud requires a paid license for the software.
Adjusting levels
Once you’re familiar with the histogram, the Levels dialog box provides a direct way to adjust the distribution curve in order to improve an image’s tonal range.
You should still have the photo DSC_0212.jpg open from the previous exercise. Choose Enhance > Adjust Lighting > Levels. In the Levels dialog box, make sure the Preview option is activated.
Use the shadows, midtones, and highlights sliders below the Input Levels histogram graph (left, middle, and right, respectively), or the Set Black Point, Set Gray Point, and Set White Point eyedroppers at the right, to redefine the end points of the curve and adjust the distribution of image information along its length.

Although the midtones range needs the most work in this image, it’s important to get the shadows and highlights right first.
Select the Set Black Point Eyedropper tool; then, watch the histogram as you click the dark area in the lower-left corner of the image. The white line and gray area in the histogram indicate the shape of the curve prior to this adjustment.

The black point eyedropper has not worked well on our lesson photo; it should ideally be used to sample a black area rather than a colored shadow. The deeper shadows have been “clipped” to black and the color has become much cooler as the warm hues have been removed to produce a pure black at the sampled point.


In the Levels dialog box, click Reset and we’ll try another method for adjusting the shadows. Hold down the Alt / Option key as you drag the shadows slider to the right to set a value of 70, just inside the left end of the tonal curve. The clipping preview shows you where the darkest parts of the image are.
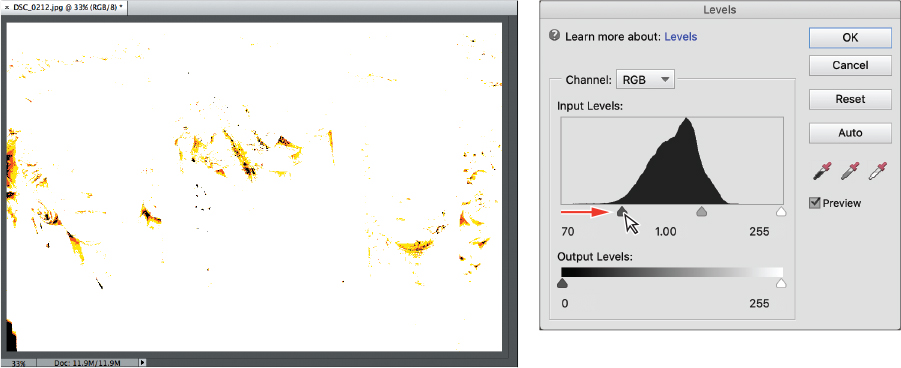
Watch the histogram as you release first the Alt / Option key and then the mouse button. The histogram curve shifts to the left—possibly a little too much. You can see that the left end of the curve has become truncated. In the Levels dialog box, use the shadows slider to reduce the value to 45. The curve in the histogram is adjusted so that there is minimal truncation (clipping).
Hold down the Alt / Option key; then, drag the highlights slider to 185. The clipping preview begins to show significant clipping of image detail in the brighter parts of the photo, as shown in the illustration below. Correct the adjustment by dragging the highlights slider back to 195, where the clipping is minimal; then release the Alt / Option key and the mouse button.

In the Levels controls, drag the midtones slider (the gray triangle below the center of the graph) to the right to set the midtones value to 0.8.
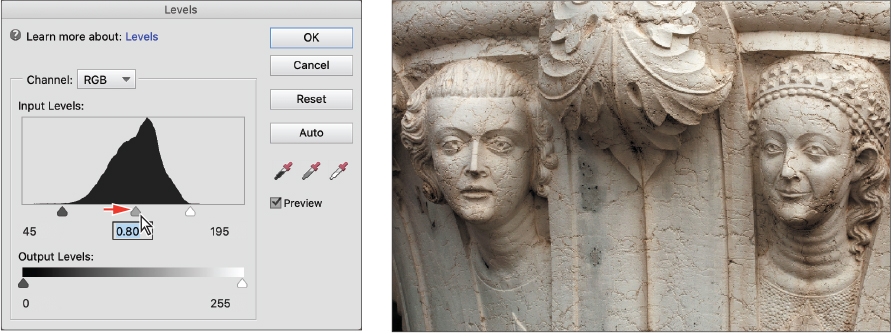
In the Histogram panel, click the yellow alert icon to refresh the display.
 Tip
TipYour edits have caused some gaps and spikes in the histogram curve. Where possible, avoid adjustments that create large gaps; even if the image still looks good onscreen, gaps indicate a loss of image data that may be apparent as color banding when printed.
Compare the original histogram (the red overlay) to the adjusted curve. Information has spread outward, widening the midtones range as well as filling out both the highlights and shadows.

Click OK to close the Levels dialog box. Select Edit > Undo Levels, or press Ctrl+Z / Command+Z, to see how the image looked before editing. Choose Edit > Redo Levels, or Press Ctrl+Y / Command+Y, to reinstate your corrections.

Choose File > Save As. Name the new file DSC_0212_Levels.jpg and set your Lessons / My CIB Work folder as the destination. Activate the option Include In The Elements Organizer, and disable Save In Version Set With Original. Click Save; then click OK to accept the JPEG settings. Choose File > Close.
Assessing a photo’s color balance
Artificial light, unusual shooting conditions, and incorrect camera settings can all result in unwelcome color casts in an image. In this exercise, you’ll work with an image that has a warm yellow-red cast commonly seen in indoor shots captured under tungsten lighting. We’ll start with a look at the Balance controls in the Quick Edit mode.
To switch to Quick Edit mode, click Quick in the view picker above the editing pane. In Quick Edit mode, choose Window > Reset panels.
Choose File > Open. Navigate to your Lesson 4 folder; then, select the image DSC_3924.jpg and click Open.

In the Adjustments panel at the right of the Quick Edit workspace, expand the Balance panel. Color imbalances are defined in terms of an image’s temperature and tint; the Balance panel has a separate control pane for adjusting each of these attributes. For now, make sure that the Temperature tab is selected just below the panel’s header.
The grid of preview thumbnails shows the full range of variation possible with this control. Clicking the central thumbnail resets an image to its original state—a blue frame highlights the currently selected setting.
Move the pointer over each preview thumbnail in the grid in turn to see that level of adjustment applied temporarily to the image in the work area. A white frame highlights the setting currently previewed.

 Tip
TipYou can preview and apply incremental settings between the levels represented in the preview thumbnails by dragging the slider left or right.
Click the Tint tab above the slider control and explore the variations.

The color temperature of an image accounts for casts ranging from cool blue to hot orange- red; “tint” refers to casts ranging from yellow-green to magenta-pink.
Working with the Temperature and Tint settings
If you’re new to color correction, the preview thumbnails provide a useful visual reference for understanding what’s behind an unwanted color cast. Before we take a closer look at the issue in the Expert Edit mode, you can correct this photo using the Balance controls and save the results for comparison to other techniques.
In the Temperature pane, click the preview to the left of the central thumbnail.
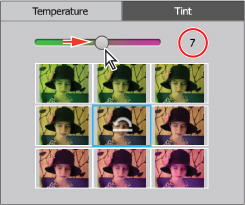
Switch to the Tint pane. Move the pointer over the preview to the right of the central thumbnail. For the Tint controls, moving by one preview in this direction increases the value by an increment of 25—a little too far for our lesson photo. Instead, drag the slider to set a value of 7, or click the number itself and type a new value of 7.
 Note
NoteWhen you switch panes, the Editor doesn’t retain the original value. So if you want to adjust the Temperature value again after changing Tint, you’ll find that Temperature is set back to the original value of 50. The image retains the edit you made, but the slider resets each time.
Choose File > Save As. Activate the option Save As A Copy. Name the copy DSC_3924_QuickBalance.jpg, to be saved to your My CIB Work folder and included in the Organizer but not in a version set; then, click Save. Click OK to accept the default JPEG quality settings.
In the Adjustments panel header, click the Reset Image button to reset all the controls, reverting the image to its original state.

Consulting the color histogram
Let’s see what the histogram has to say about this photo.
Click Expert in the mode picker at the top of the Editor workspace.
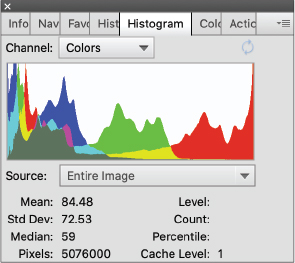
If the Histogram panel is not already open, choose Window > Histogram. If necessary, set the Channel menu at the top of the Histogram panel to Colors.
The histogram corroborates the visual evidence: this photo has a serious imbalance in the spread of color information. Rather than a largely unified curve, there is a marked separation of colors; reds and yellows are over-represented in the upper midtones and highlights.
In the next exercise, you’ll learn how to correct a color cast by adjusting the photo’s white balance—or redefining the white point—to re-calibrate the image’s color.
Adjusting the white balance
A color cast has the appearance of a tinted transparency overlaid on all the colors in your photograph. For example, the yellow-red cast commonly associated with indoor shots captured under tungsten lighting will be visible even on objects that should appear white, and even white paper photographed under fluorescent lighting will have a blue-green tint.
To adjust the white point, or white balance, you need to identify what should be a neutral tone in your photo—either a white object or an area of gray that should appear neither noticeably cool nor warm. Photoshop Elements will then recalculate the color values across the entire image in relation to whatever pixels you’ve defined as the new, color-neutral benchmark.
Choose Enhance > Adjust Color > Remove Color Cast. The Remove Color Cast dialog box appears, and the pointer becomes an eyedropper cursor (
 ).
).Click with the eyedropper to sample a white from the pattern on the girl’s shirt. If this introduces an overly cool blue cast, click the Reset button in the Remove Color Cast dialog box and try again. Try targeting a lighter tone.

When you’re satisfied with the results, click OK to close the Remove Color Cast dialog box.
Examine the color histogram. The histogram curve is much more balanced, though the photo could still be improved. For now, save the corrected image as DSC_3924_WhiteBalance.jpg, with all the usual settings; then, close the file.

Although blue and cyan are still predominant in the lower midtones, the histogram curve is now more unified, without the drastic shift to the right in the red tones.
Making easy color and lighting adjustments
In this section, we’ll begin our exploration of the Editor, taking a closer look at the tools and techniques that will enable you to get the best from your photos. Now that you’ve soaked up a little theory, you’ll find it easier to understand the processes by using one-click fixes as well as making detailed selective edits.

Whether the problem is inadequate exposure, a lack of contrast, or an unsightly color cast, you can make fast fixes using the simple controls in Quick Edit mode, let the Guided Edit mode step you through a wide range of editing tasks, make detailed adjustments in Expert Edit mode—or even arrange for Photoshop Elements to batch-process your photos, applying your choice of automatic corrections.
Fixing photos automatically in batches
In this exercise, you’ll batch-process all of the image files used in this lesson, saving the auto-adjusted photos as copies so that you can compare the results of the automatic processing to the edits you make using other techniques.
If the Editor is not still in Expert mode, click Expert in the mode picker. Choose File > Process Multiple Files. In the Quick Fix options, at the upper right of the Process Multiple Files dialog box, click the check boxes to activate all four auto-fix options: Auto Levels, Auto Contrast, Auto Color, and Sharpen.
At the upper left of the dialog box, choose Folder from the Process Files From menu. Under Source, click the Browse button. Locate and select the Lesson 4 folder as the source folder for the images to be processed. Click OK / Choose. Under Destination, click Browse to set the My CIB Work folder as the destination for the processed copies.
Under File Naming, activate the Rename Files option. Choose Document Name from the menu on the left, and then type _AutoFix in the second field. This will add the appendix “_AutoFix” to the existing document names as the processed copies are saved.
Review the settings in the dialog box. Make sure that the resizing and file conversion options under Image Size and File Type are disabled, and then click OK.
![]() Note
Note
For Windows users: if you get an alert warning that files could not be processed, ignore it. A hidden system file under some versions is the cause, which will have no impact on the success of your project.
Photoshop Elements opens, processes, and closes the images. The newly created copies are automatically tagged with the same keywords as the source files.
Adding the auto-corrected files to your catalog
When you modify an image in the Editor, the Include In Organizer option in the Save and Save As dialog boxes is activated by default. However, when you batch-edit files with the Process Multiple Files command, this option isn’t part of the process—you must add the automatically edited copies to the Organizer manually.
Switch to the Organizer by clicking the Organizer button (
 ) in the taskbar; then, click the Import button at the upper left of the Organizer workspace and choose From Files And Folders from the drop-down menu.
In the Get Photos And Videos From Files And Folders dialog box, locate and open your My CIB Work folder. Ctrl-click / Command-click or marquee-select all the files with the suffix “_AutoFix.” Disable any automatic processing option that is currently active; then, click Get Media.
In the Import Attached Keyword Tags dialog box, click Select All; then, click OK. The files are imported to your CIB Catalog and displayed in the Media Browser. Click the Back button (
 ) to display all the images in your catalog.
Correcting photos in Quick Edit mode
In Quick Edit mode, Photoshop Elements conveniently groups easy-to-use controls for the most common basic image correction operations in the Adjustments panel.
Earlier in this lesson, you tried some one-click fixes in the Organizer’s Instant Fix panel. Later, you applied a combination of the same automatic fixes while batch-processing files. The Adjustments panel presents similar automatic adjustment options but also gives you the opportunity to preview and fine-tune the settings.
You should still be in the Organizer from the last exercise. If you don’t see the right panel group, click the Keyword/Info button at the far right of the taskbar. If you don’t see the list of keywords, click the Tags tab at the top of the right panel. Expand the Imported Keyword Tags category; then, either double-click the Lesson 04 tag or click the empty search box at the left.

 Note
NoteIn this illustration, the Lesson 04 tag icon has been customized; you may see a different thumbnail.
Select the original photo of the colored perfume bottles, DSC_2474.jpg, making sure not to confuse the unedited file with the AutoFix copy; then, click the Editor button (
 )—not the arrow beside it—in the taskbar.
Use the mode picker to switch the Editor to Quick mode. If you don’t see the Adjustments panel at the right, click the Adjustments button in the taskbar.
Applying quick fixes
All of the Quick Edit adjustments have manual controls. Automatic fixes are available for Smart Fix, Lighting, Color, and Sharpen, but not for Exposure or Balance.
Choose Before & After - Horizontal from the View menu above the Edit pane. In the Adjustments panel, expand the Smart Fix pane and click the Auto button. Notice the immediate effect on the image in the After view.
 Note
NoteSmart Fix is a combination of several adjustments; it corrects overall color balance and improves shadow and highlight detail.
Expand the Lighting pane, and then click both Auto Levels and Auto Contrast, noting the effects of the adjustments in the After view.
Expand the Color pane and click the Auto button; then expand the Exposure pane and drag the slider to set a value of 0.7.

Choose File > Save As. In the Save As dialog box, type DSC_2474_QuickFix.jpg as the name of the new file, to be saved to your My CIB Work folder in JPEG format and included in the Organizer but not as part of a version set. Click Save. In the JPEG Options dialog box, accept the default quality and click OK.
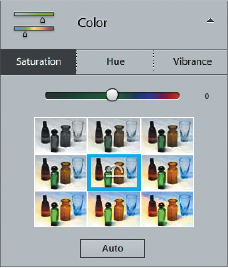
Expand the Color pane once again and click the Saturation tab. A grid of preview thumbnails shows the range of variation possible with the Saturation slider. A blue frame highlights the central thumbnail, which represents the image in its current state. Move the pointer slowly over each thumbnail in the grid to preview your image with that level of saturation in the work area.
 Tip
TipClick a thumb- nail in the preview grid to apply that level of adjustment; then, use the slider to fine-tune the effect. The preview grids not only provide an intuitive editing inter- face but also serve as a great way to learn the effects of the various adjustment controls as you work with them.
Repeat the process for the Color pane’s Hue and Vibrance controls.

Return to the Lighting pane and explore the Shadows, Midtones, and Highlights tabs in the same way. To reset a control, click the thumbnail with the Reset icon (not always the central preview).
To discard any changes you’ve made and revert the image to its last saved state, click the Reset Image button in the header of the Adjustments pane.

Choose File > Close. Don’t save any changes.
Working in Guided Edit mode
If you’re a newcomer to digital image editing and you’re not sure exactly what adjustments an image needs, the Guided Edit mode is a great place to start. You’ll find a range of procedures for correcting lighting and exposure, each with easy-to-follow prompts and instructions that make it simple for even a novice to get great results. You can improve your photos quickly, at the same time as learning image correction concepts and techniques that you can apply even in Expert mode.
![]() Note
Note
For help with some of the common problems you might encounter as you try the more advanced tasks in Photoshop Elements, refer to the section “Why won’t Photoshop Elements do what I tell it to do?” in Lesson 5.
If necessary, switch to the Editor. Click Guided in the mode picker at the top of the workspace, and then select the Basics category.
The Basics category offers solutions for many of the most common image problems, from guided Brightness And Contrast, Levels, and Lighten And Darken adjustments to fix lighting and exposure issues, to procedures for sharpening, cropping, straightening, or resizing your photos. You’ll use two of these later in this lesson.

The guided procedure previews are interactive; hover the pointer over each preview in turn and move slowly back and forth to see before and after views for the respective adjustment.
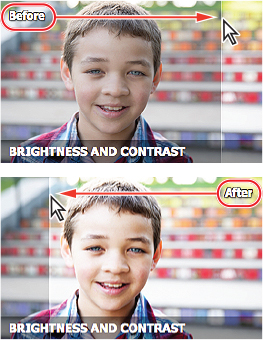
Explore each of the other categories. You’ll use a procedure from the Color category later in this section, and another in Lesson 6. The Black & White category includes not only straight color-to-grayscale conversions, but also a number of mixed effects that let you preserve the color in part of your image while applying a black and white treatment elsewhere. You’ll try several of the Fun Edits effects in Lesson 7, and four of the Photomerge projects in Lesson 8. Several categories offer guided versions of procedures you’ll perform in other Editor modes.
Guided color correction
The Color category in the Guided Edit mode offers two creative film-style color treatments—the Lomo Camera and Saturated Film effects—and two procedures for technical color correction.

In Lesson 6, you’ll use the Remove A Color Cast adjustment to balance a photo that was shot under fluorescent lighting. The Remove A Color Cast edit is a one-step procedure with the single function of correcting an image’s white point or white balance—a concept you learned about earlier in this lesson. In this exercise, you’ll use the Enhance Color treatment, which applies a broader color correction, combining several adjustments to not only balance, but also boost and brighten, color.
You’ll work once again with the image of the old perfume bottles, which has an obvious color cast as a result of inadequate artificial lighting.
Click the Open button (not the arrow beside it) at the upper left of the Editor workspace. Locate your Lesson 4 folder and open the image DSC_2474.jpg.
Launch the Enhance Color adjustment from the Color category in Guided Edit mode. Use the View menu at the left of the bar above the Edit pane to switch to the Before & After - Horizontal view; then, choose View > Fit On Screen.
In the Guided Edit mode, the Zoom and Hand tools are the only items in the toolbar; everything you’ll need for whichever editing task you choose is presented in the panel at the right.
Click the Auto Fix button twice to correct the color and contrast; the photo improves dramatically. For photos with less extreme problems, a single click produces satisfactory results.

In the Enhance Colors pane, drag the Hue slider to the left to set a value of –32.

All the colors in the image are shifted along the spectrum: the red bottle becomes purple, the blue-green glass is warmed to yellow-green, the orange bottle turns red, and the violet-blue reflections in the clear glass are shifted to cyan.
Set the Saturation value to 40, and the Lightness to 10. The new colors become more vibrant, but the overall contrast is still inadequate.

Click Next at the lower right; then, click Done. Switch to the Basics category, and then click Lighten And Darken. Drag the Shadows slider to 33 to retrieve detail in the dark bottle caps and bases; then set the Midtones to 100 to increase contrast by shifting the tonal spread. Click Next; then, click Save As.

Name the file DSC_2474_EC-LD.jpg (for Enhance Colors, Lighten And Darken) and save it to the My CIB Work folder with all the usual settings. In the JPEG Options, set the Quality to 10, then click OK. Choose File > Close.
Resizing photos made easy
For many of us, resizing an image can be confusing. When we share to social networking sites or by email from our mobile devices, the work is done for us, behind the scenes—but when we need to scale a photo to meet specific requirements, the Image > Resize command presents us with an array of options for dimensions, file size, resolution, and resampling that can be difficult for a novice to understand.
In the Guided Edit mode, the Resize Your Photo panel makes the task easy, stepping you quickly through the process of scaling an image to meet specific size requirements, whether they’re given in pixels, inches, or bytes.
In the Organizer, use the Keywords list to find all the images tagged with the Lesson 04 keyword. Select the edited photo DSC06379_AutoSmart.jpg; then, click the Editor button (
 ) in the taskbar.
If the Editor is not still in Guided mode, switch modes now, and then select the Basics category. Click the preview to launch the Resize Your Photo procedure.

In the panel at the right, choose the Web output option. Choose Long Edge from the size options menu. Our lesson file is 3000 pixels wide; to reduce it to an Instagram-friendly size that retains sharpness, type 1024 in the “W” box. When you set the length of one edge, the other is automatically adjusted to maintain the aspect ratio. The correct resolution for the web is set automatically.
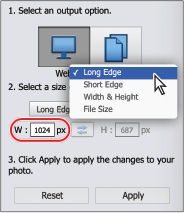
Click Apply; the new file size is displayed below the resizing controls. It’s that easy! For now, click the Reset button to cancel the resize-for-web process without leaving the Resize Your Photo panel.
 Note
NoteWhen you re- size an image for print with the Shrink To Fit option activated, the saved output file will include the white areas that you see in the resizing preview.
Under Select An Output Option, click the Print button. From the size options menu, choose Width & Height. Type 6.9 in both the W (Width) and H (Height) boxes; then click Preview. The photo is cropped to fit the square aspect ratio. Click the Cancel button (
 ) on the preview image; then, repeat the process with the Shrink To Fit option activated. Click Apply. The photo is scaled so that it fits the specified dimensions without cropping.
Our lesson image has a 4 x 6 aspect ratio, so all of the predefined size options, except 4 x 6 inch, will result in cropping unless the Shrink To Fit option is activated.
Click the Reset button and choose “8 x 10 in” from the size options menu; then, click Preview. Drag to the right in the preview window to adjust the crop, and then click the green Commit button (
 ). Click Next at the lower right and inspect the options available. For now, close the file without saving.
Working with Auto Smart Tone
The Auto Smart Tone feature provides a highly intuitive way to make the most of your photos with just a few clicks. Even if you begin with no clear idea of what adjustments an image needs, the Auto Smart Tone dialog box provides visual clues and simple controls that make the process easy.
![]() Note
Note
The Enhance > Auto Smart Tone command is available in both Quick and Expert modes in the Editor.
Called “smart” for a good reason, the Auto Smart Tone feature uses intelligent algorithms to analyze and correct an image automatically—and then actually learns from whatever adjustments you make.
Auto Smart Tone begins by comparing your image to a database drawn from hundreds of images of all types; it then references information about how those images were corrected by different photographic professionals in order to calculate an automatic adjustment that is uniquely suited to the particular photo you’re editing. Auto Smart Tone adjustments combine corrections to different aspects of both tone and color, depending on the deficiencies of the image at hand.
In the Organizer, isolate the photos for this lesson, if necessary, by clicking the Lesson 4 folder in the list at the left, or the search box beside the Lesson 04 tag in the Tags panel. Select the unedited images DSC06379.jpg, DSC_3924.jpg, DSC_0212.jpg, and DSCF6658.jpg; then, click the Editor button in the taskbar.

The Auto Smart Tone dialog box opens with the automatic adjustment pre-applied. In the center is a “joystick” control that can be dragged in any direction; a preview in each corner shows what to expect from dragging in that direction. For this photo, the upper-left preview is dark, low-contrast, and saturated; the thumbnail at the lower left is also dark but has more contrast and less saturated color. At the right, the upper preview is brighter, with more neutral colors; the lower is even brighter, with more contrast.
In the Editor, click Expert in the mode picker at the top of the workspace to switch to Expert Edit mode; then bring the image DSC_3924.jpg to the front by clicking its name tab at the top of the Edit window. Choose Auto Smart Tone from the Enhance menu to open the Auto Smart Tone dialog.

Click the upper-right preview—the closest to a technically balanced solution; the joystick control moves to the limit of its range in that direction. Press and hold the control pin; a reference grid appears. Drag the control pin downward by three grid divisions to increase the color saturation, and two squares left to deepen the shadows.
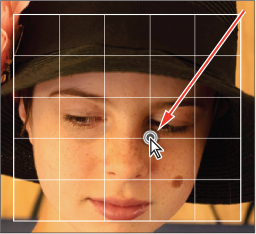
Toggle the Before / After switch at the lower left of the dialog box to see the photo with and without the Auto Smart Tone adjustment.
Click OK, and then repeat the process from step 2 for each of the other three open images. If you’re unsure, drag the joystick left to right and top to bottom to become accustomed to the effects; then, refer to the illustrations below as a rough guide. Start from the points indicated, and then season to taste. Leave the last photo open in the Auto Smart Tone dialog box and read on.

As you tweak the automatic adjustment, Auto Smart Tone learns from your actions. Each time you use the feature, your adjustments are recorded and then taken into consideration when Smart Tone is calculating a solution for the next photo. Over time, Auto Smart Tone remembers whether you tend to favor a high-contrast, color-saturated look or dreamy, high-key treatments and begins to tailor its automatic adjustments accordingly for similar images.
Click the small menu icon (
 ) at the lower left of the Auto Smart Tone dialog box to see the options available. For now, leave both options activated. Click OK to confirm your adjustment and return to the Editor.
![]() Tip
Tip
Once you’re comfortable with Auto Smart Tone, you can hide the corner thumbnails for a clear view of your photo. You can also disable learning for the current image.
If you feel that Auto Smart Tone may be picking up your beginner’s bad habits, you can reset the learning feature on the General tab in Preferences.
For each of the four images, choose Save As; then add the suffix _SmartTone to the file name and save a JPEG file to your work folder, to be included in the Organizer but not in a version set. When you’re done, choose File > Close All.
Opening closed eyes
We have all had a promising group shot or portrait spoiled by closed eyes. Until now, the solution has been to replace the person with their eyes closed by combining shots using the Photomerge Group Shot tool, which you’ll use in Lesson 8.
Adobe has addressed this very common problem with the Open Closed Eyes tool, which can do the job in just a few clicks.
In the Organizer, right-click the unedited image DSCN0555.jpg and choose Edit With Photoshop Elements Editor from the context menu. In the Editor, use the picker above the work area to switch to Quick Edit mode.
Select the Eye tool (
 ) from the toolbar. In the tool options pane at the bottom of the workspace, click Open Closed Eyes.
 Tip
TipThe Open Closed Eyes command is also available in the Eye Tool options in Expert mode, and in the Enhance menu in both Quick and Expert mode.
In the Open Closed Eyes dialog, click to select the face of the girl in the center with her eyes closed. Zoom in using the controls below the preview pane; then, click each of the sample faces at the right to see the results. When you’re done, click Reset at the lower right, and then re-select the girl with the closed eyes.
As a more appropriate source for the open eyes you need, you can choose one or more photos of the same girl that are already in your catalog, or images stored on your computer that are not yet managed by Photoshop Elements.
Under Eye Source at the right of the preview pane, click Computer. Navigate to the folder Lessons / Lesson 4 / EyeOpener, select the image DSCN0557.jpg, and click Open. Click to apply the eyes from the second face in the second row.
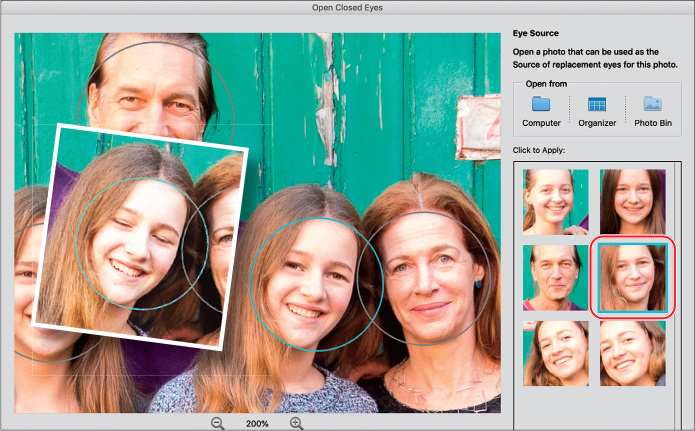
As you can see, the Open Closed Eyes tool has successfully substituted the eyes from the source image, even though the angle of the head is different. Photoshop Elements will also attempt to match color and tonal differences, though this was unnecessary in our example, as the source image was captured in the same lighting conditions. When there is no viable source photo from the same session, look for an image where the lighting angle is similar.
Click OK. Save the file to your work folder with an appropriate name, to be included in the Organizer but not in a version set; then, choose File > Close.
Putting the best faces forward
Does your family album includes pictures of a tired toddler, temperamental teen, or grumpy grandfather? Maybe the camera just caught someone between facial expressions? The Adjust Facial Features tool makes use of face-aware technology to identify the faces in your photo, and then lets you adjust a variety of attributes for the eyes, nose, lips, forehead, and jaw. You’ll find the Adjust Facial Features command in the Enhance menu in both Quick Edit mode and Expert mode.
Isolate the Lesson 4 images in the Media Browser. Select the unedited image DSCF7817.jpg, and then click the Editor button (
 ) in the taskbar.
In the Editor, click Expert in the mode picker, if necessary. Choose Enhance > Adjust Facial Features. Zoom in if necessary to focus on the faces.
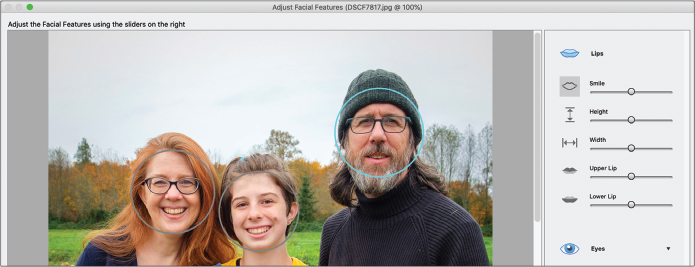
Select the face of the man at right. Click the Lips category and drag the Smile slider and the Width slider to the right to turn what looks like a confused expression into more of a smile.
Click the Face Tilt controls and drag the Up-Down slider to the right slightly, and drag the Left-Right slider to the left a bit. These adjustments still look realistic in small doses, but be aware of areas like the bridge of his glasses, which get distorted if the Up-Down slider is pressed too far.

 Tip
TipThe Face Shape controls are good for correcting lens distortion, such as when you’ve shot a portrait using a wide-angle lens.
Click OK to finish. Choose File > Save As and save the file as DSCF7817_Smile.jpg, with the usual settings, then close the file.
Selective editing with the Smart Brush
Sometimes the best way to enhance a photo is to modify just part of the image, or to treat separate areas—such as background and foreground elements—differently, rather than applying an adjustment to the photo overall.
![]() Tip
Tip
For images with a subject that is backlit, overall adjustments will never suit both the shaded subject and the brightly lit background. In such cases, using the Smart Brush to adjust differently lit areas in the image separately is the perfect solution.
The quickest and easiest way to do this is to paint your adjustments directly onto the image with the Smart Brush tool. The Smart Brush is both a selection tool and an image adjustment tool—as you paint, it creates a selection based on similarities in color and texture, through which your choice of editing preset is applied.
Isolate the Lesson 4 images in the Media Browser. Select the unedited image DSCF6658.jpg, and then click the Editor button (
 ) in the taskbar.
In the Editor, click Expert in the mode picker, if necessary. In Expert mode, choose Window > Reset Panels. Click the Photo Bin button (
 ) at the left of the taskbar to hide the Photo Bin; then, choose View > Fit On Screen.
Select the Smart Brush (
 ) from the toolbox. If the tool options pane doesn’t open automatically at the bottom of the workspace, click the Tool Options button (
 ) in the taskbar.
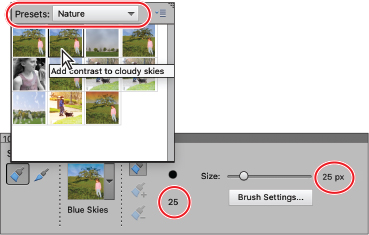
In the tool options pane, use the slider to set a brush size of 25 px (pixels); then, click the colored thumbnail to open the Smart Brush presets picker. Choose the Nature category from the Presets menu at the top of the pop-up menu, and then select the Add Contrast To Cloudy Skies preset.
 Tip
TipYou’ll use the tool options pane several times in this exercise. If you prefer, you can hide it as you work, and then show it again as needed by clicking the Tool Options button in the taskbar.
Press the Esc key on your keyboard to close the preset picker. Starting to the left of the women’s heads, drag across the sky and the land masses behind them. If your selection expands too far, subtract areas from the selection by holding the Alt / Option key and painting carefully back over them. When you’re happy with the adjustment area, Choose Select > Deselect so that a new stroke will create a new adjustment, rather than add to the current one.
 Tip
TipPress the left bracket key ( [ ) to decrease the brush size, and the right bracket key ( ] ) to increase it. While you’re fine-tuning the selection, use a small brush and make slow, short strokes.
Open the preset picker again and choose the Make Dull Skies Blue preset. Starting at the left, drag to select the water. Release the mouse button and drag across the water to the right, and in the small gap between their bodies; as long as the adjustment remains active, your strokes will add to the current adjustment area. Hold Alt / Option if you need to paint out areas such as the left woman’s leg and the driftwood they’re sitting on. (The effect looks garish now, but we’ll correct that shortly.)
If you don’t see the Panel Bin at right, click the Layers button (
 ) in the taskbar.
Two new layers have been created for the adjustments; each displays an icon representing the type of adjustment (gradient and levels) and a black and white thumbnail representing the layer mask through which the adjustment has been applied. Each layer remains active and separate from the image itself—so you can add to or subtract from the selection, tweak the effect, or even change which preset is applied, without permanently affecting your original photo.
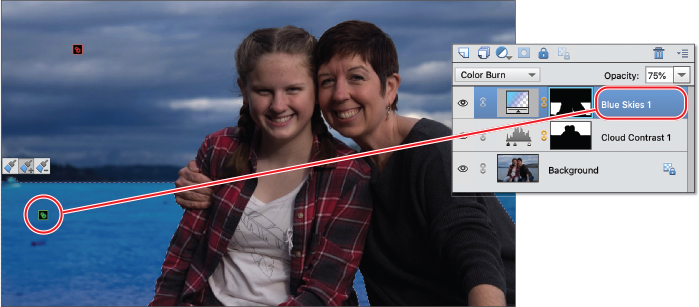
Depending on your operating system, you may see colored markers—Smart Brush adjustment pins—indicating points in the photo where you started dragging with the Smart Brush for each adjustment. The adjustment pins are visible whenever the Smart Brush is active.
Deselect the Blue Skies 1 adjustment by clicking the Background layer in the Layers panel. Open the Smart Brush presets picker by clicking the Blue Skies thumbnail in the tool options pane. Switch to the Portrait category and select the Lighten Skin Tones preset. Press Esc to close the Smart Brush presets picker.

Drag over the two women, including their hair and clothing. If your selection expands to include areas of water, hold Alt / Option as you paint out the unwanted areas. Make sure the selection includes their hands, arms, and legs. You won’t see a dramatic effect in the selected areas yet; you’ll tweak the adjustment a little later.
A new adjustment pin appears on the image; in the Layers panel, a new adjustment layer is added for the Lighten Skin Tones effect. To the left of its layer mask thumbnail, the new adjustment layer displays a different icon from the Blue Skies effect, indicating that it applies a different type of adjustment through the painted mask.
Right-click the new adjustment layer (the name, not its black-and-white layer mask icon) and choose Duplicate Layer. Type Lighten Skin Tones 2 to name the new layer; then, click OK.

Hold down the Alt / Option key and carefully paint the woman on the right out of the selection completely.
Tweaking Smart Brush adjustments
Each Smart Brush adjustment has its own set of controls that let you customize the effect—even in a later editing session, as long as you’ve saved the file with its layers.
In the Layers panel, double-click the gradient icon (
 ) on the Blue Skies 1 layer—the adjustment for the water. In the Gradient Fill dialog box, you can modify the gradient’s colors, angle, and fade rate. Watch the water as you choose Reflected from the gradient Style menu; it’s not what we’re going for here, so change it back to Linear.
 Note
NoteYou can use the Smart Brush on the same area in an image as many times as you wish. If you re-apply the same preset, the effects are usually cumulative; if you apply more than one effect to the same image area, their effects are combined. Adjustment layers affect all lower layers in the Layers panel; rearranging the order of different adjustments applied to the same area can alter the combined effect.
Disable the Reverse option; then click OK.
Use the Opacity slider at the top of the Layers panel to decrease the opacity of the Blue Skies 1 layer from 75% to 30%. You can use the adjacent menu to change the blending mode, but for now, leave it set to Color Burn.
Double-click the Brightness/Contrast icon (
 ) on the Lighten Skin Tones 1 layer to open the Adjustments panel in Brightness/Contrast mode. Set a Brightness value of +45 and increase the Contrast to +10; then, close the control panel. Repeat the process for the layer Lighten Skin Tones 2, at the top of the list. Set the Brightness to a value of 15.
Click the Hand tool to disable the Smart Brush. In the Layers panel, toggle the eye icon (
 ,
,  ) beside each adjustment layer’s name to show and hide its effect so that you can assess just how the image has changed.
Choose File > Save As. Name the file DSCF6658_SmartBrush and set up the usual save options. This time, choose the Photoshop file format and activate the Layers option so that you can edit your adjustment layers later. Close the file.
Working with camera raw images
!Raw images are high-quality image files that record the maximum amount of image data possible, in a relatively small file size. Though larger than compressed formats such as JPEG, raw images contain more data than TIFF files and use less space. Many common file formats involve in-camera processing of the incoming image data that can effectively degrade the quality of the image. In creating a compressed file, data deemed superfluous is discarded; in mapping the spread of captured data to a defined color space, the range of the color information can be narrowed. In contrast, raw images retain all of the data captured for each and every pixel.
![]() Note
Note
Photoshop Elements 2021 includes a redesigned Camera Raw interface. The first time you open a raw file, you may be asked to pick the new design or the old. Embrace change and go with the new!
Capturing photos in raw format gives you more flexibility and control in editing. Raw files do incorporate camera settings such as exposure, white balance, and sharpening, but this information is stored separately from the image data. When you open a raw image in Photoshop Elements, these settings become “live,” so you can adjust them to get more from the raw image data, working with 12 bits of data per pixel rather than the 8 bits/channel of JPEG or TIFF formats.
![]() Note
Note
Most newer and more advanced cameras can capture raw images. To see an up-to-date list of the camera models and proprietary raw file formats currently supported by Photoshop Elements, visit the Adobe website.
In the following exercises, you’ll work with a raw image in Fujifilm’s RAF format as you explore the Camera Raw window. This section will also serve as a review of the image editing concepts and terminology that you learned earlier.
Isolate the Lesson 4 images in the Media Browser, if necessary, by clicking the search box beside the Lesson 04 keyword tag in the Tags panel.
![]() Tip
Tip
If you see a message about working with raw images in Photoshop Lightroom, click Continue In Photoshop Elements.
Locate the camera raw image DSCF7542.RAF. Right-click the thumbnail and choose Edit With Photoshop Elements Editor from the menu. Photoshop Elements opens the image in the Camera Raw window.

The moment you open a raw file for the first time, the Camera Raw plug-in creates what is sometimes referred to as a sidecar file in XMP (Extensible Metadata Platform) format. Any modification that you make to the raw photograph is written to the XMP file rather than to the image file itself, which means that the original image data remains intact, while the sidecar file records every edit.
Getting to know the Camera Raw window
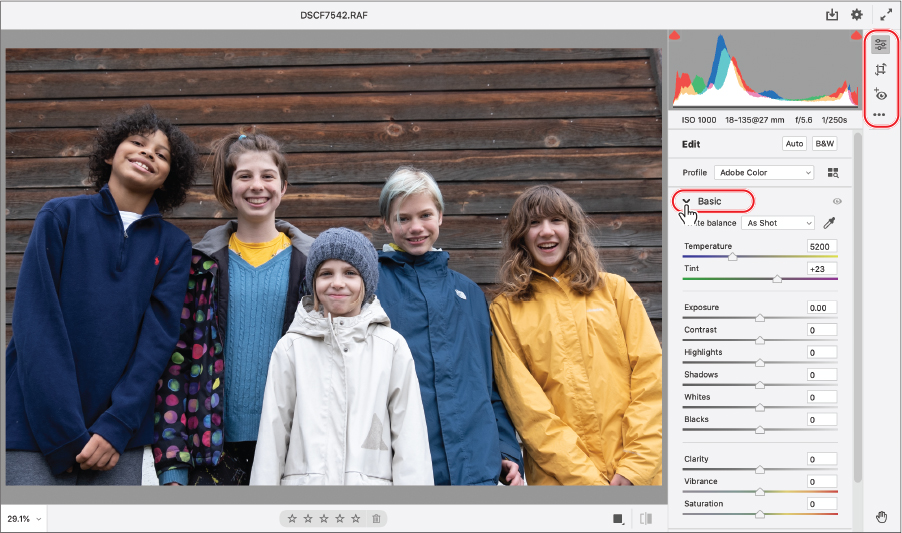
On the right side of the Camera Raw window is a sidebar containing three panels: Basic, Detail, and Calibration. For this set of exercises you’ll work with the Basic tab—the default—which presents controls for making adjustments that are not possible with the standard editing tools in Photoshop Elements.
![]() Tip
Tip
Click the Detail tab to access controls for sharpening image detail and reducing the grainy digital artifacts known as noise.
If it’s not already expanded, click the Basic panel heading to reveal its controls.
Hold the pointer over each tool in the toolbar to the right of the sidebar to see a tooltip with the name of the tool and the respective keyboard shortcut. Click the Toggle Full Screen Mode button (
 ) at the upper-right corner to switch to full-screen mode.
Click the More menu button (
 ) in the toolbar to see additional choices available. You can apply the same settings you used for the last image you worked with, have Photoshop Elements revert to the default profile for your camera by choosing Reset To Default, or revert to the state at which the file was opened.
Adjusting the white balance
The white balance presets can help you rectify a color cast caused by lighting conditions. You could correct the white balance of a photo shot on an overcast day, for example, by choosing the Cloudy preset. Other presets compensate for artificial lighting. The As Shot preset uses the settings recorded by your camera, while the Auto setting recalculates the white balance based on an analysis of the image data.
![]() Note
Note
Incandescent lighting typically causes an orange-yellow color cast, while fluorescent lighting is notorious for a dull green tint.
Switch between the presets in the White Balance menu, comparing the effects to the default As Shot setting. In the following pages you’ll discover why setting the appropriate white balance is so important to the overall look of the image.

For now, choose As Shot from the White Balance presets menu.
For many photos, the right preset will produce satisfactory results or at least serve as a basis for manual adjustment. When none of the presets takes your image in the right direction, you can use the White Balance tool (![]() ) to sample a neutral color in the photo that Camera Raw uses to recalculate the white balance. The ideal target is a light to medium gray that is neither discernibly warm nor cool. In our sample photo, the bit of stone wall peeking out by the legs of the two left kids is a good target.
) to sample a neutral color in the photo that Camera Raw uses to recalculate the white balance. The ideal target is a light to medium gray that is neither discernibly warm nor cool. In our sample photo, the bit of stone wall peeking out by the legs of the two left kids is a good target.
![]() Tip
Tip
In some images it can be difficult to identify a neutral tone; in the absence of a definitive visual reference you may at times rely on what you know about the photo: that it was taken on a cloudy day, for example, or under fluorescent lighting. It may help to look for references such as white paper, clothing, or paint, and then sample a shaded area.
Zoom in to the image by choosing 100% from the Zoom Level menu in the lower-left corner of the image window or by double-clicking the Zoom tool. Select the Hand tool (
 ) and drag the image up and to the right so that you can see the wedge of cement.
Select the White Balance tool (
 ). Sample a light gray from the relatively bare patch toward the top. If you see little change, click a slightly different point.
Zoom out by choosing Fit In View from the Zoom Level menu in the lower-left corner of the window.
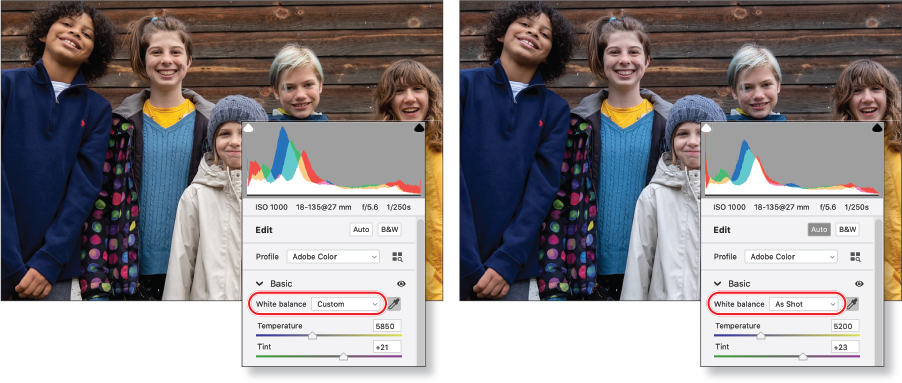
The white balance is now set to Custom and the image has become warmer. The skin tones are rosier and the colors are more vibrant and less cool.
Use the White Balance menu to alternate between your custom settings and the As Shot preset, noting the change in the preview window, as well as the differences in the Temperature and Tint settings.
![]() Note
Note
Depending on where you clicked to set the white balance, you may see different values from those illustrated.
Working with the Temperature and Tint settings
The White Balance tool can accurately remove any color cast or tint from an image, but you may still want to tweak the Temperature and Tint settings. In this case, the color tint seems fine, but the skin tones still have a slightly flat look that can be corrected by fine-tuning the blue/yellow balance using the Temperature control.
![]() Tip
Tip
There are no hard and fast rules in color correction; there might be times when you choose to retain a slight color cast for aesthetic purposes. For example, although it’s technically in need of correction, you might prefer the original, slightly muted look (due to the overcast sky that day). Although most often used for fine color correction, the white balance settings can also be applied creatively to achieve surprising and dramatic atmospheric effects.
Use the Zoom tool or the Zoom Level menu in the lower-left corner of the preview window to focus closely on the middle girl’s face.
Test the Temperature slider by dragging it from one end of its range to the other. You’ll see that the colors of the image become cooler or warmer as you move the slider. Reset the Temperature control a little above the edited value of 5850 (your value may differ, depending on where you clicked to set the white balance) either by dragging the slider or by typing the value 6500 into the text box.
Choose Fit In View from the Zoom Level menu. Press Ctrl+Z / Command+Z to toggle between the new Temperature setting and the value set with the White Balance tool, comparing the effect.

At the left, the skin tones produced by the White Balance tool still look a little too cool. On the right, the skin tones look more natural once the Temperature value has been increased manually.
Using the tone controls on a raw image
Below the White Balance sliders on the Basic tab are sliders for improving a photo’s tonal range and presence, or image definition.
Exposure adjusts the overall lightness or darkness of an image. Its effect is most apparent through the middle of the histogram; an increased Exposure setting will move the body of the curve to the right, compressing the highlights, if possible, rather than shifting them off the end of the curve. Tweak the Exposure to brighten a dull, underexposed photo or correct the flat, faded look of an overexposed image.
![]() Tip
Tip
To quickly reset a single control to its original value, double-click its slider handle. If you want to start over without exiting the Camera Raw dialog box, hold Option / Alt and click the Reset button (which is normally the Cancel button without the modifier keys).
Contrast is the amount of difference between the lightest and darkest areas of an image. The Contrast control has the most effect at the ends of the histogram; an increased setting moves information outward from the center of the curve. Adjust Contrast to add definition to a flat image or to soften one that is too harsh or stark.
Highlights recovers detail from overexposed highlights and improves midtone definition by shifting image information from the far right of the curve inward.
Shadows recovers details from shadowed areas—something close to the inverse of the action of the Highlights control—and adds depth to the midtone range.
Whites specifies which input levels are mapped to pure white in the final image. Lowering the Whites value decreases clipping at the right end of the histogram. Clipping occurs when a pixel’s color values are higher or lower than the range that can be represented in the image; over-bright values are clipped to output white, and over-dark values are clipped to output black.
Blacks specifies which input levels will be mapped to black in the final image. Raising the Blacks value decreases clipping at the left end of the histogram.
Clarity increases the local contrast between adjacent light and dark areas, sharpening detail without producing halo effects, and enhancing the midtone contrast.
Vibrance boosts color saturation selectively, having the most effect on the muted colors in an image, while avoiding over-saturation of bolder colors and skin tones.
Saturation is the purity, or strength, of a color. Increasing the Saturation reduces the amount of black or white mixed with the color, making it more vivid. Reducing the Saturation increases the amount of black or white, making it more muted.
First you’ll adjust the overall exposure and contrast; then, you’ll set the white and black points to avoid clipping at the ends of the histogram before tweaking the highlights and shadows to bring out as much image detail as you can.
Keep an eye on the histogram as you drag the Exposure slider slowly all the way to the right; then, press the letter O on your keyboard to activate the white clipping warning. The red areas that appear in the preview warn you which parts of the image are being clipped to white.

Drag the slider to the left until all the red areas disappear—even from the girl’s yellow coat—at about –0.60. Although the image initially doesn’t appear to be, it’s slightly overexposed. For now, leave the Exposure value at –0.60.
 Note
NoteThe values at which clipping appears may differ slightly for you, depending on where you clicked with the White Balance tool.
Watch the histogram as you drag the Contrast slider through its full range, before setting it to a value of +10.

Put the Whites slider through its paces. White clipping is already beginning to appear when the setting reaches +15 and is prominent at +25. Lower it to –20.

Press U on your keyboard to activate the black clipping warning, and then play with the Blacks slider. When you’re done, set the Blacks to +10, the point above which the blue clipping warning appears in the darkest areas of the image.

Move the Highlights slider all the way to the right to see how it affects the bright parts of the image. Next, reduce the Highlights setting to –50, which is the point at which the remaining highlights are eradicated. Drag the Shadows slider to set a value of +50, watching as detail is retrieved from the darkest areas in the photo. Press the U and O keys on your keyboard to disable the clipping warnings.
Choose a magnification level of 100% from the Zoom menu at the lower left of the image window; then, use the Hand tool to center your view on the face of the girl at the far right. Drag the Clarity slider to +30. Choose Fit In View from the Zoom menu to see the entire image, and then set the Vibrance value to +25.
 Note
NoteThe Camera Raw plug-in, used by Photoshop Elements to open raw files, is updated as new cameras are added to the list of those supported. Check for updates and download the latest version of the plug-in at www.adobe.com.
To compare the adjusted photo to the raw image, toggle the Before And After Views button (
 ) or press the backslash () key.
The photo originally looked somewhat dull, cool, and a little too bright. It now shows a broader range of detail and is more vivid; the colors are brighter and the tones are more realistic. For the sake of clarity in our demonstration, however, some of the adjustments you made were quite extreme. If you wish, you can now tone down the corrections to balance the image to your taste.
Saving the image in the DNG format
Each camera manufacturer has its own proprietary raw format, and not every raw file can be read or edited by software other than that provided with the camera. There is also the possibility that manufacturers might not support every format indefinitely. To help alleviate these problems, Photoshop Elements gives you the option to save raw images in the DNG format, a publicly available archival format for raw images that provides an open standard for files created by different camera models, ensuring that you’ll still be able to access your images in the future.
To convert and save the image, click the Convert And Save Image button (
 ) at the top right of the Camera Raw dialog box. Under Destination in the Save Options dialog box, click Select Folder. Navigate to and open your Lessons folder; then, highlight your My CIB Work folder and click Select.
Under File Naming, leave Document Name selected in the menu on the left. Click the menu on the right and select 1 Digit Serial Number. This will add the number 1 to the end of the file name.
Click Save. The file, together with all your current settings, will be saved in DNG format, which you can reprocess repeatedly without losing the original data.
Click the Open button in the lower-right corner of the Camera Raw dialog box. Your image will open in a regular image window in Photoshop Elements. Choose File > Save. Navigate to your My CIB Work folder, name the file DSCF7542_Work, and choose the Photoshop format. Make sure that the new file will be included in the Organizer but not in a version set.
Click Save, and then choose File > Close.
Congratulations! You’ve completed your first lesson on the Editor; take a look at all the images in the Media Browser to refresh your memory about how many new photo editing techniques you’ve learned.

1. What are the key differences between adjusting images in Expert mode, Quick edit mode and Guided edit mode?
2. Can you apply automatic fixes when you are in Expert mode?
3. What is the purpose of the Photo Bin?
4. What is the Smart Brush tool?
5. What do the terms temperature and tint refer to in image editing?
1. Expert mode provides the most flexible and powerful image correction environment, with lighting and color correction commands and tools for fixing image defects, making selections, adding text, and painting on your images. Quick edit provides easy access to a range of basic image editing controls for quickly making common adjustments and corrections. If you’re new to digital photography, Guided edit steps you through each procedure to help you get professional-looking results.
2. Yes; the Enhance menu in Expert mode contains commands that are equivalent to the Auto buttons in the Quick Edit Adjustments panel: Auto Smart Fix, Auto Levels, Auto Contrast, Auto Color Correction, as well as Auto Red Eye Fix. The Enhance menu also provides an Adjust Smart Fix command, which opens a dialog box in which you can specify settings for automatic adjustments.
3. The Photo Bin provides easy access to the photos you want to work with, without needing to leave the Editor workspace. You can set the Project Bin to display all the photos that are currently selected in the Media Browser, just those images that are open in the Editor (helpful when some of the open images are hidden behind the front window), or the entire contents of any album in your catalog.
4. The Smart Brush is both a selection tool and an image adjustment tool—it creates a selection based on similarities in color and texture, through which your choice of editing preset is applied. You can choose from close to seventy Smart Brush presets, each of which can be customized, applied repeatedly for a cumulative effect, or layered with other adjustment presets to produce an almost infinite variety of results.
5. If an image’s color temperature is too warm or too cool, it will have either a orange-red or blue color cast. A yellow-green or magenta color cast is referred to as a tint.
