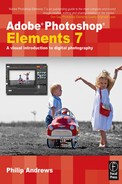
Photoshop Elements 7 provides a variety of edit and enhancement options for users to change and alter their digital photographs. The options can be grouped around four different approaches to the task. See Figure 5.1. Including four levels of editing features is Adobe’s way of providing digital photographers with exactly the tools they need irrespective of their experience level and understanding. It also means that users can progress to more sophisticated tools as their confidence and knowledge grow. This said, it can be a little confusing for those of you who are new to the program to know ‘what tool to use when’. For this reason I have broken down the features into the four categories detailed below and have separated their introduction into different chapters in the book.

Automatic: The simplest tools are almost always fully automatic with the user having little control over the final results. These are the types of color, contrast and brightness controls that are available in the Organizer grouped in the Fix panel. Seven options (Auto Contrast, Auto Levels, Auto Color, Auto Sharpen, Crop, Auto Smart Fix and Auto Red Eye Fix) are available for use on the images displayed as thumbnails in the Organizer workspace.
This is the place to start if you are new to digital photography and want good results quickly and easily.
See Chapter 3 for more details.
Semi-Automatic: The second level of features sits in the middle ground between total user control and total program control over the Editing results. The tools in this group are primarily available in the Quick mode of the Editor workspace (previously called Quick Fix) but also encompass some of the more automatic or easy-to-use controls available in the Full edit mode.
Move to these tools once you feel more confident with the digital photography process as a whole (downloading, making some changes, saving and then printing) and find yourself wanting to do more with your pictures.
More details available in this chapter.
Figure 5.1 Photoshop Elements 6 has four different levels of editing and enhancement approach available to users: (1) Automatic, (2) Semi-Automatic, (3) Guided and (4) Manual. This means that you will have features that suit your
skills level no matter how much digital photography experience you have.

Guided: This approach to editing was introduced in Photoshop Elements 6 and provided a much needed synthesis of having the program perform enhancements automatically, with no user control, and the completely manual editing of the Full and Quick edit workspaces. Using a unique step-by-step approach, the Guided edit feature leads the new user through the processes involved in performing a specific technique. The techniques are grouped in a new Guided option found under the Edit panel. For some steps, duplicate controls are included in the Guided panel that directly manipulate their counterparts in the wider editing workspace. Guided is a great place to start learning more about how to use the powerful tools in the Edit workspaces. More details available in this chapter.

Manual: The final group of tools are those designed to give the user professional control over their editing and enhancement tasks. Many of the features detailed here are very similar to, and in some cases exactly the same as, those found in the Photoshop program itself. These tools provide the best quality changes available with Elements, but they do require a greater level of understanding and knowledge to use effectively. The extra editing and enhancement power of these tools comes at a cost of the user bearing all responsibility for the end results. Whereas the automatic nature of many of the features found in the other three groups means that bad results are rare, misusing or overapplying the tools found here can actually make your picture worse. This shouldn’t stop you from venturing into these waters, but it does mean that it is a good idea to apply these tools cautiously rather than with a heavy hand. See Chapter 6 for more details.
Setting up your screen for Elements
In Chapter 3 we looked at how to download, crop, rotate, auto enhance, print and save images directly from the Photo Browser or Organizer workspace. Now you can try your hand at some simple changes courtesy of the editor components of Elements 7. It is here that you will start to see the power of the digital process. With a few clicks of the mouse you can perform basic picture adjustments and enhancements easier than ever before. This chapter will take you step by step through these changes and also show you how to use these techniques.

Figure 5.2 Even with exactly the same file and editing program, images can appear very different on several machines.
One of the truly amazing features of digital imaging is the diversity of people using the technology. Many individuals in a range of occupations, using various brands of equipment, in different countries across the world, use computer-based picture making as part of their daily work or personal life. The popularity of the system is both its strength and, potentially, one of its weaknesses. On the positive side it means that an image I make in Australia can be viewed in the United Kingdom, enhanced in the United States and printed in Japan. Each activity would involve importing my picture into a different computer, with a different screen, running an image-editing package like Elements. This is where problems can occur. Even though the program and image are exactly the same, the way that the computer is set up can mean that the picture will appear completely different on each machine. On my computer the image exhibits good contrast and has no apparent color casts. In the UK, however, it might look a little dark, in the USA slightly blue and in Japan too light and far too green. See Figure 5.2.
Before you start
To help alleviate this problem Adobe has built into its imaging programs a color management system that will help you set up your machine so that what you see will be as close as possible to what others see. For this reason it is impor tant that you set up your computer using the system before starting to make changes to your images. The critical part of the process is ensuring that your monitor is set up correctly. Most default profiles for screens are correctly set up at the time that the installation CD/DVD is run, but if this isn’t the case then use these following steps to install the monitor profile manually:
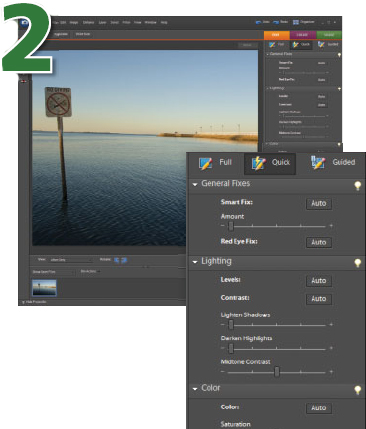
1 Windows XP users should select the Control Panel option from the Start menu.
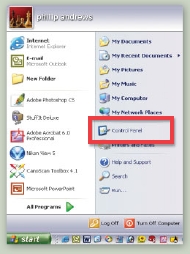
2 Click on the Display icon from those listed.

3 Select the Settings tab and then the Advanced settings. Click Add to install a new profile.
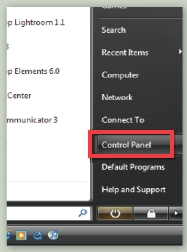
1 In Windows Vista select the Control Panel option from the Start Orb menu.

2 Click on the Color Management icon in the Control Panel.

3 Choose your monitor from the Device menu and then click the Add button to locate the ICC profile from the driver disk.
Hardware-based monitor calibration
The profile that is included with your screen drivers is based on the average characteristics of all the screens produced by the manufacturer. Individual screens will display slightly different characteristics even if they are from the same manufacturer and are the same model number. Add to this the fact that screens’ display characteristics change as they age and you will start to see why some photographers who are interested in ensuring that their photos are displayed accurately on screen resort to using a hardware calibration solution such as the ones provided by X-RITE or ColorVision. See Figure 5.3.
The ColorVision option uses a seven-filter colorimeter attached to the screen during the calibration process. This piece of hardware samples a range of known color and tone values that the software displays on screen. The sampled results are then compared to the known color values, the difference calculated and this information is then used to generate an accurate ICC profile for the screen. Unlike when using the the supplied profile, this method does require the purchase of extra software and hardware, but it does provides an objective way for the digital photographer to calibrate his or her screen.

Figure 5.3 For more accurate display of your photos calibrate your monitor with a hardware device such as the Spyder.
Calibrate all screens and use color management wherever possible

Keep in mind that for the color management to truly work, all your friends or colleagues who will be using your images must calibrate their systems as well.
Brightness and contrast changes
As we saw in Chapter 1, a digital picture is made up of a grid of pixels, each with a specific color and brightness. The brightness of each pixel is determined by a numerical value between 0 and 255. The higher the number, the brighter the pixel will appear; the lower the value, the darker it will be. The extremes of the scale, 0 and 255, represent pure black and white, and values around 128 are considered midtones. In a correctly exposed image with good brightness and contrast, the tones will be spread between these two extremes. If an image is underexposed, then the picture will appear dark on screen and most of its pixels will have values between 128 and 0. In contrast, images that have been overexposed appear light on screen and the majority of their pixels lie in the region between 128 and 255. See Figure 5.4.
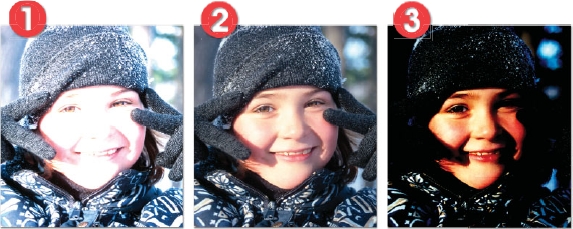
Figure 5.4 A well-exposed photograph (2) will have good brightness and contrast, and will display a good spread of tones between black and white or shadow and highlight. An underexposed image (3) appears dark on screen whereas an overexposed image (1) appears light on screen.
The best method for correcting these situations is for you to recapture the picture. channging the settings on your scanner or camera to compensate for the exposure problem. Good exposure not only ensures a good spread of tones, but also gives you the chance to capture the best detail and quality in your photographs. It is a misunderstanding of the digital process to excuse poor exposure control by saying ‘it’s okay, I’ll fix it in Elements later’. You will not get the best quality pictures possible if you use Elements to correct shooting or scanning mistakes as vital detail has been lost forever in images that are either too dark or too light. See Figure 5.5. Sometimes, though, a reshoot is not possible or a rescan is not practical. In these circumstances, or in a situation where only slight changes are necessary, Elements has a range of ways to change the brightness and contrast in your photos.
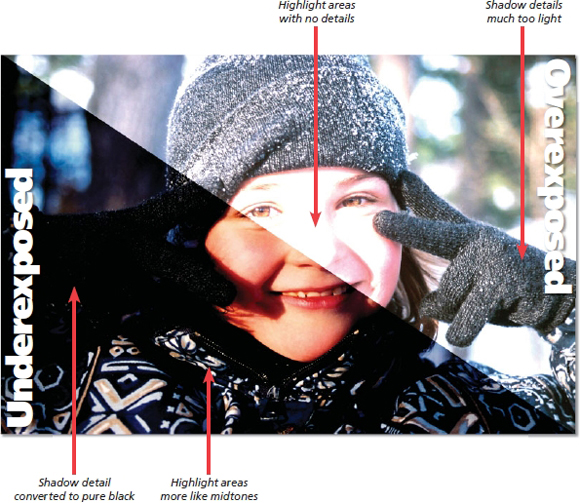
Figure 5.5 Image details are lost when an image is either under- or overexposed.
Editor: Enhance > Adjust Lighting > Brightness/Contrast
In version 6.0: Enhance > Adjust Lighting > Brightness/Contrast
The Brightness/Contrast command helps you make basic adjustments to the spread of tones within the image. The feature was revamped for version 6 so that the changes it makes are less harsh. When opened you are presented with a dialog containing two slider controls. Click and drag the slider to the left to decrease brightness or contrast, or to the right to increase the value. Keep in mind that you are trying to adjust the image so that the tones are more evenly distributed between the extremes of pure white and black. Too much correction using either control can result in pictures where highlight and/or shadow details are lost. As you are making your changes, watch these two areas in particular to ensure that details are retained. See Figure 5.6.
FEATURE SUMMARY
1 Select Enhance > Adjust Lighting > Brightness/Contrast.
2 Move sliders to change image tones.
3 Left to decrease brightness/contrast, right to increase.
4 Click OK to finish.

Figure 5.6 The Brightness/Contrast feature is located under the Adjust Lighting section of the Enhance menu. After adjusting the brightness and contrast of an image, the picture will appear clearer and its tone will be spread more evenly.
Editor: Enhance >Auto Contrast
In version 6.0: Enhance > Auto Contrast
The Auto Contrast command can be used as an alternative to the Brightness/Contrast sliders. In this feature Elements assesses all the values in an image and identifies the brightest and darkest tones. These pixels are then converted to white and black, and those values in between are spread along the full tonal range. Auto Contrast works particularly well with photographic images but can produce unpredictable results with graphic illustrations. This option is also available in the Fix panel in the Organizer workspace. See Figure 5.7.
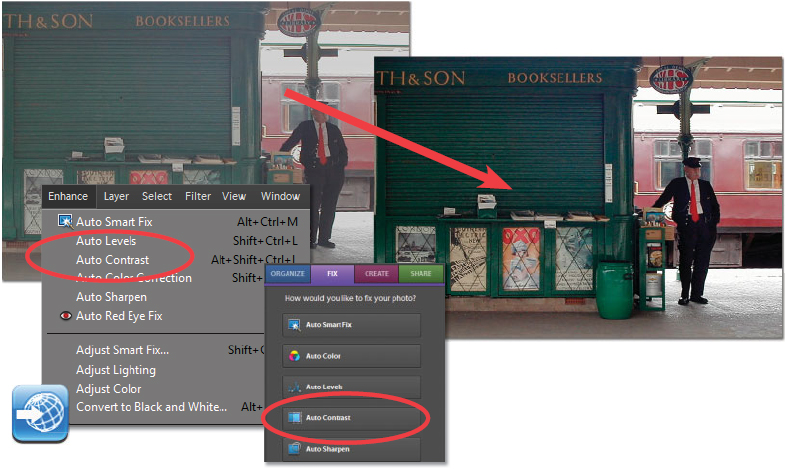
Figure 5.7 Auto Contrast adjusts and spreads image tones automatically and is available from the Enhance menu in the Editor workspace or the Fix panel in the Organizer.

Figure 5.8 Auto Levels adjusts and spreads the tones of each individual color channel. In some pictures this feature can help to reduce color casts. The feature can be found under the editor’s Enhance menu or in the Organizers’ Fix panel.
Editor: Enhance >Auto Levels
In version 6.0: Enhance > Auto Levels
The Auto Levels command is similar to Auto Contrast in that it maps the brightest and darkest parts of the image to white and black. It differs from the previous technique because each individual color channel is treated separately. In the process of mapping the tones in the Red, Green and Blue channels, dominant color casts can be neutralized. See Figure 5.8. This is not always the case; it depends entirely on the make-up of the image. In some cases the reverse is true; when Auto Levels is put to work on a neutral image a strong cast results. If this occurs, undo (Edit > Undo) the command and apply the Auto Contrast feature instead. This option is also one of the Organizer’s Fix panel enhancement options.
Editor: Enhance >Auto Smart Fix
In version 6.0: Enhance > Auto Smart Fix
The Auto Smart Fix feature enhances both the lighting and color in your picture automatically. The command is used to balance the color and improve the overall shadow and highlight detail. Most images are changed drastically using this tool. In some cases the changes can be too extreme, in which case the effect should be reversed using the Edit > Undo command and the more controllable version of the tool – Adjust Smart Fix – used instead. Auto Smart Fix can also be applied from inside the Organizer workspace. See Figure 5.9.
Editor: Enhance > Adjust Smart Fix
In version 6.0: Enhance > Adjust Smart Fix
The Adjust Smart Fix version of the feature provides the same control over color, shadow and highlight detail but with the addition of a slider control that determines the strength of the enhancement changes. Moving the slider from left to right will gradually increase the amount of correction applied to your picture. This approach provides much more control over the enhancement process and is a preferable way to work with all but the most general photos. The Auto button, also located in the dialog, automatically applies a fix amount of 100% and provides a similar result to selecting Enhance > Auto Smart Fix. See Figure 5.9.

Figure 5.9 The Smart Fix option corrects color and enhances shadow and highlight details; it comes in two forms – automatic (Auto Smart Fix) and manual (Adjust Smart Fix). Auto Smart Fix is available from both the Enhance menu and Fix panel (Organizer), but the Adjust Smart Fix option is only found in the editing workspace.
The Quick Fix editor – ‘quick change central’
The Quick Fix editor is home for many of the automatic or ‘quick and easy’ enhancement tools. You can access and apply the features via the menu system or take advantage of the controls displayed in the pane on the right of the workspace. Here you will find features that will enable you to quickly and easily adjust lighting, color, sharpening and, with the Smart Fix option included, highlight and shadow detail as well. You can let the program apply the changes for you by pressing the Auto button, or you can take control of the changes you apply by using the slider controls. Best of all, you can see the before and after results of your changes on screen via the zoomable previews.
In Elements 7.0 three new paint-on adjustment options have been added to the editor in a new Touch Up pane. Simply click on the entry that you want to use and then paint the effect onto your photo. The tools automatically anticipate the area that you want changed and apply the alteration before your eyes. Similar results can be obtained using the Smart Brush Tool in the Full Edit workspace.
There is no doubt that for making speedy adjustments of your favorite images in Elements, the Quick Fix editor is the best place to start. See Figure 5.10.

Figure 5.10 The Quick Fix editor combines the major automatic enhancing tools with great before and after preview pictures. In version 7.0 the Quick Fix editor also includes some paint on enhancement options which include Whiten Teeth, Make Dull Skies Blue and Black and White High Contrast.
Now that we have changed the brightness and contrast of the image so that the tones are more evenly spread between black and white, we can start to look at individual areas or groups of tones that need special attention.
For instance, when you are taking pictures on a bright sunny day, or where the contrast of the scene is quite high, the shadows in the image can become so dense that important details are too dark to see. A traditional method used by photographers to lighten the shadows is to capture the scene using a combination of existing light and a small amount of extra light from a flash. The flash illuminates the shadows, in effect ‘filling’ them with light, hence the name ‘Fill Flash’. This is a great solution for a difficult problem.
Similarly, if the foreground or center section of a scene is dark, then the exposure system in a digital camera can overcompensate and cause the surrounding area to become too light. ‘No problem’, you say, as you adjust the brightness so that the whole picture is darker, but this action also affects the shadow and midtone areas of the picture, causing them to lose detail.
So how can we alter the brightness of just the shadow or only the highlight areas? Well, Adobe provided quite a clever solution to these problems in the earlier versions of the program, employing two features – Fill Flash and Adjust Backlighting. Version 3.0 replaced these with yet another feature called the Shadow/Highlight control. The tool combines two different controls that performed similar functions in previous versions of the product into one dialog.
Editor: Enhance > Adjust Lighting > Shadows/Highlights
In version 6.0: Enhance > Adjust Lighting > Shadows/Highlights
Designed as a replacement for both the Fill Flash and Adjust Backlighting controls, this one little dialog contains the same power as the previous two features in an easy-to-use format. The tool contains three sliders – the upper one is for Lightening Shadows, which replaces the Fill Flash tool, the control in the middle Darkens Highlights and is a substitute for the Adjust Backlighting tool, and the final slider adjusts Midtone Contrast.
Moving the Shadows control to the right lightens all the tones that are spread between the middle values and black. Sliding the Highlights control to the right darkens those tones between middle values and white. The beauty of this feature is that unlike the Brightness/Contrast tool, these changes are made without altering other parts of the picture. To fine-tune the tonal changes a third slider is also included in the dialog. Moving this Midtone control to the right increases the contrast of the middle values, and movements to the left decrease the contrast, making the image ‘flatter’. You can also use the Midtone Contrast slider in the Advanced options of the Adjust Color Curves dialog box to produce similar results. See Figure 5.11 on the previous page.

Figure 5.11 The Shadows/Highlights feature (above) replaces both the Fill Flash and Adjust Backlighting tools available in earlier versions of Elements with the added advantage that the contrast of middle tones can be adjusted using the third slider.
FEATURE SUMMARY
1 Select Enhance > Adjust Lighting > Shadows/Highlights.
2 Move all sliders so that their values are set to 0%.
3 Move the Lighten Shadows slider to the right to lighten the dark tones.
4 Move the Darken Highlights slider to the right to darken light areas.
5 Adjust the Midtone Contrast slider to restore any lost contrast to the picture.
Dodge and Burn tools
It is no surprise, given Adobe’s close relationship with customers who are professional photographers, that some of the features contained in both Photoshop and Elements have a heritage in traditional photographic practice. The Dodge and Burn tools are good examples of this. Almost since the inception of the medium, photographers have manipulated the way their images have printed. In most cases this amounts to giving a little more light to one part of the picture and taking a little away from another. This technique, called dodging and burning, effec tively lightens and darkens specific parts of the final print.
Adobe’s version of these techniques involves two separate tools. See Figure 5.12. The Dodge tool’s icon represents its photographic equivalent – a cardboard disk on a piece of wire. This device was used to shade part of the photographic paper during exposure. Having received less exposure, the area is lighter in the final print. When you select the digital version from the Elements toolbox, you will notice the cursor change to a circle which you can click and drag over your image to lighten the selected areas. The size and shape of the circle is based on the current brush size and shape. This can be changed via the palette in the options bar. Also displayed here are other options that allow you to lighten groups of tones like shadows, midtones and highlights independently. There are also controls to change the strength of the lightening process by adjusting the exposure. See Figures 5.12 and 5.13.
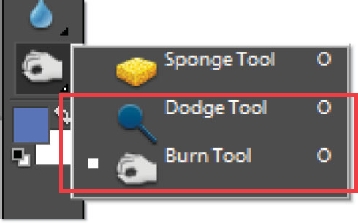
Figure 5.12 The Dodge and Burn tools are used to lighten and darken different parts of the picture.

Figure 5.13 The style and size of the Dodge and Burn tools are determined by the currently selected brush. This and other Dodge and Burn options can be adjusted via the settings in the feature’s option bar. An exposure value of 20% is a good starting place for both dodging and burning in activities.
FEATURE SUMMARYF
1 Select the Dodge tool from the toolbox.
2 Choose the brush size from the palette in the options bar.
3 Select the group of tones to adjust – highlights, midtones or shadows.
4 Set the strength of the effect via the exposure value.
5 Click and drag the cursor over the image to lighten.

Figure 5.14 Skillful dodging and burning can help improve the appearance of specific dark and light picture areas.
The Burn tool’s attributes are also based on the settings in the options bar and the current brush size, but rather than lightening areas this feature darkens selected parts of the image. Again, you can adjust the precise grouping of tones, highlights, midtones or shadows that you are working on at any one time. See Figure 5.15.
FEATURE SUMMARYF
1 Select the Burn tool from the toolbox.
2 Choose the brush size from the palette in the options bar.
3 Select the group of tones to adjust – highlights, midtones or shadows.
4 Set the strength of the effect via the exposure value.
5 Click and drag the cursor over the image to darken.

Figure 5.15 Highlights, shadows and midtones can be dodged and burnt separately.
As with many digital adjustment and enhancement techniques, it is important to apply dodging and burning effects subtly. Overuse is not only noticeable, but you can also lose the valuable highlight and shadow details that you have worked so hard to preserve. See Figure 5.16.
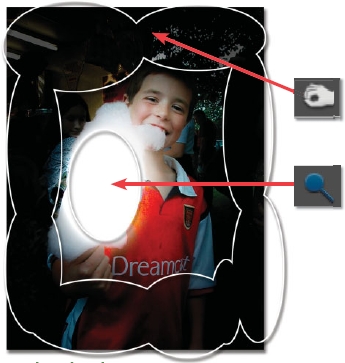
Figure 5.16 Too much dodging and burning is noticeable and can eventually degrade the image rather than improve it.
Our eyes are extremely complex and sophisticated imaging devices. Without us even being aware of it, they adjust to changes in light color and level. For instance, when we view a piece of white paper outside on a cloudy day, indoors under a household bulb or at work with fluorescent lights, the paper appears white. Our eyes adapt to each different environment.
Unfortunately, digital sensors, including those in our cameras, are not as clever. If I photographed the piece of paper under the same lighting conditions, the pictures would all display a different color cast. Under fluorescent lights the paper would appear green, lit by the household bulb it would look yellow, and when photographed outside it would be a little blue. See Figure 5.17.

Figure 5.17 The dominant color cast in an image changes when it is shot under different light sources.
(1) Fluorescent.
(2) Household bulb.
(3) Candlelight.
(4) Daylight.
This situation occurs because camera sensors are generally designed to record images without casts in daylight. As the color balance of the light for our three examples is different from daylight – that is, some parts of the spectrum are stronger and more dominant than others – the pictures record with a cast. Camera manufacturers are addressing the problem by including Auto White Balance functions in their designs. These features attempt to adjust the captured image to suit the lighting conditions it was photographed under, but even so some digital pictures will arrive at your desktop with strange color casts. See Figure 5.18.
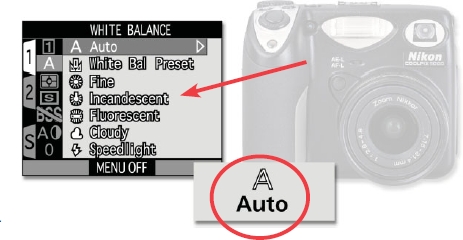
Figure 5.18 Some cameras include an Auto White Balance feature designed to compensate for different light sources.
Editor: Enhance > Auto Color Correction
In version 6.0: Enhance > Auto Color Correction
The Auto Color Correction feature, first seen in version 2.0 of the program, works in a similar way to tools like Auto Levels and Auto Contrast, providing a one-click fix for most color problems. As with all ‘I’ll let the computer decide’ features, sometimes such automatic fixes do not produce the results that you expect. In these scenarios use the Undo (Edit > Undo) command to reverse the changes and try one of the manual tools detailed below. See Figure 5.19.
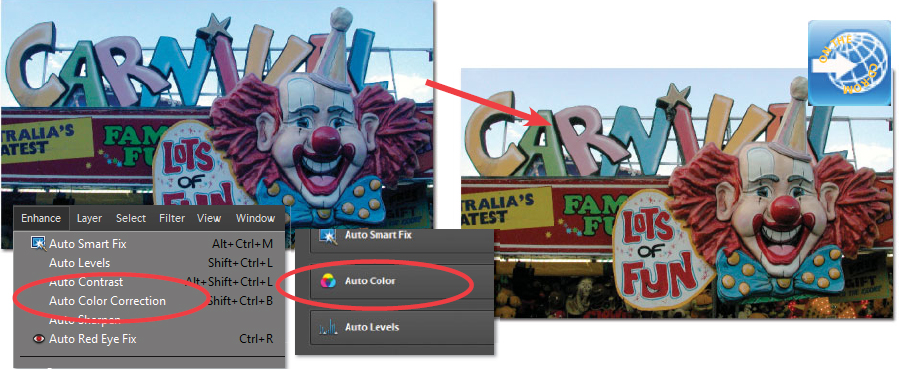
Figure 5.19 Auto Color Correction, known as just Auto Color in the Organizer’s Fix panel, provides a one-click correction for most cast problems.
Editor: Enhance > Adjust Color > Remove Color Cast
In version 6.0: Enhance > Adjust Color > Remove Color Cast
To help provide a more selective solution to the color cast problem, Adobe included the Color Cast command in Elements. This function is designed to be used with images that have areas that are meant to be white, gray or black. By selecting the feature you can then click onto the neutral area and all the colors of the image will be changed by the amount needed to make the area free from color casts. This command works particularly well if you happen to have a gray or black area in your scene. See Figure 5.20. Some image makers include a gray card in the corner of scenes that they know are going to produce casts in anticipation of using Color Cast to neutralize the hues later.
FEATURE SUMMARYF
1 Select Enhance > Adjust Color > Remove Color Cast.
2 Use the Eyedropper tool to click on a part of the image that is meant to be either a neutral white, gray or black.
3 If you are unhappy with the results, click the Reset button to start again or keep clicking until you get a suitable result.
4 Click OK when the cast has been removed.
Keep in mind that this command produces changes based on the assumption that what you are clicking with the Eyedropper is meant to be neutral – that is, the color should contain even amounts of red, green and blue. In practice, it is not often that images have areas like this. For this reason Elements contains another method to help rid your images of color casts.
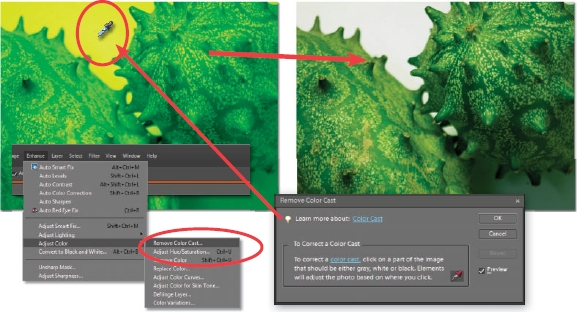
Figure 5.20 The Remove Color Cast feature works when you select a portion of the picture that should be neutral (white, gray or black) but exhibits a cast. Elements then rebalances the rest of the hues in the image to ensure that this part of the picture is cast free.
Editor: Enhance > Adjust Color > Color Variations
In version 6.0: Enhance > Adjust Color > Color Variations
An alternative to using the Remove Color Cast feature is the Color Variations command. From version 2.0 Elements has included a revised and simplified Color Variations dialog. Over the last few versions the color changing thumbnails have been rationalized so that users only have to make simple decisions about increasing or decreasing the red, green or blue components of their images. The Color Variations feature is now divided into four parts. See Figure 5.21. The top of the dialog contains two thumbnails that represent how your image looked before changes and its appearance after. The radio buttons in section 2 (middle left) allow the user to select the parts of the image they wish to alter. In this way, highlights, midtones and shadows can all be adjusted independently. The Amount slider in section 3 (bottom left) controls the strength of the color changes. The final parts, sections 4 and 5 (bottom), are taken up with six color and two brightness preview images. These represent how your picture will look with specific colors added or when the picture is brightened or darkened. Clicking on any of these thumbnails will change the ‘after’ picture by adding the color chosen. To add a color to your image, click on a suitably colored thumbnail. To remove a color, click on its opposite.
1 Select Enhance > Adjust Color > Color Variations.
2 Choose the tones you want to change (shadows, midtones or highlights) or alternatively select saturation.
3 Adjust the Amount slider to set the strength of each change.
4 Click on the appropriate thumbnails to make changes to your image.
5 Click OK to finish.

Figure 5.21 The Color Variations feature, as it appeared in version 6, gives the user more control over color changes in the image. (1) Before and after thumbnails. (2) Image area to change. (3) Color strength or intensity. (4) Color variation thumbnails. (5) Brightness thumbnails.
In version 6.0: Red Eye Removal tool
Using the built-in flash in your camera is a great way to make sure that you can keep photographing in any light conditions. One of the problems with flashes that are situated very close to the lens is that portrait pictures, especially when taken at night, tend to suffer from ‘red eye’. The image might be well exposed and composed, but the sitter has glowing red eyes. This occurs because the light from the flash is being reflected off the back of the eye. Adobe recognized that a lot of small modern digital cameras have flashguns close to their lens – the major cause of this problem – and developed a specialist tool to help retouch these images. Called the Red Eye Removal tool since version 3.0 and the Red Eye Brush in previous releases, it changes the crimson color in the center of the eye to a more natural looking black.
To correct the problem is a simple process that involves selecting the tool and then clicking on the red section of the eye. Elements locates the red color and quickly converts it to a more natural dark gray. The tool’s options bar provides settings to adjust the pupil’s size and the amount that it is darkened. Try the default settings first and if the results are not quite perfect, undo the changes and adjust the option’s settings before reapplying the tool. See Figure 5.22.
FEATURE SUMMARY
1 Select the Red Eye Removal tool from the toolbox.
2 Click on the red area of the eye or drag a marquee around the eye to apply the color change.
3 If the results are not perfect, Edit > Undo the changes and adjust the Pupil Size and Darken Amount settings in the options bar. Click on the red area to reapply the color change.
The Red Eye Removal tool is available in both the Quick Fix and Standard editing workspaces.

Figure 5.22 The Red Eye Removal tool is designed to eliminate the ‘devil-like’ eyes that result from using the inbuilt flash of some digital cameras.
Editor: Enhance > Adjust Color > Adjust Color for Skin Tone
In version 6.0: Enhance > Adjust Color > Adjust Skin Tone
The Adjust Color for Skin Tones feature is designed to allow you to adjust the hue of the skin tones within your picture.
Making changes is a two-step process. When the feature first opens you need to use the Eyedropper tool to select a typical section of skin within the photo. Next, you can adjust the color of the skin using the Tan and Blush sliders and the overall color of the picture with the Temperature control.
The picture can be reverted to its original hues by selecting the Reset button or the changes applied by pressing the OK button. See Figure 5.23.

Figure 5.23 The Adjust Color for Skin Tones feature cleverly corrects the color of skintones that contain a cast.
FEATURE SUMMARY
1 Select Enhance > Adjust Color > Adjust Skin Tone.
2 Use the Eyedropper tool to click on an area of typical skin in the picture.
3 Adjust the Skin and Blush sliders to alter skin color.
4 Change the Temperature slider to alter the color of the whole image.
5 Click Reset to remove changes or OK to finish.
As the Skin Tone tool averages tones as it works, multiple clicks around different parts of a person’s face will often refine the results. Holding down the Ctrl key while clicking turns off averaging and will resample with each click.
Editor: Filters menu
In version 6.0: Filter > Filter Gallery or Window > Effects > Filters tab
The filters contained within image-editing programs are capable of producing truly stunning effects. Digital filters are based on the traditional photographic versions, which are placed in front of the lens of the camera to change the way the image is captured. Now, with the click of a button, it is possible to make extremely complex changes to our images almost instantaneously – changes that a few years ago we couldn’t even imagine.
The filters in Adobe Photoshop Elements can be found grouped under a series of subheadings based on their main effect or feature in the Filter menu. Selecting a filter will apply the effect to the current layer or selection. Some filters display a dialog that allows the user to change specific settings and preview the filtered image before applying the effect to the whole of the picture. This can be a great time saver, as filtering a large file can take several minutes. See Figure 5.24.
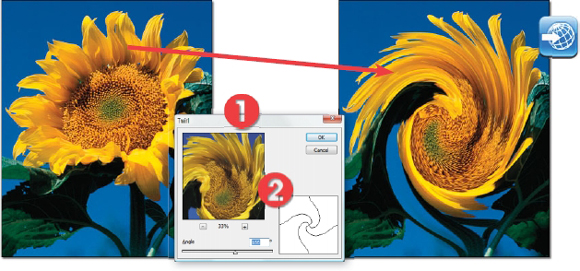
Figure 5.24 Most filters are supplied with a preview and settings dialog that allows the user to view changes before committing them to the full image. (1) Filter preview thumbnail. (2) Filter controls.
Editor: Filter > Filter Gallery
Most filters that don’t work with their own dialog are incorporated into the Filter Gallery (Filter > Filter Gallery) feature which was first introduced in version 3.0. Designed to allow the user to apply several different filters to a single image it can also be used to apply the same filter several different times. The dialog consists of a preview area, a collection of filters that can be used with the feature, a settings area with sliders to control the filter effect and a list of filters that are currently being applied to the picture.
Multiple filters are applied to a picture by selecting the filter, adjusting the settings to suit the image and then clicking the New effect layer button at the bottom of the dialog. Filters are arranged in the sequence they are applied. Applied filters can be moved to a different spot in the sequence by click-dragging them up or down the stack. Click the eye icon to hide the effect of the selected filter from preview. Filters can be deleted from the list by selecting them first and then clicking the dustbin icon at the bottom of the dialog.
Most of the filters that can’t be used with the Filter Gallery feature are either applied to the picture with no user settings or make use of the filter preview and settings dialog detailed in Figure 5.25.
If neither of these preview options is available then, as an alternative, you can make a partial selection of the image using the Marquee tool first and then use this to test the filter. Remember, filter changes can be reversed by using the Undo feature.

Figure 5.25 The Filter Gallery feature, first introduced in version 3.0, allows users to preview filter effects, alter filter settings and even apply several different filters to the same image interactively.
Editor: Window > Effects
The number and type of filters available can make selecting which to use a difficult process. To help with this decision, Elements also contains a Filter Browser type feature that displays thumbnail versions of different filter effects. The browser is located with other thumbnail previews of shapes, graphics, themes, frames and layer styles in the Effects palette (Window > Effects), previously located in the Contents palette.
Double-clicking the filter preview thumbnail will either open the Filter Gallery or a filter dialog, where settings can be adjusted, or simply apply changes directly to your picture. The selection of filters previewed in the gallery at any one time can be changed by altering the selection in the pop-up menu at the top of the palette. See Figure 5.26.
Figure 5.26 The filter browser, located within the new Effects palette (previously the Artwork and Effects palette), gives users a good idea of the types of changes that a filter will make to an image when selecting a specific filter.
Let’s get filtering
To give you a head start with your filtering, the next couple of pages contain some examples of the effects of a range of filters when applied to the same base image. See Figure 5.27. The results, along with the filter preview/settings and dialogs, are also included. See Figures 5.28 and 5.29. After that, the use and control of some of the selected filters are also featured in more detail.

Figure 5.27 The base image used for all filter examples over the next few pages.

Figure 5.28 Many of the filters that you use in Photoshop Elements will open up via the Filter Gallery feature. This will give you the added ability to be able to combine filter effects and even reapply the same effect several times. Some of the filters that work with the Filter Gallery include:
(1) Filter > Sketch > Bas Relief.
(2) Filter > Brush Strokes > Spatter.
(3) Filter > Artistic > Colored Pencil.
(4) Filter > Texture > Stained Glass.
(5) Filter > Texture > Craquelure.
(6) Filter > Artistic > Plastic Wrap.
(7) Filter > Stylize > Glowing Edges, and
(8) Filter > Distort > Ocean Ripple.

Figure 5.29 Filters that are not included in the Filter Gallery often have their own preview and settings dialog. These include:
(1) Filter > Render > 3D Transform.
(2) Filter > Render > Lens Flare.
(3) Filter > Adjustments > Gradient Map.
(4) Filter > Render > Lighting Effects.
(5) Filter > Noise > Add Noise, and
(6) Filter > Adjustments > Threshold.

Figure 5.30
Editor: Filter > Blur > Motion Blur
The Motion Blur filter is great for putting back a sense of movement into action pictures that have been frozen by being photographed with a fast shutter speed. Used by itself, the filter produces photos that are very blurred and often lack any recognizable detail. Unless this is the effect you are looking for, it is best to apply this filter via a feathered selection to help retain sharpness in some picture parts whilst blurring others. See Chapter 7 for more details on selection techniques.
The filter dialog contains a single slider, a preview window and a motion direction (Angle) dial. The Angle dial determines the direction of the blur and should be set to simulate the natural direction of the subject. The Distance slider controls the amount of blur added to the picture – higher values create longer streaks and a more dramatic effect, smaller settings produce more subtle results. See Figure 5.30.
FEATURE SUMMARYF
1 Before applying the filter we need to set up some controls over where the motion blur will be applied in our picture. To do this we start by selecting the area to remain sharp. Here I have used the Lasso tool to draw a freehand selection around the driver. Next, I invert the selection (Select > Inverse) so that the entire image except the driver is now selected.
2 To soften the transition between the sharp and blurred sections of the picture I applied a large feather (Select > Feather) to the selection. This replaces the normal sharp edge of the selection with a gradual change between selected and non-selected areas. I used a feathering of about 10% (100 pixels) of the total width of the picture.
3 Next, I hid the selection using the shortcut keys Ctrl + H (the selection is still active, you just cannot see the marching ants) and opened the Motion Blur dialog (Filter > Blur > Motion Blur). I adjusted the Angle and Distance settings to suit the picture. Make sure that the Preview option is selected so that you can see the results in the full image. Click OK to complete.

Figure 5.31
Editor: Filter > Sketch > Chalk & Charcoal
The Chalk & Charcoal filter is one of several drawing-like filters that can be found in the Sketch section of the Filter menu. The feature simulates the effect of making a drawing of the photograph with white chalk and black charcoal. The tones in the photograph that range from shadow to mid-gray are replaced by the charcoal strokes and those lighter values (from mid-gray to white) are ‘drawn’ in using the chalk color.
The filter dialog gives you control over the balance of the amount and placement of the charcoal and chalk areas as well as the pressure of the stroke used to draw the picture. Higher values for the Charcoal and Chalk Area sliders will increase the number and variations of tones that are drawn with these colors. High settings for the Stroke Pressure slider produce crisper transitions between tones and a more contrasty result. See Figure 5.31.
FEATURE SUMMARYF
1 Set the foreground colors to default (foreground – black, background – white) by clicking the small black and white squares in the bottom left of the tool bar. The filter uses the foreground color as the ‘charcoal’ color and the background color as the ‘chalk’ color. If you have the same color set for background and foreground then a warning dialog will appear.
2 Select the Chalk & Charcoal filter from the Filter > Sketch menu. Using the preview window as a guide, adjust the Charcoal and Chalk Area sliders until you have situated the two tones in the positions most suited for the image. In the example I wanted to ensure that the shadow areas remained dark but still contained detail and that the skin tones were still fairly light.
3 Next, move your attention to the Stroke Pressure slider. Adjust the setting until you achieve a good balance of both detail and contrast. You may need to readjust the Chalk and Charcoal Area sliders to ensure a good spread of tones after the Pressure slider alterations.

Figure 5.32
Editor: Filter > Distort > Liquify
The Liquify filter is a very powerful tool for warping and transforming your pictures. The feature contains its own sophisticated dialog box complete with a preview area and no fewer than eight different tools that can be used to twist, warp, push, pull and reflect your pictures with such ease that it is almost as if they were made of silly putty. See Figure 5.32.
FEATURE SUMMARYF
1 Open an example image and then the Liquify filter (Filter > Distort > Liquify). The dialog opens and has a preview in the center, tools to the left and tool options to the right (use the Size, Pressure and Jitter options to control the effects of the tools). We will start with a simple manipulation designed to broaden the subject’s smile. Select the Warp tool and drag the edge of the lips sideways and upwards. Make the brush smaller if too much of the surrounding detail is being altered as well.
2 Now let’s exaggerate the perspective in the existing picture. Select the Pucker tool and increase the size of the Brush to cover the entire bottom of the figure. Click to squeeze in the subject’s feet and legs. Now select the Bloat tool and place it over the upper portion of the subject; click to expand this area. If you are unhappy with any changes you can use the keyboard shortcuts for Edit > Undo (Ctrl + Z) to remove the last changes. If you want you can bloat the eyes as well.
3 To finish the caricature switch back to the Warp tool and drag some hair out and away from the subject’s head. You can also use this tool to drag down the chin and lift the cheekbones. The picture can be selectively restored at any point by choosing the Reconstruct tool and painting over the changed area. Click OK to apply the changes that you have previewed to the fuller image. Depending on the size of the original this can take some time.
This is a fun tutorial, but it is also good to note that when doing more serious photo retouching the Liquify filter, subtly used, can actually be great for trimming someone down or removing a double chin.

Figure 5.33
Editor: Filter > Sketch > Graphic Pen
The Graphic Pen filter is one of the group of Sketch filters. The feature simulates the effect of making a drawing of the photograph with a thin graphic arts pen. Close overlapping strokes are used for the shadow areas; midtones are represented by balancing strokes with the paper color showing through; and highlight details are drawn with a few sparse strokes.
The filter dialog gives you control over the balance of light and dark (paper and stroke) and the length of the pen stroke used to draw the picture. There is also a drop-down menu for selecting the direction of the pen strokes. See Figure 5.33.
FEATURE SUMMARYF
1 Set the foreground colors to default (foreground – black, background – white) by clicking the small black and white squares in the bottom left of the tool bar. The Graphic Pen filter uses the foreground color as the ‘ink’ color and the background color as the ‘paper’ color.
2 Select the Graphic Pen filter from the Filter > Sketch menu. Using the preview window as a guide adjust the Stroke Length, Light/Dark Balance and Stroke Direction controls. Click OK to filter the picture.
3 To add a little more color to your Graphic Pen ‘drawings’ select colors other than black and white for the foreground and background values. Double-click each swatch to open the color swatch palette, where you can select the new color.

Figure 5.34
Editor: Filter > Stylize > Emboss
The Emboss filter converts your picture to flat areas of gray, fringed by lighter tones of various colors. The final result simulates an embossing effect, making the picture appear as though it has been beaten into a sheet of thin metal. See Figure 5.34.
The filter dialog contains two sliders, a preview window and a light direction (Angle) dial. The Angle dial determines the direction of the light used to produce the shadows and highlights that create the depth of the embossing effect. The Height slider controls the size of the edge outlines and adjusting the Amount slider determines the level of picture detail used in the final result.
FEATURE SUMMARYF
1 With your picture open select the Emboss filter from the Stylize group in the Filter menu.
2 With the filter dialog open make sure that the Preview option is clicked and that the preview window is set to 100%. Turn the Angle dial to adjust the lighting direction used in the effect. Next, move the Height slider until the edges of the effect are the size you desire. Movements to the right increase the size of the edge lines.
3 Now turn your attention to the Amount slider. Move the control until the embossing effect is applied to the level of texture you desire. Movements to the right increase the detail in the result. If necessary, drag the visible area in the preview window to examine more closely the changes in other areas of the picture. Click OK to complete.
Ever since the early versions of Photoshop Elements, Adobe provided the opportunity for third party developers to create small pieces of specialist software that could plug into the program. The modular format of the software means that Adobe and other software manufacturers can easily create extra filters that can be added to the program at any time. In fact, some of the plug-ins that have been released over the years have became so popular that Adobe themselves incorporated their functions into successive versions of Elements. This is how the Photo filter, which made its first appearance in Elements 3.0, came into being.
Most plug-ins register themselves as extra options in the Filter menu, where they can be accessed just like any other Elements feature. The Digital SHO filter from Kodak, previously Applied Science Fiction, is a great example of plug-in technology. Designed to automatically enhance the shadow detail in digital photographs, when installed it becomes part of a suite of filters supplied by the company that are attached to the Filter menu. See Figure 5.35.

Figure 5.35 Third party filters add extra functions to the main program.
The 10 commandments for filter usage
1 Subtlety is everything. The effect should support your image not overpower it.
2 Try one filter at a time. Applying multiple filters to an image can be confusing.
3 View at full size. Make sure that you view the effect at full size (100%) when deciding on filter settings.
4 Filter a layer. For a change, try applying a filter to one layer and then using the Layer opacity slider to control how strongly the filter image shows through.
5 Print to check effect. If the image is to be viewed as a print, double-check the effect when printed before making final decisions about filter variables.
6 Fade strong effects. If the effect is too strong, try fading it. Apply the filter to a duplicate image layer that is above the original. Then reduce the opacity of this layer so the unfilteredoriginal shows through.
7 Experiment. Try a range of settings before making your final selection.
8 Select then filter. Select a portion of an image and then apply the filter. In this way you can control what parts of the image are affected.
9 Different effects on different layers. If you want to combine the effects of different filters, try copying the base image to different layers and applying a different filter to each. Combine effects by adjusting the opacity of each layer.
10 Did I say that subtlety is everything?!
The Guided editing mode
In Photoshop Elements 6.0, the Adobe guys mixed together the explanations and instructions from the traditional Help entry with direct control over the enhancement process normally associated with feature dialogs. The result was the Guided edit mode. Located in the editing workspace, you can select the mode by clicking the Guided button in the Task pane (right-hand side of the window). See Figure 5.36.

Like the Quick edit mode (Quick Fix), the Guided workspace contains a preview area which can be toggled between displaying just an After image or both a Before and After image. The preview can be enlarged or reduced with the Zoom tool located in the tool bar in the top left of the workspace or using the familiar shortcuts, Ctrl + to zoom in, and Ctrl -, to zoom out. The Hand tool, also located in the tool bar, can be used to navigate around a photo that has been enlarged beyond the boundaries of the preview space.

After selecting the Guided mode from the Edit panel you will see a list of technique headings. Clicking the sideways button next to a technique heading, on the left of the panel, will reveal the entries for this group. Selecting an individual entry will then display the steps for the technique.
Unlike a simple Help system entry, which explains the process involved for a given enhancement effect, many Guided edit entries also include a button, or slider control, with the instructions so that you can perform the editing action from inside the panel.
The Guided approach not only provides a great way to enhance photos, but also teaches the user the steps involved in the enhancement technique. For instance, the adjustments in the Lighten or Darken Guided entry target the brightness changes to shadow and highlight areas and contrast alterations to the midtones.
The same type of slider controls are available in the Shadows/Highlights feature (Enhance > Adjust Lighting > Shadows/Highlights). Once the user has a good understanding of how each slider works, and the changes it makes, it is possible for them to migrate from employing the Guided edit approach and go directly to the Shadows/Highlights feature for future enhancements of this type.
New for version 7.0 is the inclusion of a special Action Player feature to Guided editing workspace. Here you can select from a list of recorded editing sequences called Actions and apply the adjustments to your photos.

Figure 5.36 The Guided mode in the Edit space is a great way for introducing users to how to achieve great enhancement results with Elements’ features. Not only are step-by-step instructions provided for each technique, but some also contain controls in the panel that directly alter the image.
Here the ‘Lighten or Darken a Photo’ entry provides a guided application of the controls found in the Shadows/Highlights features. Working their way through the instructions introduces the user to how to make often sophisticated enhancements with tools that they otherwise may not use.
It’s true that shooting digitally has meant that many photographers have saved the time that they used to spend in the darkroom processing their images. The flip side to this coin is that now we while away the hours in on-screen production instead. Surely with all the power of the modern computer and flexibility of Elements there must be quicker ways to process files? Well yes there is!
Photoshop Elements users are able to automate a variety of editing functions with the Process Multiple Files feature located in the File menu of the Full editor workspace. The feature is like a dedicated batch processing tool that can name, size, enhance, label and save in a specific file format a group of photos stored in a folder or selected via the file browser. See Figure 5.37. The dialog’s options include:
File source – Files to be processed can be stored in a single folder; the files currently open in the workspace; pictures in the Photo Bin or images multi-selected in the file browser.
File destination – Sets the location where processed files will be saved.
File naming – Options for naming or renaming of selected files including a range of preset naming styles.
Image sizing – Specify size and resolution changes after choosing the unit of measure to work with from the drop-down menu. Proportions can be constrained.
File type – Select the file format that processed files will be saved or converted to.
Quick Fix enhancement – Use the options here to apply automatic enhancement of the files being processed.
Add labels – Add caption or filename labels to each of the processed files. Also contains an option for watermarking the pictures.
After setting the options for each of the sections in the dialog press the OK button to process the pictures.

Figure 5.37 Elements users can automate the application of basic enhancement and editing features to a group of files using the Process Multiple Files feature located in the File menu of the Editor workspace.
Another method of applying automatic changes to several photos at once is to multi-select photos in the Photo Browser workspace then choose an editing option from the right-click pop-up menu or the new Fix panel. There are a multitude of options available in this menu, with the Rotate, Auto Smart Fix and Auto Red Eye Fix features providing quick editing changes to the selected photos. For best results always apply critical edits and enhancements manually, but this technique is particularly useful if you want to process a bunch of files quickly. The added bonus is that the edited versions of the pictures are not saved over the original file but rather they are kept in a Version Set so that it is always possible to extract the original file if need be. See Figure 5.38.
Keystrokes for fast edits of multi-selected photos
Rotate Photos 90° Right – Ctrl + Right
Auto Smart Fix – Ctrl + Alt + M
Auto Red Eye Fix – Ctrl + R
Rotate Photos 90° Left – Ctrl + Left

Figure 5.38 The editing and enhancement options located on the menu that is displayed when you right-click a thumbnail in the Organizer workspace can be just as easily applied to several photos that have been multi-selected as to a single picture. This method is a quick and easy means of making automatic changes to a group of photos. The same approach can be applied using the options listed in the Fix panel. Here you are provided with more auto-fix options that can be applied to multi-selected photos than those listed on the right-click menu.
In developing Elements, Adobe designed a range of learning aids that can help you increase your skills and understanding of the program. There is the usual Help menu complete with a dedicated window containing Contents, Topics, Search and Index listings for the whole program, but alongside this traditional approach Adobe also developed a couple of new Help devices – namely the tool and feature Hints and the Guided edit mode or tutorial system.
Hints
The Hints feature provides instant descriptions and help for the tool or feature that you are currently using. This information can be found by clicking the Help or hyperlink associated with the feature or tool. See Figure 5.39.

Figure 5.39 The Hints function is an extension of the Help system and offers the user a detailed explanation of the tool, menu or feature selected and is activated by clicking the hyperlink next to the tool or displayed in the feature’s palette or dialog.
Help
The Photoshop Elements Help system was completely revamped for version 4.0 and since that time has been centered around the Help dialog (Help > Photoshop Elements Help). See Figure 5.40. From here you can search for, and more importantly, locate specific information on tools, menu items and program features from the vast array of Help files that accompany the program.
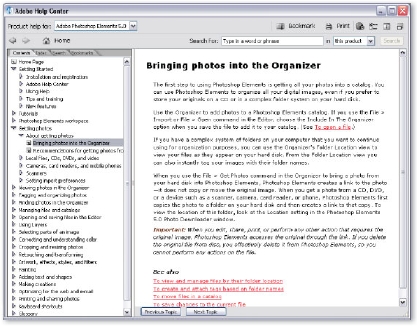
Figure 5.40 The Help feature in Elements provides a variety of ways to access the massive amount of Help files shipped with the package. You can browse through the Contents list, choose from Index headings, locate details in the Glossary or use the Search feature to hunt down the information you need.
The Help system looks and works in the same way as the system found in other Adobe products such as Photoshop and InDesign. Rather than just providing information on how to use a specific tool or feature, the new design also includes ways for you to access extra support and product resources. The Help center also acts as a resource ‘portal’ providing direct access to tips and tutorials archive, support forums and training opportunities.

Figure 5.41 Photoshop Elements 7 contains a new help system that provides inspirational tutorials right when you need them. By clicking on different tools and features Elements will display a small help notice (1) at the bottom of the workspace announcing that a tutorial is available to help you with the feature. Clicking on the notice will open a title window (2), clicking on the Learn How button will take you to the tutorial (3).
On the spot help
In a brand new system developed for version 7.0, Adobe has introduced ‘intelligent’ help for Elements users. When picking certain tools or using specific menu entries, the program pops up a little help notification at the bottom of the screen. When you click the notification a small window is displayed describing the type of help available. If you then click on the Learn How button within the window, the Inspirational Browser will be opened and the tutorial you selected displayed in the main workspace. See Figure 5.41.
The system draws its help and tutorial content from the online tips, tricks and tutorials which are also available from the Welcome Screen (if you are a registered for photoshop.com). This new way of finding help goes beyond what has been traditionally available as it provides tutorials by passionate Elements users (yes even me! see the example above) in a tutorial format right at the time that you need it.