
Chapter Nine. Using Multiple Applications for Maximum Efficiency
Any one Creative Suite 5 application is good. One or more together is much, much better. Part of the benefit that a suite of compatible applications engineered by one software company offers is that those applications are built to understand one another’s file formats. In the CS5 Design Premium edition, Illustrator and Flash Professional understand each other’s formats quite well, and Flash Catalyst can use the layer structure of Photoshop and Illustrator files to kick-start a project. However, most of the deep-level integration is between the veteran applications—Photoshop, Illustrator, InDesign, and Acrobat. Because of this, you can play off of the strengths and capabilities of one application to maximize your efficiency in another.
#85. Generating Live Metadata Captions with InDesign and Bridge
Adobe Bridge is an excellent photo-management tool, and part of its strength is support for comprehensive image metadata. The metadata that you store in Bridge can now be leveraged to automate caption creation in InDesign CS5.
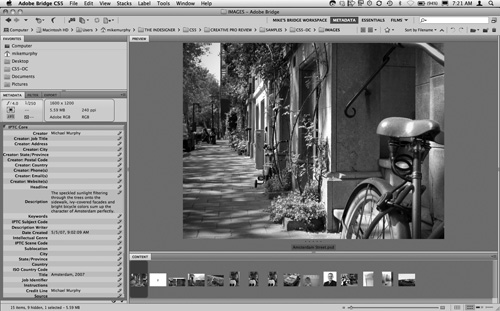
To add metadata to images in Bridge, it’s helpful to switch to the Metadata workspace to optimize the Bridge environment for metadata entry (Figure 85a). The most likely metadata fields for eventual use as captions in InDesign include Description, Title, Copyright, and Credit, but InDesign’s Live Captions feature supports more than 60 metadata fields.
Figure 85a. An image viewed in Bridge’s preconfigured Metadata workspace showing metadata in the Creator, Description, Date Created, Title, and Credit Line fields.
With the metadata added to your images in Bridge, you can use InDesign CS5’s Caption Setup dialog box to specify which pieces of metadata it should use to generate captions. Simply right-click an image, choose Caption Setup, and select the desired metadata field(s) that you want to use (Figure 85b).
Figure 85b. Metadata selection in InDesign CS5’s Caption Setup dialog box.

You can surround the metadata you select with static text by adding that information to the Text Before and Text After fields. For example, if you’re using the Copyright metadata field to dynamically pull in a photographer’s name for a placed image, you can put the copyright symbol and a space in the Text Before field, and a comma, space, and the text “Used by Permission” in the Text After field to generate a caption in the format “© Photographer Name, Used By Permission” where “Photographer Name” is whatever name exists in the image’s Copyright metadata field.
In the Caption Setup dialog box, you can also specify whether the caption’s text frame is created below, above, or to the left or right of the image. Captions aligned to the left or right of the image will be rotated to run “downhill” or “uphill,” respectively, making them ideal for photo credits (Figure 85c).
Figure 85c. The “Left of Image” and “Right of Image” caption alignment options rotate text frames 90 degrees clockwise or counterclockwise, respectively.

You can also define a paragraph style to be used by all generated captions, send generated captions to a specific layer, and opt to group the image and caption frames. Once all options have been set, you need to click OK to exit the dialog, then right-click the image again and choose either Generate Live Caption or Generate Static Caption.
Live Captions vs. Static Captions
A live caption remains dynamically linked to the metadata in the image file. If the metadata is updated, the Links panel shows the image as modified, and updating the image also updates the caption. However, live captions are actually a new kind of text variable and have the same disadvantage as all text variables—they can’t wrap, so they have to fit entirely on one line or the text is crushed together to fit (Figure 85d).
Figure 85d. The text of a live caption can’t wrap, so long captions will result in text that’s jammed together onto a single line.

One way around the text-wrapping limitation is to instead choose Generate Static Caption which populates a text frame with a caption produced from the current metadata but breaks the dynamic association to that metadata from that point on. That text will wrap and behave like any normal text (Figure 85e), but the caption won’t change if the metadata does.
Figure 85e. A static caption wraps properly but loses its dynamic link to the metadata.

#86. InDesign Tips for Easy Acrobat Forms
Forms present unique design challenges. Their function is to be filled out, so nothing about a form’s design should impair that process. Most forms also need to fit into a finite amount of space, so they need to be arranged very efficiently. In addition, more and more forms are being completed digitally—as fillable PDF forms—so another challenge when designing forms is to make them as Acrobat-friendly as possible, so you don’t have to do a lot of manual work in Acrobat Professional after you’ve exported them from InDesign.
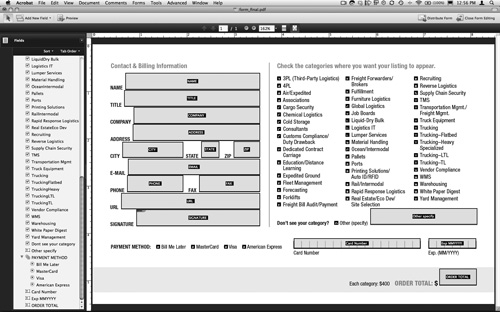
Acrobat’s Form Field Recognition feature (Advanced > Accessibility > Run Form Field Recognition) has improved dramatically over the last few versions, but it’s still rather particular about what it recognizes, and how it determines what’s a form field and what adjacent text is associated with that field. Just because something looks like a form in InDesign (Figure 86a) doesn’t mean it will in Acrobat (Figure 86b).
Figure 86a. A form layout in InDesign. Fill-in lines are established using paragraph rules, check boxes are created using characters in a symbol font, and the credit card number and expiration date number comb fields are created with individual boxes.

Figure 86b. The form from Figure 86a in Acrobat Professional after running Form Field Recognition. Most of the fill-in lines were not recognized, nor were any of the check boxes. The credit card and expiration date comb fields were also interpreted incorrectly as multiple comb fields.

To avoid potential pitfalls, here are some best practices for form layout techniques that will produce Acrobat forms most reliably.
Fill-in Lines
Acrobat is best at recognizing lines that extend out from the end of the text related to them. The fastest, most flexible way to set up form lines is to:
• Create a character style with only one attribute: underlining. It’s best to keep the underline offset set at zero.
• Build a GREP Style into your form-line paragraph style that applies the underline character style to any tab or right-align tab (Figure 86c). In GREP syntax, that’s |~y.
Figure 86c. A GREP Style built into a form-lines paragraph style that applies underlining to the space occupied by any tab or right-align tab.

• Set tab stops in the paragraph style where necessary for those parts of the form with many fill-in areas on one line (i.e., City, State, Zip).
• Use right-align tabs for any lines you want to extend fully across the width of the text frame. All other tab stops will be bypassed and the underline will extend all the way across the frame (Figure 86d).
Figure 86d. The styled form lines using the paragraph style shown in Figure 86c. Full-width lines (Company, Address, E-Mail) require a right-align tab (Shift-Tab). All others use a standard tab. The buffer spacing between the text and the lines is accomplished with em and en spaces.

Check Boxes
Although using a symbol font and InDesign’s bulleted lists feature is probably the fastest way to add what look like check boxes to a layout, there’s no way to ensure that Acrobat’s form-field recognition will translate those bullets as check boxes. What Acrobat does consistently recognize, however, is a drawn shape.
To use shapes as check boxes instead of text characters:
- Draw a square frame at a size somewhere between the x-height and cap height of your check-box item text, wherever looks best to you.
- Cut the drawn shape to the clipboard.
- Place your cursor before the first character of the first check-box item and paste in the shape from the clipboard. The shape goes in as an inline anchored object, sitting on the baseline. You may want to add a space after the shape to put some space between it and the text.
- Copy the shape and space from the first check-box item and paste it in at the start of all other check-box items.
Radio Buttons
In electronic forms, you can check as many boxes as you like. For some options, however—like a credit card payment method—only one selection is permitted, regardless of the number of choices available. This either/or choice is controlled by radio buttons. Establishing a radio button choice that Acrobat will recognize is simply a matter of using circles instead of squares (Figure 86e).
Figure 86e. A series of payment methods in a form using circles that Acrobat will interpret as radio buttons, allowing only one of the four to be chosen.
![]()
Here again, pasted-in shapes are more reliable than using symbol font characters. When you open an exported InDesign form in Acrobat Professional, the program considers all options to be associated with the text directly to the left of or above the first of the radio button choices. Acrobat will group and display these choices in its Fields panel (Figure 86f).
Figure 86f. Radio button options shown in Acrobat Professional’s Fields panel. Note that Acrobat correctly groups all four options under “Payment Method” and drops the trailing colon that was present in the original layout.

Comb Fields
The easiest and most reliable way to establish a comb field—like that used for credit card number or expiration date entry—in InDesign is to create a table. For the credit card number, use a one-row, 16-column table. The expiration date is also one row, but only six columns (two for the month, and four for the year). We suggest using a border for the table cells that’s a consistent weight with the form’s other lines—such as fill-ins and check-box borders—and setting the top border to zero, so the table looks less like a row of cells and more like a comb (Figure 86g).
Figure 86g. Tables are the most efficient, flexible way to set up Acrobat-friendly comb fields for credit card information.
![]()
If you follow the simple setup guidelines described in this tip, you’ll get reliable and accurate form-field recognition in Acrobat Professional (Figure 86h).
Figure 86h. The exported form (created using all of the techniques in this tip) after running Form Field Recognition in Acrobat Professional. All fill lines and check boxes are recognized, and radio buttons and comb fields are properly set up. Note also Acrobat Professional labeled each field accurately based on the adjacent text in the layout.
#87. Sharing Color Swatches Between Illustrator, InDesign, and Photoshop
You’re in the middle of an InDesign layout and you need to create some Photoshop or Illustrator artwork with the same color swatches you’re using in InDesign. Or maybe you’re in Photoshop or Illustrator creating artwork and want to use a matching palette in an InDesign layout. So you grab for a pen and a scrap of paper and start frantically scribbling down RGB or CMYK values...
Sound familiar? If so, you’ll want to keep reading this tip.
Illustrator, InDesign, and Photoshop use a file format—Adobe Swatch Exchange (.ase)—for swatches (Figure 87a) that allows you to export the swatches from one application and load them into another.
Figure 87a. The file icon for Adobe Swatch Exchange (.ase) files.

Exporting Swatches
Each application has a slightly different method for exporting. Here’s how each works:
• In InDesign, select the desired swatches in the Swatches panel (note that gradient, mixed-ink, and tint swatch export are not supported), then choose Save Swatches from the panel menu and save the swatches with your desired name (.ase is automatically assigned as the extension and file format).
• In Illustrator, choose Save Swatch Library as ASE from the Swatches panel menu and save the .ase file. Although you can select a specific range of swatches, Illustrator ignores what you’ve selected and instead exports all of the document’s swatches except for gradients, tints, and patterns.
• In Photoshop, choose Save Swatches for Exchange from the Swatches panel menu and save the .ase file. Like Illustrator, Photoshop doesn’t support selective export of a range of swatches. All swatches in the Swatches panel get exported.
Importing ASE Swatches
Despite their exporting differences, the three applications are similar when it comes to importing Adobe Swatch Exchange files.
• InDesign and Photoshop: Choose Load Swatches from the Swatches panel menu, then locate and select the desired .ase file.
• Illustrator: Choose Open Swatch Library > Other Library, then locate and select the desired .ase file.
Once loaded, your swatches will appear at the bottom of the Swatches panel in InDesign and Photoshop, and as a new swatch library panel in Illustrator. Your days of scribbling swatch values on scraps of paper are officially over.
#88. Linking Photoshop Images to Dreamweaver with Smart Objects
In CS5, Dreamweaver and Photoshop build upon a round-tripping feature that was originally added in CS4, making it more seamless and bringing the kind of linked image behavior that InDesign uses to the suite’s Web development and design application.
You can now maintain a dynamic link from a JPEG file in Dreamweaver to the layered, nonoptimized source Photoshop file. This allows you to modify the original Photoshop file and automatically have Dreamweaver generate a new optimized JPEG reflecting those changes. This dynamic updating will happen everywhere that image appears on your Web site.
Making this work requires inserting not an optimized GIF, JPEG, or PNG file, but instead the source Photoshop image itself, layers and all. When you do, Dreamweaver’s Image Preview dialog box appears (Figure 88a). Here, you can optimize and resize the incoming Photoshop file prior to its insertion on the page.
Figure 88a. Dreamweaver’s Image Preview dialog box allows you to optimize incoming Photoshop files with settings similar to that application’s outgoing Save for Web & Devices dialog box.

The dialog box previews the result of your settings so you know what the final optimized image will look like. Once you’ve decided upon the optimal settings and are happy with the preview, click OK and save the Web-optimized file in the appropriate folder for your site’s assets. Once saved, you’ll see the optimized image listed in Dreamweaver’s Files panel, not the original Photoshop image.
In Dreamweaver’s Design view, you’ll notice a Smart Object icon on any image added to your site this way (Figure 88b), indicating that a dynamic link exists between the image in the Web layout and an external Photoshop file. When the two files are in sync, the two arrows in the icon are both green.
Figure 88b. The Smart Object icon appears on all images optimized within Dreamweaver from an inserted Photoshop source file.

If you insert that optimized image anywhere else on your site (by dragging it from the Files panel to the Web-page layout), that instance will also have the Smart Object icon and the link to the source Photoshop document.
To modify the original Photoshop file, you can access it directly from Dreamweaver by right-clicking the image in Design view and choosing Edit With > Adobe Photoshop CS5 or by Command-double-clicking (Ctrl-double-clicking) the image to open the source file in Photoshop.
Once you’ve made your changes to and saved the original Photoshop image, you’ll notice a change to the Smart Object icon when you return to any page where the optimized Smart Object is placed in Dreamweaver: the bottom half of the Smart Object icon will be red instead of green (Figure 88c), indicating that the optimized image on the Web page no longer matches the most recently saved version of its source file.
Figure 88c. An image displaying an out-of-date Smart Object icon with a red arrow at the bottom.

To bring the optimized image into sync with its source, right-click the image in Dreamweaver’s Design view and choose Update From Original from the context menu. This updates not only the current image, but also every other optimized instance of it on your site that’s linked to the modified Photoshop file. Dreamweaver reoptimizes the newer version of the Photoshop file using the settings that you chose the first time you inserted it.
#89. Taking Advantage of Photoshop and Illustrator Layers with InDesign
Using layers is the best way to manage the various components of your Illustrator and Photoshop artwork, and you can further capitalize on that layered structure in InDesign by selectively hiding and showing any layer in an Illustrator file, and any layer or layer comp in a Photoshop file. This is a great way to keep complex, composited images together in one AI or PSD file, rather than multiple files, and have the ability to pick and choose elements from those files to use in InDesign.
For example, you may have a photograph of a person against a background, but you need to silhouette the subject so that you can put text or some other elements between that subject and the background in the page layout. Once silhouetted, your Photoshop image would likely be composed of two layers: one with the full image of the person against the background (Figure 89a), and a duplicate of that layer with the background masked out (Figures 89b).
Figure 89a. The full image on the Background layer of a Photoshop document.

Figure 89b. The top layer of the Photoshop file with the figure silhouetted from the background.

When the file is placed in an InDesign layout, it appears with all active Photoshop layers showing by default (Figure 89c).
Figure 89c. The image placed in InDesign as it was saved in Photoshop—with the background layer visible but the silhouetted layer hidden.

The goal in this magazine cover example is to have the subject’s head overlap the magazine name. To do that, you can copy the frame containing the placed Photoshop image, then use the Paste in Place command—Shift-Command-Option-V (Shift-Ctrl-Alt-V)—to put an exact duplicate of the image on top of the original. That copy is then moved up in InDesign’s Layers panel above the magazine headline type as well.
Next, right-click on the duplicate image and choose Object Layer Options from the context menu (Figure 89d). Alternatively, you could go to the Object menu and choose Object Layer Options.
Figure 89d. Accessing InDesign’s Object Layer Options from the context menu.

The Object Layer Options dialog box displays all layers and layer groups present in the source Photoshop document. Next to each is a visibility icon that toggles that layer on or off in the InDesign document (Figure 89e). This does not affect the original Photoshop document: whatever layers were visible or hidden when the PSD file was last saved remain as they were.
Figure 89e. InDesign’s Object Layer Options dialog box with an image’s background layer turned off and its top layer visible.

When you’ve turned off the background layer and turned on the foreground (silhouette) layer, the same Photoshop file, placed twice in the InDesign layout, can appear differently in each instance (Figure 89f).
Figure 89f. The top placement of the PSD file—with its background layer turned off using Object Layer Options—is placed above the magazine title, which appears on top of another instance of the same PSD that shows the whole image.

Photoshop files with Object Layer Options settings are always placed in a frame that’s the full size of the Photoshop document’s canvas, regardless of how little of the image you’re revealing in InDesign.
Illustrator files, however, can automatically crop artwork to the extent of its vector boundaries. To do this, however, you have to set your Object Layer Options as you place the Illustrator file by selecting Show Import Options in InDesign’s Place dialog box.
The Place PDF dialog box for incoming Illustrator files (Illustrator files and PDFs are the same to InDesign) includes additional options for how InDesign interprets the boundaries of the placed file. If you select a specific Illustrator layer in the Layers tab of the dialog (Figure 89g), then choose Bounding Box (Visible Layers Only) from the “Crop to” menu (Figure 89h), your artwork will be placed in a frame exactly the size of the visible artwork, regardless of the amount of hidden artwork in the Illustrator document or the size of that document’s artboard.
Figure 89g. A single Illustrator layer selected in the Place PDF dialog box.
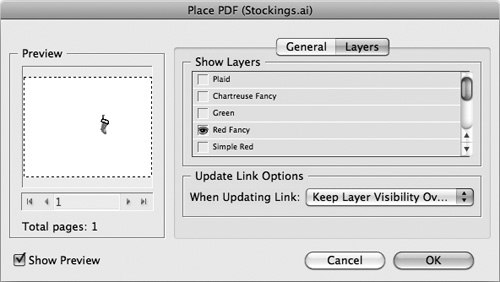
Figure 89h. The selected layer cropped to Bounding Box (Visible Layers Only).

#90. Preserving Photoshop Layers and Styles in Flash
If you’ve prototyped a Flash interface entirely in Photoshop, in CS5 you can now import your layered Photoshop file—with layers, layer styles, and editable text intact—into Flash Professional as Flash layers.
The Photoshop document in Figure 90a is a prototype for a Flash interface that’s been built using several different layers and layer properties. There are text layers, shape layers, and layers containing pixel-based images. Some have layer styles like outer glows applied, and some use blend modes. All of these Photoshop layer features can be preserved (or discarded) on a layer-by-layer basis when you bring this file into Flash Professional.
Figure 90a. A Photoshop mockup for a Flash user interface (left) and the file’s layer structure in the Photoshop Layers panel (right).

In Flash Professional, choose File > Import > Import to Stage, or press Command-R (Ctrl-R), then select the source Photoshop document and click Open. In the Import to Stage dialog box, the column on the left lists all the Photoshop file’s layers (Figure 90b). You can check the layers you want to import and uncheck those you don’t want to bring in.
Figure 90b. The Flash Import to Stage dialog box reflecting the incoming PSD file’s full layer structure on the left and layer-specific import options on the right.

You can also set specific options for how individual layers will be imported. The available options change depending on the type of content on any given layer. Type layers, for example, can be imported as vector outlines, as a flattened bitmap image, or as fully editable text. The latter choice is your best option for maximum flexibility. A shape layer with a Layer Style like a bevel, glow, or shadow can be imported either as a flattened bitmap image or as an editable path with a layer style. The latter is both more flexible and automatically converts the layer to a movie clip upon import.
Once you’ve set your import options for individual layers, there are a few remaining options to set. If your Photoshop file is a design prototype, you’ll want to stick with the default of Convert Layers to Flash Layers. If your incoming Photoshop file is made up of a series of sequential images on individual layers, you might want the other choice, Keyframes.
Finally, if your Flash stage hasn’t been set up to the same size as your Photoshop document’s canvas, you can have the incoming Photoshop document determine the Flash stage size by selecting the Set Stage Size to Same Size as Photoshop Canvas option. Then click OK, and your stage will be adjusted; your Photoshop file’s content will be imported and placed on that stage; and the content will be distributed and organized as Flash layers, each with the same name it had in Photoshop (Figure 90c).
Figure 90c. The imported Photoshop artwork on the Flash stage with all layering preserved as layers in the Timeline, and all imported artwork listed in the Library panel.

Photoshop is a far more flexible design and image-editing tool than Flash Professional, so it’s great to be able to use Photoshop to handle prototyping yet still capitalize on your layering and organization efforts when it’s time to take that prototype into Flash and make it a real interactive project.