Learning Objectives
By the end of this chapter, you will be able to:
- Develop classes to manage resources
- Develop exception-robust code so that the resources do not leak through RAII
- Implement classes that can transfer resource ownership through move semantics
- Implement classes that control implicit conversion
In this chapter, you will learn how to use a class to manage resources, protect against leaks, and prevent copying a large amount of data.
Introduction
In Chapter 2A, No Ducks Allowed – Types, and Deduction, we briefly touched on some concepts, such as smart pointers and move semantics. In this chapter, we'll be exploring them further. It turns out that these topics are very closely related to resource management and writing robust code (code that will run often and for long periods without problems).
To understand what happens, we are going to explore where variables get placed in memory, as well as when and what happens when they go out of scope.
We will look at what the compiler generates as assembler code for what we enter, and we will explore how all of this is affected when an exception occurs.
Variable Scope and Lifetime
In Chapter 2B, No Ducks Allowed – Templates, and Deduction, we discussed variable scope and lifetimes. Let's quickly go through their different types:
Scope:
- Local scope (also known as block scope): This applies to anything that's declared within a block that is enclosed within curly braces ({}).
- Global / file scope: This applies to variables declared outside a normal function or a class, and also to the normal functions.
Lifetime:
- Automatic lifetime: Here, the local variables are created when they are declared, and destroyed when they exit the scope that they are in. These are managed by the stack.
- Permanent lifetime: Here, the global and static local variables have a permanent lifetime.
- Dynamic lifetime: Here, the variables are created and destroyed at the request of the programmer (using the new and delete operators). These variables have their memory allocated from the heap.
We are going to use the following program to get a clarity on the behavior of local variables – those that have an automatic lifetime and those that have a dynamic lifetime:

Figure 3.1: Test program for variable scope and lifetime
When we run the preceding program, the following output is generated:
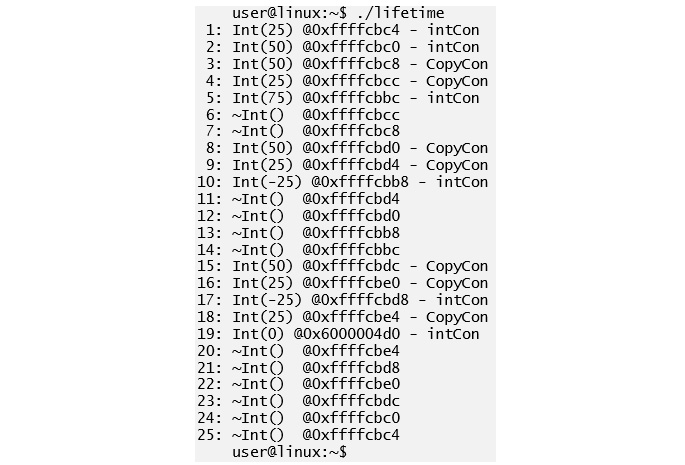
Figure 3.2: Output from Lifetime test program
The hexadecimal numbers (0xNNNNNNNN) in the preceding output are the addresses of the Int objects that are being constructed or destructed. Our program starts by entering at line 46 with the main() function. At this point, the program has already done a lot of initialization so that everything is readily available for us to use. The figures below that refer to two stacks – PC Stack and Data Stack.
These are the abstract concepts that help us explain what happens behind the scenes. The PC Stack (Program Counter Stack) is used to remember the values of the program counter (a register pointing to the next instruction that needs to be run), while the Data Stack holds the values or addresses that we are manipulating. Although these are two separate stacks, on the real CPU, it will most likely be implemented as one stack. Let's look at the following tables wherein we've used the abbreviation OLn to refer to a line number from the output of the preceding program:

Figure 3.3: Detailed analysis of the test program's execution (part 1)
Below is the second part of the detailed analysis of the test program's execution:
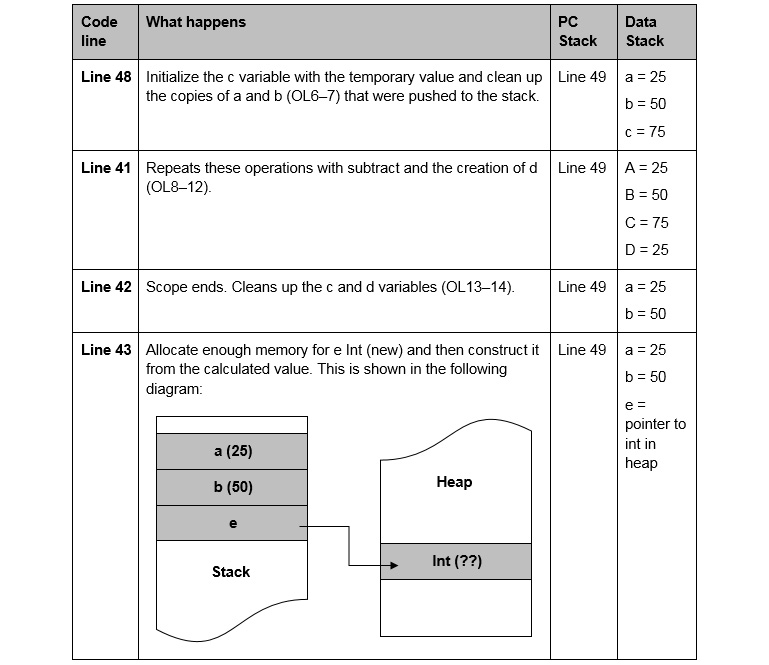
Figure 3.4: Detailed analysis of the test program's execution (part 2)
Below is the third part of the detailed analysis of the test program's execution:

Figure 3.5: Detailed analysis of the test program's execution (part 3)
From this simple program, we learned some important facts:
- Copy constructors are called when we pass by value (as we did in this case).
- Returning a type causes only one constructor to be called (not two constructors – one to create the return object and one for the variable to store the returned data) – C++ calls this copy elision and it is now mandatory in the standard.
- On termination of scope (the closing curly bracket '}'), any variable that goes out of scope has its destructor called. If that is true, then why was the address 0x6000004d0 not shown with a destructor call (~Int())? This leads us to the next fact.
- The destructor for a raw pointer only 'destroys' the pointer, not what it points at. This means that when we exited the calculate() method, we leaked some memory.
The last two facts are important in understanding and solving the problem of resource leaks when we forget to free the resources. We will look at resource management after we deal with exceptions in C++.
Exceptions in C++
We have seen how C++ manages the local scope variables with automatic and dynamic lifetime. It calls the destructors of variables with an automatic lifetime when they go out of scope. We've also seen how raw pointers get destroyed when they go out of scope. As it does not clean up the dynamic lifetime variables, we lose them. This is a part of the story that builds us towards Resource Acquisition Is Initialization (RAII) later. But, first, we need to understand how exceptions change the flow of the program.
The Need for Exceptions
In Chapter 2A, No Ducks Allowed – Types and Deduction, we were introduced to enumerations as a way of dealing with magic numbers for the check_file() function:
FileCheckStatus check_file(const char* name)
{
FILE* fptr{fopen(name,"r")};
if ( fptr == nullptr)
return FileCheckStatus::NotFound;
char buffer[30];
auto numberRead = fread(buffer, 1, 30, fptr);
fclose(fptr);
if (numberRead != 30)
return FileCheckStatus::IncorrectSize;
if(is_valid(buffer))
return FileCheckStatus::InvalidContents;
return FileCheckStatus::Good;
}
The preceding function uses a technique known as status or error codes to report the outcome of the operation. This is the approach that's used for C-style programming, wherein errors related to the POSIX API and Windows API are handled.
Note
POSIX stands for Potable Operating System Interface. It is an IEEE standard for software compatibility between variants of Unix and other operating systems.
This means that, the caller of the method must check the return value and take the appropriate action for each error type. This approach works well when you can reason about the types of errors that the code will generate. This is not always true. For example, there may be a problem with the data that is fed to the program. This leads to an abnormal state in the program that cannot be handled. The part of the code that has the logic to deal with the error is removed from the section of code that detects the problem.
While it is possible to write code that deals with such a problem, it increases the complications of dealing with all error conditions, thereby making the program hard to read, hard to reason about what the function is supposed to do, and thus very hard to maintain.
For error handling, exceptions provide the following benefits over error codes:
- Error codes can be ignored – exceptions force the error to be dealt with (or the program terminates).
- Exceptions can flow up the stack to the best method to respond to the error. Error codes would require propagation out of each intermediate method.
- Exceptions separate the handling of errors from the main program flow, leading to easy readability and maintainability of the software.
- Exceptions separate the code that detects the error, from the code that handles the error.
Provided you follow the best practices and use exceptions for abnormal conditions, there is no (time) overhead in using exceptions. This is because a well-implemented compiler will deliver the C++ mantra – you do not pay for what you don't use. It may cost some memory and your code may be a little larger, but the running time should be unaffected.
C++ uses exceptions to deal with runtime anomalies. By using exceptions, we can detect an error, throw an exception, and the error propagates back to the location where it can be handled. Let's modify the previous program to introduce the divide() function and change the calculate() function to call it. We'll also add logging to the main() function so that we can explore how the exceptions behave:
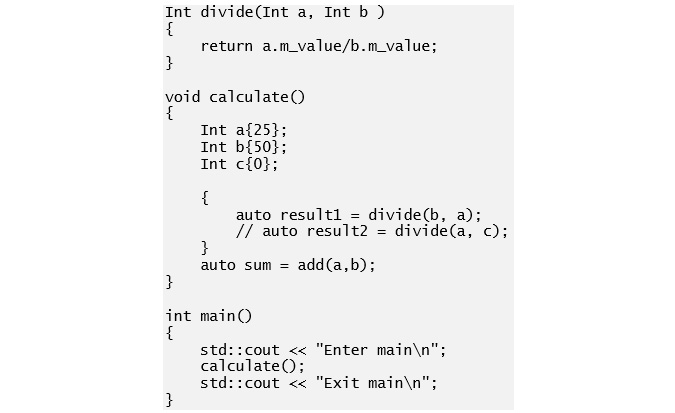
Figure 3.6: Modified test program for investigating exceptions
When we compile and run the preceding program, the following output is generated:

Figure 3.7: Output from the test program
In the preceding code, you can see that the annotations are added to the right. Now, we remove the comment from the result2 line in the program, recompile the program, and rerun it. The new output that's generated is shown as follows:

Figure 3.8: Output from the test program – result2
By comparing the outputs, we can see that the first eight lines of each are the same. The next two lines of the preceding output are added because the divide() function is called twice. The last line indicates that an exception was thrown and that the program was terminated.
The second call to the divide() function attempted to divide by zero – an abnormal operation. This leads to an exception. If an integer is divided by zero, then it leads to a floating-point exception. This has to do with the way exceptions are generated in a POSIX system – it uses something called a signal (we won't go into the details of signals here). When an integer is divided by zero, the POSIX system maps it to the signal called SIGFPE which was originally meant for floating-point error but is now the more generic arithmetic error.
Note
According to the C++ standard, if a zero appears as the divisor for either the '/' operator (divide) or the '%' operator (modulus), then the behavior is undefined. Most systems will choose to throw an exception.
So, we have learned one important fact from the preceding explanation: that an unhandled exception will terminate the program (internally, it calls std::terminate()). We will fix the undefined behavior, catch the exception, and see the changes in the output.To fix the undefined behavior, we need to add #include <stdexcept> at the top of the file and modify the divide() function:
Int divide(Int a, Int b )
{
if (b.m_value == 0)
throw std::domain_error("divide by zero error!");
return a.m_value/b.m_value;
}
When we re-compile and run the program, we get the following output:

Figure 3.9: Output when we throw an exception
As we can see from the preceding output, not much has changed. It's just that we don't get a floating-point exception (core dumped) – the program still terminates but doesn't dump the core. We then added a try/catch block into the main() function to ensure that the exception was no longer unhandled.

Figure 3.10: Catching the Exception
Recompile the program and run it to get the following output:
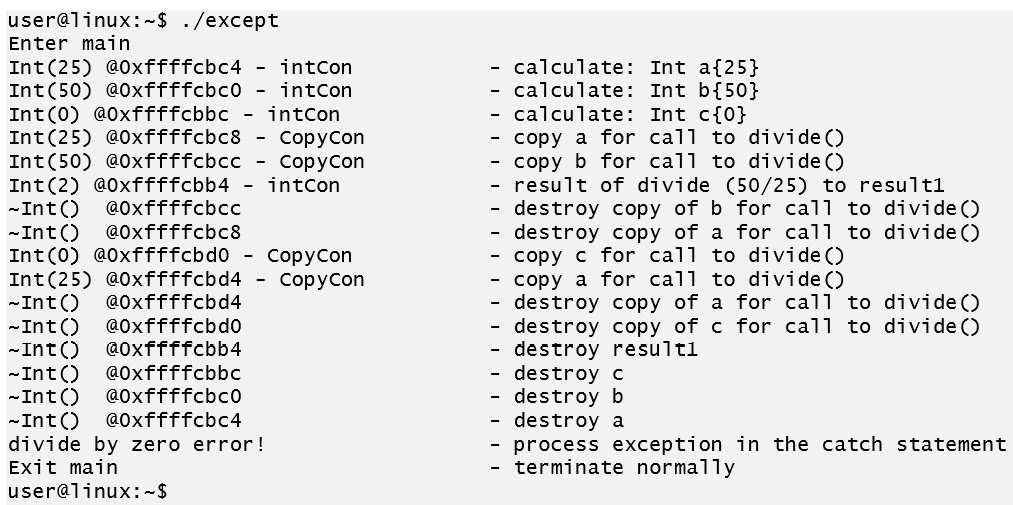
Figure 3.11: Output from the program that catches the exception
In the preceding output, an exception is thrown on the second line that is annotated as "copy a for call to divide". Everything that is output after that is a result of the exception being handled.
Our code has transferred program control to the catch() statement in the main() function and has executed the destructors for all the variables that had been constructed on the stack (from the time the call was made in the try clause).
Stack Unwinding
The process of destroying all local function variables, as guaranteed by the C++ language is known as Stack Unwinding. As the stack unwinds in the presence of an exception, C++ uses its well-defined rules to destroy all the objects in the scope.
When an exception occurs, the function call stack starts searching linearly from the current function back to the function that called it, to the one that called that, and so on, until an exception handler (expressed by a catch block) that matches the exception is found.
If an exception handler is found, then the stack unwinding occurs, destroying all the local variables for all the functions in the stack. The objects are destroyed in the reverse order that they were created. If no handler is found to deal with the thrown exception, then the program terminates (usually without warning the user).
Exercise 1: Implementing exceptions in Fraction and Stack
In this exercise, we will return to two classes that we worked on in Chapter 2A, No Ducks Allowed – Types and Deduction and Chapter 2B, No Ducks Allowed – Templates and Deduction – Fraction and Stack, both of which can experience runtime anomalies. We are going to update their code so that they can raise exceptions whenever any problem is detected. Follow these steps to implement this exercise:
- Open Eclipse and create a new project named Lesson3 using the files found in the Lesson3 examples folder.
- As this is a CMake-based project, change the current builder to be CMake Build (portable).
- Go to the Project | Build All menu to build all the exercises. By default, the console at the bottom of the screen will display the CMake Console [Lesson3].
- Configure a new Launch Configuration, L3Exercise1 to run with the name Exercise1.
- Also, configure a new C/C++ Unit Run Configuration, L3Ex1Tests, to run L3Ex1tests. Set the Google Tests Runner.
- Click on the Run option for the existing 18 tests to run and pass.

Figure 3.12: Existing tests all pass (Runs: 18)
- Open Fraction.hpp in the editor and change the line at the top of the file to read like so:
#define EXERCISE1_STEP 14
- Click on the Run button to re-run the tests – we have added one test that will attempt to create a Fraction with a zero denominator. The test expects that an exception has been thrown:

Figure 3.13: New failing test ThrowsDomainErrorForZeroDenominator
- Click on the failing test name – the Messages window will now show the expected behavior and the actual behavior. You may need to scroll to the right to read it all. At the very right it indicates "Expected … throws an exception of type std::domain_error" and the next line states "Actual: it throws nothing".
- Double-click on the message and it will take you to the following test:

Figure 3.14: The failing test
The ASSERT_THROW() macro requires two arguments. Since the Fraction initializer has a comma in it, it is necessary to wrap the whole first argument in an extra set of parentheses. The second argument is expected to get a std::domain_error from this constructor. The internal try/catch structure is present to confirm that the expected string is captured inside the exception object. If we do not want to check this, then we could simply write the test like so:
ASSERT_THROW(({Fraction f1{1,0}; }), std::domain_error);
- Open the file Fraction.cpp in the editor. Insert the following line near the top of the file:
#include <stdexcept>
- Modify the constructor to throw an exception if it's been created with a zero denominator:
Fraction::Fraction(int numerator, int denominator)
: m_numerator{numerator}, m_denominator{denominator}
{
if(m_denominator == 0)
{
throw std::domain_error("Zero Denominator");
}
}
- Click on the Run button to re-run the tests. 19 tests now pass.
- Open Fraction.hpp in the editor and change the line near the top of the file to read like so:
#define EXERCISE1_STEP 20
- Click on the Run button to re-run the tests – the new test ThrowsRunTimeErrorForZeroDenominator fails.
- Click on the failing test name – the Messages window will now show the expected behavior and the actual behavior. You may need to scroll to the right to read it all. At the very right it indicates "Expected… throws an exception of type std::runtime_error" and the next line states "Actual: it throws a different type".
- Double-click on the message again to open the failing test:

Figure 3.15: Another failing test
This test is verifying that the division assignment operator will throw an exception for a divide by zero.
- Open Fraction.cpp and locate the operator/=() function. You'll see that, inside this function, it actually uses the constructor for Fraction, so it will throw a std::domain_error.
- Now modify operator/=() to detect this problem before the constructor is called so that it throws a std::runtime_error with the expected message.
- Modify Fraction.cpp by adding a domain error that will detect the division operator:
Fraction& Fraction::operator/=(const Fraction& rhs)
{
if (rhs.m_numerator == 0)
{
throw std::runtime_error("Fraction Divide By Zero");
}
Fraction tmp(m_numerator*rhs.m_denominator,
m_denominator*rhs.m_numerator);
*this = tmp;
return *this;
}
- Click on the Run button to re-run the tests. All 20 tests pass.
- Open Stack.hpp in the editor and change the line near the top of the file to read like so:
#define EXERCISE1_STEP 27
- Click on the Run button to re-run the tests – we have added one test that will attempt to pop from an empty stack. In the C/C++ Unit tab window, click on the triangle next to FractionTest to collapse the lists of tests and show the StackTest:
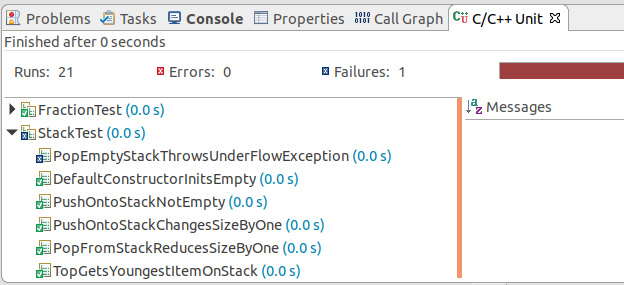
Figure 3.16: pop Stack test fails
- Use the C/C++ Unit window to click through and locate the failing test. Determine the expected exception and then open Stack.hpp. Add #include <stdexcept> to the top of the file and then update the pop() function so that it looks like this:
void pop()
{
if(empty())
throw std::underflow_error("Pop from empty stack");
m_stack.pop_back();
}
- Click on the Run button to re-run the tests. 21 tests now pass.
- Open Stack.hpp in the editor and change the line at the top of the file to read like so:
#define EXERCISE1_STEP 31
- Click on the Run button to re-run the tests – the newly added test, TopEmptyStackThrowsUnderFlowException, fails.
- Use the C/C++ Unit window to click through and locate the failing test. Determine the expected exception and then open Stack.hpp. Update the non-const top() method so that it looks as follows:
reference top()
{
if(empty())
throw std::underflow_error("Top from empty stack");
return m_stack.back();
}
- Click on the Run button to re-run the tests. 22 tests pass.
- Open Stack.hpp in the editor and change the line at the top of the file to read like so:
#define EXERCISE1_STEP 35
- Click on the Run button to re-run the tests – the newly added test, TopEmptyConstStackThrowsUnderFlowException, fails.
- Use the C/C++ Unit window to click through and locate the failing test. Determine the expected exception and then open Stack.hpp. Update the const top() method so that it looks as follows:
const_reference top() const
{
if(empty())
throw std::underflow_error("Top from empty stack");
return m_stack.back();
}
- Click on the Run button to re-run the tests. All 23 tests now pass.
In this exercise, we have added run time checking for pre-conditions that are part of the normal operation of using our Fraction and Stack classes. This code will only execute to throw an exception when one of the pre-conditions is violated, indicating that there's a problem with the data or how our program was executed.
What Happens When an Exception is Thrown?
At some point, our program executes the following statement:
throw expression;
By executing this, we are signaling that an erroneous condition has occurred, and that we want it handled. The next thing that happens is a temporary object, known as the exception object, is constructed in an unspecified storage and copy-initialized from the expression (which may call the move constructor and may be subject to copy elision). The type of the exception object is statically determined from the expression with the const and volatile qualifiers removed. Array types decay to pointers, while function types are converted into a pointer of a function. If the type of expression is malformed or abstract, then a compiler error will occur.
After the construction of the exception object, the control, along with the exception object, is transferred to the exception handler. The exception handler that's chosen is the one that has the closest matching type to the exception object as the stack unwinds. The exception object exists until the last catch clause exits, unless it is rethrown. The type of the expression must have an accessible copy constructor and a destructor.
Throw-by-Value or Throw-by-Pointer
Knowing that a temporary exception object is created, passed around, and then destroyed, what type should the throw expression use? A value or a pointer?
We haven't talked much about specifying the types in the catch statements yet. We will do that shortly. But for now, note that to catch a pointer type (which was thrown), the catch pattern also needs to be of a pointer type.
If a pointer to an object is thrown, then the throwing party must ensure that what the exception object will point at (as it will be a copy of a pointer) will be kept alive until the exception has been handled, even through the stack unwinding.
The pointer could be to a static variable, a global variable, or memory that's been allocated from the heap to ensure that the object being pointed to still exists when the exception is handled. Now, we have solved the problem of keeping the exception object alive. But when the handler has finished with it, what does the catcher do with it?
The catcher of the exception isn't aware about the creation of the exception object (global, static, or heap) and so it doesn't know whether it should delete the received pointer or not. Thus, throwing-by-pointer is not the recommended approach of throwing exceptions.
An object that is thrown will be copied to the created temporary exception object and handed off to the handler. When the exception has been handled, the temporary object will simply be destroyed, and the program will continue. There is no ambiguity as to what to do with it. Therefore, the best practice is to throw the exception by value.
Standard Library Exceptions
The C++ Standard Library defines std::exception as the base class for all the Standard Library exceptions. The standard defines the following first-level hierarchy of exceptions/errors (the number in brackets indicates how many exceptions derive from that class):

Figure 3.17: Standard Library exception hierarchy (two levels)
These exceptions are used through the C++ Standard Library including the STL. The best practice when creating your own exception class is deriving it from one of the standard exceptions. As we will see next, your special exception can be caught by a handler for one of the standard exceptions.
Catching Exceptions
While discussing the need for exceptions, we introduced the idea of throwing the exceptions but did not really look at how C++ supports catching the exception. The process of exception handling starts with a section of code being wrapped in a try block to place it under exception inspection. The try block is followed by one or more catch blocks, which are the exception handlers. When an exceptional circumstance occurs while executing the code inside the try block, an exception is thrown, and control is transferred to the exception handlers. If no exceptions are thrown, then all the exception handlers are skipped, the code in the try block completes, and normal execution continues. Let's express these concepts in a code snippet:
void SomeFunction()
{
try {
// code under exception inspection
}
catch(myexception e) // first handler – catch by value
{
// some error handling steps
}
catch(std::exception* e) // second handler – catch by pointer
{
// some other error handling steps
}
catch(std::runtime_error& e) // third handler – catch by reference
{
// some other error handling steps
}
catch(...) // default exception handler – catch any exception
{
// some other error handling steps
}
// Normal programming continues from here
}
The preceding snippet shows the necessary keywords – try, and catch and introduces the three different types of catch pattern (excluding the default handler):
- Catch exception by value: This is a costly mechanism as the exception handler is processed like any other function. Catch-by-value means that a copy of the exception object must be created and then passed to the handler. The creation of the second copy slows down the exception handling process. This type can also suffer from object slicing where a subclass is thrown, and the catch clause is a super class. The catch clause will then only receive a copy of the super-class object that loses the attributes of the original exception object. Therefore, we should avoid catch-by-value exception handlers.
- Catch exception by pointer: As discussed when looking at throw-by-value, with throw-by-pointer, this style of exception handler can only catch exceptions thrown by the pointer. As we only want to throw by value, we should avoid catch-by-pointer exception handlers.
- Catch expression by reference: This is the recommended style of exception handler as it does not suffer from the issues related to catch-by-value and catch-by-pointer. As a reference is passed to the handler, no second copy of the exception object is made. Splicing does not occur because the reference still refers to the originally thrown exception object. And since the exception was thrown by value, the temporary exception object will be destroyed automatically when we are done with it.
Note
When dealing with exceptions, it is throw-by-value and catch-by-reference.
When there are multiple catch blocks, the exception object type is used to match the handlers in the order that they are specified. Once a handler is found to match, it is executed, and the remaining exception handlers are ignored. This is different to function resolution, where the compiler will find the best match to the arguments. Thus, the exception handlers (catch blocks) should be defined from the more specific to the more general. For example, the default handler (catch(...)) should always come last in the definition.
Exercise 2: Implementing Exception Handlers
In this exercise, we will implement a hierarchy of exception handlers to manage how exceptions are processed. Follow these steps to implement this exercise:
- Open the Lesson3 project in Eclipse. Then in the Project Explorer, expand Lesson3 then Exercise02 and double click on exceptions.cpp to open the file for this exercise into the editor. This file contains the following code:
#include <exception>
#include <iostream>
void run_exceptions()
{
try
{
throw std::domain_error("We got one!!!!");
}
catch(...)
{
std::cout << "Exception caught by default handler ";
}
catch(const std::exception& e)
{
std::cout << "Exception '" << "' caught by std::exception handler ";
}
catch(const std::logic_error& e)
{
std::cout << "Exception '" << "' caught by std::logic_error handler ";
}
catch(const std::domain_error& e)
{
std::cout << "Exception '" << "' caught by std::domain_error handler ";
}
}
int main()
{
std::cout << " ------ Exercise 2 ------ ";
run_exceptions();
std::cout << "Complete. ";
return 0;
}
Note
All the exception handlers have used the same name for the exception argument, that is, e. The scope for that variable is only the catch block that it is declared in.
- Click on the Launch Configuration drop down menu and select New Launch Configuration…. Configure the L3Exercise2 application from the Search Project menu to run it with the name L3Exercise2.
- When that is complete, it will be the currently selected Launch Configuration.
- Click on the Run button. Exercise 2 will run and produce the following output:

Figure 3.18: Exercise 2 output – default handler caught the exception
- In the Console window, click on the Display Selected Console button, and select CDT Global Build Console. Scroll through the window. You will find (if the GCC compiler is being used) that there are five warning messages related to the order that we have placed our exception handlers in. (Actually, the first warning would normally be an error except that the CMake file sets the -fpermissive flag when it compiles this target.)
- In the editor, move the default exception handler, catch(...), to just after the std::domain_error handler. Click on the Run button. Exercise 2 will run and produce the following output:

Figure 3.19: std::exception handler has been used
- In the editor, move the std::exception handler to just after the std::domain_error handler. Click on the Run button. This time, it will report that the std::logic_error handler was executed.
- In the editor, move the std:: logic_error handler to just after the std::domain_error handler. Click on the Run button. This time, it will report that the std:: domain_error handler was executed which is actually what we would expect.
- Now change the throw line to be a std::logic_error exception. Click on the Run button. This time, it will report that std::logic_error handler was executed as expected.
- Now change the throw line to be a std::underflow_error exception. Click on the Run button and this time it will report that the exception was caught by the std::exception handler as expected. std::exception is the base class for all Standard Library exceptions.
In this exercise, we implemented a series of exception handlers and observed how the order of exception handlers affects the way an exception is caught and how the exception hierarchy can be used.
CMake Generator Expressions
When working with CMake, it is sometimes necessary to adjust the value of a variable. CMake is a build generator system that can generate build files for many build tools and compiler tool chains. Because of this flexibility, if you want to turn on some feature in the compiler, you only need to apply to it to one particular type. This is because the command-line options are different between vendors. For example, the command line option for the g++ compiler to enable C++17 support is -std=c++17, but for msvc it is /std:c++17. If you open the CMakeLists.txt file and locate L3Exercise2 add_excutable, then the following line will be after it:
target_compile_options(L3Exercise2 PRIVATE $<$<CXX_COMPILER_ID:GNU>:-fpermissive>)
This uses the $<CXX_COMPILER_ID:GNU> variable query to check whether it is a GCC compiler. If yes, then it generates a 1 (true), otherwise 0 (false). It also uses the $<condition:true_string> condition expression to add -fpermissive to the compiler options for the L3Exercise2 target, but only for the gcc compiler. These can be added for each compiler type as separate calls to target_compile_options or via one call.
Note
For more information on generator expressions, please take a look at the following link: https://cmake.org/cmake/help/v3.15/manual/cmake-generator-expressions.7.html.
Exception Usage Guidelines
When using exceptions in your C++ code, remember the following points:
- Chant: Throw by value and catch by reference
- Do not use exceptions for normal program flow. If a function meets an abnormal condition and is not able meet its (functional) obligations, then and only then do you throw an exception. If the function can resolve the abnormal condition and fulfil its obligations, then it is not an exception. They are named exceptions for a reason and you will not incur any processing overhead if you do not use them.
- Do not throw an exception from within a destructor. Remember that because of stack unwinding, local variable destructors will be executed. If a destructor is called during the stack unwinding process and throws an exception, then the program will terminate.
- Do not swallow exceptions. Do not use the default catch handler and do nothing about the exception. The exception has been thrown to indicate that there is a problem and you should do something about it. Ignoring an exception can lead to a failure later that will be hard to troubleshoot. This is because any useful information is truly lost with the swallowed exception.
- The exception object is copied from the throw.
Resource Management (in an Exceptional World)
So far, we have looked at local variable scope, and how automatic and dynamic lifetime variables are dealt with when the variable goes out of scope – automatic lifetime variables (those placed on the stack) are fully destructed while dynamic lifetime variables (those allocated to the heap by the programmer) are not destructed: we just lose any access to them. We have also seen that, when an exception is thrown, the nearest matching handler is found and all the local variables between the throw point and the handler will be destructed through the stack unwinding process.
We can use this knowledge to write robust resource management classes that will relieve us from the need to keep track of resources (dynamic lifetime variables, file handles, system handles, and so on) to ensure that they are released (back into the wild) when we are done with them. The technique that's utilized to manage resources, both under normal operating and under exceptions, is known as Resource Acquisition is Initialization (RAII).
Resource Acquisition Is Initialization
RAII is another good example of a badly named concept (the other is SFINAE). RAII, or Resource Acquisition is Initialization describes the behavior of a class that's used to manage resources. It may be better if it were named Destruction is Resource Release, which really captures the essence of what the management class is attempting to do. We could infer from our previous discussions how to make this work, but it will be more instructive to show a separate example that will develop the resource management File class and show how RAII also improves the readability and our ability to reason about what a function does.
Consider the following code:
void do_something()
{
FILE* out{};
FILE* in = fopen("input.txt", "r");
try
{
if (in != nullptr)
{
// UNSAFE – an exception here will create a resource leak
out = fopen("output.txt", "w");
if (out != nullptr)
{
// Do some work
// UNSAFE – an exception here will create resource leaks
fclose(out);
}
fclose(in);
}
}
catch(std::exception& e)
{
// Respond to the exception
}
}
This code shows two potential problems with the management of resources:
- Most importantly, the occurrence of an exception between the opening and closing of a file results in the resource leaking. If this is a system resource, many of these can lead to system instability or application performance being adversely affected, since it starves for resources.
- In addition, the management of multiple resources within one method can lead to deeply nested clauses because of error handling. This is detrimental to the readability of the code and hence its understanding and maintainability. It is easy to forget to release a resource, especially when there are multiple exit points.
So, how can we manage the resource so that we have exception-safe and simpler code? This problem is not unique to C++ and different languages manage it differently. Java, C#, and Python use a garbage collection approach that sweeps through created objects and cleans them up when they are no longer referenced. But C++ does not have garbage collection, so what is the solution?
Consider the following class:
class File {
public:
File(const char* name, const char* access) {
m_file = fopen(name, access);
if (m_file == nullptr) {
throw std::ios_base::failure("failed to open file");
}
}
~File() {
fclose(m_file);
}
operator FILE*() {
return m_file;
}
private:
FILE* m_file{};
};
This class implements the following characteristics:
- The constructor acquires the resource.
- If the resource is not acquired in the constructor, then an exception is thrown.
- When the class is destroyed, the resource is released.
If we use this class in the do_something() method, it then looks like this:
void do_something()
{
try
{
File in("input.txt", "r");
File out("output.txt", "w");
// Do some work
}
catch(std::exception& e)
{
// Respond to the exception
}
}
If an exception occurs while doing this, then C++ guarantees that all stack-based objects will have their destructors called (stack unwinding), thus ensuring that the files are closed. This solves the problem of resources leaking with the occurrence of an exception as the resources are now automatically cleaned up. In addition, this method is extremely easy to read so that we can understand the logic flow without having to worry about error handling.
This technique uses the lifetime of the File objects to acquire and release the resource, ensuring that the resources do not leak. The resource is acquired during the construction (initialization) of the management class and released during the destruction of the management class. It is this behavior of scope-bound resources that gives rise to the name Resource Acquisition Is Initialization.
The preceding example deals with managing file handles that are system resources. It applies to any resources that are required to be acquired before use, and then relinquished when finished. The RAII technique can be applied to a wide range of resources – open files, open pipes, allocated heap memory, open sockets, threads of execution, database connections, locking of mutexes/critical sections – basically any resource that is in short supply in the host system and needs to be managed.
Exercise 3: Implementing RAII for Memory and File Handles
In this exercise, we will implement two different classes that will manage memory or files using the RAII technique. Follow these steps to implement this exercise:
- Open the Lesson3 project in Eclipse. Then in the Project Explorer, expand Lesson3, then Exercise03, and double click on Exercise3.cpp to open the file for this exercise into the editor.
- Click on the Launch Configuration drop down menu and select New Launch Configuration…. Configure the L3Exercise3 application from the Search Project menu to run it with the name L3Exercise3.
- Click on the Run button to run Exercise 3. This will produce the following output:

Figure 3.20: Leaky memory and files from Exercise3.cpp
The output shows that we allocated memory five times and that the addresses are returned by new. When executing from the main() function when the monitor is destructed, it dumps a report of memory that was allocated and released, as well as the files that were opened but never closed.
- In the editor, type the following into the Exercise3.cpp file of the File class:
class File {
public:
File(const char* name, const char* access) {
m_file = fopen(name, access);
if (m_file == nullptr) {
throw std::ios_base::failure(""failed to open file"");
}
}
~File() {
fclose(m_file);
}
operator FILE*() {
return m_file;
}
private:
FILE* m_file{};
};
- Click on the Run button to run Exercise 3 – it still leaks files and memory, but the code is correct.
- Locate the LeakFiles() function and modify it so that it uses the new File class (like in the preceding code) to prevent file leaks:
void LeakFiles()
{
File fh1{"HelloB1.txt", "w"};
fprintf(fh1, "Hello B2 ");
File fh2{"HelloB2.txt", "w"};
fprintf(fh2, "Hello B1 ");
}
- Click on the Run button to run Exercise 3. If you have modified LeakFiles() correctly, then the output will be as follows:

Figure 3.21: No file leaks
- Now in Exercise3.cpp, add the following CharPointer class:
class CharPointer
{
public:
void allocate(size_t size)
{
m_memory = new char[size];
}
operator char*() { return m_memory;}
private:
char* m_memory{};
};
- Modify LeakPointers() to read like so:
void LeakPointers()
{
CharPointer memory[5];
for (auto i{0} ; i<5 ; i++)
{
memory[i].allocate(20);
std::cout << "allocated 20 bytes @ " << (void *)memory[i] << " ";
}
}
- Click on the Run button to run Exercise 3 – it still has memory leaks, but the code is correct.
- Now, add the following destructor to CharPointer. Note that the delete operator uses the array [] syntax:
~CharPointer()
{
delete [] m_memory;
}
- Click on the Run button again to run Exercise 3 – this time, you should see that the monitor reports no leaks:
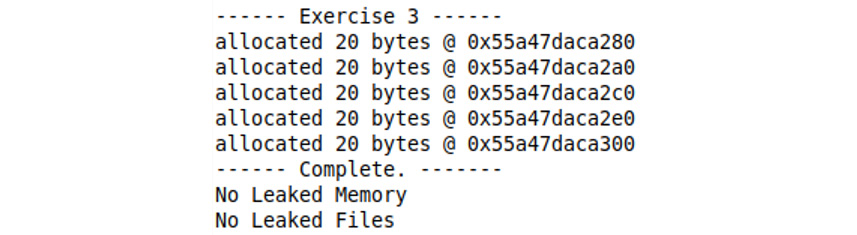
Figure 3.22: No leaks – memory or files
The implementation of File and CharPointer deliver on the RAII design approach, but there are other considerations when designing these. For example, do we want the copy constructor or copy assignment functions? In both cases, it could be a problem to just copy the resource from one object to another as this could result in two attempts to close a file handle or delete the memory. Typically, this would lead to undefined behavior. Next, we will re-visit the special member functions in light of implementing a resource management object such as File or CharPointer.
Special Coding Techniques
The code for Exercise 3, Implementing RAII for Memory and File Handles, has been specially written so that we can monitor the usage of the memory and the file handles and report any leaks on exit. Visit the monitor.h and monitor.cpp files and examine the two techniques that were used to make the monitor possible:
- Preprocessor macros: This is the special use of a preprocessor macro to demonstrate the leaks and should not be used in production code, that is, replacing a function by text substitution.
If you program to the Windows API, you may occasionally be caught with your method names clashing with the macros Microsoft uses for its API methods. For example, do not call any of your methods SendMessage if you include windows.h. If you do, then depending on whether you are building ASCII mode or Unicode mode, it will be substituted with SendMessageA or SendMessageW respectively.
- Defining our own new handler: This is an advanced technique and unless you write embedded code, it's unlikely you will need it.
C++ doesn't Need finally
Other languages (C#, Java, and Visual Basic.NET) that support an exception throwing mechanism have a try/catch/finally paradigm where the code in the finally block is called on exit from the try block – either normally or by exception. C++ has no finally block because it has access to a better mechanism that ensures that we cannot forget to release a resource – RAII. Since the resource is represented by a local object, the local object's destructor will free the resource.
The added advantage of this design pattern is that if a lot of resources are being managed, then the finally block is proportionally large. RAII removes the need for finally and leads to code that is easier to maintain.
RAII and the STL
The Standard Template Library (STL) utilizes RAII in many of its templates and classes. For example, the smart pointers that were introduced in C++11, that is std::unique_ptr and std::shared_ptr, help avoid many problems by ensuring that memory is deallocated when it has been finished with, or by ensuring that the memory is not deallocated if it is used elsewhere. Other examples in the STL include std::string (memory), std::vector (memory), and std::fstream (file handles).
Who Owns This Object?
With the preceding implementations of File and CharPointer, we have tested Resource Management with RAII. Let's explore it further. Firstly, we will define a class that has more than just one resource:
class BufferedWriter
{
public:
BufferedWriter(const char* filename);
~BufferedWriter();
bool write(const char* data, size_t length);
private:
const size_t BufferSize{4096};
FILE* m_file{nullptr};
size_t m_writePos{0};
char* m_buffer{new char[BufferSize]};
};
The class is used for buffering the writing to the file.
Note
This is not usually necessary when using iostream derived classes as they already provide buffering.
Each call to the write() function will add data into the allocated buffer until it reaches the BufferSize at which point the data is actually written to the file and the buffer is reset.
But what if we wanted to assign this instance of BufferedWriter to another instance or copy it? What is the right behavior?
If we just let the default copy constructor/copy assignment do its their thing we get a member-wise copy of the items. This would mean that we have two instances of BufferedWriter that hold the same handle to the file and the pointer to the buffer. When the first instance of the object is destroyed, being the good programmers that we are, we will clean up the file by closing it and the memory by deleting it. The second instance now has a file handle that is defunct and a pointer to memory that we have told the operating system to recover for the next user. Any attempt to use these resources, including destroying them, will result in undefined behavior and mostly likely a program crash. The default copy constructor/copy-assignment operators execute what is known as a shallow copy – that is, it copies all the members as they are, bit by bit (but not what they refer to).
The two resources that we have can be treated differently. Firstly, there should only be one class that owns the m_buffer. There are two options in dealing with this:
- Prevent the copy of the class and hence the memory
- Perform a deep copy where the buffer in the second instance has been allocated by the constructor and the contents of the first buffer is copied
Secondly, there should only be one class that owns the file handle (m_file). There are two options in dealing with this:
- Prevent the copy of the class and hence the file handle
- Transfer the ownership from the original instance to the second instance and mark the original as invalid or empty (whatever that means)
It is easy enough to implement a deep copy, but how do we transfer ownership of a resource? To answer this question, we need to look at temporary objects and value categories again.
Temporary Objects
A temporary object is created to store the intermediate results of an expression before the result is deposited into a variable (or just forgotten). An expression is any code that returns a value, including passing by value to a function, returning a value from a function, implicit conversion, literals, and binary operators. Temporary objects are rvalue expressions and they have memory, temporarily allocated for them as a location, to place the expression result. It is this creation of temporaries and copying data between them that caused some performance issues prior to C++11. To address this issue, C++11 introduced rvalue references to enable what is known as move semantics.
Move Semantics
An rvalue reference (denoted by a double ampersand, '&&') is a reference that is only assigned an rvalue that will extend the rvalue's lifetime until the rvalue reference is done with it. So, rvalues can live beyond the expression that defined it. With rvalue references, we can now implement move semantics through the move constructor and move assignment operators. The purpose of move semantics is to steal resources from the referenced object and thus avoid the expensive copy operations. When the move is complete, the referenced object must be left in a stable state. In other words, the object that was moved from must be left in a state that will not cause any undefined behavior or a program crash when it is destroyed, nor should it affect the resources that were stolen from it.
C++11 also introduced a casting operator std::move(), that casts an lvalue to an rvalue so that the move constructor or move assignment operator gets called to 'move' the resources. The std::move() method does not actually move the data.
One unexpected thing to note is that, inside the move constructor and move assignment operator, the rvalue reference is actually an lvalue. This means that if you want to ensure move semantics happen within the method then you may need to use std::move() again on the member variables.
As C++11 introduced move semantics, it also updated the Standard Library to take advantage of this new capability. For example, std::string and std::vector have been updated to include move semantics. To get the benefits of move semantics; you just need to re-compile your code with the latest C++ compiler.
Implementing a Smart Pointer
A smart pointer is a resource management class that holds a pointer to a resource and releases it when it goes out of scope. In this section, we will implement a smart pointer, observe its behavior as a copy supporting class, evolve it to support move semantics and finally remove its support for copy operations:
#include <iostream>
template<class T>
class smart_ptr
{
public:
smart_ptr(T* ptr = nullptr) :m_ptr(ptr)
{
}
~smart_ptr()
{
delete m_ptr;
}
// Copy constructor --> Do deep copy
smart_ptr(const smart_ptr& a)
{
m_ptr = new T;
*m_ptr = *a.m_ptr; // use operator=() to do deep copy
}
// Copy assignment --> Do deep copy
smart_ptr& operator=(const smart_ptr& a)
{
// Self-assignment detection
if (&a == this)
return *this;
// Release any resource we're holding
delete m_ptr;
// Copy the resource
m_ptr = new T;
*m_ptr = *a.m_ptr;
return *this;
}
T& operator*() const { return *m_ptr; }
T* operator->() const { return m_ptr; }
bool is_null() const { return m_ptr == nullptr; }
private:
T* m_ptr{nullptr};
};
class Resource
{
public:
Resource() { std::cout << "Resource acquired "; }
~Resource() { std::cout << "Resource released "; }
};
smart_ptr<Resource> createResource()
{
smart_ptr<Resource> res(new Resource); // Step 1
return res; // return value invokes the copy constructor // Step 2
}
int main()
{
smart_ptr<Resource> the_res;
the_res = createResource(); // assignment invokes the copy assignment Step 3/4
return 0; // Step 5
}
When we run this program, the following output generated:

Figure 3.23: Smart Pointer Program output
For such a simple program, there is a lot of acquiring and releasing of the resource. Let's pull this apart:
- The local variable, res, inside createResource() is created and initialized on the heap (dynamic lifetime), causing the first "Resource acquired" message.
- It is possible for the compiler to create another temporary to return the value. However, the compiler has executed copy elision to remove the copy (that is, it is able to build the object directly onto a position in the stack allocated by the calling function). The compiler has Return-Value-Optimization (RVO) and Named- Return-Value-Optimization (NRVO) optimizations that it can apply and, under C++17 these have been made mandatory in certain circumstances.
- The temporary object is assigned to the the_res variable in the main() function by copy assignment. Since copy assignment is doing a deep copy, another copy of the resource is acquired.
- When the assignment completes, the temporary object goes out of scope and we get the first "Resource released" message.
- When the main() function returns, the_res goes out of scope, which releases the second Resource.
So, if the resource is large, we have a very inefficient method of creating the the_res local variable in main() as we are creating and copying around large chunks of memory because of the deep copy in the copy assignment. However, we know that when the temporary variable created by createResource() is no longer needed, then we are going to throw it away and release its resource. It would be more efficient in these scenarios to transfer (or move) the resource from the temporary to the other instance of the type. Move semantics makes it possible to rewrite our smart_ptr template to not do the deep copy but transfer the resource.
Let's add move semantics to our smart_ptr class:
// Move constructor --> transfer resource
smart_ptr(smart_ptr&& a) : m_ptr(a.m_ptr)
{
a.m_ptr = nullptr; // Put into safe state
}
// Move assignment --> transfer resource
smart_ptr& operator=(smart_ptr&& a)
{
// Self-assignment detection
if (&a == this)
return *this;
// Release any resource we're holding
delete m_ptr;
// Transfer the resource
m_ptr = a.m_ptr;
a.m_ptr = nullptr; // Put into safe state
return *this;
}
After re-running our program, we get the following output:

Figure 3.24: Smart pointer program output using move semantics
Now, because move assignment is now available, the compiler uses it on this line:
the_res = createResource(); // assignment invokes the copy assignment Step 3/4
Step 3 is now replaced with move assignment, meaning the deep copy has now been removed.
Step 4 no longer frees the resource because the line with the comment "//" puts into a safe state – it no longer has a resource to free because its ownership was transferred.
Another point to note with the move constructor and move assignment is that where the arguments were const for their copy versions, they were non-const for their move versions. This is called the transfer of ownership, which means that we need to modify the parameter that is passed in.
An alternative implementation of the move constructor may look like the following:
// Move constructor --> transfer resource
smart_ptr(smart_ptr&& a)
{
std::swap(this->m_ptr, a.m_ptr);
}
Essentially, we are swapping the resource, and the C++ STL has support for swap as a template with many specializations. This works because we used member initialization to set m_ptr to nullptr. So, we are swapping a nullptr with the value stored in a.
Now that we have fixed the unnecessary deep copy problem, we can actually remove the copy operations from smart_ptr() as the transfer of ownership is actually what we want. If we were to copy an instance of a non-temporary smart_ptr to another instance of a non-temporary instance of smart_ptr, then we would have two objects that would delete the resource when they go out of scope, and this is not the desired behavior. To remove the (deep) copy operations we change the definition of our member functions, as follows:
smart_ptr(const smart_ptr& a) = delete;
smart_ptr& operator=(const smart_ptr& a) = delete;
The postfix of = delete which we looked at in Chapter 2A, No Ducks Allowed – Types and Deduction, tells the compiler that an attempt to access a function with that prototype is now not valid code and causes an error.
STL Smart Pointers
Instead of having to write our own smart_ptr, the STL provides classes that we can use to implement RAII on our objects. The original was std::auto_ptr(), which was deprecated in C++ 11 and removed in C++ 17. It was created before rvalue reference support and caused problems because it implemented move semantics using copy. C++ 11 introduced three new templates to manage lifetime and ownership of resources:
- std::unique_ptr: Owns and manages a single object via a pointer and destroys that object when unique_ptr goes out of scope. It has two versions: for single objects (created using new) and for array of objects (created using new[]). unique_ptr is as efficient as using the underlying pointer directly.
- std::shared_ptr: Retains shared ownership of an object through a pointer. It manages the resource through the use of a reference counter. Every copy of shared_ptr that's assigned to shared_ptr updates the reference count. When the reference count goes to zero, this means that there are no owners left and the resource is released/destroyed.
- std::weak_ptr: Provides an interface to the same resource as shared_ptr, but does not modify the counter. It can be checked to see if the resource still exists, but it will not prevent the resource from being destroyed. If you determine that the resource still exists, then it can be used to obtain a shared_ptr to the resource. One use case for it is a scenario where multiple shared_ptrs end in cyclic references. A cyclic reference would prevent the auto releasing of resources. weak_ptr is used to break the loop and allow the resources to be freed when they should be.
std::unique_ptr
std::unique_ptr() was introduced in C++ 11 to replace std::auto_ptr() and gives us everything that smart_ptr does (and more). We can re-write our smart_ptr program as follows:
#include <iostream>
#include <memory>
class Resource
{
public:
Resource() { std::cout << "Resource acquired "; }
~Resource() { std::cout << "Resource released "; }
};
std::unique_ptr<Resource> createResource()
{
std::unique_ptr<Resource> res(new Resource);
return res;
}
int main()
{
std::unique_ptr<Resource> the_res;
the_res = createResource(); // assignment invokes the copy assignment
return 0;
}
We can go one step further than this, because C++ 14 introduced a helper method to ensure exception safety when dealing with unique_ptrs:
std::unique_ptr<Resource> createResource()
{
return std::make_unique<Resource>();
}
Why is this necessary? Consider the following function call:
some_function(std::unique_ptr<T>(new T), std::unique_ptr<U>(new U));
The problem with this is that the compiler is free to order the sequence of operations in the argument list in any order it likes. It could call new T, then new U, then std::unique_ptr<T>(), and finally std::unique_ptr<U>(). The problem with this sequence is that if new U were to throw an exception, then the resource allocated by the call to new T has not been placed in a unique_ptr and will not be cleaned up automatically. The use of std::make_unique<>() guarantees the order of calls so that the construction of the resource and the construction of unique_ptr will occur together and not leak resources. The need for make_unique has been removed in C++17 where the rules around the order of evaluation in these circumstances have been tightened. However, it is still probably a good idea to use the make_unique<T>() approach as any future conversion to a shared_ptr will be easier.
The name unique_ptr makes the intent of the template clear, that is, it is the only owner of the object that it points to. This was not obvious from auto_ptr. Likewise, shared_ptr is clear in that it intends to share the resource. The unique_ptr template provides access to the following operators:
- T* get(): Returns the pointer to the hosted resource.
- operator bool(): Returns true if the instance manages a resource. (get() != nullptr).
- T& operator*(): A lvalue reference to the hosted resource. Same as *get().
- T* operator->(): A pointer to the hosted resource. Same as get().
- T& operator[](size_t index): For unique_ptr(new []), it provides access to the hosted array as if it were natively an array. Returns an lvalue reference so that the value can be set and get.
std::shared_ptr
A shared pointer is used when you want to share the ownership of a resource. Why would you do this? Several scenarios would lend themselves well to the sharing of resources, such as in the case of a GUI program, where you would probably want to share the font objects, bitmap objects, and so on. The GoF flyweight design pattern would be another example.
std::shared_ptr provides all of the same facilities as std::unique_ptr, but with more overhead because it now has to track a reference count for the object. All of the operators described for std::unique_ptr are available for use on std::shared_ptr. One difference is that the recommended method to create a std::shared_ptr is to call std::make_shared<>().
When writing libraries or factories, the author of the library will not always know how a user will want to use the objects that have been created, so the recommendation is to return unique_ptr<T> from your factory methods. The reason for this is that the user can easily convert a std::unique_ptr into a std::shared_ptr by assignment:
std::unique_ptr<MyClass> unique_obj = std::make_unique<MyClass>();
std::shared_ptr<MyClass> shared_obj = unique_obj;
This will transfer ownership and leave unique_obj empty.
Note
Once a resource has been made a shared resource, it cannot be reverted into a unique object.
std::weak_ptr
A weak pointer is a variant of a shared pointer, but it doesn't hold a reference count to the resource. So, it does not prevent it from being released when the count goes to zero. Consider the following program structure, which may occur within a normal graphical user interface (GUI):
#include <iostream>
#include <memory>
struct ScrollBar;
struct TextWindow;
struct Panel
{
~Panel() {
std::cout << "--Panel destroyed ";
}
void setScroll(const std::shared_ptr<ScrollBar> sb) {
m_scrollbar = sb;
}
void setText(const std::shared_ptr<TextWindow> tw) {
m_text = tw;
}
std::weak_ptr<ScrollBar> m_scrollbar;
std::shared_ptr<TextWindow> m_text;
};
struct ScrollBar
{
~ScrollBar() {
std::cout << "--ScrollBar destroyed ";
}
void setPanel(const std::shared_ptr<Panel> panel) {
m_panel=panel;
}
std::shared_ptr<Panel> m_panel;
};
struct TextWindow
{
~TextWindow() {
std::cout << "--TextWindow destroyed ";
}
void setPanel(const std::shared_ptr<Panel> panel) {
m_panel=panel;
}
std::shared_ptr<Panel> m_panel;
};
void run_app()
{
std::shared_ptr<Panel> panel = std::make_shared<Panel>();
std::shared_ptr<ScrollBar> scrollbar = std::make_shared<ScrollBar>();
std::shared_ptr<TextWindow> textwindow = std::make_shared<TextWindow>();
scrollbar->setPanel(panel);
textwindow->setPanel(panel);
panel->setScroll(scrollbar);
panel->setText(textwindow);
}
int main()
{
std::cout << "Starting app ";
run_app();
std::cout << "Exited app ";
return 0;
}
When executed, it outputs the following:

Figure 3.25: Weak pointer program output
This shows that the panel and the textwindow were not destroyed when the app exited. This is because they both held a shared_ptr to each other and so the reference count for both would not go to zero and trigger the destruction. If we depict the structure diagrammatically, then we can see that it has a shared_ptr cycle:
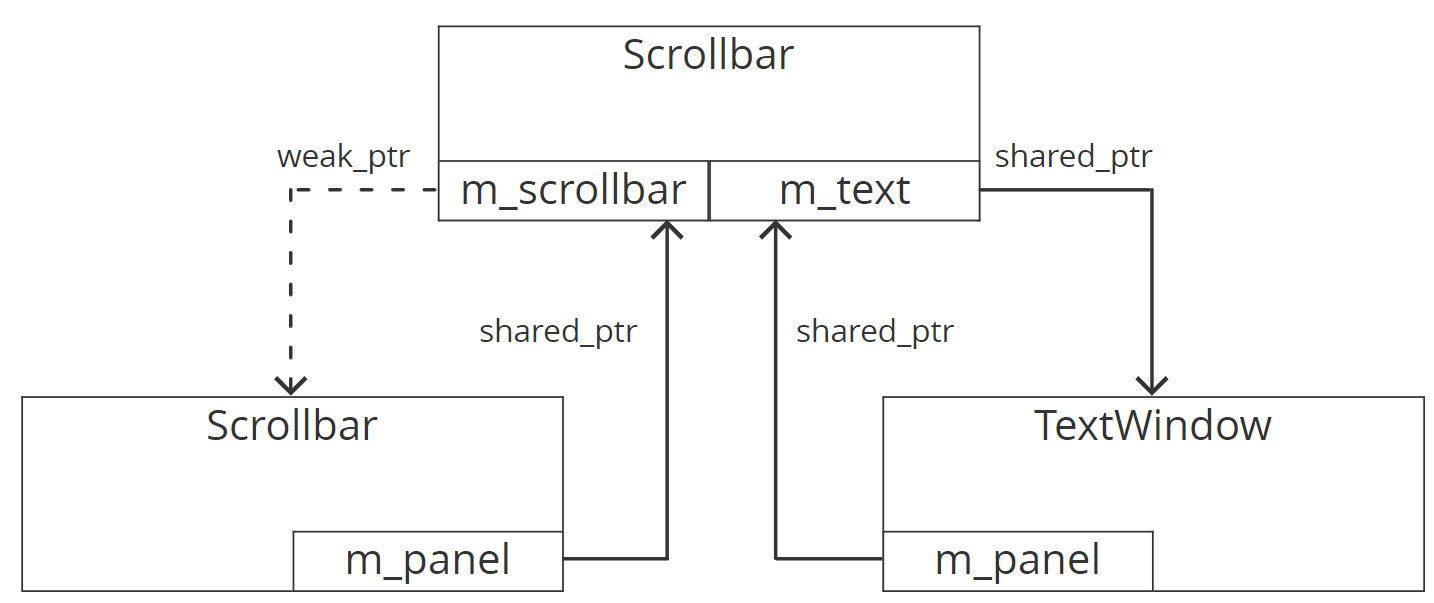
Figure 3.26: weak_ptr and shared_ptr cycles
Smart Pointers and Calling Functions
Now that we can manage our resources, how do we use them? Do we pass around the smart pointers? When we have a smart pointer (unique_ptr or shared_ptr), we have four options when calling a function:
- Pass the smart pointer by value
- Pass the smart pointer by reference
- Pass the managed resource by pointer
- Pass the managed resource by reference
This is not an exhaustive list but are the main ones to consider. The answer to how we pass the smart pointer, or its resource, depends on our intent with the call to the function:
- Is the intend of the function to just use the resource?
- Does the function take ownership of the resource?
- Does the function replace the managed object?
If the function is just going to use the resource, then it does not even need to know that it is being handed a managed resource. It simply needs to use it and should be called using the resource by pointer, or resource by reference (or even resource by value):
do_something(Resource* resource);
do_something(Resource& resource);
do_something(Resource resource);
If you want to pass the ownership of the resource to the function, then the function should be called by smart pointer by value and called using std::move():
do_something(std::unique_ptr<Resource> resource);
auto res = std::make_unique<Resource>();
do_something (std::move(res));
When do_something() returns, the res variable will be empty, and the resource is now owned by do_something().
If you want to replace the managed object (a process known as reseating), then you pass the smart pointer by reference:
do_something(std::unique_ptr<Resource>& resource);
The following program puts all of this together to demonstrate each scenario and how to call the function:
#include <iostream>
#include <memory>
#include <string>
#include <sstream>
class Resource
{
public:
Resource() { std::cout << "+++Resource acquired ["<< m_id <<"] "; }
~Resource() { std::cout << "---Resource released ["<< m_id <<"] "; }
std::string name() const {
std::ostringstream ss;
ss << "the resource [" << m_id <<"]";
return ss.str();
}
int m_id{++m_count};
static int m_count;
};
int Resource::m_count{0};
void use_resource(Resource& res)
{
std::cout << "Enter use_resource ";
std::cout << "...using " << res.name() << " ";
std::cout << "Exit use_resource ";
}
void take_ownership(std::unique_ptr<Resource> res)
{
std::cout << "Enter take_ownership ";
if (res)
std::cout << "...taken " << res->name() << " ";
std::cout << "Exit take_ownership ";
}
void reseat(std::unique_ptr<Resource>& res)
{
std::cout << "Enter reseat ";
res.reset(new Resource);
if (res)
std::cout << "...reseated " << res->name() << " ";
std::cout << "Exit reseat ";
}
int main()
{
std::cout << "Starting... ";
auto res = std::make_unique<Resource>();
// Use - pass resource by reference
use_resource(*res);
if (res)
std::cout << "We HAVE the resource " << res->name() << " ";
else
std::cout << "We have LOST the resource ";
// Pass ownership - pass smart pointer by value
take_ownership(std::move(res));
if (res)
std::cout << "We HAVE the resource " << res->name() << " ";
else
std::cout << "We have LOST the resource ";
// Replace (reseat) resource - pass smart pointer by reference
reseat(res);
if (res)
std::cout << "We HAVE the resource " << res->name() << " ";
else
std::cout << "We have LOST the resource ";
std::cout << "Exiting... ";
return 0;
}
When we run this program, we receive the following output:

Figure 3.27: Ownership passing Program output
Note
The C++ Core Guidelines has a whole section on resource management, smart pointers, and how to use them here: http://isocpp.github.io/CppCoreGuidelines/CppCoreGuidelines#S-resource. We have only touched on the most important that are aspects covered by the guidelines.
Exercise 4: Implementing RAII with STL Smart Pointers
In this exercise, we will implement a sensor factory method that returns the sensor resource via a unique_ptr. We will implement a unique_ptr to hold an array, and then develop code that converts a unique_ptr into a shared pointer and then shares it some more. Follow these steps to implement this exercise:
- Open the Lesson3 project in Eclipse. Then in the Project Explorer, expand Lesson3, then Exercise04, and double-click on Exercise4.cpp to open the file for this exercise into the editor.
- Click on the Launch Configuration drop-down menu and select New Launch Configuration…. Configure the L3Exercise4 application from the Search Project menu so that it runs with the name L3Exercise4.
- Click on the Run button to run Exercise 4. This will produce the following output:

Figure 3.28: Exercise 4 output
- In the editor, examine the code, particularly the factory method, that is, createSensor(type).
std::unique_ptr<ISensor>
createSensor(SensorType type)
{
std::unique_ptr<ISensor> sensor;
if (type == SensorType::Light)
{
sensor.reset(new LightSensor);
}
else if (type == SensorType::Temperature)
{
sensor.reset(new TemperatureSensor);
}
else if (type == SensorType::Pressure)
{
sensor.reset(new PressureSensor);
}
return sensor;
}
This creates an empty unique pointer named sensor, and then resets the contained pointer with the desired sensor according to the passed in type.
- Open Exercise4.cpp in the editor and change the line near the top of the file to read like so:
#define EXERCISE4_STEP 5
- Click on the Run button to compile the code, which will fail with the following error:

Figure 3.29: Compiler error for Step 5
The full error message is as follows:
error: conversion from 'std::unique_ptr<ISensor>' to non-scalar type 'SensorSPtr {aka std::shared_ptr<ISensor>}' requested
According to the error, we are attempting to assign a unique_ptr to a shared_ptr and that is not allowed.
- Locate the line reporting the error and change it to read like so:
SensorSPtr light2 = std::move(light);
- Click on the Run button to compile and run the program. The output is as follows:

Figure 3.30: Successful output for Exercise 4 (after EXERCISE4_STEP = 5)
The preceding output shows that we created three different sensors, that the light sensor pointer went from holding the resource until it was moved, and that the Light 2 shared pointer has two owners. Wait! What? Two owners? But all we did was move the resource from light (a unique_ptr) to light2 (a shared_ptr). The problem is actually the template method:
template<typename SP>
void printSharedPointer(SP sp, const char* message)
The first argument is passed by value, which means that a new copy of the shared_ptr will be created and passed to the method for printing.
- Let's fix that now by changing the template to pass-by-reference. Click on the Run button to compile and run the program. The following output is generated:

Figure 3.31: Corrected printSharedPointer output
- Open Exercise4.cpp in the editor and change the line near the top of the file to read like so:
#define EXERCISE4_STEP 12
- Click on the Run button to compile and run the program. The following output is generated:

Figure 3.32: Annotated Step 12 output for Exercise 4
- Compare the output with the code in the testSensors() method. We'll find that we can easily assign to an empty unique_ptr (light) and that we can assign from one shared_ptr to another (light3 = light2) without the need for std::move() in either case.
- Open Exercise4.cpp in the editor and change the line near the top of the file to read like so:
#define EXERCISE4_STEP 15
- Click on the Run button to compile and run the program. The output switches to the following:

Figure 3.33: Managing arrays in unique_ptr
- Open the editor and find the testArrays() method:
void testArrays()
{
std::unique_ptr<int []> board = std::make_unique<int []>(8*8);
for(int i=0 ; i<8 ; i++)
for(int j=0 ; j<8 ; j++)
board[i*8+j] = 10*(i+1)+j+1;
for(int i=0 ; i<8 ; i++)
{
char sep{' '};
for(int j=0 ; j<8 ; j++)
std::cout << board[i*8+j] << sep;
std::cout << " ";
}
}
There are several things to note in this snippet of code. Firstly, the type is declared as int[]. We have chosen int for this exercise, but it could be just about any type. Secondly, when unique_ptr (and shared_ptr since C++ 17) is used to manage an array, operator[] is defined. So, we simulate a two-dimensional array by calculating a one-dimensional index from the two-dimensional indices' board[i*8+j].
- Edit the first line of the method and declare the auto type:
auto board = std::make_unique<int []>(8*8);
- Click on the Run button to compile and run the program – the output will be identical to the previous run. This is a case where auto is very helpful as you no longer need to type all the details into the type declaration, as well as the make_unique() call.
In this exercise, we implemented a factory function that served up manufactured sensors using unique_ptr to manage the lifetime of the sensor. We then implemented code to change it from a unique_ptr and share it to several objects. Finally, we developed a unique_ptr technique to manage a multi-dimensional array using a single-dimensional array.
Rule of Zero/Five – A Different Perspective
When we introduced BufferedWriter, it had two resources being managed: memory and a file. We then discussed how the default compiler generated copy operations that are what are known as shallow copies. We talked about how we could manage the resources differently – stop the copy, perform a deep copy, or transfer ownership. What we decide to do in these circumstances is known as resource management policy. The policy that you choose, impacts how you execute the Rule of Zero/Five.
In terms of resource management, a class can manage no resources, manage a resource that can be copied but not moved, manage a resource that can be moved but not copied, or manage a resource that should be neither copied nor moved. The following classes show how these may be expressed:
struct NoResourceToManage
{
// use compiler generated copy & move constructors and operators
};
struct CopyOnlyResource
{
~CopyOnlyResource() {/* defined */ }
CopyOnlyResource(const CopyOnlyResource& rhs) {/* defined */ }
CopyOnlyResource& operator=(const CopyOnlyResource& rhs) {/* defined */ }
CopyOnlyResource(CopyOnlyResource&& rhs) = delete;
CopyOnlyResource& operator=(CopyOnlyResource&& rhs) = delete;
};
struct MoveOnlyResource
{
~MoveOnlyResource() {/* defined */ }
MoveOnlyResource(const MoveOnlyResource& rhs) = delete;
MoveOnlyResource& operator=(const MoveOnlyResource& rhs) = delete;
MoveOnlyResource(MoveOnlyResource&& rhs) {/* defined */ }
MoveOnlyResource& operator=(MoveOnlyResource&& rhs) {/* defined */ }
};
struct NoMoveOrCopyResource
{
~NoMoveOrCopyResource() {/* defined */ }
NoMoveOrCopyResource(const NoMoveOrCopyResource& rhs) = delete;
NoMoveOrCopyResource& operator=(const NoMoveOrCopyResource& rhs) = delete;
NoMoveOrCopyResource(NoMoveOrCopyResource&& rhs) = delete;
NoMoveOrCopyResource& operator=(NoMoveOrCopyResource&& rhs) = delete;
};
Because of the complexity of managing resources in all contexts and under exceptions, the best practice is that if a class is responsible for managing a resource, then that class is only responsible for managing that resource.
Activity 1: Implementing Graphics Processing with RAII and Move
In Chapter 2A, No Ducks Allowed – Types and Deduction, your team worked hard and got the implementation of Point3d and Matrix3d. Now, your company wants to market the library and it needs two major improvements before they can do that:
- The classes must be in a namespace for our company, that is, Advanced C Plus Plus Inc. So, the namespace for the graphics will be accp::gfx.
- The storage for the matrices in Point3d and Matrix3d is an intrinsic part of the class and so it is allocated from the stack and not the heap. As an evolution in the library matrix support, we need to allocate the memory from the heap. As we are working toward implementing larger matrices in a future release, we also want to introduce move semantics into our classes.
Follow these steps to achieve this:
- Starting with our current version of the library (this can be found in the Lesson3/Activity01 folder), place all of our classes into the acpp::gfx namespace.
- Fix all the failing tests because of the change. (Fail could mean a failure to compile, not just running the test.)
- In Matrix3d, switch from declaring the matrix directly in the class to heap allocated memory for storage.
- Fix the failing tests by implementing a deep copy implementation of the copy constructor and copy assignment operators. Make any other changes necessary to adjust to the new internal representations. Note that you should not need to modify any tests to get them to pass they only access the public interface which means we can change the internal structure without affecting the client.
- Trigger another failure by forcing a move constructor to be called in CreateTranslationMatrix() by using std::move in the return statement. Introduce the required move operations in the Matrix3d class to get the tests to compile and pass.
- Repeat steps 3 to 4 for Point3d.
After implementing the preceding steps, the expected output would look unchanged from the start:

Figure 3.34: Activity 1 output after successful conversion to use RAII
Note
The solution to this activity can be found on page: 657.
When is a Function Called?
All the operations that are performed by a C++ program are essentially function calls (although the compiler may optimize these into inline sequences of operations). However, it may not be obvious that you are making a function call due to syntactic sugar. Syntactic sugar is the syntax within a programming language that makes it easier to read or express. For example, when you write a = 2 + 5, you are essentially calling operator=(&a, operator+(2, 5)). It is just that the language allows us to write the first form, but the second form allows us to overload operators and extend these capabilities to user-defined types.
The following mechanisms result in calls to a function:
- Explicit call to a function.
- All operators such as +, -, *, /, %, and so on along with new/delete.
- Declaration of variables – will result in a call to the constructors with arguments if the initialization values are present.
- User-defined literals – We have not dealt with these, but essentially, we define an overload for the type operator "" name(argument). We can then write things such as 10_km, which make our code easier to understand as it carries semantic information.
- Casting from one value to another (static_cast<>, const_cast<>, reinterpret_cast<>, and dynamic_cast<>). Again, we have another operator overload which allows us to convert from one type into another.
- During function overload, it may be necessary to convert one type into another so that it matches the function prototype. It can do this by either calling a constructor with the right argument type to create a temporary or through a cast operator that's called implicitly.
Each and every one of these results in the compiler determine that a function must be called. Having determined that a function needs to be called, it must find the function that matches the name and arguments. This is what we'll be discussing in the next section.
Which Function to Call
In Chapter 2A, No Ducks Allowed – Types and Deduction, we saw that function overload resolution was performed as follows:

Figure 3.35: Function overload resolution
What we really did not dig into was the concept of name lookup. At some point the compiler will encounter the following call to the func function:
func(a, b);
When this happens, it must associate its name with the declaration that introduced it. This process is called name lookup. This name lookup is true for all the items in the program (variables, namespaces, classes, functions, function templates, and templates). For the program to compile, the name lookup process for variables, namespaces and classes must produce a single declaration. However, for functions and function templates the compiler may associate multiple declarations with the same name – mainly through function overloads which may be extended to consider additional functions due to Argument-dependent Lookup (ADL).
Identifiers
As defined in the C++ standard, an identifier is a sequence of uppercase and lowercase Latin letters, digits, underscores, and most Unicode characters. A valid identifier must begin with a non-digit character and is arbitrarily long and case-sensitive. Every character is significant.
Names
A name is used to refer to an entity or to a label. A name is of one of the following forms:
- An identifier
- An overloaded operator name in function notation (e.g. operator-, operator delete)
- A template name followed by its argument list (vector<int>)
- A user-defined conversion function name (operator float)
- A user-defined literal operator name (operator ""_ms)
Every entity and its name is introduced by a declaration while a name for a label is introduced by either a goto statement or by a labeled statement. A name can be used multiple times in one file (or translation unit) to refer to different entities depending on the scope. A name may also be used to refer to the same entity across multiple files (translation units), or different entities, depending upon the linkage. The compiler uses name lookup to associate a declaration that introduces a name with an unknown name in the program through name lookup.
Name lookup
The name lookup process is one of two and is – selected based on the context:
- Qualified name lookup: The name appears to the right of the scope resolution operator, ::, or possibly after ::, followed by the template keyword. A qualified name may refer to a namespace member, class member or enumerator. The name to the left of the :: operator defines the scope to lookup the name from. If there is no name, then the global namespace is used.
- Unqualified name lookup: Everything else. In this case, name lookup examines the current scope and all enclosing scopes.
If the unqualified name is left of the function-call operator, '()' then it uses Argument-Dependent Lookup.
Argument-Dependent Lookup
The set of rules for looking up unqualified function names is called Argument-dependent lookup (known as ADL), or Koenig lookup (named after Andrew Koenig, who defined it and is a longtime member of the C++ standards committee). Unqualified function names can appear as either a function-call expression or as part of an implicit function call to an overloaded operator.
ADL basically says that in addition to the scopes and namespaces considered during unqualified name lookup, the "associated namespaces" of all the arguments and template parameters are also considered. Consider the following code:
#include <iostream>
#include <string>
int main()
{
std::string welcome{"Hello there"};
std::cout << welcome;
endl(std::cout);
}
When we compile this code and run it, the output is as expected:
$ ./adl.exe
Hello there
$
This is an unusual way to write the program. Typically, it would be written like so:
#include <iostream>
#include <string>
int main()
{
std::string welcome{"Hello there"};
std::cout << welcome << std::endl;
}
We are using the strange method of calling endl() to show ADL. But there are two ADL lookups occurring here.
The first function call that undergoes ADL is std::cout << welcome, which the compiler considers to be operator<<(std::cout, welcome). The name operator, <<, is now looked up in the available scopes and the namespace of its arguments – std. This additional namespace resolves the name to the free method, that is, std::operator<<(ostream& os, string& s), that's declared in the string header.
The second call is more obvious endl(std::cout). Again, the compiler can access the std namespace to resolve this name lookup and finds the std::endl template in the header ostream (included in iostream).
Without ADL, the compiler has no way to find either of these functions, because they are free functions that are made known to us by the iostream and string packages. The magic of the insertion operator (<<) would be lost and it would be tedious for the programmer, if we were forced to write std::operator<<(std::cout, welcome). It would be even worse if you consider chained insertions. Alternatively, you could write "using namespace std;". Neither of those options is ideal, and that is why we need ADL (Koenig lookup).
Caveat Emptor
We have seen how ADL makes life easier for the programmer by including namespaces related to the function argument types. However, this lookup capability does not come without risk which, for the most part we can minimize. Consider the following sample code:
#include <iostream>
namespace mylib
{
void is_substring(std::string superstring, std::string substring)
{
std::cout << "mylib::is_substring() ";
}
void contains(std::string superstring, const char* substring) {
is_substring(superstring, substring);
}
}
int main() {
mylib::contains("Really long reference", "included");
}
When we compile and run the preceding program, we get the expected output:

Figure 3.36: ADL Sample program output
The C++ standards committee then decides that it should introduce an is_substring() function that looks like this:
namespace std {
void is_substring(std::string superstring, const char* substring)
{
std::cout << "std::is_substring() ";
}
}
If we add this to the top of our file, compile it and re-run it, we now get the following output:

Figure 3.37: ADL issue program output
Thanks to ADL, the (next C++ standard) compiler has picked up a different implementation as a better fit for the unqualified function call of is_substring(). And because of implicit conversion of arguments it does not clash which would cause an ambiguity and a compiler error. It just silently adopts to the new method which could lead to subtle and hard to find bugs if the argument order is different. The compiler can only detect type and syntactic differences, not semantic ones.
Note
For the purposes of demonstrating how ADL works, we have added our function to the std namespace. Namespaces serve a purpose of separating concerns, and to add into someone else's namespace, in particular, the Standard Library namespace (std) is not good practice.
So, why caveat emptor (buyer beware)? If you use third-party libraries for your development (and that includes the C++ Standard Library), then when you upgrade the library, you need to ensure that changes to the interface are not going to cause you problems because of ADL.
Exercise 5: Implementing Templates to Prevent ADL Issues
In this exercise, we will demonstrate a breaking change in C++17 STL that can potentially cause an issue in the wild. C++11 introduced templates for std::begin(type) and friends. As a developer, this is an appealing expression of the general interface and you may have written you own versions for size(type) and empty(type) already. Follow these steps to implement this exercise:
- Open the Lesson3 project in Eclipse. Then in the Project Explorer, expand Lesson3, then Exercise05, and double-click on Exercise5.cpp to open the file for this exercise into the editor.
- Click on the Launch Configuration drop down menu and select New Launch Configuration…. Configure the L3Exercise5 application from the Search Project menu so that it runs with the name L3Exercise5.
- Click on the Run button to run Exercise 5. This will produce the following output:
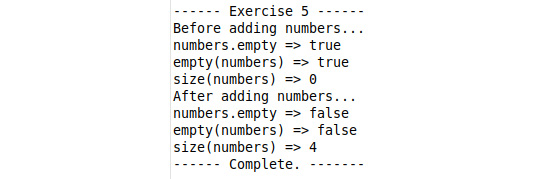
Figure 3:38: Successful execution of Exercise 5
- An examination of the code reveals two helper templates:
template<class T>
bool empty(const T& x)
{
return x.empty();
}
template<class T>
int size(const T& x)
{
return x.size();
}
- Unlike all the other exercises, this exercise has been configured to build under C++ 14. Open the CMakeLists.txt file under Lesson3 and locate the following line:
set_property(TARGET L3Exercise5 PROPERTY CXX_STANDARD 14)
- Change 14 to a 17.
- Click on the Run button to compile the exercise which now fails:
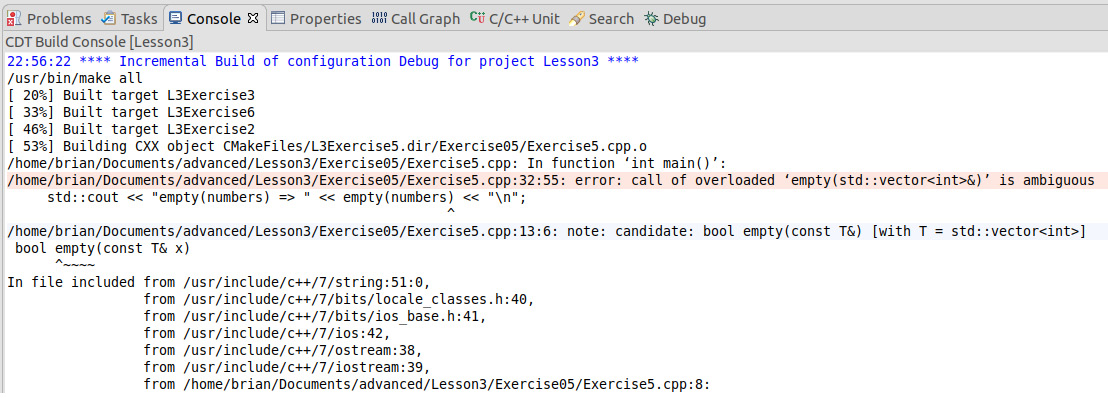
Figure 3.39: Compilation fails under C++ 17 – ambiguous function call
- Because the argument to the empty() and size() templates was a std::vector, the ADL pulled in the newly included STL versions of these templates and broke our code.
- In the Exercise5.cpp file, locate the two occurrences of empty() and two occurrences of size() that are generating the errors and insert two colons, "::", before them (scope specifier).
- Click on the Run button to compile and run the exercise. It now happily compiles and runs again because the calls to the empty() and size() function are now qualified. We could have equally specified std:: scope instead.
In this exercise, we implemented two template functions in the global namespace that worked fine if we compiled the program under the C++ 14 standard. However, our implementation broke when we compiled under C++17 because the STL library changed and we had to change our implementation to ensure that the compiler located and used the templates that we wrote.
Implicit Conversion
In determining the Candidate Set of Function in Figure 3.36, Function overload resolution, the compiler has to look at all of the available functions that have been found during the name lookup and determine whether the argument number and types match the call point. In determining whether the type matches, it will also examine all the available conversions to determine whether there is a mechanism to convert from the type T1 type (the type of the argument passed) to the T2 type (the type specified for the function parameter). If it can convert from T1 to T2 for all arguments, then it will add the function to the set of candidates.
This transformation from type T1 to type T2 is known as implicit conversion and occurs when some type, T1, is used in an expression or context that does not accept that type but accepts some other type, T2. This occurs in the following contexts:
- T1 is passed as an argument when calling a function declared with T2 as the parameter.
- T1 is used as an operand to an operator that expects T2.
- T1 is used to initialize a new object of T2 (including return statements).
- T1 is used in a switch statement (in which case, T2 is an int).
- T1 is used in an if statement or do-while or while loop (where T2 is bool).
If an unambiguous conversion sequence from T1 to 2 exists, then the program will compile. The conversions between built-in types are usually determined by the usual arithmetic conversions.
Explicit – Preventing Implicit Conversion
Implicit conversion is a great feature that, make it possible for a programmer to express their intent, and it just works most of the time. However, the compiler's ability to convert one type into another without the programmer providing a hint, is not always desirable. Consider the following small program:
#include <iostream>
class Real
{
public:
Real(double value) : m_value{value} {}
operator float() {return m_value;}
float getValue() const {return m_value;}
private:
double m_value {0.0};
};
void test(bool result)
{
std::cout << std::boolalpha;
std::cout << "Test => " << result << " ";
}
int main()
{
Real real{3.14159};
test(real);
if ( real )
{
std::cout << "true: " << real.getValue() << " ";
}
else
{
std::cout << "false: " << real.getValue() << " ";
}
}
When we compile it and run the preceding program, we get the following output:

Figure 3.40: Implicit conversion sample program output
Well, it may be a little unexpected that this compiled and actually produced an output. The real variable is of the Real type which has a conversion operator to float – operator float(). The test() function takes a bool as an argument and the if condition must result in a bool as well. The compiler will convert any numeric type into a boolean type with a value of false if the value is zero or true if the value is not zero. But if this is not the behavior that we want we can prevent it by prefixing the declaration of the function with the explicit keyword. Let's say we change the line so that it reads like so:
explicit operator float() {return m_value;}
If we now attempt to compile it, we get two errors:

Figure 3.41: Compile errors because implicit conversion was removed.
Both are related to not being able to convert the Real type into a bool – first, at the call site to test() and then in the if condition.
Now, let's introduce a bool conversion operator to fix this problem.
operator bool() {return m_value == 0.0;}
We can now build the program again. We will receive the following output:

Figure 3.42: Introducing the bool operator replaces implicit conversion
The boolean value is now false, whereas it was true before. This is because the implicit conversion of the value that was returned by the float conversion was not zero and was then converted into true.
Since C++ 11, all constructors (except copy and move constructors) have been considered to be conversion constructors. This means that if they are not declared with explicit, then they are available for implicit conversion. Likewise, any casting operator that is not declared explicit is available for implicit conversion.
The C++ Core Guidelines has two rules related to implicit conversion:
- C.46: By default, declare single-argument constructors as explicit
- C.164: Avoid implicit conversion operators
Contextual Conversion
If we now make one further change to our little program, we can get into what is known as contextual conversion. Let's make the bool operator explicit and attempt to compile the program:
explicit operator bool() {return m_value == 0.0;}
We will receive the following output:

Figure 3.43: Compile errors with explicit bool operator
This time we only have one error at the call site to test(), but not for the if condition. We can fix this error by using a C-style case (bool) or a C++ static_cast<bool>(real) (this is the preferred method). When we add the cast, the program compiles and runs once more.
So, if the bool cast is explicit, then why does the condition for the if expression not need a cast?
The C++ standard allows in certain contexts where the bool type is expected and the declaration for a bool conversion exists (whether marked explicit or not). If this happens, then an implicit conversion is allowed. This is known as contextually converting into bool and can occur in the following contexts:
- The condition (or controlling expression) of if, while, for
- The operands of the built-in logical operators: !(not), && (and) and || (or)
- The first operand of the ternary (or conditional) operator ?:.
Exercise 6: Implicit and Explicit Conversions
In this exercise we will experiment with calling functions, implicit conversions, preventing them, and enabling them. Follow these steps to implement this exercise:
- Open the Lesson3 project in Eclipse. Then in the Project Explorer, expand Lesson3 then Exercise06 and double click on Exercise6.cpp to open the file for this exercise into the editor.
- Click on the Launch Configuration drop down menu and select New Launch Configuration…. Configure the L3Exercise6 application from the Search Project menu so that it runs with the name L3Exercise6.
- Click on the Run button to run Exercise 6. This will produce the following output:

Figure 3.44: Default output from Exercise 6
- In the text editor, change the constructor of Voltage to be explicit:
struct Voltage
{
explicit Voltage(float emf) : m_emf(emf)
{
}
float m_emf;
};
- Click on the Run button to recompile the code – now we get the following error:

Figure 3.45: Failed conversion of int to Voltage
- Remove the explicit from the constructor and change the calculate function to take a reference:
void calculate(Voltage& v)
- Click on the Run button to recompile the code – now, we get the following error:

Figure 3.46: Failed conversion of int to Voltage&
The same line has the problem that we ran previously, but for a different reason. So, implicit conversion only works with value types.
- Comment out the line generating the error, and then, after the call to use_float(42), add the following line:
use_float(volts);
- Click on the Run button to recompile the code – now we get the following error:

Figure 3.47: Failed conversion of Voltage to float
- Now, add the following casting operator to the Voltage class:
operator float() const
{
return m_emf;
}
- Click on the Run button to recompile the code and run it:

Figure 3.48: Successfully converted Voltage to float
- Now, place the explicit keyword in front of the cast that we just added and click on the Run button to recompile the code. Again, we get an error:

Figure 3.49: Failure to convert Voltage to float
- By adding the explicit declaration to the cast, we are preventing the compiler from using the conversion operator. Change the line with the error to cast the volts variable to a float:
use_float(static_cast<float>(volts));
- Click on the Run button to recompile the code and run it.

Figure 3.50: Conversion of Voltage into float with cast works again
In this exercise, we have seen that implicit conversions can occur between types (not references), and that we can control when they happen. Now we know how to control these conversions, we can strive to meet the guidelines previously quoted C.46 and C.164.
Activity 2: Implementing classes for Date Calculations
Your team is in charge of developing a library to help with calculations that are related to dates. In particular, we want to be able to determine the number of days between two dates and given a date, add (or subtract from it) a number of days to get a new date. This activity will develop two new types and enhance them to ensure that the programmer cannot accidentally have them interact with built-in types. Follow these steps to achieve this:
- Design and implement a Date class that stores the day, month, and year as integers.
- Add methods to access the internal day, month, and year values.
- Define a type, date_t to represent the number of days since the epoch date of 1-Jan-1970.
- Add a method to the Date class to convert this into date_t.
- Add a method to set the Date class from a date_t value.
- Create a Days class that stores the days value.
- Add the addition operator to Date that takes Days as an argument.
- Use explicit to prevent the addition of numbers.
- Add the subtraction operator to return a Days value from the difference of two Dates.
After following these steps, you should receive the following output:

Figure 3.51: Output of a successful Date sample application
Note
The solution for this activity can be found on page 664.
Summary
In this chapter, we explored the lifetime of variables - both automatic and dynamic, where they are stored, and when they are destructed. We then used this information to develop RAII techniques that allow us to almost ignore resource management because the automatic variables will clean them up when they are destructed even in the presence of an exception. Then, we looked at throwing exceptions and catching them so that we can deal with abnormal conditions at the right level. From RAII, we went into a discussion on the ownership of resources and how STL smart pointers help us in this area. We discovered that just about everything is treated as a function call, thus allowing operator overloading and implicit conversions. We discovered the wonderful (or is it awful?) world of argument-dependent lookup (ADL) and how it can potentially trip us up in the future. We now have a good understanding of the fundamental features of C++. In the next chapter we will start to explore function objects and how they are realized and implemented using lambda functions. We will delve further into the offerings of STL and explore PIMPLs as we re-visit encapsulation.