ALTHOUGH OVERLOOKED WITH REGULARITY by some artists, low-fire clay and glaze remains one of the most fascinating areas of study within the field of ceramics. Notably, low-fire directly traces major achievements in human evolution. In his book Low Fire: Other Ways to Work in Clay, Leon Nigrosh points out the most basic of low-fired clay objects is the sun-dried adobe brick. Adobe (and cob building and similar methods) changed the game for humans and has provided a cooling shelter from the elements for many thousands of years. Many of the methods used in making adobe brick continue to be used in building to this day.
As humans developed a controlled relationship to fire, ceramic creation followed quickly. In one theory, hunting parties burned fires on top of beds of moist earth that had been placed in the front of their canoes to light the way at night. In the morning, they noticed a hard, durable stone when the fires had cooled. These fires represented the first open air kilns. Intrigued, ancient craftspeople began to mold clay and fire it with purpose, creating objects of both utility and veneration. The original studio! Then as now, as soon as one builds a studio, one looks to improve it. Pit kilns, cave kilns, and eventually brick kilns soon led to a hotter fire, and with it the potential to melt other materials onto the surface of the pot.
Similarly in Arabia humans first discovered the use of flux and colorants when beach fires chemically bonded salt and sand into a hard crust, creating a self-glazing material fired to maturity at around cone 08, now known as Egyptian paste. Greek and Roman artists began to apply refined slips and burnished them to create a sheen over black and red sgraffito (see terra sigillata shown here). In more modern times, the discovery of lead resulted in a tremendous number of bright and durable glazes on low-fire pottery. Lead has since been mostly abandoned due to health concerns, but science now seeks to exhaust all possible combinations of materials and has created an almost limitless low-fire palette for the modern clay artist.
Paul Gisondo
WHY LOW FIRE?
In a word, options! In addition to the thousands of commercially produced low-fire glazes that come in every conceivable color and texture, low-fire ceramics provides several unique glazing techniques covered in this chapter. Majolica, terra sigillata, and raku are just a few of the richly historied topics we will explore. It has been our experience that glaze combinations at low-fire temperatures are generally not as exciting as at mid-range or high-fire. A quick internet search of “low-fire glazed ceramics” yields an incredible array of finished work, but almost nothing in the way of combinations of glazes. Though some of the major suppliers have tested their low-fire glazes together, the results are decidedly less dynamic than their higher-fired counterparts. In this chapter, we’ll chart our own path, taking an approach that focuses on the variety of techniques available to the low-fire artist. Many of these techniques encourage the use of imagery or brush-work, so if decorating makes you sing, low-fire might be your thing.
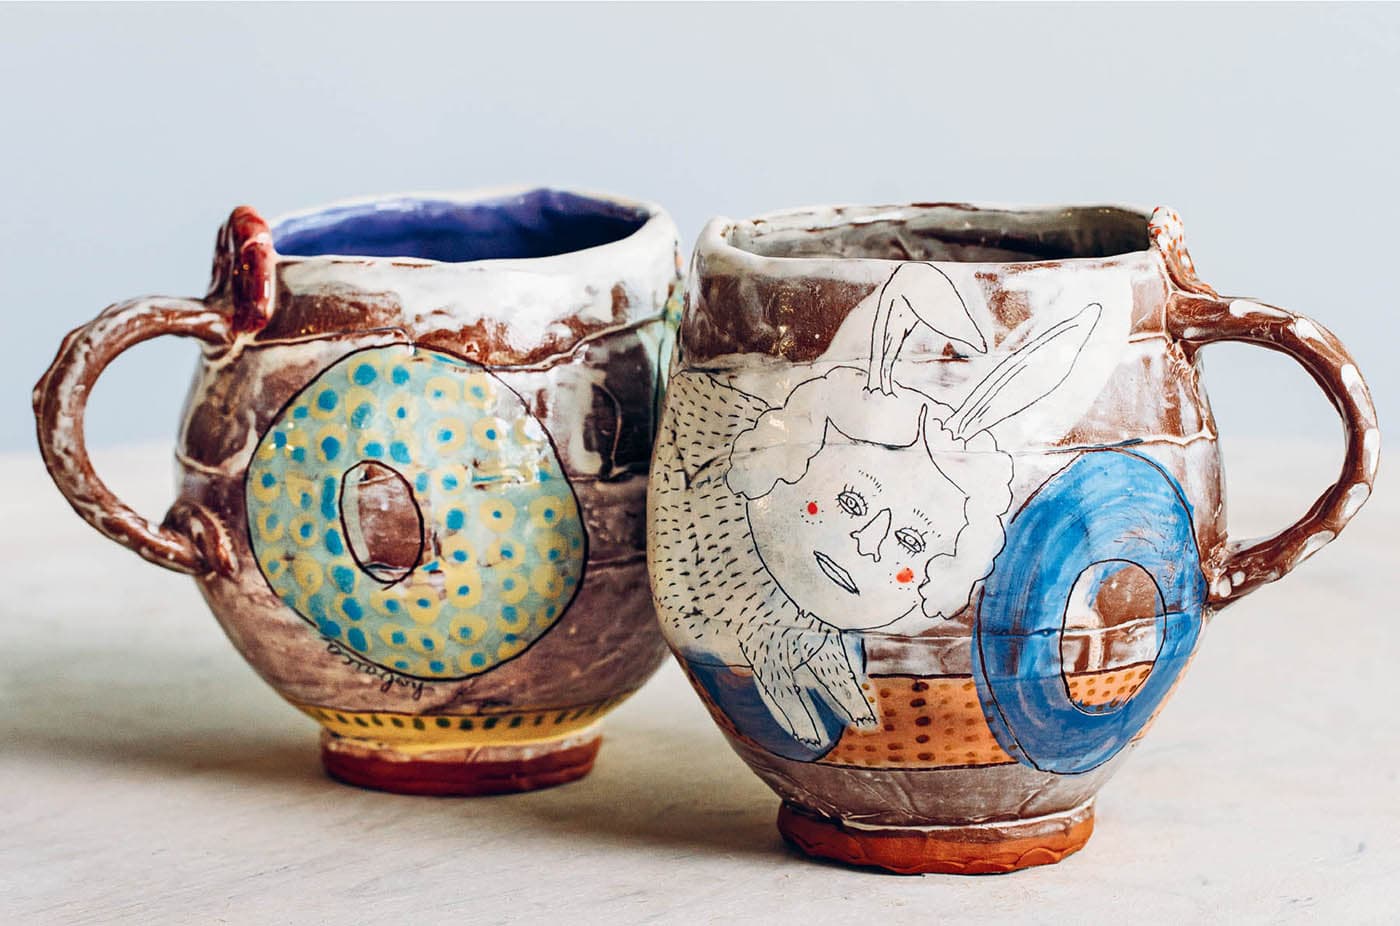
These clever mugs by Lynn Hobaica showcase several low-fire techniques. Collection of the author.
Before we get into the specialty topics, let’s consider some top-notch low-fire glazes. Whenever possible, we have included lead-free recipes. Please note, too, there are several commercial glazes including the clear, which is simply the best we have come across. Just because you love glaze doesn’t mean you have to mix everything yourself! In fact, I think it wise in some situations to let ceramic engineers do the work they were trained to do. Feel free in your work to use all glazes you mix yourself, all commercial glazes, or a combination of both. I encourage you to make use of anything available to you that will get you the results you want. Perhaps mixing your own glazes is more economical than purchasing them. That said, you will put a fair amount of elbow grease into mixing, slaking, and screening them, so consider how much time and effort you want to invest.
LOW-FIRE GLAZE RECIPES AND RECOMMENDATIONS
CLEAR—AMACO LG-10 “THE PINK STUFF”
Cone: 05–10
Atmosphere: Oxidation
Surface: Gloss
Color: Clear
NOTES Amaco got it right! This bright clear glaze was developed to work with underglaze decoration and provides a smooth glossy coating that doesn’t craze. It has become so popular that Amaco made an LG-10 T-shirt in its instantly recognizable color (LG-10 is dyed so that you can see it better when it dries). Interestingly, this glaze has a massive firing range—we have even fired it to cone 10. One drawback is that it is not formulated for dipping, so larger work can take a while to glaze.
CHRIS GUSTIN WHITE
Cone: 05
Atmosphere: Oxidation
Surface: Semigloss
Color: White
INGREDIENTS
AMOUNTS
Frit 3124
40.00%
Gerstley Borate
30.00%
Nepheline Syenite
25.00%
Silica
5.00%
Total
100.00%
Also Add
Zircopax
8.00%
NOTES This is a nice clean white, not too glossy. The glaze works well by itself or as a liner.
MULBERRY WINE
Cone: 05
Atmosphere: Oxidation
Surface: Eggshell
Color: Deep Maroon
INGREDIENTS
AMOUNTS
Frit 3134
39.00%
Silica
23.00%
Minspar
27.00%
EPK
6.00%
Whiting
5.00%
Total
100.00%
Also Add
Mason Stain #6387—Mulberry
5.00%
NOTES The base glaze yields a pleasant eggshell surface while the mason stain deeply colors it.
CANARY YELLOW
Cone: 05
Atmosphere: Oxidation
Surface: Gloss
Color: Bright Yellow
INGREDIENTS
AMOUNTS
Frit 3124
85.00%
EPK
10.00%
Silica
5.00%
Total
100.00%
Also Add
Mason Stain #6410—Canary Yellow
8.00%
Bentonite
3.00%
NOTES Bold, glossy, and bright as day, Canary Yellow really pops!
CARROT—AMACO TEACHER’S PALETTE TP-65
Cone: 05
Atmosphere: Oxidation
Surface: Gloss
Color: Bright Orange
NOTES This commercially produced line of glazes is formulated for easy use, comes in a variety of bold, bright colors, and is made from nontoxic ingredients to ensure a safe classroom. Properly fired, these glazes are dinnerware safe.
GRAPE—AMACO TEACHER’S PALETTE SERIES TP-51
Cone: 05
Atmosphere: Oxidation
Surface: Gloss
Color: Purple
NOTES This glaze can be used in combination with TP-65 – Carrot, or mixed with it to create color blends.
FIRE ENGINE RED—SPECTRUM LOW FIRE LF-748
Cone: 05
Atmosphere: Oxidation
Surface: Semigloss
Color: Bright Red
NOTES Bright Reds are notoriously difficult to achieve in ceramics, though not impossible. The glaze chemists at Spectrum have developed this bright, semigloss glaze for use at cone 05.
FORBES LOW-FIRE GREEN
Cone: 05
Atmosphere: Oxidation
Surface: Gloss
Color: Emerald Green
INGREDIENTS
AMOUNTS
Gerstley Borate
30.00%
Frit 3195
30.00%
Nepheline Syenite
20.00%
EPK
10.00%
Silica
10.00%
Total
100.00%
Also Add
Copper Carbonate
4.00%
NOTES I love this deep emerald green color, and the smooth, glossy feel of this glaze. For deep, full color, apply glaze at specific gravity of 1550–1600.
CHARTREUSE
Cone: 05
Atmosphere: Oxidation
Surface: Semimatte
Color: Chartreuse
INGREDIENTS
AMOUNTS
Ferro Frit 3195
52.1%
EPK
23.5%
Wollastonite
13.7%
Silica
10.7%
Total
100.00%
Also Add
Mason Stain #6236—Chartreuse
12.00%
Bentonite
2.00%
NOTES Like matte glazes? This is a great base recipe that could be colored many different ways using mason stains, oxides, or a combination of both.
TURQUOISE EGGSHELL
Cone: 05
Atmosphere: Oxidation
Surface: Semimatte
Color: Turquoise
INGREDIENTS
AMOUNTS
Gerstley Borate
60.00%
Nepheline Syenite
20.00%
Silica
20.00%
Total
100.00%
Also Add
Tin Oxide
5.00%
Copper Carbonate
3.00%
NOTES A simple, three-ingredient base glaze yields a semimatte to eggshell texture. The combination of tin and copper produces a pleasing opaque turquoise.
SPECTRUM LF-155—BRUSHED BRONZE
Cone: 05
Atmosphere: Oxidation
Surface: Eggshell
Color: Metallic
NOTES This terrific commercial glaze is easy to apply, stays right where you put it, and when applied and fired correctly, yields a brilliant metallic bronze that feels lovely in the hand. My compliments to the chef who developed this glaze! It’s very striking. Do follow the manufacturer’s instructions as this glaze contains heavy metals that are leachable after firing.
TERRA SIGILLATA
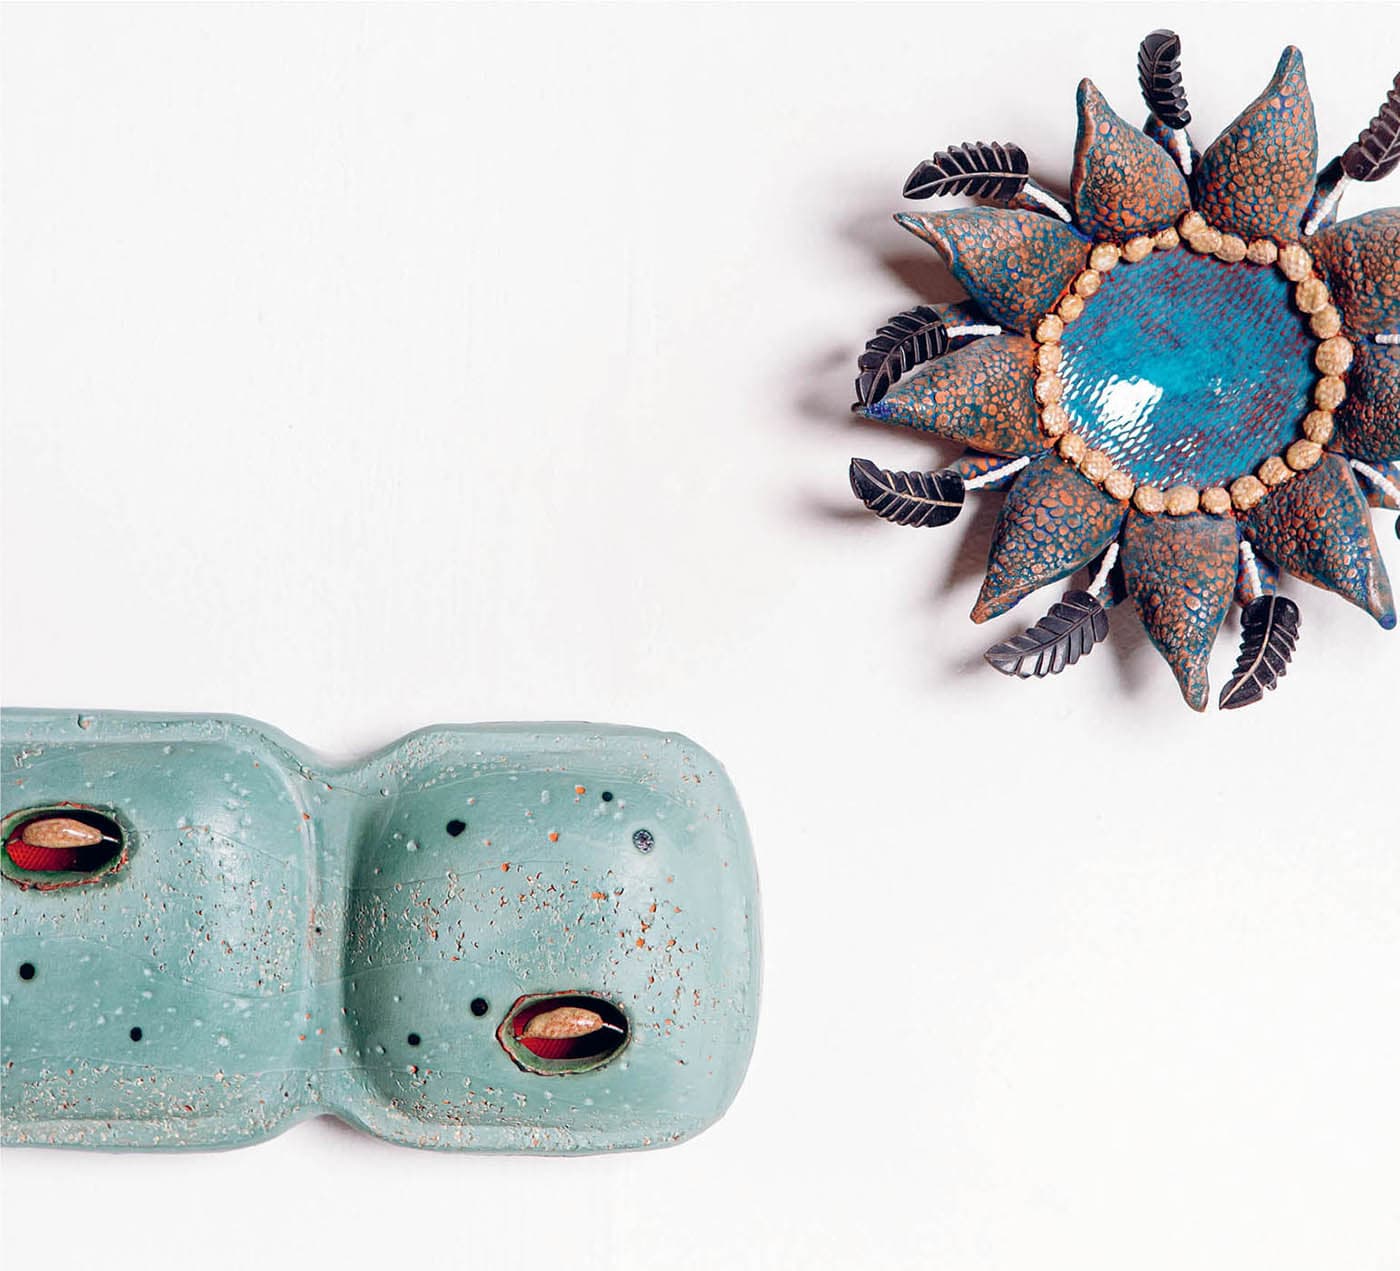
The “sealed earth” of Greek and Roman potters, terra sigillata, or terra sig for short, is the source of the recognizable glossy sheen on the outside of these pots. First a coating of terra sig was applied to the pot to ready it for decoration. Once the coating dried and was burnished, skilled hands carved sgraffito designs and painted figures representing the myths and histories of the culture. Terra sigillata is a refined slip that uses only the finest particles of clay. This creates a smooth surface on the outside of low-fire work that can be burnished to a sheen. Because the sheen burns out above cone 04, terra sigillata is a technique reserved exclusively for the low-fire clay artist.
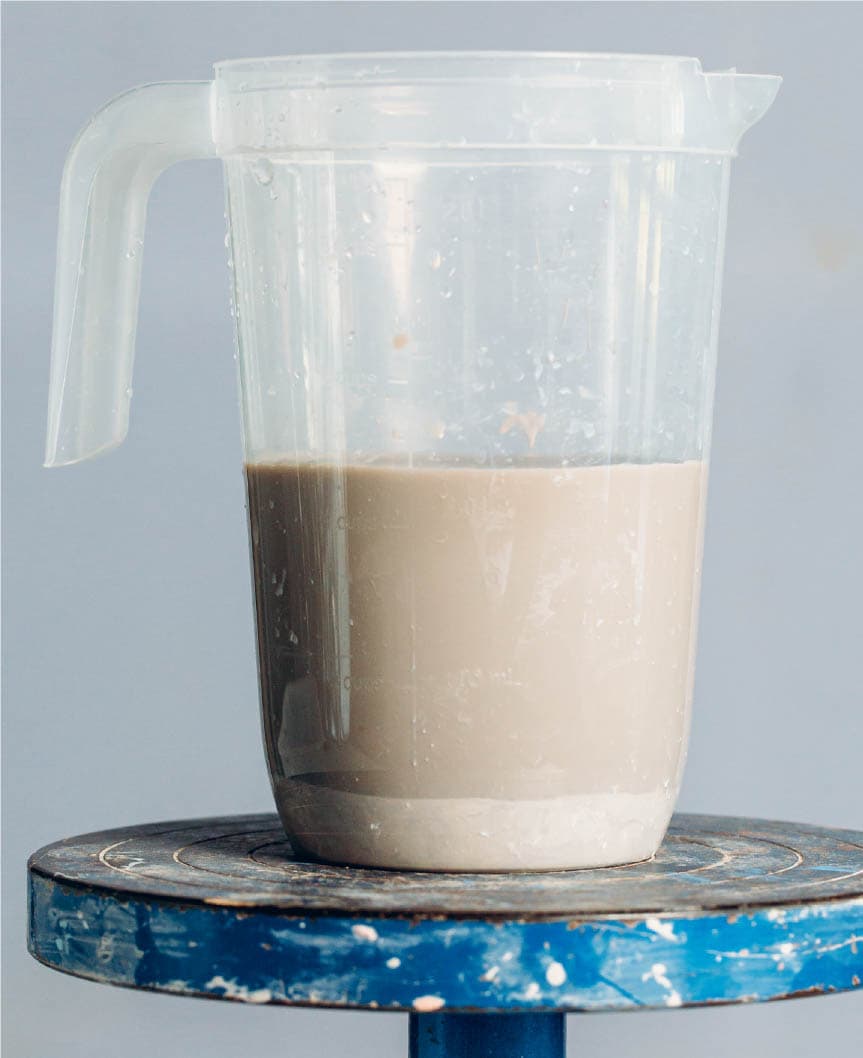
Making terra sig is not a complex process, but it takes up to two days, so prepare your batches well in advance. The basic process is to mix clay with water, adding a deflocculant such as sodium silicate to get the clay molecules to separate out by size. You will end up with three distinct layers, like a parfait. You want the middle layer. That’s the good stuff—a refined slip made out of the smaller particles of clay that can be burnished to a sheen. While you can keep the watery layer on the top to reuse, the heavier particles of clay at the bottom should be discarded. Terra sig can be colored, if desired, and applied to leather-hard or bone-dry clay.
On shown here and here are three terra sig recipes you can try. Note that the recipes diverge from other recipes in this book as they may use pounds, cups, or teaspoons as measurements. Do try to use distilled water if you can.
Terra sigillata work by Cynthia Lee hangs in the Odyssey Gallery.
CYNTHIA LEE’S OM-4 TERRA SIGILLATA
This recipe from longtime Odyssey director Cynthia Lee is still our studio’s most popular, and it receives colorants quite well. Mix it in a 1 gallon (4 L) container. It yields around 12 cups (2,000 g).
Mix well for about 5 minutes. Let settle undisturbed for at least 48 hours. Siphon off the middle section for use.
The terra sig has settled into three distinct layers: larger particles at the bottom, the terra sig in the middle, and a thin layer of water at the top.
MEREDITH BRICKELL’S REDART TERRA SIGILLATA
Here is another popular recipe from an Odyssey workshop instructor. Note the use of a different clay, Redart, which results in a dark red slip that performs well without adding any colorants. This recipe uses a slightly different water to clay to sodium silicate ration and takes only 6 hours of settling time.
INGREDIENTS
AMOUNTS
Water
20 lb
Redart
10 lb
Sodium Silicate
22.7 g
Mix all ingredients well for 5 minutes and allow to settle for 6 hours. Siphon off the middle level for use. Note that the water and Redart are listed in pounds, and the sodium silicate is in grams. I have decided to leave the recipe as is, because of the ease in measuring the first two ingredients.
Using a flexible hose to siphon off the middle layer
SECRET TECHNIQUE FROM THE ODYSSEY VAULT
Adding mason stains to the terra sig can provide a limitless color palette.
Evergreen, #6200
Victoria Green, #6204
Alumina Pink, #6020
Wedgewood Blue, #6310
ORANGESTONE TERRA SIG
While researching this book I found this fun, albeit painfully unspecific terra sig recipe, that uses entire bags of prepared clay as a base. I am reprinting this recipe verbatim as I found it in the Odyssey Glazebook because I think it illustrates how information is passed down in a studio setting. It can be very detailed or very loose. I’m not sure why the author assumed that the reader knows to siphon off the middle section once it has settled out. Also the measurements for the water and sodium silicate are remarkably casual. This is a charming recipe, nonetheless, that results in a unique, orange-colored terra sig.
“Two Bags (50 lb) of Orangestone Clay (Orange-stone is a high-fire stoneware mixed by High-water Clays in Asheville, NC.)”
“Dissolve in a 20- to 30-gallon (76- to 114-L) plastic trashcan of H20. When dissolved, add about ¼ cup sodium silicate.”
Use a soft-bristled brush to apply terra sig on leather-hard to bone-dry greenware.
HOW TO APPLY TERRA SIGILATA
Terra sig can be applied to leather-hard or bone-dry work, but it will flake off if applied to bisque. Use a soft-bristled brush and apply several coats. Terra sig usually has a specific gravity of 1150 to 1200, which is watery compared to most slips, so be careful of drips that will show up in the fired piece. When the terra sig has dried, it can be burnished to a sheen using the back of a spoon or a finger wrapped in plastic wrap.
Terra sig can be burnished to an impressive sheen. You can use a piece of plastic over your finger or the back of a spoon.
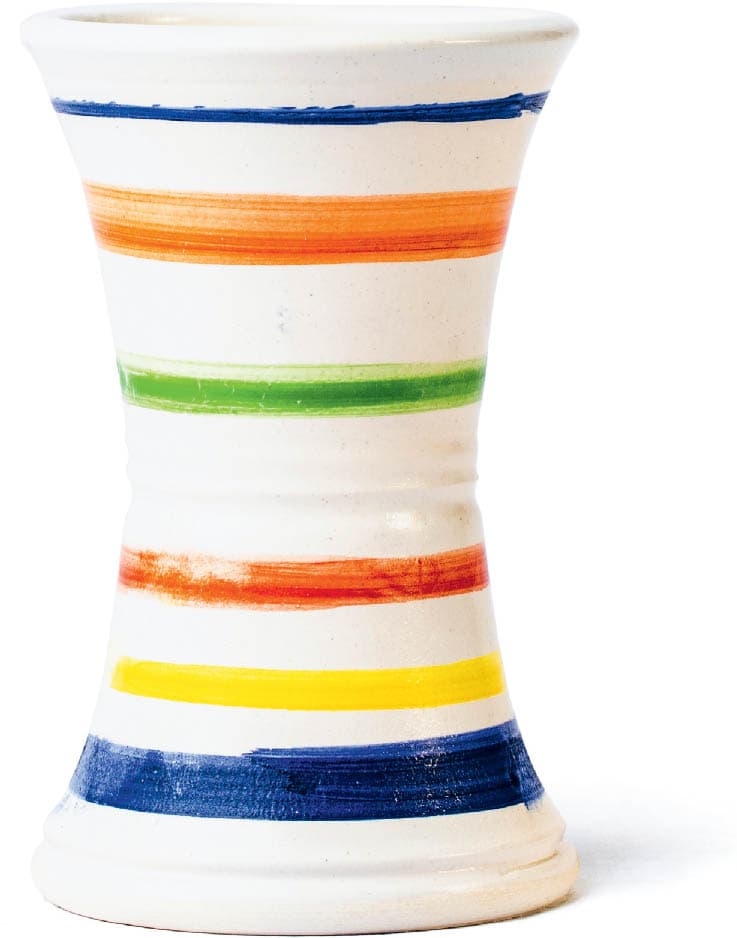
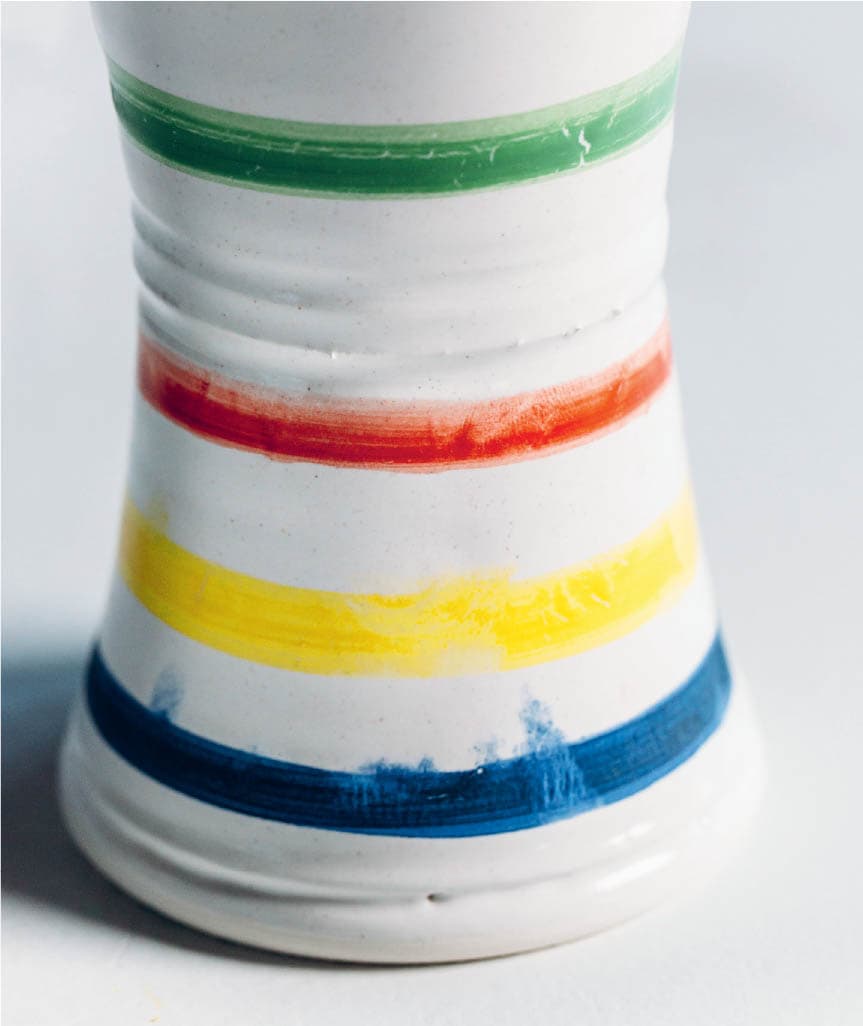
MAJOLICA
Majolica originated on the Spanish Island of Majorca, but came to prominence in Italy in the fifteenth century. Majolica refers to a style of in-glaze painting on a tin-opacified white glaze. Delft or faience are similar terms with different geographic origins. Majolica and its counterparts represented a way for European and Middle Eastern potters to imitate the highly desired white porcelain wares that had begun to travel east along the Silk Road.
There are several important aspects to preparing majolica. First your base glaze must receive the painted brush well, so often the white opaque glaze is stiffened with starch or CDC gum. This makes it less likely to flake off of the pot when handled during decorating. Here are two different majolica base glazes you can try.
MATTHIAS MAJOLICA
A bright white base that receives brushwork, Matthias Majolica uses Zircopax to opacify, which saves money over using tin oxide.
Cone: 05
Atmosphere: Oxidation
Surface: Glossy
Color: White
INGREDIENTS
AMOUNTS
Frit 3124
83.34%
OM-4
8.33%
EPK
8.33%
Also Add
Zircopax
11.11%
NOTES Lynn Hobaica recommends making a 5,000 g batch. Using 2½ gallons (9,463 g) of water per 5,000 g, slake and screen the materials and then add about ½ cup (63 g) of laundry starch. Allow the glaze to stand overnight.
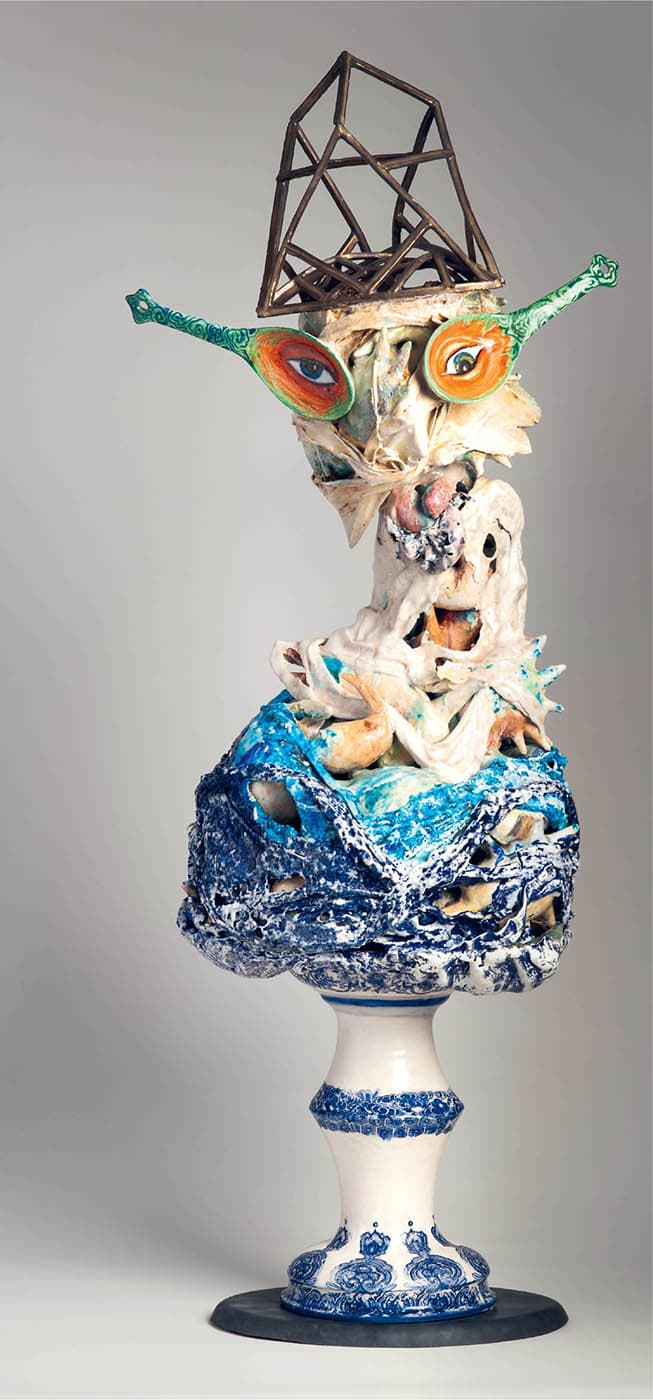
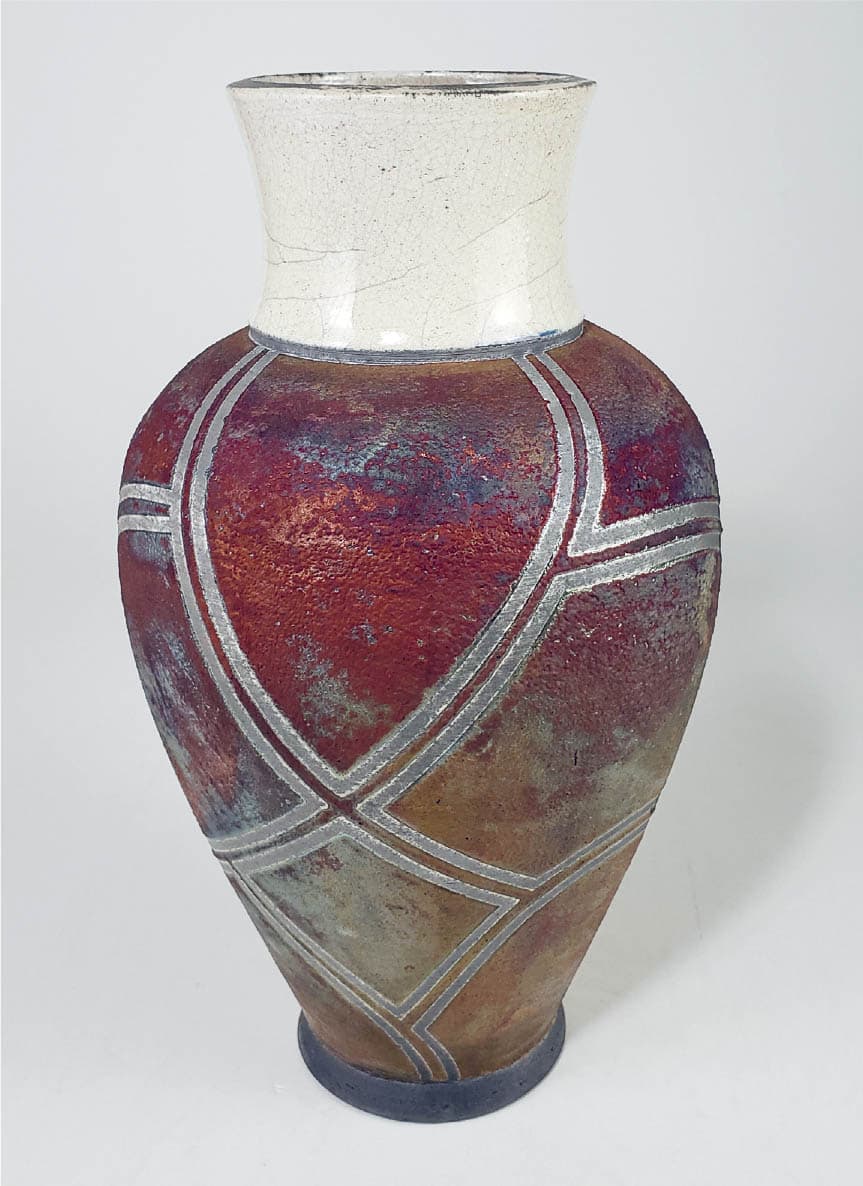
Queen. Matt Nolen. A modern majolica at the base of Queen by Matt Nolen
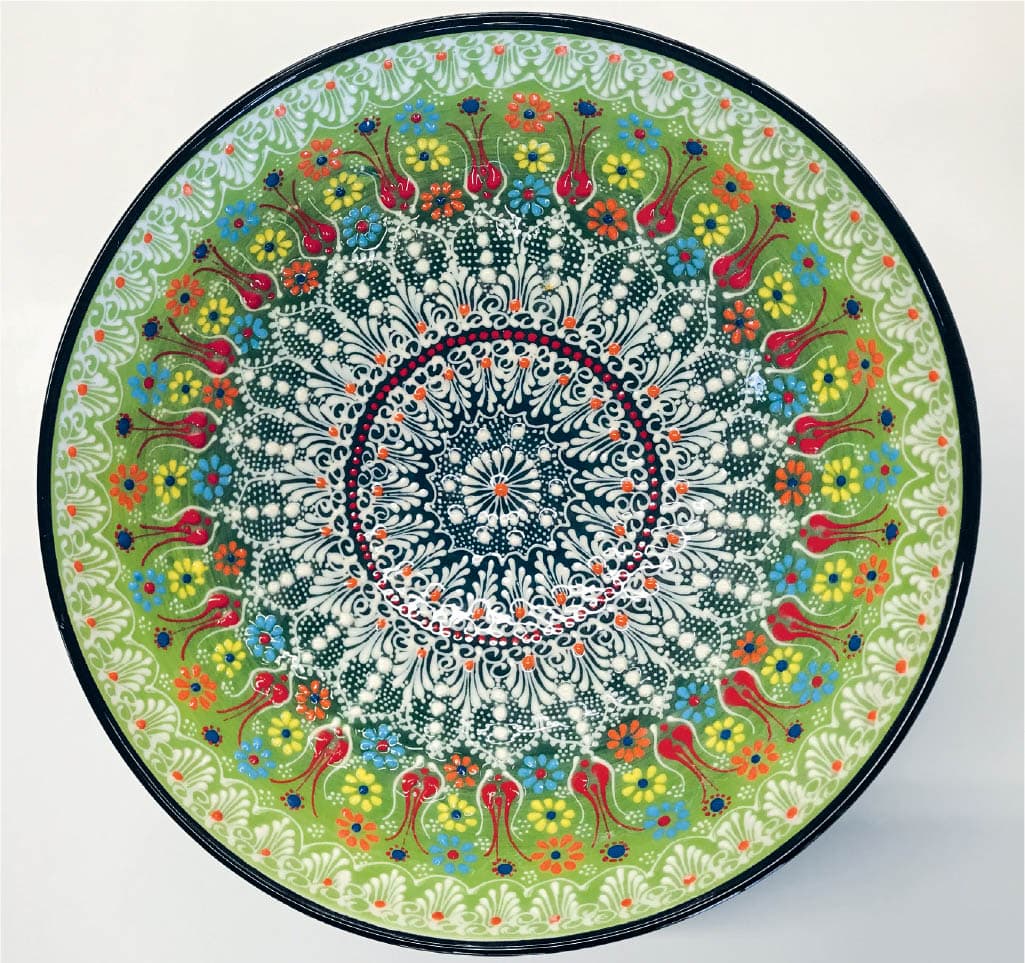
Modern Turkish Bowl. Unknown artist. This majolica piece from an anonymous Turkish decorator shows how a variety of trailers with different diameters can be used to great effect. Collection of the author.
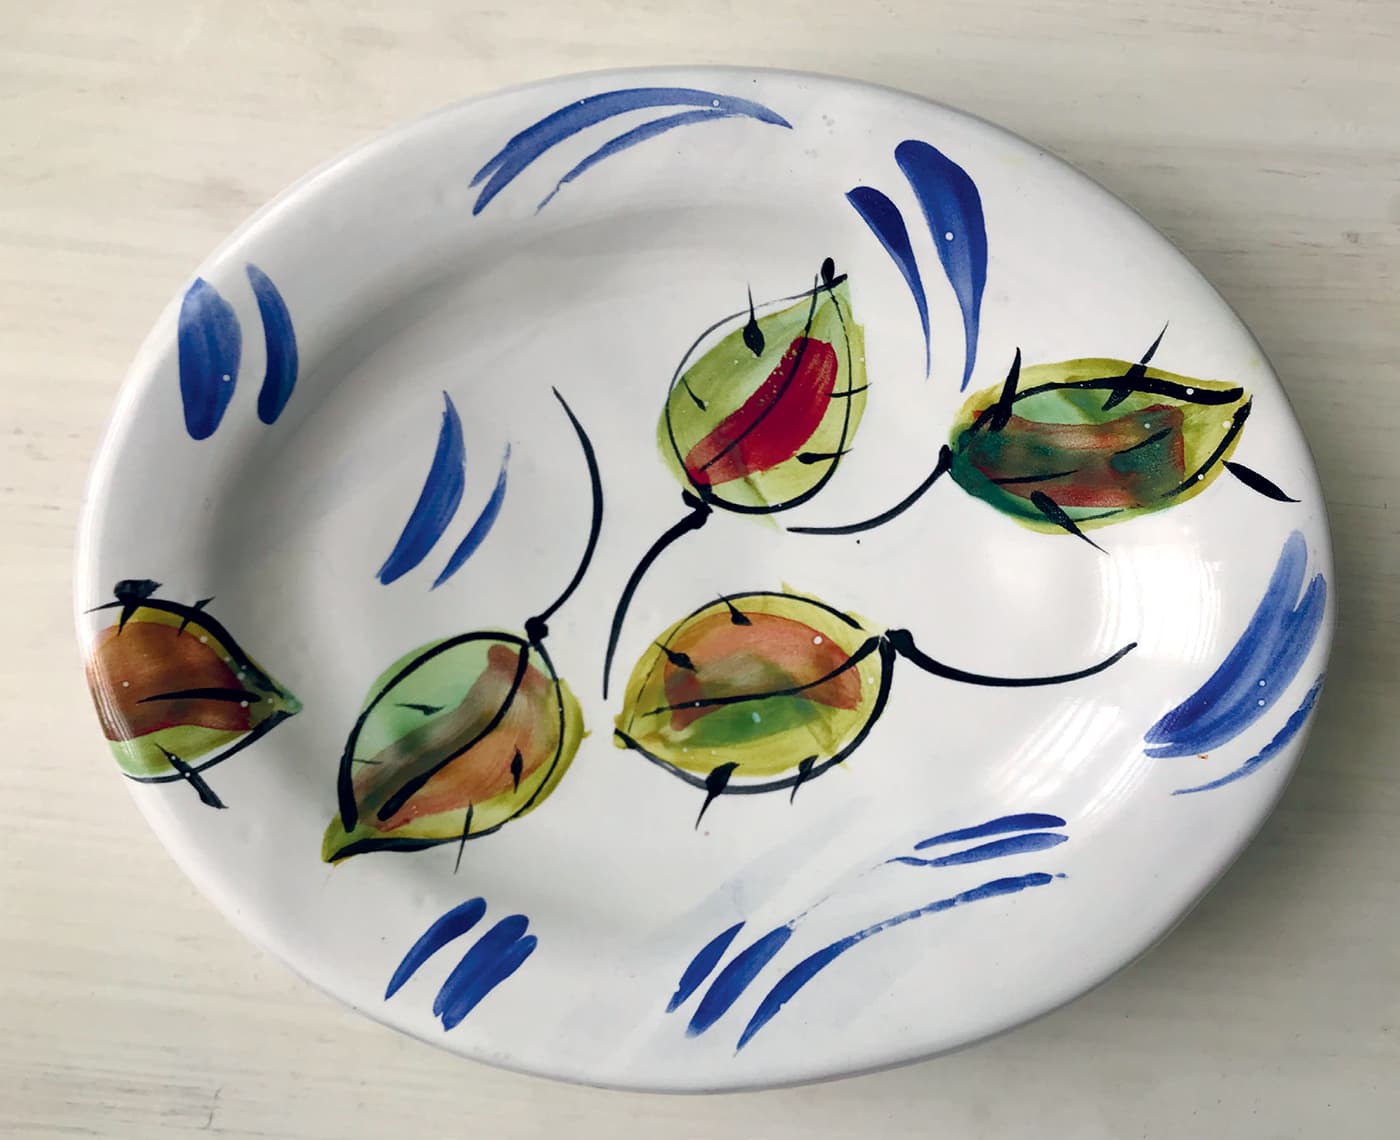
Majolica Serving Bowl. Diana Gillespie. Floral motifs are popular subjects for majolica enthusiasts, as in this example by Diana Gillespie. Collection of the author.
LINDA ARBUCKLE’S MAJOLICA
Linda Arbuckle’s recipe is popular due to its ease of application.
Cone: 05
Atmosphere: Oxidation
Surface: Gloss
Color: White
INGREDIENTS
AMOUNTS
Frit 3124
65.72%
Minspar
17.23%
EPK
10.81%
Nepheline Syenite
6.24%
Also Add
Zircopax
10.00%
Tin
5.00%
Bentonite
2.00%
After the base glaze has been applied, usually by dipping or spraying, it is allowed to dry and harden for 24 hours. Some people like to “soft bisque” their work to 1500°F (815°C), which hardens the glaze and makes it easier to paint. During this time, you can prepare your decorating colors.
Dipping into the opaque white glaze. This will serve as the background for your brushwork.
Burnish any glaze drips to create a smooth, paintable surface.
MAJOLICA APPLICATION
To make the decorating colors shown on the test opposite, I used a 50/50 blend of frit 3124 and mason stains. I mixed up 100 gram batches of dry materials and then added 1 cup (240 g) of water. The colors used on the tests shown were (top to bottom) Mason Stain #6300 (Mazarine), Mason Stain #6026 (Lobster), #6204 (Victoria Green), Degussa Stain 279496 (Intense Red), Mason Stain #6410 (Canary Yellow) and #6310 (Wedgewood Blue). These colors need to be stirred frequently during use.
Majolica takes a steady hand. You only get one shot! Plan out what you will do by sketching it out. Very light pencil lines can be added, but try not to dig too deeply into the hardened glaze. A floppy, bristled brush works best for applying decorating colors, and you’ll need to stir your water/colorant/frit solution often to keep it suspended.
After that, relax and enjoy decorating your work in a painterly manner. The subject matter is up to you. Majolica traditionally brings up connotations of flowers, vegetables, fruits, and herbs, but you can see in the work of Matt Nolen (see here, here, and here) how this old-world technique can be given a modern update. Once finished, though, be sure not to touch the painted surface of your work lest you mar the image. The decorating colors are easily smudged!
A steady hand and a banding wheel can create distinct lines of color.
Decorating colors are easily smudged, so transport the finished work to the kiln carefully!
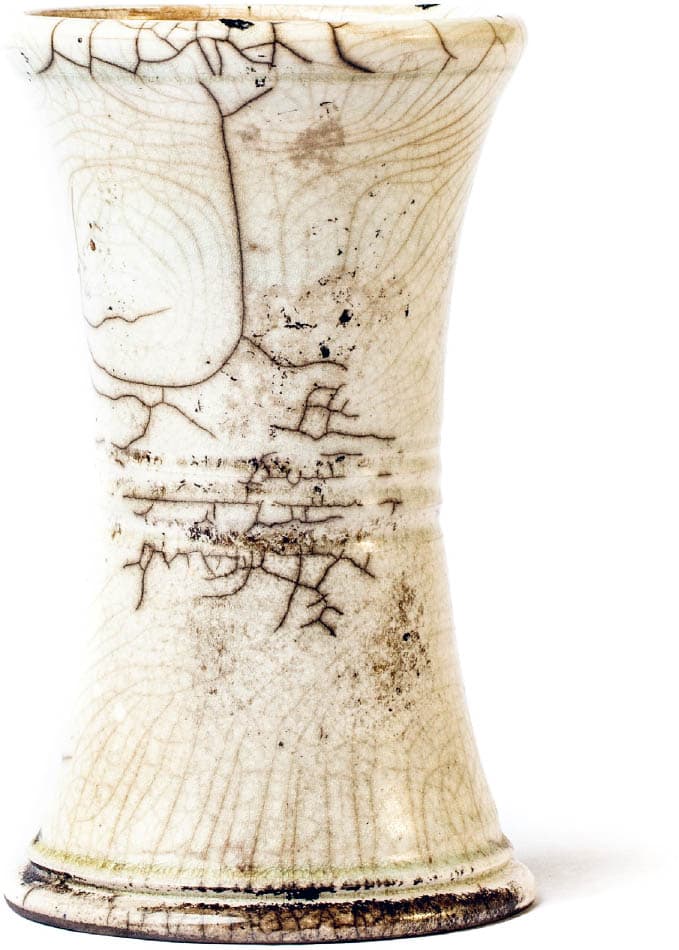
RAKU
A fast-fire technique full of excitement and choreography, this type of pottery traces its roots to the Japanese tea ceremony, but modern materials have allowed an incredible expansion of techniques under the common heading raku. In its most basic form, pots are quickly heated up to the desired temperature (usually taking 30 to 45 minutes to get to between 1650°F and 2050°F [899°C and 1121°C], depending on desired characteristics and glazes used). At the highest temperature, the pots are removed glowing hot from the kiln and placed in a lidded bucket full of combustible materials. The materials ignite and the work is allowed to smoke and reduce in the bucket for another 30 to 40 minutes before being removed. It is then plunged into water to freeze the glaze and scrubbed clean of organic material to reveal the surface.
Modern raku enthusiasts have experimented with an enormous number of different variations including placing horsehair onto a glowing pot to leave an organic line of carbon burned into the surface. Others spray ferric chloride on the surface to create some really bold reds. Still others love the quality of the carbon smoked clay, leaving their work unglazed in a technique called naked raku. Due to the fast firing nature of raku, the clay does not vitrify sufficiently for use with food or drink (though this is also why the smoke can penetrate and blacken the clay). However, the inherent drama of the process and the brilliant metallics ensure that the tradition of raku will continue for many centuries to come.
LOW-FIRE GLAZE RECIPES
GEORGIE’S WHITE CRACKLE
Cone: 06–04
Atmosphere: Reduction
Surface: Semigloss
Color: White
NOTES Nobody does it better than Georgie! We’ve tried many different white crackle recipes, and this commercially produced one is our favorite. For extra crackle, try spraying the hot glaze with water through a mister after removing from the kiln and before placing it in the reduction can.
RAKU LOVE
Cone: 08
Atmosphere: Oxidation/Reduction
Surface: Gloss
Color: Turquoise (oxidation) or Brass (reduction)
INGREDIENTS
AMOUNTS
Frit 3134
70.46%
Silica
14.13%
Lithium Carbonate
9.88%
EPK
5.53%
Total
100.00%
Also Add
Copper Carbonate
3.02%
Bentonite
2.01%
NOTES This spectacularly beautiful glaze is also temperamental. Note the lowering firing temperature, or watch out for runniness. With very light reduction, you will get a beautiful turquoise. Use a single piece of newspaper in the reduction can for this effect. Heavier reduction will result in a bright, brassy look. This excellent example displays both qualities.
DEL FAVREAU LUSTER
Cone: 06–04
Atmosphere: Reduction
Surface: Alligator Crawl
Color: Grey with Iridescent Highlights
INGREDIENTS
AMOUNTS
Gerstley Borate
80.00%
Cornwall Stone
20.00%
Total
100.00%
Also Add
Copper Carbonate
2.00%
NOTES A simple recipe with just three ingredients, I like the way this glaze texturizes a pot in addition to its metallic effects.
RAINBOW SAND
Cone: 06–04
Atmosphere: Oxidation
Surface: Matte
Color: Variable
INGREDIENTS
AMOUNTS
Gerstley Borate
71.00%
Bone Ash
18.00%
Nepheline Syenite
9.00%
Lithium Carbonate
2.00%
Total
100.00%
Also Add
Copper Carbonate
5.00%
Cobalt Carbonate
3.00%
NOTES You can achieve an amazing number of different colors using this one glaze—one of our all-time favs.
PIEPENBURG RED/BRONZE
Cone: 05
Atmosphere: Reduction
Surface: Semigloss
Color: Variegated Red
INGREDIENTS
AMOUNTS
Gerstley Borate
52.63%
Frit 3134
47.37%
Total
100.00%
Also Add
Tin Oxide
3.16%
Black Copper Oxide
2.11%
NOTES This is one of my favorite raku recipes with incredible tonal variation throughout the piece. Dynamic.
SUNSET RED—DUNCAN ENVISIONS SERIES IN-1004
Cone: 06–04
Atmosphere: Oxidation/Reduction
Surface: Semigloss
Color: Red
NOTES Shh . . . don’t tell anyone. It’s a secret that some low-fire glazes can be used in the raku kiln! Of course, you’ll have to do some testing, but this red glaze from Duncan holds up nicely. Just kidding. Tell everyone!
GEORGIE’S MIDNIGHT LUSTER
Cone: 06–04
Atmosphere: Reduction
Surface: Gloss
Color: Black
NOTES This commercial glaze fires dark and deep as night but flashes orange and red.
ORCHID—DUNCAN ENVISIONS SERIES IN-1004
Cone: 06–04
Atmosphere: Oxidation/Reduction
Surface: Semigloss
Color: Lavender
NOTES This low-fire glaze looks terrific when raku fired.
CLEMENT DOLPHIN BLUE
Cone: 06–04
Atmosphere: Reduction
Surface: Matte
Color: Variegated
INGREDIENTS
AMOUNTS
Gerstley Borate
53.88%
Bone Ash
23.04%
Nepheline Syenite
15.39%
Cornwall Stone
7.69%
Total
100.00%
Also Add
Copper Carbonate
7.69%
Cobalt Oxide
5.76%
Total
100.00%
NOTES Dolphin Blue is a classic raku glaze and commercially produced by several companies. Like Rainbow Sand, a single coat can result in several color variations throughout the piece.
NEW ROGER’S BLACK
Cone: 06–04
Atmosphere: Reduction
Surface: Gloss
Color: Black
INGREDIENTS
AMOUNTS
Gerstley Borate
80.00%
Custer Feldspar
20.00%
Total
100.00%
Also Add
Red Iron Oxide
10.00%
Cobalt Carbonate
10.00%
Black Copper Oxide
10.00%
NOTES Oxide heavy, and a costly recipe with cobalt carbonate at 10.00, New Roger’s Black is also a great black glaze with depth that can showcase the iron, cobalt, and copper.
ERICA’S AQUA
Cone: 06–04
Atmosphere: Reduction
Surface: Semigloss
Color: Variegated
INGREDIENTS
AMOUNTS
Gerstley Borate
80.00%
Cornwall Stone
20.00%
Total
100.00%
Also Add
Tin Oxide
5.00%
Cobalt Carbonate
2.00%
Copper Carbonate
3.00%
NOTES Erica’s Aqua can yield some very nice blues and purples, as in this example.
FEATURED ARTIST
Paul Gisondo: A Cartographer’s Raku
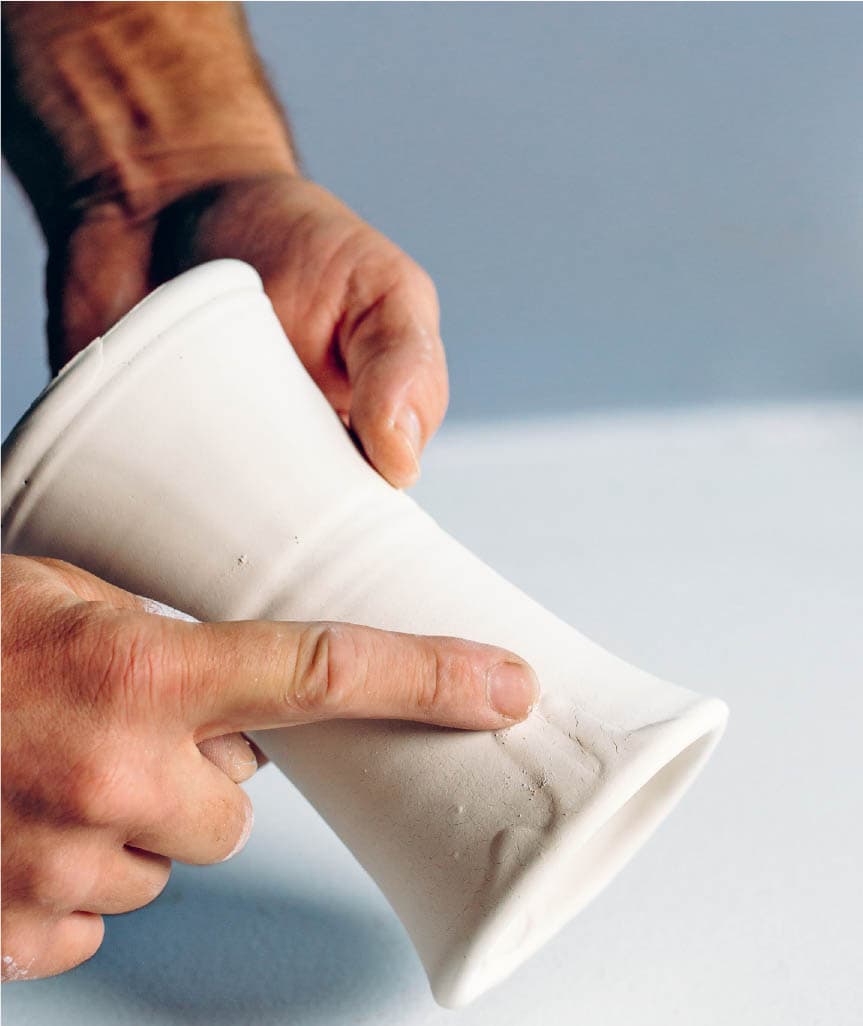
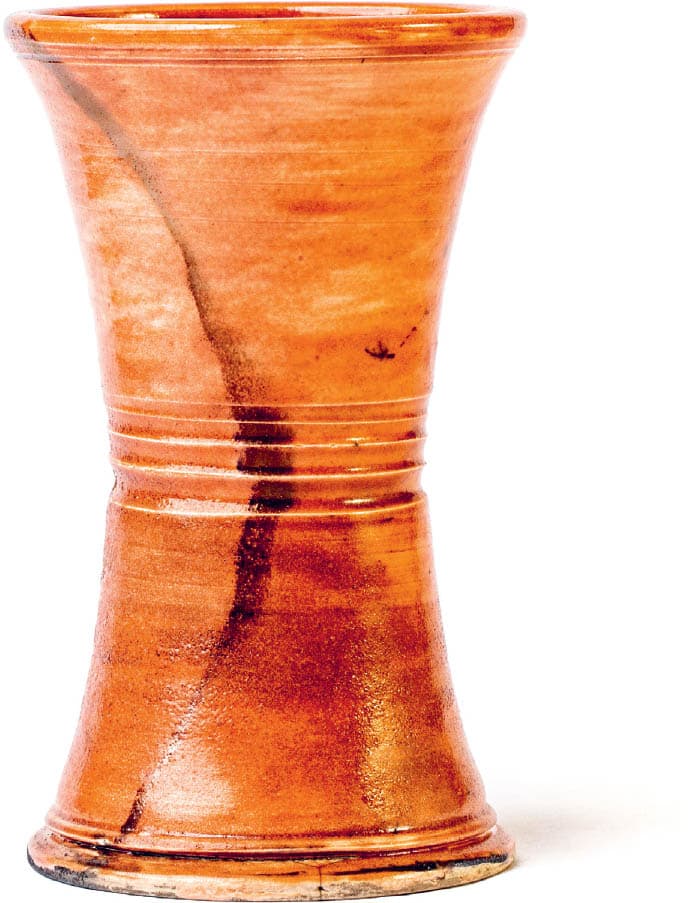
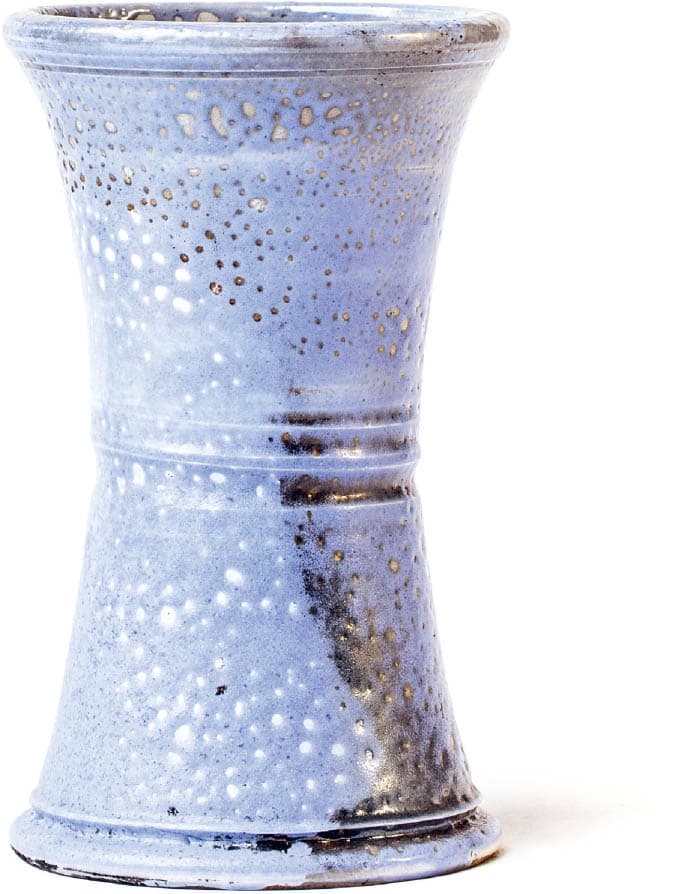
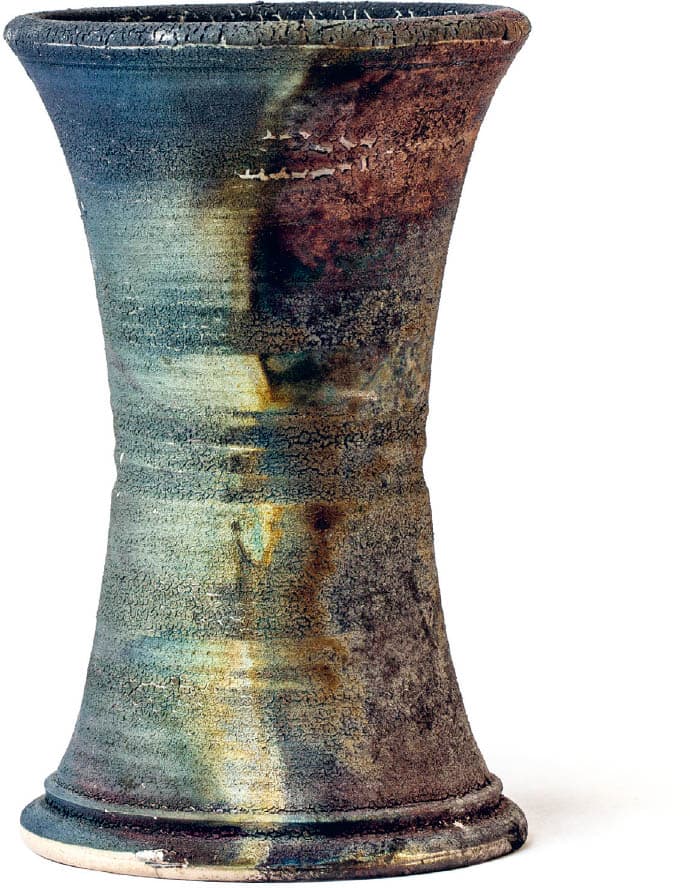
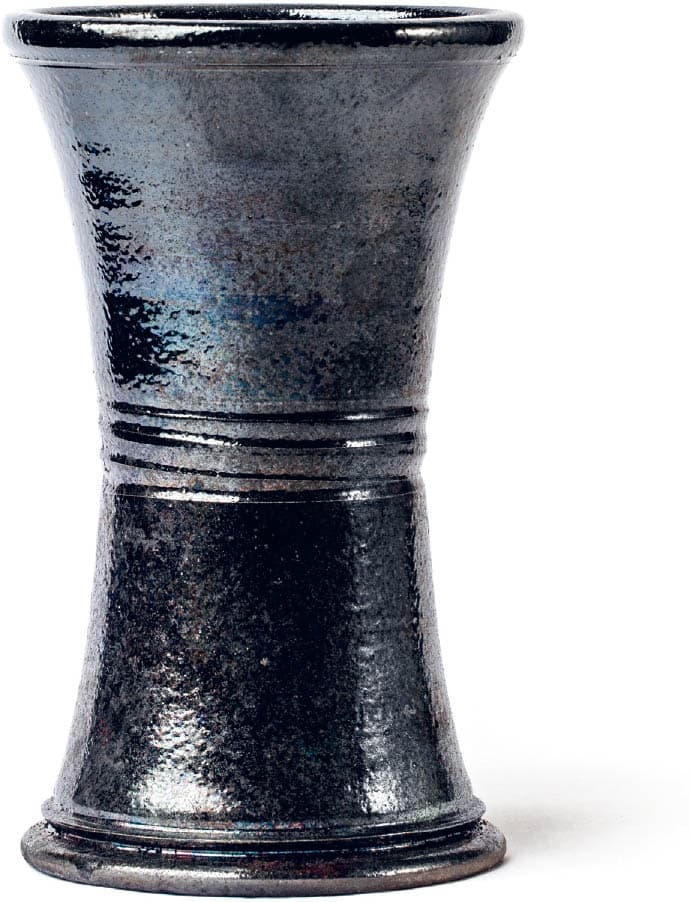
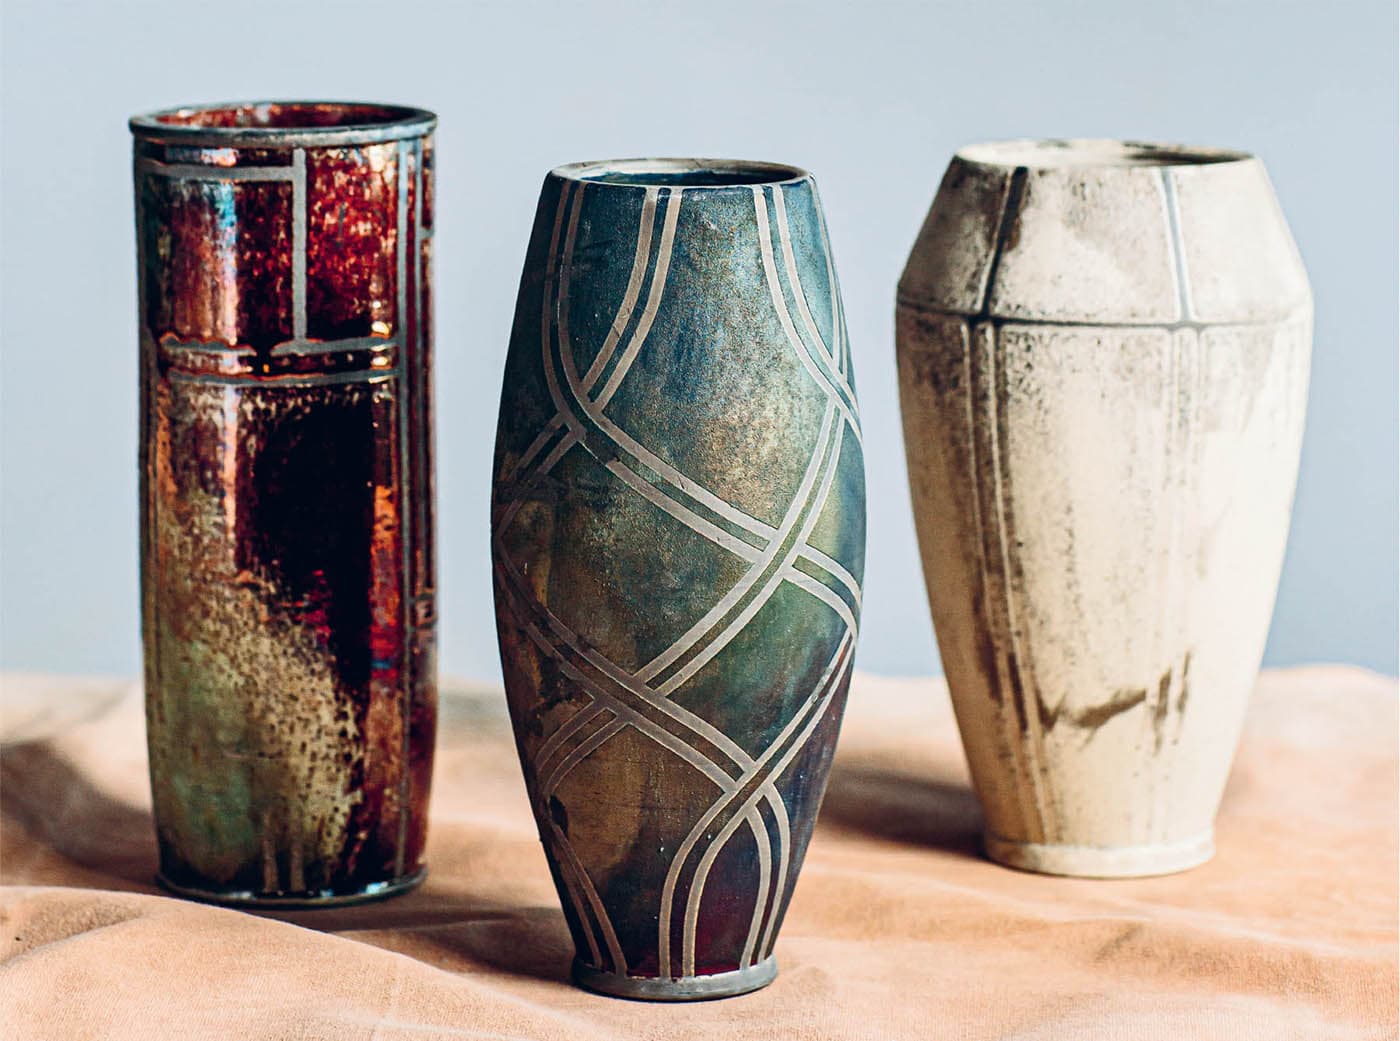
Paul Gisondo spent a career as a city planner and mapmaker in Westchester County, New York. In his spare time, he made excellent pots and certainly could have pursued ceramics as a career. Upon retiring, he and his partner Merrill moved to Asheville and soon became part of the Odyssey Family. Paul brings a lively energy to the studio! The kids in the clay camps rightly think he’s amazing. He always brings the most delicious dish to the potluck, and the man plays a mean accordion. He’ll knock out “Take Me Out to the Ball Game” on Opening Day, but completely slays the Ramones’ “I Want to be Sedated.”
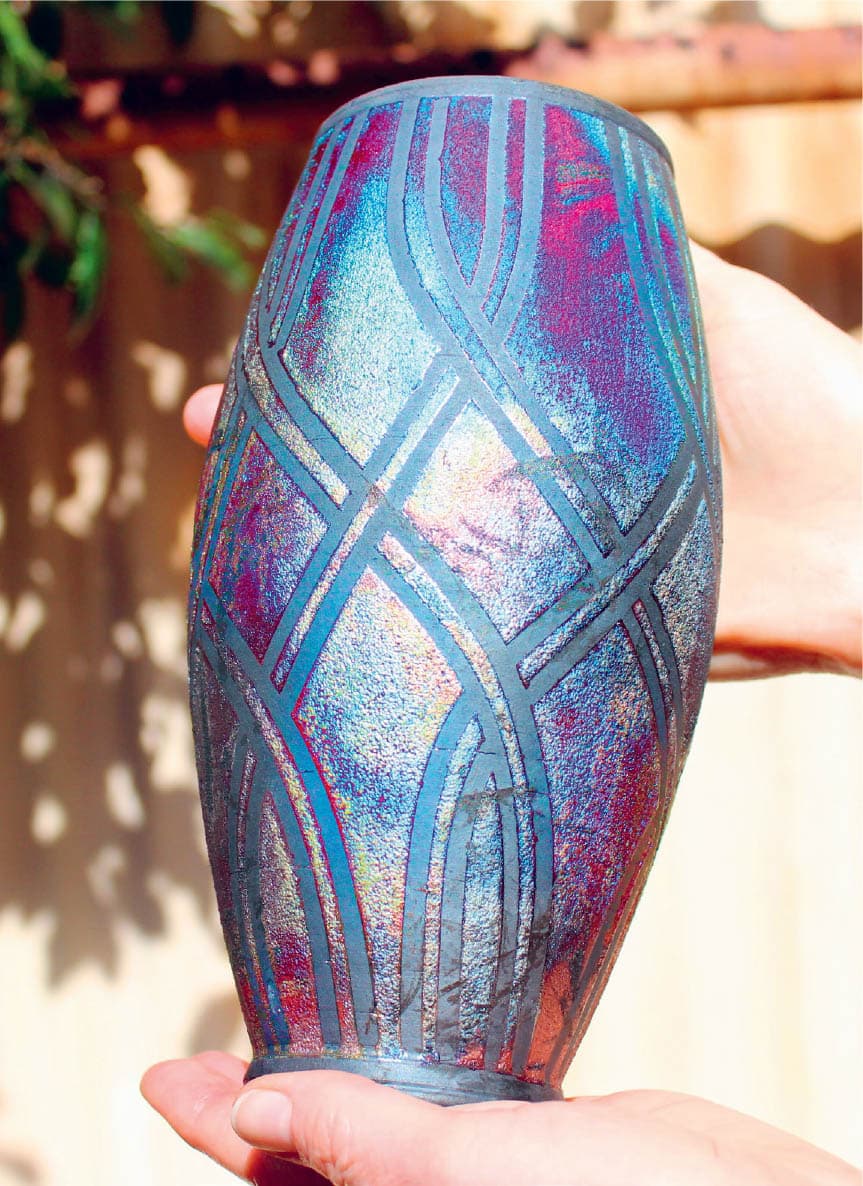
Paul Gisondo also makes some pretty mean raku. Paul throws tall, tight, angular forms on the potter’s wheel. Once leather hard, he trims the line of the form to perfection. These are bisque fired to cone 04, removed from the kiln, and then the fun begins. Armed with a series of increasingly thin rolls of painter’s tape, Paul carefully lays out tape resist designs on the surface of his work. He told me once that all the years of cartography influenced the taping designs, almost like topographical lines in the maps he once created in New York. The work is then glazed and the tape removed before firing to roughly 2000°F (1093°C).
The resists give you a sense of movement throughout the piece, a geometry of line and curve that plays itself out on the surface of his work. The tape is used as a resist for the raku glazes he applies, and with good reduction in the raku barrel, the taped areas will turn matte black, in contrast to the bright copper raku glazes, much like a highway winding its way through the Everglades. One other nice detail: Due to the fast firing and low temperature used in raku, the pieces generally will not hold water. Post firing, after cleaning the work under running water with steel wool, the pieces are allowed to dry. Paul then applies several layers of polyurethane to the interior of the piece. Although you would not use these for food and drink, the sealed interior of the piece will hold water and makes for lovely flower arranging.
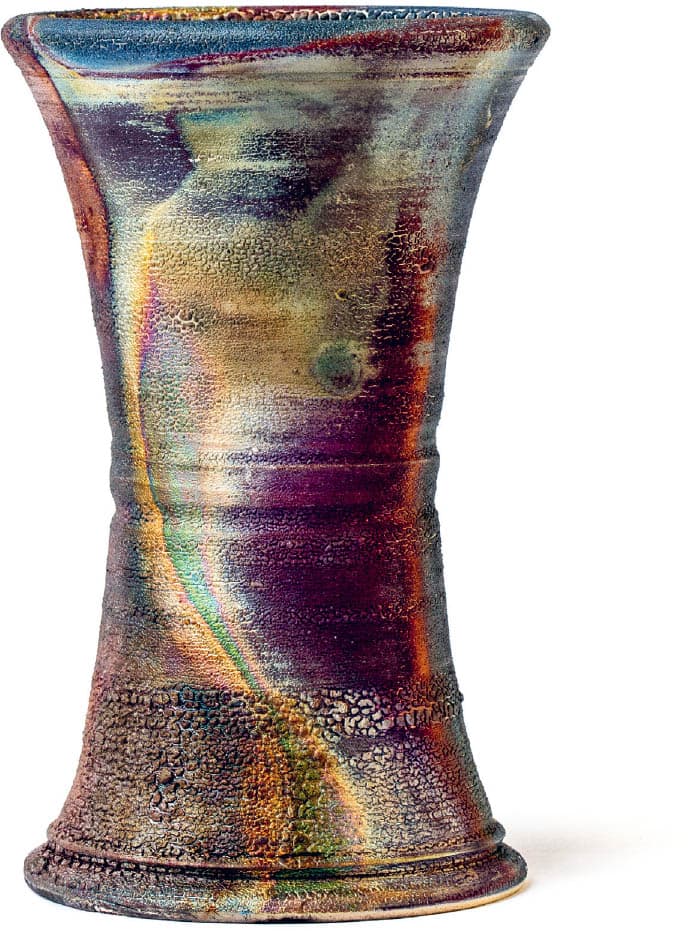
Blue Dolphin Vase. Intense purples, turquoise, and iridescent gold boldly outlined by tape resisted pathways
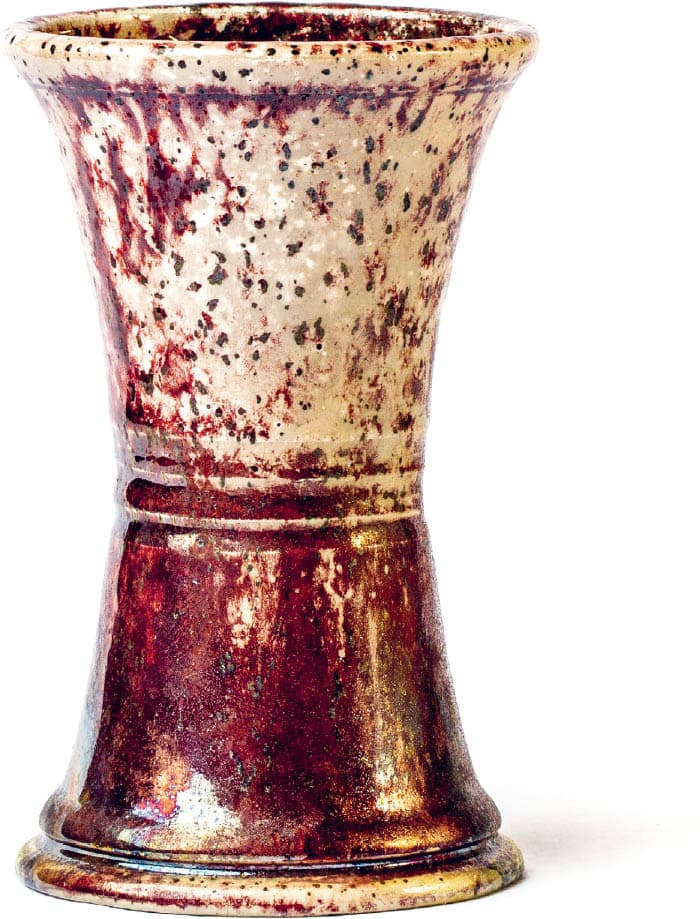
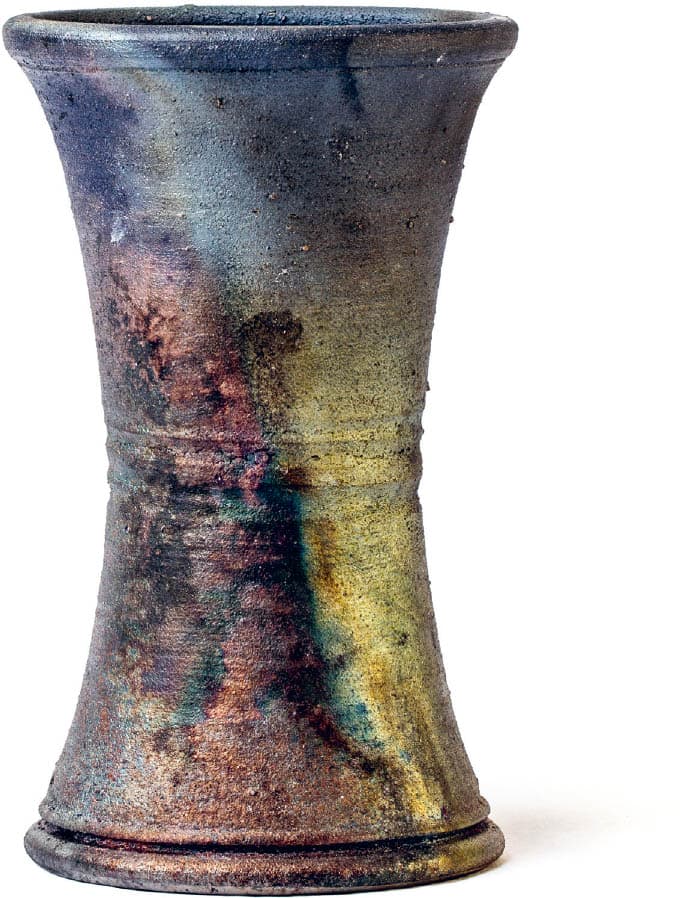
Rainbow Sand Vase. Rainbow Sand can vary from deep rust to beige matte. This piece has white crackle at the neck.
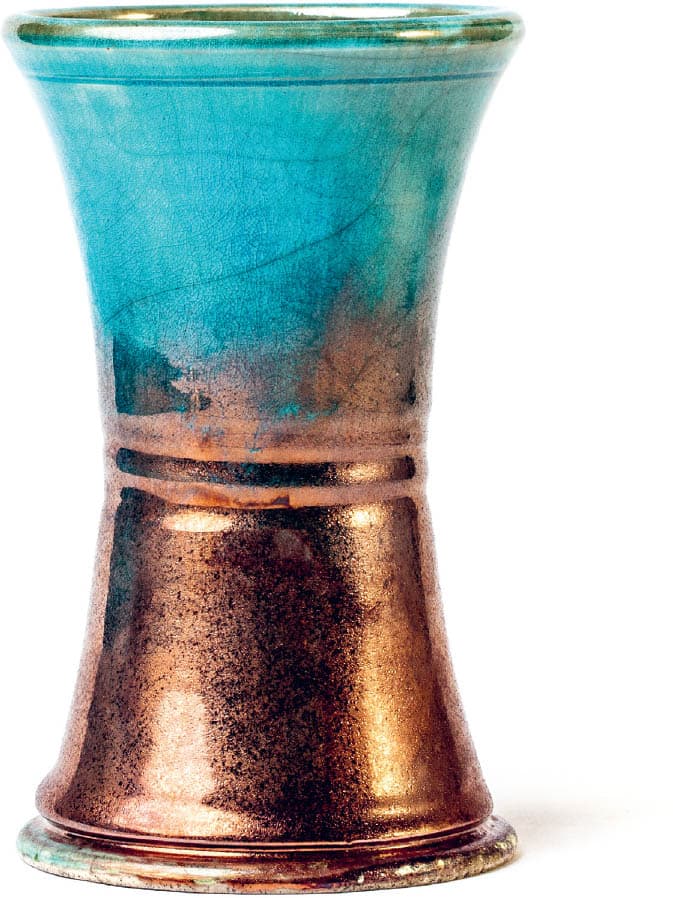
Raku Love Vase. Raku Love must be fired carefully, but results in a pleasing azure blue.
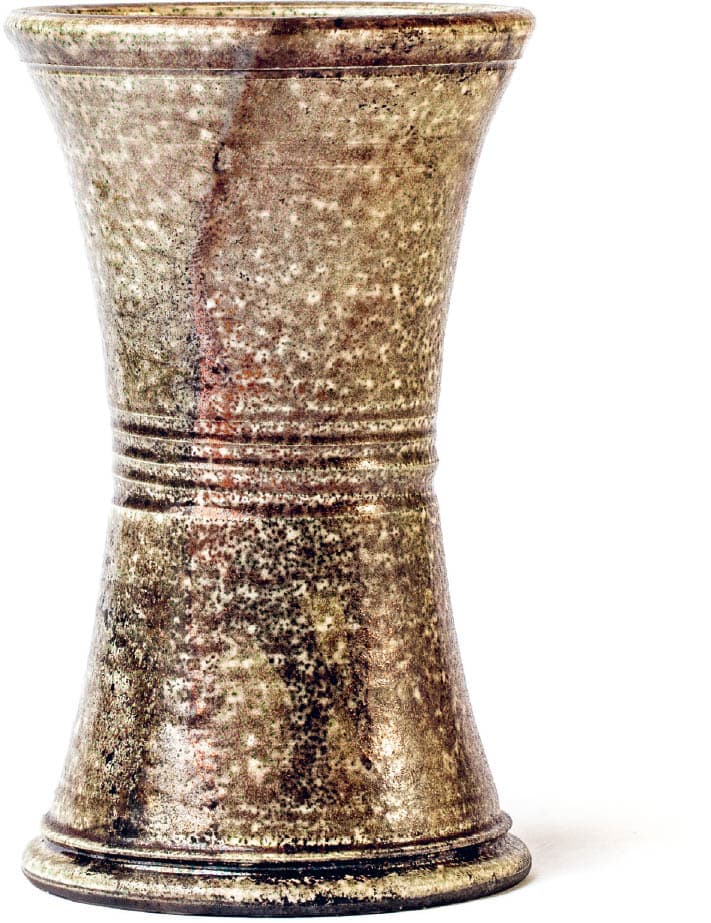
There is a quiet, calm beauty to this grouping of raku pots by Paul Gisondo.