
Chapter 11
Harnessing the Capabilities of Your Android Device
- Incorporating e-mail, SMS, and telephony into an app
- Writing programs that use the camera
- Experiencing the outside world by way of sensors
- Appreciating the SDK components used in this chapter
Mobile devices have become powerful computing platforms and can therefore accommodate a wide range of hardware capabilities. New Android devices often have not only high-performance cameras but also built-in GPS and one or more sensors. Furthermore, Google wanted to make the Android platform as developer-friendly as possible so that developers would quickly create apps for it (and drive up Android's market share). Android also liberalized the policies around Android development — making them more open than the policies that governed older mobile devices and their platforms.
Thus, the Android SDK makes all capabilities available on the device accessible from a program. You can write apps that control the camera to take photographs, communicate via the device's phone to make calls and send text messages, and record and play audio and video. (Though we don't cover it in this book, you can also write programs that communicate in custom ways over Bluetooth and Wi-Fi.) Finally, not only can you incorporate all this functionality in your app, but the Android SDK makes programming apps that use these capabilities much easier than other platforms.
This chapter shows you two broad methods to incorporate these capabilities into your apps. In many cases, you can use Android intents and reuse functionality from the built-in apps on your system; or you can directly use Android SDK classes to create finer-grained control. Additionally, you can use a hybrid approach and use both intents and custom classes. We show you examples of all these strategies in this chapter.
As we show you these examples, we will, along the way, point out quirks in the Android framework, such as differences in the ways in which to handle different types of media (audio, video, and images). We will describe how we had to work around at least one “bug” in the framework in order to make the app work, as an example of issues you too could run into and have to find a way around. Also, dealing with sensors is more complicated than the framework lets on. Because not all devices have all sensors, sensors can generate a fire hose of data that you have to find a way to handle, and every sensor is different.
Finally, you will find it really difficult to properly develop and test programs that use the capabilities described in this chapter on an emulator. You really need an actual Android device. So buy, beg, or borrow a device if at all possible.
Let's get started!
Integrating E-Mail, SMS, and Telephony into Your App
All Android devices come with a built-in e-mail application that, like all Android applications, is composed of activities. In this case, the activities collaborate to send and receive e-mail. Furthermore, this e-mail application can be called from another application by constructing an intent and broadcasting it.
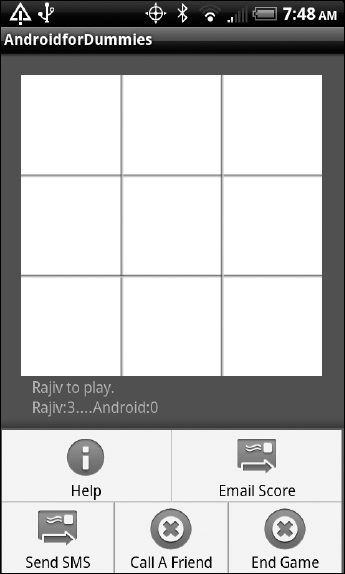
This example is somewhat hokey, but suppose that a user who's excited about a high score after playing the machine in the Tic-Tac-Toe application wants to send the score to a friend. To begin with, he configures an e-mail account on his device to send the e-mail from (you can — and must — do this in the emulator as well, for this example to work properly). Then, from the Tic-Tac-Toe app, the user brings up the Menu and then the Email Score button, as shown in Figure 11-1.
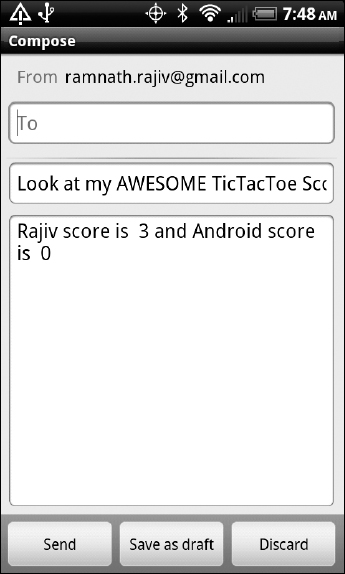
Tapping the Email Score button causes the e-mail client on the device to open. The subject and the message are already inserted, as shown in Figure 11-2, so the user only has to type the e-mail address of the intended recipient.
Figure 11-1: Choosing to e-mail a tic-tac-toe score.
After the user enters an e-mail address in the To field, the following code snippet (from GameSession.java) constructs an intent, inserts the subject and the message, and then invokes the e-mail app on your machine (or the emulator) to send the message:
public void sendScoresViaEmail() {
    Intent emailIntent = new Intent(android.content.Intent.ACTION_SEND);
    emailIntent.putExtra(android.content.Intent.EXTRA_SUBJECT,
                        “Look at my AWESOME TicTacToe Score!”);
    emailIntent.setType(“plain/text”);
    emailIntent.putExtra(android.content.Intent.EXTRA_TEXT,
                         firstPlayerName  + “ score is ” + scorePlayerOne +
                         “ and ” +
                         secondPlayerName + “ score is ” + scorePlayerTwo);
    startActivity(emailIntent);
}
Figure 11-2: The Android e-mail client, invoked from Tic-Tac-Toe.
That's it. Note that you can pre-fill the address in the To field as well, and insert it into the appropriate entry field of the e-mail client by assigning the sender's e-mail address to android.content.Intent.EXTRA_EMAIL with another call to putExtra before you broadcast the intent. The user still must be the one who finally sends the message, but he now has less work to do outside of Tic-Tac-Toe.
To send scores by text message (SMS), you simply implement the following function and invoke it from the menu:
public void sendScoresViaSMS() {
    Intent SMSIntent = new Intent(Intent.ACTION_VIEW);
    SMSIntent.putExtra(“sms_body”,
                      “Look at my AWESOME TicTacToe Score!” +
                      firstPlayerName + “ score is ” + scorePlayerOne +
                      “ and ” +

                      secondPlayerName + “ score is ” + scorePlayerTwo);
    SMSIntent.setType(“vnd.android-dir/mms-sms”);
    startActivity(SMSIntent);
}
The built-in SMS application launches, as shown in Figure 11-3. In this app also, the user must complete the process.
Figure 11-3: Sending an SMS by using the built-in SMS application.

Using intents isn't the only way to send SMS messages: You can also directly use the SMS Manager class within the SDK. (We provide links to the documentation on this class in the later section “Understanding the SDK Components Used in This Chapter.”) If you plan to use this class directly in your code rather than let the built-in apps do the work for you, remember that you must request the appropriate permissions in the AndroidManifest.xml file. The permission for sending SMS is Last, we show you how to make a telephone call for Tic-Tac-Toe help. This time, the intent is ACTION.CALL and you have to specify the phone number to launch the activity properly, as shown in Figure 11-4. The code is similar, however:
<uses-permission android:name=“android.permission.SEND_SMS”/>
public void callTicTacToeHelp() {
    Intent phoneIntent = new Intent(Intent.ACTION_CALL);
    String phoneNumber = “842-822-4357”; // TIC TAC HELP
    String uri = “tel:” + phoneNumber.trim();
    phoneIntent.setData(Uri.parse(uri));
    startActivity(phoneIntent);
}
Figure 11-4: Placing a phone call.

We want to mention one more difference between making phone calls and sending e-mail and SMS messages: Your application must explicitly ask, in AndroidManifest.xml, for permission to use the phone, because the activity that responds to the intent doesn't have it. (You'll realize why when you see that the dialer immediately starts dialing after it's launched — other apps require the user to confirm the operation.) Here's the permission you need:
<uses-permission android:name=“android.permission.CALL_PHONE”/>
 All uses-permission entries go inside the <manifest> … </manifest> elements and outside the <application> … </application> elements.
Playing Audio and Video and Capturing Images
In this section, we illustrate the Android SDK's capabilities for playing and capturing audio, video, and images in multiple ways — sometimes by using intents to launch built-in applications and sometimes by using calls to the framework classes. Then, for audio playback, we create a hybrid of these two methods. As a result, you see a range of methods and can choose the appropriate one for your particular needs.
 We have provided three sample files (SampleAudio.mp3, SampleVideo.3gp, and SampleImage.jpg) as part of the CD and on the website for you to use in the following sections. To make the sample code work correctly on an emulator or a device, all three files must be installed on the SD card, in the directory /mnt/sdcard.
To load the audio and video files into the locations specified in the code (we're using the DDMS perspective in Eclipse, as shown in Figure 11-5), simply click and highlight the directory into which you want to upload the file, and then select the little icon at the top of the window whose tooltip says, “Push a file onto the device.” In the file browser window that opens, you can select the file you want to upload. Refer to Figure 11-5 to see where the examples used in the book (SampleAudio.mp3, SampleImage.jpg, and SampleVideo.3gp) have been uploaded.
Capturing and playing audio
In this section, we show you how to work with music and audio in Android. We demonstrate audio recording by using an intent to launch the built-in voice recorder, exhibit the playback of audio by creating a playback service that plays audio in the background, and then launch this service from within the Tic-Tac-Toe app by using an intent.
Figure 11-5: Using the DDMS perspective to copy files to the device.

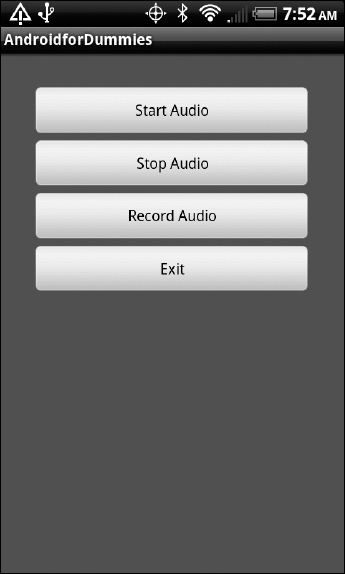
To begin, we show you the layout of the Audio activity. It has four buttons as listed below (the activity itself is shown in Figure 11-6):
- Start Audio (playback)
- Stop Audio (playback)
- Start Audio (recording)
- Exit (the activity)
Here's the XML code for the layout:
<?xml version=“1.0” encoding=“utf-8”?>
<LinearLayout xmlns:android=“http://schemas.android.com/apk/res/android”
            android:background=“@color/background”
            android:layout_height=“match_parent”
            android:layout_width=“match_parent”
            android:padding=“30dip”
            android:orientation=“vertical”>
    <Button android:layout_width=“match_parent”
            android:layout_height=“wrap_content”
            android:id=“@+id/buttonAudioStart”
            android:text=“Start  Audio”/>
    <Button android:layout_width=“match_parent”
            android:layout_height=“wrap_content”
            android:text=“Stop Audio”
            android:id=“@+id/buttonAudioStop”/>
    <Button android:layout_width=“match_parent”
            android:layout_height=“wrap_content”

            android:id=“@+id/buttonAudioRecord”
            android:text=“Record Audio”/>
    <Button android:id=“@+id/buttonAudioExit”
            android:layout_width=“match_parent”
            android:layout_height=“wrap_content”
            android:text=“Exit” />
</LinearLayout>
Figure 11-6: The audio activity.
Now let's show you the code, starting with the onCreate(…) method (see below). After setting up the buttons, the onCreate(…) method initializes audioFileURI from the path to the sample audio file (/mnt/sdcard/SampleAudio.mp3):
protected void onCreate(Bundle savedInstanceState) {
    super.onCreate(savedInstanceState);
    setContentView(R.layout.audio);

    Button buttonStart = (Button) findViewById(R.id.buttonAudioStart);
    buttonStart.setOnClickListener(this);
    Button buttonStop = (Button) findViewById(R.id.buttonAudioStop);
    buttonStop.setOnClickListener(this);
    Button buttonRecord = (Button) findViewById(R.id.buttonAudioRecord);
    buttonRecord.setOnClickListener(this);

    Button btnExit = (Button) findViewById(R.id.buttonAudioExit);
    btnExit.setOnClickListener(this);
    audioFileURI = Uri.fromFile(new File(audioFilePath));
}
Next, we show you the onClick(…) method for audio recording (we want to save the playback part for last):
public void onClick(View v) {
    switch(v.getId()){
    case R.id.buttonAudioStart:
        if(!started){
            Intent musicIntent = new Intent(this, MyPlaybackService.class);
            musicIntent.putExtra(“URIString”, audioFileURI.toString());
            startService(musicIntent);
            started=true;
        }
        break;
    case R.id.buttonAudioStop:
        stopService(new Intent(this, MyPlaybackService.class));
        started=false;
        break;
    case R.id.buttonAudioRecord:
        Intent audioRecordIntent = new Intent(MediaStore.Audio.Media.RECORD_
               SOUND_ACTION);
        startActivityForResult(audioRecordIntent,AUDIO_CAPTURED);
        break;
    case R.id.buttonAudioExit:
        finish();
        break;
    }
}
This activity uses the built-in audio recorder application on the Android device for recording audio. The couple of lines that start the recording are in the case R.id.buttonAudioRecord block of the onClick(…) method. An intent for android.provider.MediaStore.ACTION_AUDIO_CAPTURE is created and broadcast using the startActivityForResult(…) method. Because the built-in audio recorder application has declared its intent filter to handle this event, the app is launched by Android. Note that the user starts and stops the recording, and then the path to the file in which the audio has been captured is returned as the Universal Resource Identifier (URI) to the activity via the following onActivityResult(…) callback method:
protected void onActivityResult (int requestCode, int resultCode, Intent data) {
    if (resultCode == RESULT_OK && requestCode == AUDIO_CAPTURED) {
        audioFileURI = data.getData();
        Log.v(TAGACTIVITYAUDIO, “Audio File URI: >” + audioFileURI + “<”);
    }
}
In this example, you simply set the URI as the new value of the member variable audioFileURI so that when the user presses Start Audio again, the recently recorded audio is played.
Now you can work through the implementation of the audio playback service. To begin, you declare it as a service to the Android runtime via an entry in the AndroidManifest.xml file:
<service android:enabled=“true”
         android:name=“.MyPlaybackService”
/>
The code for this service is shown next. As you can see, a service is a class that extends the base class Service. (Ignore the onBind(…) method because you aren't implementing a “bound” service that can interact with multiple clients while it's running (for more information see http://developer.android.com/guide/topics/fundamentals/services.html):
public class MyPlaybackService extends Service {
    MediaPlayer player;

    @Override
    public IBinder onBind(Intent intent) {
        return null;
    }

    @Override
    public void onCreate() {
        player = MediaPlayer.create(this, R.raw.sampleaudio);
        player.setLooping(true);
    }

    @Override
    public void onStart(Intent intent, int startid) {

         Bundle extras = intent.getExtras();
         if(extras !=null){
             String audioFileURIString = extras.getString(“URIString”);
             Uri audioFileURI=Uri.parse(audioFileURIString);
             try {
                 player.reset();
                 player.setDataSource(this.getApplicationContext(),
                                      audioFileURI);
                 player.prepare();
             } catch (Exception e) {
                 // TODO Auto-generated catch block
                 e.printStackTrace();
             }
         }
         player.start();
    }

    @Override
    public void onDestroy() {
        player.stop();
    }
}
This particular service encapsulates an object of the MediaPlayer class. It is this object that handles the audio playback. Note how this object is created in the onCreate(…) method of the service — by passing it a “raw” resource that serves as the default audio file for this player. (In other words, if the media player is started without giving it an audio file, this is what it plays.) If you look at the res->raw directory of the Tic-Tac-Toe application, you see a file named sampleaudio.mp3, which we placed there. It's a copy of the /mnt/sdcard/SampleAudio.mp3 file, used as the default audio file in the Audio activity.
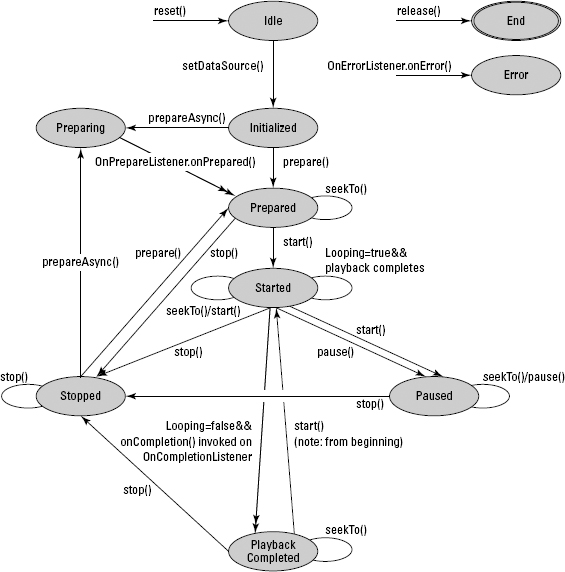
The intent that's created in the audio activity is received by the onStart(…) method. This method pulls out the URI of the audio filename that the calling activity wants it to play and sets it as the data source for the media player, after which it more or less calls the start(…) method of the player to start playing. We say more or less because the code has to jump through some hoops first because the media player is a subsystem that transitions through well-defined execution states, with only certain functionality being available in each of these states). These states are shown in Figure 11-7. Because we create the media player using the static method MediaPlayer.create(…) with a default resource, it's already in the Prepared state and ready to be started. Incidentally, to change the data source of the media player, you have to reset it, set the data source, and prepare it. Only then can you start it.
Figure 11-7: States of the media player.
Finally, the onDestroy(…) method of the service stops the media player if this service is destroyed.
Recording and playing video
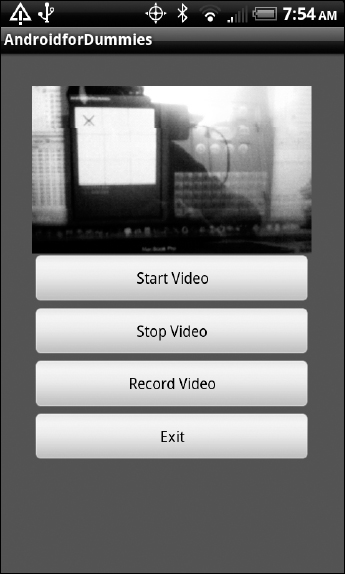
We describe video in a somewhat different manner than we describe audio. (See the earlier section “Capturing and playing audio.”) The user obviously wouldn't want to play video in the background, so you don't create a video playing service. Instead, we demonstrate how to record and play video using the VideoView visual component, which is part of the Video activity's layout:
<?xml version=“1.0” encoding=“utf-”?>
<LinearLayout xmlns:android=“http://schemas.android.com/apk/res/android”
        android:background=“@color/background”
        android:layout_height=“match_parent”
        android:layout_width=“match_parent”
        android:padding=“30dip”
        android:orientation=“vertical” >
    <VideoView android:id=“@+id/videoView”
        android:layout_height=“175dip”
        android:layout_width=“match_parent”
        android:layout_gravity=“center” />
    <Button android:layout_width=“match_parent”
        android:layout_height=“wrap_content”
        android:id=“@+id/buttonVideoStart”
        android:text=“Start Video”/>
    <Button android:layout_width=“match_parent”
        android:layout_height=“wrap_content”
        android:text=“Stop Video”
        android:id=“@+id/buttonVideoStop”/>
    <Button android:layout_width=“match_parent”
        android:layout_height=“wrap_content”
        android:text=“Record Video”
        android:id=“@+id/buttonVideoRecord”/>
    <Button android:id=“@+id/buttonVideoExit”
        android:layout_width=“match_parent”
        android:layout_height=“wrap_content”
        android:text=“Exit” />
</LinearLayout>
The Video activity that results from this layout is shown in Figure 11-8.
Here's the Video activity:
package com.wiley.fordummies.androidsdk.tictactoe;
…
public class Video extends Activity implements OnClickListener{
    Button buttonStart, buttonStop, buttonRecord;
    VideoView videoView=null;
    static Uri videoFileURI=null;
    public static int VIDEO_CAPTURED = 1;

    @Override
    protected void onCreate(Bundle savedInstanceState) {
        super.onCreate(savedInstanceState);
        setContentView(R.layout.video);
        videoView = (VideoView) findViewById(R.id.videoView);
        buttonStart = (Button) findViewById(R.id.buttonVideoStart);
        buttonStart.setOnClickListener(this);
        buttonStop = (Button) findViewById(R.id.buttonVideoStop);
        buttonStop.setOnClickListener(this);
Figure 11-8: The Video activity.
buttonRecord = (Button) findViewById(R.id.buttonVideoRecord);
    buttonRecord.setOnClickListener(this);
    Button btnExit = (Button) findViewById(R.id.buttonVideoExit);
    btnExit.setOnClickListener(this);
    File videoFile = new File(“/mnt/sdcard/samplevideo.3gp”);
    videoFileURI = Uri.fromFile(videoFile);
}

public void onClick(View v) {
    switch(v.getId()){
    case R.id.buttonVideoStart:
        // Load and start the movie
        videoView.setVideoURI(videoFileURI);
        videoView.start();
        break;
    case R.id.buttonVideoRecord:
        Intent intent =
            new Intent(android.provider.MediaStore.ACTION_VIDEO_CAPTURE);
        startActivityForResult(intent, VIDEO_CAPTURED);

            break;
        case R.id.buttonVideoStop:
            videoView.stopPlayback();
            break;
        case R.id.buttonVideoExit:
            finish();
            break;
    }

    protected void onActivityResult(int requestCode,int resultCode,Intent data){
        if (resultCode == RESULT_OK && requestCode == VIDEO_CAPTURED) {
            videoFileURI = data.getData();
        }
    }
}
As you can see in this method, VideoView has methods to set the video source and to start and stop the video player. Note that VideoView internally encapsulates an Android media player object. The stopPlayback(…) and start(…) methods on VideoView simply delegate their responsibilities to the media player object.
Although this Video activity uses the VideoView visual component for starting and stopping video play, it uses the built-in video recorder application on the Android device for recording video. The couple of lines that start the recording are in the case R.id.buttonVideoRecord block of the onClick(…) method. An intent for android.provider.MediaStore.ACTION_VIDEO_CAPTURE is created and broadcast using the start ActivityForResult(…) method. Because the built-in camcorder application declares its intent filter to permit this event, it's launched by Android. Note that the user has to start and stop the actual recording. When the user finishes, the path to the file in which the video has been captured is returned as a URI as the result of the activity. In the code sample, you simply set this URI as the new value of the member variable videoFileURI so that when the user presses Start Video again, the recently recorded video is shown.
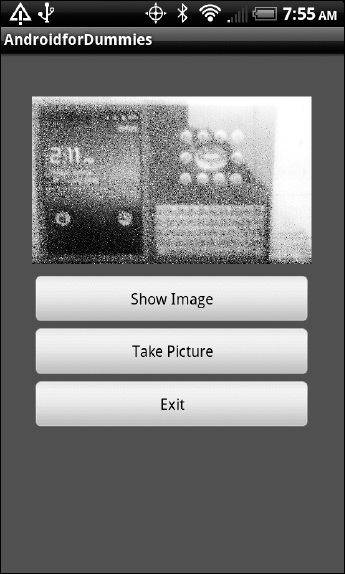
Displaying and capturing images
We describe images in a manner similar to describing video. The differences in the coding patterns arise from the Android SDK not working with images exactly how it works with video. For example, video is played directly from a file containing the video, but an image is converted into a bitmap that's completely pulled into memory before being displayed.
The Android framework offers the ImageView visual component, which you use to display images in various formats. We use this component to demonstrate how captured images are handled. We demonstrate how to capture an image in the first place, by launching the built-in camera application by using an Intent. All the example image-handling functionality in Tic-Tac-Toe has been encapsulated within the Images activity. So let's go through that activity, starting with its layout, shown below:
<?xml version=“1.0” encoding=“utf-8”?>
<LinearLayout xmlns:android=“http://schemas.android.com/apk/res/android”
        android:background=“@color/background”
        android:layout_height=“match_parent”
        android:layout_width=“match_parent”
        android:padding=“30dip”
        android:orientation=“vertical” >
    <ImageView android:id=“@+id/imageView”
        android:layout_height=“175dip”
        android:layout_width=“match_parent”
        android:layout_gravity=“center” />
    <Button android:layout_width=“match_parent”
        android:layout_height=“wrap_content”
        android:id=“@+id/buttonImageShow”
        android:text=“Show Image”/>
    <Button android:layout_width=“match_parent”
        android:layout_height=“wrap_content”
        android:id=“@+id/buttonImageCapture”
        android:text=“Take Picture”/>
    <Button android:id=“@+id/buttonImageExit”
        android:layout_width=“match_parent”
        android:layout_height=“wrap_content”
        android:text=“Exit” />
</LinearLayout>
If you've followed along throughout this chapter, you should see nothing new here. Although you may not have used ImageView already, this component is described in the layout file in much the same way as any other component.
Here's the code for the Images activity:
public class Images extends Activity implements OnClickListener{
    public int flag=0;
    ImageView imageView=null;
    public static int IMAGE_CAPTURED = 1;
    static Uri imageFileURI=null;
    String imageFilePath=“/mnt/sdcard/SampleImage.jpg”;
    Bitmap imageBitmap=null;
    static final String TAGIMAGE=“ActivityShowImage”;


    @Override
    protected void onCreate(Bundle savedInstanceState) {
        super.onCreate(savedInstanceState);
        setContentView(R.layout.images);
        imageView = (ImageView) findViewById(R.id.imageView);
        Button buttonShow = (Button) findViewById(R.id.buttonImageShow);
        buttonShow.setOnClickListener(this);
        Button buttonCapture = (Button) findViewById(R.id.buttonImageCapture);

        buttonCapture.setOnClickListener(this);
        Button buttonExit = (Button) findViewById(R.id.buttonImageExit);
        buttonExit.setOnClickListener(this);
        imageBitmap = BitmapFactory.decodeFile(imageFilePath);
    }

    public void onClick(View v) {
        switch(v.getId()){
        case R.id.buttonImageShow:
            // Use BitmapFactory to create a bitmap
            imageView.setImageBitmap(imageBitmap);
            break;
        case R.id.buttonImageCapture:
           Intent cameraIntent =
               new Intent(android.provider.MediaStore.ACTION_IMAGE_CAPTURE);
                         startActivityForResult(cameraIntent, IMAGE_CAPTURED);
           break;
        case R.id.buttonImageExit:
           finish();
           break;
        }
   }

   protected void onActivityResult (int requestCode,
                                    int resultCode,
                                    Intent cameraIntent) {
       if (resultCode == RESULT_OK && requestCode == IMAGE_CAPTURED) {
           Bundle extras = cameraIntent.getExtras();
           imageBitmap = (Bitmap) extras.get(“data”);
           imageView.setImageBitmap(imageBitmap);
       }
   }
   @Override
   protected void onPause() {
       Log.d(TAGIMAGE, “Entering onPause”);
       super.onPause();
       System.gc();
   }
}
The Images activity uses the ImageView visual component for showing the picture and uses the built-in camera for taking the picture. The couple of lines that start the picture-taking are in the case R.id.buttonImage Capture block of the onClick(…) method. An intent for android.provider.MediaStore.ACTION_IMAGE_CAPTURE is created and broadcast using the startActivityForResult(…) method. Because the built-in camera application declares its intent filter to permit this event, it's launched by Android. The user has to initiate the picture-taking. The picture is then returned as a bitmap, as the result of the activity. In the code sample, you simply set this bitmap in the ImageView component, which causes this new picture to be displayed.
Note the use of the BitMapFactory in the onCreate(…) method to create a bitmap from the default image in the file. This is one difference between images and videos in the Android SDK. The SDK has no way to directly render an image from a file, as it does for videos. Instead, the contents of the file have to be pulled into memory as a bitmap and then shown.
One issue with this technique is that your app can run out of memory and crash if the bitmaps it handles exceed the allocated space. Related to this topic is a known bug in Android (see http://code.google.com/p/android/issues/detail?id=8488 for details) that requires the app (as a work-around) to force the system garbage collector to run so that any unreferenced bitmaps are “garbage-collected” in time. We show you this work-around in the onPause(…) method of this activity (you'll see the onPause(…) method with the call to System.gc(…), the garbage collector in the code above).
Finally, Figure 11-9 shows the Images activity executing.
Figure 11-9: The Images activity.
Bringing In the Outside World by Using Sensors
To follow the unwritten rule of always saving the best for last, in this section we describe one more set of capabilities on your device: its sensors. Like the GPS and network components (wireless, cellular, and BlueTooth) covered in Chapter 10, sensors sense phenomena taking place in the outside world — such as the temperature, the pull of gravity, orientation, magnetic fields, ambient light, and sound, and they feed these sensed values to your app. Your app can then use these values to provide cool functionality. For example, given a communication interface to your heating or A/C unit, the app can act as a thermostat, the app can talk to the user more loudly if it senses greater ambient sound levels, and so on.
Listing, understanding, and monitoring the sensors on your Android device
Sensors vary among devices, so although we show examples of several sensors in this chapter, we leave others for you to uncover. After you've seen a few sensors, however, you've seen them all — in the sense that the way you incorporate them in your app is similar.
To get started, we created the Sensors activity within Tic-Tac-Toe. This activity first finds out which sensors exist on your device and lists them. Then it monitors the sensors and logs the data it receives from each of them.
As we suggest in other examples in this book, open Eclipse on the Tic-Tac-Toe project, open the files we refer to in this section — the Sensors.java file and the Sensors.xml file — and follow along.
Here's the layout file for the Sensors activity:
<?xml version=“1.0” encoding=“utf-8”?>
<LinearLayout xmlns:android=“http://schemas.android.com/apk/res/android”
    android:background=“@color/background”
    android:orientation=“vertical”
    android:layout_width=“match_parent”
    android:layout_height=“match_parent”
    android:padding=“20dip”>
    <TextView android:text=“Sensors”
        android:layout_height=“wrap_content”
        android:layout_width=“wrap_content”
        android:layout_gravity=“center”
        android:layout_marginBottom=“15dip”
        android:textSize=“20.5sp”/>

    <ScrollView android:orientation=“vertical”
        android:layout_height=“250dip”
        android:layout_width=“match_parent”
        android:layout_gravity=“top”>
        <TextView android:layout_width=“match_parent”
            android:layout_height=“match_parent”
            android:id=“@+id/sensorsListTextView”/>
    </ScrollView>
    <Button android:id=“@+id/buttonSensorsExit”
        android:layout_width=“match_parent”
        android:layout_height=“wrap_content”
        android:text=“Exit” />
</LinearLayout>
The Sensors activity is declared this way:
public class Sensors extends Activity implements SensorEventListener,
               OnClickListener {
…
}
As you can see, the Sensors activity has the standard Activity methods, and, because it has a user interface, it also implements the OnClickListener interface. To handle sensor events, though, the Sensors activity must also implement the SensorEventListener interface — the two methods onSensorChanged(…) and onAccuracyChanged(…).
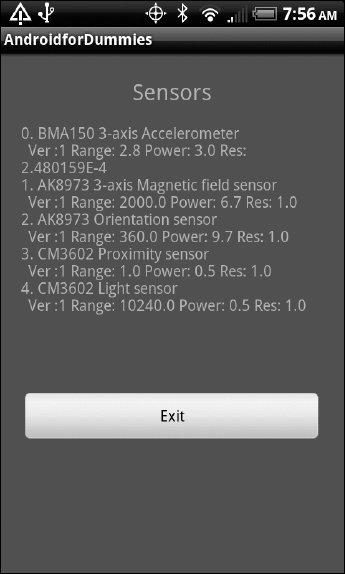
The onCreate(…) method of the activity is shown next. This method gets a handle to an instance of the SensorManager class by calling getSystemService(SENSOR_SERVICE) and receiving in return a list of sensors that it then displays in the TextView component of the user interface, as shown in Figure 11-10:
public void onCreate(Bundle savedInstanceState) {
    super.onCreate(savedInstanceState);
    setContentView(R.layout.sensors);
    listSensorsView = (TextView) findViewById(R.id.sensorsListTextView);
    Button buttonExit = (Button) findViewById(R.id.buttonSensorsExit);
    buttonExit.setOnClickListener(this);
    sensorManager= (SensorManager) getSystemService(SENSOR_SERVICE);
    sensorList = sensorManager.getSensorList(Sensor.TYPE_ALL);
    StringBuilder sensorDescriptions = new StringBuilder();
    int count=0;
    for (Sensor sensor : sensorList) {
        String sensorName = sensor.getName();
        sensorDescriptions.append(count+ “. ” + sensorName + “
” + “ ” +
                                  “ Ver:” + sensor.getVersion() +
                                  “ Range: ” + sensor.getMaximumRange() +
                                  “ Power: ” + sensor.getPower() +
                                  “ Res: ” + sensor.getResolution());
        sensorDescriptions.append(“
”);
        count++;

        }
        listSensorsView.setText(sensorDescriptions);
}
Figure 11-10: A list of sensors on a device.
Using sensors on the emulator
You really need an actual Android device to develop and test a program that uses sensors. Certain software lets you “fake” sensors on the emulator; however, you must first make a small change in your code. For more on this topic, see http://code.google.com/p/openintents/wiki/SensorSimulator.
Registering with the sensor manager and receiving sensed values
In order to receive updates on sensor values, the activity must register itself with the sensor manager. The best place to do the registering is in the activity's onResume method:
@Override
protected void onResume() {
    super.onResume();
    for (Sensor sensor : sensorList) {
        sensorManager.registerListener(this,
                                       sensor,
                                       SensorManager.SENSOR_DELAY_NORMAL);
    }
}
Incidentally, the activity must unregister itself from the sensor manager, ideally in the activity's onPause(…) method:
@Override
protected void onPause() {
    …
    super.onPause();
    // Stop updates
    sensorManager.unregisterListener(this);
    …
}
The most important method of this activity is the onSensorChanged(…) method. It has lots of code, so we show it to you twice. The first time, we show it to you with most of the code removed so that you can see how it receives changed sensor values and then writes their details to the debug log by using Log.d(…):
public void onSensorChanged(SensorEvent event) {
    …
    String sensorEventString = sensorEventToString(event);
    …
    Log.d(LOGTAG, “--- EVENT Raw Values ---
” + sensorName + “<
” +
                  “Distance Last= >” + distanceOfLastValue + “<
” +
                  “Distance This= >” + distanceOfThisValue + “<
” +
                  “Change = >” + change + “<
” +
                  “Percent = >” + percentageChange + “%
” +
                  “Last value = ” + lastValueString + “<
” +
                  sensorEventString);
    …
}
While we're at it, here's sensorEventToString(…):
private String sensorEventToString(SensorEvent event){
    StringBuilder builder = new StringBuilder();
    builder.append(“Sensor: ”);
    builder.append(event.sensor.getName());
    builder.append(“
Accuracy: ”);
    builder.append(event.accuracy);
    builder.append(“
Timestamp: ”);
    builder.append(event.timestamp);
    builder.append(“
Values:
”);
    for (int i = 0; i < event.values.length; i++) {
        builder.append(“ [”);
        builder.append(i);
        builder.append(“] = ”);
        builder.append(event.values[i]);
    }
    builder.append(“
”);
    return builder.toString();
}
Most of the code in onSensorChanged(…) is there to deal with sensor “noise” — which is sensors returning sensed values at a high frequency. You have to filter out most of these values in order to detect the real change you're looking for (such as changing the orientation or darkening the room). However, different sensors have different ranges and resolutions, so you need to filter out values differently. For example, the accelerometer returns values in meters per second squared, with a baseline value of 9.8 m/s2 on one of three axes when the device is laid flat; the orientation sensor returns azimuth values between 0 and 359 degrees around one axis, pitch between 0 and 180 degrees around a second axis, and roll from between –90 and 90 degrees on a third.
We want to give you at least an idea of how to filter values, so we include some code in onSensorChanged(…). In the interest of full disclosure, this code is somewhat crude, but it should give you an idea of what to do and how to do it:
…
private static final float TOLERANCE = (float) 10.0;
…
public void onSensorChanged(SensorEvent event) {
    String sensorName = event.sensor.getName();
    String lastValueString = “No previous value”;
    String sensorEventString = sensorEventToString(event);
    float percentageChange = (float)1000.0 + TOLERANCE;// Greater than tolerance
    float distanceOfLastValue = (float)0.0;
    float distanceOfThisValue = (float)0.0;
    float change = (float)0.0;
    float[] lastValue = lastSensorValues.get(sensorName);
    lastSensorValues.remove(sensorName); // Hash table is “open” and can store
               multiple entries for the same key

    lastSensorValues.put(sensorName, event.values.clone()); // update the value
    if (lastValue != null){
        // Compute distance of new value, change and percentage change
        StringBuilder builder= new StringBuilder ();
        distanceOfLastValue = (float)0.0;
        for (int i = 0; i < event.values.length; i++){
            distanceOfLastValue = distanceOfLastValue + (float) Math.pow
               (lastValue[i], 2);
            distanceOfThisValue =
                distanceOfThisValue + (float) Math.pow (event.values[i], 2);
            change = change + (float) Math.pow ((event.values[i]-lastValue[i]),
               2);
            builder.append(“ [”);
            builder.append(i);
            builder.append(“] = ”);
            builder.append(lastValue[i]);
        }
        lastValueString = builder.toString();
        change = (float) Math.sqrt(change);
        distanceOfLastValue = (float) Math.sqrt(distanceOfLastValue);
        distanceOfThisValue = (float) Math.sqrt(distanceOfThisValue);

        percentageChange = (float)1000.0 + TOLERANCE; // large value > tolerance
        if (distanceOfLastValue != 0.0)
            percentageChange = change*(float)100.0/distanceOfLastValue;
        else if (distanceOfThisValue != 0.0)
            percentageChange = change*(float)100.0/distanceOfThisValue;
        else percentageChange = (float) 0.0; // both distances are zero
    }
    Log.d(LOGTAG, “--- EVENT Raw Values ---
” + sensorName + “
” +
          “Distance Last= >” + distanceOfLastValue + “<
” +
          “Distance This= >” + distanceOfThisValue + “<
” +
          “Change = >” + change + “<
” +
          “Percent = >” + percentageChange + ”%
” +
          “Last value = ” + lastValueString + ”<
” +
          sensorEventString);
    if (lastValue == null || percentageChange > TOLERANCE){
        Log.d(LOGTAG+sensorName,
              “--- Event Changed ---
” +
              “Change = >” + change + “<
” +
              “Percent = >” + percentageChange + “%
” +
              sensorEventString);
    }
}
This code sample is intended to detect a significant change in the element being sensed and to then report a value. Essentially, it saves (in a hash table) the previously sensed value for every sensor modality, and when a new value arrives that's more than a certain tolerance percentage (defined in the constant TOLERANCE) away from the old value, it writes it with a special tag (in the form Sensors<Sensor Name>; for example, TestSensorsCM3602 Light sensor) to the log file. The code sample computes the percentage change as the vector distance between the previous and new values divided by the distance of the previous value from the origin (or the distance of the new value from the origin, if the previous value is <0, 0, 0>.
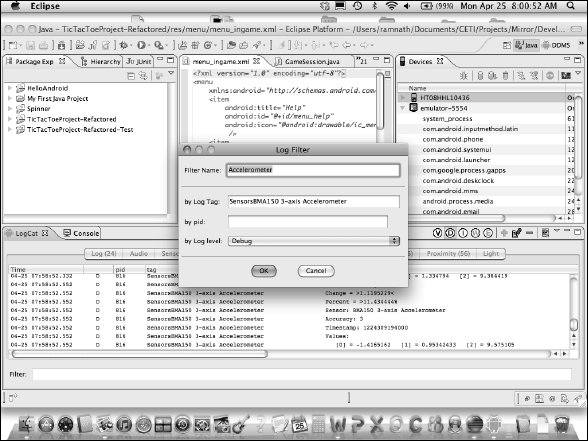
You can observe this filtering in the logcat window, shown in Figure 11-11 (check out Chapter 12 for more on the logcat window), by defining a filter on the log tag for every type of sensor and one using the tag. For example, for the light sensor, the filter is for the log tag TestSensorsCM3602 Light sensor. When you run the app and enter the Sensors activity, you see the main sensor filter showing a rapidly growing number of lines, whereas the others show changes only when you move the sensor around, change its orientation, or dim the room, for example.
Figure 11-11: The logcat window, showing filtered sensor values.
A sample log entry (for the light sensor) is shown here, for good measure:
Light Sensor:

04-23 16:17:42.784: DEBUG/SensorsCM3602 Light sensor(2389): --- Event Changed
04-23 16:17:42.784: DEBUG/SensorsCM3602 Light sensor(2389): Change = >0.0<
04-23 16:17:42.784: DEBUG/SensorsCM3602 Light sensor(2389): Percent = >1010.0%
04-23 16:17:42.784: DEBUG/SensorsCM3602 Light sensor(2389): Sensor: CM3602 Light
               sensor
04-23 16:17:42.784: DEBUG/SensorsCM3602 Light sensor(2389): Accuracy: 3

04-23 16:17:42.784: DEBUG/SensorsCM3602 Light sensor(2389): Timestamp:
               13348252950000
04-23 16:17:42.784: DEBUG/SensorsCM3602 Light sensor(2389): Values:
04-23 16:17:42.784: DEBUG/SensorsCM3602 Light sensor(2389): [0] = 320.0 [1]
               = 0.0 [2] = 0.0
04-23 16:17:50.514: DEBUG/SensorsCM3602 Light sensor(2389): --- Event Changed
               ---
04-23 16:17:50.514: DEBUG/SensorsCM3602 Light sensor(2389): Change = >160.0<
04-23 16:17:50.514: DEBUG/SensorsCM3602 Light sensor(2389): Percent = >50.0%
04-23 16:17:50.514: DEBUG/SensorsCM3602 Light sensor(2389): Sensor: CM3602 Light
               sensor
04-23 16:17:50.514: DEBUG/SensorsCM3602 Light sensor(2389): Accuracy: 3
04-23 16:17:50.514: DEBUG/SensorsCM3602 Light sensor(2389): Timestamp:
               13355983358000
04-23 16:17:50.514: DEBUG/SensorsCM3602 Light sensor(2389): Values:
04-23 16:17:50.514: DEBUG/SensorsCM3602 Light sensor(2389): [0] = 160.0 [1] =
               0.0   [2] = 0.0
Understanding the SDK Components Used in This Chapter
After you read the examples in this chapter of how to work with SMS, e-mail, telephony, audio, video, images, and sensors, you're ready for a little more detail about the components (packages and classes) of the Android framework and its add-ons that provide the functionality covered in this chapter. We don't go into much detail because Google already provides comprehensive web pages, but we want to give you at least an idea of what a component can do and our insights on it.
SDK communication components: SMS, e-mail, and telephony
In this chapter, we show you only how to send text (SMS) messages and e-mail and make calls via built-in applications. However, these applications are built on classes in the Android SDK that are also available to your application (at least for SMS and telephony). The Android SDK does not appear to have any classes for sending and receiving e-mail (there is an interesting discussion thread on this issue here: http://groups.google.com/group/android-developers/browse_thread/thread/c58d75c1ccfe598b/3bb7cf1ad6fd3a4f). However, open source resources, that work just fine for Android, are available on the web for this task.
For sending SMS messages, the only class needed is SmsManager (see http://developer.android.com/reference/android/telephony/SmsManager.html for details). You can get a handle on the (singleton) object via the class method SmsManager.getDefault(), after which this class has methods to send single and multipart messages.
Currently the Phone app on a device is the only way (that we know of) to programmatically make a call from an app. However, starting in version 2.3, Android provides the Session Initiation Protocol (SIP) package for VOIP-based calling (see http://developer.android.com/reference/android/net/ sip/package-summary.html for details). Anyone you call must have a SIP account from a provider, and many providers provide free accounts. Because this package is new and we're still experimenting with it, we don't include an example of its use. Look for it at this book's URL at www.dummies.com/go/androidsdkprogramming, or feel free to e-mail one of us.
SDK components for handling media
The main classes for playing and recording both audio and video media are MediaPlayer (see http://developer.android.com/reference/android/media/MediaPlayer.html) and MediaRecorder (see http://developer.android.com/reference/android/media/MediaRecorder.html). The MediaStore class (see http://developer.android.com/reference/android/provider/MediaStore.html) contains the resources necessary to operate on media — to extract metadata and the constants you need in order to form intents, for example. In case you're wondering, the MediaRecorder class uses the built-in audio recorder app as the input source. The Camera class (see http://developer.android.com/reference/android/hardware/Camera.html) serves as an interface to the Camera service.
Finally, BitmapFactory (see http://developer.android.com/reference/android/graphics/BitmapFactory.html) creates bitmap objects from various streams. You may have seen how it's used to create a bitmap from an image stored in a file. The Bitmap class (see http://developer.android.com/reference/android/graphics/Bitmap.html) is used for manipulating bitmaps, such as returning image dimensions for scaling.
SDK components for handling sensors
In the sensor examples earlier in this chapter, we cover four classes. The first, SensorManager (see http://developer.android.com/reference/android/hardware/SensorManager.html), gives you access to the sensors on the device. In other words, you can use it to get back objects of the Sensor class (see http://developer.android.com/reference/android/hardware/Sensor.html), which you can use to find details about the sensors on the device, such as their names, types, and range. Finally, you register activities with SensorManager to get sensed data, which is returned as objects of type SensorEvent (see http://developer.android.com/reference/android/hardware/SensorEvent.html). These objects have methods that return sensed values, with the range and meaning of the values dependent on the type of sensor.
The last component relevant to sensors is the SensorEventListener interface (see http://developer.android.com/reference/android/hardware/SensorEventListener.html), with two methods:
- onSensorChanged(SensorEvent event), which is the callback for receiving sensor events
- onAccuracyChanged (Sensor sensor, int accuracy), which should be used to change how you handle (for example, smooth and filter) these events.
Other SDK components for handling media
To complete this section, we need to mention the SDK components for one of the support components in this chapter: services. The page at http://developer.android.com/guide/topics/fundamentals/services.html and the pages it links to provide information in detail. The main class here is Service (see http://developer.android.com/reference/android/app/Service.html), and the main methods are the life cycle methods of the service (onStart(…), onBind(…), and onDestroy(…), for example).