
Chapter 12
Effectively Using Your Integrated Development Environment
- Maximizing the capabilities of Eclipse in developing Android applications
- Finding and fixing bugs in Android applications by using the debugger
- Tracking the progress of your app by using the logcat window
- Writing specialized unit tests for Android apps
Most of us who were (or will admit to) programming in Java back when it was originally released used Java command line tools such as javac to compile Java programs, java to run them, and jdb to debug them. These tools were simple to use and did the job well. When Java was made open by Sun Microsystems, the size of the Java software development community exploded and companies making Java products just couldn't leave well enough alone. Sun itself, and then IBM and Oracle, created open (and open source) integrated development environments (IDE) aimed at making large-scale Java development easier.
What we mean by open that is that the Java IDE had an extensible “plug-in” architecture in which new functionality could be added to a foundation (that was essentially a framework, like the Android framework — except for building development and development support tools), such as language-specific editors, integration with version controls systems such as CVS (http://www.nongnu.org/cvs/) and SVN (http://subversion.apache.org/), and extensions for specific frameworks such as the Android SDK. Of these IDEs, Eclipse has become the most widely used. It was pushed by IBM (which, in addition to providing a high-quality initial code base, invested a considerable amount of money to spur Eclipse development via Eclipse innovation grants).
The Eclipse integrated development environment (IDE) with the Android extensions is a powerful tool for app development. This chapter builds on Chapter 2 to discuss specifically the specialized support that Eclipse provides for Android development — how to use Eclipse effectively for making Android apps. First, we give you a brief overview of Eclipse (because we want to quickly get to the Android-specific information). We then talk about how to use Eclipse tools to develop and debug Android apps and trace their progress. Finally, we cover the cool topic of the unit test framework that's provided within Eclipse to test Android apps. Our goal is to give you the knowledge necessary to effectively leverage your IDE's capabilities to build enterprise-class and commercial-quality Android apps.
Eclipse and Android: A Beautiful Friendship
Eclipse provides a complete suite of tools to develop, debug, test, and deploy Android programs. The tools are really well integrated, and will mostly seem to you like they are one seamless tool. With that, let's get into Eclipse functionality.
Let's start by quickly going over Eclipse's standard capabilities. Every Eclipse instance is associated with a workspace in which multiple projects can exist. Projects serve as conceptual repositories for the software developed in Eclipse. The software resides in folders and files in your computer's file system. Workspaces, projects, folders, and files are collectively known as resources. Figure 12-1 illustrates the relationships among these resources.
Figure 12-1: Relationships among Eclipse resources.
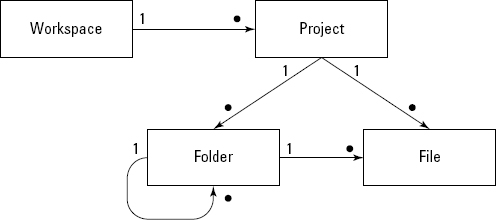
Projects are specific to the kind of software you're developing (such as a pure Java project, an Enterprise Java (J2EE) project, or an Android project). The kind of project is known as its nature. (You can determine the nature of a project by looking at its project icon in the Eclipse Package Explorer window: A Java project has the letter J in its icon, and an Android project has a tiny, barely distinguishable “Android squiggle.”) The nature of a project determines how it's configured and built, for example.
Gaining perspective in Eclipse
A perspective is a collection of views in which you can perform specific actions. Eclipse usually comes with eight standard perspectives (although this depends on the version of Eclipse that you install). Three (source code control, team synchronization, and plug-in development) are for development teams and for extending Eclipse, so we don't discuss them in detail in this book. The remaining five types of perspectives — the most useful ones — are described in this list:
- Resource: From this default perspective, shown in Figure 12-2, you can browse projects and their contents and run programs, for example.
- Java: This perspective, shown in Figure 12-3, shows you the classes in a project and lets you view one class at a time. It also has (by default) a console window in which you can track running programs.
Figure 12-2: The Eclipse Resource perspective.
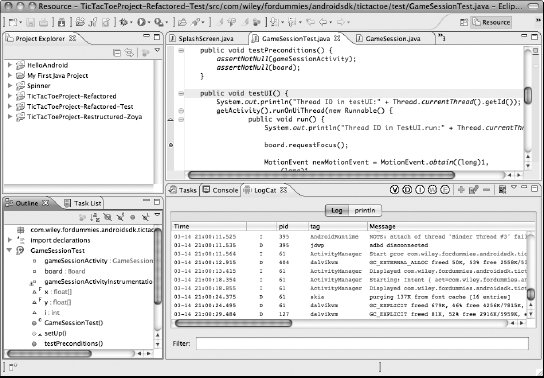
Figure 12-3: The Eclipse Java perspective.

- Java Browsing: This perspective, shown in Figure 12-4, is useful for exploring large projects because it's a single perspective that shows you all resources in a project.
Figure 12-4: The Eclipse Java Browsing perspective.

- Java Type Hierarchy: To see the source code, members, and type hierarchy of a single class at a time, use this perspective, shown in Figure 12-5.
Figure 12-5: The Eclipse Java Type Hierarchy perspective.

- Debugging: See the state of your running code in the debugger by using the Debugging perspective, shown in Figure 12-6. Note that certain debugging actions (such as setting breakpoints) can be done in the other perspectives but that any action related to the runtime state of the program (such as inspecting variables) must be done in the Debugging perspective.
 If you haven't already done so, create a Java project (choose File
![]() New Java Project) using a couple of files, and browse the perspectives we describe in the previous list. Also, browse the menus and actions in these perspectives and notice that they have no Android-specific information. The default Eclipse installation only has tools for you to develop Java programs and enterprise Java applications.
New Java Project) using a couple of files, and browse the perspectives we describe in the previous list. Also, browse the menus and actions in these perspectives and notice that they have no Android-specific information. The default Eclipse installation only has tools for you to develop Java programs and enterprise Java applications.
Figure 12-6: The Eclipse Debugging perspective.
Customizing Eclipse for Android
After you install the Android SDK Starter Package, the Android SDK Components, and the Eclipse Plug-In for Android (as explained in Chapter 2), you bring Android-specific components into Eclipse and it becomes a powerful tool for developing Android apps, with Android-specific actions and menus. For example:
- In the Resource perspective, choose File
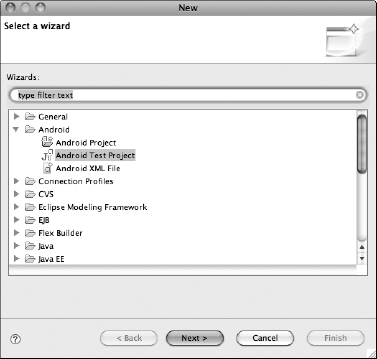
 Project. You see that the New Project Wizard now has a group for Android (see Figure 12-7) that contains Android Project and Android Test Project.
 - If you right-click an Android project, you see the menu selection Run AsAndroid Application, as shown in Figure 12-8.
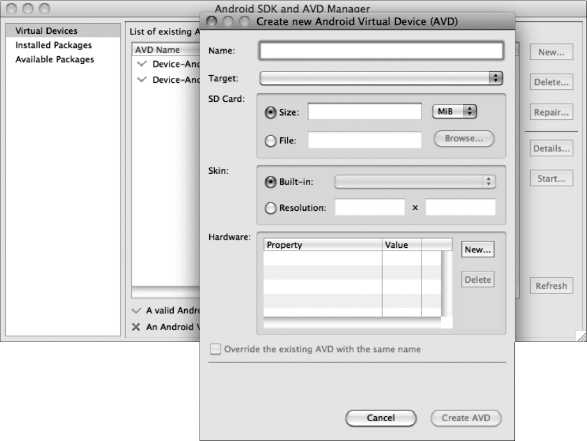
- From under the main Window menu in Eclipse, you can bring up the Android SDK and AVD Manager, which lets you download updates to the SDK and create and manage Android emulators (Figure 12-9 shows the Android SDK and AVD Manager).
Figure 12-7: The New Project Wizard selection, showing the Android group.
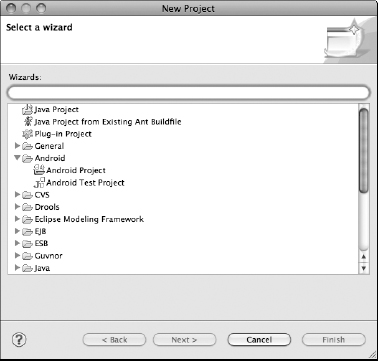
Figure 12-8: Running an Android application.
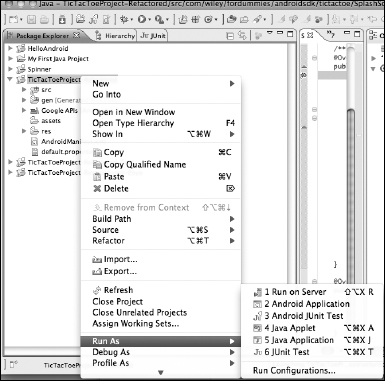
Figure 12-9: Android SDK and AVD Manager.
Observing, Debugging, and Tracking an Android App Using Eclipse Perspectives
You will need to use a set of key Eclipse components in order to do Android development. To familiarize yourself with these components, start in either the Resource or Java perspective and see whether a window at the bottom of the perspective is labeled Console. If it isn't, choose Window![]() Show View
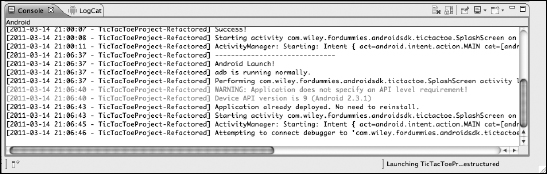
Show View![]() Console and add this view to the perspective. When you run an Android app in the IDE, you will see this window explode into action and show the progress of the start-up sequence of the app, as shown in Figure 12-10. If a problem occurs during start-up (such as having no virtual devices with the correct API level), you see them here. After the app is properly installed and the main activity is started (in the case of Tic-Tac-Toe, it's the SplashScreen activity), this window comes back to normal.
Console and add this view to the perspective. When you run an Android app in the IDE, you will see this window explode into action and show the progress of the start-up sequence of the app, as shown in Figure 12-10. If a problem occurs during start-up (such as having no virtual devices with the correct API level), you see them here. After the app is properly installed and the main activity is started (in the case of Tic-Tac-Toe, it's the SplashScreen activity), this window comes back to normal.
Figure 12-10: The Console window in Eclipse.
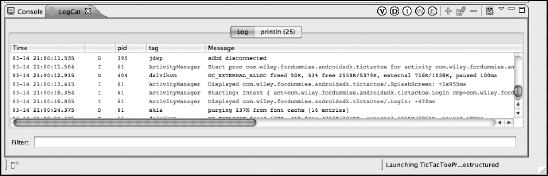
A second (and even more useful) window is the LogCat window (see Figure 12-11). You add this view by choosing Window![]() Show View
Show View![]() Other, going into the Android folder, and selecting logcat. This view shows you everything the Android runtime can tell you about the app as it's running, such as
Other, going into the Android folder, and selecting logcat. This view shows you everything the Android runtime can tell you about the app as it's running, such as
- When activities are launched
- When the debugger is attached and detached from your application
- How much memory is allocated or freed from the heap, and when
- Which error messages are generated when the app is loaded
- When the AndroidManifest.xml file is read and parsed
Finally, and by default, all app output sent to System.out (for example, by using System.out.println) or to System.err is redirected to the logcat window.
Figure 12-11: The logcat window, shown in Eclipse.
Familiarize yourself thoroughly with the logcat window. It is extremely useful in helping determine why something went wrong with your program. It has helped us many times and has even been useful in finding errors we've made in the manifest file, such as putting an element in the wrong place in the file. If you are trying to figure out why your app isn't working, start by looking inside the logcat window to see if there are any error messages.
Notice that every message has associated with it a priority and a tag, which indicates the component that's generating the message. Just look at the two columns of the message (following the timestamp and separated by the process ID). In the following example, the priority is D (for debug) and the tag is AndroidRuntime:
03-12 23:14:32.200: D 7480 AndroidRuntime Shutting down VM
The priority is one of these character values, in order from least to highest priority:
- V: Verbose
- D: Debug
- I: Info
- W: Warning
- E: Error
- F: Fatal
- S: Silent
In addition to being message parameters, these values can be set as filter parameters in logcat. The filters are ordered; thus, if a priority is set as a filter, messages with that priority and higher are shown. In other words, if you set I as the filter, messages with I, W, E, and F priorities are shown. If the S priority value is set as the filter parameter in the logcat window, nothing is printed.
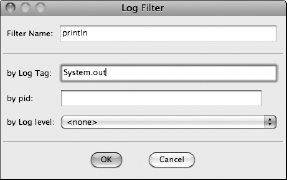
In the logcat window, you can click on a priority (see the top bar of that window to find where to click) and apply it as a filter. You can also create a filter by clicking on the Plus (+) icon and entering filter parameters in the dialog box that opens. The example shown in Figure 12-12 is filtering out everything except the println messages.
Figure 12-12: Setting up a logcat filter.
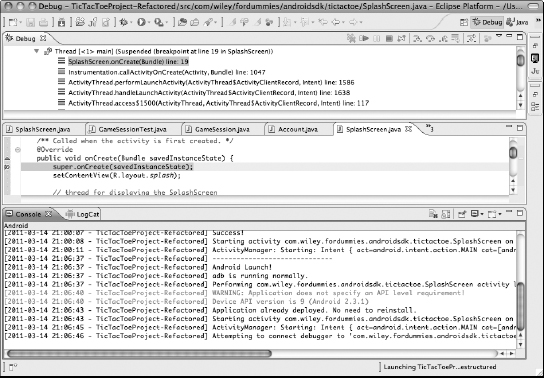
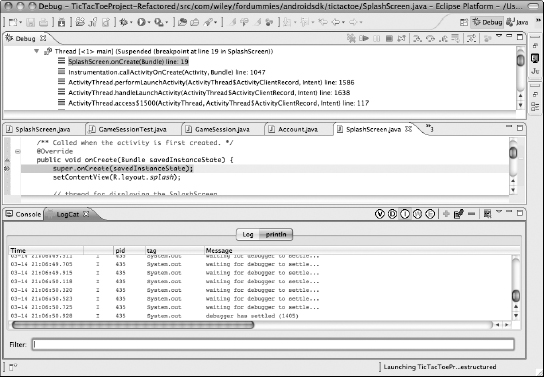
Following the execution of an Android app is straightforward — and much the same as for a Java application. From the Resource perspective or the Java Browsing perspective, right-click on the project and choose Debug As![]() Android Application. The Debug perspective, shown in Figure 12-13, displays. Note that the Console and the logcat window aren't shown, by default. In Figure 12-13, we added them by choosing Window
Android Application. The Debug perspective, shown in Figure 12-13, displays. Note that the Console and the logcat window aren't shown, by default. In Figure 12-13, we added them by choosing Window![]() Show View
Show View![]() Console and Window
Console and Window![]() Show View
Show View![]() logcat, respectively.
logcat, respectively.
In the Debug perspective, you can set break points in the source file, step through the program in a variety of ways, and inspect variables, for example.
Figure 12-13: Debugging Android apps in Eclipse.
A useful, Android-specific Eclipse perspective is the Dalvik Debug Monitor Server (DDMS) perspective, shown in Figure 12-14. From there, you can see what resources have been allocated to every virtual device. Navigate to data![]() data
data![]() com.wiley.androidsdk.tictactoe
com.wiley.androidsdk.tictactoe![]() shared_prefs or data
shared_prefs or data![]() data
data![]() com.wiley.androidsdk.tictactoe
com.wiley.androidsdk.tictactoe![]() databases. For example, you can see that the Tic-Tac-Toe application has (among other things) a database named TicTacToe.db (which is what we name the database in DatabaseHelper.java). Note that if you uninstall Tic-Tac-Toe from the virtual device, the database is also deleted, along with the preferences file and any data files created by the app.
databases. For example, you can see that the Tic-Tac-Toe application has (among other things) a database named TicTacToe.db (which is what we name the database in DatabaseHelper.java). Note that if you uninstall Tic-Tac-Toe from the virtual device, the database is also deleted, along with the preferences file and any data files created by the app.
Figure 12-14: The Android DDMS perspective in Eclipse.
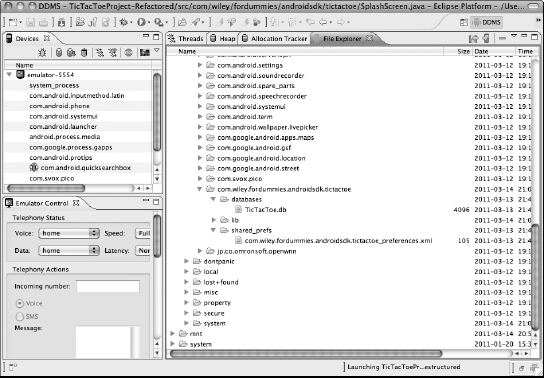
You can inspect files from the device by selecting the file (the shared_prefs file or the tictactoe.db file, for example) and clicking the Pull a File from Device button in the upper-right corner of the device's file browser in DDMS. (The button looks like a small floppy disk with an arrow piercing it.) You can also interact with the program from this perspective by sending it (fake) GPS locations from the Emulator Control pane.
You can do other tasks from here as well: Determine how heap memory is being used or how objects are being allocated and inspect threads, for example. An in-depth discussion of these topics is beyond the scope of this book. We're sure that you'll want to explore these features, however, so visit the Android page on DDMS (http://developer.android.com/guide/developing/debugging/ddms.html) to see all the details.
Getting Serious about Testing — Using the Android Testing Framework
One slick piece of application development capability provided in the Android SDK is a unit test framework built on the Java JUnit framework. We illustrate the use of this framework by using a couple of simple tests, written to test the game-playing functionality of Tic-Tac-Toe.
The Java JUnit framework?
The Java JUnit framework (www.junit.org) is a simple framework for structuring, writing, running, automating, and managing unit tests — tests written by the developer (you) to individually test the components of a program — such as methods, functions, and classes.
In JUnit, a test class is written for every target class (a class you want to test). The methods of the test class are in two categories: test methods that call methods in the class and verify their results and setup and tear-down methods that act as “fixtures” that set up the initial conditions of the test and then clear at the end any permanent resources allocated (delete all objects created by the test).
To begin unit testing, you have to create a test project (to use with the development project). You do this in either the Resource or Java perspective by choosing File![]() New
New![]() Other
Other![]() Android Test Project. We created the test project named TicTacToeProject-Test by using the dialog box shown in Figure 12-15, where we gave it its name and set the name of the Android development project that it's testing.
Android Test Project. We created the test project named TicTacToeProject-Test by using the dialog box shown in Figure 12-15, where we gave it its name and set the name of the Android development project that it's testing.
Figure 12-15: Creating an Android test project.
You see that the project, shown next, has its own AndroidManifest.xml file with its own settings. In this project, we requested permission to disable the key guard so that when the test starts, it can run immediately without waiting for you to swipe the key guard:
<?xml version=“1.0” encoding=“utf-8”?>
<manifest xmlns:android=“http://schemas.android.com/apk/res/android”
        package=“com.wiley.fordummies.androidsdk.tictactoe.test”
        android:versionCode=“1”
        android:versionName=“1.0”>
    <application
        android:icon=“@drawable/icon”
        android:label=“@string/app_name”>
        <uses-library android:name=“android.test.runner” />
    </application>
     <uses-permission android:name=“android.permission.DISABLE_KEYGUARD”/>
    <instrumentation
        android:targetPackage=“com.wiley.fordummies.androidsdk.tictactoe”
        android:name=“android.test.InstrumentationTestRunner” />
</manifest>
Inside this project, we created the test class named GameSessionTest with three tests: testPreconditions(), testUI(), and testUIThread Test(). Here's the skeleton of the class:
public class GameSessionTest extends
            ActivityInstrumentationTestCase2 <GameSession>{
    private GameSession gameSessionActivity;
    private Board board;
    private Instrumentation gameSessionActivityInstrumentation=null;
    final float x[]={(float)56.0, (float) 143.0, (float) 227.0};
    final float y[]={(float)56.0, (float) 143.0, (float) 227.0};
    int i = 0;

    public GameSessionTest(){
        super(“com.wiley.fordummies.androidsdk.tictactoe.GameSession”,
              GameSession.class);
    }

    protected void setUp() throws Exception {
        super.setUp();
        setActivityInitialTouchMode(false);
        gameSessionActivityInstrumentation = getInstrumentation();
        gameSessionActivity = getActivity();
        board = (Board) gameSessionActivity.findViewById(R.id.board);
    }
    public void testPreconditions() {
         …
    }
    public void testUI() {
         …
    }
    @UiThreadTest
    public void testUIThreadTest(){
         …
    }
    protected void tearDown() throws Exception {
        gameSessionActivity.finish();
    }
}
This skeleton highlights the important elements of how this class is set up. To begin with, this class is created from a generic class ActivityInstrumentationTestCase2, which is passed the test target class (GameSession) as the class parameter for the generic. Its constructor simply calls the constructor on the generic and again passes the target of the test as a parameter to the constructor. Next, note the use of the setUp() method to get references to the necessary member variables from the GameSession class. Finally, note the use of the tearDown() method to clean up after the test is complete.
The three methods testPreconditions(), testUI(), and testUI ThreadTest() are the three tests in the class. If you simply run this class from Eclipse (by choosing Run As![]() Android JUnitTest after right-clicking on the test project), these three tests are run. Take a look at each one of them, beginning with testPreconditions():
Android JUnitTest after right-clicking on the test project), these three tests are run. Take a look at each one of them, beginning with testPreconditions():
public void testPreconditions() {
    assertNotNull(gameSessionActivity);
    assertNotNull(board);
}
Note the use of the assert statements (assertNotNull) — it's standard JUnit material. Essentially, you're testing to ensure that the GameSession activity and the Board object have been properly created. The two methods testUI and testUIThreadTest make similar tests. The testUI method is creating a MotionEvent object and dispatching it to the board (and thereby simulating a Tic-Tac-Toe move by the human user). Then it tests to verify that two moves have been made — one by the human user and one by Android.
public void testUI() {
    System.out.println(“Thread ID in testUI:” + Thread.currentThread().getId());
    getActivity().runOnUiThread(new Runnable() {
        public void run() {
            System.out.println(“Thread ID in TestUI.run:” +
                                Thread.currentThread().getId());
            board.requestFocus();
            MotionEvent newMotionEvent =
                MotionEvent.obtain((long)1,(long)1,MotionEvent.ACTION_DOWN,
                                   (float) 53.0,(float) 53.0,0);
            board.dispatchTouchEvent(newMotionEvent);
        }
    });
    . uals(gameSessionActivity.getPlayCount(), 2);
}
testUIThreadTest is making a similar test, except that it's simulating a series of three moves. Then it verifies that six moves have been made — three by the human user and three by Android. testUIThreadTest does this (like testUI) by making use of the assertEquals(…) method that is part of the generic JUnit framework (incidentally, the assertEquals(…)
statements will sometimes fail and sometimes succeed. Can you see why? We explain why later on in this section.):
@UiThreadTest
public void testUIThreadTest() {
    System.out.println(“Thread ID in testUI:” + Thread.currentThread().getId());
    board.requestFocus();
    for (i=0; i<3; i++){
        MotionEvent newMotionEvent = MotionEvent.obtain((long)1,
                                                        (long)1,
                                                        MotionEvent.ACTION_DOWN,
                                                        (float) x[i],
                                                        (float) y[i],
                                                        0);
        board.dispatchTouchEvent(newMotionEvent);
    }
    assertEquals(gameSessionActivity.getPlayCount(), 6);
}
We have much more to tell you about these tests. First, you might be wondering how to get the coordinates you're using for the test (–53.0, 53.0) in the first test (testUI) and the values in the two arrays x[…] and y[…] in the second test (testUIThreadTest)). You get these from actually playing Tic-Tac-Toe. All you do is insert a few println(…) statements in the onTouchEvent(MotionEvent event) method of the Board class in Tic-Tac-Toe to see the pixel values of the motion events sent to it. You then use these pixel values in the testing.
Incidentally, we figured out how to create motion events by rooting around in the Android Developer Guide on the web (specifically, at http://developer.android.com/reference/android/view/MotionEvent.html) and taking an educated guess at how obtain works. Similarly, we rooted around the View class (http://developer.android.com/reference/android/view/View.html) to find out how to send the Board an event (noting that Board is a subclass of View). Another alternative is to call the onTouchEvent(…) method of Board directly, but Board may delegate the handling of this event, and such a method may not exist in Board. The way we did it more or less simulates a human interacting with Board.
You most likely have noticed the elephant in the room, so to speak — the reference to threads in two of the methods. In testUI(…), you're creating an instance of a runnable class and running it in the gameSessionActivity of the user interface thread. In testUIThreadTest, you're annotating the entire method with the annotation @UIThreadTest. Before we explain why you do this, we need to briefly explain the Android thread model.
The Android framework runs all its user interface (UI) operations in a single thread. In fact, all user interface operations must run on this thread because the UI libraries on Android aren't thread-safe. In other words, because user interface operations in multiple threads cause strange behaviors, they're disallowed.
Therefore, any tests that involve the user interface (such as these two tests) must run on the UI thread. You can do this in two ways:
- Create a runnable object and assign it to the UI thread (as in the method testUI(…)).
- Designate that the entire method must run in the UI thread by using the @UIThreadTest annotation (as we did in testUIThreadTest(…)).
By the way, we added println statements in the test methods and also in some of the Tic-Tac-Toe methods that send the current thread ID to System. out — and hence to the logcat window. After you run the test, look at this window to identify the thread IDs. (For easy viewing, create a filter that shows you only the println statements.) You can clearly see the test running in a separate thread from the UI.
Incidentally, if the logcat window doesn't show anything, click on the Devices tab and select the device on which the test was deployed on and is running.
We need to add one more topic related to threads and testing: When an application runs normally, the UI thread starts whenever the application begins and remains active until the application ends — but that isn't the case when testing. The UI thread is subordinated to the thread that runs the JUnit test, and when this thread ends, the UI thread is also terminated. Programs that run normally, therefore, may not work when being unit tested. Tic-Tac-Toe has this issue because of the way machine play is implemented. Look at the method scheduleAndroidsTurn(…) in the GameSession activity (we reproduced this method here, for your convenience):
private void scheduleAndroidsTurn() {
    System.out.println(“Thread ID in scheduleAndroidsTurn:” +
                        Thread.currentThread().getId());
    board.disableInput();
    if(!testMode){
        Random randomNumber = new Random();
        Handler handler = new Handler();
        handler.postDelayed(new Runnable(){
                              public void run(){
                                                   androidTakesATurn();
                                               }
                            },
                           500 + randomNumber.nextInt(2000)
                            );
        );
    }else{
        androidTakesATurn();
    }
}
You post the machine move as a delayed task in order to make the machine play more realistically — the delay is intended to be perceived as the machine “thinking” about which move to play. Note that the task is posted on the UI thread. However, in Test mode, the test thread (which spawned the UI thread, as you know) terminates before the posted task becomes active. In Test mode, therefore, the machine never gets a chance to make a move!
You can work around this problem and allow unit testing by implementing Test mode in Tic-Tac-Toe wherever machine play is directly executed (and not posted as a delayed task). Take another look at scheduleAndroids Turn(…) in the preceding example. For completeness, we show you the (simple) method setInTestMode() now:
private void setInTestMode(){
    testMode=true;
}
We call this method in the onCreate(…) method of the GameSession activity, in which we also turn off the key guard (recall that we requested the permission to do so in the manifest file) by using this bit of code:
public void onCreate(Bundle savedInstanceState) {
    super.onCreate(savedInstanceState);
    KeyguardManager mKeyGuardManager = (KeyguardManager)
    getSystemService(KEYGUARD_SERVICE);
    KeyguardLock mLock = mKeyGuardManager.newKeyguardLock(“GameSession”);
    mLock.disableKeyguard();
    this.setInTestMode();
    this.startSession();
}
Here's a final note about the assertEquals(…) statements at the end of the two user interface test methods: Because machine play has been implemented as a random selection from the empty squares in the Tic-Tac-Toe grid, determining whether the simulated human moves play an empty square or a square where the machine has already played is a hit-or-miss issue. Sometimes, assertEquals(…) turns out to be true, therefore, and sometimes it's false. We deliberately left this behavior in place so that you can see how the test framework behaves when the tests pass, as shown in Figure 12-16, and when a test fails because an error is found, as shown in Figure 12-17.
 This extremely rich framework is neither fully developed nor, especially, fully documented. For example, the sample code you see on the Android SDK site shows only a test with keyboard events. We had to hack our way through the SDK to figure out how to test with MotionEvent and had difficulty getting the example to work within the Android thread model. Thus, we have only barely introduced the testing framework to you in this book. We expect this framework, and in particular, its documentation, to improve eventually. As we learn more, we will figure out and post more examples on this book's website. So check the website periodically, and feel free to contact us and ask us questions.
Figure 12-16: The JUnit window, showing passed unit tests.
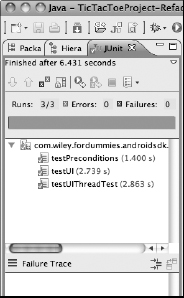
Figure 12-17: The JUnit window, showing a failed test.

Understanding the SDK Components Used in This Chapter
In this section, we give you a little more detail about the package and class components of the Android framework and its add-ons, which provide the functionality we cover in this chapter. We don't go into great detail because Google provides comprehensive web pages, but we want to give you an idea of what the component can do and any insights we have.
The Android logging framework
The standard methods provided in the logging framework consist of Log.v(…), Log.d(…), Log.i(…), Log.w(…), and Log.e(…), where the suffixes (v, d, i, w, and e) stand for verbose, debug, information, warning, and error, respectively. When you're deciding which method to use, follow these guidelines:
- Log.v(…): Provides every detail about your program's execution. You use this method to provide a detailed execution trace of the program.
- Log.d(…): Allows observers to debug key aspects of the program.
- Log.i(…): Allows observers to verify that key states in the application have been reached. For example, you can use it to report on the start of an activity or when a certain key service (such as Google Maps) is invoked.
- Log.w(…), Log.e(…): Used, obviously, when you want to report a nonfatal warning and a nonfatal or fatal error in processing, respectively.
You will find the variants of these methods with the signature (String tag, String message) to be most useful. Every method also has a variant with a three-parameter signature. The first two parameters are as just described; however, the third parameter is an exception that may have been thrown and that the app will report.
You can find more details on the logging API at http://developer.android.com/reference/android/util/Log.html.
The testing framework API in Android
The Android testing classes essentially extend the Java unit-testing framework JUnit (www.junit.org) to provide testing services specific to Android components. The base class in the Android SDK is AndroidTestCase, which extends the base TestCase class from JUnit. assert(…) methods to test whether an activity requires permission to launch a service or gain access to a Universal Resource Identifier (URI). Note that this test class is used for testing characteristics about an activity (such as permissions) that doesn't require it to be running. For tests on running activities, you need a test class that returns a handle to an Instrumentation object that allows you to monitor and control a running instance. In the example, we use the ActivityInstrumentationTestCase2 generic class.
Finally, you should understand how to create events of various sorts and then dispatch them to views. The MotionEvent class that we use in the example is described at
http://developer.android.com/reference/android/view/MotionEvent.html
Key events are described at
http://developer.android.com/reference/android/view/KeyEvent.html
To help build your knowledge beyond the introduction to the testing framework that we just presented, we list some links that we find useful (and we hope that you do, too):
- Find an overview on the Android testing framework at
http://developer.android.com/guide/topics/testing/testing_android.html
- Find a link to the unit testing framework fundamentals at
http://developer.android.com/guide/topics/testing/testing_android.html#JUnit
- Find the details of the base testing class at
http://developer.android.com/reference/android/test/AndroidTestCase.html
Note that we show a sample use of the ActivityInstrumentation TestCase2 generic class.
- Special considerations for testing Android activities are presented at
http://developer.android.com/guide/topics/testing/activity_testing.html