
Hour 22. Using the Facebook SDK
What You’ll Learn in This Hour
![]() Getting an introduction to Facebook development
Getting an introduction to Facebook development
![]() Setting up for Facebook Android development
Setting up for Facebook Android development
Incorporating Facebook into your app or creating an app just for Facebook offers benefits. This hour covers those benefits and shows how to implement a Facebook app for Android. In doing so, it also shows you how to integrate an existing third-party library into an app and considers the benefits of creating your own libraries.
About Facebook
If you are a Facebook user, then you are familiar with Facebook as a social utility or social platform. As a Facebook user, you create a Facebook profile and connect with your friends. This set of connections between Facebook users is what makes programming for social platforms different. This set of connections is known as the social graph. By connecting people to each other, your apps can become more engaging.
Facebook is one way to introduce the “network effect” into apps. The network effect is the idea that an app is more valuable when more people use it. That is not a new concept. A telephone is not very valuable to a user when 10 people have telephones, but it is incredibly valuable when everyone has a telephone.
There can be even smaller positive effects with users within a social network. Most games have leaderboards that display high scores. The high score for a game might seem unobtainable when you are one of 100,000 players and just starting out. But, if you were able to compare your game scores to only your friends’ scores, you might find that you are actually pretty good at the game. As an individual user, you are encouraged to continue and to pass your friend who has the next highest score.
One of the key things that Facebook did as a company was to open its platform to developers. That platform has changed much since the early days. Developing on Facebook is easier than before and the concepts behind developing for Facebook are clear and well documented.
In 2010, Facebook released its first Android SDK. The SDK supports Facebook’s Graph API. It has been updated regularly with new and more robust features.
Setting Up for Facebook Development
The three key steps to get set up for Facebook Development on Android are to:
![]() Create a new Facebook app on https://developers.facebook.com/apps
Create a new Facebook app on https://developers.facebook.com/apps
![]() Get the latest version of the Facebook Android SDK
Get the latest version of the Facebook Android SDK
![]() Install the Facebook Android SDK
Install the Facebook Android SDK
If you do not have a Facebook account, you need to create one. To create an app, you need to become a Facebook developer by agreeing to Facebook’s terms of service.
The following are the relevant Facebook websites:
![]() http://www.facebook.com—The Facebook consumer-facing site.
http://www.facebook.com—The Facebook consumer-facing site.
![]() https://developers.facebook.com/—The main developer page.
https://developers.facebook.com/—The main developer page.
![]() https://developers.facebook.com/android/—Android developer page.
https://developers.facebook.com/android/—Android developer page.
![]() https://developers.facebook.com/apps—Facebook Developer Dashboard.
https://developers.facebook.com/apps—Facebook Developer Dashboard.
![]() https://github.com/facebook/facebook-android-sdk—Open source Facebook Android library, including samples.
https://github.com/facebook/facebook-android-sdk—Open source Facebook Android library, including samples.
![]() https://github.com/fbsamples/android-3.0-howtos—Open source Facebook Android How-tos.
https://github.com/fbsamples/android-3.0-howtos—Open source Facebook Android How-tos.
Creating a New Facebook App
You need to create a new Facebook app in the Facebook Developer Dashboard. This is where you will give the app a name and choose other settings. Facebook will generate a Facebook app id and secret key, which you use for Facebook to identify your app.
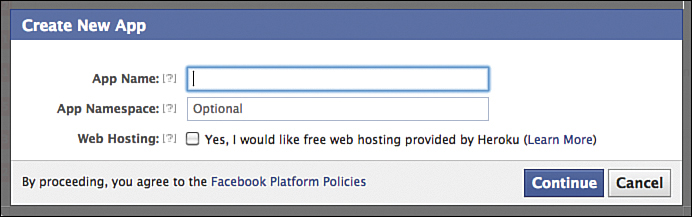
Go to https://developers.facebook.com/apps and choose the Create New App button. The window shown in Figure 22.1 appears. Enter an app name and click Continue. If you have not already registered as a Facebook developer, you will be asked to register.
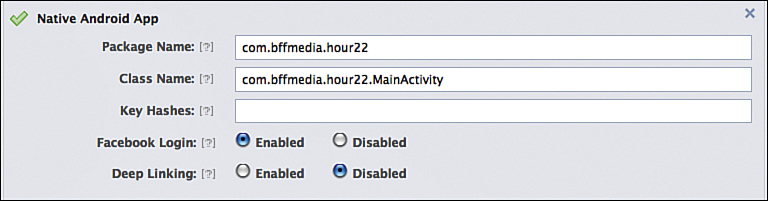
You then choose to create a native Android app. Enter a package name and a class name, as shown in Figure 22.2.
A key hash is required as part of the security check that Facebook will run before authorizing your app. Hour 24 covers creating keys in more detail. You can use the following instructions to get your debug key on either a Macintosh or Windows computer that has your Android development environment.
For Macintosh, enter the following in the terminal app:
keytool -exportcert -alias androiddebugkey -keystore ~/.android/debug.keystore |
openssl sha1 -binary | openssl base64
On Windows, run this as a command prompt:
keytool -exportcert -alias androiddebugkey -keystore %HOMEPATH%.androiddebug.
keystore | openssl sha1 -binary | openssl base64
You can find information on the Facebook developer website at https://developers.facebook.com/docs/getting-started/facebook-sdk-for-android/3.0/.
Troubleshooting login errors on Facebook can be difficult. Often, the issue is related to an incorrect key hash. The troubleshooting tips found on the developer website listed earlier can be useful. In particular, you can put code snippet in an Activity onCreate() method that will log the key hash. This can be used if login fails, but never include that code in a release!
For reference, the troubleshooting code is included in the MainActivity.java example from this hour.
Downloading the Facebook SDK
Download the Facebook Android SDK from https://developers.facebook.com/android/.
The downloaded file is a zip file with a name like facebook-android-sdk-3.0.1.zip.
Unzip the file. A folder will be created with a similar name like facebook-android-sdk-3.0.1.
If you examine the contents of the folder, you will see subfolders called bin, docs, Facebook, and samples. The samples subfolder contains sample Android projects. The Facebook subfolder is the Facebook SDK itself.
Installing the Facebook SDK
The Facebook SDK is an Android Library project. First, import the library using Eclipse and then take a look at what makes it a library project.
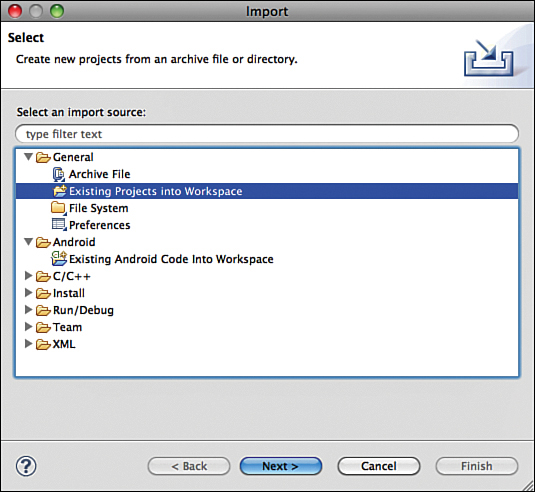
To import the SDK library project, go to Eclipse’s File, Import menu. Select General, Existing Projects into Workspace, as shown in Figure 22.3.
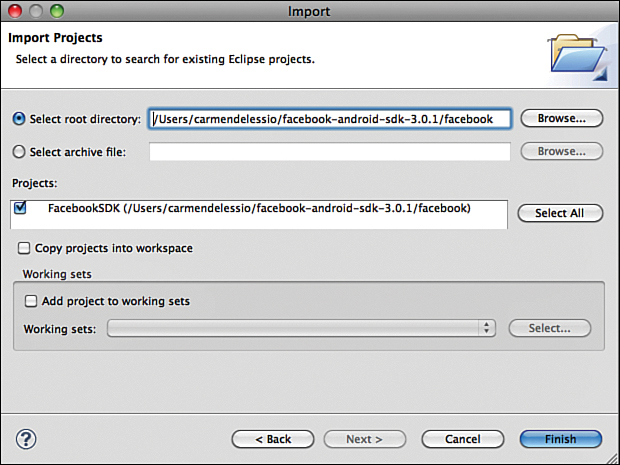
For now, select just the Facebook SDK, but you can also import all the sample projects. When you select the Facebook folder, your import window will look like Figure 22.4.
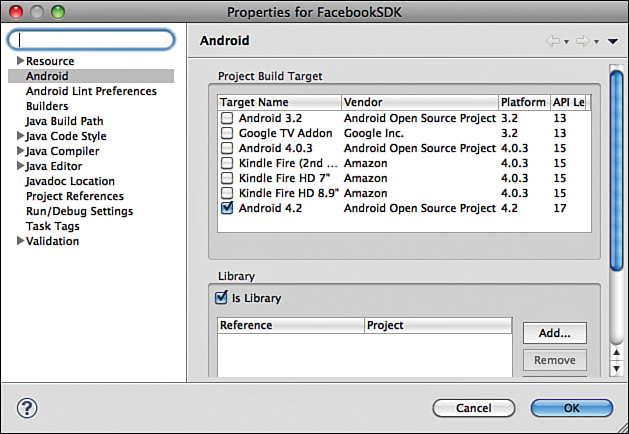
After you click Finish, your project imports into the Eclipse ADT. It should compile now like any other Android project, but it might not! A challenge in using third-party tools and libraries is getting them set up properly. In Eclipse, you can Build and Clean the project. Also look at the Android properties by choosing Properties, Android. A Project Build Target should be selected. If it is not, you must select one.
The Android properties window in Eclipse will also show that the Facebook SDK is a library project. See Figure 22.5 where the “is Library” checkbox is selected.
Library project are compiled and included in other projects, but they cannot be run on their own.
Both IntelliJ and Android Studio have methods for including library projects. For more on library projects in general, see the Android tools documentation at http://developer.android.com/tools/projects/index.html#LibraryProjects.
The preceding discussion reflects a typical scenario for the use of third-party libraries. Using open source or other Android libraries can offer significant benefits.
Using the Facebook SDK in a Project
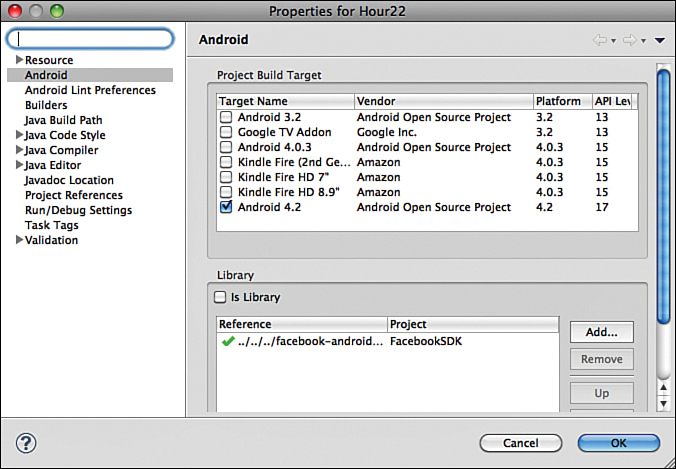
At this point, you have set up a Facebook app on the Facebook developer website and imported the Facebook Android SDK. You can now create a new Android project and associate it with the Facebook library. If you have imported the Facebook library, you can follow the steps in the Try It Yourself section. Figure 22.6 shows the result.
You have now created a Facebook app, imported the Facebook Android SDK, and associated the Facebook SDK with your new project. You can now make calls to the Facebook SDK in your app, but to log in successfully to Facebook from the app, you have to tie the application id that Facebook generated to your Android app.
Caution: Resolving Build Dependencies
The Facebook SDK uses the Android support package for backward compatibility. It is possible for a conflict to exist between the android-support-v4.jar used in the new project and the one in the Facebook SDK. One way to resolve this issue is by deleting the jar file from the libs folder of the new project.
Setting the App ID
When you created a Facebook application on the Facebook developer site, an application ID was generated. You can get the application ID by accessing your app at https://developers.facebook.com/apps/.
This application ID is how Facebook identifies the app on its system. It is the key to a user authorizing the app, setting permissions, and getting access.
You must tie this Facebook application ID to your Android project, which takes two steps:
1. Add the Facebook application ID to the String.xml file in the res/values folder. It will look like <string name="app_id">17-----91</string> where the value is the application id from Facebook.
2. Update the AndroidManifest.xml file to make the app_id string resource known to the Facebook SDK: <meta-data android:name = "com.facebook.sdk.ApplicationId" android:value = "@string/app_id"/>.
Making Final Manifest Changes
Two more things are required in Android manifest settings for the Facebook SDK to work properly. You must set the Internet permission and include the Facebook LoginActivity from the library.
The Internet permission is as follows:
<uses-permission android:name="android.permission.INTERNET"/>
The Facebook ApplicationId and LoginActivity should both be within the application tag:
<meta-data android:name="com.facebook.sdk.ApplicationId" android:value="@string/
app_id"/>
<activity android:name="com.facebook.LoginActivity"/>
Getting Ready to Code
Setting up the Facebook SDK and getting your project ready for development took a number of steps. You had to create a Facebook app, download and install the Facebook SDK itself, make sure the SDK would build in your environment, and tie it to your project.
At a high level, some of these are common steps when using a third-party SDK that requires developer registration. If you include ads in your app or analytics, you might go through some of the same steps. For ads, you want to make sure that your app gets credit for ads shown, so there will be a mechanism to tie your app to the ad provider.
The Facebook SDK does a lot for us as developers, so you might have to do more setup work with Facebook than with other third-party SDKs. If you have no need to tie the app to a backend, then including a third-party SDK can be a much easier process.
Developing a Facebook Photo Upload App
In this section, you learn to create a simple Facebook photo upload app using the technique from Hour 20 to take a photo using an Intent.
The Facebook SDK includes a custom login button that you will use with your app.
Setting Facebook Permissions
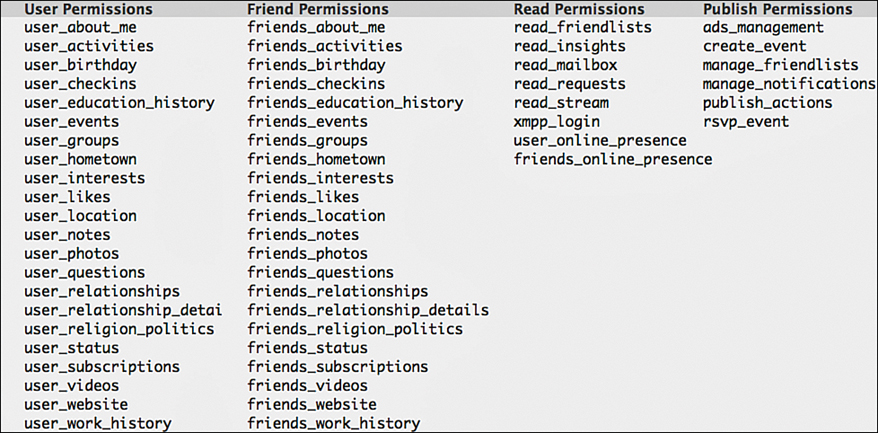
Facebook has a permission system in place. When a user authorizes an app, that user is presented with a set of permissions that the app requires. The user has the option to accept or reject the permissions. Facebook makes a distinction between permission to read basic content and permission to write to the site. You need the extended permission PUBLISH_ACTION so that you can publish the photo.
Figure 22.7 shows the set of available Facebook permissions.
Much of the app’s work will be to handle the Facebook session and permissions properly. The Login button takes care of logging in and logging out.
Login and Session Management
When a Facebook user logs into Facebook, a session is established with the Facebook server. A token is created that identifies the user’s session.
The Facebook SDK provides an infrastructure for login and session management.
Facebook provides a login button widget that you can include in your XML layouts. The LoginButton says either Login or Logout depending on the state of the session.
It is included in the XML layout as the following:
<com.facebook.widget.LoginButton
android:id="@+id/authButton"
android:layout_width="wrap_content"
android:layout_height="wrap_content"
android:layout_gravity="center_horizontal"
android:layout_marginTop="30dp"
/>
To further assist with session management, the Facebook SDK includes a class called UiLifecycleHelper. It is instantiated in the onCreate() method of a fragment as follows:
uiHelper = new UiLifecycleHelper(getActivity(), callback);
uiHelper.onCreate(savedInstanceState);
The UiLifecycleHelper should be included in each lifecycle method in a fragment or activity. See MainFragment.java to see how it is used in onResume(), onPause(), onDestroy(), and so on.
You want to know whether the user is logged in and whether there is a valid session. To do that, you use a Session.StatusCallback() method. The method is called when the session status changes. When the status changes, the Session.StatusCallback() method fires your internal method onSessionStateChange(). This method is simple. If a session is valid, the photo upload button becomes visible. The following section covers the specific structure of your app implementation.
App Implementation
The Hour 22 project has a MainActivity class and a MainFragment class. The MainActivity class loads the MainFragment class. MainFragment.java shows a Facebook login button. After the user logs in and accepts the Facebook permissions, a photo upload button appears.
The logic of the app is a combination of the photo code from Hour 20 and some sample code from the Facebook how-to section found at https://github.com/fbsamples/android-3.0-howtos.
Facebook gets basic permissions when the app starts. You request extended permissions when the user selects the photo upload button. If the session is valid, then you can check whether the publish_actions permission has been authorized by calling the following:
session.getPermissions().contains("publish_actions");
If this permission is not in place, you request the permission with a call to request new publish permissions:
session.requestNewPublishPermissions(new Session.NewPermissionsRequest(MainFragme
nt.this, PERMISSIONS));
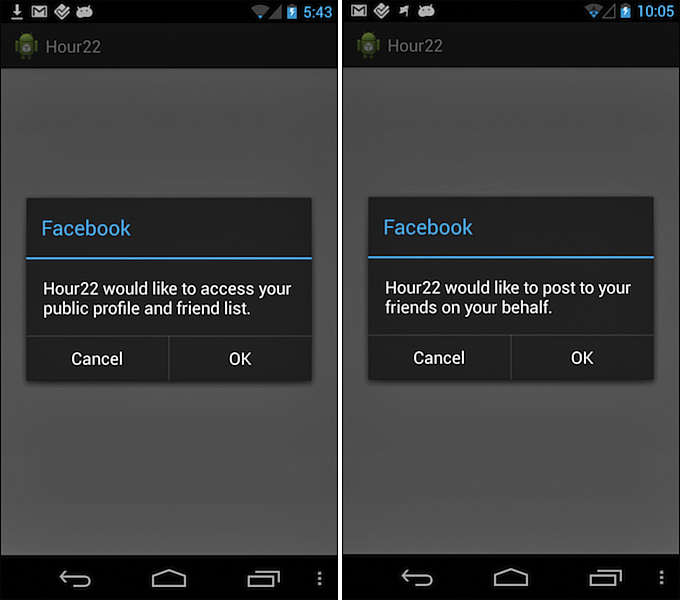
When you request this permission in your app, the Facebook user will be asked to accept the permission in a dialog. The Facebook SDK handles this user interaction. When you test your app, you can use the Facebook website to unset permissions.
Figure 22.8 shows how Facebook permissions are requested within an app.
If the permissions are in place, you use an intent to take a picture precisely as you did in Hour 20.
After you have the photo saved to a file, you can upload it to Facebook.
Making a Facebook Request
Interacting with Facebook is largely done by making requests and handling responses. In this example, you have a photo file that you want to upload to Facebook. You can use a specific request method for this purpose: the Request.newUploadPhotoRequest() method. The complete set of Request methods is documented at https://developers.facebook.com/docs/reference/android/3.0/Request.
You use the same method you used in Hour 20 to capture a photo using an Intent. The Intent is defined by:
Intent intent = new Intent(MediaStore.ACTION_IMAGE_CAPTURE);
After you set up the intent, you call the StartActivityForResult() method. The result is handled in the onActivityResult() method. This method is the same you used in Hour 20, but in addition to saving the file, you pass the file as a parameter to a new method called postPhoto().
The postPhoto() method creates the Facebook request, sends the request, and handles the result. The specific request is Request.newUploadPhotoRequest(). Listing 22.1 shows the postPhoto() method. The request is defined on line 4 and executed on line 17. The callback method for the request is defined on lines 6–16.
LISTING 22.1 Facebook Request to Upload Photo File
1: private void postPhoto(File photoFile) {
2: Request request;
3: try {
4: request = Request.newUploadPhotoRequest(Session.getActiveSession(), photoFile,
5: new Request.Callback(){
6: @Override
7: public void onCompleted(Response response) {
8: String resultMessage = null;
9: if (response.getError()!=null) {
10: resultMessage = response.getError().getErrorMessage();
11: } else {
12: resultMessage = "Successfully posted photo";
13: }
14: new AlertDialog.Builder(getActivity()).setMessage(resultMessage).show();
15: }
16: });
17: request.executeAsync();
18: } catch (FileNotFoundException e) {
19: e.printStackTrace();
20: }
21: }
The app displays the Login button when it starts. The user logs in via the Facebook LoginActivity. At that point, basic Facebook permissions are requested and the upload button is enabled. The first time the user chooses to upload a photo, he or she must accept additional permissions.
The user can then take a photo and it will upload to Facebook.
Figure 22.8 shows the interface for accepting permissions.
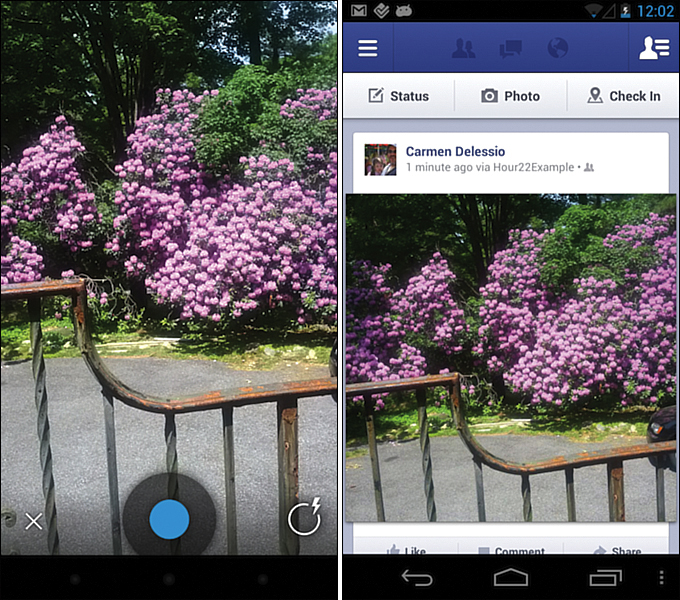
Figure 22.9 shows the photo being taken in the app and the uploaded image as it is shown in the Facebook timeline. Notice how the Facebook image refers to the Hour 22 app. That is one way that Facebook can be helpful in promoting an app.
Facebook SDK Features
You use the LoginButton of the Facebook SDK to log in and the Request class to upload a photo. The Facebook SDK also includes UI elements for things such as making friend requests and sharing on Facebook. The ability to invite friends and have the user share achievements or other aspects of your app on Facebook can help promote the app. This is easy to see in a game where the user might ask friends to play or post a high score, but it can be useful in other apps as well. If users post restaurant reviews, check into locations, or log runs in your app, for example, they can promote the app by sharing that information on Facebook.
Facebook SDK Overview
Figure 22.10 shows an overview of the Facebook system. Trying out the sample apps and how-to’s can help you get a sense of the Facebook SDK capabilities.

Deep Linking
Facebook supports the feature to deep link to an app. If your app is complete and available in the Google Play Store, you can indicate in the Facebook developer console that deep linking should be set to true. Then, if a link to your app appears in the Facebook newsfeed on an Android, Facebook will open the app on the device or link to Google Play so that the user can get the app.
Figure 22.11 shows how Facebook deep linking works.

Creating Libraries for Your Own Projects
Whether you distribute an SDK or not, creating your own library project can be helpful in managing your own development efforts. In Eclipse, you can directly create a library project when you create a new project or you can identify an existing project as a library project.
Having a library project works well when you design a core set of functions that will be available in every version of your app. Having a core set of functions that work across different apps can be extremely valuable.
Both third-party libraries and internally developed libraries can also be useful to your development process.
Summary
This hour’s focus was on setting up and implementing a Facebook Android app using the Facebook SDK. In doing so, you encountered a number of steps that are common to using third-party Android libraries. To create a Facebook app, you had to create a Facebook developer account and get an id for your app. You downloaded, installed, and integrated the SDK into your development environment. You had to resolve issues before development could begin. In incorporating the SDK into the app, you had to include the library and to update the AndroidManifest.xml file. From there, you could use the features of the SDK. You learned you could use third-party libraries to add new features or integrations to your app. Creating your own libraries to use across projects can be a beneficial development approach.
Q&A
Q. What are common issues in Facebook Android development?
A. Facebook development requires coordination between the application defined on Facebook (your Facebook app) and the Android app that you are developing. These are tied together by the app_id. Facebook security requires a key-hash from your Android build. These items should all be checked when issues arise. Session management is important, so using the UIHelper class and checking and handling Facebook exceptions can make your app more robust.
Q. Do I need to create a web app for Facebook?
A. You can have an Android-only app. If you also create a web app and an iPhone app, use the same Facebook app id. When you do that, your Android app users are promoting the app to your iPhone and web users. Facebook deep linking will do the appropriate thing based on platform.
Workshop
Quiz
1. How are Facebook permissions different from Android permissions?
2. How must the AndroidManifest.xml file be updated to support the Facebook SDK?
Answers
1. With Facebook permissions, the user is authorizing features on Facebook. Those permissions are requested via code. With Android permissions, the Android app is requesting permission to use specific features. Those permissions are requested in the Android manifest.
2. To support the Facebook SDK, the Android Internet permission is required. There must be a reference to the Facebook app id and the Facebook LoginActivity must be defined.
Exercise
Much of the required work in this hour is setting up the Facebook SDK to be used successfully. Set up the Facebook SDK and run the sample apps. Download the how-to examples and run them. The samples and how-to examples show a variety of Facebook features and capabilities.