
Hour 21. Media Basics: Images, Audio, and Video
Images and media can play an important role in creating an exceptional Android app. This chapter takes a closer look at the details of handling images and bitmaps including creating bitmaps, using drawing commands, and handling very large images. It also covers audio, video, and other media options.
Examining the ImageView Control
Hour 6 showed how to use a simple ImageView. In that case, you saw how to display a drawable resource in the ImageView. An ImageView can display any drawable image. The source of the image can be a resource, a drawable, or a bitmap.
The source code for basic ImageView examples are in the accompanying Hour21ImageView project.
The four projects that contain the source code for this hour are the following:
![]() Hour21ImageView
Hour21ImageView
![]() Hour21LargeImage
Hour21LargeImage
![]() Hour21VideoView
Hour21VideoView
![]() Hour21Audio
Hour21Audio
Displaying an Image
Four methods are available for setting an image in an ImageView. They differ by how the image passed is defined. The image can be a bitmap, drawable, URI, or resource id. The methods are as follows:
![]()
setImageDrawable(): Set a drawable as the content of the ImageView.
![]()
setImageBitmap(): Set a bitmap as the content of the ImageView.
![]()
setImageResource(): Use a resource id to set the content of the ImageView.
![]()
setImageUri(): Use a URI to set the content of the ImageView.
To set an ImageView to an image resource defined by R.Drawable.mainImage, you would use the following:
ImageView mainImage = (ImageView) findViewById(R.id.imageView1);
mainImage.setImageResource(R.drawable.mainImage)
In this hour, you take a closer look at using bitmaps with ImageViews.
In Hour 3, you used a ShapeDrawable that had been defined as a resource. If you were working with a ShapeDrawable in code, you would use the setImageDrawable() method.
To populate a Drawable object from a resource, use the getResources.getDrawable() method:
Drawable myDrawable = getResources().getDrawable(R.drawable.ic_launcher);
You’ll populate an ImageView using a resource id to explore some the available features in an ImageView.
Using ScaleTypes in ImageView
ImageViews include a ScaleType property. The ScaleType defines how an image displays within the ImageView. Using ScaleType, you can have an image fill the entire ImageView, be centered in the ImageView, or be cropped and centered in the ImageView.
The options for ScaleType are defined in ImageView.ScaleType. For example, ImageView.ScaleType.CENTER refers to a scale type in which the image is centered in the ImageView.
All scale types except for FIT_XY and FIT_MATRIX maintain the aspect ratio.
The complete set of ScaleTypes includes the following:
![]()
ImageView.ScaleType.CENTER: Center the image with no scaling. The image dimensions are unchanged.
![]()
ImageView.ScaleType.CENTER_CROP: Scales the image and keeps the aspect ratio until either the width of height of the image is the same as the width or height of the ImageView. For a small image, this will have the effect of enlarging the entire image. For a large image, this will have the effect of showing the center of the image.
![]()
ImageView.ScaleType.CENTER_INSIDE: Scale the image and maintain aspect ratio. The width and height of the image fit within the ImageView.
![]()
ImageView.ScaleType.FIT_CENTER: Fit the image in the center of the ImageView.
![]()
ImageView.ScaleType.FIT_START: Fit the image in the left and top edge of the ImageView.
![]()
ImageView.ScaleType.FIT_END: Fit the image in the right and bottom edge of the ImageView.
![]()
ImageView.ScaleType.FIT_XY: Fit into the length and width of the ImageView. Does not maintain the aspect ratio.
![]()
ImageView.ScaleType.MATRIX: Scale using a matrix. This allows for more complex translations of the image and is described later this hour.
The app created in the Hour21ImageView project illustrates the effects of setting different values for ScaleType. The layout file for this app includes an ImageView that fills the layout and a set of radio buttons for setting the ScaleType. MainActivity.java is set up in a simple way. With the ImageView and RadioButtons defined, when a button is clicked, the ScaleType value is set in the ImageView. Listing 21.1 shows the onCheckChangeListener() method for the RadioButton named centerCrop. If this RadioButton is checked, the ScaleType for ImageView is updated.
LISTING 21.1 Changing ScaleType Programatically
1: centerCrop.setOnCheckedChangeListener(new OnCheckedChangeListener() {
2: @Override
3: public void onCheckedChanged(CompoundButton buttonView, booleani sChecked) {
4: if (isChecked){
5: imageView.setScaleType(ImageView.ScaleType.CENTER_CROP);
6: }
7: }
8: });
The Hour21Image app uses the image shown in Figure 21.1 as the image for the ImageView. The image is 900 pixels wide and 200 pixels high.
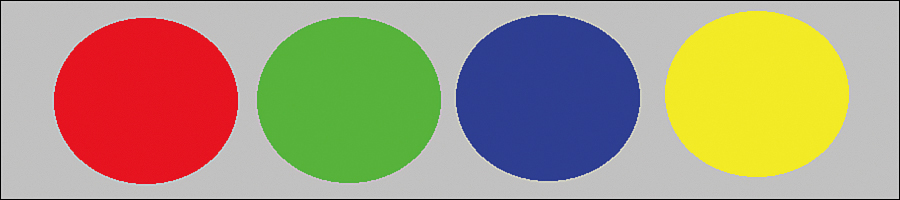
By using this simple image with four circles of different colors, you can easily see the effect of the changing ScaleType.
Figure 21.2 shows the base image using the ScaleTypes CENTER, CENTER_CROP, and CENTER_INSIDE. Using CENTER shows the image in actual size. Because the size of the image is larger than the ImageView, the green and blue circles in the center display. CENTER_CROP shows half of the green and half of the blue circles. The height of the image fills the ImageView. CENTER_INSIDE shows the entire image centered in the ImageView.
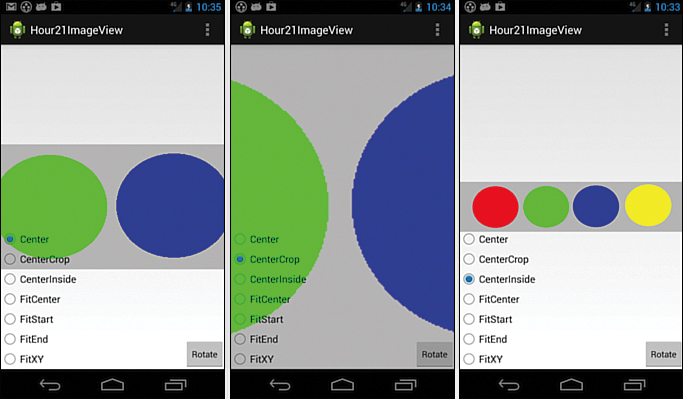
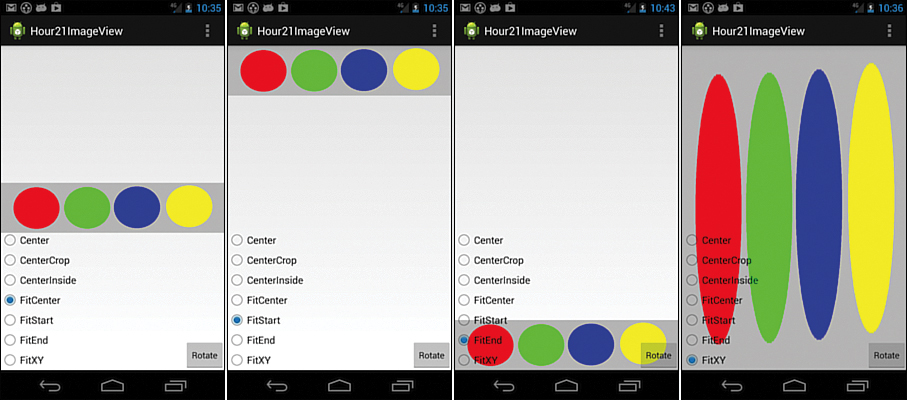
Figure 21.3 shows the base image using the ScaleTypes FIT_CENTER, FIT_START, FIT_END, and FIT_XY. The aspect ratio is maintained in the first three options, but when you use FIT_XY, the image fills the ImageView and “stretches” the image to fit.
Rotating an Image with Matrix
In graphics programming, a matrix is used to transform an image. Simple transformations include scaling, translating, or rotating an image. Android includes a Matrix class (android.graphics.Matrix) to support these graphic transformations.
You might have noticed the Rotate button in the earlier images. As a simple example of using a Matrix, the Hour21ImageView app implements a Button that rotates the image in the ImageView by 30 degrees.
Listing 21.2 shows the OnClickListener() method for the rotate Button. On line 3, the Matrix associated with the ImageView is obtained. On line 4, you use the setScaleType() method to set the ScaleType to MATRIX. You must set ImageView.ScaleType.MATRIX in order to use a modified matrix on the ImageView. Line 5 is a matrix instruction to rotate the image 30 degrees around the point that is the center of the ImageView. Line 6 shows the matrix set for the ImageView. You must set ImageView ScaleType to MATRIX for this to take effect.
Figure 21.4 shows the rotated image.
LISTING 21.2 Rotating an Image
1: rotate.setOnClickListener(new OnClickListener() {
2: public void onClick(View v) {
3: Matrix matrix = imageView.getImageMatrix();
4: imageView.setScaleType(ImageView.ScaleType.MATRIX);
5: matrix.postRotate(30, imageView.getWidth()/2, imageView.getHeight()/2);
6: imageView.setImageMatrix(matrix);
7: }
8: });

You can create complex transformations using Matrix. This app is a simple introduction to using a Matrix and the MATRIX ScaleType.
Note: Rotation in Honeycomb
Since API Level 11 (Honeycomb), the View class includes support for rotation. The methods setPivotX(), setPivotY(), and setRotation() are supported. The Matrix class supports more complex transformations.
Setting Alpha
Alpha level indicates the opacity of an image. An image can be completely transparent, completely opaque, or somewhere in the middle. You can set the alpha level on an ImageView using the setAlpha() method or, since API level 11, by using the setImageAlpha() method. These methods take an integer parameter. A parameter of 0 indicates complete transparency and 255 indicates complete opacity.
Bitmaps and Canvas
The Bitmap (android.graphics.Bitmap) class represents a bitmap image. You create bitmaps via the BitmapFactory (android.graphics.BitmapFactory) class.
Using a BitmapFactory, you can create bitmaps in three common ways: from a resource, a file, or an InputStream. To create a bitmap from a resource, you use the BitmapFactory method decodeResource():
Bitmap bitmap = BitmapFactory.decodeResource(getResources(), R.drawable.someImage);
To create a bitmap from a file or InputStream, you use the decodeFile() and decodeStream() methods, respectively.
Handling Large Images
There are techniques for avoiding the dreaded OOM (out of memory) exception. Large images can have a significant impact on memory use in your app. To demonstrate this, in this section, you create an unrealistically large image to display in an ImageView. When the image is just loaded into the ImageView, the app fails with an out-of-memory error. A java.lang.OutOfMemory exception occurs. You’ll learn to fix the memory error for this case.
You want to display the image at an appropriate size and resolution for the device. No point exists in showing a 10-foot mural in a 6-inch frame. Similarly, no point exists in showing a 20-inch image on a 3-inch phone screen. You can manipulate the image to display well and save memory.
The details of your app will influence your memory usage and the techniques that will work best in your case. This example shows how to handle a single large image.
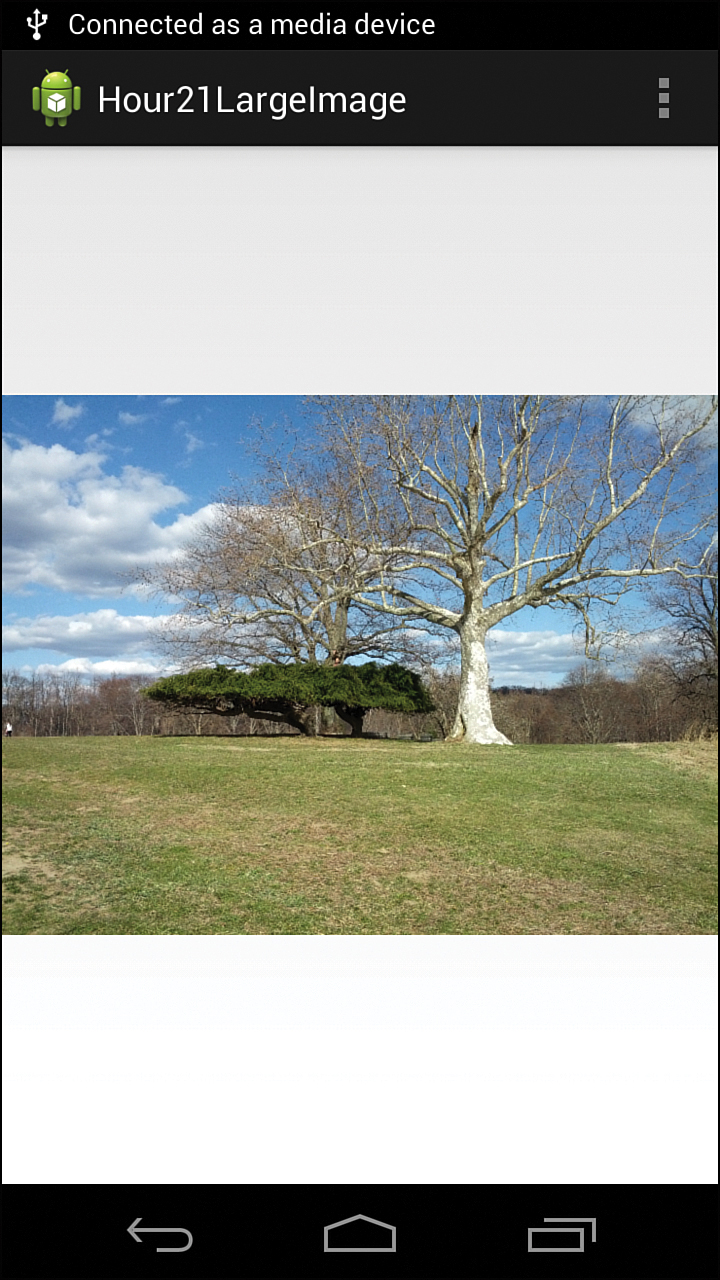
As a demonstration, start with an image and increase it to an unrealistic size. This example uses a photo that is 72 inches × 54 inches and that has a 28Mb file size.
The image is in the drawable resource folder and has the id R.drawable.largeimage.
You can cause the app to fail with an out-of-memory error by trying to set an ImageView to this resource. You have an ImageView named largeImage. This line of code causes the app to fail:
largeImage.setImageResource(R.drawable.largeimage);
Some work is required to fix this, but handling an image this large is possible. In all cases, working with appropriately sized images would be ideal, but that does not always happen.
The goal is to get the dimensions of the underlying bitmap without actually rendering it. Getting those dimensions is not a memory-intensive activity. After you have the bitmap, you can determine an appropriate size for the bitmap that will fit in your display. If you have a 20-inch image and a 4-inch display, you request that the bitmap that is created in memory be created at a size and resolution that is appropriate for the 4-inch display.
Using BitmapFactory.Options
You use the BitmapFactory.Options class with the BitmapFactory class; it is essential to how you handle large Bitmaps.
You use the following options from the BitmapFactoryOptions class:
![]()
inJustDecodeBounds: If set to true, this option indicates that the bitmap dimensions should be determined by the BitmapFactory, but that the bitmap itself should not be created. This is the key to getting the bitmap dimensions without the memory overhead of creating the bitmap.
![]()
outWidth: The width of the image set when you use inJustDecodeBounds.
![]()
outHeight: The height of the image set when you use inJustDecodeBounds.
![]()
inSampleSize: This integer indicates how much the dimensions of the bitmap should be reduced. Given an image of 1000×400, an inSampleSize of 4 will result in a bitmap of 250×100. The dimensions are reduced by a factor of 4.
Listing 21.3 shows the code to address handling large images. We’ll step through the approach and the code. The code is in the Hour21LargeImage project in MainActivity.java.
LISTING 21.3 Displaying a Large Image
1: ImageView largeImage = (ImageView) findViewById(R.id.imageView1);
2: Display display = getWindowManager().getDefaultDisplay();
3: int displayWidth = display.getWidth();
4: BitmapFactory.Options options = new BitmapFactory.Options();
5: options.inJustDecodeBounds = true;
6: BitmapFactory.decodeResource(getResources(), R.drawable.largeimage, options);
7: int width = options.outWidth;
8: if (width > displayWidth) {
9: int widthRatio = Math.round((float) width / (float) displayWidth);
10: options.inSampleSize = widthRatio;
11: }
12: options.inJustDecodeBounds = false;
13: Bitmap scaledBitmap = BitmapFactory.decodeResource(getResources(),
14: R.drawable.largeimage, options);
15: largeImage.setImageBitmap(scaledBitmap);
Lines 2 and 3 get the size of the device display. You use this as the target size for reducing the image size.
In lines 4–7, you determine the size of the current bitmap. You do that by creating a BitmapFactory.Options class and setting the inJustDecodeBounds value to true. On line 6, the bitmap is decoded to get the dimensions. This is where you get the dimensions without the memory overhead of creating the bitmap. The result is available in options.outWidth. On line 7, you assign options.outWidth to the int variable width.
This example uses a simple test for the size of the image. Line 8 checks whether the width of the bitmap is greater than the size of the display. If that is the case, you determine the inSampleSize to use. You do that on lines 9 and 10. If the width of the bitmap is 1000 pixels and the size of the display is 250 pixels, you get an inSampleSize of 4 by dividing the width of the bitmap by the width of the display. For simplicity, this example does not check the height, which could theoretically leave you exposed to a bitmap that was 20 inches tall and 2 inches wide.
With the imSampleSize set to an appropriate value, you can render the image.
On line 12, the inJustDecodeBounds value is set to false. You want to decode the image and create the Bitmap object.
Lines 13 and 14 use the BitmapFactory.decodeResource() method to create a Bitmap and assign it to the variable scaledBitmap. Note that in this call, the BitmapFactory.Options variable options is passed as a parameter. That is how you indicate to the BitmapFactory what inSampleSize to use.
Displaying a 72-inch image on a phone is certainly not recommended, but Figure 21.5 shows that it can be done.
Drawing Directly on a Canvas
You can do one more thing with an ImageView and bitmap. You can create a bitmap and draw directly on the Canvas(android.graphics.Canvas) that is associated with the bitmap. A Canvas is an object that you can draw on by calling drawing commands.
To see this, add another Button to the MainActivity activity from the Hour21ImageView project. Listing 21.4 shows the onClickListener() method for the draw button. The code creates a bitmap, gets the canvas, and draws the word “Hello” on the canvas. The resulting bitmap appears in the ImageView.
You create a new Bitmap on lines 3 and 4 by using the method Bitmap.createBitmap(). You set the width and height of the bitmap to that of the ImageView and use the Bitmap.Config (android.graphics.Bitmap.Config) set to Bitmap.Config.ARGB_8888.
The documentation for the Bitmap class offers a number of createBitmap() methods that take different parameters. These methods may return a mutable or an immutable Bitmap, but only a mutable Bitmap can be used for drawing.
On line 5, a Canvas is instantiated based on the bitmap that you created.
You apply simple drawing commands to the Canvas on lines 6–10. You create a Paint object, set the Color to blue, and set the text size. Line 6 gets the density of the display, which is used to get the text size you want. Hour 4 covered converting density independent pixels to pixels. Line 10 draws the word “Hello” in the center of the ImageView.
Line 11 updates the ImageView to show the generated bitmap.
LISTING 21.4 Drawing on a Canvas
1: draw.setOnClickListener(new OnClickListener() {
2: public void onClick(View v) {
3: Bitmap imageBitmap = Bitmap.createBitmap(imageView.getWidth(),
4: imageView.getHeight(), Bitmap.Config.ARGB_8888);
5: Canvas canvas = new Canvas(imageBitmap);
6: float scale = getResources().getDisplayMetrics().density;
7: Paint p = new Paint();
8: p.setColor(Color.BLUE);
9: p.setTextSize(24*scale);
10: canvas.drawText("Hello", imageView.getWidth()/2,imageView.getHeight()/2,
p);
11: imageView.setImageBitmap(imageBitmap);
12: }
13: });
Using VideoViews
You use VideoViews(android.widget.VideoView) to play videos. In this section, you create a simple app in which a video is served from a web URL and shown in a VideoView. You have the option to control the video with controls that you create or with a MediaController(android.widget.MediaController). The example app uses both methods. First we’ll look at the basics.
A VideoView layout is often simple. Listing 21.5 shows a typical example. The desire to show a full screen video is common. The Hour21VideoView project contains this source code.
1: <VideoView android:id="@+id/VideoView01"
2: android:layout_height="match_parent"
3: android:layout_width="match_parent">
4: </VideoView>
Loading a Video
After you declare the VideoView, you need to give the view a video to play and start the video. A video may be read from a local file or from a remote server. In both cases, you can use the setVideoUri() method of VideoView. That method takes a URI as a parameter. Creating a URI from a string is typical. Listing 21.6 shows a Uri class being defined from a String and the resulting Uri being set to the VideoView in line 3.
LISTING 21.6 Assigning a Video to a VideoView
1: String videoToPlay = "http://bffmedia.com/bigbunny.mp4";
2: Uri videoUri = Uri.parse(videoToPlay);
3: videoView.setVideoURI(videoUri);
You could use the same code in Listing 21.6 for reading a file from the SD card. Line 1 would change to include the location of a file:
String videoToPlay= Environment.getExternalStorageDirectory()+ "/Android/data/com.
bffmedia/videos/bigbunny.mp4";
Environment.getExternalStorageDirectory() refers to the location of the SD card.
Starting, Pausing, and Positioning a Video
For controlling a video, the VideoView includes methods called start(), pause(), and seekTo(). The start() and pause() methods start and stop the video. The seekTo() method positions the video at a specific location and is based on milliseconds. Calling seekTo() with 10,000 positions the video at the tenth second. You can get the current position and duration of the video with the methods getCurrentPosition() and getDuration(). To skip ahead 10 seconds in the video, you use the following:
mVideoView.seekTo(mVideo.getCurrentPosition + 10000);
Listening for the States of a VideoView
Two listeners are unique to a VideoView: onPreparedListener() and OnCompletionListener(). Videos do not start playing immediately. First, they are downloaded and buffered. That is where the onPreparedListener() comes in. You can do something in your user interface before the video begins. When it is ready, you can do something else. For example, you can show a progress bar before the video starts and then hide it in the onPreparedListener().
The onCompletionListener() triggers when the video is done playing. It is an opportunity to repeat the video, start a new video, or change the user interface to prompt the user about what to do next.
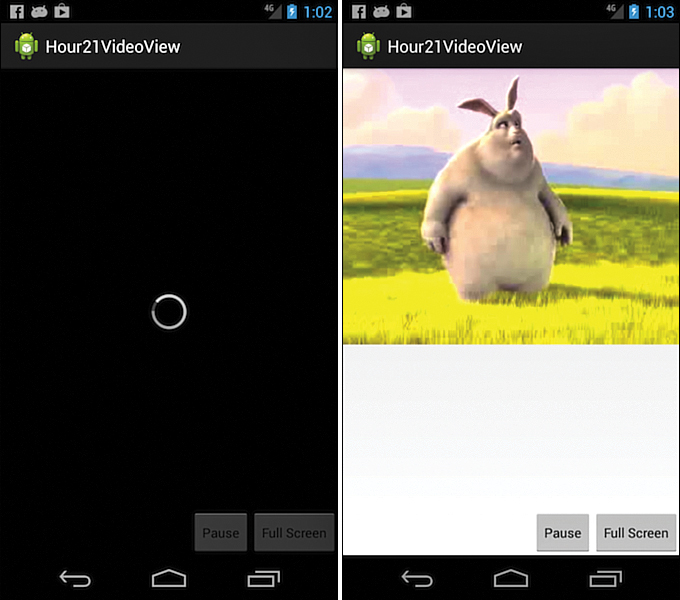
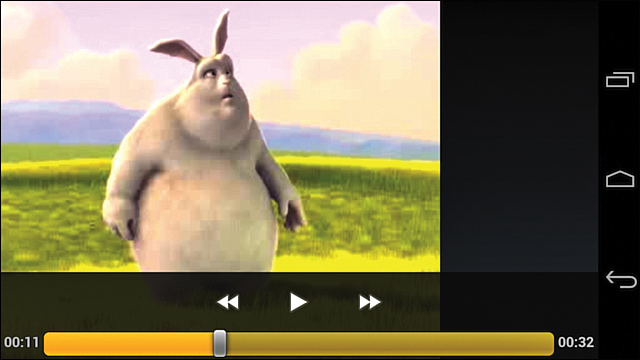
To demonstrate the use of VideoViews, in this section you create an app with two activities. In MainActivity.java, there is a VideoView, a pause/play button, and a full screen button. The play/pause button controls the video. The full screen button opens the second activity. That activity, VideoActivity.java, plays the video in full screen and attaches a MediaController that provides native controls. Both MainActivity.java and VideoActivity.java are in the Hour21VideoView project.
You’ll use the OnPreparedListener() to know when the video is ready to play. Until that time, you’ll show a progress bar.
Listing 21.7 shows how to show a video. The OnPreparedListener() code begins on line 6. If the video is ready, the progress bar is hidden and the video plays. This occurs on lines 8–10.
1: final VideoView videoView = (VideoView) findViewById(R.id.videoView);
2: final ProgressBar progressBar = (ProgressBar) findViewById(R.id.progressBar);
3: String videoToPlay = "http://bffmedia.com/bigbunny.mp4";
4: Uri video = Uri.parse(videoToPlay);
5: videoView.setVideoURI(video);
6: videoView.setOnPreparedListener(new MediaPlayer.OnPreparedListener(){
7: public void onPrepared(MediaPlayer mp) {
8: progressBar.setVisibility(View.GONE);
9: videoView.requestFocus();
10: videoView.start();
11: }
12: });
In MainActivity.java, you can implement a play/pause button. To control the video, you use the start() and pause() methods of the VideoView.
The full screen button opens the VideoActivity. The code for VideoActivity is similar to the MainActivity code, but a MediaController is implemented.
Listing 21.8 shows the onCreate() method of VideoActivity(). A MediaController is defined in line 5. On line 6, that MediaController is set as the anchor of the VideoView, and on line 9, the VideoView sets its MediaController to the defined MediaController. This code creates and shows the VideoView with a MediaController attached.
See Figures 21.6 and 21.7 to see how these two activities show videos.
LISTING 21.8 Showing a Video with MediaController
1: protected void onCreate(Bundle savedInstanceState) {
2: super.onCreate(savedInstanceState);
3: setContentView(R.layout.activity_video);
4: VideoView videoView = (VideoView) findViewById(R.id.videoView);
5: MediaController mediaController = new MediaController(this);
6: mediaController.setAnchorView(videoView);
7: String videoToPlay = "http://bffmedia.com/bigbunny.mp4";
8: Uri video = Uri.parse(videoToPlay);
9: videoView.setMediaController(mediaController);
10: videoView.setVideoURI(video);
11: videoView.start();
12: }
Playing Audio with MediaPlayer
Now consider a simple example of playing an .MP3 audio file using a MediaPlayer(android.media.MediaPlayer). When you do this, you are responsible for the state of the MediaPlayer. A MediaPlayer can be reset() and must be released when you are done using it.
The code for this example is in the Hour21Audio project in MainActivity.java. In the example, you read a file called helloworld.mp3 from the assets directory. You do this in the onResume() method. The MediaPlayer is released in the onPause() method.
Listing 21.9 shows the onResume() method of MainActivity.java. The audio file is read from the assets folder and played using a MediaPlayer.
LISTING 21.9 Playing an MP3 Audio File
1: protected void onResume() {
2: super.onResume();
3: try {
4: audioFileDescriptor = getAssets().openFd("helloworld.mp3");
5: mediaPlayer.setDataSource(audioFileDescriptor.getFileDescriptor(),
6: audioFileDescriptor.getStartOffset(),audioFileDescriptor.getLength());
7: mediaPlayer.prepare();
8: mediaPlayer.start();
9: } catch (IOException e) {
10: e.printStackTrace();
11: }
12: }
Exploring More Media Options
This hour considered ImageViews, Bitmaps, VideoViews, and MediaPlayer and covered these components at a basic level. If you are creating complex media apps, you will want to dig deeper.
In addition, you might want to explore other media-related topics, including the following classes in Android:
![]()
AudioManager: android.media.AudioManager
![]()
AudioFocus: android.media.AudioManager.OnAudioFocusChangeListener
![]()
SoundPool: android.media.SoundPool
![]()
AudioTrack: android.media.AudioTrack
![]()
MediaPlayer: android.media.MediaPlayer
![]()
Presentation: android.app.Presentation
Summary
This hour took a close look at ImageViews and bitmaps, including how to handle large images, and offered a basic approach to drawing directly on a canvas. The hour covered how to use ScaleType in detail and introduced the Matrix class to show a simple rotation of an image in an ImageView. This hour also introduced video and audio concepts using VideoView and MediaPlayer. Android provides significant ability to record and play various media types. This hour showed the basics and introduced the next steps to take to make great media-based apps.
Q&A
Q. If I am developing an app that places images in a ListView or GridView, should I use BitmapFactory.Options to check the image size for each image?
A. If you do not have control of the size of the images coming from the server, then checking size is important. If you do have control over the images, then the ideal scenario is to have appropriately sized images. You can also check out open source projects such as Thumbor for resizing images from a server and Picasso for handling images in code. See https://github.com/globocom/thumbor/wiki and https://github.com/square/picasso.
Q. Is VideoView the only way to play a video on Android?
A. No, VideoView is one of the easier ways to play a video. You can also play a video via an ActionView intent or by using MediaPlayer. To show a video using an intent, create a Uri and an Intent as follows:
Intent intent = new Intent();
intent.setAction(Intent.ACTION_VIEW);
intent.setDataAndType(videoUri, "video/mp4");
startActivity(intent);
Workshop
Quiz
1. What is the purpose of inJustDecodeBounds?
2. How is onPreparedListener() used?
3. What does mutable mean?
Answers
1. In BitmapFactory.Options, you use inJustDecodeBounds to decode a Bitmap to get the dimension, but not actually create a Bitmap in memory.
2. In a VideoView, onPreparedListener() listens for when a video is ready to play. The example in this hour showed a progress bar until the video was prepared and then displayed the video.
3. Mutable means changeable, which is important when you create Bitmaps. Some methods return mutable Bitmaps and others return immutable Bitmaps.
Exercise
Add a Button in the Hour21ImageView project to set the alpha level. It will be like the rotation example. When the user clicks on the button, the alpha level should change.
You can use the other examples in this hour as starting points for what you would like to do in media.