
4.5.5. Anonymous Inner Class That Implements the saveButton’s OnClickListener to Save a New or Updated Search
Figure 4.21 declares and initializes instance variable saveButtonListener, which refers to an anonymous inner class object that implements interface OnClickListener. Line 64 (Fig. 4.20) registered saveButtonListener as saveButtons’s event handler. Lines 76–109 override interface OnClickListener’s onClick method. If the user entered a query and a tag (lines 80–81), lines 83–84 call method addTaggedSearch (Fig. 4.23) to store the tag–query pair and lines 85–86 clear the two EditTexts. Lines 88–90 hide the soft keyboard.
Configuring an AlertDialog
If the user did not enter a query and a tag, lines 92–108 display an AlertDialog indicating that the user must enter both. An AlertDialog.Builder object (lines 95–96) helps you configure and create an AlertDialog. The argument to the constructor is the Context in which the dialog will be displayed—in this case, the MainActivity, which we refer to via its this reference. To access this from an anonymous inner class, you must fully qualify this with the outer class’s name. Line 99 sets the dialog’s message with the String resource R.string.missingMessage ("Enter both a Twitter search query and a tag").
 Look-and-Feel Observation 4.5
Adding String Resources to strings.xml
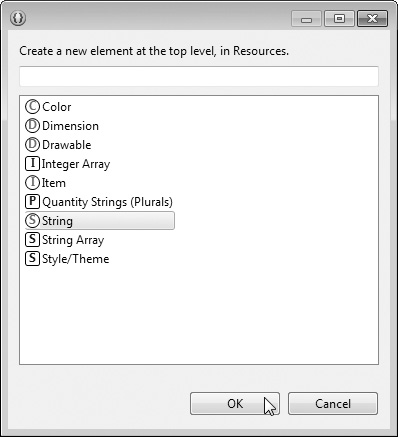
To create String resources like R.string.missingMessage, open the strings.xml file located in the project’s res/values folder. The IDE shows this file in a resource editor that has two tabs—Resources and strings.xml. In the Resources tab, you can click Add... to display the dialog in Fig. 4.22. Selecting String and clicking OK displays Name and Value text-fields where you can enter a new String resource’s name (e.g., missingMessage) and value. Save your strings.xml file after making changes. You can also use the resource editor’s Resource tab to select an existing String resource to change its name and value.
Specifying the AlertDialog’s Positive Button
In this AlertDialog, we need only one button that allows the user to acknowledge the message. We specify this as the dialog’s positive button (Fig. 4.21, line 102)—touching this button indicates that the user acknowledges the message displayed in the dialog. Method setPositiveButton receives the button’s label (specified with the String resource R.string.OK) and a reference to the button’s event handler. For this dialog, we don’t need to respond to the event, so we specify null for the event handler. When the user touches the button, the dialog is simply dismissed from the screen.
Creating and Showing the AlertDialog
You create the AlertDialog by calling the AlertDialog.Builder’s create method (line 105) and display the modal dialog by calling AlertDialog’s show method (line 106).